9Configuring Access Control
Configuring Access Control
This chapter outlines the mechanisms provided by Siebel CRM to control access to data and Siebel application functionality by users once they have accessed a Siebel application and been authenticated. It includes the following topics:
About Access Control
Access control is the term used to describe the set of Siebel application mechanisms that control user access to data and application functionality. As you work with this chapter, determine how the terminology and concepts presented here correspond to your company’s internal terminology and structure. This chapter explains the Siebel access mechanisms, but you have to decide during the planning stage how to combine the mechanisms to meet your business and security needs.
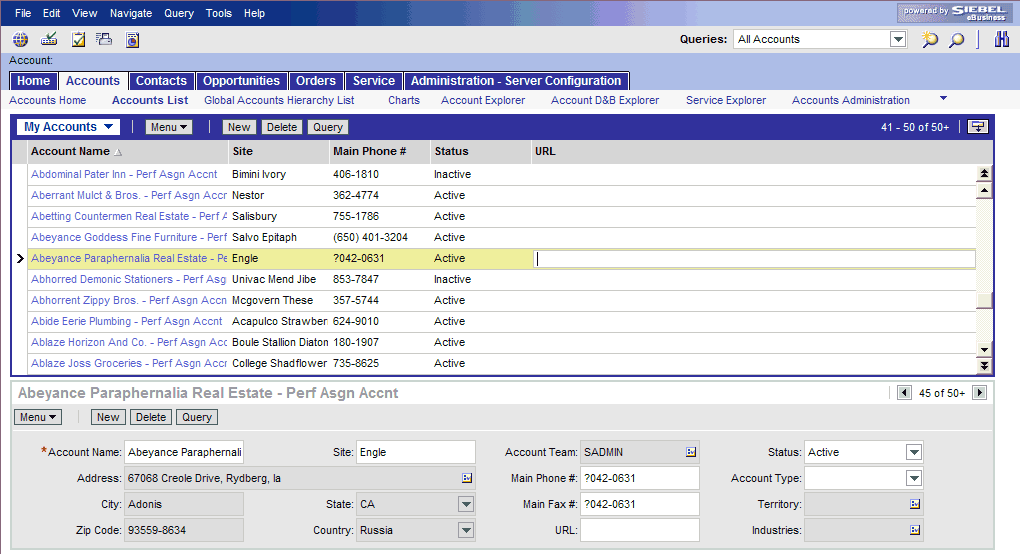
In Siebel application terms, a screen represents a broad area of functionality, such as working on accounts. The set of screens to which a user has access is determined by the applications that your company has purchased. Each screen is represented as a tab, at the start of the window. In the following example, the Accounts screen is displayed.
Each screen contains multiple views to provide different kinds of access to the data. To the user, a view is simply a Web page. Within a view, the user might see lists of data records or forms, presenting individual or multiple records, and sometimes child records. (These lists and forms are referred to as applets in a configuration context.) Each view (or grouping of views) is represented by text in the link bar.
For example, the following image shows the Account List View, which corresponds to the applet title My Accounts (the current visibility filter selection). Multiple view modes provide access to different views that filter the data differently. In the Account List View, the current user can view accounts owned or assigned to this user. Choosing All Accounts from the visibility filter displays the All Account List View instead, assuming the user has access to this view.
To control the resources and privileges that users are entitled to once they have accessed a Siebel application and have been authenticated, Siebel CRM provides the following access-control elements:
View-level access control. A screen is composed of views, and the collection of views to which users have access determines the application functionality available to them. Access to views is determined by responsibilities.
Organizations are generally arranged around job functions, with employees being assigned one or more functions. In Siebel CRM, these job functions are called responsibilities. Each responsibility is associated with one or more views, which represent data and functionality needed for a job function. Each user must be assigned at least one responsibility to access the Siebel application.
Siebel Business Applications ship with many predefined responsibilities and you can also define any additional responsibilities you require. For additional information, see Responsibilities and Access Control.
Record-level access control. Record-level access control is used to assign permissions to individual data items within an application so that only authenticated users who need to view particular data records have access to that information. You can control the data records that each user can see through a variety of mechanisms, including direct record ownership by a user (personal access control) or being on the same team as the record owner (team access control). The following topics examine access control further:
Business Components and Data Access. Within Siebel CRM, views are based on business components and must use one of the view modes specified for the business component. A business component's view mode determines the record-level access control mechanisms that can be applied to the business component in any view. Applet and view properties also determine the data available in a view. For additional information, see About View and Data Access Control.
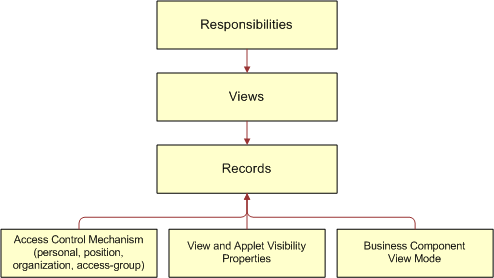
The following figure illustrates the Siebel access control elements. As shown in the figure, responsibilities provide access to views, and the data records visible to a user on a view are determined by the type of access control that applies to the data, the business component view mode, and view and applet visibility properties.
Access Control for Parties
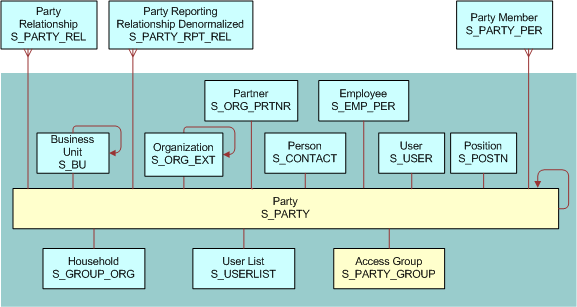
Individual people, groupings of people, and entities that represent people or groups are unified in the common notion of parties. Different party types have different access control mechanisms available.
Parties are categorized into the following party types: Person, Position, Organization, Household, User List, and Access Group. The following table describes the qualitative differences among different parties and identifies the applicable party type for each party.
Table Party Types and Parties
Party |
Party Type |
Examples |
Distinguishing Features |
|---|---|---|---|
Person (or Contact) |
Person |
|
|
User |
Person |
|
|
Employee |
Person |
An employee at your company. |
|
Position |
Position |
|
|
Partner User |
Person |
An employee at a partner company. |
|
Account |
Organization |
A company or group of individuals with whom you do business. |
|
Division |
Organization |
|
|
Organization |
Organization |
|
|
Household |
Household |
|
|
User List |
User List |
|
|
Access Group |
Access Group |
|
|
Related Topic
Access Control for Data
The type of data and whether the data is categorized determines which access control mechanisms can be applied. The following groupings of data are necessary for the purpose of discussing access control:
Customer data
Customer data includes contacts and transactional data such as opportunities, orders, quotes, service requests, and accounts.
Access is controlled at the data item level, through a mechanism such as individual record ownership or ownership by an organization.
Master data
Master data includes the following referential data: products, literature, solutions, resolution items, decision issues, events, training courses, and competitors.
Master data can be grouped into categories of similar items, for example, hard drives. Categories can then be organized into catalogs, for example, computer hardware, which are hierarchies of categories. Access can be controlled at the catalog and category levels through access groups, which is the recommended strategy for controlling access to master data. For more information about creating catalogs, see Siebel eSales Administration Guide.
Master data can be associated with organizations. By associating master data with organizations, access can be controlled at the data item level. This strategy requires more administration than the access group strategy.
Note: Divisions provide a way to logically group positions and assign currencies. Organizations provide a mechanism to control data access.
Other data
Other data includes referential data that is not master data, such as price lists, cost lists, rate lists, and SmartScripts.
Access is controlled at the data item level.
Data Categorization for Master Data
Master data can be organized into catalogs made up of hierarchical categories. Organizing data this way serves two purposes:
Ease of navigation. Categorized data is easier to navigate and search. For example, it is easy to find products of interest in a product catalog organized by product lines and subgroups of related products. For example: Computer Hardware, Hard Drives, and then Server Drives.
Access control. Access to catalogs and categories of master data can be granted to collections of users. This is an efficient means to control data access in given business scenarios. For example, you can control partner users’ access to your internal literature.
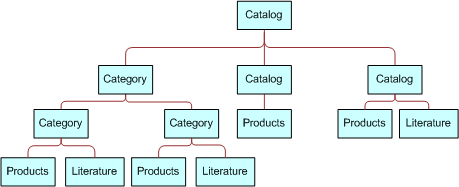
You can categorize master data to represent hierarchical structures, such as product catalogs, geographical categories, service entitlement levels, training subject areas, or channel partners. A catalog is a single hierarchy of categories, as illustrated in the following figure.
The following properties apply to catalogs and categories:
A catalog is a collection or hierarchy of categories.
Individual data items are contained in categories.
A category can contain one or more types of master data.
A category can be a node in only one catalog.
A data item can exist in one or more categories, in one or more catalogs.
A catalog can be public or private. If it is private, then some access control is applied at the catalog level. If it is public, then all users can see this catalog, but not necessarily categories within this catalog, depending on whether the categories are private or public.
Related Topic
Access Control Mechanisms
The major access control mechanisms include the following, which are described in the topics that follow:
Personal access control. For details, see About Personal Access Control.
Position access control. This includes single-position, team, and manager access control. For details, see:
Organization access control. This includes single-organization, multiple-organization, and suborganization access control. For details, see:
All access control. For details, see About All Access Control.
Access-group access control. For details, see About Access-Group Access Control.
About Personal Access Control
If individual data can be associated with a user’s Person record in the database, then you can restrict access to that data to that person only. Typically, you can implement personal access control when data has a creator or a person is assigned to the data, usually as the owner. The following are some examples:
In the My Service Requests view, a Web site visitor can only see the service requests he or she has created.
In the My Expense Reports view, an employee can see only the expense reports the employee has submitted for reimbursement.
In the My Activities view, a user can see only the activities the user owns.
Some views that apply personal access control are My Activities, My Personal Contacts, My Change Requests, and My Service Requests. The words My and My Personal are frequently in the titles of views that apply personal access control. However, My does not always imply personal access control. Some My views apply position or organization access control. For example, the My Opportunities view applies position access control.
Related Topic
About Position Access Control
A position is a job title in a division of an internal or partner organization. A position hierarchy represents reporting relationships among positions. Positions provide an appropriate basis for access control in many scenarios, because a position in an organization is typically more stable than the individual’s assignment to the position.
Customer data and some types of referential data can be associated with one or more positions. If individual data can be associated with a position, then you can apply position access control to the data by one or more of the following means:
Single-position access control. You can associate a single position to individual data records. For details, see About Single-Position Access Control.
Team access control. You can associate multiple positions, in the form of a team, to individual data. For details, see About Team (Multiple-Position) Access Control.
Manager access control. You can grant access concurrently to data associated with a position and data associated with subordinate positions in a reporting hierarchy. For details, see About Manager Access Control.
An employee or partner user can be associated with one or more positions, of which only one can be the active position at a given time. All types of position access control for an employee or partner user are determined by the active position.
One of the user’s positions is designated as the primary position. When a user logs in, the primary position is the active position. To make a different position the active position, one of the following must happen:
An employee must designate another position as the active position, from the User Preferences screen.
A partner user must designate another position as the primary position, and then log in again.
You can configure an agent who uses Siebel CTI to automatically change positions based on the data provided for an incoming call.
For information about Siebel CTI and related modules, and about setting up agents, see Siebel CTI Administration Guide.
Related Topic
About Single-Position Access Control
You can associate a single position to individual data. For example, in the My Quotes view, an employee logged in using a particular position can see only the quotes associated with that position. Another view that applies single-position access control is My Forecasts.
The word My is frequently in the titles of views applying single-position access control. However, My does not always imply single-position access control. Some My views apply personal, organization, or team access control. For example, the My Activities view applies personal access control.
A business component’s view modes determine whether single-position access control can be applied in a view that is based on the business component. To have single-position access control available, a business component must have a view mode (usually Sales Rep) of owner type Position with an entry in the Visibility Field column (instead of the Visibility MVField column). For information about business component view modes, see Viewing Business Component View Modes. For information about implementing access control in a view, see Listing View Access Control Properties.
Related Topic
About Team (Multiple-Position) Access Control
You can associate multiple positions, in the form of a team, to individual data. For example, in the My Opportunities view, an internal employee or partner with a particular active position can see all the opportunities for which that position is included in the opportunity’s sales team. A team can include internal and partner positions.
The display names for fields representing position teams vary with the view in which they appear. Some common views that apply team access control follow, with the display names for the field representing the team:
The My Opportunities view has a Sales Team field.
The My Accounts view has an Account Team field.
The My Contacts view has a Contact Team field.
The My Projects view has an Access List field.
Although the field for the team can contain multiple positions, only one name is displayed without drilling down. In a view that uses team access control, for example My Projects, the name of the active login is displayed. Other views, such as those using organization access control, can also have a field for the team. In these other views, the name of the login that occupies the primary position is displayed.
The word My is frequently in the titles of views applying team access control. However, My does not always imply team access control. Some My views apply personal, organization, or single-position access control. For example, the My Activities view applies personal access control.
A business component’s view modes determine whether team access control can be applied in a view that is based on the business component. To have team access control available, a business component must have a view mode (usually Sales Rep) of owner type Position with entries in the Visibility MVField and Visibility MVLink columns (instead of the Visibility Field column). One of a team’s members is designated as the primary member. The primary member is a factor in manager access control, but not in team access control.
If a business component is configured for team access control, any new record added for that type of component follows this rule: the user who created the record is added to the record’s team and is set to be the primary. For information about business component view modes, see Viewing Business Component View Modes. For information about implementing access control in a view, see Listing View Access Control Properties.
Related Topic
About Manager Access Control
You can indirectly associate a position with data associated with subordinate positions in a reporting hierarchy. For example, in the My Team’s Opportunities view, an employee with a particular active position can see opportunities associated with that position and opportunities associated with subordinate positions.
Manager-subordinate relationships are determined from a position hierarchy. One position hierarchy is included as seed data when you install your Siebel application. You can specify one parent position for a position, which represents that the position is a direct report to the parent. The parent of an internal position can be in the same division or a different division. For example, a sales manager in the Sales division can report to a sales vice president in the Corporate division.
In a view using manager access control, an employee or partner user has access to data according to the behavior outlined in the following topics.
Business Component Uses Position Access Control
If a view uses manager access control, and if the business component on which the view is based uses position access control, then the following behavior applies:
If the business component on which the view is based uses single-position access control, then the user sees data associated directly with the user’s active position or with subordinate positions.
If the business component on which the view is based uses team access control, then the user sees data for which the user’s active position is on the team or any subordinate position that is the primary member on the team. This is the standard behavior, known as primary manager visibility.
A business component using team access control can be configured to allow the user to see data for all subordinate positions, regardless of whether they are the primary position for a record. This is known as nonprimary manager visibility.
To configure nonprimary manager visibility, define a user property called Manager List Mode for the business component and set it to Team (rather than the default value of Primary). For more information about the Manager List Mode user property, see Siebel Developer's Reference.
Business Component Uses Personal Access Control
If a view uses manager access control, and if the business component on which the view is based uses personal access control, then the behavior is as follows:
For single-owner access control, the user sees data associated directly with the user’s active position or with subordinate positions.
For multiple-owner access control, the user sees data for which the user’s active position is on the team, or any subordinate position that is the primary member of the team.
Views that apply manager access control generally contain the phrase My Team’s in the title, such as My Team’s Accounts. (In some cases, the word My is omitted.) There are no business component view modes specific to manager access control. Manager access control is set at the view level. It requires that the business component on which the view is based has a view mode with owner type Position or Person.
Note: In a view using manager access control, if the manager user has no subordinate positions defined, then the user cannot create new records in the view. The New button and the New Record command are unavailable.
Related Topics
About Organization Access Control
When individual data can be associated with an organization, you can apply organization access control to the data by one or more of the following means:
Single-organization access control. You can associate a single organization with individual data. For details, see About Single-Organization and Multiple-Organization Access Control.
Multiple-organization access control. You can associate multiple organizations with individual data. For details, see About Single-Organization and Multiple-Organization Access Control.
Suborganization access control. You can grant access concurrently to data associated with an organization and data associated with subordinate organizations in the organizational hierarchy. For details, see About Suborganization Access Control.
Note: Siebel Assignment Manager is also organization-enabled; that is, assignment rules can use organization as a criterion.
A user is associated with one organization at any given time, the organization to which the user’s active position belongs. For information about changing the active position of an employee or a partner user, see About Position Access Control.
A contact user is indirectly associated with an organization through the proxy employee specified for a Siebel customer application. For information about proxy employees and access control, see the following topics:
About Single-Organization and Multiple-Organization Access Control
Depending on the type of data, you can associate one or more organizations to individual data. The user can see data that is associated with the user’s active organization. For example, in the All Service Requests view, a user can see all the service requests associated with the user’s active organization.
For data that can be associated with multiple organizations, one of the organizations is designated as the primary organization. The primary organization is a factor in suborganization access control, but not in multiple-organization access control.
The following information lists data on which you can apply organization access control and indicates, for some of the most commonly used Siebel objects, whether a single organization, or multiple organizations, can be associated with the data.
Table Data Enabled for Organization Access Control
Object Type |
Object |
Relationship |
|---|---|---|
Customer data |
Account |
Multiple |
Competitor |
Multiple |
|
Contact |
Multiple |
|
Forecast Series |
Multiple |
|
Household |
Multiple |
|
Marketing Event/Activity |
Multiple |
|
Opportunity |
Multiple |
|
Order |
Multiple |
|
Partner |
Multiple |
|
Product Defect |
Multiple |
|
Project |
Multiple |
|
Quote |
Multiple |
|
Service Request |
Multiple |
|
User List |
Multiple |
|
Referential data (includes master data) |
SmartScript |
Multiple |
Literature |
Multiple |
|
Price List |
Multiple |
|
Cost List/Rate List |
Multiple |
|
Period |
Single |
|
Product |
Multiple |
|
Catalog |
Not Applicable (catalogs use access-group access control) |
|
Administrative data |
Employee |
Multiple |
Division |
Single |
|
List of Values Type |
Multiple |
|
List of Values |
Single |
|
Position |
Single |
|
Responsibility |
Multiple |
All (but not All across) is frequently in the title of views applying single- or multiple-organization access control. For example, the All Contacts view applies single-organization access control, and the All Product Defects view applies multiple-organization access control. However, All does not always imply single- or multiple-organization access control. Some All views apply All access control. For example, the All Service Requests view applies All access control.
A business component’s view modes determine whether single-organization or multiple-organization access control can be applied in a view that is based on the business component.
To have single-organization access control available, a business component must have a view mode (typically Organization) of owner type Organization with an entry in the Visibility Field column (instead of the Visibility MVField column).
To have multiple-organization access control available, a business component must have a view mode (typically Organization) of owner type Organization with entries in the Visibility MVField and Visibility MVLink columns (instead of the Visibility Field column).
For information about All access control, see About All Access Control. For information about business component view modes, see Viewing Business Component View Modes.
Related Topic
About Suborganization Access Control
Suborganization access control, based on hierarchical organizations, is analogous to manager access control, which is based on hierarchical positions. For any organization in the organizational hierarchy, you can grant access to data associated with subordinate organizations. This access control mechanism is designed to provide rollup views of data.
For example, a director of a continental sales organization can see the data rolled up from subordinate regional sales organizations. A vice-president in the corporate sales organization can then see rollups of the continental sales organizations and the regional sales organizations. Subordinate relationships are determined from the organizational hierarchy, as an administrator can view by navigating to Administration - Group, and then Organizations.
The organizational hierarchy is included as seed data when you install your Siebel application. Within the organizational hierarchy, you can create branches for both internal and partner organizational structures. You can specify one parent organization for an organization.
In a view using suborganization access control, the user has access to the following data:
If the business component on which the view is based uses single-organization access control, the user sees data associated directly with the user’s active organization or with a descendant organization.
If the business component on which the view is based uses multiple-organization access control, then the user sees data for which the user’s active organization or a descendant organization is the primary organization.
The titles of default views applying suborganization access control are structured as All business component name across My Organizations, such as All Opportunities across My Organizations. There are no business component view modes specific to suborganization access control. Suborganization access control is set at the view level. It requires that the business component on which the view is based has a view mode with owner type Organization.
Related Topics
About All Access Control
All access control provides access to all records that have a valid owner, as defined in any of the business component’s view modes. The owner can be a person, a position, a valid primary position on a team, or an organization, depending on the view modes that are available for the business component.
All users with a view in their responsibilities that applies All access control see the same data in the view. A user’s person or position need not be associated with the data.
All access control essentially provides a view of data across all organizations. For example, in the All Quotes across Organizations view, a user sees all the quotes that are associated with any internal or external organization in the Enterprise, for which there is a valid person, position or organization owner.
The phrases All across and All are frequently in the titles of views applying All access control. For example, the All Opportunities across Organizations and the All Service Requests views apply All access control. However, All does not always imply All access control. Some All views apply single-organization or multiple-organization access control. For example, the All Contacts view applies single-organization access control.
A separate property (Admin Mode) provides the means to see all records in a view using team access control, including those without a valid owner. Admin mode allows the administrator to modify records that otherwise no one could see. You specify Admin mode for a view in the Admin Mode Flag property.
There are no business component view modes specific to All access control. All access control is set at the view level.
Related Topics
About Access-Group Access Control
Access groups are used to control access to master data by diverse groups of party types. An access group is a collection of any combination of positions, organizations, account, households, and user lists. Its members are instances of party types other than Person; that is, its members cannot be individual people. For example, an access group could consist of several partner organizations and user lists to which you want to grant access to a particular set of your sales tools.
A user is associated with an access group if, during the current session, the user is associated with a position, organization, account, household, or user list that is a member of the access group. Although you can add divisions to access groups, doing so has no effect on visibility. Use organizations instead.
You can create hierarchies of access groups. An access group can belong to only one access group hierarchy. That is, an access group can have only one parent access group. For example, the access group mentioned earlier might belong to a hierarchy of access groups for the purpose of granting differing levels of access to sales tools.
You can grant access groups access to catalogs and categories of master data: products, literature, solutions, resolution items, decision issues, events, training courses, and competitors. For example, branches in the access group hierarchy could be granted access to categories in a hierarchical catalog in which each category contains sales literature and decision issue items. For an illustration of an access group hierarchy (master data), see Access Control for Data.
A category of master data can contain any combination of master data items. You can only control access to catalogs and categories of master data. You cannot control access to individual master data items using access-group access control.
When access groups are associated with a catalog or with categories in the catalog, you can apply access-group access control. You can control access to the data in one of the following ways:
Group. While in a given category, the user sees either a list of the category’s first-level subcategories (child categories) to which he or she has access or all the data records in the current category, depending on the applet being used. If the user is at the catalog level, the user sees the first-level categories.
Catalog. The user sees a flat list of all the data in categories across all catalogs to which the user has access. This access control type is typically used in product picklists and other lists of products, such as a recommended product list.
Related Topics
Planning for Access Control
Two main strategies are available for controlling access to data in Siebel Business Applications:
Multiple-organization access control. This strategy limits data access to only those organizations that have a need to see the information. Organizational access control can be implemented across internal or external organizations. This strategy can be applied to transaction data, master data, and other referential data. For more information, see About Organization Access Control.
Access-group access to catalogued data. This strategy can be implemented with all party types. It is designed to reduce access control administration by associating hierarchical groups of users with similarly organized data. This strategy can be applied to master data only. For more information, see About Access-Group Access Control.
For additional information on planning for access control, see the following topics:
Access Control and Business Environment Structure
As part of implementing an access control strategy for your application, you must define your company’s structure, outside partner relationships, and so on. You also define the types of data and objects that people need to access and work with to perform their job functions. How you define the structure of your business environment directly impacts how access control applies to your users.
This topic provides some background information about business environment structure. If your enterprise is large and complex, you can accurately reflect its structure as you set up your Siebel Business Applications. You can build multilevel hierarchies of organizations, divisions, and positions. You build a hierarchy by associating positions, for example, with other positions through parent-child relationships.
Defining your business environment structure involves setting up the elements shown in the following table.
Table Elements of Business Environment Structure
Element |
Parent-Child |
Description |
|---|---|---|
Divisions |
Y |
Subunits of your company’s (or partner company’s) organizations. Used to set default currencies. Not used to control visibility of data. |
Organizations |
Y |
The major parts or entities that make up your company (or your partner companies). Used to control visibility of data. See About Organization Access Control. |
Positions |
Y |
Control the data set (records) to which a user has access. See About Position Access Control. |
Responsibilities |
N |
Control the views to which a user has access. |
Employees |
N |
Individual users in your company and in partner companies who have access to your company’s data. |
You can set up divisions, organizations, positions, responsibilities, and employees in any order. You can also associate these types of records with one another in a variety of ways. For example, to link a responsibility and an employee, you can associate the employee with the responsibility from the responsibility record, or you can associate the responsibility with the employee from the employee record.
Benefits of Multiple Organizations
Using organizations provides the following benefits:
It allows your company to partition itself into logical groups, and then display information appropriate to each of those groups.
It provides the ability to limit visibility (access) to data based on the organization to which positions are assigned.
It affects both customer data (accounts, opportunities, service requests, and so on) and master data (price lists, literature, and so on).
It allows you to assign skills to organizations, which allows Assignment Manager to make assignments based on organization.
It allows you to set up multitenancy for call centers. For more information, see Siebel CTI Administration Guide.
Deciding Whether to Set Up Multiple Organizations
If your Siebel application is already deployed and you do not need to change your users’ visibility (access), your company might not need more organizations. Some circumstances where your company could benefit from multiple organizations are as follows:
Internal business units. If you have a small number of distinct internal business units, you might want to use organizations to support specific versions of a limited number of data entities such as products and price lists.
Complex global enterprise. If you have a full-scale global enterprise that encompasses multiple internal and external businesses, each of which is made up of multiple business units, your company benefits from implementing organizations. In this circumstance, some data can be available only to some business units, while other information can be shared at the corporate level.
Internal and external units. If your company shares data with external partner companies, you can set up each of these companies as an organization. You can make fewer views available to these external organizations than to your internal organizations. You can also configure the employee list so that it shows only employees who belong to the user’s organization.
Different rules for business units. If you would like to make different Siebel Assignment Manager or Siebel Workflow rules apply to different parts of your company, then your company benefits from implementing organizations. For example, a company might want some Assignment Manager rules to apply to a telesales organization and other rules to apply to customers of its Web site.
Web-enabled enterprise. If you have customers who log in through a Web site, you can set up a customer organization to control their access to views and data. If you have channel partners who log in through a Web site, you set up channel partner organizations to control their access.
For more information on using organizations with Siebel customer and partner applications, see Siebel Partner Relationship Management Administration Guide.
Related Topic
About Planning for Divisions
This topic and those that follow explain the common tasks for defining a company structure in your Siebel application. These include tasks for defining divisions, organizations, responsibilities, and positions.
Divisions belong to organizations and have no direct effect on visibility. Divisions help you to group positions, to record addresses, and to maintain default currencies. User reporting structures are defined by their parent positions, but their country of operation and currency are defined by their division. To implement Siebel Business Applications, you must set up at least one division.
An organization can contain multiple divisions, but a given division can only be part of one organization. Organizations can be arranged into a hierarchy of parent organizations and suborganizations. You can also promote a division to an organization. Multiple divisions can be arranged in a multilevel hierarchy by assigning some divisions as the parents of others.
You can assign positions to a division. When you associate employees with those positions, the employees become associated with the division.
Related Topics
About Planning for Organizations
Organizations are designed to represent the broadest divisions of your company. An organization controls the data access of the employees that are assigned to it. Organizations can be internal, or they can be external (in the case of Siebel Partner Relationship Manager).
The organization associated with the employee’s active position determines visibility for the employee. Conversely, the organizations that are associated to the employee, such as using the Employee Organization field in the Employee business component, determine visibility to the employee record for this employee.
Setting up organizations is an optional step in your implementation. If you are upgrading from a previous version of your Siebel application, all the data is automatically assigned to one default organization. With one organization, there is no impact on visibility and data access. However, if you want to divide your company into multiple structural units, you can create multiple organizations.
You might want to delegate administration of users to organizations that access only their users. To do this, you must configure the appropriate views using Siebel Tools. For more information on configuring views, see Configuring Siebel Business Applications.
The following are best practices for working with organizations:
Merging organizations is not recommended. Because many business objects are configured for multiple-organization access control, you might disrupt these relationships to a significant extent and get unexpected results.
It is recommended that you do not change the name of the default organization, which is Default Organization. This record is seed data that is referenced in many places. If your company decides to change the default organization name, the name must be unique from any other organization or division name. References to Default Organization in other locations must also be changed.
For example, if you are using Siebel Assignment Manager, you might have to rename references in assignment objects to the new name for the default organization. For more information, see Siebel Assignment Manager Administration Guide and Configuring Siebel Business Applications.
Related Topics
About Planning for Positions
A position represents a specific job slot within your company. As you define your company structure, define specific positions with each level in the hierarchy of divisions. Positions determine which records users have access to. You must be logged on to a server database to add positions.
Positions and Employees
An employee must have a position to create and use accounts, opportunities, contacts, and other customer data objects in your Siebel application.
Each position typically has only one associated employee. In some circumstances such as job-sharing situations, a position can have multiple associated employees. One employee can be associated with multiple positions. There can be only one primary employee for a position, but an employee can be primary for more than one position.
There is a drawback to having multiple employees associated with a position. Because a position can have only one primary employee, only the primary employee is visible in the Employee field. If you search for an employee in a positions list, you might not find relevant position records in which the employee is not primary for the position.
Only the primary employee for a position appears in the Account Team, Opportunity Sales Team, and Contact Access lists. However, all the employees in that position can access the My Accounts, My Opportunities, and My Contacts views.
A position can be associated with only one organization. If you want an employee to have visibility to multiple organizations, you must create a position for each organization and assign that employee to each position. The employee can then see one organization’s data at a time by changing positions.
Your Siebel application allows users to change their position to another position to which they have already been given access by the administrator. A user can change positions while logged in by choosing Tools, User Preferences, and then Change Position, selecting a different position in the list, and clicking the Change Position button. For instance, a sales representative can change position to a sales executive and have access to the same views as the previous position, but gain visibility to another organization’s data.
Position Administration
Positions can be set up in a multilevel hierarchy, which allows for manager access control. The parent position gains visibility to all the sets of data visible to the individual child positions. (Usually, the data is displayed only where the child position is the primary on the team or record.)
You cannot make a position obsolete by setting the End Date. This field records only the end date for the current employee associated with the position. It does not make the position obsolete after that date has passed.
If you rename a position, check these areas in your Siebel application to make sure the name change is reflected correctly:
Assignment rules, if you have used these positions in assignment rules. For more information, see Siebel Assignment Manager Administration Guide.
Workflow processes, if you have used these positions in workflow processes. For more information, see Siebel Business Process Framework: Workflow Guide.
Enterprise Integration Manager (EIM), if you are referring to these positions in EIM import SQL scripts. For more information, see Siebel Enterprise Integration Manager Administration Guide.
The Position field of the Employees view.
Note: If you change a mobile user’s position, that user’s visibility rules change. In this case, it is recommended that the user reextract his or her local database. However, if you change only the position name (for example, from Sales Representative to Sales Associate), then reextraction is not required because in the database table where position names are stored, this column has enterprise-wide visibility. In other words, changes to this column are distributed to all users.
Related Topics
About Planning for Responsibilities
Responsibilities determine which views users have access to. For example, the System Administrator responsibility allows access to all views. Defining responsibilities lets you limit user access to views, and therefore to your Siebel application’s information and functions. You must assign responsibilities to all users. Without a responsibility, a user cannot use the Siebel application, because that user cannot access any views.
You can also assign tab layouts and tasks to responsibilities. For more information, see Managing Tab Layouts Through Responsibilities and Managing Tasks Through Responsibilities.
To define a responsibility, you must specify which views are available to that responsibility. It is recommended that you use the responsibilities that are provided as seed data, where applicable. These can be copied and then customized. Then define any additional responsibilities you require that correspond to the major job functions in your organization.
For example, you might use or create responsibilities for the marketing administrator, the sales manager, and sales representatives. The sales representative responsibility might have access to all views except those reserved for sales management, marketing administration, and applications administration. The sales manager responsibility might have access to the same views as the sales representative, plus the sales manager views, and so on.
As appropriate, you can specify that a view is read-only for a given responsibility.
When you are defining responsibilities, consider the following issues:
Grant access to the System Preferences view to only a selected group of administrators; do not give end users access to the System Preferences view. System preferences control many things throughout the Siebel system, including some server logic and processing for Siebel Remote and Siebel Assignment Manager.
Do not add Administration views to responsibilities associated with end users. Likewise, limit access to the Master Forecasts, Mobile Web Clients, Responsibilities, Views, and Territories views. The work performed with these views has far-reaching implications for the entire application.
Where users require access to data presented in a view, but do not need to create or modify data, specify that the view is read-only for this responsibility. (If any one responsibility for a user is associated with a view that is not marked with the Read Only View flag, the view will not be read-only for this user, regardless of how the flag is set for any other responsibility.)
You might want to hide access to license keys by deleting the license key-related views from a user’s responsibility. For more information about license keys, see Siebel Applications Administration Guide.
If you add the Internal Division view to a user’s responsibility, all organizations in the Organizational picklist are displayed. By default, only the organization the user belongs to appears in this picklist.
If you log into the application through the normal Siebel Web Client, you can add new views to responsibilities in the Administration - Application, Responsibilities view.
Related Topics
Setting Up Divisions, Organizations, Positions,and Responsibilities
This topic outlines procedures for setting up divisions, organizations, positions, and responsibilities. For more information, see the following topics:
Setting Up Divisions
This topic describes how to set up divisions.
To set up a division
Navigate to the Administration - Group screen, then the Internal Divisions view.
The Internal Divisions view appears.
In the form, add a new record and complete the necessary fields.
Some fields are described in the following table.
Field
Guideline
Parent Division
If this division is a subdivision, select the parent division. This allows a division to be associated with another division.
Organization Type
Indicates the type of organization, which controls where in the application a division will appear for selection purposes.
For example, divisions with Organization Type set to Service appear for selection in the Group field on the Service screen, Service Requests view.
Organization Flag
When selected, indicates that the division is also an organization. The division is copied into the Organization view.
Setting Up Organizations
This topic describes how to set up organizations.
To set up an organization
Navigate to the Administration - Group screen, then the Organizations view.
The Organizations view appears.
In the form, add a new record and complete the necessary fields.
Some fields are described in the following table.
Field
Guideline
Parent Organization
If this organization is a suborganization, select the parent organization. This allows an organization to be associated with another organization.
Partner Flag
Used for Siebel Partner Relationship Manager. This is a read-only check box. When the box is checked, this indicates that the organization represents an external enterprise that is a partner of your company.
Note: Partners are registered and promoted to organizations using the Approved Partners view in the Administration - Partner screen, as described in Developing and Deploying Siebel Business Applications.
Setting Up Positions
This topic describes how to set up positions.
To set up a position
Navigate to the Administration - Group screen, then the Positions view.
The Positions view appears.
In the form, add a new record and complete the necessary fields.
Some fields are described in the following table.
Note: Most fields in the form are filled in automatically from the Employee record of the active employee. If you have not set up employees, you can associate them with positions later.Field
Guideline
End Date
Last day for the currently associated employee to be associated with this position.
Last Name
Select one or more employees to occupy the position. In the Assigned Employees dialog box, select the Primary field for the employee whom you want to make primary for this position.
Parent Position
If this position is a subposition, select the parent position. This allows a position to be associated with another position.
Position Type
Type of position. This field is informational and has no impact on visibility.
Territory
This field is a read-only multi-value group. You are not able to enter a value manually. For use by Siebel Assignment Manager.
Setting Up Responsibilities and Adding Views and Users
This topic describes how to set up responsibilities and add views and users.
To define a responsibility and add views and users
Navigate to the Administration - Application screen, then the Responsibilities view.
The Responsibilities view appears.
Note: By default, the Responsibilities view shows all responsibilities, regardless of organization. However, you might want to configure new views in Siebel Tools that restrict the visibility to responsibilities. For more information on configuring views, see Configuring Siebel Business Applications.In the Responsibilities list, add a new record and enter a name and description for the responsibility.
In the Organization field, select an organization for the responsibility.
To add views, do the following:
In the Views list, add a new record.
Select the appropriate views in the Add Views dialog box and click OK.
When you add a view, set the flag Read Only View if users with this responsibility only require read access to the view.
Note: You can also delete views from the Views list.To add users, do the following:
In the Users list, add a new record.
Select the appropriate users in the Add Users dialog box and click OK.
Note: You can also delete employees from the Users list.
Related Topic
About View and Data Access Control
The particular data displayed in a view and whether a view is displayed at all are determined by settings made for related components. You configure most of these settings in Siebel Tools. This topic specifies where to find these settings within Siebel Tools, but in most cases does not provide procedures to implement them. After updating the Siebel repository, you must publish and deliver those updates to the Siebel runtime repository for them to take effect. For more information about required practices when using Siebel Tools, see Configuring Siebel Business Applications and Using Siebel Tools.
The following components determine what views a user sees:
Application. Each Siebel application includes a licensed set of views. When a user is in an application, the user has no access to views that are not included in the application. For additional information on application views, see Listing the Views in an Application.
Responsibilities. Every user has one or more responsibilities, which define the collection of views to which the user has access. If a particular view is not in a user’s responsibilities, then the user does not see that view. A wide-ranging view such as All Opportunities Across Organizations is not typically included in the responsibility for an employee such as a district sales representative. For additional information on responsibilities, see Responsibilities and Access Control.
The following components determine the data within a view to which a user has access.
Business component view mode. A view can have several applets; these include lists, forms, or trees. Each applet is based on a business component. The business component’s view mode determines the allowable parties on which access control can be based for that business component. The business component’s view modes also determine how the association with the party is determined, for example owned by or created by. For additional information on business component view mode, see Viewing Business Component View Modes.
Applet visibility properties. A view can specify one of its applets as the visibility applet. The visibility applet connects the business component to the view. The visibility applet specifies which business component to use and the display names for the business component’s fields. For additional information on applet visibility properties, see Viewing an Applet’s Access Control Properties.
View visibility properties. A view’s visibility properties determines the access control mechanism that is applied to the business component on which the view is based. For example, the business component might have personal or position access control available. The view specifies which of these to use, and in which form to use it. For additional information on view visibility properties, see Listing View Access Control Properties.
In short, the application and a user’s responsibility restrict the views presented to the user. Within a view, view visibility properties determine the applet that drives visibility in the view and specifies the access control mechanism to apply to the business component. The view’s visibility applet specifies the business component used in the view. The business component specifies how a user can be associated with data to provide access. For an example of how the visibility applet specified for a view determines the type of data access control that applies to the view, see Example of Flexible View Construction.
Listing the Views in an Application
This topic describes how to list the views that are included in your Siebel application.
Each Siebel application is associated with a set of screens. Each screen is in turn made up of a set of views. In a particular application, all users are limited to the views that are licensed to your company and that are defined for the application. The licensed views are specified in the license key, which is determined by the features you purchase for your Siebel Business Applications.
To see which views an application includes
Log in as an administrator.
Navigate to the Administration - Application screen, then the Views view.
The views defined for an application are listed.
Related Topic
Responsibilities and Access Control
A responsibility corresponds to a set of views. Each user must be assigned at least one responsibility. When you assign responsibilities to a user, the user has access to all the views contained in all of the responsibilities assigned to the user and that are also included in the user’s current application.
If a view in an application is not included in a user’s responsibilities, the user will not see the view or a listing of the view in the Site Map, in the link bar, or in any other picklist. If the user does not have access to any of the views in a screen, then that screen’s listing in the Site Map and its screen tab are not displayed.
For example, the responsibility assigned to an administrator might include the views in the Administration - Application screen. The administrator sees this screen listed in the Site Map and can navigate to the views it includes. A customer care agent typically does not have administrative views in a responsibility, so the agent would not see this screen or its views listed in any context.
Each user’s primary responsibility also controls the default screen or view tab layout for the user. For more information, see Managing Tab Layouts Through Responsibilities.
A user can have one or more responsibilities. The user has access to all the views in the union of all the responsibilities assigned. For example, you could assign a sales manager both the Sales Manager responsibility and the Field Sales Representative responsibility.
For additional information on using responsibilities to provide access control, see the following topics:
About Associating a Responsibility with Organizations
You can associate a responsibility with one or more organizations. Associate responsibilities with organizations only when you are implementing delegated administration of users, such as for Siebel Partner Portal (for Siebel Partner Relationship Manager).
A partner user can see responsibilities that are associated with the organization with which the user is associated for the session. A partner user is associated with the organization with which his or her primary position is associated.
A user can be assigned responsibilities across organizations for the purpose of providing the user access to views. However, the user can only see the responsibilities that are associated with the user’s active organization.
For example, you could decide that delegated administrator responsibility can only be assigned to users by internal administrators, and not by other delegated administrators. A user can then have a delegated administrator responsibility, but would not be able to see it in a list of responsibilities. Therefore, the delegated administrator could not assign it to other users. You can accomplish this scenario by associating the delegated administrator responsibility with an organization other than that with which the delegated administrator is associated.
Related Topics
Local Access for Views and Responsibilities
Each view and each responsibility has a Local Access flag. Together, these settings determine whether views can be accessed by Siebel Mobile Web Client users with particular responsibilities.
The setting of the Local Access flag does not affect access to a view for users using either the Siebel Web Client or Siebel Developer Web Client.
When Local Access is set to TRUE (checked), all users with the view in one of their responsibilities can access the view when using the Siebel Mobile Web Client (connected to the local database). When Local Access is set to FALSE (unchecked), users cannot access the view when using the Mobile Web Client.
The Local Access flag appears in the following locations:
Default Local Access flag in Administration - Application, Views. This setting defines a default setting to be inherited for the view, unless the setting is overridden in another context.
Local Access flag in Views list of Administration - Application, Responsibilities. This setting displays or overrides the default setting applicable to a view record that is a child to the current responsibility. The setting affects a view only as it is made available to users through association with a specific responsibility record.
Local Access flag in Responsibilities list of Administration - Application, Views. This setting displays or overrides the default setting applicable to the view record that is the parent to the current responsibility. The setting affects a view only as it is made available through association with a specific responsibility record.
The Local Access field is a mechanism for controlling which views mobile users can work in when using the Siebel Mobile Web Client. In addition to enabling or disabling local access to views based on responsibility, administrators can provide different sets of views for access by different mobile users. For more information, see Siebel Remote and Replication Manager Administration Guide.
FALSE. A view with All access control can cause unpredictable and possibly undesirable results for a mobile user. For information about All access control, see
About All Access Control.
Related Topic
Read Only View for Responsibilities
Each responsibility has a Read Only View flag. Set this flag to True to prevent a user from creating data in a view or modifying existing data in a view. To make sure that a user cannot create or modify data in a view, you must select this flag for all responsibilities associated with the user that allow access to the view.
The Read Only View flag appears in the following locations:
Read Only View flag in Views list under Site Map, Administration - Application, Responsibilities, and then Responsibilities.
Read Only View flag in Responsibilities list under Site Map, Administration - Application, Views, and then Responsibilities.
Related Topic
Assigning a Responsibility to a Person
You can add a responsibility to a Person, User, Employee, or Partner record. The following procedure describes how to add a responsibility to a Person record. You can assign a responsibility in the Users list or Employees list in the Administration - User screen.
If the individual does not have a current responsibility, this procedure upgrades the Person to a User. If the individual already has at least one responsibility, then the individual is already a User, an Employee, or a Partner. As such, the individual’s record appears in the Persons list also, so this procedure works for any scenario.
To assign a responsibility to a Person
Log into a Siebel employee application as an administrator.
Navigate to the Administration - User screen, then the Persons view.
The Persons list appears.
Select a Person record.
In the form, click the select button on the Responsibility field.
A list of the responsibilities assigned to this Person appears.
In the Responsibilities list, click New.
A list of responsibilities available for assigning appears.
Select one or more responsibilities, and then click OK.
The selected responsibilities appear in the list of responsibilities for this Person.
Click OK.
Save the record.
Related Topics
Using Responsibilities to Allow Limited Access to Server Administration Views
You can configure responsibilities to grant specific users access to some, but not all, of the server administration views in Siebel Business Applications. For example, LOV administrators require access to the LOV administration screens to add new LOV values in multiple languages; however, they do not require access to other administration views. Likewise, the system administrator must be able to access the server management views to monitor the server performance, but only the Siebel administrator requires access to the server configuration views through which Siebel Business Applications are configured.
The following procedure describes how to provide access to a defined set of Siebel Server administration views for specific users.
To allow limited access to server administration views
Create a new responsibility, for example, create a responsibility with the name SubAdminRole.
For information on creating responsibilities, see Setting Up Responsibilities and Adding Views and Users.
In the Views list, associate the new responsibility with the Administration - Server views that you want to allow users with the responsibility to access.
In the Users list, add users to the SubAdminRole responsibility you have just created. Make sure that the users do not have Siebel Administrator responsibility.
Change the value of the AdminRoles parameter for the Server Manager (ServerMgr) component by issuing the following command:
srvrmgr> change param AdminRoles="Siebel Administrator,SubAdminRole" for
compdef ServerMgr
Add the following parameter to the Security Profile using the Siebel Management Console.
Section Under Security Profiles
Parameter
Value
Basic Information
Authorization Roles (comma-separated)
For more information about setting this parameter, see Parameters for Configuring Security Adapter Authentication.
Siebel Administrator,SubAdminRole
For information on the Security Profile, see About Authentication for Siebel Gateway Access.
Stop and restart the Siebel Server.
Users assigned the SubAdminRole responsibility can now access the Siebel Server Administration views you associated with that responsibility.
Related Topic
Viewing Business Component View Modes
A business component’s view modes determine the allowable access control mechanisms that can be applied to the business component in any view. When a view is based on a particular business component, the view must use one of the view modes specified for the business component. For example, the Account business component can only be used in Organization view mode or Sales Rep view mode.
Each view mode also determines how data is associated with a user to determine whether the user gets access. For example, a business component that allows personal access control might connect the data to the person by comparing the data’s Owner Id field to the person’s user ID. Another business component might apply personal access control through the data’s Created by field.
You use Siebel Tools to work with properties of business components. For information about working with business components, see Configuring Siebel Business Applications.
The following procedure describes how to view a business component’s view mode in Siebel Tools.
To view a business component’s view mode and visibility fields
Launch Siebel Tools.
In the Object Explorer, expand the Business Component object type.
The Business Component subtree appears.
Click the BusComp View Mode icon.
The Business Components list and its BusComp View Modes detail list appear.
In the Business Components list, select a business component for which there are records in the BusComp View Modes list.
A record in the BusComp View Modes list represents one view mode the business component can assume.
The following table shows the fields in the BusComp View Modes list that determine the allowable visibility for a business component.
Table Fields that Determine Visibility for Business Components
Field |
Description |
|---|---|
Owner Type |
Specifies the party type that is used to determine whether or not a user is associated with a record. The allowable owner types are:
For example, the Account business component’s Sales Rep view mode determines the association of the user to the record by the user’s position. The Service Request business component’s Personal view mode determines the association of the user to the record by the user’s Person record. |
Private Field |
This flag determines whether the record is private or public. If it is not private, then the record is shown, independent of its view mode. If it is set as private, then access control is applied as specified by the business component’s Visibility Field or VisibilityMV Field. This is applicable to all view modes. |
Visibility Field |
A value in either Visibility Field or Visibility MVField is required. The value in this field is compared with the corresponding value for the user, as specified in Owner Type, to determine whether the user is associated with a record. If the user is associated, the user gets access to the record. A value in this field indicates that there is only one party associated with this business component when using this view mode. For example, the Service Request business component’s Personal view mode determines whether the user is associated with the record by comparing the user’s Login ID with the value in the Contact Id field. When this view mode is used, only one user qualifies as being associated with this record. Typically, this user is the creator of the service request. |
Visibility MVField (or multivalue field) |
This field has the same purpose as Visibility Field, except a value in this field indicates that there can be more than one party associated with this business component when using this view mode. For example, the Account business component’s Sales Rep view mode determines whether the user is associated with the record by comparing the user’s position with the value in the Sales Rep field. When this view mode is used, more than one position can be associated with a record. In some applets, the Sales Rep field has a display name like "Account Team," indicating that more than one position is associated with the record. |
Visibility MVLink (or multivalue link) |
An entry in this field is required if there is a value in Visibility MVField. This field specifies which of the business component’s multivalue links is used to determine the value in the MVField for this record. Links establish a parent/child relationship between business components, often by specifying an intersection table (in the case of a many-to-many relationship). This multivalue link’s Destination Link property indicates which link ultimately defines this relationship. To see a business component’s multi-value links and their properties in Siebel Tools, expand the Business Component object in the Object Explorer, and then click Multi Value Link. The Destination Link property is a field in each record. For example, the Account business component’s Sales Rep view mode has Position as its MVLink. The Destination Link property for this multi-value link specifies that this relationship uses the Account/Position link. As seen in the Link object type listing in Siebel Tools, this link uses the S_ACCNT_POSTN intersection table to look up the positions associated with an account. |
Name |
The name typically suggests the view mode. For example, a view mode named Organization typically has an Owner type of Organization. However, the only requirement is that view mode records for a buscomp must have unique names. A business component cannot, for example, have two view modes named Personal. Some view mode names are:
For example, the Account business component’s Sales Rep view mode determines the association of the user to the record by the user’s position. An example of an exception to the typical naming convention is the Service Request business component. Both the Personal and Sales Rep view modes have an Owner type of Person, one interpreting owner by Contact Id and the other by Owned By Id. Both view modes are needed because the creator and the customer care agent both need access to the data based on a person. |
Configuring Access to Business Components from Scripting Interfaces
Siebel CRM provides object interface methods that can be used on Siebel business components to make their data and functions available to custom code, for example, to code that is written using Siebel scripting interfaces such as Browser Script. This topic describes how to control the operations that can be performed on business components from the Siebel scripting interfaces.
The following parameters allow you to configure the operations that can be performed on business components from scripting interfaces:
The Siebel Server parameter, BusCompAccessLevel, can be specified for all business components to configure the operations that can be performed directly on a business component from scripting interfaces.
The business component user property, DirectUIAccess, allows you to enable or disable operations on a specific business component from the scripting interfaces. The value of the DirectUIAccess property specified for a business component overrides any value set for business components using the BusCompAccessLevel server parameter.
Depending on the value you configure for the DirectUIAccess parameter, you can also set a value for the DirectUIAccessFieldList business component user property; this allows you to enable write operations on specified business component fields through client-side scripting.
The following procedures describe how to set values for the BusCompAccessLevel server parameter and for the DirectUIAccess and DirectUIAccessFieldList user properties.
Configuring the Scripting Operations Permitted on Business Components (Siebel Server Parameter)
To configure the operations that can be performed on business components from scripting interfaces, specify a value for the Siebel Server parameter BusCompAccessLevel as described in the following procedure.
To configure the scripting operations permitted on business components (Siebel Server parameter)
Navigate to the Administration - Server Configuration screen, then the Servers view.
In the Siebel Servers list, select a Siebel Server.
Click the Components view tab.
In the Components list, select a Siebel Server component.
Select the Parameters view tab.
In the Component Parameters list, locate the BusCompAccessLevel parameter.
Specify one of the values shown in the following table to configure access to the component from the scripting interfaces.
Value
Description
None
Do not allow any direct operations on the business component from scripting interfaces.
Readonly
(Default value)
Allow read-only operations on the business component from scripting interfaces.
All
Allow all operations on the business component from scripting interfaces.
Configuring the Scripting Operations Permitted on Business Components (Business Component User Property)
To configure the operations that can be performed on a specific business component from scripting interfaces, specify a value for the DirectUIAccess business component user property as described in the following procedure.
To configure the scripting operations permitted on a business component (business component user property)
Start Siebel Tools.
In the Object Explorer, click Business Component.
In the Business Components list, locate the business component for which you want to configure access.
In the Object Explorer, expand the Business Component tree, then click Business Component User Prop.
In the Business Component User Props list, locate the DirectUIAccess user property, and set the property to one of the values shown in the following table.
Value
Description
None
Do not allow any direct operations on the business component from scripting interfaces.
Readonly
(Default value)
Allow read-only operations on the business component from scripting interfaces.
Limitedwrite
Allow limited field-write operations on the business component from scripting interfaces.
If you set the value of the DirectUIAccess parameter to Limitedwrite, you also have to set a value for the business component user property DirectUIAccessFieldList (see the next step in this procedure).
If the DirectUIAccess property is set to Limitedwrite but a value is not specified for the DirectUIAccessFieldList property, this is equivalent to setting DirectUIAccess to Readonly.
All
Allow all operations on the business component from scripting interfaces.
If you set the value of the DirectUIAccess parameter to Limitedwrite, you also have to set a value for the business component user property DirectUIAccessFieldList to specify the fields that can be updated through browser scripting.
In the Value field of the DirectUIAccessFieldList user property, specify a comma-separated list of fields that can be updated through client side scripting. For example:
Field1,Field2,Fieldn
where Field1,Field2,Fieldn are the names of the fields for which write operations can be performed.
Compile and test your changes.
For more information on setting user properties, see Using Siebel Tools.
Viewing an Applet’s Access Control Properties
A view presents a collection of lists, forms, and trees at once. These lists and forms are referred to as applets in a configuration context.
Applets are reused in different views and can have different access control properties applied in different views. If visibility is defined specifically for a view, then one of the applets in the view is specified as the visibility applet. Several properties of the visibility applet drive the access control of data in the view.
You use Siebel Tools to work with applets and their properties. For more information, see Configuring Siebel Business Applications.
Use the following procedure to view an applet’s access control properties.
To view an applet’s access control properties
Launch Siebel Tools.
In the Object Explorer, click + to expand the Applet object type.
The Applet subtree and the Applets list appear.
To see a particular applet property, click the icon for its subcomponent or click + (plus) to expand the subtree for a subcomponent, and then click its subcomponent.
A detail list for the subcomponent appears after the Applets list. Two applet properties in particular contribute to data visibility: Business Component and Display Name.
In the Object Explorer, choose Applets, List, and then List Columns.
As shown in the following figure, the List Columns list shows the business component fields that this applet displays. For each business component field, the Display Name entry in the accompanying Properties list shows how that field is labeled in the applet.
For example, the Accounts business component can use either the Sales Rep or Organization field to determine user association with a record. It is useful to know how these fields display in the Account List Applet. The Organization field has display name Organization in the applet, but the Sales Rep field has display name Account Team.
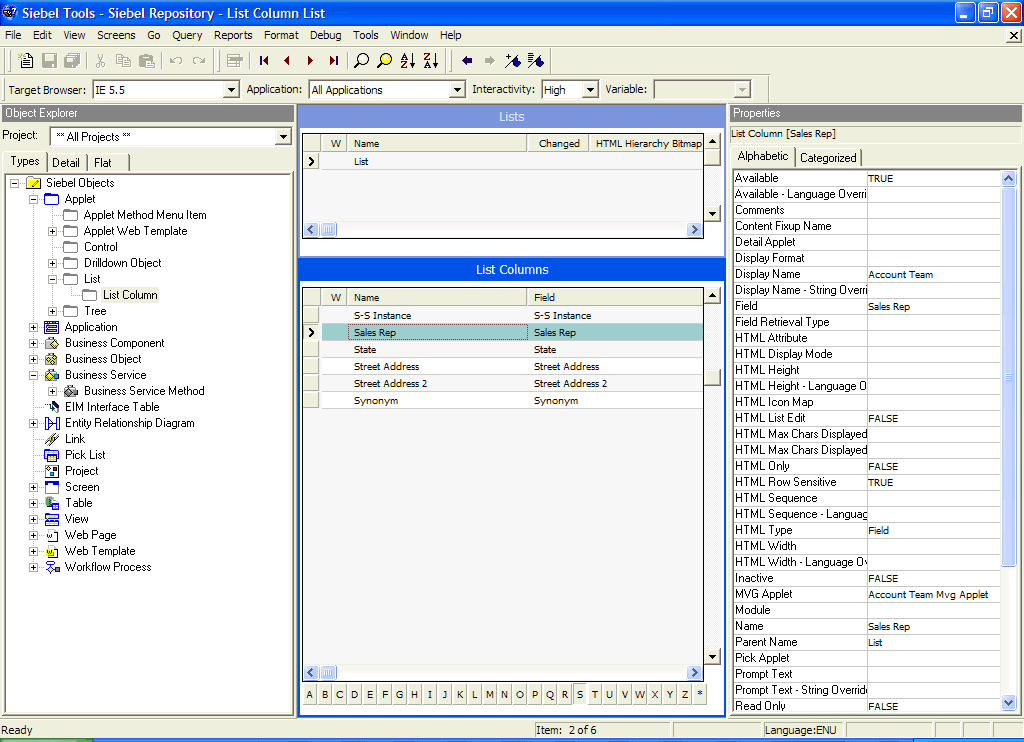
Listing View Access Control Properties
A view’s access control properties determine what applet is used to drive visibility and what access control mechanism is applied to the business component on which the view is based.
You use Siebel Tools to work with properties of views.
To list a view’s access control properties
Launch Siebel Tools.
In the Object Explorer, click the Views object type.
The Views list appears.
The following fields in the Views list help determine data visibility.
Title. The title is the name given to a view in the user interface. It is recommended that the title indicates the level of access control on the view’s data. For example, My Accounts suggests more restricted visibility than My Team’s Accounts.
Visibility applet. Typically, this is the master in a master-detail applet relationship. This applet defines the business component on which the view is based and how fields of the business component are displayed.
When the view property Visibility Applet is defined on a view, this view is considered to be associated with its own, independent visibility. The Siebel application will re-query this view when you choose it, according to the Visibility Applet Type (the default Visibility Applet Type is All).
Note: Do not specify the Visibility Applet property on detail views, where the current record context and the current query should be retained.A view has an entry in this field if the view is not derived from another view. For example, a view that is listed in the link bar for any screen has a visibility applet, but a view that results from drilling down from another view does not. A view with no visibility applet typically inherits access control properties from the view from which it is derived.
Multiple views can have the same visibility applet. For example, both All Account List View and Manager’s Account List View have Account List Applet as their visibility applet.
Visibility Applet Type. This field determines the access control mechanism that is applied to that view. It specifies which of the business component’s view modes are applied and how they are applied. Following are the choices available in the picklist for this field:
All. A view of this type applies All access control.
The user can access all records, except for those with a missing or invalid owner.
Personal. A view of this type applies personal access control.
The user can access records with which the user’s Person record is associated, as determined by the business component’s Visibility Field.
To use this visibility applet type, the business component must have a view mode with owner type Person.
Note: The Personal view mode of the Quote business component is specialized to display quotes created by the user and assigned to somebody else.Sales Rep. A view of this type applies single-position or team access control.
The user can access records owned by the user’s position or records whose team contains the user’s position, as determined by the business component’s Visibility Field or Visibility MVField. 2
To use this visibility applet type, the business component must have a view mode with owner type Position.
Manager. A view of this type applies manager access control.
The user can access records associated with the user’s own position, positions that report directly to the user’s position, and positions subordinate to those direct reports. For additional information, see About Manager Access Control.
To use this visibility applet type, the business component can have a view mode with owner type Position or Person.
Organization. A view of this type applies single-organization or multiple-organization access control, as determined by the business component’s Visibility Field or Visibility MVField.
The user can access records associated with the organization to which the user’s position is associated.
To use this visibility applet type, the business component must have a view mode with owner type Organization.
Sub-Organization. A view of this type applies suborganization access control. The user has access to the following data:
If the business component on which the view is based uses single-organization access control, the user sees data associated directly with the user’s active organization or with a descendant organization.
If the business component on which the view is based uses multiple-organization access control, then the user sees data for which the user’s active organization or a descendant organization is the primary organization.
Descendant organizations are defined by the organization hierarchy. To use this visibility applet type, the business component must have a view mode with owner type Organization.
Group. A view of this type applies Group access control, which is one mechanism of access-group access control. The user is associated with an access group if, during the current session, the user is associated with a position, organization, account, household, or user list that is a member of the access group.
The user can access categories of master data that are associated with any of the access groups with which the user is associated. In a view that provides a navigable tree, the user sees accessible first-level subcategories (child categories) in the current category. In a view that provides a list of master data records, the user sees all the records in the current (already accessed) category.
To use this visibility applet type, the business component must have a view mode with an owner type of Group.
Catalog. This view applies Catalog access control, which is one mechanism of access-group access control. The user is associated with an access group if, during the current session, the user is associated with a position, organization, division, account, household, or user list that is a member of the access group.
The user sees a flat (uncategorized) list of all the data in all of the categories across catalogs to which all of the user’s access groups have access. This visibility type is typically used in product picklists and other lists of products.
To use this visibility applet type, the business component must have a view mode with an owner type of Catalog Category.
Note: Despite setting the visibility type to Catalog, you might be able to see extra products in product picklists and other lists of products. This is expected behavior for products that belong to public catalogs.Admin Mode. This property requires a TRUE or FALSE value. When TRUE, the view operates in Admin mode. When the view is in Admin mode, all insert, delete, merge, and update restrictions for the business component used by applets of the view are ignored (including those restrictions specified by the following business component user properties: No Insert, No Delete, No Merge, No Update).
Examples of Admin mode views include Account Administration view, Opportunity Administration view, and Product Administration view.
Admin mode does not override pop-up visibility. It does not override Read Only restrictions on fields in a business component.
In Admin mode, every record in a view that uses team access control is visible, even those with no primary position designated. (This mode is distinct from All visibility, which shows all records that have a primary team member designated.)
Caution: Views using Admin mode are intended for access by administrators and are typically included in a grouping of like views in an administration screen, such as Administration - Application. Do not include views in Admin mode in a screen with views not set for Admin mode. When a user transitions from a view that is in Admin mode to one that is not, the target view remains in Admin view, thereby exposing data that is not intended to be seen.
Example of Flexible View Construction
The following example shows how several existing views were constructed, based on the same visibility applet and business component. It suggests how similar view "families" can be constructed in Siebel Tools, but does not give procedures for constructing views. After updating the Siebel repository, you must publish and deliver those updates to the Siebel runtime repository for them to take effect. For more information about required practices when using Siebel Tools, see Configuring Siebel Business Applications.
The following image shows the BusComp View Modes list in Siebel Tools for the Account business component. As indicated by the Owner Type field, organization and position view modes are allowed. As indicated in Visibility MVField, accounts can be associated with multiple organizations and multiple positions (for example, sales teams).

The following image shows five views in the Views list in Siebel Tools. The Title field shows the display name for the view. All five views have Account List Applet as their visibility applet. Account List Applet is based on the Account business component.
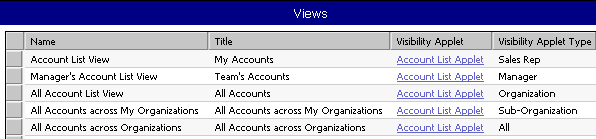
These five example views provide different lists of account data because they have different visibility applet types specified, as shown in the following table.
Table Example Account Views and Visibility Applet Types
View |
Visibility Applet Type |
Data Access |
|---|---|---|
Account List View (displayed as My Accounts) |
Sales Rep |
Team access control applies. The visibility applet type is applied to a business component for which multiple positions can be associated. For this view, access is granted to account data where the user’s position is on the account team. |
Manager’s Account List View (displayed as Team’s Accounts) |
Manager |
Manager access control applies. The visibility applet type is applied to a business component for which multiple positions can be associated. For this view, access is granted to account data where the user’s active position or a subordinate position is the primary position on the account team. |
All Account List View (displayed as All Accounts) |
Organization |
Organization access control applies. The visibility applet type is applied to a business component for which multiple organizations can be associated. For this view, access is granted to account data where a user’s primary organization is one of the organizations with which the account is associated. |
All Accounts across My Organizations |
Sub-Organization |
Suborganization access control applies. The visibility applet type is applied to a business component for which multiple organizations can be associated. For this view, access is granted to account data where the user’s active organization or a descendant organization is the primary organization. |
All Accounts across Organizations |
All |
All access control applies. The Account business component has only position and organization view modes. For this view, access is granted to all account data for which there is a primary position on the account team or an organization associated with the account. |
About Implementing Access-Group Access Control
You associate an access group to a catalog or category of master data. When an access group is associated with a catalog or a category, the users associated with the access group have visibility to the data in the catalog or the category. An access group in this context is an individual node in an access group hierarchy.
The following principles apply to access-group access control:
Private catalogs and categories. A catalog is a hierarchy of categories. A catalog cannot itself contain data. To apply access-group access control on all of a catalog’s categories, you must designate the catalog as private, and then associate access groups to the catalog. If a catalog is not private, then any user can see data in its categories. You can designate individual categories private within a public catalog.
Access group access is inherited. If an access group is associated with a category, then the group's descendant groups (child, grandchild, and so on) are automatically associated with the category. Conversely, if an access group is disassociated with a category, then its descendant groups are also disassociated. The inheritance association is enforced at run time.
Cascading category visibility is optional.
If an access group is associated with a category, the Cascade button provides that the access group is automatically associated with that category’s descendant categories (child, grandchild, and so on). Therefore, users associated with the access group have access to the data in those descendant categories.
If the access group is disassociated with the category, then the access group is automatically disassociated with that category’s descendant categories. If the access group is disassociated with one of the descendant categories, then the access group’s cascading visibility is granted only down to, but not including, that descendant category.
Once the Cascade button is set, cascading access can only be disabled by disassociating the access group from a category. The flag itself cannot be unset.
If the Cascade button is not used, access is limited to the individual category to which the access group is associated.
Related Topics
Scenario That Applies Access-Group Access Control
Assume that you want the status of your resellers to determine which of your knowledge resources they have access to. Your resellers include partner organizations and some individual consultants who are not associated with a partner organization. Your solution must meet the following requirements:
Provide your base resellers access to basic product information resources, for example, service FAQs, product documentation, and product training classes.
In addition to basic product information, provide your "premier" resellers access to more sales-specific resources, for example, marketing FAQs, documents that provide guidance on customer decision issues, and sales training classes.
In addition to product and sales resources, provide your alliance resellers access to resources to help design entire marketing campaigns, for example, competitive briefs and training classes.
As the status of a reseller changes, the administration required to change the reseller’s access to data must be minimal.
The following figure illustrates one access control structure that solves this business problem.
This solution assumes that your partners are stored as organizations, in which partner users are associated with positions. The consultants exist as users; they have responsibilities, but not positions, and are not associated with an organization.
The Resellers Community is an access group hierarchy. Each node is an access group whose members are partner organizations and a single user list. The user list in each node contains all consultants of the appropriate status. For internal administrators to have visibility of the catalog, include their positions in the Alliance access group.
The Reseller Resources catalog is constructed of categories containing data and nodes that are empty categories to define access levels.
Apply the following principles to construct this structure:
Construct the Resellers Community such that the upper levels have the narrowest access to resources. Therefore, the Base Resellers access group is the parent of the Premier access group, which is in turn the parent of the Alliance access group.
Construct the Reseller Resources Catalog such that the Product Resources, Sales Resources, and Alliance Resources nodes are all first-level categories in the catalog.
For information about creating and administering catalogs, see Siebel eSales Administration Guide.
The child nodes to the Product Resources node include categories of product resources. The child nodes to the Sales Resources and Alliance Resources nodes are determined similarly.
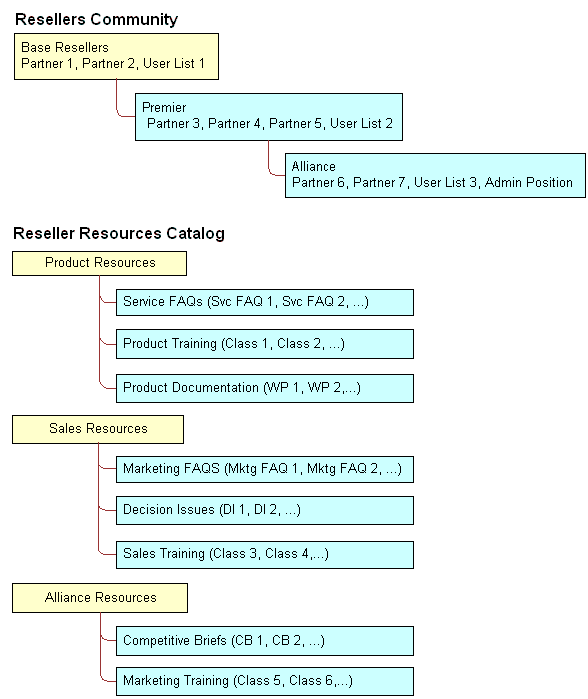
Implementing the Reseller Resources Access Control Structure
The following implementation procedure restricts the base resellers’ access to product resources only, premier resellers’ access to product resources and sales resources, and alliance resellers’ access to all resources.
To implement the Reseller Resources access control structure
Construct the Reseller Resources catalog, and specify it as private, with access provided to the Base Resellers access group.
Access to the catalog is also granted to the Premier and Alliance access groups because access group access is inherited.
Associate the Base Resellers access group with the Product Resources category, and use the Cascade button.
Access is inherited by the Premier and Alliance access groups from the Base Resellers group, and access cascades from the Product Resources category to its subcategories containing data. The resulting behavior is that all the nodes in the Resellers Community have access to all the subcategories in the Product Resources category.
Associate the Premier access group with the Sales Resources category, and use the Cascade button.
Access is inherited by the Alliance access group from the Premier group, and access cascades from the Sales Resources category to its subcategories containing data. The resulting behavior is that the Premier and Alliance groups have access to all the subcategories in the Sales Resources category.
Associate the Alliance access group with the Sales Resources category, and use the Cascade button.
No group inherits access from the Alliance group. Access cascades from the Alliance Resources category to its subcategories containing data. The resulting behavior is that only the Alliance group has access to the subcategories in the Alliance Resources category.
Set the catalog to type Partner to make it visible to partners and consultants on partner applications such as Siebel Partner Portal, and to internal administrators on Siebel employee applications in the Info Center screen.
This structure meets the minimal maintenance requirement. If the status of a partner organization changes, add the partner organization to the appropriate access group and delete the partner organization from the old access group. If the status of a consultant changes, add the user to the appropriate user list, and delete the user from the old user list. Recategorized consultants and partner users are granted appropriate new access as defined by the structure.
Related Topic
Viewing Categorized Data (Users)
You can configure a catalog to display in Siebel employee applications and in selected customer and partner applications, such as Siebel Sales and Siebel Partner Portal, as default functionality.
In an employee application, such as Siebel Call Center, a user can see categorized data controlled by access group membership in the Info Center and Info Center Explorer screens. Info Center Explorer provides a tree interface for navigating all the catalogs to which the user has access, down to the data item level. Info Center, as compared to Info Center Explorer, shows how categorized data can be presented in Siebel Business Applications using a more open user interface.
To see categorized data in Info Center
Navigate to the Info Center screen.
The Info Center screen appears, showing accessible catalogs and their first-level categories.
Click a category link. For example, you might choose Decision Issues.
The category appears, showing its data items and its first-level subcategories.
Click a data item to view it, or drill down on a subcategory link to see its contents.
Related Topic
Implementing Access-Group Access Control
This topic describes the administrative tasks you must perform to implement access-group access control.
To implement access-group access control perform the following tasks:
Administer catalogs of master data; build the catalogs and categories, associate data, and modify catalog structures as needed.
For additional information, see About Administering Catalogs of Data.
Administer the party types that are members of access groups, that is, positions, organizations, households, and user lists.
For additional information, see Administration Tasks for Positions, Organizations, Households, and User Lists.
Administer access groups; build the access groups and modify their structures as needed.
Associating Access Groups with Data.
Associate access groups with catalogs and categories of data.
About Administering Catalogs of Data
You can do the following catalog and category administration tasks in the Administration - Catalog screen:
Create and delete catalogs and categories of master data.
Associate data with categories.
Modify the hierarchical position of a category within a catalog.
For information about creating and administering catalogs, see Siebel eSales Administration Guide and Siebel Partner Relationship Management Administration Guide.
Key principles for setting up a catalog include, but are not limited to:
Set the Catalog Type field to allow display of the catalog in certain Siebel customer or partner applications, in addition to Info Center and Info Center Explorer in Siebel employee applications. For example, set the Catalog Type to Partner to display the catalog in Siebel Partner Portal, as well as in Info Center.
Make sure the Active flag is set and the Effective Start Date and Effective End Date fields provide visibility of the catalog during your intended time interval.
Related Topic
Administration Tasks for Positions, Organizations, Households, and User Lists
Access groups are made up of positions, organizations, households, and user lists. This topic describes the administration tasks associated with each of these access groups.
About Administering Positions
Perform the following administrative tasks for positions:
Create positions.
For information on this task, see Setting Up Positions.
Associate positions with employees and partner users.
For information on this task, see Adding a New Employee and About Adding a New Partner User.
Maintain position hierarchies.
For information on this task, see About Position Access Control and About Planning for Positions.
About Administering Organizations
The Organization group type includes organizations, divisions, and accounts. You must perform the following administrative tasks for organizations:
Create divisions and accounts.
For information on creating divisions, see Setting Up Divisions. For information on creating accounts, see Siebel Applications Administration Guide.
Promote divisions to organizations and maintain division hierarchies.
Associate positions with divisions and with partner organizations.
For information on creating organizations, see Setting Up Organizations. For information on planning for organizations, see About Organization Access Control and About Planning for Organizations.
About Administering Households
You must perform the following administrative tasks for households:
Create households.
Associate contacts with households.
Maintain household data.
For information on these tasks, see Siebel Applications Administration Guide.
Administering User Lists
You can group arbitrary users into user lists for the purpose of granting them access to data through access groups. Users in this context include contact users, employees, and partner users. For information about user lists, see Access Control for Parties.
The following procedure describes how to create a user list and add users to it. You can delete users from a user list similarly.
To create a user list
Navigate to the Administration - Group screen, then the User Lists view.
In the User Lists list, add a new record.
A new user list record appears.
Enter a name for the user list. Optionally, change the default entry for Group Type.
Save the record.
To add users to the user list you created, select the list.
In the Users list at the end of the view, add a new record.
Select one or more users, and then click OK.
The selected users appear in the Users list. If a user, such as a customer user, belongs to an account, the Account field populates automatically.
Related Topic
Administering Access Groups
You can group parties of types Position, Organization, Household, and User List into access groups for the purpose of controlling their individual members’ access to data.
You administer access groups in the Administration - Group screen. This screen contains the Access Groups tree and the Access Groups list.
The Access Groups tree lists all access groups on the second level of the tree. Each access group can be expanded to show its descendants. Therefore, an access group can appear at different levels in multiple branches of the tree. An access group that has no parent access group is the highest node of an access group hierarchy. For information about access groups, see Access Control for Parties and About Access-Group Access Control.
Creating an Access Group
The following procedure describes how to create an access group.
To create an access group
Navigate to the Administration - Group screen, then the Access Groups view.
The Access Groups tree and the Access Groups list appear.
In the Access Groups list, add a new record.
A new access group record.
Complete the following fields, then save the record. Use the guidelines in the following table.
Field
Guideline
Name
Required. Provide a name for the access group.
Group Type
Pick Access Group or Partner Community. These labels denote conceptual differences. Functionally, they are the same.
Parent Access Group
Specify a parent access group from which this new group inherits access to data that the parent group has access to.
The new access group also appears in the Access Groups tree.
Modifying an Access Group
You can modify an access group by adding or deleting members using the following procedure.
To add members to an access group
Navigate to the Administration - Group screen, then the Access Groups view.
The Access Groups list appears.
In the Access Groups list, select an access group.
In the Members list, add a new record.
A pop-up list appears that contains positions, organizations, accounts, households, and user lists.
Select one or more members, and then click OK.
The selected members appear in the Members list.
In the Access Groups list, save the record.
You can delete members from an access group similarly.
Modifying an Access Group Hierarchy
You can modify the hierarchy of an access group by changing an access group’s parent as described in the following procedure.
To modify a hierarchy of access groups
Navigate to the Administration - Group screen, then the Access Groups view.
The Access Groups list appears.
In the Access Groups list, select an access group.
Click on the Parent Access Group field.
The text box becomes editable and its entry is highlighted.
Do one of the following to modify the hierarchy:
To make the access group the highest (first) node of its own hierarchy, delete the entry in the Parent Access Group field. Click Save.
From the Parent Access Group field, pick a new parent and click OK. Click Save.
The Access Group tree is updated to reflect the access group’s new position in a hierarchy.
Related Topic
Associating Access Groups with Data
The individual users in an access group are provided access to data by associating the access group with catalogs or categories of data.
Be aware of the following user interface behaviors related to associating an access group with a catalog or category:
Access inheritance. When you associate an access group with a category, its descendant groups are also associated with the category. However, this inheritance is implemented at run time, and is not represented in the database. As such, the descendant access groups associated with the category are not displayed in the list of groups associated with the category.
Cascade button. Clicking the Cascade button provides the given access group with visibility to all of the child categories of the current catalog or category. Clicking this button repeatedly has no effect. You must manually disassociate the group from the child categories to undo the access cascade.
Private catalog. If you specify a catalog to be private, its categories are all set as private. If you remove privacy at the catalog level, the categories retain privacy. You must then set or remove category privacy individually.
Associating an Access Group with a Catalog
By associating an access group with a catalog of master data, you grant access to the data in the catalog to individual users in the access group.
To associate an access group with a catalog
Navigate to the Administration - Catalog screen, then the Access Groups view.
The Catalogs list appears.
Select a catalog.
In the Access Groups list, add a new record.
A pop-up list appears that contains access groups.
Select an access group, and then click Add.
The access group appears in the Access Groups list.
In the Access Groups list, save the record.
Select an access group, and then click Add.
The access group appears under the Access Group tab.
Complete the following fields, then save the record. Use the guidelines provided in the following table.
Field
Guideline
Admin
Set this flag to allow users in this access group to administer the catalog.
Cascade
Set this flag to automatically associate this access group with the catalog’s descendant categories (child, grandchild, and so on). The resulting behavior is that users in the access group have access to the data in the descendant categories.
You can disassociate an access group from a catalog similarly.
Associating an Access Group with a Category
By associating an access group with a category of master data, you grant access to the data in the category to individual users in the access group.
To associate an access group with a category
Navigate to the Administration - Catalog screen, then the Access Groups view.
The Catalogs list appears.
Drill down on a catalog name.
The Categories list for the catalog appears.
Click the Access Groups view tab.
In the Access Groups list, add a new record.
A multi-value group appears that lists access groups.
Select an access group, and then click Add.
The access group appears in the Access Groups list.
In the Access Groups list, save the record.
Select an access group, and then click Add.
The access group appears under the Access Group tab.
Complete the following fields, and save the record. Use the guidelines provided in the following table.
Field
Guideline
Admin
Set this flag to allow users in this access group to administer this category.
Cascade
Set this flag to automatically associate this access group with this category’s descendant categories (child, grandchild, and so on). The resulting behavior is that users in the access group have access to the data in the descendant categories.
You can disassociate an access group from a catalog similarly. When an access group is disassociated from a category, it is automatically disassociated from all of the category’s descendant categories.
Related Topic
Managing Tab Layouts Through Responsibilities
Siebel Business Applications administrators can manage default screen and view tab layouts that are specific to job functions. Tab layouts are managed through responsibilities.
Administrators can use the Responsibilities view (Responsibility Detail - Tab Layout View) in the Administration - Application screen to define a default tab layout for each responsibility. Administrators can administer both view access and default tab layout from this view.
To ease the administrative burden of setting up default tab layouts and associating them with responsibilities, Siebel Business Applications ship with many predefined responsibilities that are preconfigured with default tab layouts.
For example, the Universal Agent responsibility for Siebel Call Center has associated with it both screen and view access as well as a default tab layout. These are the views required most often for users holding that job function. Each time a user with this responsibility logs in, this user has access to all screens and views for that responsibility, and for all other responsibilities the user is associated with.
However, the user sees in the application user interface only the simplified default screen and view tab layout associated with the user’s primary responsibility, for example, the layout associated with the Universal Agent responsibility, if this is the user’s primary responsibility.
Each user can modify personal tab layout settings by using the Tab Layout view in the User Preferences screen (Tools, and then User Preferences). Once the user has modified the tab layout, these settings will always override the default tab layout associated with the user’s primary responsibility. For more information, see Siebel Fundamentals.
If a user selects a screen from the Site Map that is not part of his or her tab layout, a screen tab is created for that screen which is only available for that session.
The following topics provide additional information on managing tab layouts through responsibilities:
Specifying Tab Layouts for Responsibilities
This topic describes how to specify the tab layout for a responsibility.
The Tab Layout view (Responsibility Detail - Tab Layout View) is used for basic tab layout management tasks such as reordering or hiding screen and view tabs for different responsibilities, as well as for exporting and importing tab layouts. To let you manage screens and views for multiple applications, tab layout administration uses four lists:
Responsibilities list. Includes all the responsibilities in the repository.
Applications list. Includes all the Siebel Business Applications in the repository, and specifies for which application you are managing tab layouts.
Screen Tab Layout list. Specifies which screens are displayed for each application.
View Tab Layout list. Specifies which views are displayed for each screen.
You must select an application because you might be administering responsibilities for a different application than the one you are logged into as an administrator. For example, you use Siebel Partner Manager to administer responsibilities for partners who will use Siebel Partner Portal.
To specify the tab layout for a responsibility
Log in as an administrator.
Navigate to the Administration - Application screen, then the Responsibilities view.
In the Responsibilities list, select the responsibility you want to associate tab layouts with.
Click the Tab Layout view tab.
In the Tab Layout list, select an application associated with the responsibility.
The Screen Tab Layout list displays all the screens used by the selected application:
Select the Hide check box for any screens whose screen tabs will not be displayed.
Change the numbers in the Order field to change the sequence in which the screen tabs are displayed.
Select each record in the Screen Tab Layout list, and the View Tab Layout list displays all the views for that screen:
Select the Hide check box for any views whose view tabs will not be displayed.
Change the numbers in the Order field to change the sequence in which the screen tabs are displayed.
Related Topic
Assigning a Primary Responsibility
Each user can have multiple responsibilities assigned, in order to provide access to all necessary views. One responsibility is defined as the primary responsibility. The user sees the tab layout associated with his or her primary responsibility. The Site Map provides this user with access to the superset of screens and views defined in the responsibilities with which the user is associated.
To assign a primary responsibility to a user, perform the following procedure.
To assign a primary responsibility to a user
Navigate to the Administration - User screen, then the Users view.
Select a User record.
In the form, click the select button on the Responsibility field.
A list of the responsibilities assigned to the User appears.
In the Responsibilities dialog box, set the primary responsibility for the user by checking the Primary flag of one of the selected responsibilities.
Note: By default, the first responsibility assigned to a user (based on timestamp) becomes the primary responsibility. Particularly for customers who are upgrading, verify that the correct primary responsibility is assigned to each user, or specify the desired primary responsibility.
Related Topic
Exporting and Importing Tab Layouts
To copy a tab layout from one responsibility to another, you can export and import tab layouts. For example, if you have a tab layout associated with one responsibility and you want to apply it to another responsibility, you can first export the desired tab layout settings to an XML file, optionally modify the file, and then import it to the target responsibility.
Exporting Tab Layouts
This topic provides the procedure for exporting tab layouts to an XML file.
To export tab layouts
Navigate to the Administration - Application screen, then the Responsibilities view.
In the Responsibilities list, click the Tab Layout view tab.
Select the responsibility that has the desired tab layout.
Select a record in the Applications list.
You can select multiple applications and export the tab layouts for a responsibility for one or more associated applications. The XML file will contain screen tab and view tab settings for the selected applications. When you later import the XML file, tags in the file specify the applications that are affected if tab layouts are subsequently imported from this file.
Click the menu button in the Responsibilities list and select Export Tab Layout.
Save the XML file.
For example, to save tab layout settings for a responsibility designed for field engineers who use Siebel Field Service, you might export a file such as Siebel Field Service@Field Engineer.xml.
Importing Tab Layouts
This topic provides the procedure for importing tab layouts from an XML file you previously exported to.
To import tab layout to a target responsibility
From the application level-menu, navigate to the Administration - Application screen, then the Responsibilities view.
Click the Tab Layout view tab and select the target responsibility in the Responsibilities list.
Click the menu button in the Responsibilities list and select Import Tab Layout.
In the import dialog box, choose the XML file for the Application Tab Layout you want to import.
Click Import.
After you have imported the XML file, default tabs in the application correspond to those defined in the file you imported.
Note: Importing a tab layout file hides and resequences views for affected users. Although you cannot roll back imported changes directly, you can still modify tab layout settings in the Responsibilities Administration view, or you can modify the XML file and reimport it.(Optional) If the XML file you are importing contains all the tab layout settings for a responsibility, not just the differences between the existing tab layout and the default tab layout, then, after importing the XML file, you must log out of the application, then log back in again to see the updated tab layout.
Related Topic
Managing Tasks Through Responsibilities
A user with an administrator login can control access to tasks by associating tasks with user responsibilities. To access a task, a user must be assigned the responsibility that allows access to the task. A user who is assigned more than one responsibility can access any task that is associated with one of his or her responsibilities.
The administrator can also define hyperlinks to the tasks associated with a responsibility; these task links then appear on the home page of the users who are assigned the responsibility.
The following topics describe how to associate responsibilities and tasks:
For more information about tasks, see Siebel Business Process Framework: Task UI Guide.
Associating Responsibilities with a Task
This topic describes how you can associate a responsibility with a task to control access to the task. You carry out the following procedure through the Registered Tasks Administration view.
To associate responsibilities with a task
Log in as an administrator.
Navigate to the Administration - Application screen, then the Tasks view.
In the Registered Tasks list, select the task that you want to associate with responsibilities.
In the Responsibilities list, click New.
The Tasks dialog box appears.
Select a responsibility, then click OK.
The responsibility appears in the Responsibilities list and is associated with the task that you selected earlier in this procedure.
If appropriate, select or clear the check boxes for Allow Delete and Allow Transfer.
Allow Delete
Select the Allow Delete check box if you want an employee with the associated responsibility to be able to delete the task.
Allow Transfer
Select the Allow Transfer check box if you want an employee with the associated responsibility to be able to transfer the task.
For information about deleting or transferring tasks, see Siebel Business Process Framework: Task UI Guide.
Step off the record to save changes.
Creating Task Links for a Responsibility
After creating a responsibility, you can create links to the tasks commonly performed by employees who have that responsibility. These links are then displayed in the task list on the home page for these employees.
For each task link, you enter a caption, an image file, and a description. In addition, specify the view where the task is performed. When the user clicks on the hyperlink for this task on the home page, this view appears. Personalization of this type is already specified for various seed responsibilities.
The following procedure describes how to create task links for a responsibility.
To create task links for a responsibility
Log in as an administrator.
Navigate to the Administration - Application screen, then the Responsibilities view.
In the Responsibilities list, select the responsibility you want to associate with task links.
Click the Links tab.
In the Links list, do one of the following:
Click the Add tab.
Click this tab to display the Add Links list, from which you can select an existing task link to add to the list of task links associated with the responsibility.
Click the New tab to add a new task link for this responsibility, and enter the following information:
Field
Guideline
Name
Enter the name of the task.
Caption
Enter a caption for the task; this is displayed as a hyperlink in the task list.
Description
Enter a description of the task; this is displayed under the caption in the task list.
Destination View
Click the select button and choose the view that appears when the user clicks the hyperlink for this task.
Sequence
Optionally, specify the order in which this task is displayed in the task list for this responsibility on the home page. If this field is empty, then tasks are displayed in the order that you list them here.
Image
Select the graphic image that is displayed as a hyperlink next to this task in the task list.
Group
This field is used if search specifications are applied to filter the tasks that are displayed in the task applet, if multiple task applets are associated with the responsibility.
Administering Access Control for Business Services
Business services can be accessed by all users by default. However, the administrator can restrict access to specified business services and business service methods. The administrator can then associate responsibilities with the restricted business services or associate the business services with responsibilities. This allows the administrator to restrict access to business services based on the end user’s responsibility. To access a restricted business service, an end user must be associated with the responsibility that allows access to the restricted business service. An end user who is assigned more than one responsibility can access any restricted business service that is associated with one of his or her responsibilities.
For business services that allow you to specify a view mode to access data, you can specify which view mode can be used by different responsibilities. The following figure shows two examples of view modes that can be associated with a responsibility to restrict the set of data records a user with the responsibility accesses.
The view modes in the first example are as follows:
1 Personal, 2 Sales Rep, 3 Manager, 4 Organization, 5 Sub-Organization, 6 All.
The view modes in the second example are as follows:
1 Group, 2 Catalog, 3 All.
The level of visibility broadens as you move from 1 to 6 in the first example and from 1 to 3 in the second example; for example, the Manager (3) view mode grants access to more data than the Sales Rep (2) view mode.
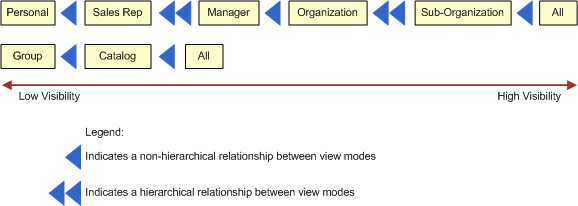
The image also shows whether or not the relationship that exists between each view mode is hierarchical. For example, the relationship between Manager view mode and Organization view mode is not hierarchical. The relationship between Sales Rep view mode and Manager view mode is hierarchical.
Assigning appropriate view modes allows you to manage access to business services (and associated methods) by end users based on the responsibilities assigned to the end user. The following topics provide more detailed information on the tasks involved in administering access control for business services:
Associating a Business Service with a Responsibility
This topic describes how you can associate a business service with a responsibility to control access to the business service and its methods. You carry out the following procedure through the Responsibilities view.
To associate a business service with a responsibility
Log in as an administrator.
Navigate to the Administration - Application screen, Responsibilities, and then the Business Service view.
In the Responsibilities list, select the responsibility that you want to associate with a business service.
In the Business Service list, click New to select a business service to associate with the responsibility that you selected in the preceding step.
The Business Service dialog box displays the list of business services that are currently associated with the responsibility that you selected.
In the Business Service dialog box, click New.
A new record appears in the Business Service list view.
Click the Select button in the Name field.
The Business Service dialog box appears.
Select a business service to associate with the responsibility that you selected earlier in this procedure, and then click OK.
The selected business service appears in the Business Service list view.
In the Business Service Method list, click New to specify the business service methods to which the responsibility that you selected earlier in this procedure gains access.
The Business Service Method dialog box appears. This dialog box displays the list of Business Service methods to which access is currently controlled.
If the business service method to which you want to allow the responsibility access appears in the Business Service Method dialog box, select it, then click OK, and then go to Step 13 of this procedure. If not, continue to the next step in this procedure.
Tip: To allow you to restrict access to business service methods without associating them with a real responsibility, Siebel Business Applications have provided a responsibility:Default Bus Service Method Access Control User. Use the steps described in this procedure to associate all business service methods to which you want to control access withDefault Bus Service Method Access Control User. This makes sure that the Business Service Method dialog box is populated with the business service methods to which you want to control access.In the Business Service Method dialog box, click New.
A new record appears in the Business Service Method list view.
Click the Select button in the Name field.
The Business Service Method dialog box appears.
Select a business service method to associate with the responsibility that you selected earlier in this procedure, and then click OK.
The selected business service method appears in the Business Service Method list view.
Note: By default, if you do not specify the business service methods to which the responsibility gains access, then the responsibility gains access to all business service methods of the business service provided that none of the business service methods have restricted access.From the Broadest Visibility list, select the view mode to associate with the responsibility.
Note: The business service that you selected earlier in the procedure must support view modes to allow you to select a value from the Broadest Visibility list.Step off the record to save changes.
Related Topic
Associating a Responsibility with a Business Service
This topic describes how you can associate a responsibility with a business service to control access to the business service and its methods. You carry out the following procedure through the Business Service Access view.
To associate a responsibility with a business service
Log in as an administrator.
Navigate to the Administration - Application screen, then the Business Service Access view.
In the Business Service list, click New to select a business service.
A new record appears in the Business Service list.
Click the Select button in the Name field.
The Business Service dialog box appears.
Select the business service to which you want to control access, then click OK.
The selected business service appears in the Business Service list view.
In the Access By Responsibility list view, click New.
The Add Responsibilities dialog box appears.
Select a responsibility to associate with the business service that you selected earlier in this procedure, and then click OK.
The selected responsibility appears in the Access By Responsibility list view.
In the Business Service Method list, click New to specify the business service methods to which the responsibility that you selected in the preceding step gains access.
The Business Service Method dialog box appears. This dialog box displays the list of business service methods to which access is currently controlled.
If the business service method to which you want to allow the responsibility access appears in the Business Service Method dialog box, select it, then click OK and go to Step 12 in this procedure. If not, continue to the next step in this procedure.
Tip: To allow you to restrict access to business service methods without associating them with a real responsibility, Siebel Business Applications have provided a responsibility:Default Bus Service Method Access Control User. Use the steps described in this procedure to associate all business service methods to which you want to control access withDefault Bus Service Method Access Control User. This makes sure that the Business Service Method dialog box is populated with the business service methods to which you want to control access.Click the Select button in the Name field.
The Business Service Method dialog box appears.
Select a business service method to associate with the responsibility that you selected earlier in this procedure, and then click OK.
The selected business service method appears in the Business Service Method list view.
Note: By default, if you do not specify the business service methods to which the responsibility gains access, then the responsibility gains access to all business service methods of the business service provided that none of the business service methods have restricted access.From the Broadest Visibility list, select the view mode to associate with the responsibility.
Note: The business service that you selected earlier in this procedure must support view modes to allow you to select a value from the Broadest Visibility list.Step off the record to save changes.
Related Topic
Example of Associating a Responsibility with Business Service Methods
The following figure shows the modifications made in the Business Services Method applet so that a user with Partner Executive responsibility can invoke the business service methods Query, Update, and Insert of the business service Account Test UDS.
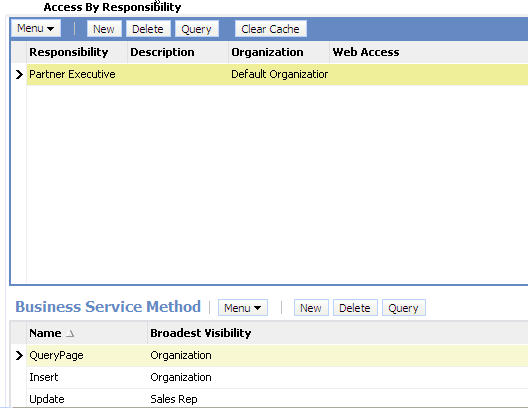
A user with Partner Executive responsibility in the example illustrated in this figure can:
View all accounts that belong to his or her organization because the business service method Query has Broadest Visibility equal to Organization.
Update accounts for the sales team of which he or she is a member because the business service method Update has Broadest Visibility equal to Sales Rep.
Insert a new account as the business service method Insert has Broadest Visibility equal to Organization. If the new account entry matches an existing account entry in the user’s organization, then an error message appears.
Related Topic
Clearing Cached Business Services
A business service is cached when a user logs in who has access to that business service through the responsibility associated with the user. Users have access only to those business services that were defined for applicable responsibilities at the time that they logged in, even though an administrator might have changed access to business services since that time.
If an administrator makes any changes that affect a user’s access to a business service and its associated methods, then the administrator must clear the cache in order to instruct the Siebel application to read updated values from the database. Clearing the cache makes these changes to the business service available to users who log in subsequently or who log out and log in again. The Siebel Server does not have to be restarted.
To clear cached business services
Navigate to the Administration - Application screen, Responsibilities, and then the Business Service view.
Select the business service in the Business Service list, and then click Clear Cache.
Changes to the business service that you made prior to clicking Clear Cache are made available to end users the next time that they log in.
Related Topic
Disabling Access Control for Business Services
You can use the OM - Enable Resource Access Control parameter to control access to business services in a component as follows:
Set OM - Enable Resource Access Control to True to enable access control for business services in a component.
This allows only users with responsibilities to access the business services in the component. Siebel checks access control each time a user accesses a business service.
Enabling access control for business services can have an effect on response times for your Siebel Business Applications.
Note: The default value for OM - Enable Resource Access Control is True.Set OM - Enable Resource Access Control to False to disable access control for business services in a component.
This allows everyone to access the business services.
The following procedure demonstrates how to set the value for OM - Enable Resource Access Control for a selected component.
To disable access control for business services
Log in as an administrator.
Navigate to the Administration - Server Configuration screen, then the Servers view.
In the Siebel Servers list, select the Siebel server that hosts the component for which you want to disable access control for business services.
In the Components tab, select the component for which you want to disable access control for business services.
Click the Parameters tab and query for the parameter OM - Enable Resource Access Control.
The record for OM - Enable Resource Access Control appears.
In the Value on Restart field, enter
False.Step off the record to save changes.
Related Topic
Administering Access Control for Business Processes
Business processes can be accessed by all users by default. However, a user with an administrator login can restrict access to specified business processes and can then associate responsibilities with the restricted business processes, or associate the restricted business processes with responsibilities. This allows the administrator to restrict access to business processes based on the end user’s responsibility. To access a restricted business process, an end user must be associated with the responsibility that allows access to it. An end user who is assigned more than one responsibility can access any restricted business process that is associated with one of his or her responsibilities.
To associate business processes with responsibilities, use the same procedures outlined in the following topics describing how to associate business services with responsibilities:
Clearing Cached Responsibilities
A particular responsibility is cached when a user logs in who has that responsibility. Users have access only to those views that were defined for applicable responsibilities at the time they logged in, even though additional views might have been added by an administrator since that time.
If you add, remove, delete, or modify a responsibility in the Responsibilities view (Responsibilities List View) or even modify or rearrange the views for a responsibility or the responsibilities for a user, then you must clear the cache as shown in the following procedure in order to instruct the Siebel application to read updated values from the database. Clearing the cache makes these changes available to users who log in subsequently or who log out and log in again. The Siebel Server does not have to be restarted.
To clear cached responsibilities
Navigate to the Administration - Application screen, then the Responsibilities view.
In the Responsibilities list, click the Clear Cache button.
About Configuring Visibility of Pop-Up and Pick Applets
Configuring the visibility of pop-up and pick applets is one method of applying access control to data. Pop-up visibility determines what data is shown when a pop-up pick applet is displayed, for example, when a user associates a contact with an account, or adds a sales representative to the sales team.
Pop-up visibility is usually set using the Popup Visibility Type property of the business component object in Siebel Tools. When pop-up visibility is set in this way, any pop-up based on that business component will show the same data for all users.
There are often circumstances where you need greater flexibility when determining what data is shown in pop-up pick applets. For example:
Most employees of your company only need to see positions for your organizations when they are assigning a sales representative to the sales team.
Partner Managers need to see positions for your organization, as well as the partner organizations that they manage.
There are also many scenarios where it is appropriate that your partners have more restrictive visibility than your employees. In order to meet these business requirements, Siebel Business Applications have three capabilities that allow the developer to override the visibility set in the Business Component Popup Visibility Type property at the business component level in favor of another setting. The developer can:
Set visibility of the Pick List object definition
Use the visibility Auto All property
Use the Special Frame Class and User Properties
About Setting Visibility of the Pick List Object Definition
Developers can override the visibility set at the business component level by setting a different visibility type on the Pick List object definition, in the Visibility Type property. When you do this, you override the visibility set at the business component level in a specific instance of that business component for all users of that instance.
For example, you might want partners to be able to add new fund requests and associate those fund requests with campaigns in which they participate. However, you want partners to see only campaigns to which they have access. You can configure a special picklist for this use, and set the visibility on that picklist to Sales Rep, so that partners can only select from accessible campaigns when associating to a fund request.
About Using the Visibility Auto All Property
For both Pick List Visibility Type and Business Component Pop-up Visibility Type, you can use the Visibility Auto All property to override the visibility type property. This property checks the current user's responsibility to see if it includes the All Across Organizations view based on the same business component. If the view is found, then this visibility type is overridden and the user will get All visibility on the object in question. Otherwise, the visibility type will not be overridden.
For example, if the pop-up visibility on the Opportunities business component is set to Organization with Auto All set to true, most users will see all opportunities for their own organization in an Opportunity pick applet. Users who also have access to the All Opportunities Across Organizations view will see all available Opportunities regardless of organization.
The Visibility Auto All property makes visibility consistent across views and pop-up pick applets. It can override any other visibility type, including Sales Rep, Manager, Organization, and so on. In addition to the Business Component and Pick List properties, the Visibility Auto All property can be set on the Link object as well. The Visibility Auto All property is often used for executives or administrative users, who would usually have access to all of the data in your Siebel application.
About Using the Special Frame Class and User Properties
The developer can use a special frame class and user properties to set visibility for a pick applet on the applet object depending on which application is being used. For example, if users are running Siebel Sales, then the Pick Positions applet for the sales team shows positions only for the user’s organization. If users are running Siebel Partner Manager, then the applet shows the positions for the user’s own organization and for the suborganizations (or child organizations) of that organization. This allows users to select positions for the partners they manage.
In order to override the pop-up visibility set at the business component level, the developer must make the following changes:
If the applet whose visibility is to be overridden is an association applet, then change the frame class of the applet to CSSSWEFrameListVisibilityAssoc.
If the applet whose visibility is to be overridden is a pick applet, then change the frame class of the applet to CSSSWEFrameListVisibilityPick.
If the applet whose visibility is to be overridden is an MVG applet, then change the frame class of the applet to CSSSWEFrameListVisibilityMvg.
Add an applet user property called Override Visibility, with the following values:
Name: Override Visibility: [Application Name]
Value: [Visibility Type] where the developer can choose from the standard visibility types
Set the business component user property Popup Visibility Auto All to FALSE.
The developer can also set visibility on an applet based on whether the user has access to a view or not. The developer must change the frame class of the applet to CSSSWEFrameListVisibilityPick and add the following user property to the applet:
Name: Override Visibility View: [View Name]
Value: [Visibility Type] where the developer can choose from the standard visibility types
For example, to override Campaign Pick Applet popup visibility to All if the user has access to the Campaign Administration List view, add the user property with the following values:
Name: Override Visibility View: Campaign Administration List
Value: All
About Configuring Drilldown Visibility
You can control access to data by configuring the visibility to drilldown views. Drilldown visibility can occur within the same business object or between different business objects. The following sections provide more details on each scenario.
Drilldown Visibility Within the Same Business Object
If the original view and drilldown view are both based on the same business object, and visibility is unspecified in the drilldown view, then whatever visibility is in effect in the original view is continued in the drilldown view.
If the drilldown view of a drilldown object has a different Visibility Applet Type setting from the original view, then drilling down on a record takes the user to the first visible record of the destination view. It does not to the drilldown record.
Drilldown Visibility Between Different Business Objects
If the original view and drilldown view are based on different business objects, then moving from the original view to the drilldown view might require that you configure visibility in the drilldown view to something other than its standard setting.
If you have to configure visibility in the drilldown view, then note that two types of drilldown object exist:
ID-based drilldown object
Bookmark-based drilldown object
The drilldown object is ID-based when it has values specified for the Business Component and Source Field properties. Otherwise, it is a bookmark-based drilldown object.
The visibility rules in the drilldown view are the same for the two types of drilldown object, with the following exception; for an ID-based drilldown, setting the Visibility Type property of an applet’s drilldown object overrides the Visibility Applet Type setting of the drilldown view. For example, assume you configure a drilldown object with a visibility type of All. It overrides other visibility types (for example, Sales Rep visibility) on the drilldown view when the user drills down.
The Visibility Type property in a drilldown object only overrides the drilldown view Visibility Applet Type property once, that is, when you drill down. If you navigate to another view in the screen and then return to the drilldown view, then the original visibility of the drilldown view is applied. The visibility is refreshed every time you navigate to a different view in the same screen after drilling down.
For example, assume that you navigate to a view with personal access control in the same screen after drilling down; the drilldown record is no longer visible. If you then navigate back to your original drilldown view (with Sales Rep visibility), then the drilldown record remains invisible. If you navigate to a third view with All visibility, then you can see your drilldown record again.
Visibility Rules for the Drilldown Object Type
If the drilldown view is a detail view that does not have visibility specified and the drilldown object does not have visibility specified, then visibility on the drilldown view’s screen applies in the following order:
All
Organization
Manager
Sales Rep
This scenario assumes that the business component is configured for visibility.
Visibility Rules for the Link Object Type
After you drill down to another screen, the thread bar is updated. The current view displays its records using a master-detail relationship, based on the value of the link property Visibility Rule Applied in the original view (before the drilldown).
If Visibility Rule Applied is set to Never, then no additional visibility rules apply. The thread context’s master-detail relationship determines the records visible in the view, regardless of the visibility setting for the current view. If you change the view using the link bar, then the thread context is retained. Records might be displayed that normally (without the thread context) are not visible in this new view.
If Visibility Rule Applied is set to Always, then additional visibility rules apply. The Siebel application might display an error message when a user performs a drilldown to notify the user that he or she does have the appropriate privileges to see the detail records. For more information about the Link object type, see Siebel Object Types Reference.
Example of Visibility in a Drilldown Between Different Business Objects
The following example illustrates how the visibility rules, previously described, apply when a user drills down from the Opportunity business object to the Quote business object. In the Opportunity Quote View, a user drills down on the Name field of an entry in the Opportunity Quote List Applet to the Quote Detail View. In the screen (Quotes Screen) of Quote Detail View, the visibility type of all views accessible by the user are checked. Visibility is applied in the following order:
If an accessible view has visibility equal to All, then this visibility applies after the user drills down to Quote Detail View.
If an accessible view has visibility equal to Organization, then this visibility applies after the user drills down to Quote Detail View.
If the user’s position equals Manager and an accessible view has visibility equal to Manager, then Manager visibility applies after the user drills down to Quote Detail View.
If an accessible view has visibility equal to Sales Rep or Personal, then this visibility applies after the user drills down to Quote Detail View.
An error message appears if the user does not have the appropriate visibility to view the record in the Quote Detail view.
Party Data Model
The S_PARTY table is the base table for all of the parties listed in Access Control for Parties: Person (Contact), User, Employee, Partner User, Position, Account, Division, Organization, Partner Organization, Household, User List, and Access Group.
For each party record stored in the S_PARTY table, the value of the PARTY_TYPE_CD column denotes the party type. Along with the party type, extension tables provide the primary differentiation between the different parties.
For information about how joins are used to draw data from multiple tables into a single business component, such as is done for Employee, Account, and other business components for party-type data, see Configuring Siebel Business Applications.
In the following figure, the base table and extension tables that make up the party data model are shown within the Party boundary box (all of the shaded area). The three tables shown outside of the Party boundary are used to define relationships among parties. Sections that follow illustrate how the party data model applies to various particular parties.
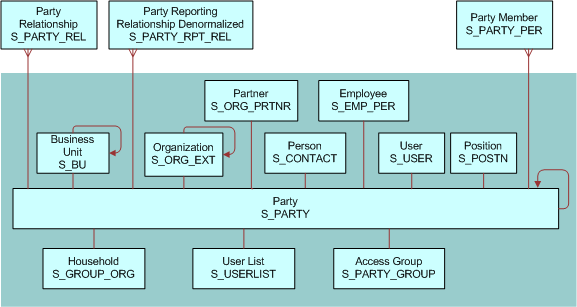
How Parties Relate to Each Other
Parties have some required relationships as follows:
Divisions, organizations, and accounts are instances of the Organization party type.
A division, internal or partner, is also an organization if its internal organization flag is TRUE (INT_ORG_FLG = "Y") and it has an associated S_BU record.
Every division is associated with one organization: either itself or the closest ancestor division that is also an organization.
Every position is associated with a division. The position is then also automatically associated with one organization: the organization with which the division is associated.
Persons (contacts), users, employees, partner users are instances of the Person party type.
Typically, you associate each employee and partner user with one or more positions. The employee or partner user has only one active position at one time. The employee or partner user is automatically associated with one division and one organization at a time; the division and organization associated with the active position.
For purposes of granting visibility to data, associations of parties of type Person with other types of parties are stored using the S_PARTY_PER table. For example, accounts are associated with contacts, users are associated with positions, and so on. A user associated with a position can see data for accounts or opportunities assigned to the position (when this is the active position). Relationships stored in S_PARTY_REL also affect data routing for mobile users.
Nonstructured and informational relationships between parties are stored in the table S_PARTY_REL. For example, a company and its accounting firm might both be stored as accounts. The relationship between these two accounts can be stored in the S_PARTY_REL table, assuming that your application has been configured to define these relationships.
Person (Contact) Data Model
In the following figure, the base table and extension table (S_CONTACT) that define a Person, or Contact, are highlighted. A Person is the simplest representation of an individual in the database.
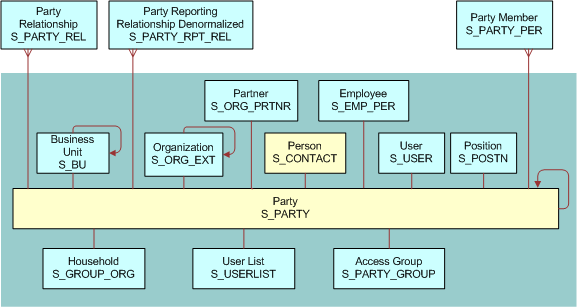
User Data Model
In the following figure, the base table and extension tables (S_CONTACT and S_USER) that define a User are highlighted. A User is a Person with the following added qualities:
The S_USER table contains a login for this user.
The S_PER_RESP intersection table (not shown) specifies a responsibility for this user.
It is possible to promote a contact to a user. For example, adding a User ID value for a person in the All Persons view in the Administration - User screen causes the person to appear as a user in the Users view.
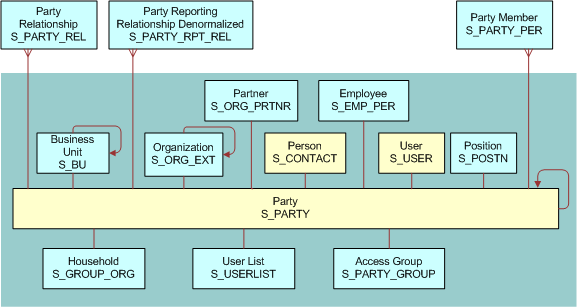
Employee Data Model
In the following figure, the base table and extension tables (S_CONTACT, S_USER, and S_EMP_PER) that define an Employee are highlighted. Internal Employees and Partner Users are each represented as Employee records.
An Employee is a User with the following added qualities:
S_EMP_PER provides employee data for this user.
A position defined using the S_POSTN table is typically (but not necessarily) associated with an employee.
If the organization to which the position belongs is not a partner organization, then the employee is an internal employee.
If the organization is a partner organization, then the employee is a partner user.
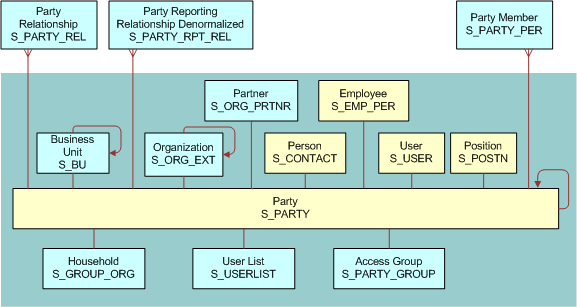
Position Data Model
In the following figure, the base table and extension table (S_POSTN) that define a Position are highlighted.
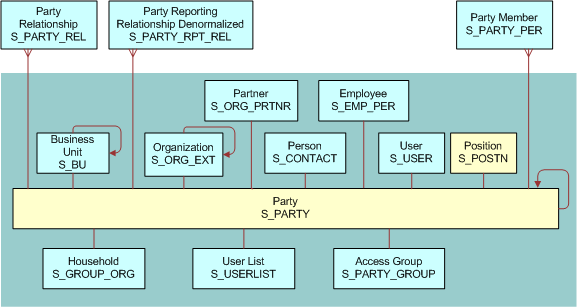
Account Data Model
In the following figure, the base table and extension table (S_ORG_EXT) that define an Account are highlighted.
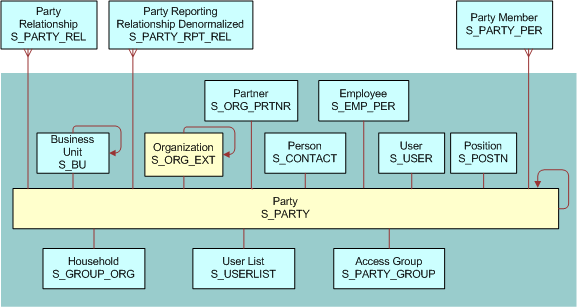
Division Data Model
In the following figure, the base table and extension table (S_ORG_EXT) that define a Division are highlighted. In S_ORG_EXT, the flag INT_ORG_FLG = Y specifies that a division is an internal organization. (For an account, this flag is set to N.)
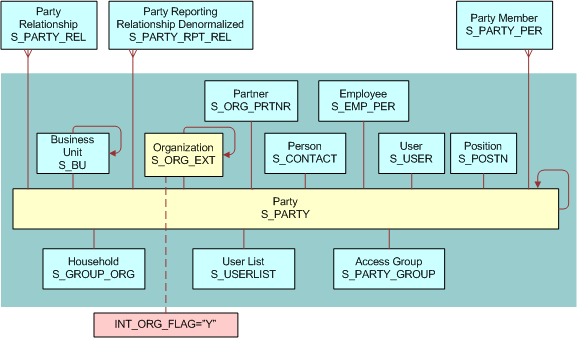
Organization Data Model
In the following figure, the base table and extension tables (S_ORG_EXT and S_BU) that define an Organization are highlighted. An Organization, sometimes known as a business unit, is also a Division, but has a record in the S_BU table.
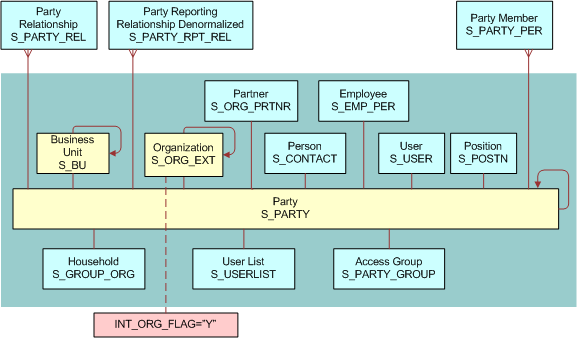
Partner Organization Data Model
In the following figure, the base table and extension tables (S_ORG_EXT, S_BU, and S_ORG_PRTNR) that define a Partner Organization are highlighted. A Partner Organization is the same as an Organization but the flag PRTNR_FLG in S_ORG_EXT qualifies it as a Partner Organization.
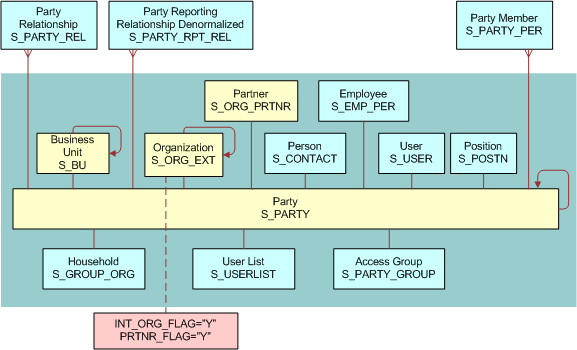
Household Data Model
In the following figure, the base table and extension table (S_ORG_GROUP) that define a Household are highlighted.
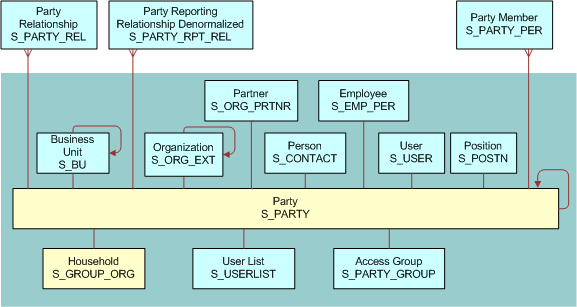
User List Data Model
In the following figure, the base table and extension table (S_USERLIST) that define a User List are highlighted.

Access Group Data Model
In the following figure, the base table and extension table (S_PARTY_GROUP) that define an Access Group are highlighted.