4Using Workspaces in Siebel Tools
Using Workspaces in Siebel Tools
This chapter describes the Workspaces feature and how to use workspaces in Oracle’s Siebel Tools. It includes the following topics:
Overview of the Workspaces Mode for Siebel Tools
This section describes the Workspaces feature and the Workspaces dashboard. It includes the following topics:
Workspaces Overview
The Workspace feature provides users a new way to manage configurations of repository artifacts in Siebel Tools. This feature allows multiple developers to work on the same repository objects in the Siebel database.
A workspace provides a user with a sandbox for editing and publishing (delivering) configuration changes until these changes are ready to be delivered into the main workspace (parent, root, or master workspace). This feature ensures isolation from other users making changes to either the same objects or other objects in the application. It is also an alternative to using local databases to make changes to the repository data.
Users can preview and test repository updates made in a developer’s environment (workspace) in Web Tools without affecting other developers. They can do this when they are added to the database and also have the Composer Administrator responsibility to access the Workspace Dashboard to perform developer or configuration operations. Until all updates are delivered, these updates will not impact other developers. Once the changes in developer workspace are delivered then Siebel runtime repository tables will be updated with the new values. To learn more about Web Tools and workspaces in Web Tools, see Using Web Tools and Setting up Web Tools.
In other words, the Workspace feature in Siebel Tools provides the following capabilities:
A user can make configuration changes to the repository application without any impact on other users.
Configuration changes are persistent but in isolation from the metadata of the deployed application.
Only modifications to the configuration (delta) are tracked and stored, while other configurations are referenced from the base repository in order to render a consistent view of the modified application.
Persistence of configuration changes enables configuration to be a long-running operation or transaction.
Concurrency is achieved so that multiple users can each modify the same application in isolation from one another.
Workspace is also a feature of Web Tools, which is an alternative to the traditional Siebel Tools client. Starting with Siebel Innovation Pack 2017, the Workspace feature is available as a part of product upgrade in both Siebel Tools and Web Tools. After the Workspaces mode is enabled for Siebel Tools, it cannot be reverted back to the non-workspace mode.
For more information about how to use workspaces for Web Tools, see Setting up Web Tools, and Navigating to the Workspace Dashboard in the Web Tools Mode Application.
Workspace Users
Workspace users are categorized into these two groups:
Workspace Owner is the owner of a workspace and also the creator of that workspace.
Workspace Administrator is the owner of the MAIN workspace who has the privileges to deliver workspaces to MAIN, undo submit for delivery, flatten, etc. The owner of the MAIN workspace is set at the time of enabling Siebel Workspace on the database using the EnableWorkspace utility.
Note: Only the Siebel (system) Administrator can create and manage the responsibility called Workspace Administrator.
To create the responsibility Workspace Administrator in Siebel application
Ensure that Workspaces and Parallel Development Using Workspaces features are enabled in the system.
Navigate to Administration - Application, Responsibilities.
Click the New Record button in the Responsibilities applet.
Add a new responsibility called Workspace Administrator.
In the Users applet, click the New Record button to add the user IDs that will have the authority to perform the administrative tasks.
Save the record.
Workspace Dashboard in Siebel Tools
The Workspace dashboard enables users to view the list of all workspaces that were created and currently presented in the database. From the workspace dashboard, you can perform various operations on workspaces.
The following image illustrates the workspace dashboard in Siebel Tools.
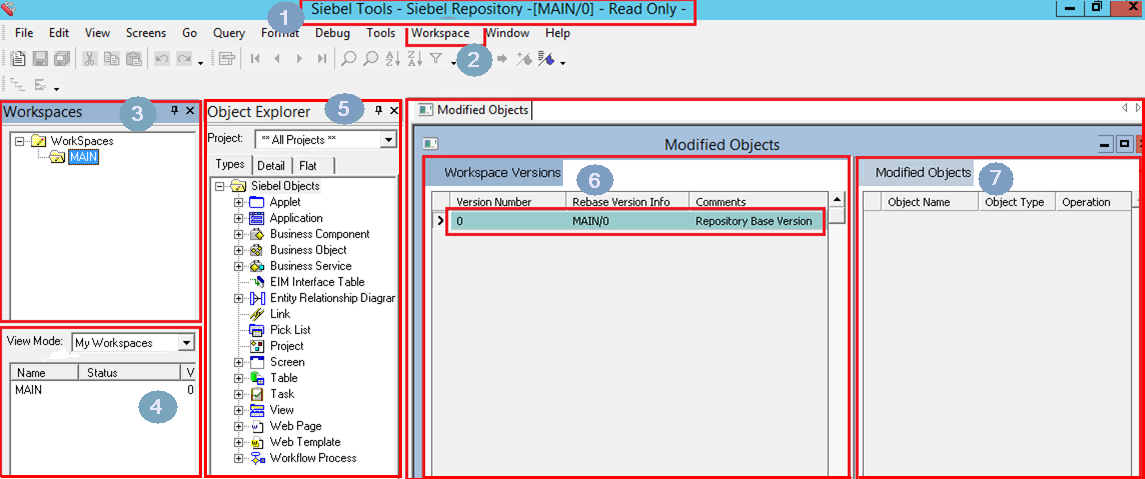
Explanation of Callouts
The workspace dashboard in Siebel Tools includes the following information:
The Siebel Tools title bar displays the title that includes the name, the latest version, and the status of the opened workspace. For example:
Siebel Tools -Siebel Repository -[MAIN/0] - Read Only-
Note: You have the Editable access on your workspace after you create it, but you have Read only access after you change its status to Submit for Delivery.On the menu bar, the Workspace menu is between the Tools and the Window menus.
When you select the Workspace menu, a list of different options that are used to configure and manage workspaces appears. The following table lists and describes the options under the Workspace menu:
Option Description Create
Select this option to create a new workspace.
For more information, see Creating New Workspaces.
Checkpoint
Select this option to check in the changes that you made to the current version of the workspace.
For more information, see Performing the Checkpoint Version Process.
Revert
Select this option to revert the changes that you made to the current version of that workspace.
For more information, see Reverting to Previous Workspace Versions.
Rebase
Select this option to apply the changes that were made in the parent workspace into the current workspace.
For more information, see Rebasing Workspaces.
Merge Reports
Select this option to view and resolve the conflicts that occurred during the rebase process.
For more information, see Rebasing Workspaces and Detecting Conflicts in Workspaces and Applying Resolutions.
Submit for Delivery
Select this option to change the status of the workspace and make it ready for delivering the changes to the MAIN workspace.
For more information, see Submitting Workspaces for Delivery.
Deliver
Select this option to deliver the changes in the workspace to the MAIN workspace.
Note: This option is available only to the user who is also the owner of the MAIN workspace.For more information, see Delivering Workspaces.
Compare
Select this option to view the differences that are made to the objects in two selected workspace versions.
For more information, see Comparing Workspace Versions.
Undo Submit for Delivery
Select this option to cancel the workspace delivery process.
For more information, see Canceling the Workspace Delivery Process.
Workspace Explorer
Select this option to display the Workspace explorer pane.
The Workspace explorer pane is displayed next to the window.
After you select the Workspace Explorer option under the Workspace menu, this pane appears listing all available workspaces in the database. This section is expandable and collapsible. You can select a workspace and then view the versions of the selected workspace and the list of modified objects for the selected version.
By default, Siebel Tools opens the latest version of the root workspace and this workspace is set at the session. Also, the root workspace is the only workspace in the Workspace explorer pane and it is always a read-only workspace.
Depending on the workspace that you select, different context menu options are available in the Workspace dashboard.
The View Mode pane is also displayed next to the window following the Workspace explorer pane. This pane lists the workspace information (including the names, current statuses, and versions) based on the selected filter option in the View Mode drop-down list.
The following table describes the filter options under the View Mode drop-down list:
Option Description My Workspaces
Select this option to view all workspaces that you own regardless of their status.
My In-progress Workspaces
Select this option to view the workspaces that you own and that have the status of Edit In Progress.
All Workspaces
Select this option to view all workspaces that were created by all users of the current development environment.
In the Object Explorer pane, most of the object types are workspace-enabled, except the following ones: Table, Dock Object, EIM Interface Table, Repository, Workflow Policy Column, Workflow Policy Object, Workflow Policy Program, Task, Task Group, and Project.
The Workspace Version pane lists the versions of the selected workspace and the rebase version information. For more information, see Rebasing Workspaces.
The Modified Objects pane lists the objects that were modified in the current version of the workspace. This pane displays the object name, object type, and operation type performed on the modified objects. For more information, see Tracking Repository Object Changes in Workspaces.
Using Workspaces in Siebel Tools
This topic describes how to use the Workspaces feature in Siebel Tools. These tasks are performed by all users who have the permissions to use the Workspace feature. This topic includes the following information:
Creating New Workspaces
This topic describes how to create new workspaces.
To create a new workspace
In Siebel Tools, select the Workspace menu and then select the Create option.
The Create Workspace dialog box appears.
Enter the workspace name in the Enter Workspace Name field.
Workspace names can only contain lower case alphabetic, numeric, hyphen, and underscore characters. Also, workspace names must start with the value that is set for Workspace Prefix in the System Preferences, appended by _<login userid>_.
For example, if you log into Siebel Tools using user name sadmin, the workspace name must be dev_sadmin where dev is the value set for the Workspace Prefix system preference. For more information on how to add Workspace Prefix in system preferences, see Adding the Workspace Prefix in System Preferences.
Note the values in the Parent Workspace and Parent Workspace Version fields.
By default, the newly recreated workspace is always branched out from the latest version of the MAIN workspace; therefore, the Parent Workspace field is populated with the value MAIN and the Parent Workspace Version field is populated with the latest check-pointed version of the MAIN workspace.
(Optional) Use the Parent Workspace Version drop-down list to select a previous version to branch out from the previous versions of the MAIN workspace.
Enter the description for the workspace in the Add Description field.
Click the OK button and note that:
In the Workspaces pane, the newly created workspace is listed under the MAIN workspace.
In the View Mode list, the status of the workspace is updated to Created.
The title bar text in Siebel Tools is updated using this format:
Siebel Tools - Siebel Repository -[<workspace name>/0] - Editable -
For example:
Siebel Tools - Siebel Repository -[dev_sadmin_test/0] - Editable -
Opening Existing Workspaces
You must open a workspace before you can make any configuration changes. Remember that you can open only one workspace at any given time within your current session.
If you are the owner of the opened workspace, then you can edit (read and write) that workspace.
If you are not the owner of the opened workspace, then you can only read (without editing) that workspace.
Opening a workspace sets a session-level workspace context; therefore, while the workspace is opened, all configuration changes that you made are saved as parts of the opened workspace.
To open an existing workspace
In the workspace dashboard, navigate to the Workspace explorer pane.
Select the workspace that you want to open and then right-click.
A list of available options appears. These options are Open, Delete, Refresh, Docked, and Hide.
Tip: Select the Hide option to hide the Workspace explorer pane or select the Close (X) icon to close this pane.Select the Open option.
The workspace dashboard opens the selected workspace and displays its information.
Editing Workspace-Enabled Repository Objects
You can edit workspace-enabled repository objects directly without locking any project. Note that only workspace-enabled repository objects can be edited inside workspaces. By default, all workspace-enabled objects are locked at the database level, so you are not required to lock projects when you edit the objects or perform any type of CRUD (create, read, update, delete) operations.
However, locking a project is still required before you edit the non-workspace objects. The non-workspace objects are Table, Task, Workflows, Repository, Type, EIM Table, Projects, Dock objects, Schema Maintenance, and Server Components.
As in the previous releases of Siebel Tools:
You can update existing records by selecting the attribute and child record.
You can create new child records of the parent objects by drilling down on the child objects using the tree hierarchy in the Object Explorer pane.
All context menu options that are applicable in the previous releases of Siebel Tools for the child level objects are still applicable when the Workspace mode is enabled.
You cannot delete any parent objects or child-level objects if any of them are workspace-enabled objects.
Only the new parent objects that were created in one workspace version can be deleted in that version.
To edit a workspace-enabled repository object
In the workspace dashboard, navigate to the Workspace explorer pane.
Right-click on the workspace that you want to edit and then select the Open option.
Note that:
In the Siebel Tools title bar text, the status Editable is added at the end of the title.
In the View Mode pane, the status of the workspace is shown as Edit-In-Progress.
Edit the repository object as needed.
Note: In workspace mode, the concept of checking out objects does not apply to workspace-enabled repository objects, explicitly. As in the previous releases of Siebel Tools, you can perform all context menu options such as inserting new records, copying records, and other default options that are specific to the selected objects.(Optional) Create new object records using the following steps:
In the workspace dashboard, select the File menu and then select the New Object option.
Alternatively, click the New icon in the tool bar.
In the New Object Wizards dialog box, select an object template.
Tip: When Workspace mode is enabled, project or object locking is not mandatory. You can select an appropriate object by selecting one option in the New Object Wizards dialog box.
Save the changes.
If the workspace is in Edit-In-Progress state, then the changes are tracked under the latest checked-out version. Otherwise, a new version is created and changes are tracked under that new version until that version is checkpointed.
If you edit the repository object again after it is checkpointed, the current version is incremented by 1 and all new changes are tracked under the current version until the new version is checkpointed.
For more information on how to enable workspaces in Siebel Tools and then edit the repository objects, see Editing the Repository Objects.
For more information on how to configure non-workspace objects, see Configuring Non-Workspace Objects.
Deleting Development Workspaces
You can delete the development workspaces that you own, but you cannot delete workspaces or parent workspaces that are owned by other users. In addition, development workspaces that are in the status of Submitted for Delivery or Delivered cannot be deleted from the repository.
To delete a workspace
In the workspace dashboard, navigate to the Workspace explorer pane.
Select the workspace that you want to delete and then right-click.
A list of available actions appears. These options are Open, Delete, Refresh, Docked, and Hide.
Select the Delete option.
The selected workspace is removed from the Workspace explorer pane.
Refreshing the Workspace Explorer Pane
At the time you open the Workspace explorer pane, this pane lists all available workspaces that are in the database. After that, if other users use other workspace sessions to modify their workspaces in the same database, such as adding new workspaces or deleting the current ones, you need to refresh the Workspace explorer pane to display these changes.
To refresh the Workspace explorer pane
In the workspace dashboard, navigate to the Workspace explorer pane.
Select the root (MAIN) workspace and then right-click.
A list of available options appears. These options are Open, Delete, Refresh, Docked, and Hide.
Select the Refresh option.
The Workspace explorer pane is refreshed displaying the latest changes for all workspaces in the database.
Tracking Repository Object Changes in Workspaces
You can use the Modified Objects option under the Workspace menu to view the changes that you have made to objects in the current workspace.
To track repository object changes in a workspace
In Siebel Tools, navigate to the Workspace explorer pane.
To see the list of modified objects in a workspace without opening a workspace, select that workspace and then select a version from the Workspace Version pane.
To see only the changes in the repository, open a version of the workspace.
When you open a particular version, all versions succeeding the selected version are also opened. For example, if the workspace dev_sadmin_demo has 10 versions and you open the fifth version, then you can view the repository changes of version one through version five.
View the detailed changes in the Modified Objects pane.
The Modified Objects pane lists the object names, object types, and operations that were performed for each modified object.
The following table describes the values listed in the Operation column on the Modified Objects pane.
Option Description Update
Indicates an operation of updating a parent object record.
Also indicates an operation of inserting, updating, or enabling the Inactive option for a child record.
Insert
Indicates an operation of inserting a new parent object record.
Delete
Indicates an operation of enabling the Inactive option for a parent object record.
Performing the Checkpoint Version Process
The checkpoint operation commits the changes that you made to the current workspace version of the selected workspace and sets that version to be non-editable. After checkpointing the workspace, you are no longer able to make object changes to the current version of the workspace. All subsequent object changes will be tracked under the next version of the workspace.
To perform a checkpoint workspace version process
In Siebel Tools, select the Workspaces menu and then select the Checkpoint option.
The Enter Comment dialog box appears.
Enter the comments, which will be displayed in the Comment column on the Workspace Versions pane.
Click the OK button.
A message appears saying the checkpoint process is completed successfully.
Click the OK button.
After a workspace version is check pointed, its status changes to Checkpointed in the My Workspaces pane and the Submit for Delivery option for that workspace is enabled under the Workspaces menu.
Reverting to Previous Workspace Versions
When the changes that were made since the last checkpointed version of the workspace cause issues, you can revert or roll back to the most recent checkpointed version. You can also revert or roll back a checkpointed version to the previous checkpointed version.
If you perform the revert process on a workspace with the status set to Edit-In-Progress or Checkpointed, then all changes that you made in the latest version are lost and the workspace reverts back to the last checkpointed version.
If you perform the revert process on the first version of the workspace, then all changes that you made in the first version are lost and the status of the workspace reverts back to Created.
To revert to a previous version of a workspace
In Siebel Tools, select the Workspace menu and then select the Revert option.
A revert confirmation appears.
Click the Yes button to revert all changes back to the last checkpointed version.
Note: All changes that were made in the latest version will be lost.Alternatively, click the No button to cancel the revert operation.
Rebasing Workspaces
Rebasing (merging) a workspace is applying the changes that were made in the parent workspace (as a result of deliveries by other workspaces that have branched off the same parent) into the current workspace.
Only the owner of the workspace can perform the rebase process for that workspace.
You can perform the rebase process only after you perform the checkpoint operation at least on the first version of the workspace. If you perform the rebase process for the workspace that has no changes in the root (MAIN) workspace since it was created, then the rebase process fails and this error message appears: The rebase failed with error: No changes found to rebase/deliver/checkpoint.
To rebase a workspace
In the workspace dashboard, select the Workspace menu and then select the Rebase option.
The Rebase Workspace dialog box appears displaying the From Workspace, To Workspace, and Merge Status fields and the Start Rebase button.
Click the Start Rebase button to start the rebase process.
The Rebase Workspace dialog box displays the merge details and the rebase process bar in the Merge Status section.
Confirm that the rebase process bar shows the process is completed.
The Rebase Workspace dialog box updates the message in the Merge Status section to Rebase Completed. The status of the workspace in the View Mode pane is updated to Rebase-in-Progress and the version of the workspace is incremented by 1.
If there is any conflict, the Rebase Workspace dialog box displays the Resolve Conflicts button and you must click this button to resolve the conflicts.
Note: If you close the Rebase Workspace dialog box without clicking the Resolve Conflicts button, then all workspace-enabled objects will be read-only even though the workspace title indicates that the workspace is editable. In this case, you can change its status to Editable by running the Merge Report process using the Merge Reports option under the Workspace menu. For more information on how to detect conflicts in workspaces and how to apply the resolutions, see Detecting Conflicts in Workspaces and Applying Resolutions.In the workspace dashboard, click the Finish button on the Merged Workspaces pane to complete the merge process.
Alternatively, click the Cancel button on the Merged Workspaces pane to cancel the merge process. The workspace will be reverted to the last checkpointed version and its status is set to Checkpointed in the View Mode pane.
Note: If you are the owner of the workspace, you can set the Override option and use the Finish or Cancel buttons in the Merged Workspaces pane for that workspace.After you click the Finish button, enter comments using the Enter Comment dialog box and click the OK button.
A message appears confirming the completion of the merge process.
Note: If you close the Merged Workspaces pane without clicking the Finish button while the workspace status is Rebase-In-Progress, then you cannot do any object changes (even though the title of the workspace includes Editable) until you resolve the conflicts by clicking the Finish button or clicking the Cancel button to cancel the merge process. You can reopen the Merged Workspaces pane by selecting the Merge Reports option under the Workspace menu.Click the OK button on the confirmation message.
After the Rebase process in completed successfully:
The status of the workspace in the View Mode pane is updated to Checkpointed. In the My Workspaces pane, the version of the workspace is incremented by 1 and the comments that you previously entered are also displayed.
Workspace resolution is set to the From Version value by default. When you click the Finish button, the value of From Version is saved in your workspace. If you select the Override option, then the workspace resolution changes to To Version and the value of To Version is saved in your workspace when you finish the rebase process.
Note: While checking the Override flag, keep in mind that you are overwriting other users' changes that are already checked into the MAIN workspace. Therefore, you must use this option carefully. For details on various errors and conflict scenarios during the deliver and rebase processes, see Detecting Conflicts in Workspaces and Applying Resolutions.
Detecting Conflicts in Workspaces and Applying Resolutions
In a development environment where multiple users work in parallel making configuration changes concurrently in their own private workspaces, conflicts might arise when the same objects and attributes are modified by different users in their own private workspaces, and then the changes from these users are delivered to the main branch. These situations often lead to non-trivial merges because of the conflicting changes between different users.
For workspaces, the system detects the possibility of conflicts prior to workspace delivery. If conflicts or errors are found, the system displays the issues along with the default resolutions. You must review the conflicts and apply the resolutions to resolve the issues.
In other words, during the rebase workspace process, the system enables you to:
Identify the conflicts by viewing the conflict flags on the attributes. Notice that some conflicts must be explicitly resolved before you can submit the workspace for delivery again.
Identify the errors by viewing the status message of the objects or attributes.
View the status message that describes the error or conflict in details for each object or attribute.
If the system cannot resolve the conflict or the delivery process encounters an error while merging the changes, an error message appears. Although an attempt is made on all objects, the overall delivery process fails even if a single error is encountered.
Conflicts and errors can be broadly categorized as:
Attribute-level conflicts and errors.
The default resolutions for the attribute conflicts can be overridden by selecting the Override option. You must select the Override option with caution because you might overwrite other users’ changes that were already checked into the MAIN workspace. If you select the Override option by mistake, then you can clear it to resolve the issue.
Errors can happen on attributes when the merge process is unable to set the correct value. Common errors are when there are inconsistencies in the repository and a foreign key is missing.
You can analyze the error further by viewing the appropriate log files.
Object-level conflicts and errors, which are name conflicts, object inactive conflicts, and index violation errors.
Name Conflicts
A name conflict occurs when there are two different objects of the same type that have the same combination of name and parent ID. A potential violation of user key is detected as a result of the rebase operation, and the merge process selects a default resolution of renaming the object that belongs to the child workspace by appending the string -[Rebase]. Both object and name attribute are marked with a conflict flag in the Merge Conflicts dialog box.
If a name conflict is not resolved, then subsequent delivery fails by identifying the system-generated name. This conflict cannot be resolved by selecting the Override option, but you must finish the rebase process and resolve it in either one of the two methods described in this example:
Suppose that both User1 and User2 branch from MAIN/5 and create their workspaces WorkSpace_U1 and WorkSpace_U2, respectively.
User1 renames and creates a new business component with the name NewBC123. This user then delivers changes to the MAIN workspace by creating a new version MAIN/6.
User2 is unaware of User1’s changes, so he renames and creates a new business component with the same name, NewBC123, in WorkSpace_U2/1.
User2 cannot deliver his branch before starting a rebase process because this is a non-trivial merge.
Upon doing a rebase, the merge process detects that there is a name conflict, so it renames the object in WorkSpace_U2 to NewBC123-[Rebase] and issues a conflict flag for this object in the Merge Conflicts dialog box.
To resolve this conflict, both users can intend to either create two different objects or create the same object being duplicated, as in these cases:
Case-1: Two logically different objects. In this case, both users can click the Finish button to finish the rebase process, navigate to the corresponding object in the Object Explorer pane, and then re-name the object to a valid name; for example, NewBC123_ProjA.
Case-2: The same object being duplicated. In this case, both users have duplicated the same record because they were not aware of the changes made by the other. Neither user should perform the RevertObject operation from the WorkSpace_U2 branch at this point. Instead, to enable the objects to merge appropriately, User2 should finish the rebase process, open WorkSpace_U2/1 version explicitly, navigate to the NewBC123 workspace and perform a Siebel Archive File (SIF) export, and open the WorkSpace_U2 branch and import the SIF file back into the repository. Subsequently, both users must perform the RevertObject operation or inactivate the NewBC123-[Rebase] business component.
Object Inactive Conflicts
An object inactive conflict occurs when the target workspace being rebased has a change to an object that is inactivated in the source workspace. Even if the source workspace has an inactive parent object, this conflict is still alerted to let users know that the change that is made in the workspace will not be applied at runtime because either this object or its parent is inactivated.
Users can either ignore this conflict or resolve this conflict by checking the Override option for the Inactive attribute.
For example:
Both User1 and User2 have branched from MAIN/5 and created their workspaces WorkSpace_U1 and WorkSpace_U2, respectively.
User1 inactivates the contact business component and delivers this change to the MAIN workspace by creating a new version MAIN/6.
User2 modifies the account status Field by making it force active. He then tries to deliver this change to the MAIN workspace, but the system enforces a rebase.
On rebase, the merge process detects that the changes on the account status Field are no longer applied as the parent contact Business Component is inactivated. Hence a conflict is logged against the contact Business Component and the corresponding inactive attribute.
To resolve the conflict, users can select the Override option for the inactive attribute on the contact Business Component.
Index violation errors
An index violation error conflict occurs when there are two different objects of the same type having the same combination of contents. A potential violation of the index is detected as a result of the rebase and the merge process cannot select any resolution. Hence the system displays an error on the object and fails the rebase process.
Users must fix this error either by manually modifying the fields involved in the index or by performing the RevertObject operation on the object (on a single version or the entire workspace). This fix ensures that there is no longer a violation and then users can run the rebase process again.
For example:
Both User1 and User2 have branched from MAIN/5 and created their workspaces WorkSpace_U1 and WorkSpace_U2, respectively.
User1 modifies and creates a Workflow Policy Component Column with these attributes: Name - 'NewCompCol', Workflow Column Name - 'COL1', Workflow Object Name. This user then delivers this change to the MAIN workspace by creating a new version MAIN/6.
User2 modifies and creates a Workflow Policy Component Column under the same Workflow Policy Component with these attributes: Name - 'AnotherCompCol', Workflow Column Name - 'COL1'.
During the rebase process, the merge process detects the possibility of a unique key violation on the index involving the field Workflow Column Name (Workflow Column Name, Workflow Object Name). The object is marked with the key violation error in the Merge Conflicts dialog box.
To resolve this conflict, User2 must perform either of the following resolutions to resolve the error and ensure that there is no longer an index violation, and then perform the rebase process again.
Case-1: Modify the index-based fields. User2 modifies the Workflow Policy Component Column name from COL1 to COL2 on the AnotherCompCol object.
Case-2: Run the RevertObject process. User2 runs the RevertObject process on the AnotherCompCol object either for a single version or for all versions in the workspace.
To view the merge conflicts and resolutions
In the workspace dashboard, select the Workspace menu and then select the Merge Reports option.
The Merged Workspaces pane appears with the following sections:
The Merged Workspaces section displays the status of merge, resultant version, base version, From version, and To version of the merge process.
The Object Differences section displays the object name, object type, top-level parent name and type, and the status of the selected object after the merge process is completed.
The Attribute Differences - Critical Conflicts section displays the attribute information including the workspace resolution, base version value, To and From version values, conflict, override, and so on.
(Optional) Select the Override flag to override the default workspace resolution.
Click the Finish button to complete the merge process.
Alternatively, click the Cancel button to cancel the merge process.
Submitting Workspaces for Delivery
After you perform the checkpoint process on the latest workspace version, you can use the Submit for Delivery option under the Workspace menu to deliver the changes of your workspace to the MAIN workspace.
The Submit for Delivery process initiates the governance flow that may require one or more levels of review and approval. After the changes are submitted for delivery, the workspace is locked or made read-only to prevent further configuration changes while the workspace is being reviewed. After the workspace is approved, it is delivered into the MAIN workspace.
To submit a workspace for delivery
In the workspace dashboard, select the Workspace menu and then select the Submit for Delivery option.
A confirmation message appears enabling you to confirm the submission.
Click the Yes button to start the Submit for Delivery process.
The workspace status in the View Mode pane changes to Submitted for Delivery and the workspace title indicates the workspace is read-only. You cannot perform any operation on the objects in the Object Explorer pane. Except for the Deliver option, other options under the Workspace menu such as Checkpoint, Revert, and Rebase are also disabled.
Alternatively, click the No button to cancel the submission. Then you can continue to make changes on the objects.
If there is a non-trivial merge issue, then an error message appears and you must perform the rebase process and then submit the workspace for delivery again.
For more information, see Rebasing Workspaces.
Canceling the Workspace Delivery Process
Before delivering a workspace, workspace administrators must change the status of that workspace to Submitted for Delivery to make it ready for the delivery process. After the status of the workspace is changed to Submitted for Delivery, it is a read-only workspace and end users or developers cannot perform any other repository changes on it until the merging process is completed. Any repository changes to that workspace would make the delivery process fail.
To cancel the workspace delivery process, avoid the delivery failures, and allow end users or developers to be able to make repository changes on the workspaces with the status of Submitted for Delivery, workspace administrators must revert the status of that workspace back to Checkpointed and Editable by using the Undo Submit for Delivery option under the Workspace menu or running the UndoSubmitForDelivery command from the Command Prompt window.
Delivering Workspaces
Delivering a workspace, or merging workspace changes, is applying the changes that are made in the workspace into its parent workspace such as the MAIN workspace or the root workspace. You must always perform the workspace delivery process to the immediate parent workspace. You cannot deliver the workspace to any arbitrary workspace.
If you are the owner of the parent workspace or if you are a workspace administrator who is also the owner of the parent workspace, then you can run the workspace delivery process. For more information on how to deliver workspaces, see Delivering Workspaces.
Exporting Workspace Objects to Archive Files
You can export all workspace objects to an archive file, such as object definitions of the object types Business Component, Applet, View, Screen, Integration Object, Business Object, and so on.
To export workspace objects to an archive file
In the workspace dashboard, select and open a workspace.
Select the Tools menu and then select the Export Workspace to Archive option.
The Export Workspace to Archive dialog box appears. By default, the Workspace To Version field always displays the latest version of the workspace.
Tip: Optionally, you can open a specific workspace version in the Workspace Version pane to export that workspace’s object changes into an archive file. For example, when a workspace has ten versions and you want to export the workspace’s object changes through the seventh version, you can open the seventh version in the Workspace Version pane and then click the Export Workspace to Archive option under the Workspace menu.On the Export Workspace to Archive dialog box, select one version from the Workspace From Version drop-down list.
Click the Export button.
The Export to Archive File dialog box appears. The status bar in this dialog box indicates the child objects that are included in the export process. When the process finishes, this dialog box displays the top-level objects in the Objects to Archive list.
Comparing Workspace Versions
You can use the Compare option under the Workspace menu to identify the changes that are made to the objects in two selected workspace versions.
To compare workspace versions
In the workspace dashboard, select the Workspace menu and then select the Compare option.
The Compare Workspace dialog box appears. In the First Selection group box, the value in the Workspace Name field is populated using the value of the opened workspace name and the Version field is populated using the value of the opened version of that workspace.
In the Second Selection group box:
- Select a workspace name from the Workspace Name drop-down list.
- Select a version from the Version drop-down list (which includes all versions of the selected workspace.)
Click the OK button.
The status bar indicates that the process is running. When the process finishes, the Compare Objects dialog box appears, displaying all top-level objects that have differences in the two selected workspace versions.
Select one object that has such differences.
The Compare Objects dialog box displays the object properties, including the similarities and the differences for each attribute.
Close the Compare Objects dialog box by clicking the Close button.
Flattening Workspace Versions
In general, flattening workspace versions is one of the workspace administrator’s tasks. A workspace administrator who is also the owner of the MAIN workspace (root, parent, or master workspace) can perform the process of flattening workspace versions using the command prompt. No other users can perform this process.
When you access Siebel Tools after the flattening workspace version process has successfully completed:
Siebel Tools is opened in the non-workspace mode (as in the previous releases of Siebel Tools).
The database is set back to the workspace-disabled status with data for MAIN\LATEST in Main\0.
For more information on how to flatten workspace versions, see Flattening Workspace Versions.
Configuring Non-Workspace Objects
The following object types and their child objects are non-workspace objects:
Repository
Project
Table
Task
Type
EIM table
Dock objects
Schema maintenance
Server components
Only one single public version of the object is available for all users. Hence, configuration on instances of this object is centrally controlled by the workspace administrator, who can lock all relevant projects and objects. Developers are able to configure the respective objects or projects after their requests to release the locks on these objects or projects are granted by the workspace administrator.
When developers configure non-workspace objects, they must develop and test the non-workspace objects against a dedicated environment and deliver changes (or import using the SIF-OUT/SIF-IN command) directly to the master database by requesting that the workspace administration team unlock the project.
For more information on how to control the access on non-workspace objects, see Controlling Access on Non-Workspace Objects.
Using Workflows in Workspaces
In Siebel Tools Innovation Pack 2016, workflow objects were considered non-workspace objects. However, workflow objects are also workspace objects in Siebel Tools Innovation Pack 2017 and the later releases.
This section describes how to use Siebel workflows in Siebel workspaces. It includes the following topics:
Using Workflows in Workspaces Overview
Using Siebel workflows in Siebel Workspace, note that:
You cannot perform any operation on workflows that are in the MAIN/Integration branch.
You have to create the developer workspaces under the Main/Integration branch to perform the operations on workflows.
Workflows can be imported within a workspace and they can be exported.
For more information, see Importing Workflows into Workspaces and Exporting Workflows from Workspaces.
Workflows cannot be deleted.
The statuses of all workflows are always In Progress by default. Hence the Status column of the workflows is no longer required and not available in Siebel Tools starting with Siebel Tools Innovation Pack 2017.
If you are a developer who is not the owner of the root workspace, you cannot activate a workflow but you can publish the workflow. When you click the Publish button in the Workflow Task Editor toolbar, the system moves the workflow to the Completed state.
If you are a developer who is also the owner of the root workspace, you can publish and activate the workflow. When you click the Publish/Activate button, the system moves the workflow to the Completed state and also activates the workflow. As you activate the workflow, the version number is incremented. The version changes can be viewed in the thin or thick client platform, but the version number always remains 0 (zero) in Siebel Tools.
Only the Siebel (system) Administrator can activate the Workflows feature by either of the following actions:
Through Siebel Tools on the root (Main) workspace or
Launching Siebel application and then navigating to Administration, Business Process, Workflow Deployment.
Other workflow users can search for the workflows that need to be activated and then click the Activate button on the retrieved records to activate the workflows.
For detailed information on Siebel workflows and how to manage workflows in Siebel Tools, see the Siebel Business Process Framework: Workflow Guide.
Creating New Workflows
You can use the New Record option under the Workflow Object List to create new workflows.
To create a new workflow
In Siebel Tools, create a new developer workspace under the Main/Integration workspace.
For more information on how to create a new developer workspace, see Creating New Workspaces.
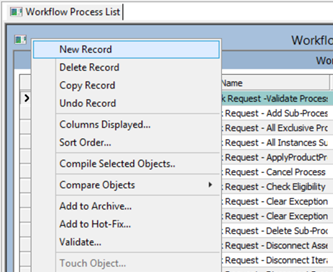
Under the newly created workspace, click the Workflow Process List from the Object Explorer section.
In the Workflow Process List, right-click your mouse and select the New Record option.
This example illustrates the New Record option under the Workflow Process List.
Enter the required information for the new record.
Right-click your mouse and select the Edit Workflow Process option.
Add all required workflow process steps using the Workflow Process Editor window.
For more information on how to add workflow process steps, see Siebel Business Process Framework: Workflow Guide for Adding Workflow Process Steps.
Save the record.
Click the Publish button in the Workflow Task editor toolbar.
From the Workspace menu, choose Checkpoint, Submit for Delivery, and then Deliver.
Click Start Merge in the Deliver Workspace dialog box.
After the merge finishes, open the object in MAIN and then click the Publish/Activate button in the Workflow Task editor toolbar.
Modifying Existing Workflows
You can use the Edit Workflow Process option under the Workflow Object List to modify existing workflows.
To modify an existing workflow
In Siebel Tools, open an existing developer workspace under the Main/Integration workspace.
For more information on how to open an existing developer workspace, see Opening Existing Workspaces.
Click the Workflow Process List from the Object Explorer section.
Select the workflow that you want to modify, right-click, and select the Edit Workflow Process option.
In the Workflow Process Editor window, modify the workflow as needed.
Save the record.
Click the Publish button in the Workflow Task editor toolbar to activate the workflow.
From the Workspace menu, choose Checkpoint, Submit for Delivery, and then Deliver.
Click Start Merge in the Deliver Workspace dialog box.
After the merge finishes, open the object in MAIN and then click the Publish/Activate button in the Workflow Task editor toolbar.
Importing Workflows into Workspaces
You can use the Import Workflow Process option under the Workflow Object List to import a workflow into a workspace.
To import a workflow into a workspace
In Siebel Tools, to create a new workspace, select the Workspace menu, select the Create menu option, enter all required values, and click the OK button.
Note: You can also modify an existing workspace by selecting a workspace in the Workspace Explorer pane. Next, right-click the workspace and select the Open option.Click the Workflow Process List from the Object Explorer section.
In the Workflow Process List window, right-click your mouse and select the Import Workflow Process option.
From the list of all available workflows, select the workflow that you want import into the current developer workspace.
Select the project for import.
Save your record.
Exporting Workflows from Workspaces
You can use the Export Workflow Process option under the Workflow Object List to export a workflow from a workspace to a defined location.
To export a workflow from a workspace
In Siebel Tools, open the developer workspace with the workflow you want to export.
Click the Workflow Process List from the Object Explorer section.
Select the workflow to export, right-click, and select the Export Workflow Process option.
Specify the location path to save the exported workflow.
Save your record.
[EAIFileTransportConfigSubsys]
EAIFileTransportFolders = <path to the version_Tools\BIN folder>
Validating Workflows
You can use the Validate option under the Workflow Object List to validate workflows.
To validate a workflow
In Siebel Tools, click the Workflow Process List from the Object Explorer section.
In the Workflow Process List, select the workflow to validate, right-click, and select the Validate option.
The Validate wizard opens. If there are any errors in the workflow, the wizard displays the error information and the location of the log file.
Optionally, save or download the error log file.
Correct the errors as required.
For more information on how to fix the conflict errors and apply resolutions, see Detecting Conflicts in Workspaces and Applying Resolutions.
Click the Start button to start the Validate Workflow process.
Alternatively, click the Cancel button to cancel the Validating Workflow process and return to the Siebel Tools window.
Debugging Workflows
Siebel Tools launches the thick client with the user-provided database details to simulate the workflow wizard. You can use the Debug tab under the Development Tools Options window to debug workflows.
To debug a workflow
In Siebel Tools, select the Development Tools Options from the View menu bar.
The Development Tools Options window opens.
Select the Debug tab from the Development Tools Options window.
Under the Run-time start up information and Login Information sections, enter the following required information:
Field Name Example Value Executable
C:\17_17\Dclient\BIN\siebel.ext
CFG file
C:\17_17\Dclient\BIN\enu\uagent.cfg
Working Directory
C:\17_17\Dclient\BIN
Arguments
/h
Show Workflow Primary Business Component Data
<Selected>
User Name
SADMIN
Password
SADMIN
Data source
ServerDataSrc
Save your work and return to the Siebel Tools window.
In the Workflow Process List, select a workflow to simulate, right-click your mouse, and select the Simulate Workflow Process option.
Click the Next button in the simulator to proceed to the next step.
The Watch window appears showing the values of workflow properties at each simulating step.
For a detailed example that uses the Watch window, see information about defining a workflow process that closes obsolete service requests in Siebel Business Process Framework: Workflow Guide.
Invoking Workflows
You can use one of the following methods to invoke a workflow:
Calculating fields through the InvokeSiebelMethod
Applet User Property such as Named Method
RTEs
Running a script
Using other workflows
Applying workflow policies
Applying web services
Delivering Workspaces that Use Workflows
Performing the Deliver Workspace process does not activate the workflow. You must click the Publish/Activate button in the Workflow Task editor toolbar to activate the workflow.
For the detailed information on how to deliver workspaces, see Delivering Workspaces.
Workspaces Administration
This topic describes how to perform Workspace administrative tasks in Siebel Tools. These tasks are performed only by the users who are assigned the user role Workspace Administrator. This topic includes the following information:
Editing the Repository Objects
This topic discusses how to enable the workspaces in Siebel Tools and edit the repository objects.
To enable the workspaces in Siebel Tools and edit the repository objects
Enable the workspaces by running the EnableWorkspace utility.
Log into the Siebel Tools environment.
By default, the MAIN workspace or the last-modified workspace opens at the last-updated session.
Open the Workspace tab to view the existing workspaces.
Create a new workspace or edit an existing one.
To create a new workspace, select the Workspace menu, select the Create menu option, enter all required values, and click the OK button.
To modify an existing workspace, select a workspace in the Workspace Explorer pane, right-click and select the Open option.
Modify, insert, or delete any repository object as required.
Note: Users can modify an object without locking that object.Perform the Checkpoint process to check the changes that you just made by selecting the Workspace menu bar and the Checkpoint option.
After all changes are checked, run the Rebase process with the parent workspace by selecting the Workspace menu bar and the Rebase option.
Confirm that the Rebase process completes successfully.
Navigate to the Conflicts Resolution view if this view is not displayed automatically.
By default, the values in the From Version Value list are committed to the target workspace’s To Version Value list during the Rebase process.
Optionally, override the values in the To Version Value list and select the Override option.
Resolve all conflicts as needed.
Save your record.
Perform the Checkpoint process on the rebased workspace.
Click the Finish button.
For more information on how to edit workspace-enabled repository objects, see Editing Workspace-Enabled Repository Objects.
For more information on how to enable the workspaces in Web Tools and edit the repository objects, see Enabling Workspaces in Web Tools and Editing the Repository Objects.
Canceling the Workspace Delivery Process
Before delivering a workspace, workspace administrators must change the status of that workspace to Submitted for Delivery to make it ready for the delivery process. After the status of the workspace is changed to Submitted for Delivery, it is a read-only workspace and end users or developers cannot perform any other repository changes on it until the merging process is completed. Any repository change to that workspace would make the delivery process fail.
To cancel the workspace delivery process, avoid the delivery failures, and allow end users or developers to be able to make repository changes on the workspaces with the status of Submitted for Delivery, workspace administrators must revert the status of that workspace back to Checkpointed and Editable by using the Undo Submit for Delivery option under the Workspace menu or running the UndoSubmitForDelivery command from the Command Prompt window.
To cancel the workspace delivery process using the Undo Submit for Delivery option
In Siebel Tools, select the Workspace menu and then select the Undo Submit for Delivery option.
The Undo Submit for Delivery confirmation message appears.
Click the Yes button to revert the status of the workspace from Submitted for Delivery to Checkpointed and Editable.
To cancel the workspace delivery process using the Command Prompt window
Open the Command Prompt window from your computer by clicking the Start button and then selecting the Run option.
The Run window appears.
Enter the value CMD in the Open field.
The Command Prompt window appears.
Change the directory in the Command Prompt window to the <TOOLS_HOME>/BIN folder using this command:
cd <TOOLS_HOME>/BIN
The Command Prompt window displays a list of arguments and parameters.
Run this command line to cancel the workspace delivery process:
siebdev /c tools.cfg /u SADMIN /p SADMIN /d ServerDataSrc /UndoSubmitForDelivery
<Workspace Name>
For example:
C:\Siebel\Tools\BIN>siebdev /c tools.cfg /u SADMIN /p SADMIN /d ServerDataSrc /UndoSubmitForDelivery <Workspace Name>
After the status of the workspace is reverted, end users and developers of that workspace must perform these steps before they can make any repository change on it:
In Siebel Tools, close and then reopen the workspace.
In the View Mode pane, confirm that the reverted workspace status is now Checkpointed and the title of the workspace includes Editable.
Delivering Workspaces
Delivering a workspace, or merging workspace changes, is applying the changes that are made in the workspace into its parent workspace such as the MAIN workspace or the root workspace. You must always perform the workspace delivery process to the immediate parent workspace. You cannot deliver workspace to any arbitrary workspace.
If you are the owner of the parent workspace or if you are a workspace administrator who is also the owner of the parent workspace, then you can use one of these options to run the workspace delivery process:
Running the Deliver command from the Command Prompt window.
Only workspace administrators can optionally enter comments into the command line while running the Deliver command from the Command Prompt window.
Using the Deliver option under the Workspace menu.
The workspace owner and/or administrator can enter comments while running the workspace delivery process using the Deliver option.
If you are a workspace administrator without being the owner of the parent workspace, you can run the workspace delivery process by running the Deliver command from the Command Prompt window.
A workspace can be delivered once. Workspace administrators have full permissions on the MAIN workspace, including delivering the workspace. However, end users and developers have read-only access on the MAIN workspace.
To run the workspace delivery process from the Command Prompt window
On the Siebel Tools workspace dashboard, confirm that the status of the workspace is Submitted for Delivery.
Open the Command Prompt window from your computer by clicking the Start button and then selecting the Run option.
The Run window appears.
Enter the value CMD in the Open field.
The Command Prompt window appears.
Change the directory in the Command Prompt window to the <TOOLS_HOME>/BIN folder using this command:
cd <TOOLS_HOME>/BIN
The Command Prompt window displays a list of arguments and parameters.
If you are the owner of the parent workspace, run this workspace delivery command:
siebdev /c tools.cfg /u <User ID> /p <password> /d ServerDataSrc /DeliverWorkspace
" <Workspace Name>"
For example:
C:\SIEBEL\TOOLS\BIN siebdev /c tools.cfg /u SADMIN /p SADMIN /d ServerDabaSRC_ /DeliverWorkspace "<Workspace Name>
If you are a workspace administrator, you can optionally enter comments into the command line. For example:
C:\SIEBEL\TOOLS\BIN siebdev /c tools.cfg /u SADMIN /p SADMIN /d ServerDataSrc_ /
Deliverworkspace "<Workspace Name>" “<Your Comment>
Note: The comments in the command line will be displayed in the comment fields in the Workspace version pane of the parent workspace. If you do not provide comments in the command line, the system uses the description of the workspace for the comment fields. If the description of the workspace is not available, the system displays the value Enter Comments for these comment fields.
To deliver a workspace using Siebel Tools
In Siebel Tools, select the Workspace menu and then select the Deliver option.
The Enter Comment window appears.
Enter comments in the Enter Comment field.
Note: Entering comments is a mandatory step while delivering a workspace using the Deliver option under the Workspace menu.Click the OK button.
The Deliver Workspace window appears displaying the From Workspace, To Workspace, Merge Status fields and the Start Merge button.
Click the Start Merge button to trigger the merging process.
The In Progress status bar and the detailed information of the merging process are displayed in the Merge Status field.
Click the Done button after the merging process is completed.
Siebel Tools reappears displaying the status and detailed information of the merging process.
In the View Mode pane, confirm that the parent workspace status is now Checkpointed.
(Optional) View the detailed information in the Workspace Versions pane including the merge version information and the comments that you entered while delivering the workspace.
If the merging process encounters any non-trivial merge, then the system displays this error message: The deliver failed with error: Non-trivial merge found. Rebase needs to be done. The View Mode pane now displays the workspace status as Delivery Failed. If this error message appears, you must rebase the workspace, resolve the conflicts, and then run the workspace delivery process again. For more information on how to rebase a workspace, see Rebasing Workspaces.
The Checkpoint, Revert, Submit for Deliver, and Rebase options under the Workspace menu are disabled if the workspace deliver is completed successfully. The Rebase and Submit for Delivery options are enabled and the workspace title indicates the workspace is editable if the workspace delivery process fails.
Flattening Workspace Versions
Although the Workspace mode in the master database is enabled by default, Oracle Siebel Tools is delivered with a monolithic repository without workspaces, so there is a slight change in the preparation for the build process. In this case, you need to run a full utility directly on the master database. Because the full migration utility is not workspace-aware, the flattening workspace process has to be run on the package master database, which is derived by cloning the master database and flattening the workspaces to obtain all the repository changes from the master database without workspace information.
Thus, the flattening of workspaces essentially collapses the MAIN branch to a single version with all the latest changes and subsequently deletes all the workspaces. The flattening process also restores the time stamps throughout the hierarchy of all objects, so the upgrade process (IRM) has no impact.
A workspace administrator who is also the owner of the MAIN workspace (root, parent, or master workspace) can perform the process of flattening workspace version using the command prompt. No other users can perform this process.
[Siebel]
…
…
…
ReportsODBCDataSource = Siebel Reports: Access
LocalDbODBCDataSource = m:/siebel Local DB
ServerDbODBCDataSource = "ORAJQ141"
DockRepositoryName = Siebel Repository
HoldExportOdbcConnection = FALSE
…
…
…
To flatten the workspace versions using the command prompt
Open the Command Prompt window from your computer by clicking the Start button and then selecting the Run option.
The Run window appears.
Enter the value CMD in the Open field.
The Command Prompt window opens.
Change the directory in the Command Prompt window to the <TOOLS_HOME>/BIN folder using this command:
cd <TOOLS_HOME>/BIN
Run either one of the following flattening workspace commands:
If you want to disable workspaces on the database at the end of the flattening process, run this command to mark all indexes as non-unique indexes and flatten the workspace versions:
siebdev /c tools.cfg /d ServerDataSrc /u <User ID> /p <password> /
FlattenWorkspace /DisableWorkspace /DropIndexes <DB_user_name> <DB_password>
<DB_platform>
For example:
C:\Siebel\TOOLS\BIN>siebdev /c tools.cfg /d ServerDataSrc /u sadmin /p
sadmin /FlattenWorkspace /DisableWorkspace /DropIndexes sadmin sadmin ORACLE
Note: The user that uses DB_user_name and DB_password in this command must have the privileges to execute the DDL statements.Note: You need to mark the indexes as non-unique index because the index columns are non-nullable, so they cannot have null values unless they are made non-unique.C:\Siebel\Tools\BIN> EnableWorkspace -s "T:\Siebel\17.0.0.0.0\Tools" -u ORAXXXX -p ORAXXXX -t ORAXXXX -r "Siebel Repository" -d "Oracle" -o ORAXXXX -w SADMIN -y SADMIN -z SADMIN
or
C:\Siebel\Tools\BIN> EnableWorkspace -s "C:\Siebel\17.0.0.0.0\Tools" -u MXXXXXXX -
p MSSQL -t dbo -r "Siebel Repository" -d "MSSQL" -o MXXXXXXX -w SADMIN -y SADMIN -
z MSSQL
If the workspaces have to be retained on the database at the end of the flattening process, run this command to only flatten the workspace versions:
siebdev /c tools.cfg /u <User ID> /p <password> /d ServerDataSrc /FlattenWorkspace
For example:
C:\Siebel\TOOLS\BIN>siebdev /c tools.cfg /d ServerDataSrc /u sadmin /p
sadmin /FlattenWorkspace
Confirm that the flatting workspace version process shows the process is successfully completed.
The Command Prompt window displays the following arguments and parameters, which you can use to run the EnableWorkspace utility:
-s Siebsrvr/Tools Installation path specified (required)
-t Siebel Table Owner (required)
-u TBLO Username (required)
-p TBLO Password (required)
-o ODBC Data Source (required)
-d DB Platform Name (Oracle, MSSQL, DB2UDB or DB2390)
-l Log File Name (default: EnableWorkspace.log)
-w Workspace Owner Username (required)
-r Repository Name (default: “Siebel Repository )
-a Action ((R)epository, (S)eed, (B)oth) (default: (B))
-f Seed inp file
-y Siebel UserName (required)
-z Siebel User Password (required)
-i Integration Branch (default: All integration branches unless passed integration branch name with this parameter)
-c Workspace Checkpoint Status (default: N)
-k Log directory (default: “Current Directory )
-e Language Code
-g Production Path (default: N)
Note: The -a, -f, -c, and -g arguments are used during the upgrade process.Use the listed arguments and parameters to run the EnableWorkspace utility.
The following example shows the arguments and parameters that are used to run the EnableWorkspace utility in a MSSQL database. In this example, dbo is the table owner of the MSSQL database and MSZXM187 is the database instance that is used in this example environment.
EnableWorkspace.exe -s "C:\Tools" -t dbo -u MSXXXXX -p XXXXX -o MSXXXXX -d MSSQL -w SADMIN -y SADMIN -z XXXXX
The following example shows the arguments and parameters that are used to run the EnableWorkspace utility in an Oracle database. In this example, orakwj115 is the table owner and the user ID of the Oracle database, and these parameters are used to execute the SQL statements that exist in the EnableWorkspace utility.
EnableWorkspace -s "T:\Siebel\17.0.0.0.0\Tools" -u ORAXXXX -p XXXXXX -t
ORAXXXX -r "Siebel Repository" -d "Oracle" -o ORAXXXX -w SADMIN -y SADMIN -z XXXXX
The following example shows the arguments and parameters that are used to run the EnableWorkspace utility in a DB2 database.
EnableWorkspace -s "C:\Siebel\17.0.0.0.0\Tools" -u DB2XXXX -p XXXXXX -t SIEBEL -r
"Siebel Repository" -d "DB2UDB" -o DB2XXXX -w SADMIN -y SADMIN -z XXXXX
View the output stages, representing the progress of the tasks performed by the utility.
The Command Prompt window lists the following output stages after you run the EnableWorkspace utility:
Stage 1 of 8: Setting the Repository ID
Stage 2 of 8: Validate the Workspace Data
Stage 3 of 8: Generate the Workspace Data
Stage 4 of 8: Update the Workspace Data in all Repository Tables
Stage 5 of 8: Update the indexes
Stage 6 of 8: Update the Workspace Data in all Seed Tables
Stage 7 of 8: Update the statistics for all Workspace-enabled Repository/Seed Tables
Stage 8 of 8: Post Run Cleanup
Tip: Ensure that you enable the applicable component group while configuring the Siebel Server. For more information about configuring the components, see Siebel Installation Guide for the operating system you are using and Siebel Applications Administration Guide.Confirm, using the following steps, that the EnableWorkspace utility has processed successfully on your environment:
Access and open Siebel Tools.
Confirm that the Siebel Tools title bar displays this title:
Siebel Tools -Siebel Repository -[MAIN/0] - Read Only
On the menu bar, confirm that the Workspace menu appears between the Tools menu and the Window menu.
Click the Workspace menu and then select the Workspace Explorer option.
Next to the window, the Workspaces dashboard (Workspaces explorer pane) precedes the visibility View Mode pane.
Note: The MAIN workspace (also known as the root, parent, or master workspace) is the default selection and the Workspace Versions and Modified Objects panes display.
Controlling Access on Non-Workspace Objects
Currently, the following object types and their child objects remain as non-workspace objects:
Table
Dock Object
EIM Interface Table
Repository
Workflow Policy Column
Workflow Policy Object
Workflow Policy Program
Task
Task Group
Project
Only one single public version of the object is available for all users. Hence, configuration on instances of this object is centrally controlled by the workspace administrator, who can lock all relevant projects and objects. Developers are able to configure the respective objects or projects after their requests to release the locks on these objects or projects are granted by the workspace administrator.
For changing the existing database schema or adding new tables to the database schema, all users must follow the same process that is currently followed by all development teams; that means, respective teams need to cooperate with the workspace administrators for any change that is required in the database schema of their applications.
For Workflow and Task configurations, developers must ensure that only the 0th version on the master database exists.
Publishing Tables
Tables can also be published into the S_RR_TABLE table using the same concept by which other metadata objects are published into the report repository table. A table maintains a different version number and it is tracked from the S_RR_OBJ_ITEM.TBL_VER column.
However, table versioning is different from other metadata versioning because a table is not workspace-enabled. While performing the Full Publish process, the table version is always 0 (zero), irrespective of the workspace version.
A table can be published in two ways using Siebel Tools in a Windows environment:
Using the Apply/DDL button.
Using the siebdev.exe utility.
Publishing Table in the Source-to-Target Migration
In the source environment, a table needs to be published either by using the Apply/DDL button or by running the siebdev.exe utility command.
In the target environment, publishing a table is generated by the Incremental/Full source-to-target runtime repository migration. Hence, a table should not be published explicitly in the target environment.
To publish a table using the Apply/DDL button in Siebel Tools
In Siebel Tools, update the required table schema changes as needed.
Search for the table that you want to publish.
Siebel Tools now displays a list of table row records.
The following image shows the Siebel Tools window displaying the table row records after you perform the table search. The Apply/DDL button is available after the table header.
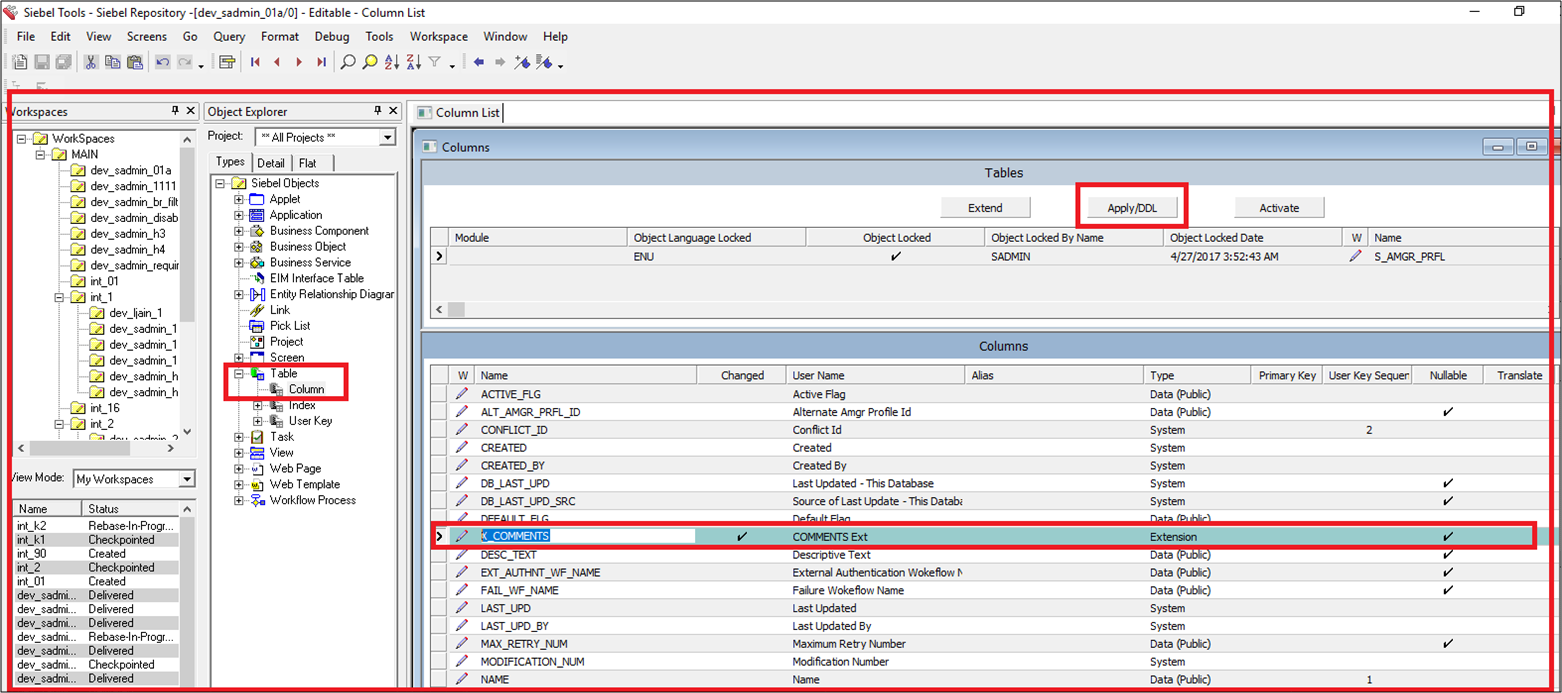
Click the Apply/DDL button.
The Choose Option window appears enabling you to select the action to either apply the schema changes to the database or create the DDL file.
Select either the Apply or the Generate DDL option, and click the OK button to return to Siebel Tools.
If you select the Apply option, then the Apply Schema window appears, enabling you to specify the details of table, database, and DDL. After you click the OK button, the schema is applied to the tables and the tables are republished with the next version number. The table compiled-object definitions are present in the S_RR_TABLE table in the next table version, and the list of effected tables is present in the S_RR_OBJ_ITEM table.
If you select the Generate DDL option and click the OK button, the table will not be published but it will generate the DDL in the specified location.
To publish a table using the siebdev.exe utility in Siebel Tools
Open the Command Prompt window from your computer by clicking the Start button and then selecting the Run option.
In the Run window, enter the value CMD in the Open field.
In the Command Prompt window, run the following siebdev.exe utility command:
siebdev /c tools.cfg /l <LANG> /d <odbcdatasource> /u <username> /p <password> /
IncrementalTablePublish <FileName>
The contents of <FileName> can be <TableName>:<Operation> where the operation can be Insert, Update, or Delete. These are the examples of the ddl_TableSchema.txt:
S_RR_OBJ_VER:Update
S_RR_TEST1:Insert
S_RR_TEST2:Delete
Using Workspaces for Seed Data
You can enable Siebel Workspaces for the seed data so that the seed data can be deployed within the runtime framework of the Composer Web Tools. This feature enables developers to have their work neatly isolated. It also maintains the changes that are set at the design time and the runtime as a single package. This feature requires no downtime of the seed data to deploy.
Using workspaces for the seed data, note that:
By default, Oracle Siebel delivers seed data workspace-enabled for LOVs and you cannot disable those workspaces on seed data.
The concept of workspace for seed is similar to the concept of workspace for metadata. The only difference is metadata changes are specific to the user whereas seed data changes apply to all users under the nearest integration branch.
Modifying the seed data occurs in the closest integration branch; hence, all users under the same integration branch can see each other’s changes immediately.
Seed data is copied automatically when a user creates a new integration branch, so there is a separate copy of the seed data for every integration branch, including the MAIN branch.
Modifying seed data does not create the workspace version. You must always modify metadata to create the workspace versions.
Workspace delivery from the user-to-integration branch carries only metadata modifications because seed data modification exists in the integration branch.
However, workspace delivery from integration-to-integration workspace carries both seed data and metadata changes.
You can access Siebel Tools or the thick client using the \editseeddata option to create a corporate record and then start using the workspace.
For more information on how to use the \editseeddata option, see Siebel Developer's Reference Guide.
You cannot perform the Revert process for the changes in the seed data.
For more information on how to use database utilities to migrate metadata and seed data, see the Migration Application section in the Siebel Database Upgrade Guide.
To enable workspaces for seed data
Create a user workspace under the integration branch.
For more information on how to create new workspaces, see Creating New Workspaces.
Modify the seed data and metadata as needed.
The modification of seed data in the user workspace causes the modification in the nearest integration branch.
Perform the Checkpoint process on the workspace.
For more information on how to perform the Checkpoint process, see Performing the Checkpoint Version Process.
Submit the workspace for delivery.
For more information on how to submit the workspaces for delivery, see Submitting Workspaces for Delivery.
Deliver the workspace to the nearest integration branch.
For more information on how to deliver workspaces, see Delivering Workspaces.
Deliver the integration workspace to the MAIN branch.
For more information on how to deliver the integration workspace to the main branch, see Delivering Workspaces.
If there is non-trivial change or conflict in the seed data, perform the following steps to rebase and deliver the workspace:
Rebase the workspace.
For more information on how to perform the Rebase process, see Rebasing Workspaces.
Select the original value to override the current workspace value; otherwise, use the default new value.
For more information on how to fix the conflict errors and apply resolutions, see Detecting Conflicts in Workspaces and Applying Resolutions.
After the Rebase process is completed, perform the Workspace Deliver process again to deliver the workspace.
For more information on how to deliver the workspace, see Delivering Workspaces.
Example: Inserting Seed Data Records
Create the integration workspace called INT_IP2017 under the MAIN workspace.
For more information on how to create new workspaces, see Creating New Workspaces.
Create another workspace called EXAMPLE_WS under the INT_IP2017 workspace.
Optionally, modify the metadata record.
From the menu bar in the Siebel Tools window, choose the Screens menu, System Administration, and then select the List of Values menu item.
Change the Type value to CUT_ACCOUNT_TYPE.
Change the display name from BILLING to BILLINGNEW.
The new display name BILLINGNEW is available in the INT_IP2017 workspace.
Perform the Deliver process to deliver the EXAMPLE_WS workspace to the INT_IP2017 workspace.
For more information on how to deliver workspaces, see Delivering Workspaces.
Perform the Deliver process again to deliver the INT_IP2017 workspace to the MAIN workspace.
Open the MAIN workspace.
Navigate to the Account List view and select the Account Class drop-down list.
The BILLINGNEW value is listed in the Account Class drop-down list. If the BILLINGNEW value is not listed, you must clear the cache by navigating to System Administration\Data\List of Values and click the Clearcache button.
Check to ensure that both INT_IP2017 and MAIN workspaces now list the BILLINGNEW value.
Support for NON-ENU Language in Rich Text Control
To enable the support for NON-ENU language in rich text control (RTC), you must run the Full Publish process using the appropriate language. In the Full Publish process, the NON-ENU language compiles all object definitions and adds those records to the respective Repository Runtime tables.
To run the Full Publish process
Confirm that Siebel Tools Innovation Pack 2017 or later release is installed in your environment.
For more information about performing a new installation, see the Siebel Installation Guide for the operating system you are using.
Open the Command Prompt window from your computer by clicking the Start button and then selecting the Run option.
In the Run window, enter the value CMD in the Open field.
In the Command Prompt window, use this format to run the FullPublish process:
siebdev /c tools.cfg /TL <lang_code> /d <dataSource_name> /u <username> /p
<password> /FullPublish
For example:
siebedev.exe /c tools.cfg /TL ENU /d orakrv122 /u sadmin /p sadmin / FullPublish
Notice that the /d parameter in this example refers to the ODBC data source.
Note that the <lang_code> parameter in the previous command can either be a single language or multiple languages. You must specify the language that needs to be published in the /TL parameter. For more information about runtime repository business components that are language independent, see the following table in this section.
This example shows the command that is used to run the Full Published process in the database with one language, English (ENU):
siebdev /c tools.cfg /d ServerDataSrc /u SADMIN /p SADMIN /TL ENU /FullPublish
This example shows the command that is used to run the Full Published process in the database with one language, German (DEU):
siebdev /c tools.cfg /TL DEU /d ServerDataSrc /u sadmin /p sadmin /FullPublish
or
siebedev.exe /c tools.cfg /TL DEU /d orakrv122 /u sadmin /p sadmin / FullPublish
This example shows the command that is used to run the Full Published process in the database with three languages: English (ENU), German (DEU), and Japanese (JPN):
siebdev /c tools.cfg /TL ENU, DEU, JPN /d <ServerDataSrc> /u SADMIN /p MSSQL /
FullPublish
or
siebedev.exe /c tools.cfg /TL ENU, DEU, JPN /d orakrv122 /u sadmin /p sadmin /
FullPublish
After the Full Publish process completes successfully, you can launch the Siebel application only in those languages that have the application strings and languages that are specified in the Full Publish process. In case you need to launch the Siebel application in any additional language, run Full Publish again by specifying those languages.
In the given example, Siebel application is already published in ENU, DEU, and JPN. However, if their is a requirement for FRA (French) then you need to repeat Full Publish with all the four languages together as follows:
siebedev.exe /c tools.cfg /TL ENU, DEU, JPN, FRA /d orakrv122 /u sadmin /p sadmin /
FullPublish
If you need to drop a language then too repeat Full Publish. For example, you can remove JPN as follows:
siebedev.exe /c tools.cfg /TL ENU, DEU, FRA /d orakrv122 /u sadmin /p sadmin /
FullPublish
Full Publish will recompile all the objects again and you can later launch Siebel in the three remaining languages.
You can also perform Full Publish in all the languages supported by Siebel by specifying ALL during FullPublish as follows:
siebedev.exe /c tools.cfg /TL ALL /d orakrv122 /u sadmin /p sadmin / FullPublish
The following table lists all runtime repository business components that are language independent:
Table Runtime repository business components that are language independent
| Object Type | Runtime Object Name | Table |
|---|---|---|
Prototype Applet Browser Script |
Runtime Repository Prototype Applet Browser Script |
S_RR_APL_BRSCPT |
Prototype Applet Server Script |
Runtime Repository Prototype Applet Server Script |
S_RR_WEBSCRPT |
Data Source Definition |
Runtime Repository Data Source |
S_RR_DATASRCDEF |
Content Object |
Runtime Repository Content Object |
S_RR_CONTENTOBJ |
Web Template |
Runtime Repository Web Template |
S_RR_WEB_TMPL |
Assignment Attribute |
Runtime Repository Assignment Attribute |
S_RR_ASGN_ATTR |
Table |
Runtime Repository Table |
S_RR_TABLE |
Help ID |
Runtime Repository Help ID |
S_RR_HELP_ID |
Pager Object |
Runtime Repository Pager Object |
S_RR_PAGER_OBJ |
Search Index |
Runtime Repository Search Index |
S_RR_SRCH_INDEX |
Text Style |
Runtime Repository Text Style |
S_RR_TEXT_STYLE |
Icon Map |
Runtime Repository Icon Map |
S_RR_ICON_MAP |
Integration Object |
Runtime Repository Integration Object |
S_RR_INT_OBJ |
HTML Hierarchy Bitmap |
Runtime Repository HTML Hierarchy Bitmap |
S_RR_HRCHY_BMP |
String Map |
Runtime Repository String Map |
S_RR_STRING_MAP |
Link |
Runtime Repository Link |
S_RR_LINK |
Business Object |
Runtime Repository Business Object |
S_RR_BUSOBJ |
Type |
Runtime Repository Type |
S_RR_OBJ_TYPE |
DLL |
Runtime Repository DLL |
S_RR_DLL |
Search Category |
Runtime Repository Search Category |
S_RR_SRCH_CAT |
Pick List |
Runtime Repository Pick List |
S_RR_PICKLIST |
System Activity Object |
Runtime Repository System Activity Object |
S_RR_SYS_ACTOBJ |
Adding the Workspace Prefix in System Preferences
To ensure all users follow standards while creating workspace names, a workspace administrator who is also the owner of the MAIN workspace needs to create a new system preference called Workspace Prefix.
When users create workspaces that do not have values for the Workspace Prefix system preference, the default prefix values are set as dev in the application.
To add the Workspace Prefix in system preferences
In Siebel Tools, select the Screens menu bar.
Select the System Administration option and then select the System Preferences option.
Note: In Web Tools, click the Tools menu and then click the System Preferences menu item.Create a new record to add the new system preference by clicking the Add New Record button.
The System Preference Administration pane appears.
Note: In Web Tools, click the plus icon to create a new record or select New Record from the gear icon.Enter the value Workspace Prefix in the Description field.
Enter the value ‘Workspace Prefix’ Value as <text decided> in the System Preference Name field.
Save the new system preference.
For more information about setting system preferences, see Siebel Applications Administration Guide.