5Setting up Web Tools
Setting up Web Tools
This chapter includes information about the setup tasks that you must perform to deploy Web Tools for a new deployment and an existing deployment that you originally installed for an earlier version. It includes the following topics:
Troubleshooting and Verifying the Results of the Web Template Migration Process
Enabling Workspaces in Web Tools and Editing the Repository Objects
Navigating to the Workspace Dashboard in the Web Tools Mode Application
HTML Tags Migrated to Web Tools
The following table shows the HTML (Hypertext Markup Language) tags that are migrated to fields in Web Tools in the Web template migration process.
Table HTML Tags Migrated to Web Tools
| Tag Name | General Tag Purpose |
|---|---|
div |
Generates a container record for a Web template item and for its properties. |
li |
Generates a container record for a Web template item and for its properties. |
span |
Generates a container record for a Web template item and for its properties. |
ul |
Generates a container record for a Web template item and for its properties. |
Manually Running the Migration Script
You can manually run the migration script for the Web template migration process by entering the following command in a command-line interface:
-jar $DbsrvrRoot\common\SWTClob.jar /s $SiebelRoot /c "$ODBCDataSource" /t
$TableOwner /u $TableOwner /p $TablePassword /o $SiebelLogDir /d $DatabasePlatform
/r $RepositoryName /j $WebTemplatesDir /w $WSUSerName /x $WorkspaceName /b
$BranchedWS /i $WebTemplateName
where:
$DbsrvrRoot is the path of the database server installation.
$SiebelRoot is the path of the Siebel Server installation.
$SiebelLogDir is the path to the log directory.
$DatabasePlatform is the database platform such as Oracle, DB2UDB, MSSQL, and DB2390.
$RepositoryName is the Name of the Repository such as Siebel Repository.
$WebTemplatesDir is the directory for Web Templates such as $SiebelRoot/Webtempl.
$WebTemplateName is the list of template names for Incremental Migration. If not passed, all Web Templates are considered for Migration.
The following are optional parameters applicable only for Workspace Environment:
$WSUserName is the Workspace Owner user such as SADMIN.
$WorkspaceName is the Workspace Name to be created such as dev_xxxx_xxx.
$BranchedWS is the Workspace Branch under which $WorkspaceName needs to be created such as MAIN.
Troubleshooting and Verifying the Results of the Web Template Migration Process
After the migration script runs, you can access the SWTClob.log file to review the results of the Web template migration process. This file is available when you manually run the migration script and when the migration script automatically runs during upgrade. The log file will list the probable errors, if any, or will state the program completion message. Look for messages in the log that indicate incomplete or partial conversion or failure in conversion:
Incomplete conversion for <template name>
This error indicates that the template file still contains some unconverted od tags. The possible reason for this is that occurrences of SWE markup in the template file are not as per their documented usage. To resolve, review the remaining od tags in the converted template.
Unable to convert <template name>
This error indicates that the template could not be converted at all. The possible reason for this is an internal conversion error when you tried to migrate to ODH. To resolve, review the template content for any inconsistency.
Note: You can ignore the Malformed markup log that indicates that the template does not have a complete markup. It relates to tags that are not closed in the same file at the correct level.
Publishing Changes to Siebel Web Templates
The Web template migration process generates the table-based content for Siebel Web templates. If the migration installation case applies to you, then you must publish the content in these tables so that the content is implemented in the Siebel application. If the new installation case applies to you, then publication of this content is automatically completed for you.
To publish the table-based content for Siebel Web templates, enter the following command in a command window on the computer where you installed Siebel Tools:
siebdev /c tools.cfg /u $SIEBUSER /p $SIEBPWD /d "$ODBCDataSource" /l enu /
fullpublish
Workspaces Dashboard in Web Tools
The Workspace dashboard enables users to view the list of all workspaces that were created and currently presented in the database. From the workspace dashboard, you can perform various operations on workspaces.
The following image illustrates the Workspace dashboard in Web Tools.
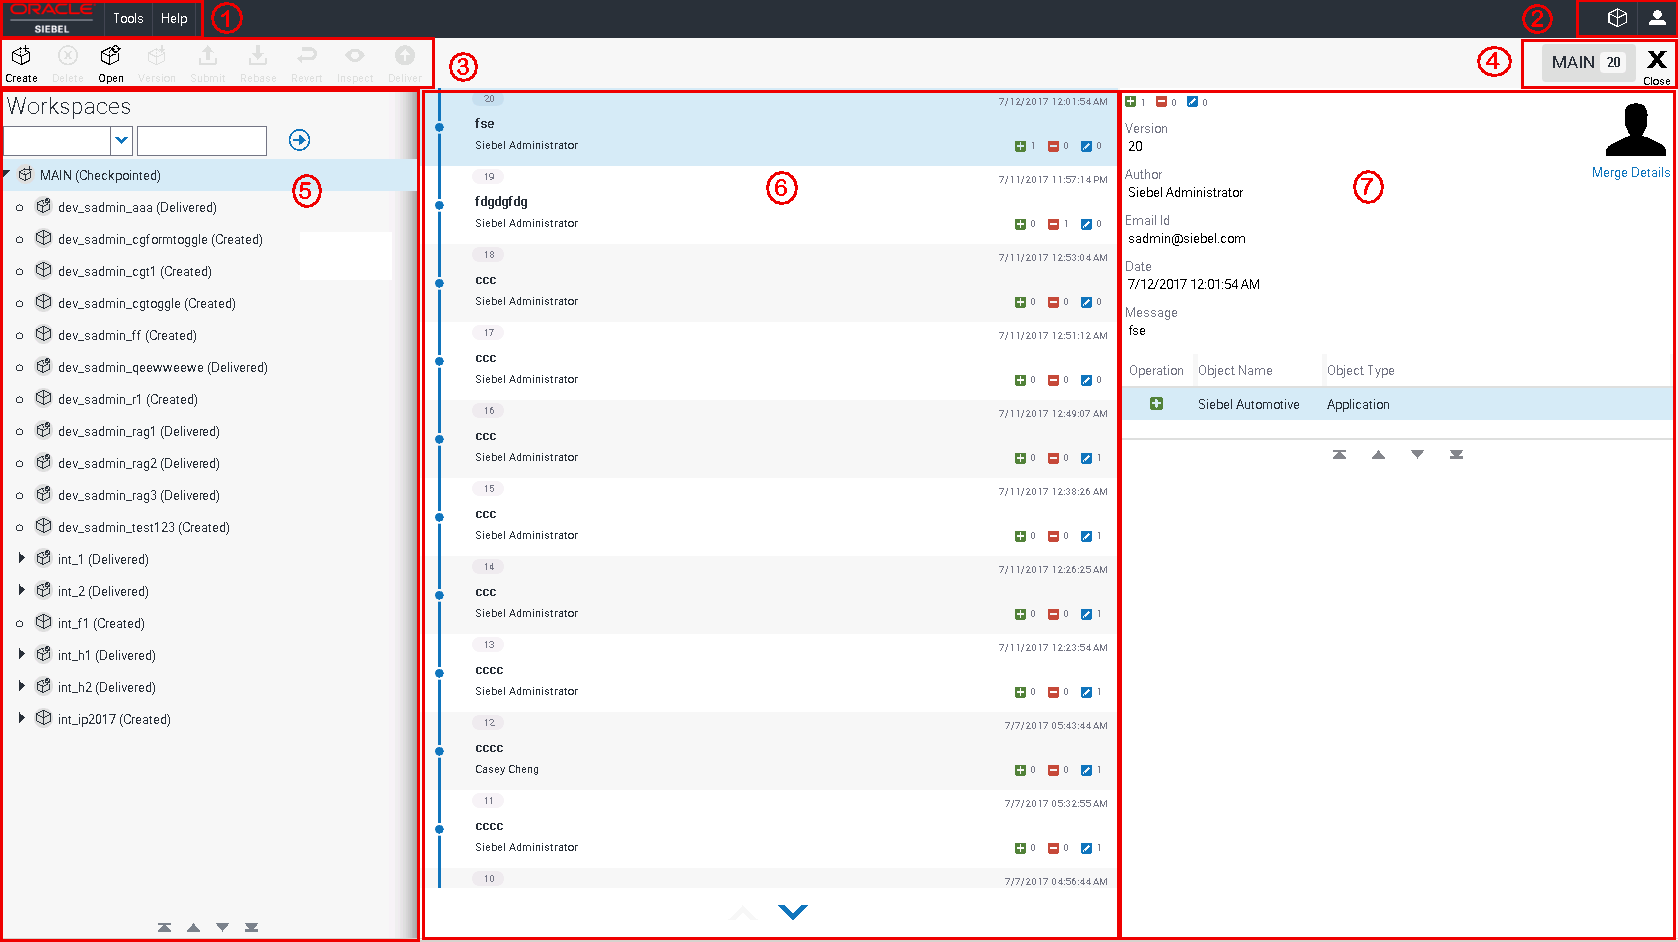
Explanation of Callouts
The workspace dashboard in Web Tools includes the following information:
Toolbar and menus.
Use the toolbar and menu items to initiate various actions. The application-level menu (File, Edit, View, Navigate, Query, Tools, and Help) appears depending on your system configurations.
For more information about toolbar and menus, see Configuring Siebel Business Applications.
Workspace icon and user name.
Click the Workspace icon to navigate to the Workspace Dashboard view in Siebel Tools. For more information, see Workspace Dashboard in Siebel Tools.
Click the User icon (a man) to display the name of current workspace user, access the Settings button, or log out. Click the Settings button to set the date and time by which updated records need to be marked as changed.
The Workspace menu.
The Workspace menu displays different buttons that are used to configure and manage workspaces. These buttons are active or displayed depending on the current workspace user and the selected workspace.
The following table lists and describes the buttons on the Workspace menu:
Button Description Create
Click this button to create a new workspace.
Delete
Select a workspace and click this button to delete the selected workspace.
Open
Click this button to open an existing workspace.
Version
Click this button to view the version of the selected workspace.
Submit for Delivery
Click this button to change the status of the workspace and make it ready for delivering the changes to the MAIN workspace.
Rebase
Click this button to apply the changes that were made in the parent workspace into the current workspace.
Deliver
Click this button to deliver the changes in the workspace to the MAIN workspace.
This button is available only to the user who is also the owner of the MAIN workspace.
Checkpoint
Click this button to check in the changes that you made to the current version of the workspace.
Revert
Click this button to revert the changes that you made to the current version of that workspace.
Merge Reports
Click this button to view and resolve the conflicts that occurred during the rebase process.
Compare
Click this button to view the differences that are made to the objects in two selected workspace versions.
Undo Submit for Delivery
Click this button to cancel the workspace delivery process.
Title of the workspace and its latest version.
This section also include the Close button that is used to close the current workspace.
The Workspace pane.
This pane lists all available workspaces in the database and their statuses. This pane is expandable and collapsible. You can select a workspace and then view the versions of the selected workspace and the list of modified objects for the selected version.
By default, Web Tools opens the latest version of the root workspace and this workspace is set at the session. Also, the root workspace is the only workspace in the Workspace explorer pane and it is always a read-only workspace.
Depend on the workspace that you select in this pane, different buttons are available in the Workspace menu.
The following table describes the filter sections in the Workspace pane:
Option Description My Workspaces
Expand this section to view all workspaces that you own regardless of their status.
My In-progress Workspaces
Expand this section to view the workspaces that you own and that have the status of Edit In Progress.
Workspaces
Expand this section to view all workspaces that were created by all users of the current development environment.
The Modified Objects pane.
This pane lists the objects that were modified in the current version of the workspace. This pane displays the object name, object type, and operation type performed on the modified objects.
The Workspace Version pane.
This lists the versions of the selected workspace and the rebase version information. This pane also lists the author of the workspace, his/her email, date and time the workspace was modified, and the contact email, and a message of the last updated version.
Enabling Workspaces in Web Tools and Editing the Repository Objects
This topic discusses how to enable workspaces in Web Tools and edit the repository objects.
To enable the workspaces in Web Tools and edit the repository objects
Enable the workspaces by running the EnableWorkspace utility.
Log into the Web Tools environment.
By default, the MAIN workspace or the last-modified workspace opens.
Optionally, select Admin-Runtime Config, and then All Workspaces to view all existing workspaces.
Alternatively, select Admin-Runtime Config and then My Workspaces to view only the workspaces that you created.
Create a new workspace in the Workspaces window or open an existing one.
Modify, insert, or delete any object as required.
Note: Users can modify an object without locking that object.Return to the Workspaces window.
Click the workspace version to check the changes that you just made.
Optionally, click the Edit button to continue editing the object.
Perform the Rebase process.
Perform the Deliver process to deliver the changes to the MAIN workspace.
Confirm that the Deliver process has successfully completed.
Navigate to the Conflicts Resolution view.
By default, the values in the From Version Value list are committed to the target workspace’s To Version Value list during the Rebase process.
Optionally, override the values in the To Version Value list and select the Override option.
Save the record.
Resolve all conflicts as needed.
Perform the Checkpoint process on the rebased workspace.
Click the Finish button.
Click the Deliver button and then click the Start button to merge the changes to the mainline.
Click the Finish button to check in the MAIN workspace.
Optionally, open the MAIN workspace and click the Publish button to publish the newly changed values.
Note: If the object-level conflicts are not resolved by the system-selected solutions, then you need to open the MAIN workspace to directly edit it and perform the Publish process again.
For more information on how to enable the workspaces in Siebel Tools and edit the repository objects, see Editing the Repository Objects.