6Parallel Development Using Workspaces
Parallel Development Using Workspaces
Parallel Development enables Siebel workspace users to create and to work on integration branches. This tool is useful when users work in a parallel development environment. It maintains the relationship between the design time (workspaces) and the runtime repository tables even after the Parallel Development Using Workspaces feature is enabled on workspaces. Using this tool, users can create or open the workspaces from any parent or version workspace and get a consistent manifestation of the runtime metadata.
This chapter describes the Parallel Development Using Workspaces feature and how to use this feature for the Siebel Tools workspaces. These tasks are performed only by the users who have the permissions to use the Parallel Development Using Workspaces feature. This topic includes the following information:
Administering Parallel Development using Workspaces
This section describes how to perform the administrative tasks for the Parallel Development Using Workspaces feature. Note that only users with the administrative permissions can perform these administrative tasks:
Enabling the Parallel Development Feature for Siebel Tools Workspaces.
Setting an Integration Workspace as the Default Workspace Branch.
Setting System Preferences for Parallel-Development Workspaces.
For more information on how to detect errors and conflicts in the parallel-development workspaces, and then apply the resolution, see Detecting Conflicts in Workspaces and Applying Resolutions.
Enabling the Parallel Development Feature for Siebel Tools Workspaces
Only users that have administrative permissions can enable the Parallel Development Using Workspaces feature. In general, the Siebel administrators perform this task for all members in the development teams.
For more information on how to enable workspaces in Siebel Tools, see Workspaces Administration.
For more information on how to use the Workspaces feature in Siebel Tools as a Siebel developer or user, see “Using the Command Line.
To enable the Parallel Development feature for Siebel Tools Workspaces
As an administrator and owner of the development environment, log into the Siebel application that is set in the Composer mode.
Note: You can set the user preferences using either the Siebel application or Siebel Tools. To see the changes of the preferences in Siebel Tools, you must log out of Siebel Tools and then log in again. To see the changes of the preferences in Siebel application, you must restart the services of the application.From the toolbar, choose the Screens option, System Administration and then select the System Preferences menu item.
The System Preference Administration window appears.
Note: In Web Tools, click the Tools menu and then click the System Preferences menu item.In the System preferences section, set the following parameter value to Y (yes):
Enable Integration Workspaces=Y
The following image illustrates Siebel Tools displaying the System Preference Administration window.
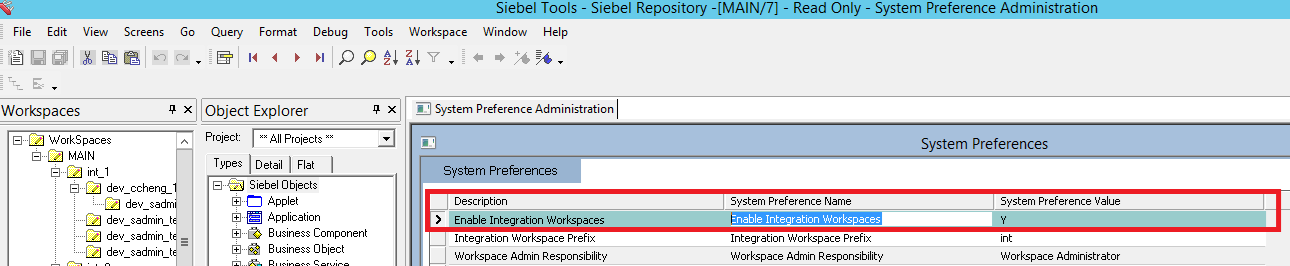
After setting the parameter Enable Integration Workspaces to Y, restart the services of Siebel Server Application to reflect the new parameter value on the server side.
The environment is now ready for all users to create the parallel-development workspaces.
For information about restarting Siebel Servers, see Siebel System Administration Guide.
Understanding Integration Workspaces in Siebel Tools
Users with the administrative permissions can create parallel-development integration workspaces in the production environment. Developers use these integration workspaces to set up a parallel release development environment. The names of all integration workspaces start with the prefix int_ and these workspaces have the corresponding run-time repository version.
Only administrators can perform these workspace operations on the integration workspaces: Submit for Delivery, Rebase, Delivery, and Undo Submit for delivery. By default, the Deliver and Rebase processes trigger the Publish process on an integration branch that is the parent branch of the workspace you are trying to deliver. Also, only administrators can deliver the changes in the integration workspaces to the immediate parent integration workspace, and the rebase process must be performed from the immediate parent integration workspace.
For more information on how to deliver workspace changes and rebase workspaces, see Using the Command Line“.
For more information on how to create development workspaces, see Understanding Development Workspaces in Siebel Tools, Creating Development Workspaces Using Siebel Tools, and Creating Development Workspaces in the Workspaces Dashboard.
After the Merge process from the source workspace to the destination workspace has completed, the Publish process runs automatically if the destination workspace is an integration workspace. The publish process is not initiated if the destination workspace is a development workspace. When the Publish process starts, processing updates all run-time repository tables with the latest metadata values. After the Publish process has successfully completed, users can see the latest compiled and published changes when they open the integration workspace in the Siebel application.
To avoid conflicts, it is recommended that you always create workspaces branching from the latest versions of the integration workspaces. For more information on how to resolve the conflicts in the emerging resolution window in Siebel Tools, see Detecting Conflicts in Workspaces and Applying Resolutions.
The parallel-development workspaces are incremented either when:
The child-level integration or development workspaces merge their object repository changes with them, or
Users perform the rebase operation on an integration workspace to uptake the changes that are made in the parent integration workspace (which means the Check Point option is not available for all users, including the administrators, to manually checkpoint the version of the integration workspaces).
Creating Integration Workspace in the Workspaces Dashboard
This topic describes the steps that administrators use to create an integration workspace in the Workspaces dashboard.
To create an integration workspace in the Workspaces dashboard
As an administrator, log into the Siebel application that is set in the Composer mode.
Click the Cube icon, after the menu bar and next to the Settings icon, to navigate to the Workspace dashboard.
Select the parent integration workspace.
Click the Create button.
The Create Workspace window appears displaying the following elements:
Name of the selected parent workspace.
Integration Workspace option.
Note: The Integration Workspace option is available only for administrators. The Integration Workspace option is not available for other users, including developers.Comment field.
Cancel and Create Workspace buttons.
Select the Integration Workspaces option.
In the Name field, the prefix of the workspace name changes to int_.
Append the workspace name text to the prefix int_.
For example, int_cir4build.
Optionally, enter a comment in the Comment field.
Click the Create Workspace button to complete the workspace creation.
For more information on how to create integration workspace using Siebel Tools, see Creating Integration Workspace Using Siebel Tools.
Creating Integration Workspace Using Siebel Tools
This topic describes the steps that administrators use to create the integration workspaces using Siebel Tools.
To create a new integration workspace using Siebel Tools
Administrators log into Siebel Tools.
Navigate to the Workspace Menu bar.
Select the Create option to display the Create Workspace window.
The Create Workspace window appears displaying the following elements:
Integration Workspace option.
Enter Workspace Name field.
Parent Workspace drop-down list. The available options are MAIN, int_1, and int_2.
Parent Workspace Version drop-down list.
Add Description field.
OK and Cancel buttons.
Select the Integration Workspace option.
After the Integration Workspace option is selected, the prefix of the workspace name changes to int_.
Select one of the integration workspaces from the Parent Workspace drop-down list.
Select a version from the Parent Workspace Version drop-down list.
Optionally, enter the workspace description in the Add Description field.
Click the OK button to create the integration workspace.
For more information on how to create integration workspace in the Workspaces dashboard, see Creating Integration Workspace in the Workspaces Dashboard.
Setting an Integration Workspace as the Default Workspace Branch
When users access the Siebel application after they set an integration branch as the default workspace branch, the system loads the application based on the latest metadata changes of the integration workspaces that they have set as the default workspace instead of the values in the MAIN workspace. This setting enables the Siebel application to display the latest metadata values that are stored in the run-time repository tables. Every time the integration workspace is incremented by one version, the latest metadata values are stored in the run-time repository tables. When the application is reloaded, changes are reflected in the Siebel application window based on the latest version of integration workspace.
Administrators can set any integration workspace as their default workspace branch where their changes do not impact other users who are branched out from the other integration workspaces. Meanwhile, developers can work in parallel on multiple features of Siebel application without disturbing other features. Moreover, developers can verify how their latest metadata configuration appears in the Siebel application window without delivering their changes to the MAIN workspace.
To set up an integration workspace in the environment as the default workspace branch, administrators must update the parameter WorkspaceBranchName at the component level as shown in the following example. Notice that administrators must run this parameter by connecting to the server manager:
Command:
change param WorkspaceBranchName=<workspace_name> for comp <OBjMgr_lang>
Example:
change param WorkspaceBranchName=int_ip2017rel for comp SCCOBjMgr_enu
To reflect the changes, administrators must restart the services of the Siebel server.
Setting System Preferences for Parallel-Development Workspaces
This section describes the important system preferences in the Parallel Development feature for Workspaces in Siebel Tools.
The following image illustrates the System Preference Administration window.
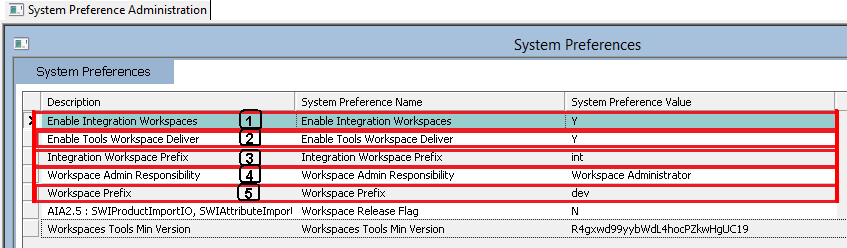
Explanation of the System Preference Administration window
The system preferences for the parallel development feature in workspaces include the following information:
Enable Integration Workspaces
To enable parallel-development workspaces, administrators must set this preference to Y (Enable Integration Workspaces=Y).
The default value for this preference is N. After the parallel-development workspaces merge successfully to the production environment, the default value will be set to Y.
After the administrator changes the Enable Integration Workspace value, they must restart the services to reflect the latest integration workspace preferences on the server side.
Enable Tools Workspace Deliver
To deliver and publish the workspace changes from Siebel Tools, administrators must set this preference to Y (Enable Tools Workspace Deliver=Y).
The default value for this Preference is Y. If administrators do not want to deliver the workspaces from Siebel Tools, they can set this preference to N (Enable Tools Workspace Deliver=N).
After the administrator changes the Enable Tools Workspace Deliver value, they must restart the services to reflect the latest integration workspace preferences on the server side.
Integration Workspace Prefix
Integration workspaces start with the prefix value of int, which is derived from the preference Integration Workspace Prefix.
If an administrator wants to set up a new prefix value, they must change the Integration Workspace Prefix preference value accordingly.
After the administrator changes the integration workspace prefix value, they must restart the services to reflect the latest integration workspace preferences on the server side.
Workspace Admin Responsibility
The Workspace Administrator Responsibility is granted only to Workspace administrative users who will have the full privileges to manage the integration/MAIN workspace.
For more information about the detailed tasks of Workspace Administrators, see Workspaces Administration.
Workspace Prefix
Development workspaces start with prefix value of dev, which is derived from the preference Workspace Prefix.
If an administrator wants to set up a new prefix value, he or she must change Workspace Prefix preference value accordingly.
After administrators change the workspace prefix value, they must restart the services to reflect the latest workspace preferences on the server side.
Launching the Web Client with a Specified Workspace
To launch the web client with a specified workspace on Siebel Tools, the administrator must update the [Workspace] and [ingraObjMrg] sections in the configuration file of the Siebel application.
For example, in the Siebel Financial application, they must update the [Workspace] sections in the fins.cfg file, which is the same for other applications. Administrators must update these sections in the respective applications’ configuration files.
[Workspace]
Name = int_ip2017
Version = Latest
[InfraObjMgr]
RepositoryType = RUNTIME
Using the Parallel Development Tools for Workspaces
Users with the authority of a developer can perform the following tasks:
Applying Parallel Development Using Workspaces Hierarchy
After the administrators enable the Parallel Development feature in a working environment, developers can create the N levels of hierarchy for the parallel-development workspaces.
You can apply a parallel-development hierarchy to create integration workspaces. The hierarchy of workspaces will be in the following combinations:
Integration workspace, integration workspace, followed by another integration workspace.
This combination is applied to the N levels and you can have multiple integration or development workspaces at one level that are parallel under one parent integration workspace.
Integration workspace, development workspace, followed by another development workspace.
This combination is applied to the N levels and you can have multiple development workspaces at one level that are parallel under one parent (integration or developer) workspace.
For more information about the integration workspaces, see Understanding Integration Workspaces in Siebel Tools.
For more information about the development workspaces, see Understanding Development Workspaces in Siebel Tools.
Understanding Development Workspaces in Siebel Tools
You can create the development workspaces by branching from either an integration workspace or a development workspace at the immediate parent level.
After opening the development workspaces, you can directly edit the workspace-supported repository object and complete the development configurations.
The names of all development workspaces start with the prefix dev_<userid>_.
Working on the development workspaces, note that:
Administrators can perform these workspace operations on the development workspaces: open, edit workspaces that support repository objects and complete their development configuration, submit for delivery, and rebase.
All developers can create development workspaces branching from integration workspaces. If you are a new developer, confirm with the administrators to ensure that you have the permissions of a Composer administrator in the production database.
While creating development workspaces on a specific release, development members should communicate with the administrators to select an integration workspace and define it as the parent workspace.
Users with the developer permissions can create the parallel-development workspaces by selecting one of their parent release integration workspaces as the parent workspace.
For example, if the parent release integration workspace is IP20xx_apps, the developer’s environment displays the parallel-development workspace trees as the following:
ip20xx_apps, dev_sadmin_l1, dev_ccheng_l2, followed by dev_cmorris_l3
Development teams can edit repository metadata or change the repository configuration only through the development workspaces.
Users with the developer permissions can open the development workspaces that they own to edit the repository configuration, checkpoint the version, revert the version changes, rebase the workspaces, change the state of the workspaces to Submitted to Delivery, and delete the workspaces (that is in the editable state if that workspace does not have a child workspace).
Users or developers can preview the development workspace in the Siebel application by clicking the Inspect button for the repository changes they made to that version. However, they cannot perform the Inspect task on integration workspaces.
Workspace developers cannot deliver their workspace changes directly to the integration workspaces after they complete the repository configurations on their development workspaces. In this case, they must change the status of the workspaces to Submitted for Delivery, and then the Siebel administrators approve and perform the deliver process.
Creating Development Workspaces in the Workspaces Dashboard
This topic describes how to create the development workspaces in the Workspaces dashboard.
To create the development workspace in the Workspaces dashboard
Log into the Siebel application that is set in the Composer mode.
Click the Cube icon to navigate to the Workspace dashboard.
Select the parent integration workspace or any parent development workspaces.
Click the Create button.
The Create Workspace window appears displaying the following elements:
Name of the selected parent workspace.
Name field.
Comment field.
Cancel and Create Workspace buttons.
Append the workspace name text to the prefix dev_ccheng_.
For example, dev_ccheng_bug12345.
Optionally, enter a comment in the Comment field.
Click the Create Workspace button to complete the development workspace creation.
Creating Development Workspaces Using Siebel Tools
This topic describes how to create development workspaces using Siebel Tools.
To create the development workspaces using Siebel Tools
Log into the Siebel Tools environment that is set in the Composer mode.
Navigate to the Workspace Menu bar and select the Create option.
The Create Workspace window appears displaying the following elements:
Enter Workspace Name field.
Parent Workspace drop-down list. The available options are MAIN, int_1, and int_2.
Parent Workspace Version drop-down list.
Add Description field.
OK and Cancel buttons.
In the Enter Workspace Name field, enter a name for the new development workspace.
In the Parent Workspace drop-down list, select an integration workspace or a development workspace as the parent workspace.
Note: You cannot select development workspaces when they are read-only, and these read-only workspaces are not listed in Parent Workspace drop-down list.Select a parent version.
Click the OK button to create the development workspace.