2Using Siebel Tools
Using Siebel Tools
This chapter describes how to use Oracle’s Siebel Tools. It includes the following topics:
Overview of Using Siebel Tools
Siebel Tools is an integrated development environment that you can use to customize Siebel CRM. You can use it to modify predefined Siebel objects or to create custom objects that meet your business requirements. For example, you can use Siebel Tools to modify the data model, modify business logic, or customize the user interface that the Siebel client shows. Siebel Tools allows you to develop a single configuration that you can use to do the following:
Deploy Siebel CRM across multiple types of clients
Support multiple Siebel Business Applications and languages
Upgrade Siebel product releases
Maintain Siebel CRM
Declarative configuration is a type of programming technique that uses objects and object properties in the Siebel repository to implement the logic that your business requires. Siebel Tools uses declarative configuration to create and modify the object definitions that define a Siebel application. Siebel Tools is not a programming environment. You do not modify the source code or write SQL. Siebel CRM uses the terms object and object definition differently than developers who use programming languages that use similar terms, such as object, object class, or object instance. For more information about the Siebel repository, see Managing Repositories For more information about the objects, object definitions, and the object hierarchy that Siebel CRM uses, see Configuring Siebel Business Applications.
Roadmap for Setting Up and Using Siebel Tools
To set up and use Siebel Tools, do the following tasks:
Process of Setting Up the Development Environment
To set up the development environment, do the following tasks:
Controlling How Siebel Tools Handles Versions for a Workflow Process or Task UI
Controlling How Siebel Tools Displays the Confirmation Dialog Box
This process is a step in Roadmap for Setting Up and Using Siebel Tools.
Enabling Workspaces in the Development Environment
In order to set up the Siebel development environment, the Siebel Administrator has to enable workspaces.
Installing Siebel Tools
In this guide, SIEBEL_TOOLS_ROOT represents the folder where you install Siebel Tools. This folder is C:\Siebel\release_number\Tools, by default.
For more information about:
How to install Siebel Tools, see the Siebel Installation Guide for the operating system you are using. For example, see Siebel Installation Guide for Microsoft Windows.
System requirements, such as supported versions of Microsoft Windows, see Siebel System Requirements and Supported Platforms on Oracle Technology Network.
Note: For Siebel CRM product releases 8.1.1.9 and later and for 8.2.2.2 and later, the system requirements and supported platform certifications are available from the Certifications tab on My Oracle Support. For information about Certifications, see article 1492194.1 (Article ID) on My Oracle Support.
This task is a step in Process of Setting Up the Development Environment.
Controlling How Siebel Tools Handles Versions for a Workflow Process or Task UI
You can control how Siebel Tools handles versions for a workflow process or task UI that you open with an editor, depending on the value of the Status property.
This task is a step in Process of Setting Up the Development Environment.
To control how Siebel Tools handles versions for a workflow process or task UI
In Siebel Tools, click the View menu, and then click Options.
In the Development Tools Options dialog box, click the General tab.
In the Workflow and Task Configurations section, set the options by using the descriptions in the following table, and then click OK.
Option Description Automatic Revision in WF/Task Editor and Version Check
If this check box:
Includes a check mark, and if you use an editor to open a workflow process or task UI, and if the Status property of this workflow process or task UI is Completed, then Siebel Tools creates a copy of this workflow process or task UI, sets the status for this copy to In Progress, and then opens an editable version of it in the editor.
Does not include a check mark, then Siebel Tools opens the editor, and then displays a version of the workflow process or task UI that you cannot edit.
Automatically Close All the Previous WF/Task Versions
If this check box includes a check mark, and if you use an editor to open a workflow process or task UI, and if the Status property of this workflow process or task UI is Completed, Not In Use, or Expired, then Siebel Tools closes any prior versions of this workflow process or task UI.
Setting the Language Mode
The language mode is a type of mode that allows you to configure Siebel CRM to display text in a language other than English. For example, the German (DEU) language mode allows you to view text in some objects of Siebel Tools in German, such as the text that a string contains or object definitions that the Object List Editor shows. The language mode determines the set of locale data that Siebel Tools uses when it compiles the repository, and during checkin and checkout. If you add a language to the Siebel database that does not come predefined with Siebel CRM, then this language must use all capital letters. For more information, see About Predefined Objects and Siebel Global Deployment Guide.
This task is a step in Process of Setting Up the Development Environment.
To set the language mode
Make sure the repository includes the language data that Siebel Tools must show.
In Siebel Tools, click the View menu, and then click Options.
In the Development Tools Options dialog box, click the Language Settings tab.
In the Tools Language Mode section, choose a value from the Language drop-down list, and then click OK.
(Optional) To enable language override, make sure the Enable and Use Language Override check box includes a check mark.
For more information, see the Enabling Language Override section in this chapter.
Click OK.
Enabling Language Override
A language override is a nontranslatable, locale property that you can configure differently for different locales. For example, you can configure Siebel CRM to use a specific height for the address field in French and to use a different height in English. If you enable language override, then Siebel CRM might create more locale records in the repository. To avoid unnecessary records, it is recommended that you enable language override only if your deployment requires it. For more information, see Configuring Nontranslatable Locale Object Properties and Configuring Siebel Business Applications.
Controlling How Siebel Tools Displays the Confirmation Dialog Box
You can control how Siebel Tools displays the confirmation dialog box.
This task is a step in Process of Setting Up the Development Environment.
To control how Siebel Tools displays the confirmation dialog box
In Siebel Tools, click the View menu, and then click Options.
In the Development Tools Options dialog box, click the General tab.
In the Editing Confirmation Dialogs section, configure Siebel Tools to do one of the following:
Display a confirmation dialog box. Add a check mark to a check box.
Do not display a confirmation dialog box. Remove a check mark from a check box.
Click OK.
Resetting Development Tools Options
If Siebel Tools behavior is not consistent with the preferences you set, then you can reset them.
This task is a step in Process of Setting Up the Development Environment.
To reset development tools options
Do one of the following:
Reset preferences in the Development Tools Options dialog box:
Click the View menu, and then click Options.
In the Development Tools Options dialog box, click the various tabs and reset preferences, as necessary.
Delete the file that stores your preferences:
Close Siebel Tools.
Navigate to the SIEBEL_TOOLS_ROOT
\BINfolder, and then delete the devtools.prf file.
Log in to Siebel Tools, click the View menu, and then click Options.
Set preferences in the Development Tools Options dialog box.
Siebel Tools stores the preferences that you set in the Development Tools Options dialog box. It stores these preferences in the devtools.prf file. If you delete this file, then Siebel Tools resets all your preferences to their default values.
Using the Object Explorer and Object List Editor
This topic describes how to use the Object Explorer and Object List Editor. It includes the following information:
Overview of the Object Explorer and Object List Editor
The Object Explorer is a window that displays the Siebel object hierarchy. It allows you to use a tree structure to navigate through the object types that the hierarchy contains. The Object List Editor is a window that displays the object definitions of the object type that you choose in the Object Explorer. It allows you to view and modify the object definitions.
How Siebel Tools Displays Object Types and Object Definitions
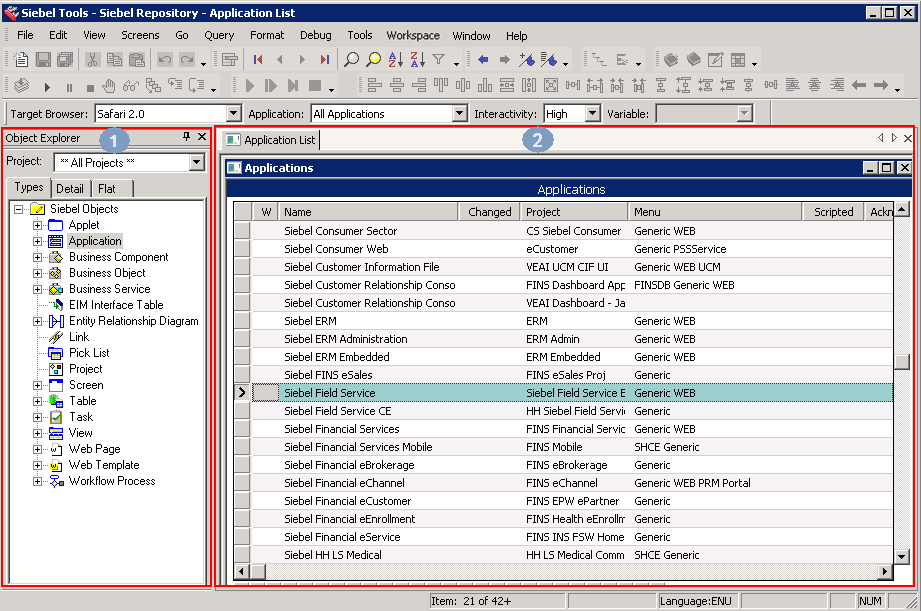
The following image illustrates how Siebel Tools includes an Object Explorer window and one or more Object List Editor windows. In this image, the Applications list in the Object List Editor is shown. For more information about the object hierarchy that Siebel CRM uses, see Configuring Siebel Business Applications.
Explanation of Callouts
The preceding image includes the following items:
Object Explorer. A window that displays object types. Allows you to navigate between each group of object definitions of an object type.
Object List Editor. A window that displays object definitions. For more information, see Using the Object List Editor.
An object type is an entity that includes a predefined set of properties. You can use it as a template to create an object definition. An application is one kind of object type. For more information, see About Predefined Objects.
An object definition implements one piece of the software. This object definition consists of object properties, which are characteristics of this piece of the software. The Object Explorer and Object List Editor display all the object definitions that the repository contains. Siebel Field Service is an example of an object definition of an application. Siebel CRM uses the terms attribute and property. These terms have the same meaning.
If an object type is not visible in the Object Explorer, then you can display it. For more information, see Displaying Object Types in the Object Explorer.
How Siebel Tools Displays the Siebel Object Hierarchy
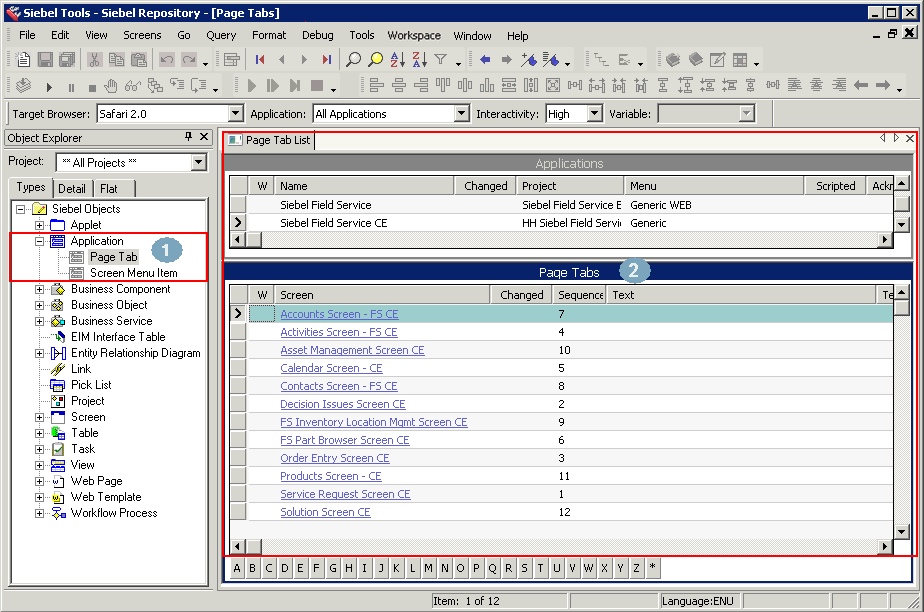
The following image illustrates a parent and child relationship, which is a type of hierarchical relationship between one object type and another object type. In this image, the Page Tabs object definitions for the Siebel Field Service application are shown.
Explanation of Callouts
The preceding image includes the following items:
Object type hierarchy. In this example, the Page Tab object type and the Screen Menu Item object type are child objects of the parent Application object type. The Object Explorer displays this relationship as a hierarchical tree that you can expand or collapse. For more information, see Using the Types Tab.
Object definition hierarchy. The Object List Editor uses two windows to display this parent and child relationship. In this example, the Applications list displays the object definition for the parent Siebel Field Service application. The Page Tabs list displays the object definitions of the child page tabs that the repository contains for the Siebel Field Service application.
If you click the Types tab in the Object Explorer, then Siebel Tools arranges folder icons in a hierarchy. An object type that the Object Explorer shows succeeding another object type and indented after it is the child in a parent and child relationship. The object type that the Object Explorer shows preceding the child object type is the parent. A parent object type can include multiple child object types.
About Predefined Objects
This guide uses the term predefined to describe an object or configuration that comes already defined when you first install Siebel CRM or Siebel Tools. Each object that the Object List Editor shows after you install Siebel Tools, but before you make any modification, is a predefined object. A custom object is a new object that you create. A modified object is a predefined object or custom object that you modified.
Locating and Modifying Object Definitions in the Object List Editor
The example in this topic locates the object definitions for a single object type in the Object List Editor, and then modifies the value in a property of this object definition. You use the Object Explorer and Object List Editor to modify the Comment property of the Siebel Call Center application, and then examine the page tabs that this application uses. For information about locating object definitions for multiple object types, see Searching the Repository.
To locate and modify object definitions in the Object List Editor
Log in to Siebel Tools.
Click the View menu, and then click Object Explorer.
You can also press CTRL+E.
In the Object Explorer, click Application.
For more information, see How Siebel Tools Displays Object Types and Object Definitions.
In the Applications list, query the Name property for Siebel Call Center.
For more information, see Using the Query Menu to Run a Query.
If the object definition exists, then the Object List Editor displays it in the Applications list. Querying for a record in this way causes Siebel Tools to display a single, isolated record. This technique helps to make sure that you choose the correct object definition and that it remains chosen while you use the Object Explorer and Object List Editor to navigate the object hierarchy, or if you do other work, such as delivering or revising. It reduces the possibility that you might mistakenly modify another object definition. For more information, see How Siebel Tools Displays Object Types and Object Definitions.
Right-click the Siebel Call Center record, and then click Lock Object.
Note: In Web Tools, locking a project is still required before you edit the non-workspace objects. The non-workspace objects are Table, Task, Workflows, Repository, Type, EIM Table, Projects, Dock objects, Schema Maintenance, and Server Components. For more information, see Using Workspaces in Siebel Tools.Locate the property you want to modify, and then type a new value in this property, choose a value from a drop-down list, or add a check mark to a check box.
In this example, locate the Comments property. Use the scroll bar at the end of the Object List Editor to scroll toward the end.
Enter the following text in the Comments property:
This is the object definition for the Siebel Call Center application.
For more information, see Using the Object List Editor.
To save your modifications, click anywhere outside of the row.
In the Object Explorer, expand the Application tree, and then click Page Tab.
Notice the records that the Object List Editor shows in the Page Tabs list.
For more information, see How Siebel Tools Displays the Siebel Object Hierarchy.
Modifying Multiple Records in the Object List Editor
You can modify multiple records in the Object List Editor of Siebel Tools.
To modify multiple records in the Object List Editor
In the Object List Editor, locate the objects you want to modify.
To choose multiple records, hold down the CTRL key while you click each record you want to modify.
Click the Edit menu, and then click Change Records.
In the Change Selected Records dialog box, choose the field you want to modify, and then enter a value for that field.
Click OK.
Displaying Object Types in the Object Explorer
This topic describes how to display object types in the Object Explorer.
To display object types in the Object Explorer
Log in to Siebel Tools.
Click the View menu, and then click Options.
Click the Object Explorer tab.
Note: In Web Tools, click the pencil icon from the menu before the Object Explorer tabs.Scroll down through the Object Explorer Hierarchy window until you locate the object type you want to display.
Make sure the object type you want to display includes a check mark, and use the values from the following table.
Check Box State - Web Tools Check Box State - Siebel Tools Description 

Display this object and all child objects of this object.


Hide this object and all child objects of this object.


Display this object. Display some child objects and hide some child objects.
If you add a check mark to a top-level object type, such as Applet, then Web Tools and Siebel Tools add a check mark to all child objects that the Applet contains. You can expand the parent tree to display only some child objects. A top-level object type is an object type at the start of the object hierarchy. The object types that the Object Explorer shows immediately after you install Siebel Tools or Web Tools, but before you expand any object types in the Object Explorer, are top-level object types.
(Optional) To restore the Object Explorer to the settings when you first install Siebel Tools or Web Tools, click Default.
Note: In Web Tools, click the Refresh icon to restore the default settings.Click OK.
Note: In Web Tools, click Save.
Displaying Hidden Object Types and Properties
This topic describes how to display hidden object types and properties. A hidden object type is an object type that Siebel CRM does not show in the Siebel Web Client. For more information, see Siebel Object Types Reference.
To display hidden object types and properties
Close Siebel Tools.
Use a text editor to open the
tools.cfgfile.In the Siebel section, set the value of the following parameter to
All:ClientConfigurationModeSave the file, and then restart Siebel Tools.
Using Lists and Tabs in the Object Explorer
This topic describes how to use lists and tabs in the Object Explorer.
Using the Project Drop-Down List
The Object Explorer includes the Project drop-down list that allows you to filter objects according to project. The example in this topic describes how to use the Project drop-down list so that the Object Explorer displays only the object types that reference the Account project.
To use the Project drop-down list in Siebel Tools
In the Object Explorer, click the Project drop-down list.
Choose Account.
You can choose All Projects in the Project drop-down list to reset the Object Explorer so that it displays objects types for all projects.
Using the Types Tab
Siebel Tools displays the Types tab, by default. You can use it to navigate the object hierarchy. The Object Explorer does not display all object types, by default. For more information, see Displaying Object Types in the Object Explorer. For more information about the object hierarchy, see Configuring Siebel Business Applications.
To use the Types tab
In the Object Explorer, click the Types tab.
Siebel Tools displays the top-level object types in alphabet order.
To display child object types, expand the tree for an object type.
To expand the tree, you click the plus sign (+) that the Object Explorer shows next to the object type. For example, expand the Business Component tree.
To collapse an object type, click the minus sign (–).
Note: In Web Tools, click the arrow sign to expand and collapse the Object Explorer tree.
Using the Detail Tab
The Object Explorer includes a Detail tab that allows you to view and expand an object type. If you use the Detail tab, then Siebel Tools displays object properties in the Object List Editor only for the object that you choose.
Using the Flat Tab
The Object Explorer includes a Flat tab that displays all object types in a single, alphabetic list. It does not display a hierarchy. You can use it to do the following:
Find a child object with an unknown parent. For example, you create a new field but do not remember the business component that this field references. You can click the Flat tab, click the Field object type, and then query the Name property for the field name. Each record that Siebel Tools returns includes a parent property that displays the business component name.
Determine how Siebel CRM typically uses objects and properties, such as how it uses a predefault value or the format that it uses in a calculated field.
To use the Flat tab
In the Object Explorer, click the Flat tab.
The Object Explorer displays a list of all the object types in the repository. It displays this list in alphabetic order and with no hierarchy.
In the Object Explorer, click Field.
The Object List Editor displays all the object definitions in the repository for the field object. This example describes how to use the flat tab to identify all the business components that include a field named Account Address.
In the Fields list, query the Name property for Account Address.
The Object List Editor displays a list of all the field object definitions in the repository with the name Account Address.
Right-click in the Fields list.
Note: In Web Tools, use the Columns Displayed menu from the gear icon or press CTRL+SHIFT+K.In the Columns Displayed dialog box, scroll to the end of the Displayed Columns window, choose Parent Business Component, click the move to first arrow, and then click OK.
The Parent Business Component column in the Object List Editor lists all the business components that include a field named Account Address.
In the Parent Business Component property, click Order Entry - Orders.
The Object List Editor displays the object definition for the Order Entry - Orders business component.
Using the Object List Editor
You can use the Object List Editor to edit the properties of an object definition. For example, if you choose the Application object type in the Object Explorer, then the Object List Editor displays a list of all the applications that the repository contains. One row in the Object List Editor represents one object definition. For example, the values that the Object List Editor shows in the properties of the Siebel Call Center application represent one object definition.
The Object List Editor displays each object property as a column in the list. Information that you enter in each column represents a property value. You can modify the property values in an object definition. You cannot modify the set of properties that constitute an object definition. You can also use the Properties window to edit these properties. Modifying the value of a property in the Properties window also modifies the corresponding value of that property in the Object List Editor window. For more information, see Using the Properties Window.
Controlling How Siebel Tools Displays the Object List Editor
You can control how Siebel Tools displays the Object List Editor.
To control how Siebel Tools displays the Object List Editor
In Siebel Tools, click the View menu, and then click Options.
In the Development Tools Options dialog box, click the List Views tab, and then set the options using the information from the following table.
Option Description Small, Normal, or Large
Sets the size of the font that Siebel Tools shows.
Tight, Normal, or Loose
Sets the spacing that Siebel Tools uses between rows.
Horizontal Grid Lines
Displays or hides horizontal grid lines in the list.
Vertical Grid Lines
Displays or hides vertical grid lines in the list.
Alternating Row Color
Displays a different color for every other row.
Mouse Focus Rectangle
Displays or hides a dotted line around the record that you choose.
Using the W Property
If an object is locked and editable, then Siebel Tools displays a pencil icon in the W property in the Object List Editor. The pencil icon in How Siebel Tools Displays the Siebel Object Hierarchy indicates that all objects in the Object List Editor are locked and editable. If you lock a parent object, then Siebel Tools locks all child objects of this parent throughout the hierarchy. If you lock a child object, then Siebel Tools locks all objects that are parents of this child throughout the hierarchy.
Using the Changed Property
If you edit a record, then Siebel Tools adds a check mark in the Changed property. This check mark indicates that you modified this object definition since a specific date and time. If the Changed property does not include a check mark, then no modification has occurred since the date and time that you specify in the General tab of the Development Options dialog box. If you modify a child object, then Siebel Tools also adds a check mark to the Changed property of all objects that are parents of this child in the hierarchy. You can control how Siebel Tools displays the check mark in the Changed property.
To use the Changed property
In Siebel Tools, click the View menu, and then click Options.
In the Development Tools Options dialog box, click the General tab.
In the Changed Date section, set the Date and Time fields, and then click OK.
If a modification occurs on a record that the Object List Editor shows, and if this modification occurs:
On or after the date you specify. Siebel Tools displays a check mark in the Changed property.
Before the date you specify. Siebel Tools does not display a check mark in the Changed property.
Note: For more information on how the change is handled in Web Tools, see Workspaces Dashboard in Web Tools.
Using the Link
If the property value in the Object List Editor references the name of another object, then Siebel Tools displays this value as a link that you can click. If you click this link, then Siebel Tools displays the object definition of the item you clicked.
To use the link
Make sure you are assigned the Developer responsibility in the Administration - Application screen, Responsibilities view in the Siebel client.
For more information, see Siebel Security Guide.
Using the Inactive Property
If the Inactive property is TRUE, then Siebel Tools and Web Tools deactivate the record in the repository the next time you deliver your modifications. For more information, on how to deliver your workspaces see Delivering Workspaces.
To use the Inactive property
If an object definition becomes obsolete due to an update or due to a new requirement, then you must not delete the unused objects. Instead, it is recommended that you set the Inactive property of this object definition to TRUE.
Siebel CRM does not reference an inactive object.
Defining the Name of the User Property Object Type
It is not necessary to enter the name of a valid user property if you add a user property to an object, such as an applet or business component. Instead, you can use a drop-down list in the Name field of the user property. Siebel Tools then displays a dialog box that lists the valid user properties that you can define for the object. For more information about user properties, see Siebel Developer's Reference.
Using Menus and Running Queries
This topic describes how to use menus and run queries.
Using the Menu Bar
The menu bar follows the title bar of the Siebel Tools interface. It includes the same menus that a typical Microsoft Windows application includes, such as File, Edit, and Help. You click a menu on the menu bar to display menu items. Siebel Tools disables the menu items that are not available. For more information, see Menus and Menu Items on the Menu Bar.
To use the Menu Bar
Log in to Siebel Tools, and then click a menu on the menu bar.
Using a Right-Click Menu
A right-click menu is a type of context-sensitive menu that appears if you right-click an object or an element. It allows you to do the following:
Create, copy, or delete a record.
Undo modifications that you make to a record.
Display the name and status of a toolbar. You can right-click any toolbar. You can also customize how a toolbar appears.
Check out or lock an object.
Add an object to an archive.
Access wizards.
Running Queries
This topic describes how to run a query in the Object List Editor. If you use the Query Menu, then Object List Editor searches for objects according to the conditions that you enter in one or more properties. You can use a simple query or a compound query. You can create, refine, or activate a query from the Query menu or from the List toolbar. You can also use shortcut keys instead of using the Query menu.
Using the Query Menu to Run a Query
This topic describes how to use the Query Menu to run a query.
To use the Query Menu to run a query
In the Object Explorer, click the object type you want to locate.
Click the Query menu, and then click New Query.
Siebel Tools displays an empty record in the Object List Editor.
Note: In Web Tools, search using the Filter preceding the list of objects or use the object’s menu in the Object List Editor.In the Object List Editor, enter the query.
For more information, see Using a Simple Query and Using a Compound Query.
Click the Query menu, and then click Execute Query.
Siebel Tools displays the records that meet the query criteria that you entered.
(Optional) To refine the query, do the following:
Click the Query menu, and then click Refine.
In the Object List Editor, add more query conditions.
Click the Query menu, and then click Execute Query.
Using Shortcut Keys to Run a Query
You can use a shortcut key to run a query.
To use shortcut keys to run a query
In the Object Explorer, click the object type that you want to locate.
In the Object List Editor, enter CTRL+Q in Siebel Tools or ALT+Q in Web Tools.
In the Object List Editor, enter the query.
For more information, see Using a Simple Query and Using a Compound Query.
Press the ENTER key.
Siebel Tools displays the query results.
Using a Simple Query
The following table describes the operators that you can use to create a simple query. A simple query is a type of query that locates records according to one condition. A check mark in a property that can contain a Boolean value represents TRUE. The Changed property is an example of a property that contains a Boolean value. For more information about query operators and Siebel data types, see Siebel Developer's Reference.
Table Simple Query Operators
| Operator | Description |
|---|---|
= |
Equal to. |
< |
Less than. |
> |
Greater than. |
<> |
Not equal to. |
<= |
Less than or equal to. |
>= |
Greater than or equal to. |
* |
A wildcard. An asterisk (*) can represent any number of characters, including no characters. |
? |
A wildcard. A question mark (?) can represent any single character. |
IS NOT NULL |
Queries for a property that is not empty. |
IS NULL |
Queries for an empty property. |
LIKE |
Queries for a value that begins with the string that you enter. |
NOT LIKE |
Queries for a value that does not start with the string that you enter. |
" " |
Queries for a string that includes a special character. For example, enter "MyQuery's Text" to query for the MyQuery’s Text string. If your query text includes a special character, then you must use quotes to enclose the query. |
EXISTS ( ) |
Queries for a value in a multi-value group. |
~ |
Forces the case of the text string to use the case that follows the tilde (~). |
Using a Compound Query
A compound query is a type of query that locates records according to more than one condition. You can use parentheses to control the order that Siebel Tools uses to do a compound query. Siebel Tools runs the query according to the expression that you enter. It starts with the inside parentheses and then proceeds to the next, similar to the order in which you read English.
The following table describes operators that you can use for a compound query. You can combine simple conditions and compound conditions in a single query. For more information, see Siebel Developer's Reference.
Table Compound Query Operators
| Operator | Description |
|---|---|
AND |
All the conditions that the AND operator connects must be true. |
OR |
At least one of the conditions that the OR operator connects must be true. |
NOT |
The condition that the NOT operator precedes must be false. |
To use a compound query, do one of the following:
Enter conditions in two or more properties.
When you run the query, Siebel Tools uses an AND operator between the conditions that you enter.
Use OR, AND, and NOT operators in a single property.
Removing Query Results from the Object List Editor
You can remove query results from the Object List Editor.
To remove query results from the Object List Editor
Click the Query menu, and then click New Query.
Do not enter any values in the Object List Editor.
Click the Query menu, and then click Execute Query.
Getting Documentation About an Object
This topic describes how to get documentation about an object.
To get documentation about an object
Open Siebel Tools.
In the Object Explorer, click an object type, such as Business Component, and then press the F1 key.
Siebel Tools Online Help appears with documentation about the selected object type, including information about its properties. The content in this online help also appears in Siebel Object Types Reference.
Using Windows, Wizards, and Toolbars
This topic describes how to use windows, wizards, and toolbars. It includes the following information:
Using the Properties Window
The Properties window is a window that displays the properties and the property value for the object that you choose in the Object List Editor. It displays the name of this object and the name of the property in the one column and the property value in the next column. Siebel Tools displays properties in the Properties window in alphabetic order. You can click the Categorized tab to view these properties grouped according to category. The Properties window does not display the Project property or the Changed property.
In this example, you use the Properties window to modify the Comments property of the Siebel Call Center application.
To use the Properties window
Locate the Siebel Call Center application in the Applications list.
For more information, see Locating and Modifying Object Definitions in the Object List Editor.
Click the View menu, Windows, and then click Properties Window.
In the Properties window, enter the following text in the Comments property:
I can modify values in the Properties window or in the Object List Editor.
To verify your modifications, examine the Comments property in the Applications list. It includes the values you entered.
Using Web Templates
Web Template is an applet in Web Tools that displays the HTML code of a Siebel Web Template in an editor and also lets you preview the object design.
To use the Web Templates applet
In Web Tools, navigate to Object Explorer and then click the Web Template object.
To filter the templates, you can use the filter preceding the list of objects or run a query using the gear icon in the Object List Editor applet.
Drill down on the Web template that you want to view or modify.
Web Tools displays the HTML code for Siebel Web Template in Object List Editor. To modify, you must first open a workspace. To do so, see Navigating to the Workspace Dashboard in the Web Tools Mode Application.
If the Web template is editable, you can edit the HTML code in the editor.
You can customize the editor with options such as auto-close tags, hints, display of line numbers or Object Design hierarchy, and indentation. The settings you select are automatically available whenever you access the editor.
Click the Preview (eye-shaped) icon to preview the object design.
You can toggle between the editor and preview.
Click the Back button to exit the preview.
Using the Multi Value Property Window
The Multi Value Property Window allows you to view and set values for multi-value properties when you use one of the following designers:
Entity Relationship Designer
Task Designer
Workflow Process Designer
For more information about multi-value properties and how to use the Multi Value Property Window, see Siebel Business Process Framework: Task UI Guide and Siebel Business Process Framework: Workflow Guide.
Using the Bookmarks Window
The Bookmarks window is a window that allows you to navigate directly to an object that you use frequently. For more information, see History Toolbar.
Displaying, Docking, and Stacking Windows
This topic describes how to display, dock, and stack windows.
Displaying a Window
You can display or hide a window.
To display a window
In Siebel Tools, click the View menu, click Windows, and then click the window that you want to display.
You can also click the Go menu, and then click Bookmarks List to display the Bookmarks window.
To hide a window, do one of the following:
Click the Close button in the title bar of the window.
Right-click the window that you want to hide, and then click Hide.
Docking a Window
You can dock a window in a corner of the main window.
To dock a window
Relocate the window to the area of the main window where you want to dock the window.
To undock a window, you can right-click the window, and then click Docked.
To prevent Siebel Tools from docking a window when you move it, you can hold down the CTRL key while you move the window.
Displaying a Window as a Tab
You can display a docked window, including the Object Explorer, as a tab. You can open, close, or dock a tabbed window.
To display a window as a tab
Right-click the window, and then click Hide.
Siebel Tools collapses the window and displays a tab for it at the margin of Siebel Tools.
To display a tabbed window:
Temporarily. Place your curser over the tab that represents the window.
Permanently. Place your curser over the tab that represents the window, and then click the push pin in the window title bar.
Stacking Windows
You can stack windows over each other if they are floating.
To stack windows
Relocate a floating window to another floating window.
Siebel Tools creates a single window that includes both windows, and it adds a tab that represents each window. You can click the tabs to navigate between these stacked windows.
Resetting Windows
You can reset windows to the display that Siebel Tools uses immediately after you first install it.
To reset windows
In Siebel Tools, click the View menu, and then click Reset Windows.
Siebel Tools closes all windows except the Object Editor and the Object List Editor. It pins the Object Editor and the Object List Editor to their placeholders and resizes them to their original size.
Using a New Object Wizard
A new object wizard is a feature that you can use that guides you through the steps of creating a new object. It prompts you to configure the properties and objects that Siebel Tools requires according to the object type that you are creating. You can use a new object wizard to create the following objects:
General object. For example, a business component, table, view, or applet method menu item.
Applet object. For example, a list applet, form applet, MVG Applet, or chart applet.
EAI object. For example, an integration object.
Task object. For example, a task, task applet, task view, or transient business component.
For more information about how to use a wizard for a particular object type, see Configuring Siebel Business Applications.
To use a new object wizard
Do one of the following:
Click the File menu, and then click New Object.
Siebel Tools displays the New Object Wizards dialog box.
Right-click an object in the Object List Editor, and then click New Object Wizards.
Siebel Tools displays a list of wizards that are specific to the object type that you choose.
Choose a wizard.
Using the Toolbars
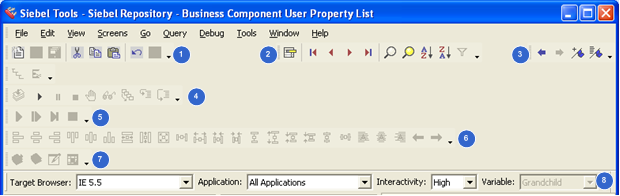
The following image illustrates the toolbars that you can use in Siebel Tools. A toolbar is active only if the object type or window that uses it is active. You can relocate toolbars using the mouse. You can display and hide toolbars.
Explanation of Callouts
Siebel Tools includes the following toolbars:
Edit Toolbar. Allows you to use edit tools, the New Object wizard, and undo and redo options. You can right-click a field in the Object List Editor to display a menu of edit tools.
List Toolbar. Allows you to insert a new record, move forward and backward through records, query records, and sort records. It manages records that the Object List Editor shows.
History Toolbar. Allows you to retrace your steps, and to create and navigate to bookmarks.
Debug Toolbar. Allows you to access debug tools that you can use with Siebel VB and Siebel eScript. For more information, see Using Siebel Script Editors
Simulate Toolbar. Allows you to simulate a workflow process.
Format Toolbar. Allows you to apply a format to an applet control. This control uses a Web template that uses a grid layout.
WF/Task Editor Toolbar. Allows you to publish, revise, or expire a workflow process or task UI. You can activate a workflow process if you are the owner of the root workspace and the workflow is delivered into it.
Configuration Context Toolbar. Allows you to define settings for Web browser layout and scripting.
Displaying a Toolbar
You can display a toolbar.
To display a toolbar
In Siebel Tools, click the View menu, click Toolbars, and then click the menu item that represents the toolbar that you want to display.
If Siebel Tools displays a check mark next to the menu item that represents the toolbar, then the toolbar is visible.
Displaying the Status Bar
You can display the status bar.
To display the status bar
In Siebel Tools, click the View menu, and then click Status Bar.
If Siebel Tools displays a check mark next to the Status Bar menu item, then the Status Bar is visible.
Using Editors in Siebel Tools
This topic describes how to use some of the editors that you can use in Siebel Tools. It includes the following information:
Using an Editor That Includes a Canvas
A canvas is a background that appears in different designers. It includes a work area that allows you to move or rearrange objects. For example, the Task Designer allows you to move a Siebel Operation step from the Palette window to the canvas. The canvas also indicates whether or not you can edit an object.
The example in this topic uses the canvas that appears in the Task Designer for the FS Asset To Contract Task.
To use an editor that includes a canvas
In the Object Explorer, click Task.
In the Tasks list, locate the FS Asset To Contract Task.
Siebel Tools displays two records for the FS Asset To Contract Task. For more information, see How Siebel Tools Displays Object Types and Object Definitions.
Use multiselect to choose both records in the Tasks list.
For more information, see Choosing More Than One Record in the Object List Editor.
Right-click the tasks that you chose in Step 3, and then click Lock Object.
Use the canvas for an object that you can edit:
Right-click the task that includes In Progress in the Status property, and then click Edit Task Flow.
Siebel Tools displays the canvas as a solid grid, which indicates that you can edit the task. It displays task objects over this grid.
To verify that you can edit the task, move an existing object.
- Click the File menu, and then click Close.
- In the Confirm dialog box, click No.
Use the canvas for an object that you cannot edit:
Right-click the task that includes Completed in the Status property, and then click Edit Task Flow.
Siebel Tools displays the canvas as a solid background with no grid, which indicates that you cannot edit the task. Some editors, such as the Workflow Process Designer, use a colored canvas to indicate that you cannot edit the object.
To verify that you cannot edit the task, do the following:
Attempt to move a Siebel Operation step from the Palette window to the canvas.
Attempt to move an existing object.
Click the File menu, and then click Close.
Right-click the tasks that you chose in Step 3, and then click Unlock Object.
Choosing More Than One Record in the Object List Editor
You can use multiselect to choose more than one record in the Object List Editor.
To choose more than one record in the Object List Editor
Do one of the following:
To choose records that are not consecutive, hold down the CTRL key while you click each record.
To choose multiple records that are consecutive, click a record, hold down the SHIFT key, and then click another record.
Editors That Include a Canvas
The following table describes the editors that include a canvas. You can use these editors with the Palettes Window
.
Table Editors That Include a Canvas
| Editor | Description |
|---|---|
Entity Relationship Designer |
Allows you to diagram the business entities that your configuration uses and represent relationships between these entities. For more information, see Configuring Siebel Business Applications. |
Task Designer |
Allows you to create a user interface that assists the user in completing a job task. Allows you to add steps and connectors to a task UI. For more information about task UI and using the Task Designer, see Siebel Business Process Framework: Task UI Guide. |
Workflow Process Designer |
Allows you to define, manage, and enforce the business processes that your company uses. Allows you to add steps and connectors to a workflow process. For more information about workflow processes, using the Workflow Designer, and using the Workflow Simulator, see Siebel Business Process Framework: Workflow Guide. |
Using a Script Editor
If you cannot use declarative configuration to meet your requirements, then you can use the Server Script Editor and the Browser Script Editor in Siebel Tools to create a script. You use these editors to add a script to a Siebel object. You can use the following types of script:
Siebel VB
Siebel eScript
Browser Script
For information about declarative configuration, see Overview of Using Siebel Tools. For information about scripting, see Using Siebel Script Editors
Using IDE in Web Tools
Overview of Integrated Development Environment
In Web Tools, Integrated Development Environment (IDE) provides a selection of tools for you to create or modify a Siebel object. You can access IDE through the preview mode of View or Applet Web templates in the Object Explorer. IDE helps you configure new applets and views or modify existing ones. You can also preview your changes from within IDE for the desired application. To exit IDE and revert to Object Explorer, you need to click the Close button on the IDE title bar.
To learn more about the various sections of IDE, see the following table.
Table Sections of View and Applet Web Template IDE
| Section | Type of Editor | Description |
|---|---|---|
Title bar |
Both |
Displays the view or applet you selected for update. It also has the Close button to exit IDE. |
Form Factor |
Both |
Helps you view the layout in three different form factors: Desktop, Tablet, and Mobile. This helps fine tune the layout as per your requirement and visualize the result. For example, placeholders that display in a row in Desktop will stack under each other in a column in Mobile due to restricted space. |
Show More/Show Less |
Applet Web Template Editor |
It is next to the Form Factor buttons and toggles to display more or less number of fields and columns in applets. In grid-based form applets, you can further fine-tune the fields that will display by clicking the pin icon that appears on the control/column after you move it to the form. The pin is a toggle to enable/disable a red border around the control and its label. Appearance of the border indicates that the control will display only during the Show More mode of the applet. |
Applications |
Both |
Lists Siebel applications so that you can select the application that will reflect your changes. In Applet Web Template Editor, you can select All Applications to make your changes available to all applications. You can also select a particular application in which you want to use the applet. If you select a specific application, your changes will be available for this applet only in the selected application. In View Web Template Editor, you have the preview option to view your changes within IDE. Before you obtain the preview, you must set the user property of the selected application. The preview displays the objects in context but without data. When you want to view the changes made in either editor with data, you need to log in to the actual application and submit the changes for delivery. |
Library |
View Web Template Editor |
Lists preconfigured applets you can map to the selected view. To unmap, you can click the Trash icon at the far end of the applet. |
Web Template |
Applet Web Template Editor |
Displays all the web templates of a selected applet so that you can select to work on another web template from within the IDE itself. For each web template, this pane lists Web Controls that you can use to create a control or a column. In Controls/Columns, the pane lists pre-configured controls/columns and their labels for the applet. You can also filter on unmapped controls/columns to select a required object quickly.
Note: In grid-based applets, the controls and their labels display separately under the Name (control) and Type (label) columns so you need to move them to the canvas one at a time. The difference between a control and its label is that the control has a border.
|
Canvas |
Both |
Contains placeholders to receive an object. Click (+) to show additional unmapped placeholders. Click the Trash icon to unmap an object and reuse a placeholder. You can resize the canvas from both the Library and Property pane sides.
Note: If a workspace is open then the editor’s canvas is white, which indicates that you can now perform actions on it. If the workspace is closed then the canvas is grey and non-editable. In Applet Web Template, you can unmap individual web controls and controls/columns.
|
Properties |
Both |
Lists the properties of currently selected object, web control, or control/column. If you click on an empty placeholder then this section will be blank. If you click outside a placeholder, on the canvas, then it will display the selected property of the view or applet. |
Using a Web Page Editor
Web Tools supports Web Page Editor for both edit and preview of the code.
To use a web page editor
In the Object List Editor, locate the web page that you want to modify.
Click the Preview (eye-shaped) icon to preview the design in the same page as the object.
Note: You can make changes to the web page in its record.To save your changes to the web page or exit the preview, step off the record.
Using a View Web Template Editor
You sometimes have to modify an existing view to add a new applet or remove an existing one. You can do these tasks in View Web Template Editor, which is available in IDE. For more information about IDE, see Overview of Integrated Development Environment.
To use a View Web Template editor
Create or open a workspace.
In the Object List Editor, go to View and search for a view where you want to add a new applet.
For example, search for Account List View.
In the View Web Template of the view, click the Preview button to view the IDE for View Web Template Editor. The IDE for the view displays.
The Property pane in the IDE displays the property of the selected view web template similar to that in Object List Editor.
Select a form factor in which to view your changes. The default view is Desktop.
In the Library pane, search for an applet that you want to add to the view.
For example, search for Account Contact List Applet.
Select the applet and, with the mouse button depressed, move the selected applet onto an unused placeholder then release the mouse button. The Properties pane displays the property for the new applet.
For example, move it to placeholder 14. If the placeholder is not visible, then click the plus sign on the canvas until you reach it or move to any unused placeholder.
Select the application you want to preview from the Applications drop-down list.
For example, select Siebel Universal Agent to preview changes in the Call Center application.
Click the arrow button next to the Application drop-down list to preview the changes from within Web Tools.
Using an Applet Web Template Editor
You can use Applet Web Template Editor to modify existing controls or add new ones. You can do so for any of the web templates of the applet without exiting IDE to select the next web template. You must access this editor through IDE. For more information about IDE, see Overview of Integrated Development Environment.
To use an Applet Web Template editor
Create or open a workspace.
In the Object List Editor, go to Applet, Applet Web Template and then search for the applet that you want to modify.
For example, search for SIS Account Entry Applet.
Select the web template that you want to modify and then click the preview button to view the IDE for Applet Web Template Editor.
Select a form factor to preview your changes.
Select the application you want to modify from the Applications drop-down list.
For example, select Siebel Universal Agent to view changes only in the Call Center application. If you select All Applications then the changes will reflect in all applications where this applet is in use.
Note: At any time, you can click the Close button at the end of the title bar to exit the IDE. To submit your changes, log in to the selected application, go to the workspace dashboard and then click Inspect.Select a web control and, with the mouse button depressed, move the selected web control to an unused placeholder then release the mouse button.
For example, select the Delete web control.
In the Properties pane, modify the properties of the object as required. The Property pane displays the same properties as given in the Object List Editor.
Select a control and, with the mouse button depressed, move the selected control to an unused placeholder then release the mouse button.
For example, select Account Channel.
Do likewise for the label of the control.
Note: In list-based applets, when you move a control, its label automatically moves to the adjacent placeholder.For example, the label of Account Channel.
Using the Command Line
For more information about using the command line, see the following information: