| Oracle® Retail Store Operations Cloud Service Mobile Guide Release 22.1.103.0 F52088-01 |
|

 Previous |
| Oracle® Retail Store Operations Cloud Service Mobile Guide Release 22.1.103.0 F52088-01 |
|
Previous |
This chapter describes how to install and configure JDeveloper and Oracle Store Operations Cloud Service (SOCS) for deployment onto an iOS or Android or Windows 10 device.
JDeveloper
Deploying Oracle Store Operations Cloud Service (SOCS) requires JDeveloper 12.2.1.3.
https://www.oracle.com/tools/downloads/jdev-v12213-downloads.html
Mobile Application Archive File
Mobile Application Archive file .maa can be downloaded from https://edelivery.oracle.com for the appropriate version of Store Operations Cloud Service (SOCS).
iOS Platform
Deploying Oracle SOCS for use on an iOS device requires that you have a computer running Mac OS X set up for iOS development. For more information on the setup, including provisioning profiles and certificates. Refer to Apple's documentation at https://developer.apple.com/.
Additionally, you must have installed JDeveloper, Xcode and Oracle MAF extension.
Also refer to Oracle Mobile Application Framework documentation for Setting Up Development Tools for the iOS Platform.
Android Platform
Deploying Oracle SOCS for use on an Android device requires that you have a computer that has the Android SDK installed.
Additionally, you must have installed JDeveloper and Oracle MAF extension.
Also refer Oracle Mobile Application Framework documentation for Setting Up Development Tools for the Android Platform.
Universal Windows Platform (UWP)
Deploying Oracle SOCS for use onto a Windows 10 personal computer or tablet requires that your computer has Microsoft Visual Studio installed.
Additionally, you must have installed JDeveloper and Oracle MAF extension.
Also refer Oracle Mobile Application Framework documentation for Setting Up Development Tools for the Universal Windows Platform.
Build Time Support (SDK & build tool versions)
| Mobile Platform | Mobile SDK Version | Native Development Tools Version |
|---|---|---|
| Android | Android 10.0 (API 29) | Minimum versions: Android SDK Tools 23, Platform-tools 27, Build-tools 27.
If your MAF application uses a third-party Cordova plugin and the plugin uses native libraries for Android, ensure that the plugin also supports the 64-bit architecture for Android. |
| iOS | iOS SDK 14.x | Xcode 12.x
Provisioning files and certificates For more Apple documentation see: |
| Windows | Windows 10 SDK (10.0.10586.0) and Windows 10 SDK 10.0.14393 | Visual Studio 2015 or Visual Studio 2017 (Enterprise, Professional or Community version)
.pfx file created and installed |
| File | Contents |
|---|---|
| maf-2.6400.20211004-0031.zip | This is the MAF extension that must be installed in JDeveloper (see Installing the MAF Extension below).
MAF extension for JDeveloper can be found here: https://www.oracle.com/webfolder/technetwork/jdeveloper/downloads/1213center.xml#oracle.maf. |
| OracleSocsArchive.maa | The main SOCS application archive. (Required to install or customize Oracle SOCS) |
To install the MAF extension on already installed JDeveloper, see Installing Mobile Application Framework with JDeveloper.
When you reach "Installing the MAF Extension in JDeveloper" step 2, click the Install from Local File radio button and then locate and select the maf-2.6400.20211004-0031.zip file (from Installer Artifacts above). Then skip to step 5.
To configure your environment for the iOS platform:
Ensure Xcode and iOS SDK are installed.
In JDeveloper, click Tools, and then click Preferences.
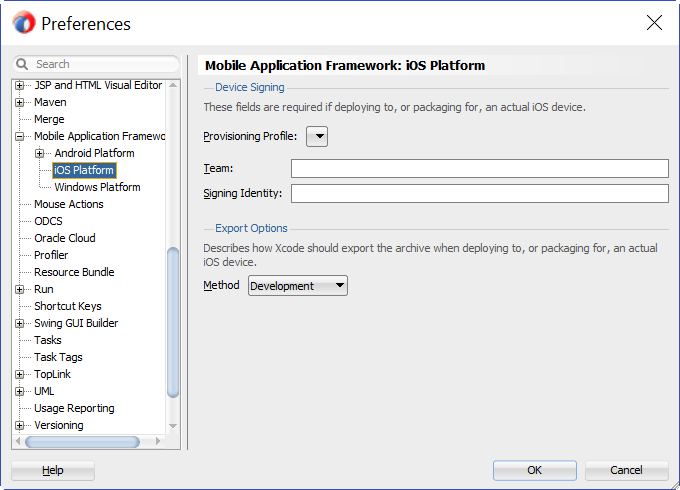
In the Preferences dialog, click Mobile Application Framework and then click iOS Platform.
Enter the signing information and export options.
For more information, see How to Set Device Signing and Export Options in Developing Mobile Applications with Oracle Mobile Application Framework.
|
Note: Customers must use their own provisioning profile and signing identity to distribute the application. And Export Option method should be selected as for Release. |
In the first box, use the browse button to select the Automatically Add to iTunes directory.
Select the Provisioning Profile from the drop-down list.
Enter the name of the signing identity corresponding to your development certificate.
To configure your environment for the Android platform:
Ensure the Android SDK is installed.
In JDeveloper, click Tools, and then click Preferences.
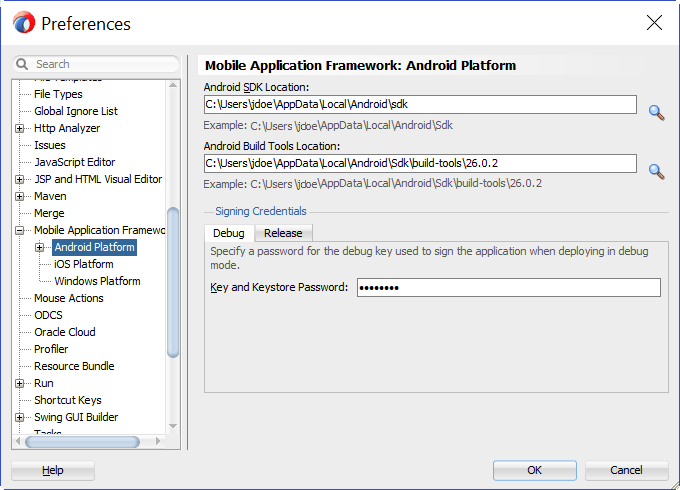
In the Preferences dialog, click Mobile Application Framework, and then click Android Platform.
Specify the location of the Android SDK on your computer.
Specify the location of the Android build tools on your computer.
Provide information on the signing credentials.
For more information about creating a key and keystore, see How to Sign a MAF Application that You Deploy to the Android Platform in Developing Mobile Applications with Oracle Mobile Application Framework.
|
Note: For performance reasons it is recommended to use Release in Signing Credentials section unless the intent is to debug the application. |
To configure your environment for the UWP platform:
Ensure the needed Windows SDKs are installed when installing Microsoft Visual Studio 2017.
In JDeveloper, click Tools, and then click Preferences.
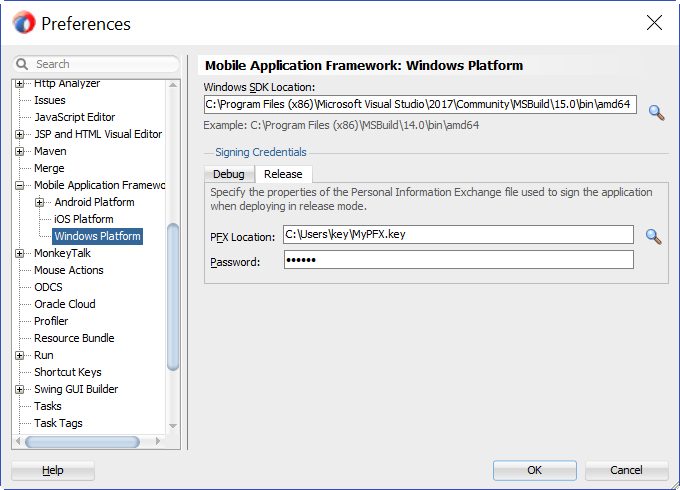
In the Preferences dialog, click Mobile Application Framework, and then click Windows Platform.
Specify the location of the Windows SDK files (MSBuild version 15.0).
Provide the certificate (PFX file) location and password.
You can use the same PFX file to run your application in the Release and Debug modes on your computer. We recommend that you use a certificate issued by a trusted authority, such as your internal CA, if you want to distribute your application and run it on other devices within your organization.
A mobile application archive (MAA) must be downloaded, then configured and built for the appropriate target operating system.
Any endpoint configuration or customization must be done prior to deployment.
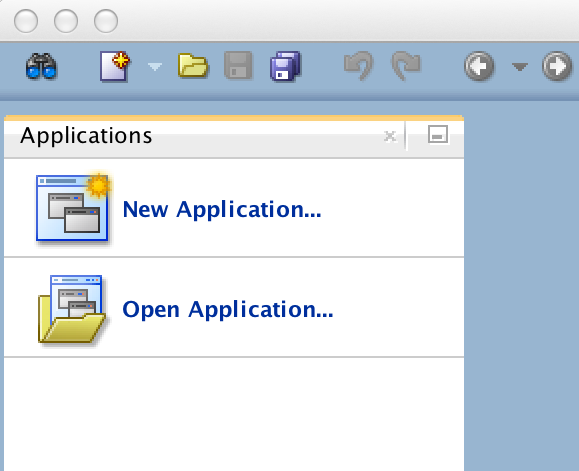
When you launch JDeveloper for the first time, you will encounter an empty workspace. The first thing that must be done is to create a new application from the provided .maa file. Use the steps that follow:
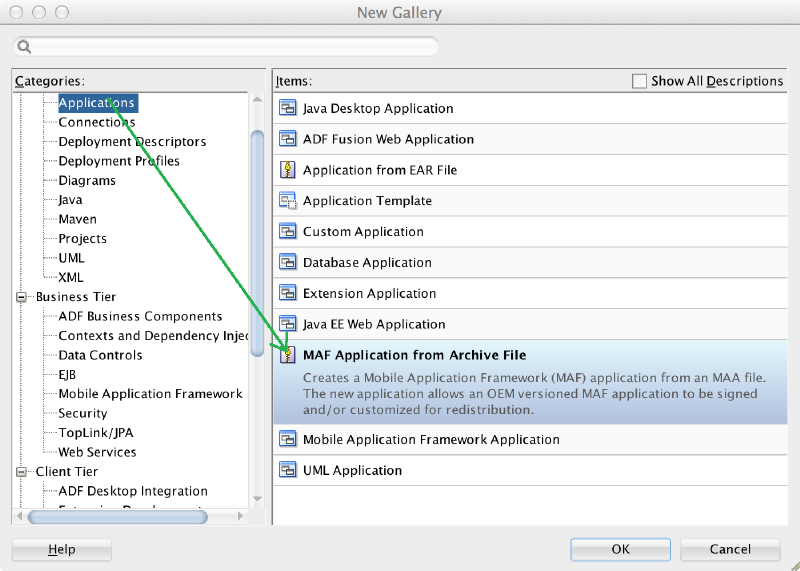
Open the New Application dialog (or open the general New dialog and select Applications).
Select MAF Application from Archive File and click OK.
In the wizard that opens, select the .maa file you want to create a SOCS application from (the main Oracle SOCS app is packaged as OracleSocsArchive.maa).
Enter a name for your application.
You can also change where the application will be saved (by default, <workspace>/<application name>).
On the Location page, enter the location information, for example:
MAA file: /Users/Myuser/Desktop/OracleSocsArchive.maa
Application file: OracleSocsCustom
Directory:/Users/Myuser/jDeveloper/mywork/OracleSocsCustom
Click Finish when you have entered the necessary information.
For more information see Creating a New Application from an Application Archive.
This section describes the configuration that is required (and some that is optional) prior to building and deploying the Oracle SOCS application.
Configuring the application includes Configuring Service End Points mainly for allowing the application to authenticate users, connect to web services, and in certain cases, access remote images.
| Feature | Connection (Type) |
|---|---|
| Configuration | ConfigServiceLogin (Login)
ConfigService (URL) |
| Oracle SOCS | SimMobileLogin (Login)
SimMobileService (URL) |
The Oracle SOCS app uses Oracle IDCS (Identity Cloud Service) or Oracle Cloud Infrastructure Identity and Access Management (OCI IAM) as its identify provider (IDP) for authentication. Several URLs and IDs will need to be configured prior to deployment for successful connection to the servers. Mainly:
oauthClientId - is the client id of SOCS application provisioned by Oracle.
security.idcs.url - is the end point url of IDCS provided by Oracle.
deploy.mobile.server.base.url - is the end point url of base SOCS for ConfigService.
deploy.mobile.server.service.url - is the end point url of SOCS server service for SimMobileService.
Oracle SOCS is delivered with placeholder connections for each of the connections listed above. It is possible to build and install the application without updating the included connections and then use the Configuration feature to update the connections after the application is installed on a device. For more information, see Configuration Service Setup.
Another option is to update the placeholder connections with valid URLs prior to building the application so that the application is ready to run immediately after installation on a device. In either case, it is always possible to update the connections used on the device at a later time through the Configuration feature. For more information, see No Configuration Service Setup – Application Ready for Use.
For more information on accessing and configuring login connections, see Configuring End Points Used in MAF Applications.
|
Note: These updates must be made prior to building the application and cannot be updated through the Configuration feature. |
If you are using the Configuration feature to update the connections.xml file on a mobile device after the application has been installed, it is necessary to host the connections.xml file at a secured location.
The hosted connections.xml file should contain valid URLs for all connections being used by the application (including the ConfigService and ConfigServiceLogin connections).
The connections.xml file must be named connections.xml and be located at a path that ends with the application identifier. For example, if the application identifier is com.company.SOCS, the connections.xml could be located at the following URL:
http://server:port/SomeLocation/com.company.socs/connections.xml
You need two URLs to complete the configuration process:
Configuration URL: This is the base URL up to, but not including, the application identifier. For example:
http://server:port/SomeLocation
|
Note: That this is also the value that can be pre-populated in the ConfigService connection. |
Configuration Login URL: This is a complete URL to a secured resource on the same domain as the connections.xml file. For example:
http://server:port/SomeLocation/SomeSecuredResource
|
Note: That this is also the value that can be pre-populated in the ConfigServiceLogin connection. |
If the application is deployed with placeholder (non-valid URLs) in the connections.xml file and the user is required to use the Configuration feature to get valid connections, it is recommended that you configure the application to prompt the user to set up configuration on the initial launch of the application (until configuration has been completed).
To configure the application to prompt the user:
Locate and open the adf-config.xml file in JDeveloper under Application Resources / Descriptors / ADF META-INF.
In the source view, locate the adf-property tag with the name value
RETAIL_INITIAL_CONFIGURATION_REQUIRED.
Change the value to true.
If the application is deployed with placeholder (non-valid URLs) in the connections.xml file and Oracle provides the connection.xml URL for SOCS, the user can build application so that the application is ready to run immediately after installation on a device.
To configure the application with pre-defined connections:
Locate and open the adf-config.xml file in JDeveloper under Application Resources / Descriptors / ADF META-INF.
In the source view, locate the adf-property tag with the name value
RETAIL_INITIAL_CONFIGURATION_REQUIRED.
Change the value to false.
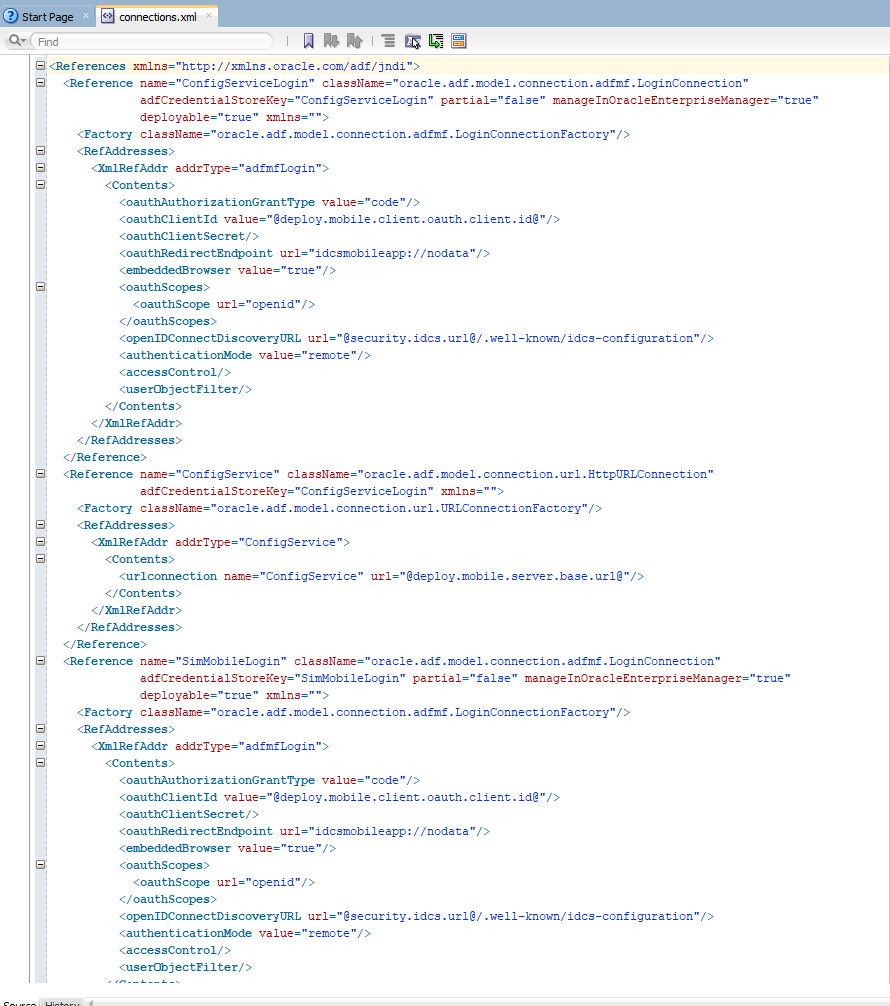
Modify the connection.xml in JDeveloper or located in <SOCS workspace>/.adf/META-INF/connection.xml by replacing the below strings:
Replace all occurrences of @deploy.mobile.client.oauth.client.id@ with SOCS Client ID from IDCS.
Replace all occurrences of @security.idcs.url@ with the IDCS url.
Replace @deploy.mobile.server.base.url@ with https://<your-eics-host>/sim-mobile.
Replace @deploy.mobile.server.service.url@ with https://<your-eics-host>/sim-mobile/internal.
Or just copy the connection.xml contents provided by Oracle and replace that with the existing contents in the connection.xml in JDeveloper. Or in connection.xml located <SOCS workspace>/.adf/META-INF/connection.xml in the Archive file workspace created by JDeveloper.
|
Note: There is no need to update the navigation configuration unless changes in organization, labelling, and so on are desired. |
The springboard is configured by a navigation.json file in the mobile application controller project. The file has the following structure:
{
menu : {
name : <Menu Title>,
taskFlowId : <ID of the task flow>
permission : <permission key that controls menu visibility>
options : [
{
name : <Feature group name>,
options : [
{
name : <Feature name>,
taskFlowId : <ID of the task flow>
permission : <permission key that controls menu visibility>
options : <Optional submenu>
},
...
]
},
...
]
}
footers : [
{
name : <Label for footer item>,
featureId : <ID of feature to link to>
taskFlowId : <ID of the task flow>
},
...
]
}
The bundles section allows the declaration of aliases to XLIFF bundles. Translated strings can then be used for name/label with [Alias.Key], similar to the usage in AMX pages (after using loadBundle). If an alias is not declared, the full bundle path must be used instead of the alias.
The menus section begins with the root node of the hierarchy. The name of this node is displayed on the switcher page of the springboard. The nodes under it are the feature groups to display on the switcher page. Finally, the next level of nodes are the features within the group. If no name is provided, the name of the feature referenced is used. If the options property is specified, another level of feature nodes can be placed in it to form a submenu (the springboard does not support nesting submenus), and name is required in this case. Tapping on a feature item in the group or a submenu allows you to navigate to the provided feature identifier.
The footers section allows for setting up feature links that should be displayed regardless of current feature group. A feature link is included by specifying the featureId and optionally a label.
This section describes the supported customizations of the Oracle Retail SOCS application. Customizations require familiarity with developing mobile applications using Oracle Mobile Application Framework (MAF).
For more information on the specifics about MAF customizations, see Chapter 11 Customizing MAF Application Artifacts with Metadata Services (MDS) available at the following web site:
Customizing MAF Application Artifacts with MDS
|
Note: For more information on the scope of customizations allowed under the MAF Foundation license that is provided, see the Restricted Use Licenses in the Oracle Retail Licensing Guide. |
For more information on MDS and the MAF artifacts that can be customized, see Developing Mobile Applications with Oracle Mobile Application Framework available at the following web sites:
Customizing MAF Application Artifacts with MDS
Customizing MAF AMX Application Feature Artifacts
Understanding Customization Developer Role
The JDeveloper IDE runs using a given role. Usually, developers use the Studio Developer role to develop mobile applications with MAF. However, MDS-based customizations must be done using the Customization Developer role.
The Customization Developer role limits what you can do. For example, source code generally cannot be edited directly and new files cannot be created. When changes are made to files using the IDE, the changes are saved separately from the actual source by MDS. MDS applies the changes on top of the source documents. This allows the customizations to be preserved when the source documents are updated.
For more information refer to Understanding a Customization Developer Role.
There are several setup steps that must be completed before one can begin customizing the Oracle SOCS application with MDS. MDS has a notion of customization layers that must be set up before customization can begin. The supported customization layers must be configured in the CustomizationLayerValues.xml file. Java customization classes must be created for the layers you support. The customization classes need to be added to the Oracle SOCS classpath and then referenced in the adf-config.xml file in the Oracle SOCS workspace.
|
Note: Oracle Retail recommends that customization classes be created in a separate JDeveloper workspace that produces a JAR that is consumed by the Oracle SOCS workspace. |
For more information, see Developing Mobile Applications with Oracle Mobile Application Framework available at the following web site:
https://docs.oracle.com/en/middleware/developer-tools/maf/2.6/develop/index.html
The application branding consists of the application icon as shown in various contexts and the splash screens when launching the application. The application branding can be customized by replacing the icons and images that are referenced by the application.
The following steps assume that a workspace has already been created from the Oracle SOCS MAA file and that the appropriate-sized icons or images have been added to the workspace created from the MAA file:
Open JDeveloper in the Studio Developer role.
Follow the steps outlined in Developing Mobile Applications with Oracle Mobile Application Framework for more information on How to Add a Custom Image.
How to Add a Custom Image to an Android Application
Adding a Custom Image to an iOS Application
|
Note: Since MDS is not aware of changes made to this image configuration, any customizations are overridden by upgrading to a newer version of Oracle SOCS. |
The overall look and feel of the Oracle SOCS application is controlled by a skin. Since MAF supports MDS customizations of the maf-skins.xml and maf-config.xml files, it is possible to apply a custom skin to the application. If the Oracle SOCS application is upgraded to a newer version at a later date, the skinning customizations are still applied on top of the upgraded version by MDS.
The following steps assume that a workspace has already been created from the Oracle SOCS MAA file:
Open JDeveloper in the Studio Developer role.
Open the Oracle SOCS workspace created from the delivered MAA file.
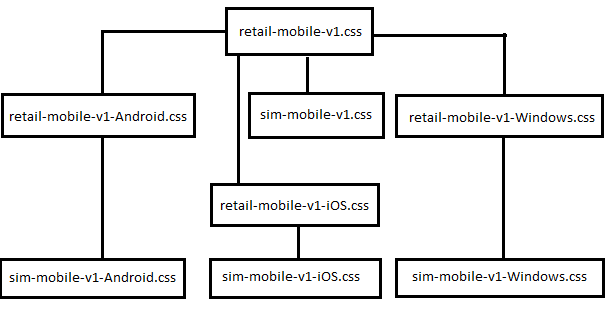
The currently used skinning files for Oracle SOCS are found in the SIMApplicationController project, inside of the public_html > platform > css subdirectory. The current hierarchy of files is represented below:
Create a new CSS skin file in the SIMApplicationController project. For more information on how to create CSS skin files and how MAF skinning works, see Chapter 9, Skinning MAF Applications, in Developing Mobile Applications with Oracle Mobile Application Framework.
Switch JDeveloper to the Customization Developer role by selecting the Tools menu and then Switch Roles / Customization Developer.
When JDeveloper has restarted in the Customization Developer role, open the maf-skins.xml file.
In the Structure Pane, right click the adfmf-skins node and select Insert Inside adfmf-skins > skin.
Fill in the fields in the popup. Note that the style-sheet-name should reference the CSS skin file created in Step 3.
If the skin should be versioned, in the Structure Pane, right click the skin element just created, and select Insert Inside skin / version.
Fill out the popup with the skin version information. For more details on configuring skins in maf-skins.xml, see Chapter 9, Skinning MAF Applications, in Developing Mobile Applications with Oracle Mobile Application Framework.
Save the changes.
Open the maf-config.xml file.
Update the skin-family element with the name of the custom skin family that should be applied to the entire application.
Update the skin-version element if the custom skin was defined with a different version. If the custom skin does not have a version, remove the skin-version element.
Save the changes.
Deploy the application to iOS Simulator to verify that the new skin is being picked.
After upgrading to a new Oracle SOCS version, the custom skin changes are still applied over the base application.
In order to support localization, Oracle SOCS references application string resources in the XLIFF resource bundles.
Since Oracle MAF does not support MDS customizations of XLIFF resource bundles, the Customization Developer role does not allow you to make changes to the XLIFF resource bundles. Any changes made in the Studio Developer role to the XLIFF resource bundles delivered in the Oracle SOCS application are overridden when the application is upgraded at a later date, so this approach is not recommended.
In order to add custom string resources to the Oracle SOCS application in a future-proof way, you must create new resource bundles under the Studio Developer role, add strings to these new bundles, and then reference strings from these new resource bundles in customizations to AMX pages or other customizable artifacts under the Customization Developer role. For more information about this process, see Enabling Customizations in Resource Bundles in Developing Mobile Applications with Oracle Mobile Application Framework.
The following table lists the resource bundles that are packaged in the Oracle SOCS MAA file:
| Base XLIFF Resource Bundle | Text Resource Descriptions |
|---|---|
| OracleSOCS/.adf/META-INF/SimMobileBundle.xlf | Text resource for the application name. |
| OracleSOCS/SimMobileViewController/src/oracle/retail/sim/mobile/SimMobileViewControllerBundle.xlf | Text resources for the Oracle SOCS feature. |
| OracleSOCS/SimApplicationController/src/oracle/retail/sim/mobile/client/application/SimMobileApplicationControllerBundle.xlf | Text resources for the application names as shown on the springboard. |
To configure Oracle SOCS for iOS deployment, use the following steps:
Open the workspace created above in Creating a Workspace from the Archive.
Open the application properties (Application' Application Properties…).
Under Deployment, select the iOS1 deployment profile and click the pencil icon.
Select iOS Options and confirm you have the correct Application Bundle Id and Application Archive Name (for more information about application bundle ids, refer to Oracle Fusion Middleware Developing Mobile Applications with Oracle Mobile Application Framework documentation.)
Confirm that the application deploys in Release Mode.
Check the other settings as needed.
Click OK.
To deploy Oracle SOCS to a .ipa file, use the following steps:
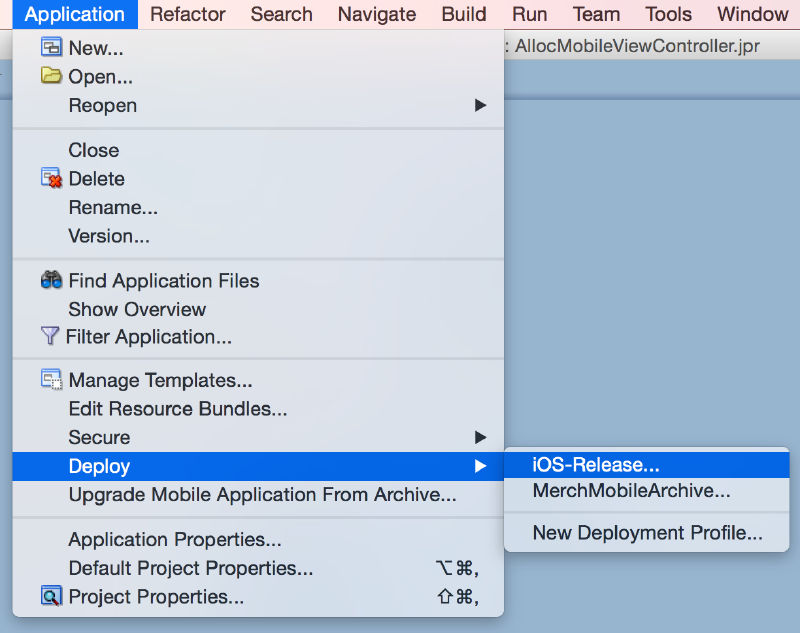
In the Application menu, select Deploy/iOS-Release.
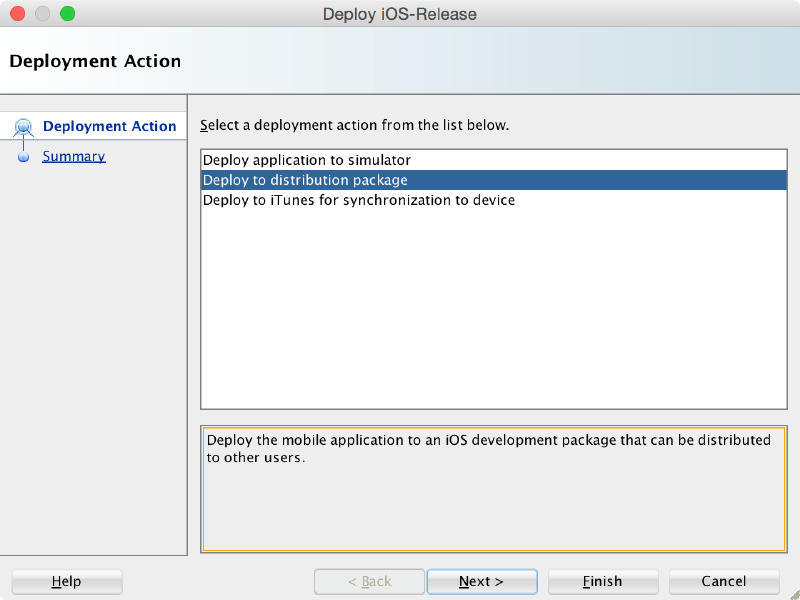
Select Deploy to distribution package.
Press Finish to begin deployment.
You can view the progress of the deployment by opening the Log window. (Window' Log).
After a successful deployment you can find the .ipa file within your workspace under the deploy folder.
For Enterprise app distribution refer to:
https://developer.apple.com/documentation/xcode/preparing_your_app_for_distribution
For other distribution options, see Oracle Fusion Middleware Developing Mobile Applications with Oracle Mobile Application Framework documentation.
|
Note: If Oracle SOCS is already deployed to a device, it is recommended to delete it from the device before redeploying it again. |
To configure Oracle SOCS for Android deployment, use the following steps:
Open the workspace created above in Creating a Workspace from the Archive.
Open the application properties (Application ' Application Properties…).
Under Deployment, select the Android1 deployment profile and click the pencil icon.
Select Android Options and confirm you have the correct Android settings.
Confirm that the application deploys in Release Mode.
If you wish to change Android application settings, do so in the subsections Application Details and Application Images.
Check the other settings as needed.
Click OK.
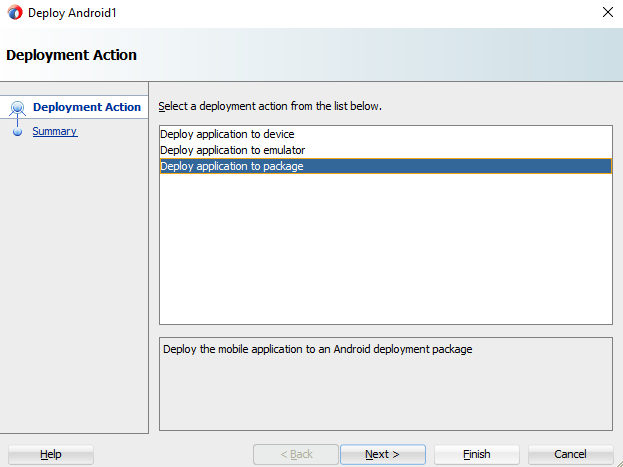
To deploy Oracle SOCS to a .apk file, use the following steps:
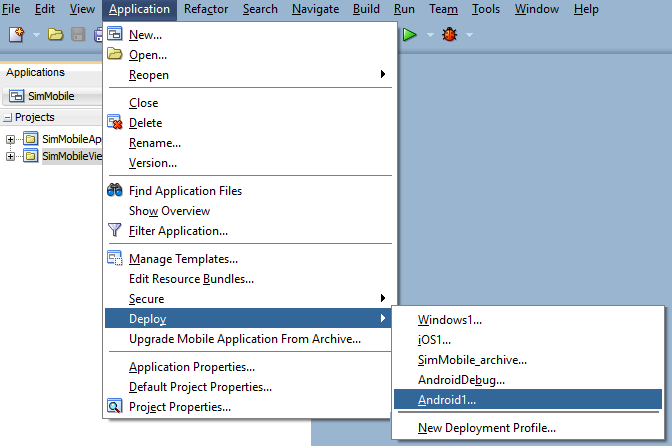
In the Application menu, select Deploy/Android1.
Select Deploy Application to package.
Press Finish to begin deployment.
You can view the progress of the deployment by opening the Log window. (Window' Log)
After a successful deployment you can find the .apk file within your workspace under the deploy folder.
|
Note: If Oracle SOCS is already deployed to a device, it is recommended to delete it from the device before redeploying it again. |
Oracle SOCS is already deployed to a device, it is recommended to delete it from the device before redeploying it again.
|
Note: This is applicable to Zebra /Symbol / Motorola Android devices only. |
Open the DataWedge application on the device.
Click on the Menu Bar at the top right corner. Select New Profile.
Enter the profile name.
Select the newly created profile.
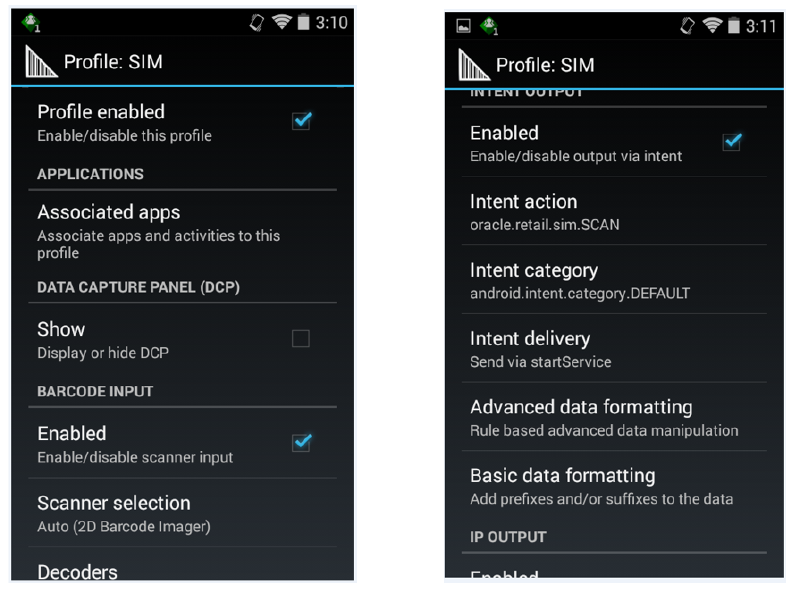
Make sure only these are checked:
Profile enabled - enable/disable this profile
Barcode Input - enable/disable scanner input
Intent Output - enable/disable output via intent
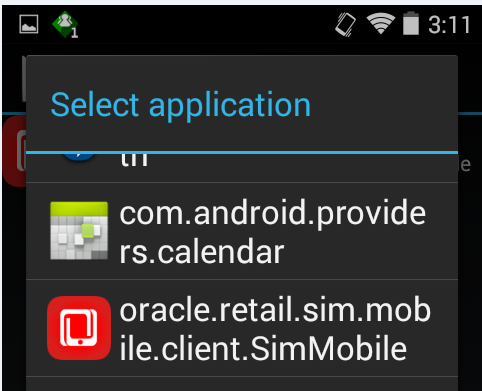
Under the APPLICATIONS group select Associated Apps:
Under the INTENT OUTPUT set:
Save the settings and you would be able use the hardware buttons to provide scan inputs to the Oracle SOCS application.
To configure Oracle SOCS Mobile for Windows deployment, use the following steps:
Open the workspace created above in Creating a Workspace from the Archive.
Open the application properties (Application / Application Properties…).
Under Deployment, select the Windows1 deployment profile and click the pencil icon.
Select Windows Options and confirm you have the correct Application Bundle Id and Application Archive Name (for more information about application bundle ids, refer to Oracle Fusion Middleware Developing Mobile Applications with Oracle Mobile Application Framework documentation.)
Confirm that the application deploys in Release Mode.
Check the other settings as needed.
Click OK.
Windows 10 setup requires a different set of prerequisites and deployment steps. Setup and deployment steps are explained in the Oracle Mobile Application Framework documentation. For more information, see:
Deploying a MAF Application to the Universal Windows Platform
If configured, the SOCS mobile application will display images for items that have been entered into the system. Different sizes of images are supported in the application for optimal performance. In addition, the application supports a configurable amount of background threads to further improve image loading speeds.
There are two different image sizes used in the SOCS mobile application. These sizes exist to improve performance where different sizes of images are displayed by not using excess bandwidth (for example high resolution images being loaded and scaled down to a small space).
Thumbnail images are the main images utilized in the application. These images are intended for areas in the application where smaller images are displayed (for example lists of items). The suggested resolution of these images is about 128x128px to 256x256px depending on the resolution and DPI of the mobile device's screen running the application. Any higher resolution images are scaled down, and the increased bandwidth to load the images is merely wasted and can cause decreases in performance. Thumbnail images are loaded asynchronously after the screen is populated, and there is a configurable amount of background threads to increase the rate multiple images are loaded into the application.
High resolution images, denoted by the size code 'H' in the system, are loaded on demand by a user. These images are meant to be large up to full screen images of an item. Thus the suggested resolution of these images is up to the screen resolution of the device. These images can be 600x600 pixels to 800x800 pixels or even greater.
The SOCS mobile application also supports a configurable number of background threads to load multiple images at once. The configured number of threads should be an appropriate number for the mobile hardware running the SOCS application. An excess number of threads can severely impact performance of the device.