
|
|
|
Business Block Room Grid Snapshot
The Room Grid Snapshot feature allows you to create room button grid snapshots manually, in addition to creating Initial and Current snapshots automatically via the snapshot definitions (Configuration > Database > Snapshot Setup). You can also create snapshots for types other than Current and Initial if they have been set up via Configuration > Database > Snapshot Types. Automatically and manually created snapshots can be selected when you run the Post Convention Summary report (Grid Type Original Block report option and Grid Type Final Block report option).
Business block room grid snapshots are available when the Blocks > Block Snapshots application parameter is set to Y.
To access this feature, select the Snapshot right-click option from the Room Grid screen. The Snapshot Grid screen appears.
The Blocks > Initial Room Snapshot Logic application setting determines whether the Initial Snapshot is automatically created when the business block status changed from non-deduct to deduct, or if it is created when the room grid was initially created.
The Packages lamp is display only in the Snapshot Grid when S&C Room Types are displayed. When PMS Room Types are displayed and the Packages lamp is selected, the Rate Summary screen opens with the rate details for the rate code and room type selected.
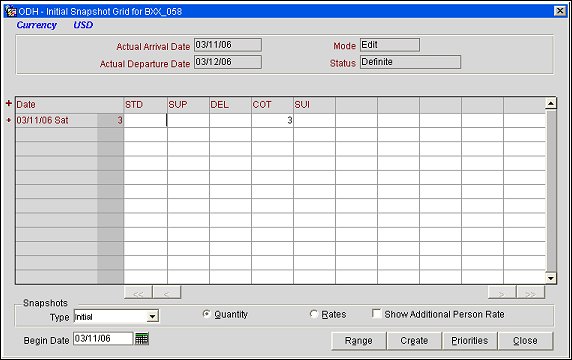
The screen provides the following information:
Actual Arrival Date. Arrival date for the Business Block.
Actual Departure Date. Departure date for the Business Block.
Mode. Edit appears here if the Editable option is selected on the Snapshot Types screen in configuration (Configuration > Database > Snapshot Setup). You can make changes to the grid of an editable snapshot.
Status. Business Block rooms status.
See Room Grid for details on the Date/Room Type information provided by the grid.
Type. Snapshot type. Select the down arrow to choose a snapshot type. Snapshot types are set up in Configuration > Database > Snapshot Types.
Quantity/Rates. Select an option button to display Quantity data (number of rooms per occupancy level) or Rate data (rate per occupancy level) when the + next to a date is selected. The currency for the rate is shown in the upper left corner of the screen.
Show Additional Person Rate. Select this check box to see the additional person rate when the Rates option button is selected.
Begin Date. Enter a start date for the snapshot. The default is the Business Block arrival date.
Range. Enabled when the selected Snapshot Type is configured as Editable (Configuration > Database > Snapshot Type). Set the range for the snapshot (load the block of Room Types with number of rooms and [optionally] rates). See Snapshot Range for details.
Create. Create a new snapshot. See Creating a New Snapshot, below.
Priorities. Set room grid priorities for the snapshot (change the Room Types display order on the grid). See Room Grid Priorities for details.
To create e new snapshot, select the Create button. The Create Snapshot screen appears. Provide the following information, then select the OK button. Select the New Snapshot Type or the Copy Snapshot option button, depending on whether you want to create the snapshot from the Room Grid, or copy an existing snapshot.
New Snapshot Type. Select the down arrow to choose a new snapshot type.
Overwrite Snapshot, if it already exists. Select this check box to overwrite an existing snapshot if one exists.
New Snapshot Type. Select the down arrow to choose a new snapshot type.
Copy From. Select the down arrow to choose the grid display from which the snapshot should be copied.
Overwrite Snapshot, if it already exists. Select this check box to overwrite an existing snapshot if one exists.