
|
|
|
Confirmation Letters
OPERA allows you to fax, email or print letters for the individual guest and/or to the company, agent, source, or group who made, updated, or canceled the reservation. Sending confirmation letters can be integrated into the booking process, or handled afterward from the Reservation screen Options menu. Confirmation letters can also be sent to Waitlisted Reservations when the application setting is active: Property > Function > Reservation > Waitlist = Y.
Note: Your OPERA system must have a properly installed and configured fax and email interface in order to use these confirmation letter communications methods. These features are set up in Configuration > Property > Delivery Method > Confirmation > Email, Fax. See Delivery Method Maintenance for details.
When the Confirmation check box is selected on the Reservation screen Main tab the Confirmations screen will automatically appear when you have made a new reservation — immediately following the display of the confirmation number — if the RESERVATIONS > CONFIRMATION LETTER NEW RESERVATION application parameter is set to Y. When updating a reservation, the Confirmations screen will also appear if the Reservations > Confirmation Letter Update Reservation application parameter is set to Y and the Confirmation check box is selected on the reservation you have changed. (Reservation updates do not trigger the Confirmation screen when the reservation was accessed from the Arrivals screen or the In House Guest screen.) In addition, the Confirmation screen will appear when you cancel a reservation if the RESERVATIONS > CONFIRMATION LETTER CANCEL RESERVATION application parameter is set to Y and the Confirmation check box is selected on the reservation you have canceled. (Reservation cancellations do not trigger the Confirmation screen when the reservation was accessed from the Arrivals screen.)
Note: When the OPR<version number>ORS license code is active, the parameter CRO>Reservation LAUNCH_CONFIRMATION_FROM_CLOSINGSCRIPT can be selected in ORS. This parameter will only be visible when the CRO > Selling Screen > Parameter > Endscript parameter is On. When the LAUNCH_CONFIRMATION_FROM_CLOSINGSCRIPT parameter is activated, the Confirmation check box is removed from the Reservation screen and placed on the Closing Script screen. The Confirmation check box is selected by default and when the End Call button is selected, the Confirmation screen appears.
Note: Confirmations can be sent en masse to the guests listed on a business block Reservation List as well as to any group, company, travel agent, source, caller, and/or contact associated with the business block. From the business block Reservation List screen, select the Group Opt. button to display the Group Options Menu. From the Group Options menu, select the Confirmation button to display the Confirmations screen for the block. See Sending Letters to a Reservation List of a Block, below.
To access the Confirmations screen after the new reservation has been created, select the Confirmation button from the Reservation Options menu. (The Reservation Options menu is accessible from the Reservation screen or from the Reservation Search screen.) The Confirmation button is also available for reservations having a status of Checked Out or No Show. Also, the Confirmation button, on both the Reservation Options menu and the Group Options menu, will only be available to users who have the RESERVATIONS > CONFIRMATIONS permission granted.
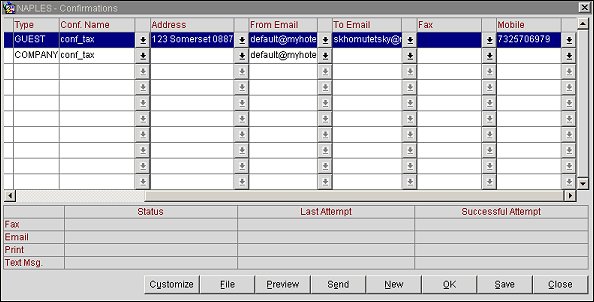
You can select letter recipients, designate communication methods, preview and customize letters, and monitor letter printing or transmission progress from the Confirmations screen.
Print, Email, Fax, Text Msg. Communication role, or method. An X in any of these columns indicates that the method has been selected for sending confirmation/reservation update/cancellation communications to the person or entity identified in the Name column. For a method to be selected, the appropriate address information must be provided. See Adding and Editing Communication Methods, below.
Name. Name of the confirmation/update/cancellation letter recipient. The recipient can be the individual guest, or the company, source, agent, contact, or group attached to the reservation.
Type. The type of profile for this letter recipient (guest, company, source, group, contact, or agent). A confirmation letter can be sent to the Caller if the RESERVATIONS > CALLER INFORMATION application function is set to Y.
Conf. Name. File name of the letter template. Select the down arrow to choose from the letter templates available to you. The list is ordered alphabetically by the report Description. Any reports that do not have a Description are listed first.
When you select a letter, variable information (such as name, address, greeting, and so on) are automatically entered into the letter template to compose a letter for this recipient. OPERA allows each property to prepare their own standard letter templates. In addition, you may customize the letter for each particular recipient before it is sent. If the template has been customized for the recipient, "Customize" appears in this field in place of the template file name. See Customizing Letters, below.
Note: A user must have the appropriate permission granted for a particular profile type before the user can edit the Address, Email, or Fax fields. For example, to edit the email address for a company profile type, a user will need the PROFILES > COMPANY PROFILE EDIT permission granted.
Address. Mailing address of the recipient, if you choose to use the print communication method. Select the down arrow to display the List of Addresses. Choose the address you wish to use, or select New Address to specify a new address and add it to the profile. A screen appears prompting you for the new address information.
From Email. The e-mail address of the user, department, or other entity that sent the e-mail. To determine which e-mail address populates in this field, the system will use the following sources and priorities:
Note: After a confirmation has been e-mailed, if the confirmation needs to be re-sent and the e-mail address that was used in the 'From Email' field has since been deleted from the system, you must select a new e-mail address from the 'From Email' field list of values.
To Email. Email address for the recipient if you choose to use the email communication method. The confirmation /reservation update/ cancellation letter is rendered as a PDF attachment (an RTF attachment if the letter is customized) and delivered directly to the recipient's email account. The address designated as the primary email address appears here by default. Select the down arrow to display the List of Email Addresses. Choose the address you wish to use, or select New Email Address to specify a new address and add it to the profile. A screen appears prompting you for the new address information. See Adding and Editing Communication Methods, below, for more information.
Note: When the GENERAL > PROFILE LANGUAGE application function is active and a folio email is generated from the Confirmations screen, the language of the profile selected for the confirmation letter is used and the corresponding language translation for Email Subject and Email Body is used.
Fax. Fax number for the recipient if you choose to use the fax communication method. The confirmation/reservation update/cancellation letter is delivered directly to the recipient's fax phone number. The address designated as the primary fax address appears here by default. Select the down arrow to display the List of Fax Phone Numbers. Choose the number you wish to use, or select New Fax to specify a new number and add it to the profile. A screen appears prompting you for the new phone number information. See Adding and Editing Communication Methods, below, for more information.
Mobile. Available when the GENERAL > TEXT MESSAGE HANDLING application function is set to Y, select the mobile number for the recipient if they choose to receive a text message.
Optional Email. (Available when the RESERVATIONS > CONFIRMATION OPTIONAL EMAIL application parameter is set to Y.) You can enter an optional email address under this column to send the reservation confirmation to another recipient. This email address will not be linked to the profile for which the reservation was created.
Note: The Optional Email for the confirmation will not be exchanged between ORS/PMS.
Customize. To customize a letter, highlight the record of the recipient for whom you want to make changes and select the Customize button. See Customizing Letters below.
File. Highlight the record for the letter to generate a PDF file. Select the File button. �The file that is generated can be opened and viewed or saved to your local drive or to a network location.
Preview. To see exactly how the letter will look when it is sent, highlight the record for the letter you wish to see and select the Preview button. Printed letters will be opened in Microsoft Word. E-mail and fax letters will be opened in Adobe Acrobat. You cannot change or customize a letter when it is being previewed.
Send. Select the Send button to print the confirmation letter on the printer, to initiate transmission of the fax, and/or to send the e-mail letter, depending on the communication methods you have selected. The grid area in the lower part of the screen allows you to monitor the progress of the printing and/or transmission of the confirmation letters.
All. Confirmations can be sent en masse to the guests listed on a business block Reservation List as well as to any group, company, travel agent, source, caller, and/or contact associated with the business block. From the business block Reservation List screen, select the Group Opt. button to display the Group Options Menu. From the Group Options menu, select the Confirmation button to display the Confirmations screen for the block. The All button is available when the Confirmations screen is accessed from the Reservation List screen. When the All button on the Confirmations screen is selected, the Send Choices screen appears. You can select the delivery methods for the confirmation and who the confirmation recipient types will be (Guest, Company, Source, Group, Agent, Contact, Caller). By default, all check boxes are selected. You may select/unselect any combination of these and select OK. You will be prompted for any missing information, such as if the Fax check box was selected and the record did not have a fax number. If you select a recipient type that doesn't exist for the block, such as Agent or Company, the resulting confirmations list will be empty.
The following Send As and Send To options will only be available in the CRO or property when the required application settings are activated:
Send As
Send To
Status. The current processing status. PENDING means that the printing (for print letters) or transmission (for email or fax letters) has not been attempted. This can be because the printer or the email or fax interface is not configured or is currently not online. (PENDING can also indicate that you did not select the particular communication method.) SUCCEEDED means that the letter was printed or that the fax or email was sent to the fax or email server.
Note: SUCCEEDED does not necessarily mean that the fax or email letter reached its destination. Actual delivery or delivery failure can only be ascertained by reviewing server records.
Last Attempt. The date of the most recent attempt.
Successful Attempt. The number of letters successfully printed (for print letters) or sent to the email or fax server (for fax and email letters). For example, if three faxes were successfully sent to the fax server, the number 3 would appear in this column of the Fax row. Zero appears here if the processing is PENDING.
Address information on the Confirmations screen is drawn from the profile of the individual guest, company, group, agent, or source identified in the Name column. If you select a communication role, or method, for which appropriate address information is not included in the profile, screens appear allowing you to add that information. For example, if you select the fax method for the guest and the guest's profile does not include a fax number, a dialog appears allowing you to add the fax number to the guest's profile. See Profile Communication Information for details.
On the profile Communication Information screen, you may designate one address for each communication type as the guest's primary fax/email/mailing address. (If only one address of a given communication role is entered in the profile, it is automatically designated as the primary address for that role.) The primary address appears in the appropriate address column at the right-hand side of the Confirmations screen. Furthermore, for primary fax and email addresses, you may specify if the address is to be the Default Communication Method. The designated default communication method will be pre-selected with an X in the left-hand Email or Fax column on the Confirmations screen.
If no default has been designated, click in the Fax, Email, Mobile, and/or Print columns to choose that communication method. An X displays in the column you selected.
A series of screens prompts for additional information, as necessary.
Select the confirmation letter template to use. Your choice appears in the Conf. Name column. (See Customizing Letters, below, to customize the standard letter.)
When you select OK, a screen similar to the following appears.
Enter the address information for this communication method. For printed letters, this will be a street address for mailing. For fax, this will be a fax phone number. For email, this will be an email address. Your choice appears in the Address, Email, or Fax column on the Confirmations screen, as appropriate.
To designate the address you enter as the primary address for the communication type, select the Primary check box. The primary address will automatically appear on the Confirmations screen if two or more addresses of the same type are assigned to the guest's profile. (Only one address of a given communication type can be set as the primary. Choosing a new primary address will override any previous choice for that communication type. If only one address of a given communication type is entered in the profile, it is automatically designated as the primary address of that type.)
For fax and email communication methods, if you select the Primary check box, the Default Communication Method check box appears. When an address is designated as the default, it will be pre-selected with an X when you open the Confirmations screen for this guest.
You may choose one or multiple communication methods for each recipient.
You can produce a single confirmation letter for a multi-leg reservation (itinerary reservation). This is useful if you have several properties where wholesale business is conducted through itinerary reservations. For example, if three legs are made for one reservation (one confirmation number), a single confirmation letter can be created that contains information for all three legs. Previously, you had to print and send three individual confirmation letters to the agent or customer.
This is accomplished by a customizable report called sample_itinerary_conf.rdf. It has two main queries called Q_Confirmation_No and Q_Leg. You can add columns from the temp_reg_cards table to q_confirmation_no query and add the merge code outside the repeating frame R_RESV_NAME_ID in order to display the merge code confirmation number wise. All merge codes per leg will reside inside the repeating frame r_resv_name_id. In the confirmation query, give the merge code a suffix of "c" so that it can be easily identified in the layout.
You can define and use a single confirmation letter for multiple properties if the OPR_<version number> ORS license is active or if the OPP_MHOT Multi-property PMS license is active.
To send additional confirmation/reservation update/cancellation letters to one of the listed recipients, highlight the record belonging to the recipient and select the New button. A new record will be created for you to use in setting up an additional letter. For example, if you want to send a printed letter to the guest at his home address and an email to his business address, set up the GUEST record for the printer method. Then, highlight the GUEST record and select the New button. A new GUEST record appears in the grid. You may then choose email as the communication method for the new letter, and select a letter template and email address for this additional letter.
Confirmations can be sent to group members of a rooming list in a block, in mass. When a block is created with a rooming list saved, and a reservation is made against the block (Reservation > Blocks > New or Edit > Resv), the Confirmation button can be selected to display the Confirmations screen for the block from the Group Opt. menu options. See the All button, above.
Customized letters provide a way for you to add personalized notes to the letter or to make changes to the standard confirmation/reservation update/cancellation letter. Customizing a letter does not change the letter template; rather, a new version of the letter is created for the recipient.
Note: The letter is presented for editing as an RTF file. Microsoft Word must be installed on the workstation to enable letter editing. The modified RTF file can be no larger than 2 MB for it to be uploaded after editing.
|
Note: Customized confirmation letters that are prepared using the OPERA Stationery Editor (BI Publisher) are emailed as PDF documents by default. To email the customized confirmation letter in HTML format, the Confirmation Letter delivery method must be set to HTML and the required additional setup steps must be completed. Contact your Regional manager for assistance with the additional setup that is required for emailing customized HTML confirmation letters prepared using the OPERA Stationery Editor. |
To customize a letter, highlight the record of the recipient for whom you want to make changes and select the Customize button. The letter will be presented in Microsoft Word for you to edit.
When you have finished making changes to the standard letter, save it in Word (do not change the format from RTF). OPERA prompts you if you want to store the customized letter in the OPERA database. Select Yes to keep the customized letter; select No to discard the customized letter and revert to the standard template letter. If you selected Yes, the Conf. Letter field will read "Customize," thereby indicating that the letter has been changed for this recipient.
To see exactly how the letter will look when it is sent, highlight the record for the letter you wish to see and select the Preview button. Printed letters will be opened in Microsoft Word. Email and fax letters will be opened in Adobe Acrobat. You cannot change or customize a letter when it is being previewed.
Highlight the record for the letter to generate a PDF file. Select the File button. The file that is generated can be opened and viewed or saved to your local drive or to a network location.
OPERA enables you to configure default confirmation letters for different Account Types to make printing and sending letters more efficient and ensure that the correct letter is sent. From the Profile > Confirmation Letter menu, the Default Confirmation Letter screen displays.
Global/Property. (Displays for properties with an active ORS license). Select Global for all properties or Property for a single property.
Property. (Displays for properties with an active MHOT license). Select the property name to configure the default confirmation letter for.
Individual. Define the Confirmation Letter to be sent for Individual Profiles.
Company. Define the Confirmation Letter to be sent for Company Profiles.
Travel Agent. Define the Confirmation Letter to be sent for Travel Agent Profiles.
Source. Define the Confirmation Letter to be sent for Source Profiles.
Group. Define the Confirmation Letter to be sent for Group Profiles.
Contact. Define the Confirmation Letter to be sent for Contact Profiles.
Note: The LOVs will show all reports/letters that are configured in the Confirmation Letter Report Group.
See Also