
|
|
|
Delivery Method Maintenance
The Delivery Method Maintenance screen is used to configure email, fax, text, and SFTP (for Scheduled Reports) specifications for delivery and distribution of various OPERA reports and documents. Select Configuration > Property > Delivery Method and choose a type of configuration to display the Delivery Method Maintenance screen. The same screen, with some variations, is used for the following purposes:
Accounts Receivables
Passerby
Credit Bill
Post It
Queue Reservations - For Queue Reservations. Available when the Rooms Management > Queue Rooms application function is set to Y.
Queue Rush - For Queue Rush rooms. Available when the Rooms Management > Queue Rooms application function is set to Y.
Welcome Letter - For sending customized membership welcome letters via email or fax. The Email Subject and Email Body can be customized with special tags. See Email Delivery Method below for more details.
Statement - For sending customized membership statements via email or fax. The Email Subject and Email Body can be customized with special tags. See Email Delivery Method below for more details.
The Delivery Method Maintenance screen can have up to three tabs, depending on the delivery methods supported by the feature: Email, Fax, Text (when the General > Text Message Handling application function is set to Y), and SFTP. These four delivery methods are described below.
Note: Fax delivery requires an SMTP (Simple Mail Transfer Protocol) compliant fax server. ZetaFax is recommended for OPERA fax delivery.
The actual document being faxed, for example an AR statement, a folio, or select S&C reports, is first converted behind the scenes by OPERA into a PDF file, which the fax server then renders as a TIF format file for faxing. The fax may include a cover page, which is created from the Email Subject and Email Body information provided here, if any, and rendered by the email fax server into a TIF file for faxing.
Confirmation letters and contracts are handled the same way except when they are configured with the HTML Delivery option selected. When HTML Delivery is chosen, the confirmation letter or contract is embedded into the email message in HTML form, prefixed by any Email Subject and Email Body information. This whole message is then rendered as a TIF file for faxing by the fax software application you are using.
Property. Available when the OPP_MHOT PMS Multi-property add-on license is active. Select the down arrow to choose the property to configure fax communications delivery. When the OPR_<version number>ORS license code is active, the CRO LOV displays; select the CRO.
Activate Email to Fax. Select to activate email to fax functionality. This option must be selected in order to activate faxing from an SMTP compliant fax server.
HTML Delivery. Available for Confirmation, Contracts, and OWS only. Available when Activate Email to Fax is selected. When selected, the information provided in Fax Subject and Fax Body fields and the confirmation letter or contract information are formatted as embedded HTML and rendered as a TIF format file for faxing. Use of this feature assumes that the report being delivered is optimized for HTML presentation (i.e., features such as tables and line length are appropriate for on-screen display). Also, all graphics included in the report (such as logos) must be available on a publicly accessible server from which they may be downloaded to render the message.
"From" E-Mail Fax Address. Enter the email fax address used by the property for this delivery method. The information entered here may affect the email-fax software licensing requirements. If an email address has been set up as a Department email address (Configuration > Setup > User Configuration > Departments) for the Department to which the user belongs, the Department email address will appear as the default when this delivery method is selected for a report. The user will have the opportunity to change the default before sending the report.
Note: Not all servers will need to have a user ID and password. Whether a user ID and password are needed is based on the security set for the server.
Note: Reports emailed via OPERA Reports Scheduler will use the "From" email address configured for the General delivery method (see Reports Scheduler for details).
User ID. User ID needed to sign-on to the server.
User Password. Password needed to sign onto the server.
Server Name. Enter the machine name or IP address (if DNS is not used) of the SMTP server that is used for transmission of the faxed document.
Fax Prefix and Fax Suffix. Some fax software programs require a prefix and/or a suffix. If required for your property, provide the information in these fields.
Fax Domain. Enter the domain name for the fax.
Fax Subject. Available for Confirmation, Contracts, Other Folios, and Billing. Available when Activate Email Fax is selected. Enter the subject that is to be included with the fax. Select the down arrow to choose from a list of tags that may be used to customize the subject line. (Tags are inserted at the point where the cursor is positioned.) These tags represent variables that will be dynamically converted at the time the document is generated. For example, the subject for a confirmation letter might be:
Note: The Fax Subject and Fax Body texts specified here are used for AR invoices but not for statements and reminders. For statements and reminders, the subject and body information is hardcoded (e.g., "AR Statement for Bell Hotel") and is not pulled from these fields. In addition, no list of tags is available for AR invoices.
Fax Body. Available for Confirmation, Contracts, Other Folios, and Billing. Available when Activate Email Fax is selected. Enter up to 1500 characters for the body that is to be included with the fax. Select the down arrow to choose from a list of tags that may be used to customize the body text. (Tags are inserted at the point where the cursor is positioned.) These tags represent variables that will be dynamically converted at the time the document is generated. For example, the body for a confirmation fax might be:
Line breaks, as entered, are observed when output is generated.
The actual document being emailed, for example an AR statement or a folio, is first converted behind the scenes by OPERA into a PDF file. This PDF file is sent to the recipient as an email attachment. The email may include an Email Subject and Email Body information provided here, if any.
Confirmation letters and contracts are handled the same way except when they are configured with the HTML Delivery option selected. When HTML Delivery is selected, the confirmation letter or contract is embedded into the email message in HTML form, prefixed by any Email Subject and Email Body information.
Electronic vouchers are associated with the reservation after the check in is complete, and then OPERA informs the guest that the vouchers have been issued and are ready for use.
Property. Available when the OPP_MHOT PMS Multi-property add-on license is active. Select the down arrow to choose the property to configure email communications delivery. When the OPR_<version number>ORS license code is active, the CRO LOV displays; select the CRO.
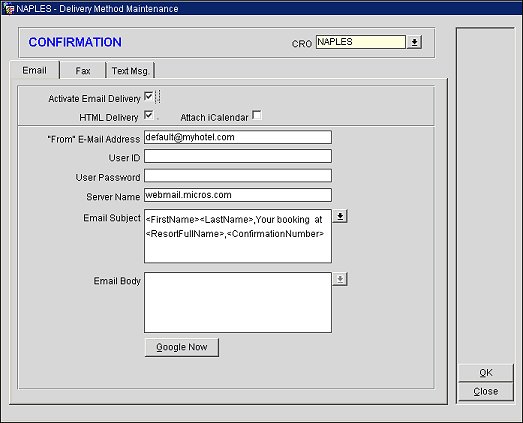
Activate Email Delivery. Select to activate email delivery functionality. This option must be selected in order to activate emailing from an SMTP compliant email server.
HTML Delivery. Available for Confirmation, Contracts and OWS only. Available when Activate Email Delivery is selected. When selected, the email message is formatted as embedded HTML. Use of this feature assumes that the report being delivered is optimized for HTML presentation (i.e., features such as tables and line length are appropriate for on-screen display). Also, all graphics included in the report (such as logos) must be available on a publicly accessible server from which they may be downloaded to render the message.
Attach iCalendar. Available for Confirmation letters and OWS only and when Activate Email Delivery is selected. When selected, the property or CRO will email all confirmation letters with an iCalendar event file (.ics) attached.
Note: iCalendar is a computer file format that allows Internet users to send meeting requests and tasks to other Internet users, either by email or by sharing files with an extension of .ics. Recipients of the iCalendar data file must have the necessary supporting software, such as an email client or calendar application, in order to respond to the sender or propose another meeting date/time.
"From" E-Mail Address. Enter the email address used by the property. (The information entered here may affect the email-fax software licensing requirements.) You can use a "display name" along with the email address in the "From" Email Address field (for example: Bell Hotel <accounting@bell.com>). If you do so, enclose the email address in < and >. If an email address has been set up as a Department email address (Configuration > Setup > User Configuration > Departments) for the Department to which the user belongs, the Department email address will appear as the default when this delivery method is selected for a report. The user will have the opportunity to change the default before sending the report.
Note: Not all servers will need to have a user ID and password. Whether a user ID and password are needed is based on the security set for the server.
User ID. User ID needed to sign-on to the server.
User Password. Password needed to sign onto the server.
Server Name. Enter the machine name or IP address (if DNS is not used) of the SMTP server that is used for email transmission.
Email Subject. Available for Confirmation, Contracts, Other Folios, Billing, Membership Welcome Letter, and Membership Statement. Available when Activate Email Delivery is selected. Enter the subject that is to appear on the email message. Select the down arrow to choose from a list of tags that may be used to customize the subject line. (Tags are inserted at the point where the cursor is positioned.) These tags represent variables that will be dynamically converted at the time the document is generated. For example, the email subject for an emailed folio might be:
The viewable length of the subject line may be limited by the recipient's email application.
Note: The Email Subject and Email Body texts specified here are used for AR invoices but not for statements and reminders. For statements and reminders, the subject and body information is hardcoded (e.g., "AR Statement for Bell Hotel") and is not pulled from these fields. In addition, no list of tags is available for AR invoices.
Click the globe icon adjacent to the Email Subject or Email Body to open the Multilanguage Descriptions screen to configure language-specific text. Click New or Edit on this screen to enable an LOV button to the right of the text field, and then click the LOV button to display a list of available tags (merge codes) to insert into the Email Subject or Email Body texts at the cursor location.
Email Body. Available for Confirmation, Contracts, Other Folios, Billing, Membership Welcome Letter and Membership Statement. Available when Activate Email Fax is selected. Enter up to 1500 characters for the body that is to be included with the email. Select the down arrow to choose from a list of tags that may be used to customize the body text. (Tags are inserted at the point where the cursor is positioned.) These tags represent variables that will be dynamically converted at the time the document is generated. For example, the body for an emailed folio might be:
You can use conditional text containing the <?> </?> expression in the email subject and email body fields to generate dynamic results.
For example, using the following text in the email subject generates an email subject based on the reservation status:
<?><Status>[='RESERVED']Reservation confirmation #<ConfirmationNumber> for <ResortFullName></?>
<?><Status>[='CANCELLED']Reservation cancellation #<CancellationNo> for <ResortFullName></?>
Line breaks, as entered, are observed when output is generated.
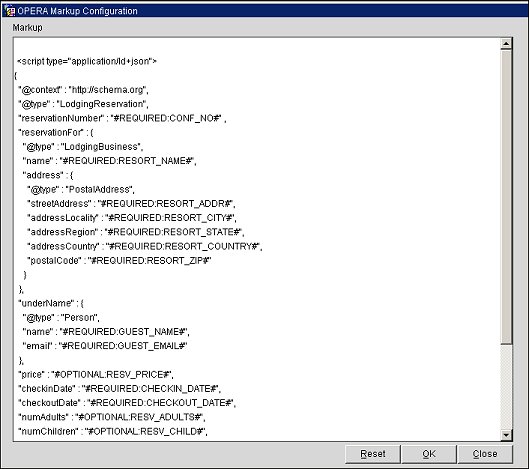
Google Now. Select to open the OPERA Markup Configuration screen (see screen below) and edit the markup tags in the script that is sent to the Google Now service. When your hotel is certified to use the Google Now service and subscribed to the service, you can use this feature to edit the script for the reservation information that is displayed on a guest's hotel card when viewed on supported devices. On the Markup Configuration screen, select OK to save changes to the script or Reset to change back to the default script.
Note: You can only edit the script by removing the markup tags and will not be able to enter new ones. You should NOT remove tags marked as "REQUIRED."
Inbound Server Name. Available for General when the OPS_<version_number> or OPC_<version_number> OPERA Sales & Catering license code is active. Enter the Microsoft Exchange Mail Server name to enable receiving inbound email and attachments from within OPERA Sales and Catering. If this feature is being used, and authentication is required to log onto the mail server, the User ID and Password must be specified. See Receiving Email from Exchange Server (S&C).
Important: To use this feature, you must first setup an account with a Text Delivery Provider.
In PMS and ORS, you can send a confirmation message to a mobile device using Text Messaging.
To see and have access to this feature, you must enable Text functionality by setting the General > Text Message Handling application function to Y.
Text messaging may be set up for confirmation letters, messages, queue reservations notifications, queue rush notifications, and electronic vouchers. To configure the delivery method, tags, and conditions for sending confirmations, messages, queue reservations, and queue rush via Text, select Configuration > Property > Delivery Methods > Confirmations or Messages, Queue Rooms > Queue Reservations, or Queue Rooms > Queue Rush. This opens the Delivery Method Maintenance screen.
Note: Queue Reservations and Queue Rush only support Text, not Email or Fax. The Delivery Method Maintenance screens for Queue Reservations and Queue Rush do not include Email or Fax tabs.

On the Text Message Configuration screen, select the Tags, Conditions, and Delivery buttons to open or access the relevant configuration screens.
Text Message. Configure your text message in this pane using HTML syntax that must be contained within the <BODY> and </BODY> tags.
Tip: Select the Tags button to choose tags from the Tags list of values and insert tags within the message. For example, address and confirmation number tags can be inserted. Select the Conditions button to insert condition tags in the message. All tags will be inserted in the position where your cursor is placed.
Text Message Preview. In this pane, a preview of what your text message will look like is displayed when the Preview button is selected.
Note: When previewing any text messages, any conditions that have been added to the text message configuration will be displayed in the preview as in the below examples. But when the actual message is actually sent, these conditions will not be displayed, but the correct message will be displayed based on the condition that was met.
Tags. Select to open the OPERA Tags screen and choose a tag from the list of values to insert into the text message. The selected tag will be inserted in the position indicated by your cursor.
Conditions. Select to apply a condition to the text message. The condition tag will be inserted in the position indicated by your cursor. A condition is used when a property would want a specific message to display based on a specific factor/result.
Example
Two different confirmation messages could be configured based on the Room Type for the Reservation.
Ocean View Room
Text Message Configuration: <html><body><?><RoomType>[='POKB']Thank you for booking a <RoomTypeDescription> with <ResortFullName>. Your confirmation no is <ConfirmationNumber> and we look forward to your arrival. For further information, please call <ResortPhone>.</?></body></html>
Text Message Preview: [='POKB']Thank you for booking a Deluxe Ocean view with King size bed with ABC Resort and Spa. Your confirmation no is 123456 and we look forward to your arrival. For further information, please call 941-434-1000.
Deluxe Room
Text Message Configuration:<?><RoomType>[='SUI']Thank you for booking with <ResortFullName>. Your confirmation no is <ConfirmationNumber>. For further information, please call <ResortPhone>.</?>
Text Message Preview: [='SUI']Thank you for booking with ABC Resort and Spa. Your confirmation no is 123456. For further information, please call 941-434-1000.
Preview. Select to preview the message you have configured in the Text Message Preview pane at the bottom of the screen. A character length will be displayed in blue type above the preview pane. A max of 160 characters is recommended so that only one text message is sent to the person.
Note: When previewing any text messages, any conditions that have been added to the text message configuration will be displayed in the preview as in the above examples. But when the actual message is actually sent, these conditions will not be displayed, but the correct message will be displayed based on the condition that was met.
Delivery. Select to open the Text Message Delivery Configuration screen and configure the delivery method for the message. See Text Message Delivery Configuration for details.
OK. Select to save the text message. If the text message's length exceeds 160 characters, a warning message will appear.
Note: If a text message exceeding the 160 character limit is saved, the message could be split by the mobile provider or additional charges could be incurred.
Select the Tags button to open the Opera Tags screen and choose the tags to insert between the <html><body> and </html></body> tags.
Reports and export files can be delivered to hosted properties from the Oracle Data Center via SFTP by the Reports Scheduler. The SFTP tab provides the means to add, edit, delete, and configure the SFTP location.
Note: SFTP proxy servers can be configured for the Reports Scheduler and export files.
- Set up your proxy server (contact your Network Administrator, if necessary).
- Configure the OPERA proxy server settings to connect to the proxy server address. Access the Application Setting > General > Proxy Server and enter the proxy server in the following format: <proxy.domain.com:port number>. Example: 172.28.70.186:808.
- Configure OPERA proxy credentials for the user and password. Access the Application Setting > General > Proxy Credentials and enter in this format: proxyuser:proxypwd. Example:gen:gen1234.
- If proxy servers are used at the property for purposes other than SFTP Scheduled Reports (or SFTP Export File Delivery), you may need to bypass the proxy for the SFTP server or else the SFTP may stop working. Access the Application Setting > General > Proxy Server Bypass and enter the configured SFTP addresses in this format: *.<DOMAIN.NAME>. Example: *.ft.company.com,172.28.70.186.
Property. Available when the OPP_MHOT PMS Multi-property add-on license is active. Select the down arrow to choose the property you want to create or edit SFTP destinations.
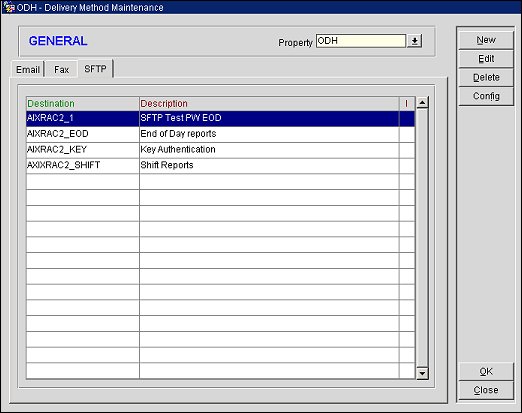
The grid displays existing SFTP locations for the property, including the destination name and description.
Config. Select this button to configure the highlighted SFTP destination. The Export File Delivery Configuration screen appears where you need to define the SFTP Destination URL, User Id, and other security information. See Export File Delivery Configuration below.
On the New or Edit Destinations screen, the following fields are available. You can create an unlimited number of SFTP locations for your property.
Destination. SFTP destination.
Description. Description of the destination, such as Shift Reports.
Inactive. Select the Inactive check box if you choose to remove the SFTP destination from being available for selection. It will not appear on the grid but will be available again if the Inactive check box is deselected.
This screen will complete the connection and configuration process.
Select one of the option buttons for your choice of the type of authentication of your SFTP delivery method:
Host/URL. Enter the URL of the SFTP site to which the export will be sent.
User Id. Enter the User Id required to login to the SFTP site.
Password. (SFTP - Password Authentication only). Enter the password required for the user to login to the SFTP.
Private Key Password. (SFTP - Public Key Authentication only). Enter the password key required for the user to login to the SFTP. When public/private key files are generated (using CuteFTP or a similar tool) the private key file is generated along with a password for the private key file. Enter this private key file password in this field. As you type, asterisks are displayed. OPERA will encrypt the password and store it in the database.
Target Directory. Enter the directory and/or subdirectories (including path) on the SFTP site where the report/export file will be stored.
Validate. (Both SFTP - Password Authentication and SFTP - Public Key Authentication.) Select to test the validity of the location and delivery method information you have specified. OPERA will attempt to contact the SFTP site using the information you have provided. If the validation is successful, "Valid" will display in blue type at the bottom-left of the screen. If the validation fails, a "Connection could not be established" message screen will open and "Invalid" will display in blue type at the bottom-left of the screen.
Note: If the location and delivery method information has not been verified via selection of the Validate button, "Not Verified" will display in blue type at the bottom-left of the screen.
Import Key. (SFTP - Public Key Authentication only). Select the Import Key button to import the private key file (generated using CuteFTP or a similar tool). The private key is stored in encrypted format in the OPERA database. When you select the Import Key button, the File Upload screen appears.
Select the down arrow on the Select File field and navigate to the file on the application server where the private key is stored. When you have navigated to the file, the filename and path show in the Select File field. Select the Upload button to save the filename and path and return to the Export File Delivery Configuration screen. The following message displays: "Private key file has been imported successfully." The read-only Private Key Stored check box will be selected on the Export File Delivery Configuration screen.
When an export using SFTP public key authentication is generated, an OPERA API will access the private key, decrypt the private key using the private key password, then use the private key to encrypt the export file. Finally, the API transmits the export to the host.
See Report Scheduler for scheduling reports delivered via SFTP.
See Also
Show Me