
|
|
|
Reports Scheduler
Note: The Schedule screen is used for setting up schedules for both the OPERA Batch Processor Scheduler and the Reports Scheduler. Scroll down to the section Schedule Screen Selection Criteria to view instructions for using the Schedule screen. When the Schedule screen is accessed from the OPERA Batch Processor Scheduler, the screen does not contain the Server field.
When the General > Report Scheduler application function is set to Y, the Reports Scheduler provides the capability to run OPERA reports at a certain time and frequency. The user selects the report and sets up the schedule for a future time. The report automatically generates data according to the schedule. This functionality is accessed by selecting Miscellaneous > Reports Scheduler. All available OPERA reports can be scheduled to run using this feature.
The Reports Scheduler is an enhancement over the single, one-time report generation done when selecting Miscellaneous > Reports. At the single, one-time report procedure, reports can only be run individually and sequentially; users have to wait to start a report after the previous one has finished. Users are also not able to cancel the report. Although this might not be an issue for small reports, it can be an issue for long running reports, especially for ORS where there may be a need to generate data for many properties. The Reports Scheduler, therefore, was developed to solve these issues.
Note: In ORS, the scheduled reports run according to the CRO time zone and in PMS, the time zone is determined by the property time zone. The scheduled reports' time zones are dependent on the property configured time zones either in the application setting General > Database Time Zone Region or in Configuration > Property > Property Details > Edit. (The user workstation time zone does not affect the report scheduler.)
Note: The Reports Scheduler can also be used to schedule transmission of reports via Secure FTP (SFTP) to a configured SFTP destination server.
The following sections include a list of reports that cannot be scheduled with this utility, Reports Scheduler permissions, screen descriptions, and information on how to create and modify report schedules.
The following reports cannot be scheduled with Reports Scheduler.
Product |
Report Name |
File Name |
|---|---|---|
PMS |
Cashier Report |
cashier_rep |
PMS |
Check Report |
check_rep |
PMS |
Exchange Report |
exchange |
PMS |
Housekeeping Details |
hk_detail |
PMS |
Room Maintenance - Not Resolved |
hk_discrepancy |
PMS |
Package Option Report |
package_option |
PMS |
Room Maintenance Report |
room_maintenance |
PMS |
Three Month Forecast |
three_month_forecast |
PMS |
Track It Valet Items |
trackit_valet_items |
PMS |
1099 Report |
us_1099 |
S&C |
FIT Contract Report |
rep_contract_info |
S&C |
Rooms Availability/Forecast |
rep_rooms |
S&C |
Sales Managers Production Goals |
rep_smgr_prodgoals |
S&C |
Daily Analysis Report |
rep_weekend_weekday |
OVOS |
Compressing Owner Accounts Transactions into Invoices |
ovos_auto_invoice.auto_invoice_creation |
OVOS |
Renew Rental Contracts |
ovos_contract.renew_rental_contracts |
OVOS |
Post Reservation Fees and Revenue for Owners |
ovos_fintrx.post_resv_fees_and_revenue |
OVOS |
Populate New Rotation Period |
ovos_rotation_api.populate_new_period |
OVOS |
Cashbook |
sample_owner_cashbook |
OVOS |
Sample Owner Checks |
sample_owner_checks |
OVOS |
Sample Owner Statement |
sample_owner_statement |
OVOS |
SIG Owner Statements |
sig_owner_statements |
OVOS |
SIG Owner Summary |
sig_owner_summary |
ORS |
Arrival By Guarantee |
arrbyguat |
ORS |
Arrival By TA/Corp |
arrbytacorp |
ORS |
Reservations By Trx Date |
arrivalsimple |
ORS |
Arrival By Source |
arrsource |
ORS |
Award Redeem Analysis |
award_redeem |
ORS |
Master Booked Reservations |
mstbookres |
ORS |
Multiple Subscription Report |
ors_mul_subscr |
ORS |
ORS Arrivals: Detailed |
orsresarrdetail |
ORS |
Reservation Detail Report |
orsresdetail |
ORS |
ORS ResReserved |
orsresreserved |
ORS |
Reservations by Clerk |
orsresvclerk |
ORS |
Promotion Code Statistics |
promocd_stats |
ORS |
Reservations Guaranteed to Credit Card |
reservationcc |
Using the application server configuration tools, it is possible to change the export directory where reports generated by the Reports Scheduler are stored (the default directory path is ..\micros\opera\export\<schema_name>). Once the export directory has been changed, all new scheduled reports you set up will have the new directory location. The report System Parameters _FILE_LOCATION_ and DESNAME (if DESTYPE=FILE) define the scheduled report's export directory location.
In the event that there are already scheduled reports configured for which the _FILE_LOCATION_ and DESNAME specify a non-current export directory, the following message appears when you access the Reports Scheduler screen:
"Export Directory has changed from <old_directory_path> to <new_directory_path>. Do you want to update all scheduled reports to this new location?" Reply Yes to change the _FILE_LOCATION_ and DESNAME for these scheduled reports to reflect the new directory location. Messages appear in the title bar as each scheduled report is modified.
Reply No to leave the directory location unchanged for the existing scheduled reports. If you reply No, each time you access the Reports Scheduler screen you will be prompted to update the directory location for scheduled reports that do not have the current directory location.
SFTP proxy servers can be configured for SFTP Scheduled Reports. Ensure that the Delivery Method for SFTP is configured in Configuration > Property > Delivery Method > General.
The following Reports Scheduler user permissions are available in the GENERAL Group, providing users with various rights:
The user logging in as the supervisor will be able to view all report results, modify all report schedules, and cancel any scheduled report.
When Miscellaneous > Reports Scheduler is selected, the Schedules screen appears displaying Scheduled Reports. This screen displays all previously set up and active reports (those scheduled for a future or ongoing run). From this screen you can select options to view reports scheduled to run, run a report now, edit an existing report schedule and date parameters, create a new report schedule, or delete a report schedule.
Report Name. Name of the scheduled report you want to view.
Repeat Interval. The interval of the report generation, such as Every 1 Week.
User. The name of the user who scheduled the report.
Start Date From/To. The report generation run dates: start to end by month, day, year.
Report Name. Name of the report scheduled to be run.
Start Date/Time. The date and time the report is scheduled to begin to run.
Repeat Interval. The frequency in which the report is scheduled to run.
End Date/Time. Date when the report generation is scheduled to end.
Run Count. How many times the report has been generated since the start date to now (today's date), according to the schedule.
Last Start. The last time report was run.
Next Run. The next time the report will run, according to schedule.
User. The name of the person who created the report schedule.
Select one of the three option buttons for viewing either the Distribution List, Parameters, or System Parameters associated with the selected report.
|
PLACEHOLDER_CODE |
PLACEHOLDER_DESCRIPTION |
1 |
<REPORT_FILE_NAME> |
Report File Name (=Default) |
2 |
<RESORT> |
Property placeholder_code |
3 |
<HOTEL_CODE> |
Hotel Code from Property Details |
4 |
<BUSINESS_DATE> |
Business Date |
5 |
<SYSTEM_DATE> |
System Date |
6 |
<SYSTEM_TIME_HH> |
Hour of System Time in AM/PM format |
7 |
<SYSTEM_TIME_HH24> |
Hour of System Time in 24 hour format |
8 |
<SYSTEM_TIME_MI> |
Minute of System Time |
9 |
<SYSTEM_TIME_SS> |
Second of System Time |
10 |
<BRAND> |
Brand |
11 |
<BUSINESS_UNIT> |
Primary Business Unit |
12 |
<DEPARTMENT_CODE> |
Primary Department Code |
13 |
<DIVISION> |
Primary Division |
14 |
<OPERATING_UNIT> |
Primary Operating Unit |
Note: When a report is highlighted, you can select to have it delivered via SFTP for any of the output methods, if SFTP destinations have been configured. The Value LOV contains the property's configured SFTP destinations and descriptions. These were configured in the SFTP tab on the Delivery Method Maintenance Screen.
Distribution
Communication Type. This field identifies the communication option selected for this report: whether it is a fax or email report output to recipients, or if it is to print the output to a file.
Address. The Fax number, email address, or file format for the generated report.
Note: Should Distribution List be selected, the New and Delete buttons are available to allow users to create a new destination type for the reports. Selecting Delete on a specific type will delete the destination type.
Note: Reports emailed via OPERA Reports Scheduler will use the "From" email address configured for the General delivery method (see Delivery Method Maintenance for details).
Parameters
Parameter. The report parameters are originally set up by the user from the reports parameter screen.
Value. The value of the parameters. When the value is a date (displayed either when the Dates Only check box is selected, or when all parameters are displayed), you are given the opportunity to further modify the report parameter dates by selecting the Set Date button. When the Set Date button is selected, the Date Screen appears.
Note: The Date parameters are the only parameters that can be modified here, by selecting the Set Date button. The other parameters are view-only and are for information only.
Reports. Displays the Submitted/Completed Reports screen where you can view the scheduled report status and once the report is completed, the report results (see Submitted/Completed Reports Screen below for further details).
Note: The Reports button changes to the Schedules button on the Submitted/Completed Reports screen which, when selected, returns the user to the Scheduled Reports screen.
Refresh. Select this button to refresh the grid and see new report schedules or updates to the runs of the scheduled reports.
Select All/None. Selects/deselects all reports, respectively.
Run Now. You can run the modified or highlighted report now by selecting this button.
Delete. If a report is in the process of running, pressing the Delete button will stop the processing and delete the report permanently from the schedule. If a report has not been run, selecting this button will remove the report from the queue and permanently remove it from the schedule. In both cases, the report will not be visible for viewing.
Edit. Displays the Schedule screen where you can edit the existing report schedule by changing such things as dates and frequency.
New. Displays the Reports screen, where you can select the report and the property whose data you will be running.
Log. Used for troubleshooting report scheduler problems. Debug mode must be set in order to create a log of Print program processing steps while reports are running. This feature should be used as directed by Oracle Technical Support.
Set Date. Available with the Scheduled Reports display when the Parameters option button is selected. Select this button to view and modify the date parameter values. The Date screen appears. Changing the dates using this method allows you to modify the report default dates to a new desired time period on a repetitive basis. Any date parameter can be defined starting with the date when the report was started and using other date modifiers, such as the First Day of the Month, this Monday, or an offset in days and months.
Note: The report configuration form must be saved in Configuration prior to using the Set Date feature. To save the report configuration, go to Configuration > Setup > Reports Setup > Reports. Then select and Edit the report. Finally, select the Parameters button to display the report parameters and Save the configuration. Do not enter any dates in the parameters form; leave the date fields empty.
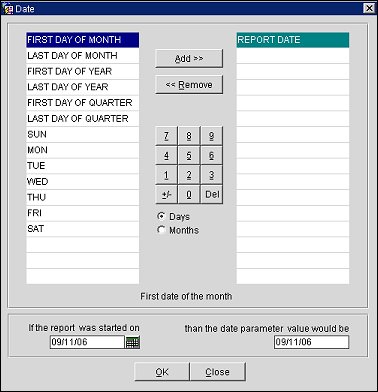
Add>> / <<Remove. Highlight a value in the left column and select Add>> to move it to the right column. The values in the right column are active. Select <<Remove to deactivate a highlighted value in the right column and move it to the left column, thus deactivating it.
Number Keypad. Select the number desired to indicate days and months. Select +/- (continue to scroll) to indicate the first or future (+) or last or past (-) number of days/months. Select the Del button to delete the last number entered if you want to modify your values.
Days/Months. Select the appropriate option button to indicate the date values.
Day of Week. By adding the day of the week you can further modify the date. If you wanted to see the last weekend of the month in the setup for the FROM_DATE, add FRI-Friday, and in the TO_DATE add SUN-Sunday.
FIRST DAY OF QUARTER/LAST DAY OF QUARTER. This parameter is based on a calendar year.
IF THE REPORT WAS STARTED ON and THEN THE DATE PARAMETER VALUE WOULD BE fields. The Date screen reads the current date on the database server and displays two dates in the "If the report was started on" field and the "then the date parameter value would be" field. As the user makes changes, the "If the report was started on" field and the "then the date parameter value would be" field changes dates. When the next, subsequent month arrives the system will read the dates and apply the same values to that month, adjusting the dates automatically.
OK. Select OK after you have set up your dates and the Schedule screen appears with your values.
Sample Scenario
Users can modify dates for the selected report. For example, the report can include only specific periods of the month for every month. Also, the Start and End Dates will change based on when the report was started. An example follows.
This screen displays the reports that are currently in the queue ready to run or have already been submitted. Their report status indicates whether they were completed and/or successful. This screen is similar to the initial Schedules screen, except the user cannot edit or modify the report schedule, nor can the user directly run the report; the user can view the report results here, however.
Report Name. Name of the scheduled report whose status you want to view.
Property. Name of the property from which data was obtained to generate the report.
Status. The reports whose status you want to view, such Error or Successful.
File Name. Name of the report, for example, Sample BEO 1 Column report.
Report ID. Unique identifier that is added to each generated report.
Start Date From/To. The report generation run dates: start to end by month, day, year.
User. The name of the user who scheduled or manually generated the report.
Show Non-Scheduled. Select this option to include report details for reports that were run manually and not through the Reports Scheduler. See Reports for more details.
Report Name. Name of the report that was submitted or completed (i.e. Length of Stay).
Status. Indicates if the report is waiting in the queue, was submitted, finished successfully, or couldn't be generated due to an error.
Start Date/Time. The date and time the report was run.
End Date/Time. Date when the report generation was completed.
Name. The REP name of the report (i.e. los_forecast for Length of Stay Report).
User. The name of the person who created the report schedule.
Property. Name of the property from which data was obtained to generate the report.
Select one of the two option buttons for viewing either the Distribution List or Parameters associated with the selected report.
Dates Only. Select this check box in conjunction with the Parameters option button, if you want to view only the date parameters and date values for the report. If you want to modify the date parameters, you must return to the Scheduled Reports screen (select Schedules button) and select the Set Date button.
Distribution
Communication Type. This field identifies the communication option selected for this report: whether it is a fax or email report output to recipients, or if it is to print the output to a file.
Address. The Fax number, email address, or file format for the generated report.
Parameters
Parameter. The report parameters are originally set up by the user from the reports parameter screen.
Value. The value of the parameters.
Schedules. Select this button to view the Scheduled Reports screen, where previously set up reports display.
Refresh. Select this button to refresh the grid and see updates to the runs of the scheduled reports.
Select All/None. Selects/deselects all reports, respectively.
Delete. If a report is in the process of running, selecting the Delete button will stop the processing and delete the highlighted report permanently from the system. If the report is scheduled to be run, this key will delete the report from the system. In both cases, the report will no longer be in the queue or be scheduled to run.
View. Highlight the report and select this button to view the report results.
The Schedule screen appears immediately after a report schedule is highlighted on the Schedule Reports screen and the Edit button is selected. Users can change the future run times of the report and select OK to save the changes. See Schedule screen below.
When New is selected from the Schedule Reports screen, the standard Reports screen initially appears.
Note: Scheduling several reports at the same time, or during peak hours, may affect the total system performance.
Enter the desired values in the Start, Repeat, and Repeat Until sections. These values interact with each other to create the schedule you want, as described below.
Enter how often you would like the report to run after the start date and time.
Once Only. Select this option button if you want the report to be run only once. Otherwise, proceed to select the frequency option buttons.
Every. Enter a number to indicate how many times the report should be run per minute, hours, days, weeks, or months.
Minutes. Select this option button to run the report on a minute basis. The Every field appears where you can enter the "every number" of minutes you want the report to be run.
Hours. Select this option button to run the report on an hourly basis. The Every field appears where you can enter the "every number" of hours you want the report to be run.
Days. Select this option button to run the report on a daily basis. The Every field appears where you can enter the "every number of days" you want the report to be run.
Weeks. Select this option button to run the report on a weekly basis. The Every field appears where you can enter the "every number of weeks" you want the report to be run.
Months. Select this option button to run the report on a monthly basis. Several options provide further scheduling flexibility.
Days of the Week. (Only available when the Weeks or Months option button is selected.) Select the day, or days, of the week in which you want the report to be run (Monday, Tuesday, Wednesday, Thursday, Friday, Saturday, Sunday) on a Weekly or Monthly basis.
Enter when you would like to stop the report from running.
Indefinite. Select this option button if you want to continue generating the report according to your scheduled parameters, without an End Date. (You could delete the report when you wanted to end the generation or you could edit the end date at a later time.)
Date. Enter the End Date when you want the report schedule to stop.
Time. Enter the Time associated with the End Date when you want the report schedule to stop.
When you are through entering the schedule parameters, select the OK button.
Note: If the printer is not visible on the Reports screen, the printing of scheduled reports is not possible. This indicates the printer is on a different network. Only printers not configured as Print Clients are available for selection in the Reports Scheduler.
Server. Select the down arrow to choose the application server where the report server runs.
Run as... . Before a scheduled report job runs it is initialized in OPERA. Among other things, initialization sets permissions for the report according to the report “owner” – the user who created the scheduled report job. (Obtaining the desired report results may depend on the scheduled report job owner’s permissions.) In situations where the user who originally created the scheduled report job is inactive, the report will not run as intended or may error out. In cases where you (the logged in user) are not the user who created the report job, the Run as check box is available. Select this check box to change the scheduled report job’s “owner” to your login username. (This check box is available only when the scheduled report job was created by a user who is not the logged in user.) Once the Run as check box is selected and the job is saved, you will remain as the scheduled report job “owner” until this option is again edited.
When the values of the application setting General > Database Time Zone Region and the Property Details > Time Zone Region field differ, scheduled reports will accurately consider the time differential between the database and property time so that jobs will run on the property time. Additionally, the property time zone will display in the title bar of the Schedules screen.
For Example:
Assume the database/application server resides in Singapore (GMT+8) with properties in Sydney (GMT+11)
A report schedule is created to run a report at the database time of 9:30 am, which in local property time is 12:30pm; the database considers and then calculates the time differential of (in this case) +3 hours. As the job is submitted and then run on the database the report is actually run at the property time of 12:30 pm.
Database Scheduled Time |
Resort Time |
Time Differential |
Report is Run at: |
9:30 am |
12:30 pm |
+3 hours |
Database Time - 9:30 am Property Time - 12:30 pm |
Resort Time will display on the following screens:
Note: It is important to understand that workstation time and property time are not necessarily always the same. Resort time is set via the Property Details > Time Zone Region field and might not match the time reflected on your workstation.