Using the Scheduler
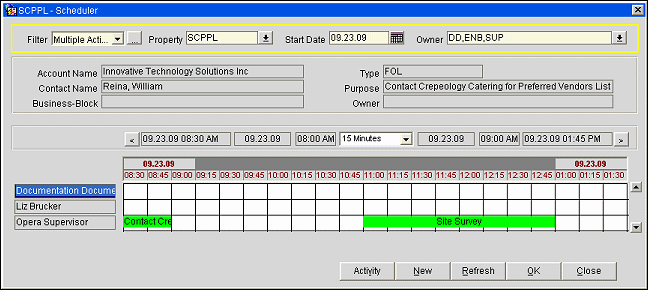
The Scheduler screen provides a window on the Activities you or others in your organization have set up. Access the Scheduler by selecting Customer Management>Scheduler from the main menu, or by selecting the Scheduler button from the Activity Search screen Options menu.
Note: When the Activity>Use Time Zones for Activities application parameter is set to Y, date and time information related to activities will be displayed in the logged-in user's time zone; if no time zone is specified for the logged-in user, the logged-in property time zone is assumed; if the logged-in property does not have a time zone assigned, the database time zone is assumed. See Activity Time Zones for details.

Property. This feature is available if the OPP_MHT2 or OPS_MHT2 license is active. Select the down arrow to choose the property for which the Detailed Calendar applies.
Start Date. Search for any past, present or future date. If you are accessing the Scheduler from the main Activities menu, the date shows today's date. If you are accessing the Scheduler from the Activities Search screen, the date that is being passed through is the date that is on the highlighted activity in the Search grid.
Owner. A multi-pick box where you can choose owners to search for their activities. If you are accessing the Scheduler from the main Activities menu, this will default to the person who logged on. If you are accessing the Scheduler from the Activities Search screen, the Owners that have been chosen in this screen will be passed to the Scheduler search criteria. When left empty, only those employees that have owner initial assigned to them will be shown.
Filter Name. Select a filter to control which Activities are displayed.
The results to your search display on the Scheduler grid. This is a color-coded graphical display of the Activities within the system. If the Activity Block is red, then this activity has been completed. If it is green, then this activity has not been completed.
These fields are populated only if an Activity is highlighted on the Scheduler grid.
Note: When the appropriate View and Edit Profile permissions are granted, in the Scheduler screen, it is possible to open the attached Account, Contact or Business Block by double clicking on the respective fields.
Account. Displays the primary Account attached.
Contact. Displays the primary Contact attached.
Business Block. Displays the primary Business Block attached.
Type. Displays the Activity Type.
Purpose. Displays the Purpose of the Activity.
Owner. Displays the owner of this Activity.
Owner Name. Sales Manager whose Activity information is shown.
Date/Time From. Start date and time for this grid display. The time can be changed by selecting the < and > buttons.
Date Start. When an Activity is highlighted, the start date for the Activity.
Time Start. When an Activity is highlighted, the start time for the Activity.
View. Select the down arrow to choose the viewing increments for the Scheduler grid.
Date End. When an Activity is highlighted, the end date for the Activity.
Time End. When an Activity is highlighted, the end time for the Activity.
Date/Time Range To. End date and time for this grid display. The time can be changed by selecting the < and > buttons.
Activity. Go to the Activity Search screen with the Date and Owner fields passed from the Scheduler to the Search screen.
Refresh. After changing a search parameter (e.g., Owner), click Refresh to update the Scheduler grid display.
Copy Item. Copy the structure of one Activity to a new Activity.
Delete Item. Delete the activity that you have highlighted.
Paste Item. A small screen will appear with a new start date and time for the new Activity being created from the Activity you copied.
Display I. Display the highlighted activity.
See Also