
|
|
|
Activities Screen
To access activities, select the Customer Management > Activities option from the main menu, or use the Activities button available from the Accounts, Contacts, or Business Block screens. The Activities Search screen appears. Select the New button to create a new activity. To view or edit an existing activity, search for the activity using the search criteria; then, in the search results grid, highlight the activity to change and select the Edit button. The Activities screen appears.
Note: From the Activities screen you can create webProposals in S&C and SFA that are associated with transient sales and not associated with a business block. See the button webProp below. See also OPERA webProposals for Transient Sales.
The Activities feature helps keep track of upcoming appointments, sales calls, follow-up contacts, things to do, and so on. Activities remain in the OPERA database until they are manually deleted. Because of this, they can serve as an historical record of your communications and business interactions.
Use activities to create reminders to send or follow-up on correspondence, make appointments, and establish project planning milestones for Account, Contact, and Business Block management. Pre-configured Surveys can be attached to activities as a way to solicit post-convention feedback from your clients. When appointments and meetings are created and updated, not only can they be updated on the local computer calendar (Microsoft Outlook), but an email can be sent to the activity owner with an iCalendar attachment. This file will allow the user to update other compatible calendars, such as on mobile devices. When the application parameter ACTIVITY > AUTO-GENERATE ICAL EMAIL FOR TRACES is activated, the iCalendar will also automatically update for traces.
Activities can be assigned to multiple owners by their originator. When you assign an activity to multiple owners, each owner receives a separate copy of the activity.
When you are finished with the activity, you can return to this screen to mark it as Complete, and add any appropriate notes.
Note: When the Activity > Use Time Zones for Activities application parameter is set to Y, date and time information related to activities will be displayed in the logged-in user's time zone; if no time zone is specified for the logged-in user, the logged-in property time zone is assumed; if the logged-in property does not have a time zone assigned, the database time zone is assumed as set up in the application setting General > Database Time Zone Region. See Activity Time Zones for details.
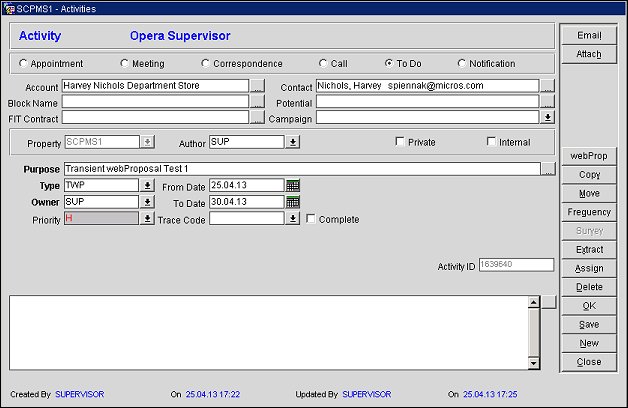
The Activities screen is the starting point for creating and editing activities.
Activities have characteristics that are set by their activity class. Activity classes determine the kinds of information associated with the activity and the functionality available with the activity. Activity classes can be associated with activity types. For example, an activity type in the meeting activity class allows you to specify a time and date for the meeting and to invite others to the meeting. If an activity type is associated with activity classes, that activity type appears in the Type field only when the option button for its activity class is selected. When creating an activity you can select an activity class by choosing one of the option buttons in the upper part of the Activities screen. Available activity classes include:
Activity Class. Select the option button that corresponds to the class of activity to create. The information fields available on the screen are determined by the activity class you select. Similarly, certain fields and functions apply only to specific activity types.
These fields are specific to the Appointment and the Meeting activity types, except where noted.
Note: When an Appointment or Meeting Activity overlaps with another Appointment or Meeting Activity for the same Owner, a prompt will display that states 'This Activity conflicts with another activity. Do you want to continue?'. Select Yes to save the Activity or No to not save the Activity, and choose a different time frame.
Start/End Date. Enter the start date and the end date for the appointment or meeting.
Start/End Time. Enter the start time and the end time for the appointment or meeting. The default start time is set by the Activity > Default Start Time application setting. The default can be edited.
All Day. Select this check box if the appointment or meeting lasts all day. The duration defaults to 8 hours, with a start of 09:00 am and an end time of 17:00.
Duration (Time and Units). Length of the appointment or meeting. The duration time and units default to the duration set by the Activity > Default Duration application setting. The default can be edited.
Assign. You can invite other users to an appointment or meeting using the Assign button. The Assign button is enabled once an activity has been saved. When others are assigned to a meeting, the Attendees indicator lamp appears. Select this lamp to view the list of invited users. See Ownership for details.
Status. (Available for Meeting activity type only.) Select the down arrow to choose a status. If you are the creator of the meeting and you assign other owners to the activity, the status of your activity is set to Organizer. The status of activities assigned to other owners will be blank and should be changed by them as they 'Accept' or 'Refuse' the activity. When other owners are assigned to a meeting, the Attendees indicator lamp appears. Select this lamp to view the Accept/Refuse disposition of each invited user. See Ownership for details.
Alert __ Minutes Before Start Time. Specify a number of minutes prior to the start time for the activity when the activity owner should be alerted. A default number of minutes can be set by the activity type configuration; if so, the default can be changed.
Note: When the Activity > Use Time Zones for Activities application parameter is set to Y, alerts are shown in the activity owner's time zone; if no time zone is specified for the activity owner, the time zone of the owner's log-in property is assumed; if the activity owner's log-in property does not have a time zone assigned, the database time zone is assumed as set up in the application setting General > Database Time Zone Region. For example, assume the database time zone = US/Eastern and the Time Zone Region field on the sales manager's Edit User screen is set to US/Pacific. If the sales manager creates an activity for a client meeting at 12:00 PM on 05/05/11 (03:00 PM US/Eastern database time), an alert set for 30 minutes prior to the meeting will be displayed to the sales manager at 11:30 AM (02:30 PM US/Eastern database time).
See Activity Time Zones for details.
Update My Calendar. Click on this link to download and update the details of your appointment or meeting into your local Microsoft Outlook calendar. OPERA generates an ICS (iCalendar) file from the activity details and then downloads these details into Outlook to populate the activity in your local calendar.
Email iCal To. Click on this link to email the new or updated activity (appointment or meeting) as an ICS (iCalendar) file to the email address linked to the activity owner. The owner can then update other calendars that support ICS files, including those on mobile devices.
Note: The mail iCal To link will be visible when the activity owner and the currently logged in user have valid email addresses set up.
Note: The SUBJECT and MESSAGE of the email are translatable using:
- SUBJECT - SC_ACTIVITY.ICALENDAR_EMAIL_SUBJECT
- MESSAGE - SC_ACTIVITY.ICALENDAR_EMAIL_MESSAGE
The iCalendar file has the following translatable items:
- NO REPLY text - SC_ACTIVITY.EMAIL_NO_REPLY
- Disclaimer text - SC_ACTIVITY.ICALENDAR_DISCLAIMER
- Error Message - SC_ACTIVITY.CANNOT_CREATE_ICALENDAR_CONTENT. The "^1" will be replaced with the actual error message.
Date. Date of the correspondence. Defaults to today's business date. Correspondence activities do not display in the activity Scheduler.
Date. Date of the call. Defaults to today's business date. Call activities do not display in the activity Scheduler.
From/To Date. Enter the begin date and end date for the activity. This date range will also determine when the activity will be visible in the Salesrep Dashboard and the Detailed Calendar screen To Do Activities list (Quick Key {F4]). To Do activities do not display in the activity Scheduler.
Type. The Notification type to be created for this activity.
Date. Date the notification/alert should be created.
![]()
Important! When the appropriate View and Edit permissions have been granted, it is possible to open the attached Account, Contact, Business Block, Potential or FIT Contract record by double clicking on the name. The double click is only enabled if there is an actual value in the field.
Account. The account or company associated with this activity. Select the ellipsis button to display the Quick Profile Search screen (to assign an account to a new activity) or double click on the account name to display the listed account. If more than one account is associated with the activity, the background of this field is yellow.
Note: When accessing the Activities screen directly from a Business Block and selecting the New button, the Account and Contact information designated as PT (on the Account/Contact Select screen) for the Business Block will be defaulted for these fields. If no account or contact has been designated as PT, the account and contact from the business block will be linked based on the Company > Travel Agent > Source hierarchy.
Contact. The company or account contact associated with this activity. Select the ellipsis button to display the Quick Profile Search screen (to assign a contact to a new activity) or double click on the contact name to display the listed contact. If more than one contact is associated with the activity, the background of this field is yellow. The contact's phone number and email address, if one exists, will also display in this field next to the contact's name. If the contact selected has no relationship to the account or company already associated with the activity, the contact's name will display a red background.
Block Name. The business block associated with this activity. Select the ellipsis button to display the Business Block Search screen (to assign a business block to a new activity) or double click on the block name to display the listed business block. If more than one business block is associated with the activity, the background of this field is yellow.
Potential. The potential associated with this activity. Select the ellipsis button to display the Potential Search screen (to assign a potential to a new activity) or double click on the potential name to display the listed potential. If more than one potential is associated with the activity, the background of this field is yellow.
Campaign. Available if the Activity > Campaign Management application function is set to Y. Select the down arrow to choose the campaign with which this activity is associated. See Campaign Management for details.
Property. If the OPERA Multi-Property license (MHOT) is active, the property for which the activity was created.
Author. The owner who created the activity. When an activity is created via the auto trace functionality, the author field will be populated with the owner logged in when the activity is generated.
Private. Select this check box as an indicator that this activity is personal. An activity marked as private will not be transferred via OXI.
Internal. An activity marked as internal will not be transferred via OXI.
Purpose. Enter a hint about the purpose of this activity as a reminder when you look at your schedule (for example, "Call Andrew Kramer at Melbourne - May 2005 Meeting"). There is a maximum of 36 characters. This will show up on your Detailed Calendar and Scheduler.
Type. Select the Activity Type from the pick box showing all the types of activities you can track. These are property definable. Be as specific as possible. If an activity type has been assigned to an activity class (Meeting, Appointment, Call, Correspondence, To Do) in Activity Type configuration, the activity type will appear in this list only if its activity class option button has been selected.
Start. Specify the date and time to have this activity begin. The property decides the default start time, which you can change. Depending on the property standards, you will either be using a 24-hour or 12-hour clock. The default date is today's date. To change this, use the calendar or type in the date.
Duration. Enter an estimate of how long this activity will take. This is a numeric field only and is directly affected by the Time Unit Field. For example, if the Time Units value is minutes, and the Duration is 60, you estimate the Activity will take 60 minutes. The default duration is set in configuration, but the value can be changed while creating/editing the activity.
Time Unit. This is a pick box field. Use it to specify the time units for the Duration. For example, if the Time Units value is minutes, and the Duration is 60, you estimate the Activity will take 60 minutes. Time Units options are property specific and should reflect the type of timing you want your Sales Managers to use.
End. Time to have this Activity end. It is a calculated field and will automatically be populated based on the Start Time and the Duration. If you change this field then the Duration field also gets updated. The next field is for the Date to have this Activity end. It is a calculated field and will automatically be updated based on the Start Date and the Duration.
Owner. Choose one Sales Manager to be accountable for the activity. This field will default to the owner code of the logged in user but can be changed if the activity should be assigned to a different Sales Manager.
When the Owner field has a gray background, it indicates that the owner listed is an inactive primary owner. Select a new active owner, if desired.
Note: Once the activity has been saved, the Assign button can be selected to assign the Activity to multiple owners.
Priority. Choose the priority assigned to this activity. This field will also display the configured color schematic assigned to the activity priority codes.
See Priority Codes for more details.
Attachments. Displays a hyperlink of any file attachments associated with this activity. Although multiple attachments can be added to an activity, only the first two will display as hyperlinks on the Activities screen.
Note: When an attachment is added to a 'Master' activity (an activity from which other attendees were invited), that attachment will be visible on all the linked activities. Attachments added to the linked activities, will NOT be visible on the 'Master' nor on the other linked activities.
Trace Code. Use this pick box to select the trace code for this activity. Trace codes should be used for re-tracing an activity based on the activity type or completion date or any of the other activity fields.
Complete. Check this box when the activity is completed. You must mark this field for the Completed Date and Time fields to appear.
Note: In SFA only, in addition to the Completed Date and Time fields, when this option is selected and the application parameter Activities > Activity Results is set to Y in SFA only, a Results drop-down field displays. See the section, Activity Results for SFA later in this topic for more details.
Alert __ Minutes Before Start Time. Available for Appointments and Meetings. Specify a number of minutes prior to the start time for the activity when the activity owner should be alerted. A default number of minutes can be set by the activity type configuration; if so, the default can be changed.
Note: When the Activity > Use Time Zones for Activities application parameter is set to Y, alerts are shown in the activity owner's time zone; if no time zone is specified for the activity owner, the time zone of the owner's log-in property is assumed; if the activity owner's log-in property does not have a time zone assigned, the database time zone is assumed (as set up in the application setting General > Database Time Zone Region). For example, assume the database time zone = US/Eastern and the Time Zone Region field on the sales manager's Edit User screen is set to US/Pacific. If the sales manager creates an activity for a client meeting at 12:00 PM on 05/05/11 (03:00 PM US/Eastern database time), an alert set for 30 minutes prior to the meeting will be displayed to the sales manager at 11:30 AM (02:30 PM US/Eastern database time).
See Activity Time Zones for details.
Notes Field. Beneath the fields, on the Activity screen in OPERA, is a text entry area where you can add any pertinent notes for the activity. This field has a maximum text entry capacity of 4000 characters.
Launch webProposal. See Auto-created webProposal Activities, below.
Using a web service, the property ID, booking ID and the external access token can be sent from webProposal to OPERA when the webProposal Send button is selected. The web service populates internal PROPOSAL_SENT_DATE and VIEW_TOKEN fields in the business block allotment header. Based on changes to the PROPOSAL_SENT_DATE, a trace definition can be set up to auto-create an activity whenever the webProposal related to the booking is sent (either initially or updated). See Trace Code Definition for details on setting up this functionality. Click the Launch webProposal link to view the most current webProposal associated with this activity.
See Activities Main Screen Painting Elements for details.
Activity ID. ID number assigned to the activity.
Assigned By. User ID number of the employee who assigned the activity.
Assigned By User. Name of the user who assigned the activity.
Assigned On Date. The date that the activity was assigned.
Assigned To. User ID number of the employee who the activity was assigned to.
Assigned To User. Name of the user who the activity was assigned to.
Category Code. Category code that the activity belongs to.
Color Code. Color code selected for the activity to easily identify it.
Completed By. User ID number of the employee who completed the activity.
Completed By User. Name of the user who completed the activity.
Completed By Date. Date that the activity was completed.
Depending On Activity ID. Displays the other activity that this activity is depending on.
Department of Action. Department of the property that needs to take action for the activity.
Due Date. Date when an activity is due.
Note: A background process periodically checks to see if there are any non-completed activities that were due within the specified time interval. When a match is found a screen displays with the activity description and time due so that the currently logged in user can deal with it immediately rather than having to manually check for upcoming tasks/activities. This information applies to start times for Meetings as well.
Duration Time Description. Enter a description pertaining to the worked completed for the duration time worked.
Duration Worked. Enter the duration worked for the activity.
Duration Worked UOT. Enter the unit of time for the duration worked.
Duration Worked UOT Description. Enter a description relating to the unit of time for the duration worked.
End Date. Date the activity ends.
Estimated Time to Complete. Enter the estimated time to complete the activity.
Location Code. Code for the location where the activity is to be held.
Location Desc. Description of the location where the activity is to be held.
Parent Activity ID. Identification code of the parent activity.
Plant Item Code. Plant item code.
Plant Item Desc. Description for the plant item.
![]()
webProp. This functionality is for creating transient webProposals not associated with a business block from within S&C and SFA (when the property code is an SFA property code). Available when the application parameter Blocks > Webproposal is set to VERSION 4 and linked to webProposal sprint 2.9 or higher. The application parameter Activities > Transient webProposal must be active and the user must have the permission ACTIVITY > WEBPROPOSAL TRANSIENT.
Email. Open the Email Activities screen. Use the Alt + L keys to access the Email Activities Screen directly.
Note: The OPERA user wanting to open this screen must have an email address associated with their Employee profile.
Attach. Add an attachment document to this Activity.
Copy. Select this option to copy the activity. When this button is selected, user will be prompted to copy to another account, contact or to an activity with no profile links. If an Activity has a Business Block linked to it, that link will carry over when copied to an Account or Contact profile. See Copying any Activity for further details.
Move. Select this option to move the activity from one account to another. When this button is selected, the Quick Profile Search screen displays. Enter the account name to locate the account to move this activity to.
Frequency. Open the Task Frequency Setup screen to set or edit repeating frequencies for this activity. The Frequency indicator lamp appears on the screen if a frequency has been set for the activity.
Survey. Available if there is a survey attached to the activity. Surveys can be attached to Activity Types so that when an activity of that type is created, the Survey Responses form will automatically open if the survey has not been completed when the Activity is marked Completed. See About Surveys for details.
Extract. Create a mail merge based on this activity. The Extract button takes you to the Attachment screen where you can choose a template (or create a new one) for the mail merge. When you select an Activity for an extract, you have access to the associated Accounts, Contacts, and Business Blocks information. See Data Extraction for details.
Assign. Select other employee owners to whom this activity should be assigned (linked). This button is enabled once the activity has been saved. Takes you to the Assign Owner screen.
Delete. Delete the activity. A message will prompt you to confirm this action. This button might not be activated, depending on your permissions. If this activity has multiple profiles associated with it (e.g., an Account and a Contact, two Contacts, two Accounts, etc.) the message "This is a multiple assigned activity. Do you wish to continue?" appears. Select Yes to delete the activity or No to keep the activity.
Note: If you are the originator of this activity and you have linked it to other owners using the Assign button, you must first select the Assign button and un-select the other owners before you can delete the activity.
New. Select this option to create a new activity.
Note: When the New button is selected, you are prompted to choose to attach the same links to the new activity. Selecting Yes will automatically copy over all available existing links to the new activity. These links can include: Account, Business Block Name, Contact Potential, FIT Contract, Campaign Management Links, as well as the following fields - Class, Type, Purpose, Priority, Alert (minutes), and Notes.
When an Activity has a link to a Business Block, and the Copy button is selected, you are presented with the following 4 options:
At the bottom of the screen is a "log" showing the OPERA user ID, the dates, and the times when the activity was Created, when it was last Updated, and when it was marked as Completed.
When the Attendees lamp appears at the bottom of the screen (see Indicator Lamps for lamp list and descriptions), this activity is assigned to more than one owner. Click on Attendees to view a list of employee owners to whom the activity is assigned. You can also change assignments if your permissions settings allow.
The Survey lamp in the lower part of the Activities Search screen indicates that a survey is attached to the activity you have highlighted. Click on the lamp (or select the Survey button from the Activities Options menu) to display the Survey Response screen. You can use this screen to provide responses to the survey questions if the survey has not already been answered. If responses have already been provided, you can review the answers given but you cannot change them. See Surveys for details.
When the application parameter Activities > Activity Results is active in SFA, a Result field becomes available once an activity is marked as 'Complete'. You must select a result code prior to closing the Activities screen as this field is mandatory.
Results codes can be defined using Configuration > Database > Activity Results. Select one or multiple configured result codes from the list of values. See Activity Results for more details.
See Also