
|
|
|
Stationery Editor
Stationery Editor provides a user-friendly method to customize guest stationery templates (e.g., Folios, Confirmation Letters, and so on) using Microsoft Word.
The customizable reports are stored in the Customizable Reports folder on the Application server. Each template available for customization has three files with the following extensions: *.ODT, *.RTF and *.XML.
The Stationery Editor utilizes the Oracle BI Publisher plug-in for Microsoft Word. Microsoft Word, installed on a workstation, is used to customize the layouts of the RTF document and the customized template is uploaded and saved on the application server. At runtime, data is extracted in XML format and merged with the RTF template to generate the final document in either PDF, HTML, or RTF formats.
For multi-language stationery, an RTF template per language is required.
To utilize the Stationery Editor, the client machine used for the customization must have Microsoft Word and Oracle BI Publisher installed. Once installed, Microsoft Word will have an additional menu/toolbar, titled the Oracle BI Template Builder, available.
Download installation from https://www.oracle.com/technetwork/middleware/bi-publisher/downloads/index.html by selecting either the 32-bit Office or 64-bit Office on Windows installer.
This section describes the steps for installing Oracle BI Publisher Desktop for WINDOWS 10 workstation with Office 2016.
To customize a Stationery template in OPERA Property Management System, you must enable the Customize button.
Configure a new report by selecting Configuration, PMS, Setup, Reports, and the report group.
The Customize button may be disabled or hidden on the Reports screen.
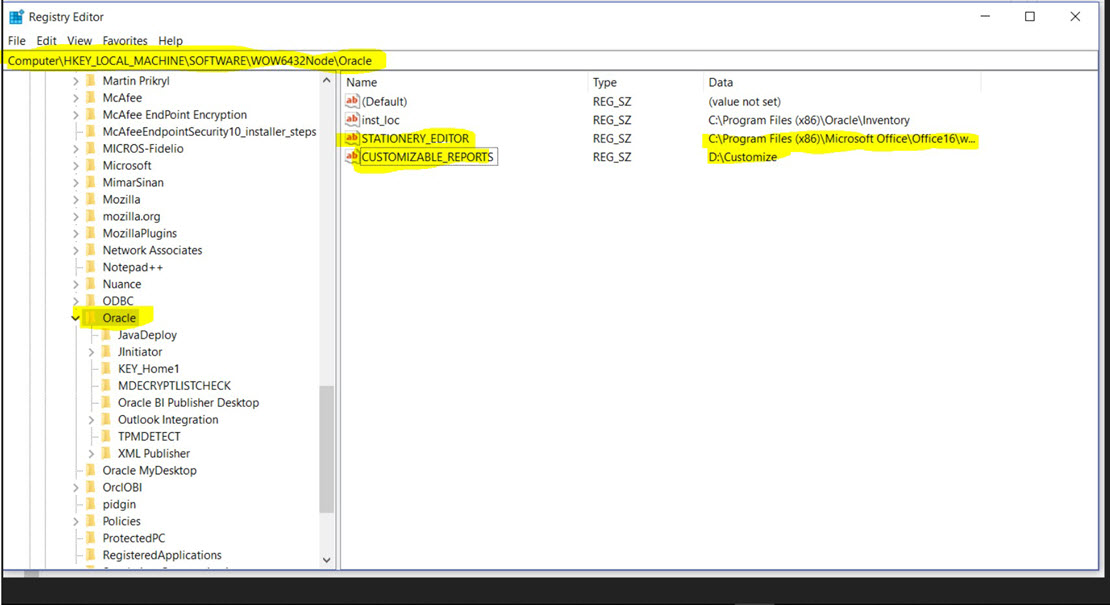
For the Customize button to be visible, the STATIONERY_EDITOR and CUSTOMIZABLE_REPORTS registry keys must exist on the client computer.
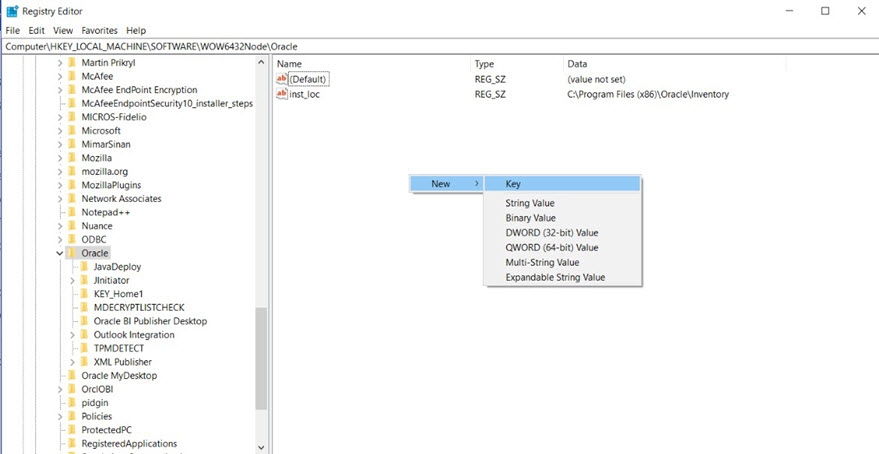
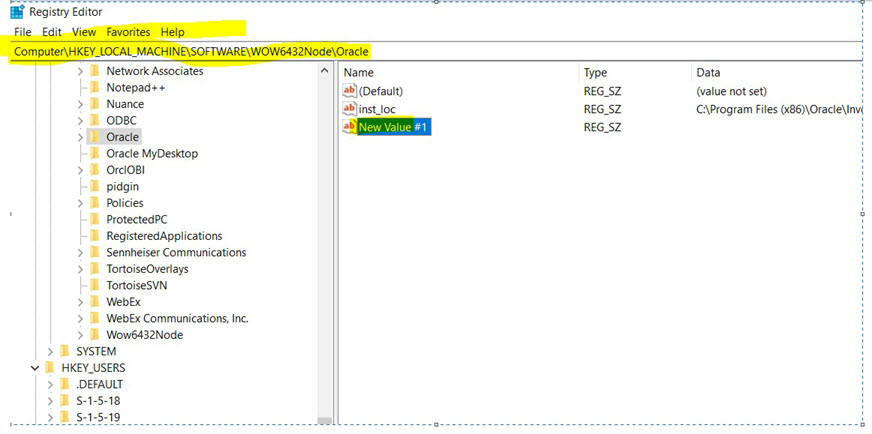
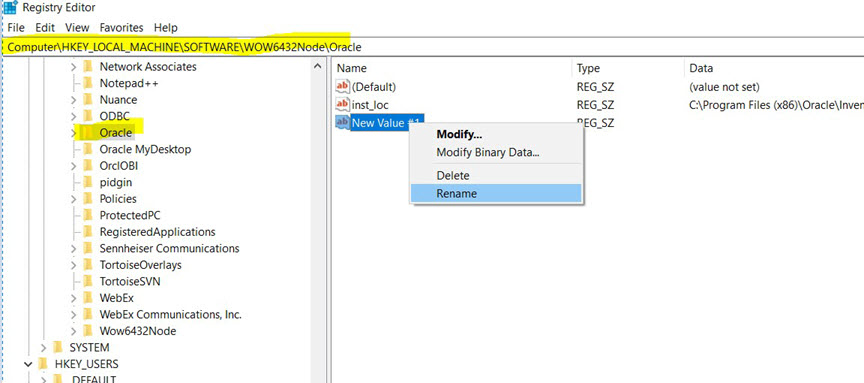
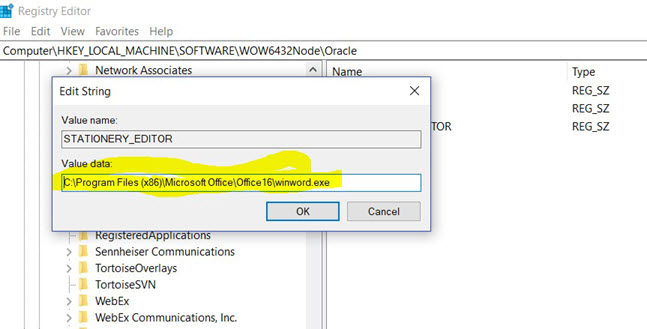
HKEY_LOCAL_MACHINE\SOFTWARE\ORACLE\CUSTOMIZABLE_REPORTS
Specify client drive and folder to store local desktop RTF templates ; eg d:\customise
For the Customize button to be enabled, the following conditions must be met:
Adding non-standard fonts to the Stationery Editor is just another way in which to further customize reports. This can be done for a number of reasons, from using corporate issue fonts, to having the ability to print international addresses that use a bar-coding system.
On the Application Server
When using the FOLIO COPY LEGEND functionality with the OPERA XMPL, the OPERAXMLP.cfg file must be modified from:
<!-- property name="pdf-compression">true</property-->
to
<property name="pdf-compression">false</property-->
so that the PDF is not compressed.
Copy any non-standard fonts to be used with customizable reports into the Windows Font directory (generally C:\WINNT\FONTS). Next, edit the file OPERAXMLP.cfg to include font mappings.
Note: If this file does not exist, then one must be created as a copy of 'sample_OPERAXMLP.cfg'.
This file is normally stored in the folder defined by the CUSTOMIZABLE_REPORTS environment variable; for example, d:\micros\opera\production\customizable_reports. If multiple CUSTOMIZABLE_REPORT directories exist, which is a non-typical setup, then the OPERAXMLP.cfg file for each directory must be modified. Using Notepad or a similar editor, modify the file as follows:
|
Ensure that the font name is correctly entered and that 'font family' is also entered as it appears in the font viewer. In this example, all fonts including the QAS Barcode font are configured.
Note: If the Quick Address Software has been installed and configured for Australian Data on the application server, the QUICASB_.TTF font may have already been installed into the C:\WINNT\FONTS. However, the OPERAXMLP.cfg file must still be modified to properly display the barcode in PDF format.
First, copy any non-standard fonts to be used with customizable reports into the Windows Font directory (generally C:\WINDOWS\FONTS). Next, edit the file xdo.cfg to include font mappings. This file is located in, C:\Program Files\Oracle\XML Publisher\XML Publisher Desktop\Template Builder for Word\config. Using Notepad or similar text editor, modify xdo.cfg in the same manner as the following example.
|
In this example, all other fonts are commented out (or hidden) and only the QAS Barcode font is actually configured.
Note: If the Quick Address Software has been installed and configured for Australian Data on the application server, but the reports to be customized are modified from a client machine, the QUICASB_.TTF font must be installed and configured for the client machine for the barcode to properly display in PDF format.
The following customizable templates are available for use with Stationery Editor (these file names must be changed if the user wants to customize these reports because a report name starting with "sample" will not enable the Customize button on the Reports - Edit screen):
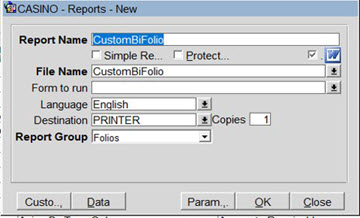
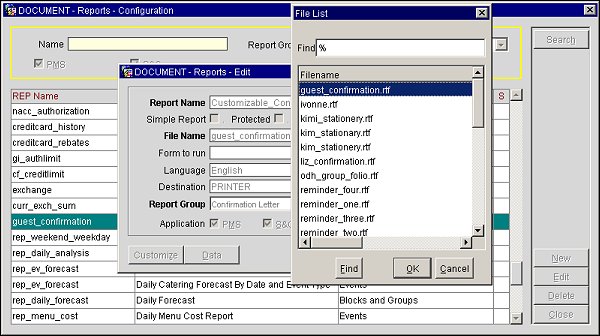
To customize the sample reports with the Stationery Editor Tool, access the OPERA Report Setup menu item in Configuration (Setup > Configuration > Setup > Report Setup > Reports > New). The Reports - New/Edit screen displays.
Report Name. Define the name of the template (for example, email_confirmation). If a template per language will be created, then prefix or suffix the template filename with the language code for uniqueness of the RTF template (for example, fr_email_confirmation for ‘French Email Confirmation').
Simple Report. This is not applicable for stationery reports and must be left unchecked (See Simple Report Writer for details).
Protected. This is not applicable for stationery reports and must be left unchecked.
Microsoft Word Icon/Check box. Select the check box with the Microsoft Word icon to indicate you will be using the Stationery Editor.
File Name. When the Microsoft Word check box is selected, the list of files in the LOV will be files with *.rtf extensions from the Customizable Reports folder in the Runtimes directory of the Application Server.
Form to Run. This is not applicable for stationery reports and should be left blank.
Language. Select the language of the template based on the profile language value in OPERA (for example, select the Italian folio template for Italian national guests).
Destination. Select Printer, Fax, or Email for the default output destination.
Report Group. Single select pull-down menu from where your customized report will be run in the OPERA application.
Application PMS/S&C/ORS. These check box options indicate from where the customizable reports are available.
Customize Button. When selected, the customizable report is downloaded from the application server to the client machine and placed in the directory as defined in the registry setting of HKEY_LOCAL_MACHINE\SOFTWARE\ORACLE\CUSTOMIZABLE_REPORTS. Two files for the customizable report (*.RTF and *.XML) are downloaded each time a report is customized. Once you have completed customization of your report and return to the OPERA application, selecting the OK or Close buttons will upload only the RTF files back to the application server and then place them in the Customizable Reports folder.
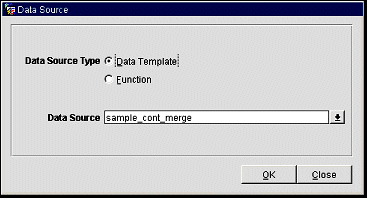
Data. Use the Data button to select the data source for your Oracle BI Publisher report. When the Data button is selected, the Data Source selection screen displays. From this screen there are two available options, the data source type and the data source name. The option buttons and the data source file name are automatically defaulted here. This is true based on the report group you are adding the report from (e.g., Folios, Confirmation Letter, etc. ).
The data template defaulted here is the sample_xxx.odt and is based on the report group from which you are creating the report. To simplify for the end user, this does not need to be downloaded or changed for the sample templates.
For BEO reports, the Function option button should be selected. For the BEOs, the Data Source will not default because the BEO can be listed in several report groups. Enter the Function Data Source as follows:
For the BI Publisher Contract Merge report, the Data Template option button should be selected, and the Data Source should be configured for sample_cont_merge.odt:
Parameter. Select the Parameter button to enter criteria to filter your report by. See Customizing Reports for more information on Parameter Forms.
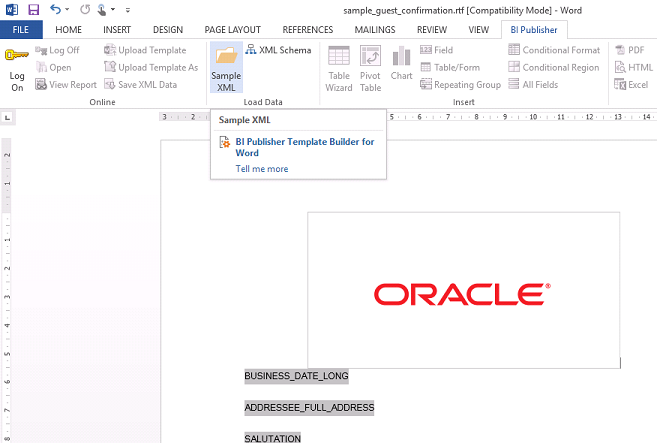
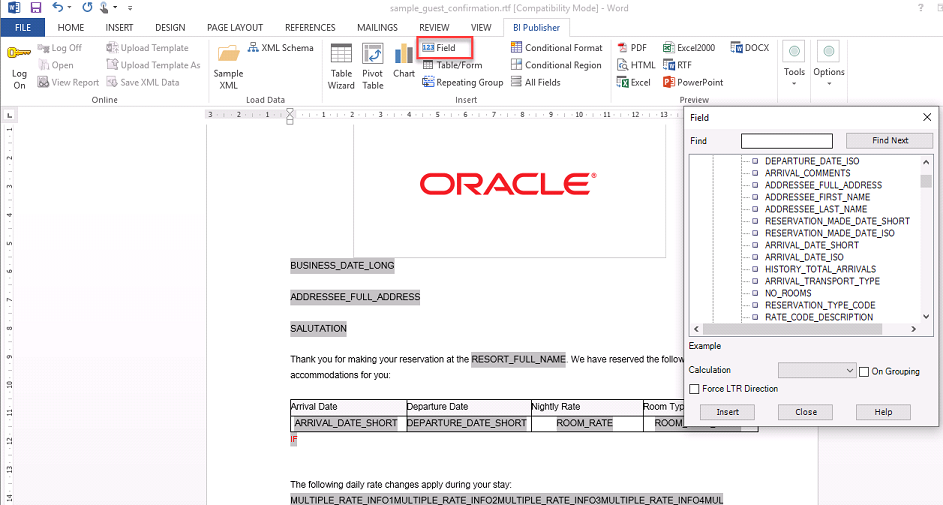
After selecting to customize, two files (*.rtf and *.xml) are downloaded to the client machine and Microsoft Word will automatically open the [filename].rtf. Use the Oracle BI Publisher toolbar (circled in red in the following example screen captures) to load the corresponding XML data (select Data, select Load XML Data, and then select the applicable XML file).
The Oracle BI Publisher toolbar will generally appear in Microsoft Word among the other toolbars upon installation of the Oracle BI Publisher software. If the toolbar does not display automatically, select View > Toolbars > Template Builder to add it to the existing toolbar display. Alternatively, you can use the Oracle BI Publisher function menu (circled in blue in the following example screen capture), which will always display among the other function menus at the top of Microsoft Word once the Oracle BI Publisher software has been installed.
The Data > Load XML Data menu option is used to load sample data for the template. Sample data consists of every XML tag (field) available for inclusion in the template. This default data is used when selecting to preview the customized report to view how the report will look once it is generated within OPERA.
Select the XML file from the Customize directory which corresponds to the type of template you want to customize. The XML file should be the sample_xxx that corresponds to the template you are customizing. For example, if you are creating a confirmation letter for your resort, and you have named it “email_confirmation,” you will not see an XML corresponding. You should select the file sample_guest_confirmation.xml to load the available elements for customization.
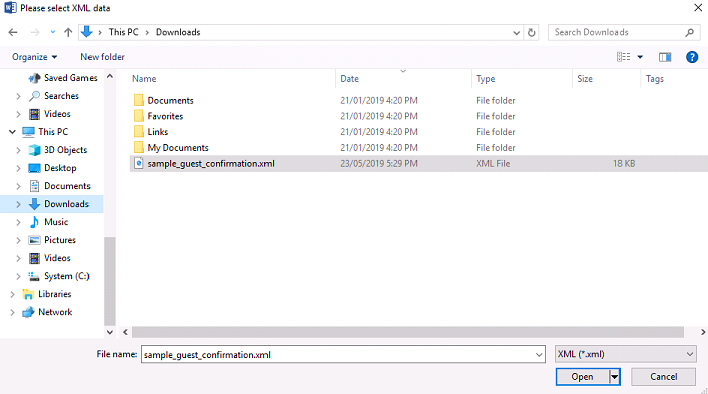
Once the XML is selected a message, 'Data loaded successfully', displays to inform you that the sample XML data is now loaded for use in customization. See Adding and Editing Form Fields, for more details on how to further customize your report.
Microsoft Word functionality is used to add style elements to the report; for instance font styles and sizes, font color and weight, etc. To add text, simply type the text where you would like the text to appear.
Note: Only standard operating-system packaged fonts are supported.
Normally, the image files are based on the property code and taken from runtimes directory. However, this can be modified when the application parameter General > Images Location is defined to enable users to keep images elsewhere, either in the file system or at a web location for customizable reports.
Note: Although this tool utilizes Microsoft Word for customization, not all elements can be used on the template. An RTF template is a document which describes how data will be presented. It does not contain any knowledge of how to extract data, only tags containing field names. Macros cannot be used, as the report is stored in *.RTF format.
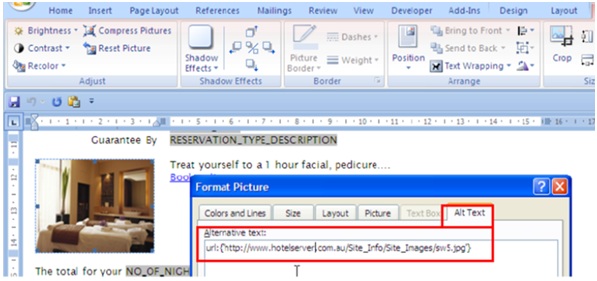
Within *.RTF templates, link to the external graphic files in the Alt Text tab from the Format Picture properties of an image in Microsoft Word. The URL or file system path value established by the General > Image Location application setting is passed to BI Publisher via the $IMAGE_PATH variable.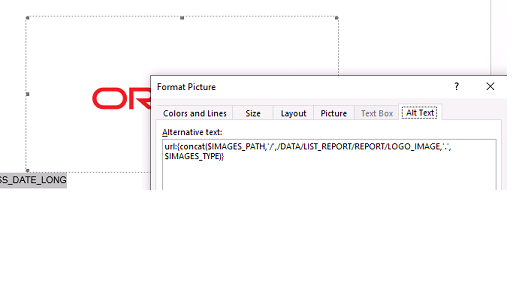
At runtime, the above expression would result in the following drive folder and file path being calculated.
URL:{d:\micros\opera\production\runtimes\ODH.GIF}
Changing the General > Image Location application setting to reference a web server address, properties are then able to change the location of their image library without the need of updating the server/folder location within all of their stationery.
The creation of the full URL path to the image file can be an XPATH. This can be used to compute values (strings, numbers, or boolean values) from the content of an XML document. Using XPATH, you are able to obtain the value of the LOGO_IMAGE XML tag using:
/DATA/LIST_REPORT/REPORT/LOGO_IMAGE'.'.GIF'
XPATH starts at the root (/) of the XML and traverses the specified tags to obtain to LOGO_IMAGE.
Once the customization is complete, preview your custom report from the Stationery Editor tool to ensure the layout and information is correct. The Preview feature is available in several formats: PDF, HTML, Excel or RTF.

Save your changes in Microsoft Word, then close the document. Once you are back in OPERA, select OK or Close on the Report Setup form to upload the three files back to the Application Server to the designated directory for storage of customizable reports.
Once the customizable reports file is generated and exists on the Application Server, from within OPERA, the standard OPERA delivery methods will be used.
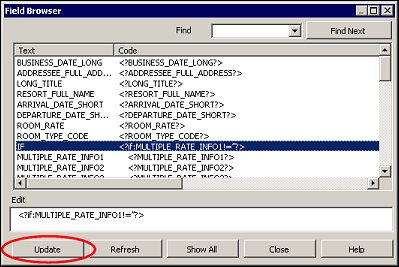
Form fields can be added or edited directly from the report template in one of several ways; double-click an existing field or select Tools > Field Browser to edit existing fields or select Insert > Field to add a new field to the template document.
When editing existing fields using the Field Browser, select a field from the list to view or modify the corresponding XML tag. Once your fields are modified, select the Update button to apply your changes, then Close to exit from the Field Browser.
It is recommended that tables are used to keep the field positions static. When creating a new table in Word, be sure to set the AutoFit behavior to 'AutoFit to Contents' in order to avoid truncating any fields that may be larger than the actual cell size or resizing a cell to accommodate a field with a longer description than display data. Refer to Microsoft Word Help (F1) for more details.
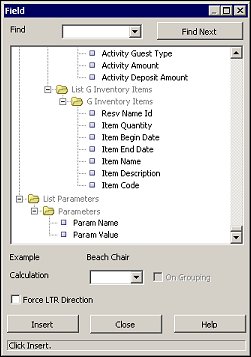
After the XML data has been loaded into the Template document, use the Insert > Field menu item will to insert new fields in the document and edit accordingly.
Select the XML tag or field to add to the customizable report from the list of available fields. The Tree of available fields is divided into the sections that they are applicable to on the report, (e.g., header, footer, body, etc.). You can add fields by highlighting and dragging to the document or double clicking on a selected field from this list.
Note: The provided sample_xxx.rtf reports cannot be directly modified with the Stationery Editor. Each property must create their own report using the sample_xxx.rtf files as templates. Since the sample reports can be updated from development changes at any time, this will prevent a Property from customizing a sample_xxx.rtf report that can be overwritten and then having to recreate their reports.
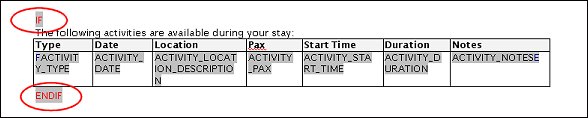
Notice that IF statements appear throughout the document template. IF and ENDIF represent the IF and END IF statements provided with the sample reports. All content contained within the IF to ENDIF statements will only display based on the conditions of the IF statement being met. For instance, if a guest has a reservation where a deposit is not required for their stay the IF statement suppresses the field DEPOSIT_DUE from displaying on the confirmation.
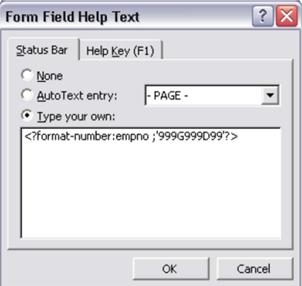
To add new IF statements to the report template, select Insert > Field to add a new field to the template document. Then double click the newly created field to display the Text Form Field Options screen and select the Add Help Text button. From here it is possible to create your IF statement.
Viewing and/or editing the condition of an existing IF statement can be done one of two ways. First, double-click on the field for the IF statement you want to modify. This displays the Text Form Field Options screen. Click the Add Help Text button. The Form Field Help Text screen appears. From here you can manually edit the IF statements to suit your requirements.
The conditional regions rely on expressions <?if:?> and <?end if?>.
<?if: [ELEMENT][CONDITION]?>
Where element is the field name and condition is what must evaluate to true. Ensure the [ELEMENT] from the XML is referenced in uppercase.
IF can be combined with other string functions.
CONTAINS
Using the CONTAINS function, an expression can be constructed to output conditional text when an element contains a specific string value. This is similar to a LIKE operator.
<?if: contains(ELEMENT,’txt_to_search_for’)=’true’?>Yes it does <?end if?>
For example: <?if:(VIP='V1')
STARTS-WITH
To evaluate the start of a string, use the STARTS-WITH function:
<?if: starts-with(COMPANY_NAME,'Oracle')?> <?end if?>
Or, you can also view and/or edit the condition of an IF/ENDIF statement via the Field Browser (Tools > Field Browser) then selecting the Update button to apply your modifications.
Each customizable report contains internal parameters that are used for report generation. These parameters can be utilized when creating conditions for report generation. For example, if a property wants to display a graphic on a confirmation letter only when generating output in a PDF format, these internal parameters would be used. The XML Tags of Param Name and Param Value are displayed in the available fields list.
To see the list of available internal parameter values, open the [filename].xml that is downloaded to the workstation along with the customizable [filename].rtf file (where [filename] is the name of the file you have customized).
In this example, a condition is created that only displays text if the report output is PDF format. To accomplish this, add the field Param_Name, then double click to edit. The Form Field Help Text screen displays. Insert the following line:
<?if:PARAM_VALUE[../PARAM_NAME='DESFORMAT']='PDF'?>
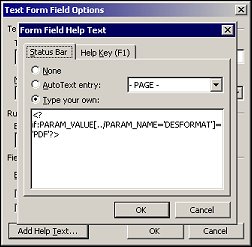
Insert an ENDIF statement to close the condition, then select OK and OK again to return to the customized report.
Images can be embedded within the RTF document; however there is a maximum size of 2MB for the RTF template. Therefore, it is recommended that images are stored externally and referenced at runtime. This also enables the images to be easily changed without the need to edit the RTF template.
Images can be stored on the application server or other network drive locations. For HTML confirmation letters, images must be published to a web server for download as the recipient opens the email in their email client.
To include external images within the document:
url:{'http://www.hotelserver.com/images/logo.gif'} for a web image
url:{'d:\micros\opera\production\images\promo.gif'} for a graphic located on the local drive of each application server
At runtime, the dummy graphic will be replaced with the image stored at the specified web address or file drive.
Graphic Image Size
The external images that are used within the document should be sized to suit the layout of the document, then published to the web server. The dummy graphic, used as a place holder within the RTF, can also be set to the required image size using picture tools.
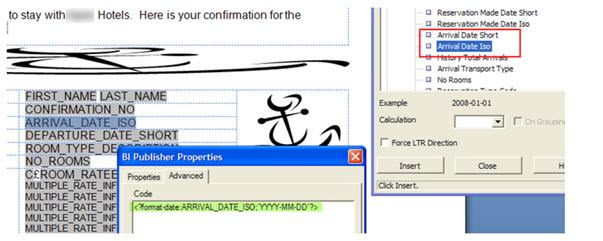
In addition to preformatted date strings in the XML, all date fields are also provided as canonical date/time values; these fields are identified with the suffix _ISO in the element name. Canonical dates can be formatted in BI Publisher using one of two methods for specifying the desired output format:
Note: Only one method should be used; if both the Oracle and MS Word format masks are referenced for a field the data will be formatted twice causing unexpected behavior.
To apply the Oracle BI Publisher format mask to a date field:
<?format-date: [DATE FIELD]; ’[MASK]’?>
For example: <?format-date:ARRIVAL_DATE_ISO;’YYYY-MM-DD’?>
BI Publisher has a number of predefined format masks that can be used with the <?format-date> function for _ISO date fields.
Mask |
Output for US Locale |
SHORT |
12/31/1999 |
MEDIUM |
Dec 31, 1999 |
LONG |
Friday, December 31, 1999 |
SHORT_TIME |
12/31/99 6:15 PM |
MEDIUM_TIME |
Dec 31, 1999 6:15 PM |
LONG_TIME |
Friday, December 31, 1999 6:15 PM |
SHORT_TIME_TZ |
12/31/99 6:15 PM GMT |
MEDIUM_TIME_TZ |
Dec 31, 1999 6:15 PM GMT |
LONG_TIME_TZ |
Friday, December 31, 1999 6:15 PM GMT |
Country locales can also be used to format a date value using a national character set. For localized stationery, any ISO date field set to output a ‘LONG’ mask will output a translated string. The expression <?format-date: BUSINESS_DATE_ISO;’LONG’;?> would result in 2019? 8? 12? ??? for date value Monday, August 12, 2019.
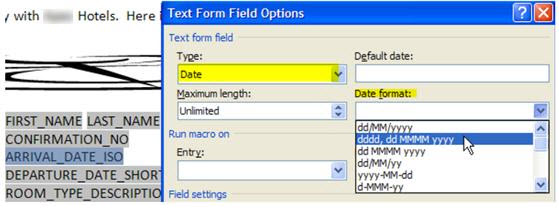
Alternatively, the Microsoft Word format mask can also be used on ISO date elements. Open the field properties and set the field type as date and select the date format mask required for the field.
Number formatting is achieved using similar method to date formatting. BI Publisher supports two methods for specifying the number format:
To use Microsoft Word format mask, open the field properties and set the field type as number and select the number format mask required for the field.
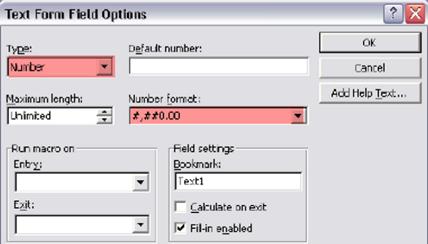
To use the Oracle BI Publisher format mask, specify an explicit format mask using Oracle’s format-number function.
<?format-number:fieldname;'999G999D99'?>
Note: For further information on formatting dates and numbers, refer to https://docs.oracle.com/middleware/12211/bip/BIPRD/GUID-7BD3C665-851A-43FE-BA2D-7501390D95AC.htm
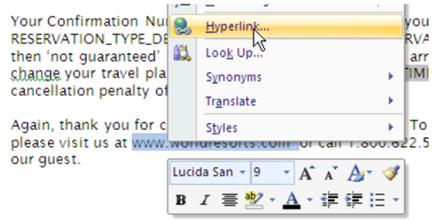
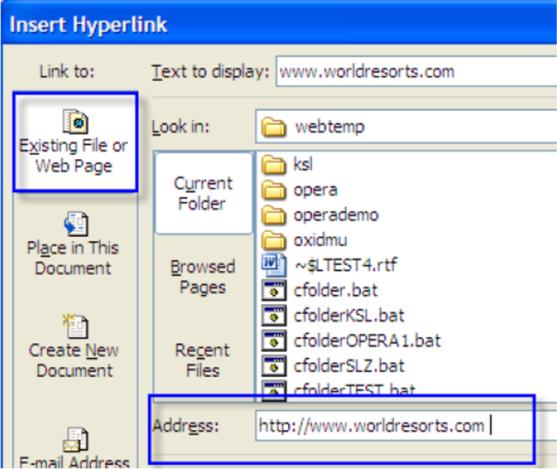
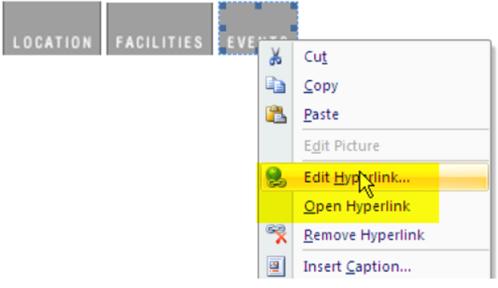
The RTF template may contain hyperlinks to web locations. When generated to PDF or HTML format, the hyperlink would be presented to the receipt to click and launch the website (this feature is typically used in HTML confirmation letters).
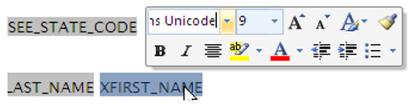
Only OS-packaged, standard fonts are supported. In order to support internationalization and non-Western character sets, a unicode font must be used in the RTF template. Arial Unicode and Lucida Sans Unicode are two standard Unicode fonts installed with Microsoft Windows and Microsoft Office.
Format any string or date field that will output non-Western characters with Arial or Lucida Sans Unicode to ensure correct output.
BI Publisher has extended a set of SQL and XSL functions for use in RTF templates.
The syntax for these extended functions are the following:
<?xdofx:expression?> for extended SQL functions or
<?xdoxslt:expression?> for extended XSL functions.
An SQL example is IF-THEN-ELSE used for a conditional region.
<?xdofx:if [ELEMENT][condition] then result1 else result2 end if?>
For further information, refer to https://docs.oracle.com/middleware/12212/bip/BIPRD/GUID-B39D756A-C54D-4C64-A822-DD2CFFC3A54E.htm#BIPRD3160.
See Also