2 Merchandise Hierarchy
The merchandise hierarchy allows you to create the preferred product management structure for your company. A maximum of six levels of hierarchy relationships can be added from Company down to Subclass. All levels of the hierarchy are required. You can assign a buyer and merchandiser at the division, group, and department levels of the merchandise hierarchy. The levels of the merchandise hierarchy in Merchandising are:
Company: The highest default organizational and merchandise hierarchy level defined in Merchandising. Only one company can be defined.
Division: The second level of the merchandise hierarchy below company is division. The definition of this level can differ based on the needs of your company, but is commonly used for grouping broader categories of product within the organization. For example, a mass merchandiser may have a division for clothing, one for grocery, and so on.
Group: The next level below division is group. This definition can also differ based on the needs of your company, but usually is used to break down the division grouping to the next level of product. So, in the mass merchandiser example, groups within the clothing division may be defined as Women's, Men's, and Children's. A group belongs to only one division.
Department: Below group is department, which where many key attributes for Merchandising are managed in the merchandise hierarchy, such as the accounting method (cost or retail) and whether or not value added tax (VAT) is included in the retail prices for items in the department. A department belongs to only one group.
Class: The second lowest level of the merchandise hierarchy is class, which rolls up to a single department.
Subclass: The lowest level of the merchandise hierarchy, a subclass rolls up to a department/class combination and is the level of the hierarchy that connects to item.
The Merchandise Hierarchy page allows you to create, edit, and view a member of the selected level of the merchandise hierarchy.
Merchandise Hierarchy Structure
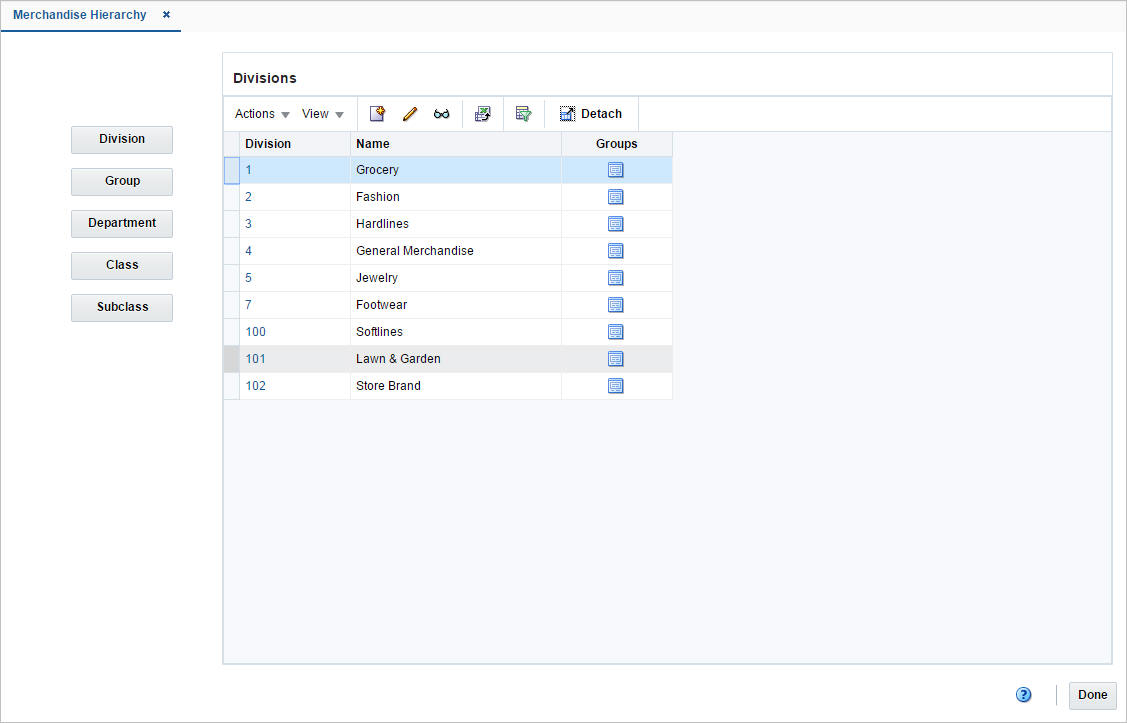
The Merchandise Hierarchy structure on the left side of the page contains the following buttons.
Table 2-1 Merchandise Hierarchy Structure - Buttons and Description
| Buttons | Description |
|---|---|
|
Division |
Displays the available divisions in the table. |
|
Group |
Displays the available groups in the table. |
|
Department |
Displays the available departments in the table. |
|
Class |
Displays the available classes in the table. |
|
Subclass |
Displays the available subclasses in the table. |
Merchandise Hierarchy Table
The Hierarchy table displays the available entries of the selected hierarchy level.
For example, if you select the Division button, all available divisions are displayed in this table.
The table displays the following columns by default.
-
Hierarchy ID, depending on the selected hierarchy button.
-
Name of the hierarchy level, for example, the name of the chain.
-
Next hierarchy level, for example, Group
This column contains either the Create icon or the Details icon.
If the next level has been created, the Detail icon is displayed. Use the icon to maintain or view the details of the next level.
If the next level has not been created, the Create icon is displayed. Use the icon to create the next level.
This column is not available for subclasses.
Create Divisions
To create a division, follow the steps below.
-
Click the Division button. All available divisions are displayed in the table.
-
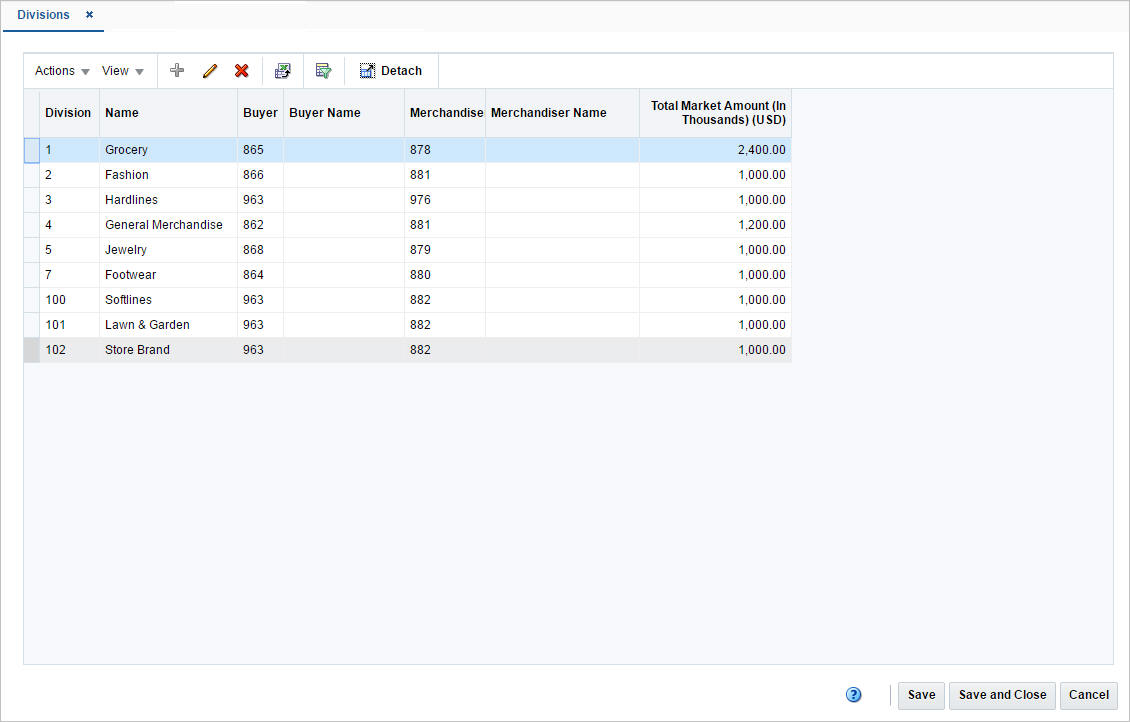
In the table, select Actions > Create, or use the Create icon. The Divisions page appears.
-
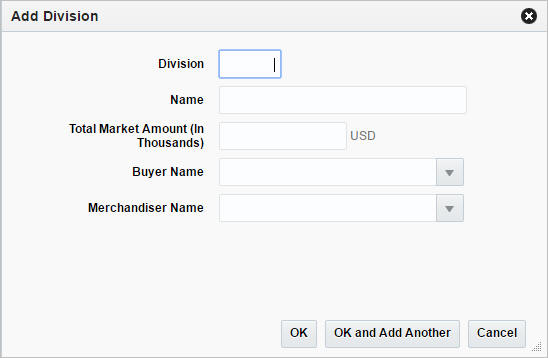
Select Actions > Add, or use the Add icon. The Add Division page appears.
-
In the Division field, enter a unique ID for the division.
-
In the Name field, enter a name for the division.
-
In the Total Market Amount field, enter the amount of annual sales that the division is expected to generate in thousands.
-
In the Buyer Name field, enter, select or search for the buyer ID who is responsible for the division.
-
In the Merchandiser Name field, enter, select or search for the merchandiser ID who is responsible for the division.
-
Then choose one of the following options.
-
Click OK to add the division and close the page.
-
Click OK and Add Another to add additional divisions.
-
Click Cancel to reject all entries and close the page.
-
-
Manage Divisions
Editing Divisions
To edit a division, follow the steps below.
-
Click the Division button. All available divisions are displayed in the table.
-
Select Actions > Edit, or use the Edit icon. The Divisions page appears.
-
Select a record in the table.
-
Then select Actions > Edit, or use the Edit icon. The Edit Division page appears.
-
The information of the selected division is displayed. Change the values, as necessary. You cannot change the division ID.
-
Then choose one of the following options.
-
Click OK to save your changes and close the page.
-
Click Cancel to reject all entries and close the page.
-
-
Divisions Page
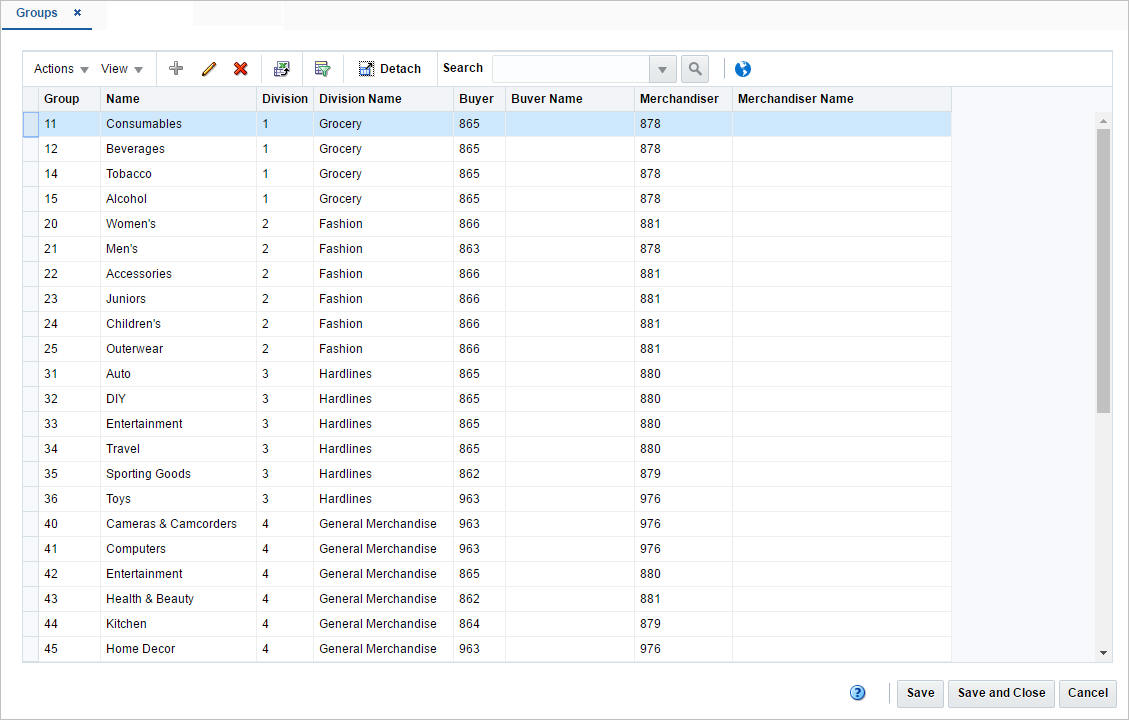
The Divisions page allows you to add, edit, delete and view divisions in the merchandise hierarchy. A division is below the company and above the group in the merchandise hierarchy. Typically, the division is used to signify the type of merchandise that your organization offers, such as hardlines or apparel.
Create Groups
To create a group, follow the steps below.
-
Click the Group button. All available groups are displayed in the table.
-
In the table, select Actions > Create, or use the Create icon. The Groups page appears.
-
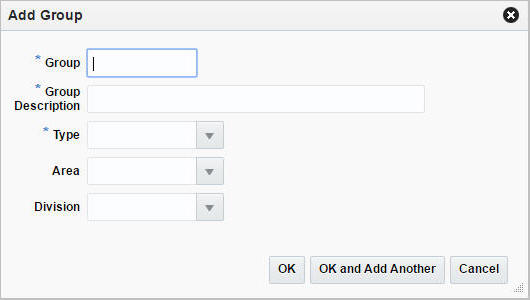
Select Actions > Add, or use the Add icon. The Add Group page appears.
-
In the Group field, enter a unique ID for the group. This field is a required field.
-
In the Name field, enter a name for the group. This field is a required field.
-
In the Division field, enter, select or search for the division ID of the division associated with the group. This field is a required field.
-
In the Buyer Name field, enter, select or search for the buyer ID who is responsible for the group.
-
In the Merchandiser Name field, enter, select or search for the merchandiser ID who is responsible for the group.
-
Then choose one of the following options.
-
Click OK to add the group and close the page.
-
Click OK and Add Another to add additional divisions.
-
Click Cancel to reject all entries and close the page.
-
-
Manage Groups
Editing Groups
To edit a group, follow the steps below.
-
Click the Group button. All available groups are displayed in the table.
-
Select Actions > Edit, or use the Edit icon. The Groups page appears.
-
Select a record in the table.
-
Then select Actions > Edit, or use the Edit icon. The Edit Group page appears.
-
The information of the selected group is displayed. Change the values, as necessary. You cannot change the group ID.
-
Then choose one of the following options.
-
Click OK to save your changes and close the page.
-
Click Cancel to reject all entries and close the page.
-
-
Create Departments
To create a department, follow the steps below.
-
Click the Department button. All available departments are displayed in the table.
-
In the table, select Actions > Create, or use the Create icon. The Department page appears.
-
Enter the necessary information. For more information about the available fields of the Department page, see the Department Page section.
-
Then select one of the following options.
-
Click Save and Close to save the current department and close the page.
-
Click Save to save the current department.
-
Click Save and Create Another to create additional departments.
-
Click Cancel to reject all entries and close the page.
-
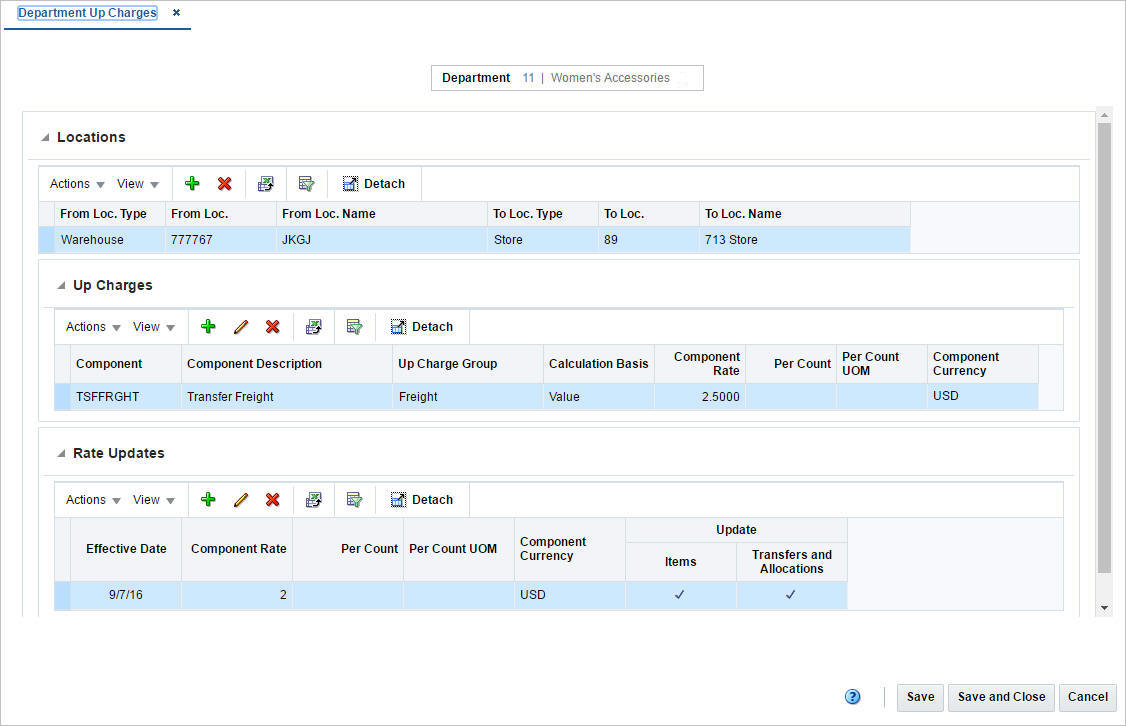
Department Up Charges Page
The Department Up Charge page displays a department's from/to location combinations and associated up charges. Up Charges are incurred when transferring items within the department or within the from and the to locations.
Note:
This page will only be available if the Merchandising 'Estimated Landed Costs' indicator is set to 'Yes'.Each Up Charge has a:
-
Calculation Basis of either 'Value' or 'Specific.'
-
Cost Basis of either 'Weighted Average Cost' (when using Average Cost Method) or 'Unit Cost' (when using Standard Cost Method).
Component Rate of:
-
Monetary if Calculation Basis = 'Specific.'
-
Percentage if Calculation Basis = 'Value.'
-
Component Currency.
The Up Charge Group is used to group Up Charge Components together to show a total sum on the Transfer Up Charge page.
Locations
The Locations section displays the from and to locations containing expenses for the department.
Up Charges
The Up Charges section displays the details of the charges.
Rate Updates
In the Rate Updates section you can apply rate updates to items and transfers and allocations.
Maintaining Department Up Charges
To maintain department up charges, follow the steps listed in the sections below.
-
From the Tasks menu, select Foundation Data > Items > Merchandise Hierarchy. The Merchandise Hierarchy page appears.
-
Click the Department button. The available Departments are displayed in the table.
-
In the Department column, click the department ID link, or mark a record and select Actions > Edit, or use the Edit icon. The Department page appears.
-
Select More Actions > Up Charges. The Department Up Charges page appears.
-
Update the department up charges, as necessary.
To add locations for up charges, follow the steps listed below.
-
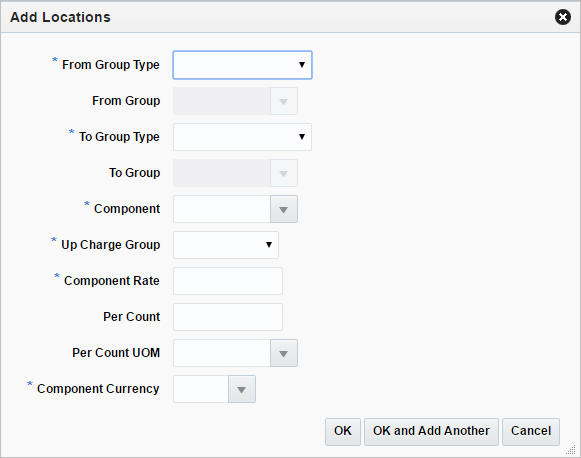
In the Locations section, select Actions > Add, or use the Add icon. The Add Locations page appears.
-
In the From Group Type field, select a group type from the list. This field is a required field.
-
In the From Group field, enter, select or search for the group ID, if enabled.
-
In the To Group Type field, select the group type from the list. This field is a required field.
-
In the To Group field, enter, select or search for the group ID, if enabled.
-
In the Component field, enter, select or search for the component. This field is a required field.
-
In the Up Charge Group field, select an up charge group from the list. This field is a required field.
-
In the Component Rate field, enter the rate. This field is a required field.
-
In the Per Count field, enter the number of counts.
-
In the Per Count Unit of Measure, enter, select or search for the UOM.
-
In the Component Currency field, enter, select or search for the currency.
-
Then choose one of the following options.
-
Click OK to save the location information and close the page.
-
Click OK and Add Another to add additional location information.
-
Click Cancel to reject all entries and close page.
-
To add components, follow the steps listed below.
-
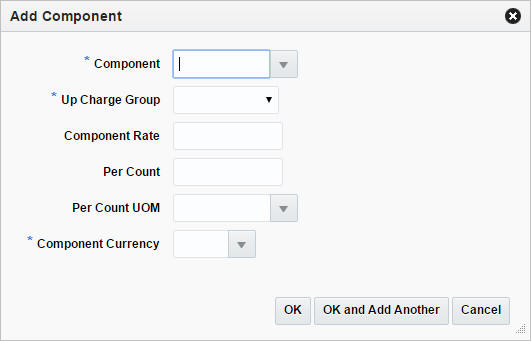
In the Up Charges section, select Actions > Add, or use the Add icon. The Add Component page appears.
-
In the Component field, enter, select or search for the component. This field is a required field.
-
In the Up Charge Group field, select the group from the list.
-
In the Component Rate field, enter the rate.
-
In the Per Count field, enter the number of counts.
-
In the Per Count Unit of Measure, enter, select or search for the UOM.
-
In the Component Currency field, enter, select or search for the currency.
-
Then choose one of the following options.
-
Click OK to save the location information and close the page.
-
Click OK and Add Another to add additional location information.
-
Click Cancel to reject all entries and close the page.
-
To edit existing components, follow the steps listed below.
-
In the Up Charges section, select Actions > Edit, or use the Edit icon. The Edit Component page appears.
-
Edit the fields, as necessary.
-
Then choose one of the following options.
-
Click OK to save your changes and close the page.
-
Click Cancel to reject all entries and close the page.
-
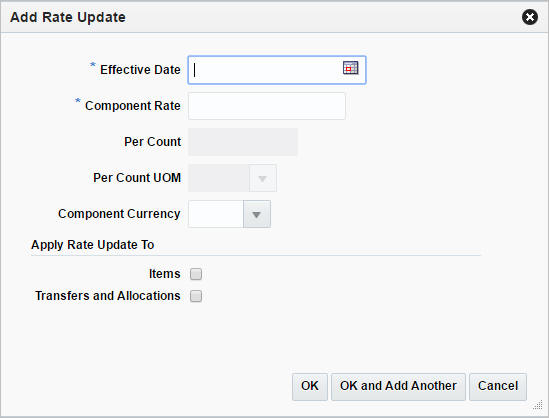
To add rate updates for items and/or transfers and allocations, follow the steps below.
-
In the Rate Updates section, select Actions > Add, or use the Add icon. The Add Rates page appears.
-
In the Effective Date field, enter the effective date or use the Calendar icon to select a date. This field is a required field.
-
In the Component Rate field, enter the component rate. This field is a required field.
-
In the Per Count field, enter the number of counts.
-
In the Per Count UOM, enter, select or search for the unit of measure.
-
In the Component Currency field, enter, select or search for the component currency code.
-
Select the Transfers and Allocations checkbox to apply the rate updates to transfers and allocations.
-
Select the Items checkbox to apply the rate updates to items.
-
Then choose one of the following options.
-
Click OK to add the rate updates and close the page.
-
Click OK and Add Another to add additional rate updates.
-
Click Cancel to reject all entries and close the page.
-
To edit rate updates for items and/or transfers and allocations, follow the steps below.
-
In the Rate Updates section, select Actions > Edit, or use the Edit icon. The Edit Rates page appears.
-
Edit the fields, as necessary.
-
Then choose one of the following options.
-
Click OK to add the rate updates and close the page.
-
Click Cancel to reject all entries and close the page.
-
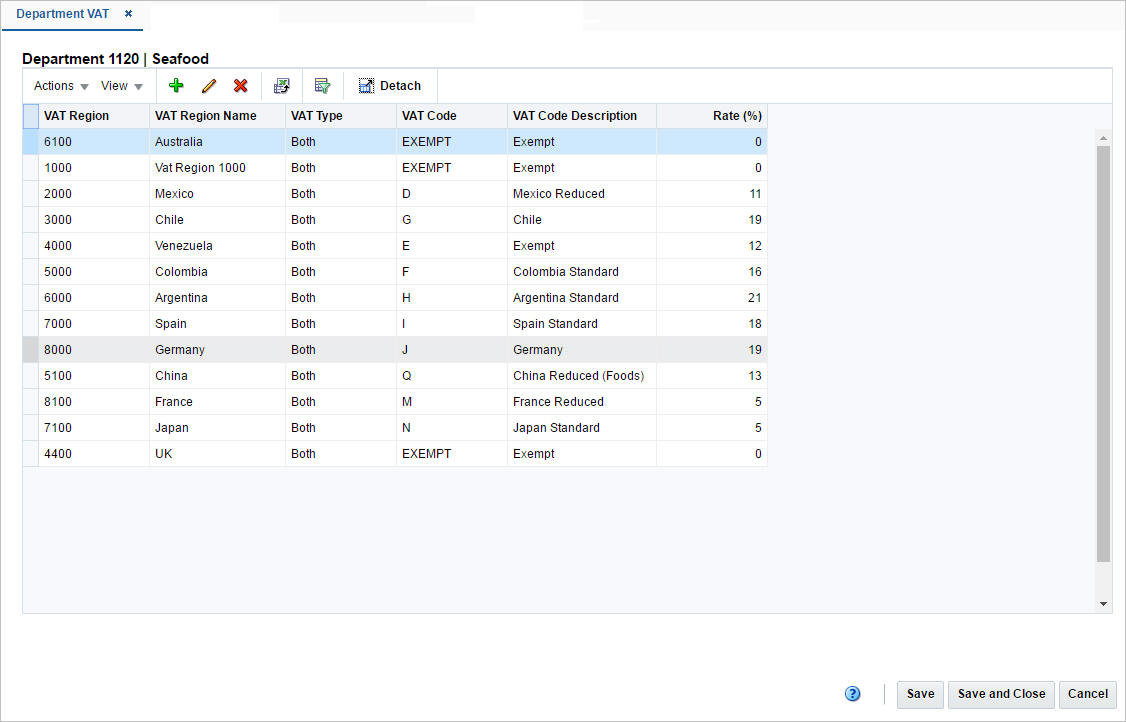
Department VAT Page
The Department VAT page allows you to maintain and view value added tax (VAT) regions and VAT codes that are associated with a department. The VAT regions and VAT codes that are entered at the department level become the default VAT regions and VAT codes for items within the department.
Maintaining Department VAT Regions
To maintain Department VAT regions, follow the steps below.
-
From the Tasks menu, select Foundation Data > Items > Merchandise Hierarchy. The Merchandise Hierarchy page appears.
-
Click the Department button. The available Departments are displayed in the table.
-
In the Department column, click the department ID link, or mark a record and select Actions > Edit, or use the Edit icon. The Department page appears.
-
Select More Actions > VAT Maintenance. The Department VAT page appears.
-
Update the department VAT regions, as necessary.
To add VAT regions to the selected department, follow the steps below.
-
Select Actions > Add, or use the Add icon. The Add VAT Region page appears.
-
In the VAT Region field, enter, select or search for the desired region. This field is a required field.
-
In the VAT Type field, select the type from the list. This field is a required field.
-
In the VAT Code field, enter, select or search for the VAT code.
-
The Rate(%) and the VAT Code Description are displayed.
-
Then choose one of the following options.
-
Click OK to add the VAT region and close the page.
-
Click OK and Add Another to add additional VAT regions.
-
Click Cancel to reject all entries and close the page.
-
To edit VAT regions for the selected department, follow the steps below.
-
Select Actions > Edit, or use the Edit icon. The Edit VAT Region page appears.
-
In the VAT Code field, change the VAT code, as necessary.
-
Then choose one of the following options.
-
Click OK to save your changes and close the page.
-
Click Cancel to reject all entries and close the page.
-
Manage Departments
Editing Departments
To edit a department, follow the steps below.
-
Click the Department button. All available departments are displayed in the table.
-
In the table, select the department you want to edit. The Department page appears.
-
The information of the selected department is displayed. Change the values, as necessary. You cannot change the department ID and purchase type.
-
Then choose one of the following options.
-
Click Save and Close to save your changes and close the page.
-
Click Save to save your changes.
-
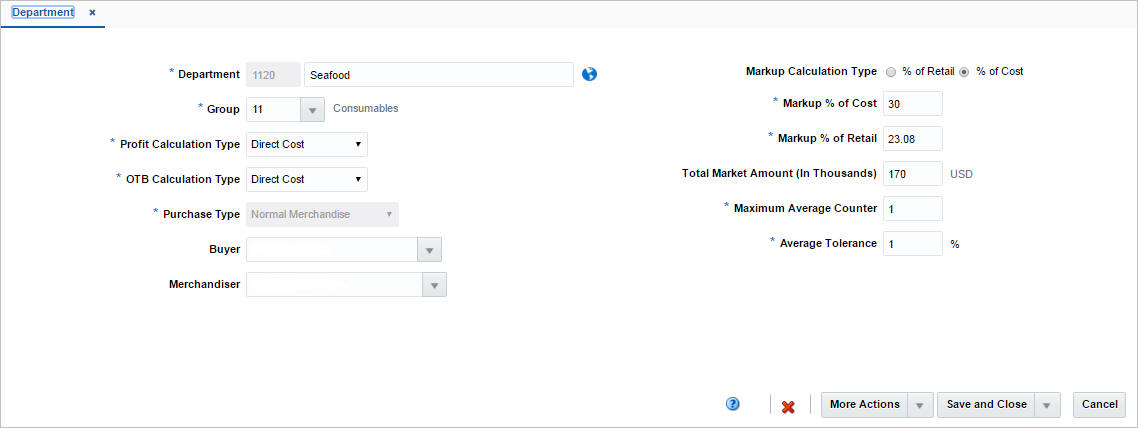
Department Page
The Department page allows you to create, edit, delete, and view a department in the merchandise hierarchy.
The Department page contains the following fields.
Table 2-2 Department - Fields and Description
| Fields | Description |
|---|---|
|
Department |
Enter a unique ID for the department. Enter a name for the department in the field next to the department ID. These fields are required fields. You cannot edit the department ID in edit mode. |
|
Group |
Enter, select or search for the group ID associated with the department. This field is a required field. |
|
Profit Calculation Type |
Select a profit calculation type from the list. Possible values are:
This field is a required field. |
|
OTB Calculation Type |
Select an OTB calculation type from the list. Possible values are:
This field is a required field. |
|
Purchase Type |
The purchase type indicates the type of merchandise sold in the department. Select a purchase type from the list. Possible values are:
This field is a required field. You cannot change the purchase type in edit mode. |
|
Buyer |
Enter, select or search the buyer ID associated with the department. |
|
Merchandiser |
Enter, select or search for the merchandiser ID associated with the department. |
|
Markup Calculation Type |
Select the markup calculation type. |
|
Markup % of Cost |
Enter the markup percent of the cost. This field is a required field. You cannot change the value in edit mode. |
|
Markup % of Retail |
Enter the markup percent of the retail value. This field is a required field. You cannot change the value in edit mode. |
|
Total Market Amount (in Thousands) |
Enter the amount of annual sales that the department is expected to generate. |
|
Maximum Average Counter |
Enter the maximum average counter. This field is a required field. |
|
Average Tolerance |
Enter the average tolerance value in percent. This field is a required field. |
|
Include VAT in Retail? checkbox |
The Include VAT in Retail checkbox indicates that all prices include VAT in the retail price for all classes in the department. Clear the check box to indicate that VAT is not included in the retail price at the class level, and is applied at the POS. The Include VAT in Retail checkbox is only available, if the default tax type is set to Simple VAT or Global Tax. |
Creating Classes
To create a class, follow the steps below.
-
Click the Class button. The Department field is displayed.
-
In the Department field, enter, select or search for the department ID.
-
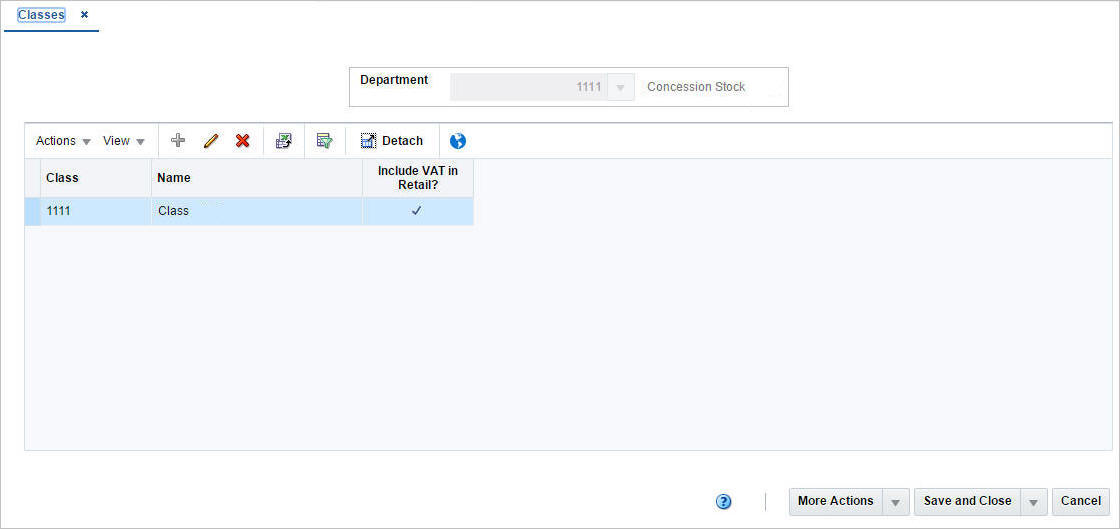
In the table, select Actions > Create, or use the Create icon. The Classes page appears. The selected department ID and description are displayed in the header.
-
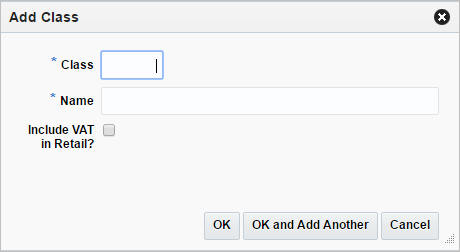
Select Actions > Add, or use the Add icon. The Add Class page appears.
-
In the Class field, enter a unique ID for the class. This field is a required field.
-
In the Name field, enter a name for the class. This field is a required field.
-
Select the Include VAT in Retail checkbox to indicate that the retail price includes VAT.
Note:
The Include in VAT Retail checkbox is only displayed, if VAT at the class level is indicated in the Merchandising system settings.If you do not select the checkbox, you indicate that VAT should be applied to the retail price at the point of sale when setting up a store.
-
Then choose one of the following options.
-
Click OK to add the class and close the page.
-
Click OK and Add Another to add additional classes.
-
Click Cancel to reject all entries and close the page.
-
-
Manage Classes
Editing Classes
To edit a class, follow the steps below.
-
Click the Class button. The Department field is displayed.
-
In the Department field, enter, select or search for the department ID. The classes for the selected department are displayed in the table.
-
Select Actions > Edit, or use the Edit icon. The Classes page appears.
-
Select a record in the table.
-
Then select Actions > Edit, or use the Edit icon. The Edit Class page appears.
-
The information of the selected class is displayed. Change the values, as necessary. You cannot change the class ID.
-
Then choose one of the following options.
-
Click OK to save your changes and close the page.
-
Click Cancel to reject all entries and close the page.
-
-
Classes Page
The Classes page allows you to add, edit, delete, and view a class in the merchandise hierarchy. A class is below the department and above the subclass in the merchandise hierarchy.
A class can belong to only one department. A class further defines the type of merchandise sold in a department. For example, a department for Men's Shirts might have the classes Casual, Business, and Formal.
When VAT is enabled at the class level in Merchandising, you can indicate whether the retail price should include the VAT or not. If you choose not to indicate that VAT is included at the class level, then you should indicate to include it at the POS.
Finally, you can associate user defined attributes with a class.
Create Subclasses
To create a subclass, follow the steps below.
-
Click the Subclass button. The Department field is displayed.
-
In the Department field, enter, select or search for the department ID. The Class field enables.
-
In the Class field, enter, select or search for the class ID. The available subclasses are displayed in the table.
-
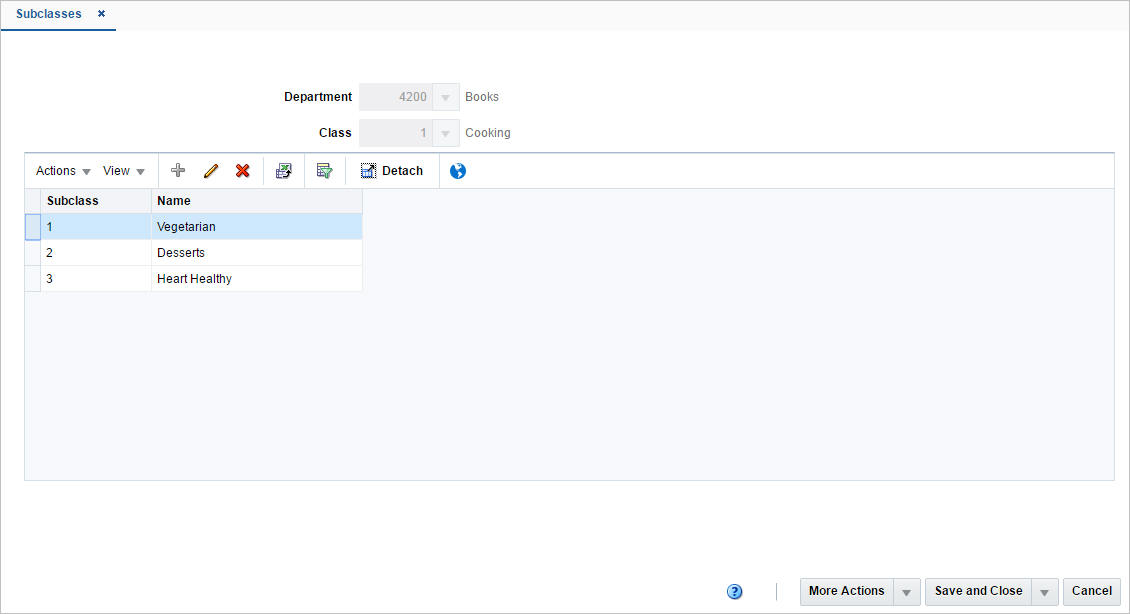
Select Actions > Create, or use the Create icon. The Subclasses page appears. The selected department/class ID and description are displayed in the header.
-
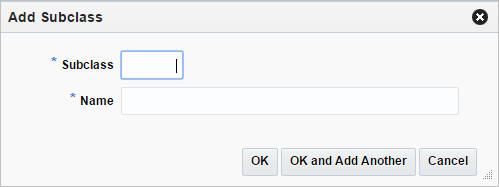
Select Actions > Add, or use the Add icon. The Add Subclass page appears.
-
In the Subclass field, enter a unique ID for the subclass. This field is a required field.
-
In the Name field, enter a name for the subclass. This field is a required field.
-
Then choose one of the following options.
-
Click OK to add the subclass and close the page.
-
Click OK and Add Another to add additional subclasses.
-
Click Cancel to reject all entries and close the page.
-
-
Manage Subclasses
Editing Subclasses
To edit a subclass, follow the steps below.
-
Click the Subclass button. The Department field is displayed.
-
In the Department field, enter, select or search for the department ID. The Class field is enabled.
-
In the Class field, enter, select or search for the Class ID. The available subclasses are displayed in the table.
-
In the table, select Actions > Edit, or use the Edit icon. The Subclasses page appears.
-
Select a record in the table.
-
Then select Actions > Edit, or use the Edit icon. The Edit Subclass page appears.
-
The information of the selected subclass is displayed. Change the values, as necessary. You cannot change the subclass ID.
-
Then choose one of the following options.
-
Click OK to save your changes and close the page.
-
Click Cancel to reject all entries and close the page.
-
-
Subclasses Page
The Subclasses page allows you to add, edit, delete, and view a subclass in the merchandise hierarchy. A subclass is below a class in the merchandise hierarchy. A subclass can belong to only one class. A subclass further defines the type of merchandise sold in a department and class.
You can associate user defined attributes with a subclass.
Pending Merchandise Hierarchy Updates
Pending Merchandise Hierarchy Search
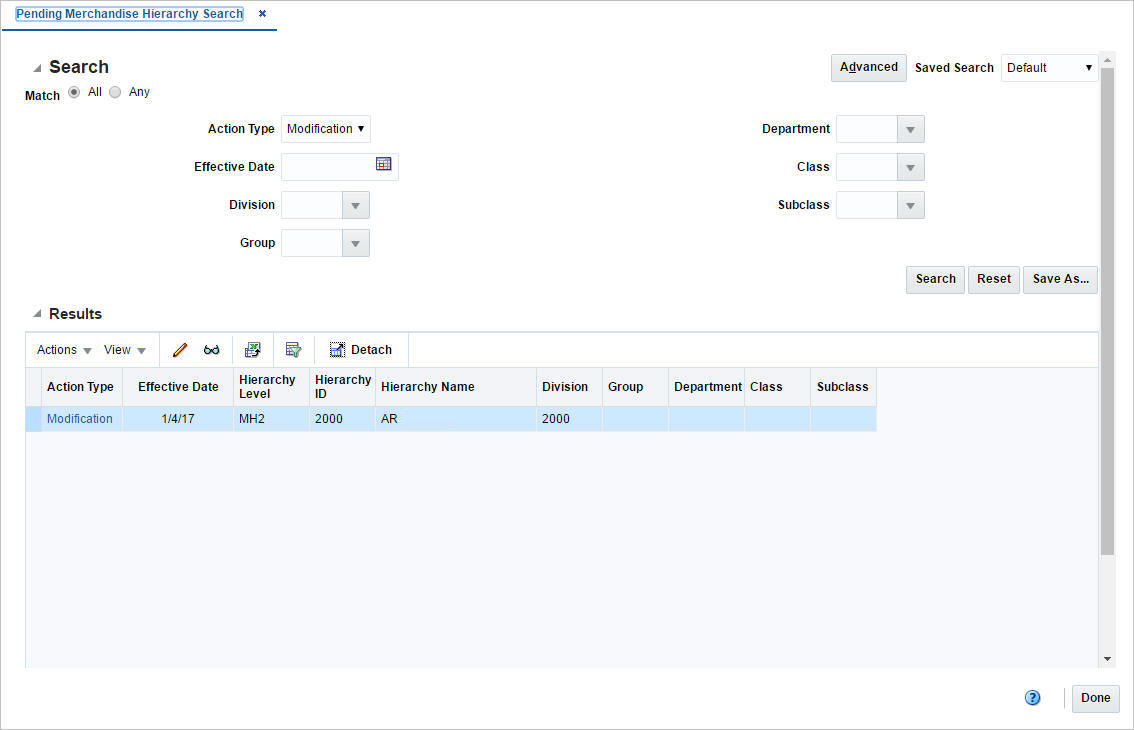
The Pending Merchandise Hierarchy option opens the Pending Merchandise Hierarchy Search page. In the Pending Merchandise Hierarchy Search page you can perform the following actions.
-
Search for pending hierarchy levels by various search criteria
-
View the entered search results
-
View and edit the action type of the hierarchy level
Searching for a Pending Merchandise Hierarchy
To search for a pending merchandise hierarchy level:
-
From the Task menu, select Foundation Data > Items > Pending Merchandise Hierarchy. The Pending Merchandise Hierarchy Search page appears.
-
You can search for a hierarchy by using basic or advanced search criteria, depending on the requirement. The basic mode is the default search mode.
-
Click Advanced to access the search section in advanced mode.
-
Click Basic to return to the basic mode.
-
Searching for a Pending Merchandise Hierarchy Through the Basic Search Criteria
To search for a hierarchy level by using basic search criteria:
-
Enter, select or search for one or all of the following basic search criteria.
Table 2-3 Pending Merchandise Hierarchy Search - Basic Search Criteria and Description
Fields Description Match option
Check radio button All or Any.
All - only hierarchy levels matching all entered search criteria are shown.
Any - hierarchy levels matching any of the entered search criteria are shown.
Action Type
Select an action type from the list. Possible action types are:
-
Addition
-
Modification
Effective Date
Enter an effective date or use the Calendar icon to select a date.
Division
Enter, select or search for a division.
Group
Enter, select or search for a group.
Department
Enter, select or search for a department.
Class
Enter, select or search for a class.
Subclass
Enter, select or search for a subclass.
-
-
Click on the Saved Search list to select one of the saved search criteria. Selecting a saved search populates the search section with the saved search criteria. If the run automatically function is enabled for the search, the search is executed immediately.
You can also personalize your saved searches by selecting Personalize. The Personalized Saved Searches page appears.
For more information about the Personalized Saved Search, see Personalize Saved Search in the Oracle® Retail Merchandising Foundation Cloud Service Do the Basics User Guide.
-
Click Search. The pending hierarchy levels that match the search criteria are displayed in the Results section.
-
Click Reset to clear the search section and results.
-
Click Save As... to save the current search criteria. The Create Saved Search page appears.
For more information about how to save your search criteria, see Create Saved Search in the Oracle® Retail Merchandising Foundation Cloud Service Do the Basics User Guide.
-
Click Done to close the page.
Searching for a Pending Hierarchy Through Advanced Search Criteria
To search for a hierarchy level by using advanced search criteria:
-
To search by using advanced search criteria, enter or select one or all of the advanced search criteria.
-
To narrow down the search, use the list next to the search fields. For example, determine if the entered value should be equal or not equal to the search result.
-
Click on the Saved Search list to select one of the saved search criteria. Selecting a saved search populates the search section with the saved search criteria. If the run automatically function is enabled for the search, the search is executed immediately.
You can also personalize your saved searches by selecting Personalize. The Personalized Saved Searches page appears.
For more information about the Personalized Saved Search, see Personalize Saved Search in the Oracle® Retail Merchandising Foundation Cloud Service Do the Basics User Guide.
-
Click Search. The pending hierarchy levels that match the search criteria are displayed in the Results section.
-
Click Reset to clear the search section and results.
-
Click Save As... to save the current search criteria. The Create Saved Search page appears.
For more information about how to save your search criteria, see Create Saved Search in the Oracle® Retail Merchandising Foundation Cloud Service Do the Basics User Guide.
-
Click Add Fields to add more fields for the advanced search. To remove the field from the search, click the x right next to the field.
-
Click Reorder to change the order of the available search fields. The Reorder Search Fields page appears.
-
Select the desired search field and use the up and down arrows to rearrange the order of the fields.
-
Click OK to confirm the new order of the fields and close the page.
-
Click Cancel to reject any changes and close the page.
-
-
Click Done to close the page.
Results
The Results section lists the retrieved pending merchandise hierarchy levels.
Pending Merchandise Hierarchy Page
The Pending Merchandise Hierarchy page allows you to maintain movements within the merchandise hierarchy. Movements within the merchandise hierarchy will lead to the eventual reclassification of the items within the reclassified level. When an item is reclassified, sales history, purchase orders, inventory, and planning information is reclassified as well.
Only Level 1 items can be reclassified. Any prepacks, Level 2, or Level 3 items associated with the Level 1 item are also reclassified.
The Pending Merchandise Hierarchy page contains the following fields.
Table 2-4 Pending Merchandise Hierarchy - Fields and Description
| Fields | Description |
|---|---|
|
Action Type |
Displays, if you add or edit a merchandise hierarchy. |
|
Effective Date |
Enter an effective date or use the Calendar icon to select a date. |
|
Hierarchy Level |
Displays the hierarchy level. |
|
Hierarchy Level ID and Description |
Displays the hierarchy level. Enter a description. You can create a translation by selecting the Translate icon. |
|
Buyer |
Enter, select or search for the buyer. |
|
Total Market Amount (in Thousands) |
Enter the total market amount in thousands. |
|
Merchandiser |
Enter, select or search for the merchandiser. |
|
Domain |
This field contains the unique number representing the domain. The domain number is used when interfacing data to external systems using domains. |
|
Markup Calculation Type: |
|
|
% of Cost |
Indicates that the markup is calculated as a percentage of the cost. |
|
% of Retail |
Indicates that the markup is calculated as a percentage of the Retail value. |
|
Profit Calculation Type: |
|
|
Direct Cost |
Indicates that the profit is calculated by direct cost. |
|
Retail Inventory |
Indicates that the profit is calculated by retail inventory. |
|
Open To Buy (OTB) Calculation Type: |
|
|
Cost |
Determines that the OTB is calculated by costs in this hierarchy level. |
|
Retail |
Determines that the OTB is calculated by retail value in this hierarchy level. |
|
Purchase Order Type: |
|
|
Normal Merchandise |
Indicates that the items in the department are ordered, invoiced, and recorded in the stock ledger. |
|
Consignment Stock |
Indicates that the items in the department are ordered, invoiced, and recorded in the stock ledger. Accounts receivable and accounts payable are not recorded for this item type. The consignment rate is recorded at the item/supplier level. |
|
Concession Stock |
Indicates that the items in the department are ordered, invoiced, and recorded in the stock ledger. Accounts receivable and accounts payable are not recorded for this item type. The concession rate is recorded at the item/supplier level. |
|
For Departments the Markup Calculation Type, OTB Calculation Type and Purchase Order Type are not available. |
|
|
Markup % of Cost |
Displays the budgeted markup as percentage of the costs. |
|
Markup % of Retail |
Displays the markup in %. When the retailer uses Simple VAT or Global Tax, this value excludes VAT. |
|
Maximum Average Counter |
Displays the maximum count of days with acceptable data to include on average for items within the hierarchy type. |
|
Average Tolerance % |
Displays a tolerance percentage value which is used as average for items within this value. This value sets a range for appropriate data and constrain outliers. |
Editing a Pending Merchandise Hierarchy
To edit the pending merchandise hierarchy, follow the steps below.
-
From the Tasks menu, select Foundation Data > Items > Pending Merchandise Hierarchy. The Pending Merchandise Hierarchy Search page appears.
-
Enter or select search criteria as desired to make the search more restrictive.
-
Click Search. The actions that match the search criteria are displayed in the Results section.
-
In the Action Type column, click the action link, or mark a record and select Actions > Edit, or use the Edit icon. The Pending Merchandise Hierarchy page appears.
-
Edit the fields, as necessary.
-
Then choose one of the following options.
-
Click Save to save your changes.
-
Click Save and Close to save your changes and close the page.
-
Click Cancel to reject all entries and close the page.
-
Other Merchandise Hierarchy Foundation Data
In addition to the hierarchy, there are three other foundational data components that can be set up in Merchandising: buyers, merchandisers, and merchandise hierarchy defaults. Buyers and merchandisers are common retail roles associated with managing the business of a product area. They can be associated with the division, group, or department levels of the merchandise hierarchy to facilitate reporting within Merchandising. Merchandise hierarchy defaults can be defined at the department, class, and/or subclass level and allow for configuration of the item setup process for items in those hierarchies by allowing you to define certain attributes of items as required or displayed. For example, the functionality could be used to make differentiators required for a fashion department, to ensure that all items created in that department get set up with colors and sizes.
Buyers and Merchandisers
Buyer and Merchandiser are business roles that are common across retailers. The role of the buyer is typically to research, select, and procure stock for purposes of resale to an end customer. Similarly, the role of the Merchandiser is broadly to stimulate product sales through a variety of means including product design, packaging, availability, display, pricing, etc. Buyer and Merchandiser details can be captured in the Merchandising system. Once defined, these buyers and merchandisers can be associated with merchandise hierarchy levels thereby giving them a span of control over a product hierarchy.
Buyers and Merchandisers can be defined and managed using the spreadsheet download and upload processes, which are accessed through the main Merchandising task list under Foundation Data > Download Foundation Data and Foundation Data > Upload Foundation Data respectively. Navigate to Foundation Data > Download Foundation Data, choose the Template Type of 'Foundation' and the Template titled 'Buyers and Merchandisers' to download existing data into a spreadsheet.
In order to add a new Buyer, start in the Buyers tab on the spreadsheet. Add a new row by selecting the action type of Create and proceed to add Buyer details which includes the Buyer ID which is a 4 digit numeric code that uniquely identifies the Buyer, the Buyer name and the buyer contact details (phone and fax numbers).
There are no significant validations for uploading a new Buyer definition apart from validating that the Buyer ID is unique.
In order to add a new Merchandiser, start in the Merchandisers tab on the spreadsheet. Add a new row by selecting the action type of Create and proceed to add Merchandiser details which includes the Merchandiser ID which is a 4 digit numeric code that uniquely identifiers the Merchandiser, the Merchandiser name and the merchandiser contact details (phone and fax numbers).
There are no significant validations for uploading a new Merchandiser definition apart from validating that the Merchandiser ID is unique.
Updating Buyer and Merchandiser Details
If you would like to update any details, a similar process will need be followed as that described above for creating new Buyers or Merchandisers. First, download the Buyers and Merchandisers spreadsheet, and then navigate to the tab where you would like to make your updates.
The following columns can be updated in each tab:
-
Buyers – Buyer Name, Buyer Phone, Buyer Fax
-
Merchandisers – Merchandiser Name, Merchandiser Phone, Merchandiser Fax
In the tab where you are going to make your updates, set the action type to Update on the row being updated, and then correct the value in the spreadsheet. Once your updates are complete, save and close the spreadsheet.
Deleting a Buyer or Merchandiser
If you wish to delete a Buyer or Merchandiser record, then update the action column to Delete against the Buyer or Merchandiser record to be deleted in their respective tabs. Before deleting a Buyer or Merchandiser, care should be taken to ensure it is really not associated with a hierarchy or an error will be raised on upload.
For all actions defined above, once all the updates have been made to the data in the spreadsheet, save the file and close it. Then, return to the Merchandising screens and select Foundation Data > Upload Foundation Data from the main task list. In this screen, you will again select the template type Foundation and the template Buyer and Merchandisers. This will generate a process description automatically, but this can be updated if desired. Lastly, you will select the Browse button and navigate to the directory where you saved the updated spreadsheet.
To review the status of the upload and check whether any errors occurred, select the Foundation Data > Review Status task from the main task list.
See also and .
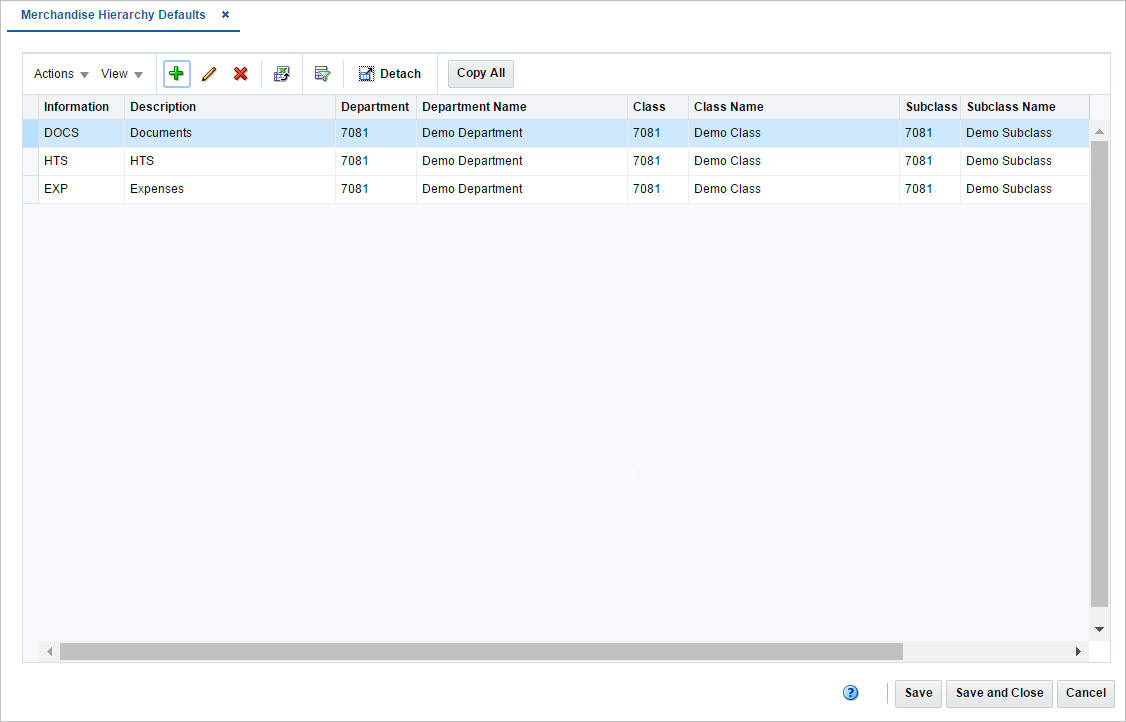
Add Merchandise Hierarchy Defaults
The Merchandise Hierarchy Defaults page allows you to make certain item details available and required. These item defaults are based on the department, class, and subclass in which the item resides. The defaults may include a variety of options, such as Harmonized Tariff Schedule (HTS), item attributes, and tickets. You can set up the defaults when creating a department, class, or subclass. For example, you can indicate that items in a selected department cannot be approved unless they have an HTS code. On the other hand, you can make the HTS option unavailable for items in the selected department.
When creating defaults at the department level, you can add information only for the classes and subclasses within that department. For example, if you enter department 1000 and make the default both available and required, every class and subclass within department 1000 inherits the same default settings. If you enter department 2000 and class 3000, every subclass within department 2000 and class 3000 inherits the same default settings.
Maintaining Merchandise Hierarchy Defaults
To maintain merchandise hierarchy defaults, follow the steps below.
-
From the Tasks menu, select Foundation Data > Items > Merchandise Hierarchy. The Merchandise Hierarchy page appears.
-
Click the Department/Class/Subclass button. The available departments/classes/subclasses are displayed in the table.
-
In the Department/Class/Subclass column, click the department ID link, or mark a record and select Actions > Edit, or use the Edit icon. The Department/Class/Subclass page appears.
-
Select More Actions > Merchandise Hierarchy Defaults. The Merchandise Hierarchy Defaults page appears.
-
Update the hierarchy default information, as necessary.
To add item defaults for the selected hierarchy level, follow the steps below.
-
In the table, select Actions > Add, or use the Add icon. The Add Merchandise Hierarchy Defaults page appears.
-
In the Information field, select the default information you want to add.
-
In the Class field, enter, select or search for the class ID. This field is only enabled, if you add an item default for a department.
-
In the Subclass field, enter, select or search for the subclass ID. This field is only enabled, if you add an item default for a department.
-
Indicate, if the information is unavailable or available for the items in the selected department/class/subclass.
-
Select the Required checkbox to indicate that the information is required for items in the selected department/class/subclass.
-
Then choose one of the following options.
-
Click OK to add the default information and close the page.
-
Click OK and Add Another to add additional defaults.
-
Click Cancel to reject all entries and close the page.
-
To edit item defaults for the selected hierarchy level, follow the steps below.
-
In the table, select Actions > Edit, or use the Edit icon. The Edit Merchandise Hierarchy Defaults page appears.
-
Change the checkboxes, as necessary. All other fields are disabled.
-
Then choose one of the following options.
-
Click OK to save your changes and close the page.
-
Click Cancel to reject all entries and close the page.
-
To copy all item defaults from one subclass to another, follow the steps below.
-
In the table, select the Copy All button. The Copy From page appears.
-
In the Department field, enter, select or search for the department you want to copy from.
-
In the Class field, enter, select or search for the class ID.
-
In the Subclass field, enter, select or search for the subclass ID.
-
Then choose one of the following options.
-
Click OK to copy the item defaults from the selected hierarchy and close the page.
-
Click Cancel to reject all entries and close the page.
-
