1 Organizational Hierarchy
The organizational hierarchy allows you to create the relationships that are necessary in order to support the operational structure of a company. You can create a preferred organizational structure to support consolidated reporting at various levels of the company. Also, you can assign responsibility for any level of the hierarchy to a person or persons in order to satisfy internal reporting requirements.
The following are the levels of the organizational hierarchy in Merchandising:
Company: The highest default organizational and merchandise hierarchy level defined in Merchandising. Only one company can be defined.
Chain: The first level below the company level in the organizational hierarchy. The definition of a chain is based on the needs of the company, but a chain can be used to group various store formats, concepts, and geographical locations within the organization.
Area: The second level below the company level in the organizational hierarchy. The definition of an area is based on the needs of the company, but an area is used typically to define a geographical group within the organization. An area can belong to only one chain.
Region: The third level below the company level in the organizational hierarchy. The definition of a region is based on the needs of the company, but a region can be used to group geographical locations within the organization. A region can belong to only one area.
District: The fourth level below the company level in the organizational hierarchy. The definition of a district is based on the needs of the company, but a district is used typically to group geographical locations within the organization. A district can belong to only one region.
Store: The fifth and lowest level of the organizational hierarchy. A store, which is associated with a single district, can represent a physical selling location, a virtual selling location (e.g. e-commerce site), or a customer (e.g. franchisee) location.
Warehouse: Considered the bottom of the organizational hierarchy, but unlike stores, it does not roll up under a specific level of the hierarchy, as it can source many store, districts, areas, and so on. Warehouses can be physical or virtual. Physical warehouses are meant to represent the physical building, whereas virtual warehouses are where inventory is held. One or more virtual warehouses can exist in one physical warehouse.
The Organizational Hierarchy page allows you to create, edit and view the organizational hierarchy of the company.
To access the Organizational Hierarchy page from the Task menu, select Foundation Data > Location Foundation > Organizational Hierarchy.
Hierarchy Structure
The Organizational Hierarchy structure on the left side of the page contains the following buttons.
Table 1-1 Hierarchy Structure - Buttons and Description
| Buttons | Description |
|---|---|
|
Chain |
Displays the available chains in the table. |
|
Area |
Displays the available areas in the table. |
|
Region |
Displays the available regions in the table. |
|
District |
Displays the available districts in the table. |
|
Store |
Displays the available stores in the table. |
|
Warehouse |
Displays the available warehouse in the table. |
Hierarchy Table
The Hierarchy table displays the available entries of the selected hierarchy level. For example, if you select the Chain button, all available chains are displayed in this table.
The table displays the following columns by default.
-
Hierarchy ID, depending on the selected hierarchy button.
-
Name of the hierarchy level, for example, the name of the chain.
-
Next hierarchy level, for example, Area.
This column contains either the Create or the Details icon.
If the next level has been created, the Detail icon is displayed. Use the icon to maintain or view the details of the next level.
If the next level has not been created, the Create icon is displayed. Use the icon to create the next level.
This column is not available for stores and warehouses.
Manage Company
Company is the highest level of the organization and merchandise hierarchies defined in Merchandising. Only one company can be defined in the Merchandising and is initially setup in the installation process. Since the company is required, and only one company is allowed, the upload/download process only allows the company to be updated; you cannot add or delete a company. However, the company information can be referenced in multiple languages, so you can add, update, or remove translations of the company information through the upload/download process. This functionality is accessed from the main Merchandising task list under Foundation Data > Download Foundation Data and Foundation Data > Upload Foundation Data.
To update the company, select the template type of Foundation from the Download Data screen and then the template Company. Click the Download button and when prompted, choose to either open the .ods file that is generated or save the file and open it separately in the spreadsheet application of your choice.
To update a company, select the action type of Update on the populated row on the Company tab. Next, update the column you wish to change. Note that the Company column cannot be changed, but any of the other columns can be updated. Any of the entries on the company translations tab can also be updated in a similar manner. This facilitates the ability to translate the company information into multiple languages.
Although only a single company is allowed, the system does support translation of the company information in multiple languages. If you would like to add a company translation, then a similar process will be followed to that described above for updating the company. First, download the spreadsheet, then select the Create action from the dropdown on a blank row of the Company Translations tab. Next, select the language you wish to add from the dropdown in the language column. Enter the Company ID matching the Company ID from the Company tab, and then enter the translated company information in the remaining columns.
Removing a Company Translation
A company translation can be removed from the Merchandising system. If you would like to remove a company translation, then a similar process will be followed to that describe above for updating the company. First, download the spreadsheet, then select the Delete action on the row you which to delete on the Company Translations tab.
For all actions defined above, once all the updates have been made to the data in the spreadsheet, save the file and close it. Then, return to the Merchandising screens and select Foundation Data > Upload Foundation Data from the main task list. In this screen, you will again select the template type Foundation and the template Company. This will generate a process description automatically, but this can be updated if desired. Lastly, select the Browse button and navigate to the directory where you saved the updated spreadsheet.
To review the status of the upload and check whether any errors occurred, select the Foundation Data > Review Status task from the main task list.
See also Download/Upload Data from Spreadsheets and View Data Loading Status.
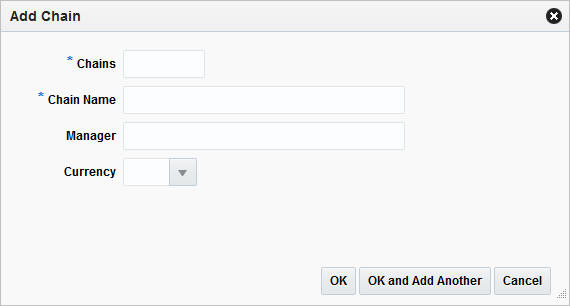
Create Chains
To create a chain, follow the steps below.
-
From the Tasks menu, select Foundation Data > Location Foundation > Organizational Hierarchy. The Organizational Hierarchy page appears.
-
Select the Chain button. All available chains are displayed in the table.
-
In the table, select Actions > Create, or use the Create icon. The Chains page appears.
-
Then select Actions > Add, or use the Add icon. The Add Chain page appears.
-
In the Chains field, enter a unique number. This field is a required field.
-
In the Chain Name field, enter the name of the chain. This field is a required field.
-
In the Manager field, enter the name of the manager who is responsible for the chain.
-
In the Currency field, enter, select or search for the chain's currency code.
-
Then choose one of the following options.
-
Click OK to save the chain and close the page.
-
Click OK and Add Another to save the current chain and add additional entries.
-
Click Cancel to reject all entries and close the page.
-
-
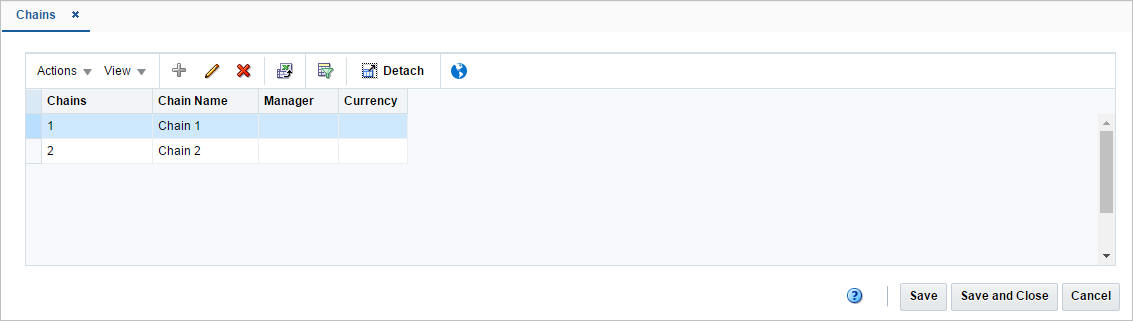
Manage Chains
Editing Chains
To edit a chain, follow the steps below.
-
From the Tasks menu, select Foundation Data > Location Foundation > Organizational Hierarchy. The Organizational Hierarchy page appears.
-
Select the Chain button. The available chains are displayed in the table.
-
Select a record in the table.
-
Then click the chain ID link, or select Actions > Edit, or use the Edit icon. The Chains page appears.
-
Select a record in the table.
-
Select Actions > Edit, or use the Edit icon. The Edit Chain page appears.
-
The Chain field displays the selected chain ID.
-
Edit the chain name, manager and/or currency, if necessary.
-
Then choose one of the following options.
-
Click OK to add your to the table and close the page.
-
Click Cancel to reject all entries and close the page.
-
-
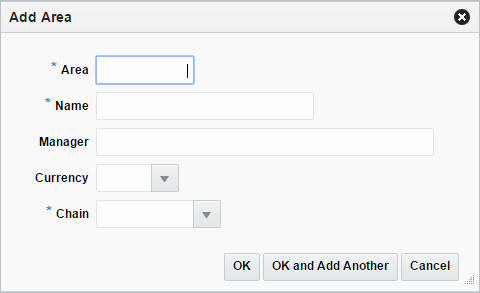
Create Areas
To create an Area, follow the steps below.
-
From the Tasks menu, select Foundation Data > Location Foundation > Organizational Hierarchy. The Organizational Hierarchy page appears.
-
Select the Area button. All available areas are displayed in the table.
-
In the table, select Actions > Create, or use the Create icon. The Areas page appears.
-
Then select Actions > Add, or use the Add icon. The Add Area page appears.
-
In the Area field, enter a unique number. This field is a required field.
-
In the Name field, enter the name of the area. This field is a required field.
-
In the Manager field, enter the name of the manager who is responsible for the area.
-
In the Currency field, enter, select or search for the area's currency code.
-
In the Chain field, enter, select or search for the chain ID which is associated with the area. This field is a required field.
-
Then choose one of the following options.
-
Click OK to save the area and close the page.
-
Click OK and Add Another to save the current area and add additional entries.
-
Click Cancel to reject all entries and close the page.
-
-
Manage Areas
Editing Areas
To edit an area, follow the steps below.
-
From the Tasks menu, select Foundation Data > Location Foundation > Organizational Hierarchy. The Organizational Hierarchy page appears.
-
Select the Area button. The available areas are displayed in the table.
-
Select a record in the table.
-
Then click the area ID link, or select Actions > Edit, or use the Edit icon. The Areas page appears.
-
Select a record in the table.
-
Select Actions > Edit, or use the Edit icon. The Edit Area page appears.
-
The Area field displays the selected area ID.
-
Edit the area name, manager, currency and/or chain, if necessary.
-
Then choose one of the following options.
-
Click OK to add your changes to the table and close the page.
-
Click Cancel to reject all entries and close the page.
-
-
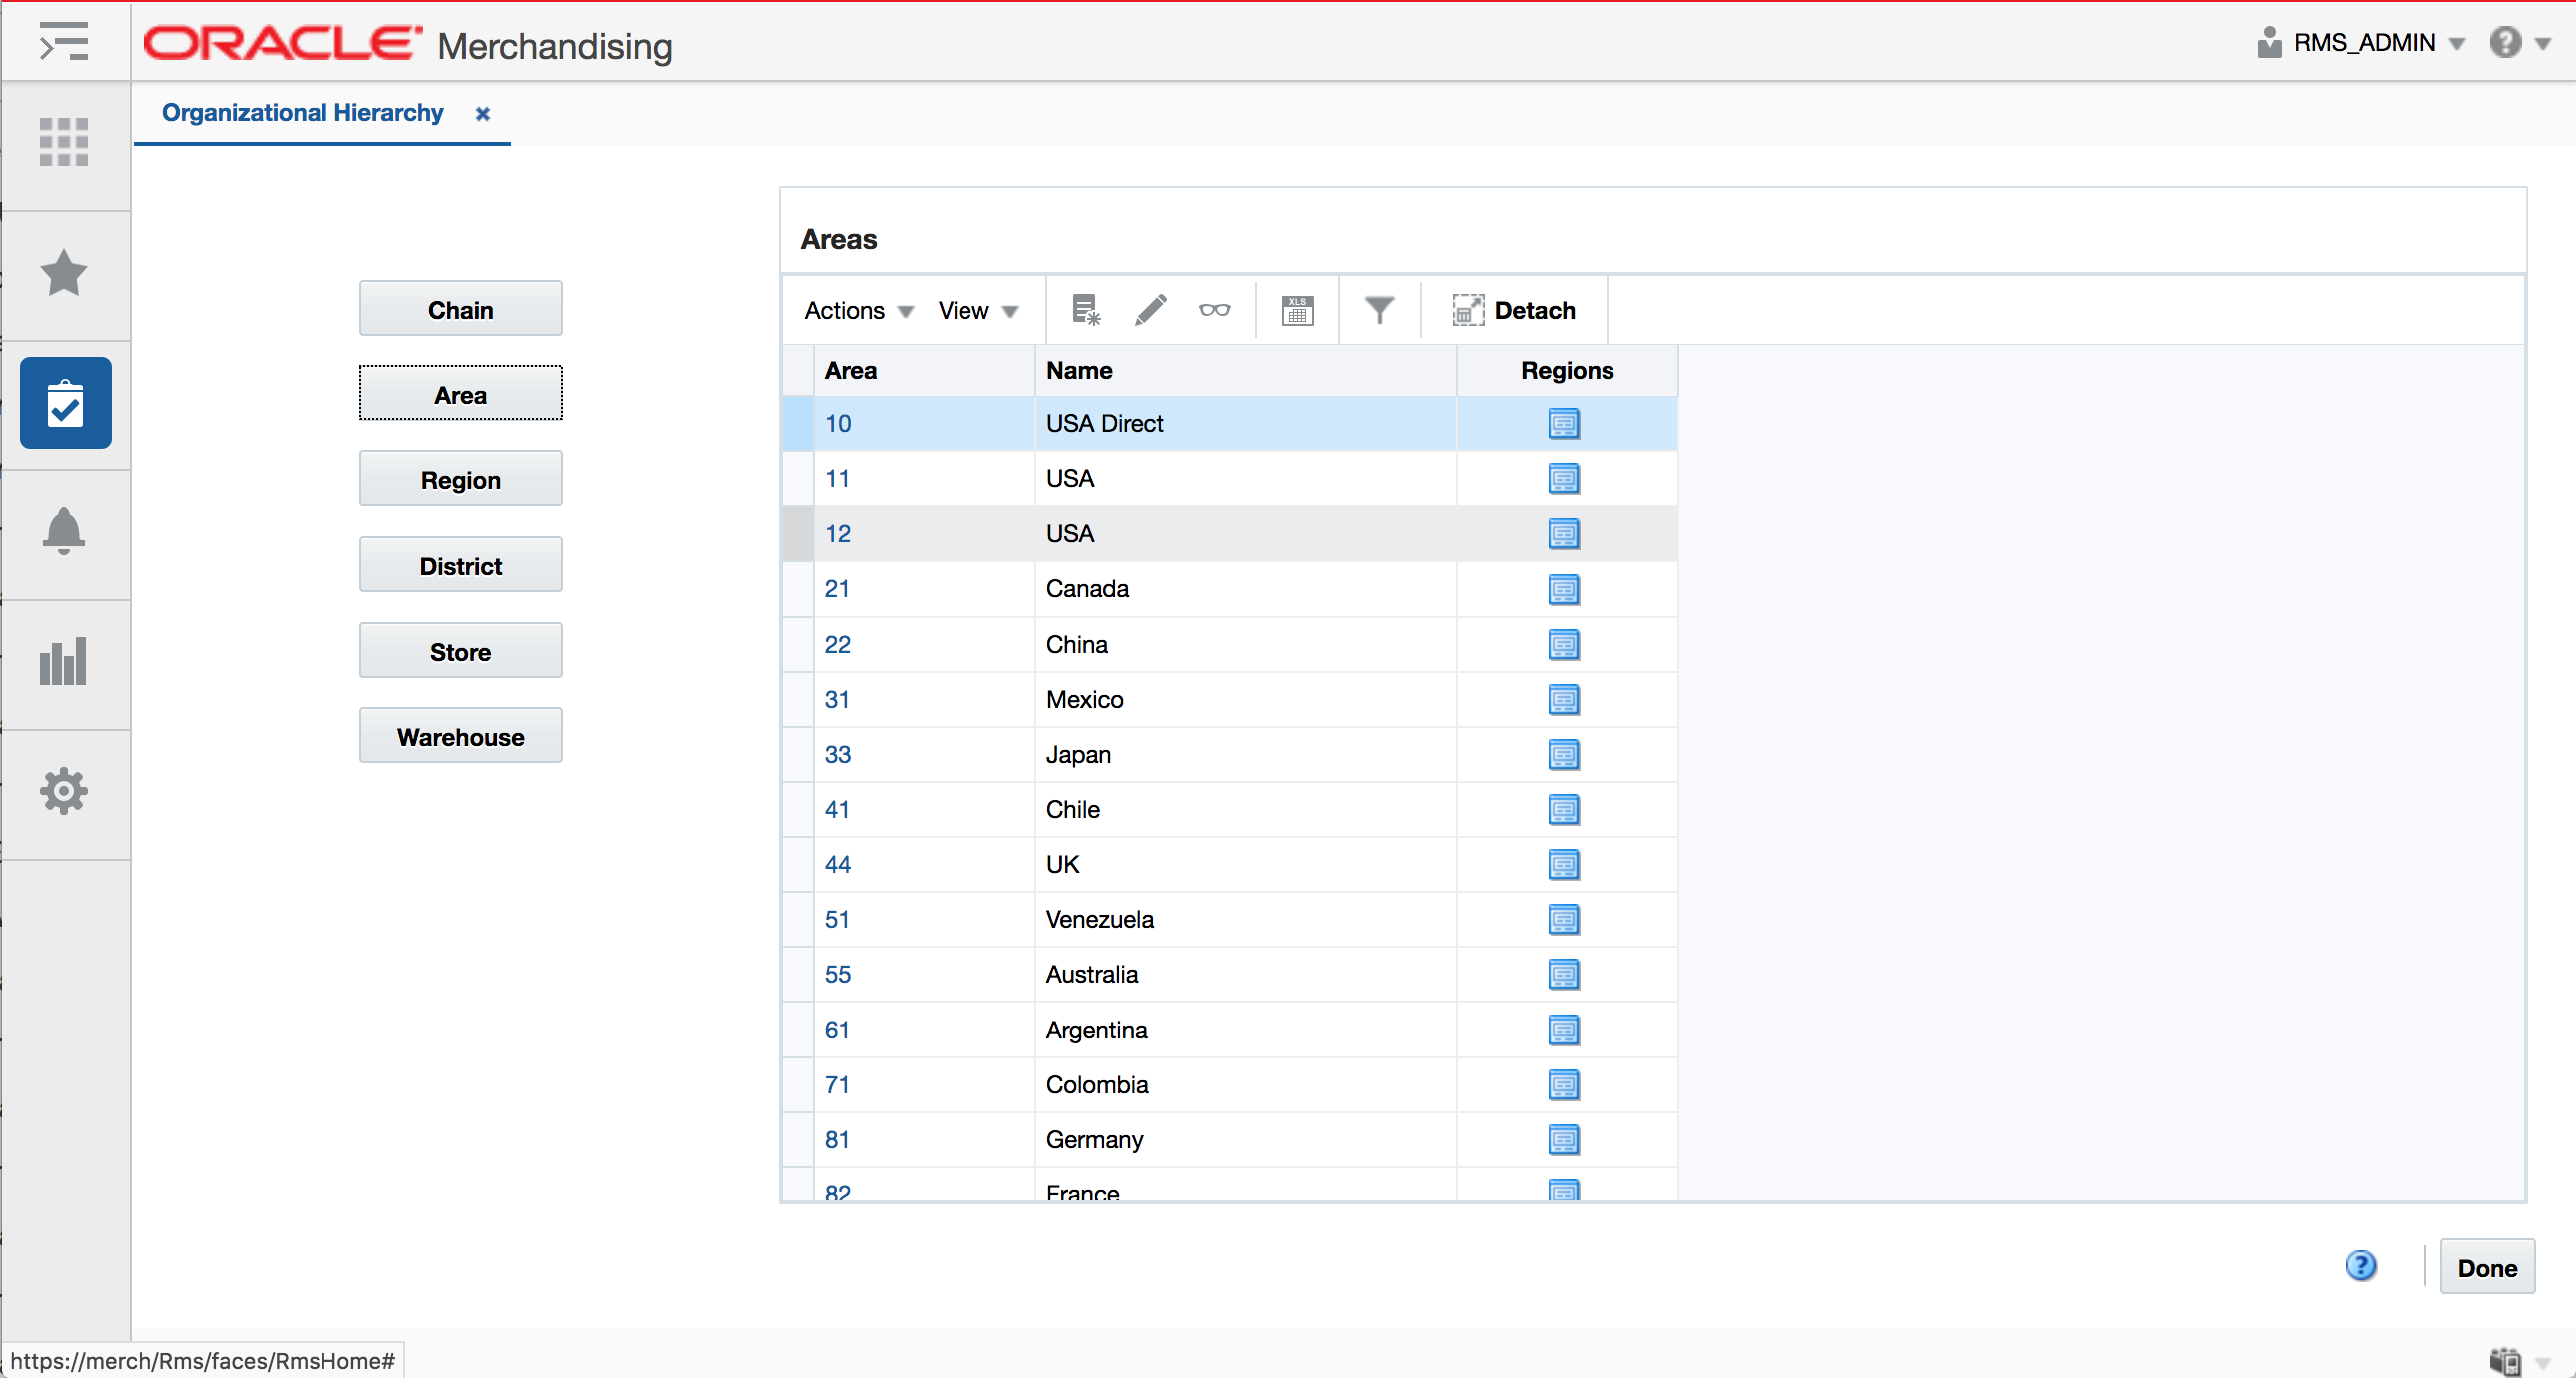
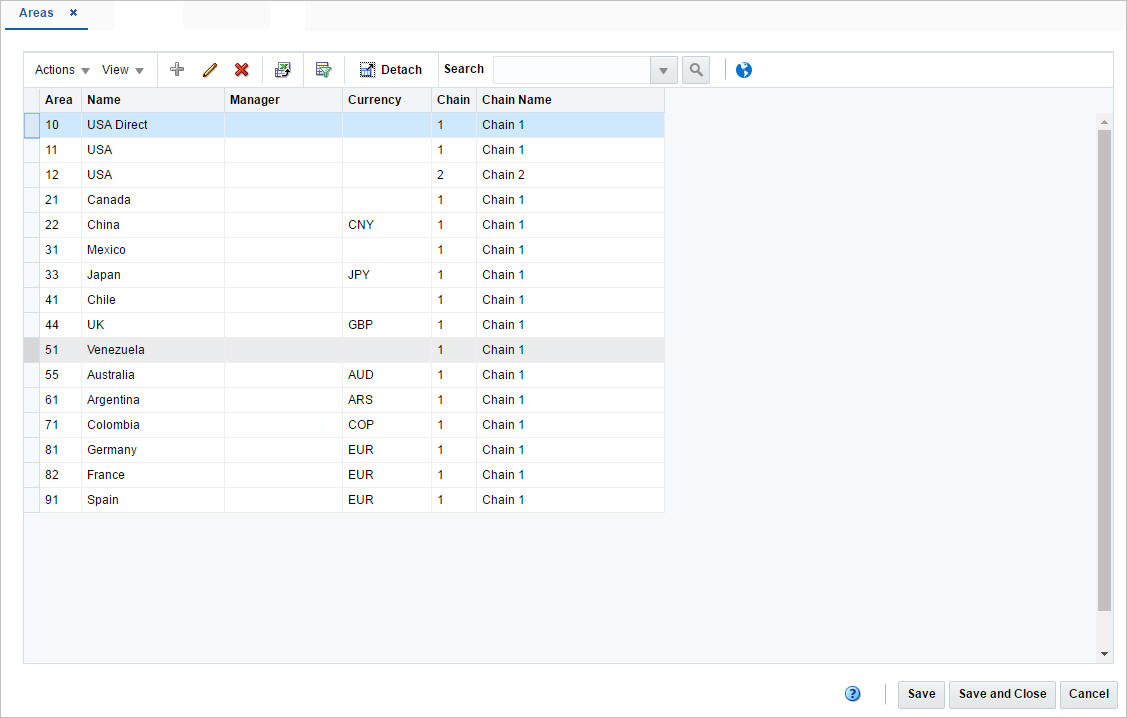
Areas Page
The Areas page allows you to create, edit, delete, or view an area in the organizational hierarchy. Area is below chain and above region in the organizational hierarchy. Typically, an area is used to define a geographical grouping within the organization. An area can belong to only one chain within the organizational hierarchy.You can associate location traits with an area. Location traits that are applied to an area are applied automatically to the regions, districts, and stores within the area.
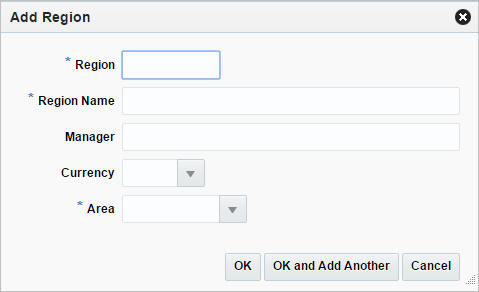
Create Regions
To create a region, follow the steps below.
-
From the Tasks menu, select Foundation Data > Location Foundation > Organizational Hierarchy. The Organizational Hierarchy page appears.
-
Select the Region button. All available regions are displayed in the table.
-
In the table, select Actions > Create. The Regions page appears.
-
Then select Actions > Add, or use the Add icon. The Add Region page appears.
-
In the Region field, enter a unique number. This field is a required field.
-
In the Region Name field, enter the name of the region. This field is a required field.
-
In the Manager field, enter the name of the manager who is responsible for the region.
-
In the Currency field, enter, select or search for the region's currency code.
-
In the Area field, enter, select or search for the area ID which is associated with the region. This field is a required field.
-
Then choose one of the following options.
-
Click OK to save the region and close the page.
-
Click OK and Add Another to save the current region and add additional entries.
-
Click Cancel to reject all entries and close the page.
-
-
Manage Regions
Editing Regions
To edit a region, follow the steps below.
-
From the Tasks menu, select Foundation Data > Location Foundation > Organizational Hierarchy. The Organizational Hierarchy page appears.
-
Select the Region button. The available regions are displayed in the table.
-
Select a record in the table.
-
Then click the region ID link, or select Actions > Edit, or use the Edit icon. The Regions page appears.
-
Select a record in the table.
-
Select Actions > Edit, or use the Edit icon. The Edit Region page appears.
-
The Region field displays the selected region ID.
-
Edit the region name, manager, currency and/or area, if necessary.
-
Then choose one of the following options.
-
Click OK to add your changes to the table and close the page.
-
Click Cancel to reject all entries and close the page.
-
-
Regions Page
The Regions page allows you to add, edit, delete, and view a region in the organizational hierarchy. A region is below the area and above the district in the organizational hierarchy. Typically, the region is used to define a geographical grouping within the organization.

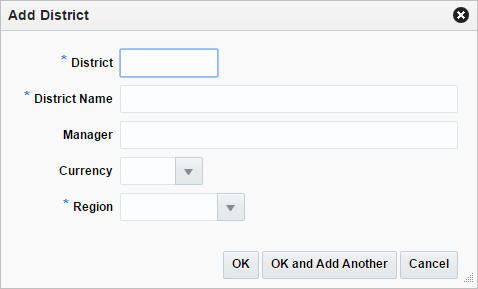
Creating a District
To create a district, follow the steps below.
-
From the Tasks menu, select Foundation Data > Location Foundation > Organizational Hierarchy. The Organizational Hierarchy page appears.
-
Select the District button. All available districts are displayed in the table.
-
In the table, select Actions > Create. The Districts page appears.
-
Then select Actions > Add, or use the Add icon. The Add District page appears.
-
In the District field, enter a unique number. This field is a required field.
-
In the District Name field, enter the name of the district. This field is a required field.
-
In the Manager field, enter the name of the manager who is responsible for the district.
-
In the Currency field, enter, select or search for the district's currency code.
-
In the Region field, enter, select or search for the region ID which is associated with the district. This field is a required field.
-
Then choose one of the following options.
-
Click OK to save the district and close the page.
-
Click OK and Add Another to save the current district and add additional entries.
-
Click Cancel to reject all entries and close the page.
-
-
Manage Districts
Editing Districts
To edit a district follow the steps below.
-
From the Tasks menu, select Foundation Data > Location Foundation > Organizational Hierarchy. The Organizational Hierarchy page appears.
-
Select the District button. The available districts are displayed in the table.
-
Select a record in the table.
-
Then click the district ID link, or select Actions > Edit, or use the Edit icon. The Districts page appears.
-
Select a record in the table.
-
Select Actions > Edit, or use the Edit icon. The Edit District page appears.
-
The District field displays the selected region ID.
-
Edit the district name, manager, currency and/or region, if necessary.
-
Then choose one of the following options.
-
Click OK to add your changes to the table and close the page.
-
Click Cancel to reject all entries and close the page.
-
-
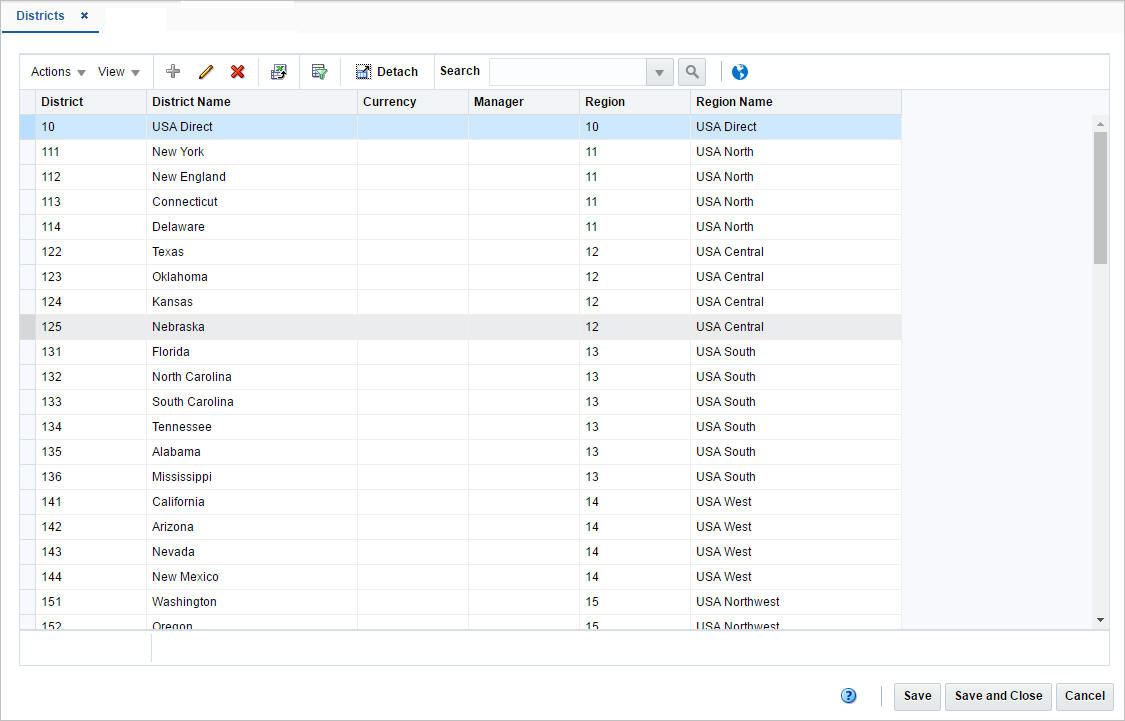
Districts Page
The Districts page allows you to add, edit, delete, and view a district in the organizational hierarchy. A district is below the region and above the store in the organizational hierarchy. Typically, the district is used to define a geographical grouping within the organization.
Create Stores
To create a store, follow the steps listed below.
-
From the Tasks menu, select Foundation Data > Location Foundation > Organizational Hierarchy. The Organizational Hierarchy page appears.
-
Select the Store button. All available stores are displayed in the table.
-
In the table, select Actions > Create, or use the Create icon. The Store page appears.
-
Enter the necessary information for the store. For more information about the available fields in the Store page, see the Store Page section.
Manage Stores
Editing Stores
To edit a store, follow the steps below.
-
From the Tasks menu, select Foundation Data > Location Foundation > Organizational Hierarchy. The Organizational Hierarchy page appears.
-
Select the Store button. The available regions are displayed in the table.
-
Select a record in the table.
-
Then click the store ID link, or select Actions > Edit, or use the Edit icon. The Store page appears.
-
Edit the fields, if necessary. For more information about the available fields in the Store page, see the Store Page section.
Note:
You cannot edit the Company Store ID, Currency, Org Unit and Transfer Entry. Additionally you cannot select or deselect the Stockholding checkbox in edit mode.
Store Page
The Store page allows you to create, edit, delete, and view a store in the organizational hierarchy. The store is the lowest level of the organizational hierarchy. The store may be defined as the selling entity. The store is crucial because it is the level at which business transactions are processed. A store can belong to only one district within the organizational hierarchy.
You can navigate to other pages in order to set up attributes, the square area of the store's departments, location traits, associations with competitors' stores, activity and delivery schedules, and geocodes.
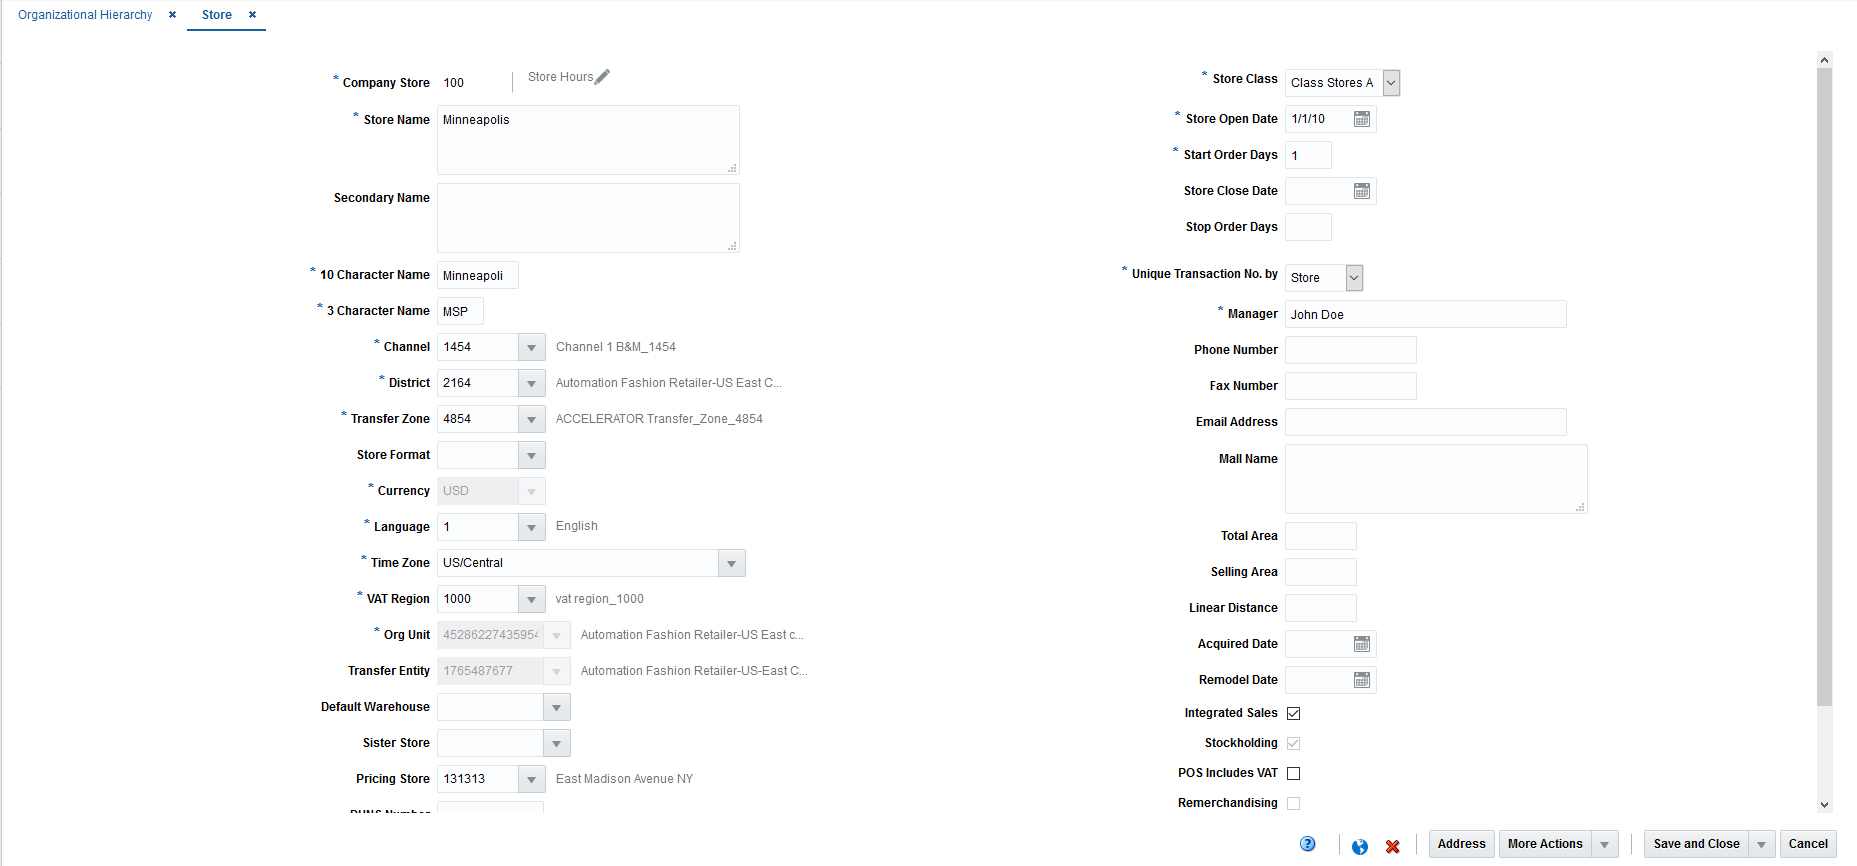
Table 1-2 Store Page - Fields and Description
| Fields | Description |
|---|---|
|
Store |
Select the store type from the list. Possible store types are:
The Store field next to the store type enables. Enter a unique ID for the store. This field is a required field. |
|
Store Name |
Enter a unique description for the store. This field is a required field. |
|
Secondary Name |
Enter the secondary name for the store. |
|
10 Character Name |
Enter up to 10 character abbreviation for the store. This field is a required field. |
|
3 Character Name |
Enter up to 3 character abbreviation for the store. This field is a required field. |
|
Channel |
Enter, select or search for the channel of business to which the store belongs. This field is a required field. |
|
District |
Enter, select or search for the district ID. This field is a required field. |
|
Transfer Zone |
Enter, select or search for the transfer zone. This field is a required field. |
|
Store Format |
Enter, select or search for the store format ID. For example, select Mall. |
|
Currency |
Enter, select or search for the currency code. This field is a required field. |
|
Language |
Enter, select or search for the language code for the store. This field is a required field. |
|
Time Zone |
Enter, select or search for the time zone of the store. This field is a required field. |
|
VAT Region |
Enter, select or search for the VAT region code for the store. This field is a required field. |
|
Org Unit |
Enter, select or search for the organizational unit ID. This field is available if Oracle Financials is integrated. This field is a required field, if available. |
|
Transfer Entity |
Enter, select or search for the transfer entity ID. This field is a required field. |
|
Default Warehouse |
Enter, select or search for the default warehouse of the store. This field is only enabled, if you have specified a channel ID. For Franchise stores, this field is a required field. |
|
Sister Store |
Enter, select or search for the store number. This field is used to copy the store's history when defining allocations for new stores. |
|
DUNS Number |
Enter the Dun & Bradstreet Data Universal Numbering System (DUNS) number. The DUNS number is a nine digit code that identifies your store. |
|
DUNS Location Number |
Enter the DUNS location number. The DUNS location number is a four digit code that identifies the locations of your store. This field is only enabled, if you have entered the DUNS number for your store. |
|
Store Class |
The Store Class field is enabled, if you selected the store type Company. The Store Class field is defaulted to Class X and disabled if you selected the store type Franchise. Select the Store Class from the list. A store is grouped under the class based on the sale or the location. |
|
Store Open Date |
Enter the date when the store opens or use the Calendar icon to select a date. This field is a required field. |
|
Start Order Days |
Enter the number of days before the store opens to start ordering merchandise. |
|
Store Close Date |
Enter the date when the store closes or use the Calendar icon to select a date. |
|
Stop Order Days |
Enter the number of days before the store closes to stop ordering merchandise. |
|
Unique Transaction No. by |
Select the store or register for the Unique Transaction Number By from the list. This field indicates if the transaction number in the store is generated uniquely across store or at each register. This field is a required field. |
|
Manager |
Enter the name of the store manager. |
|
Phone Number |
Enter the phone number. |
|
Fax Number |
Enter the fax number. |
|
Email Address |
Enter the email address. |
|
Mall Name |
Enter the mall name, if necessary. |
|
Total Area |
Enter the total space of the store. |
|
Selling Area |
Enter the selling space available at the store. |
|
Linear Distance |
Enter the shelving space available at the store. |
|
Acquired Date |
Enter the date when the store has been acquired or use the Calendar icon to select a date. |
|
Remodel Date |
Enter the date when the store has been remodeled or use the Calendar icon to select a date. |
|
Integrated Sales |
The Integrated Sales checkbox is selected by default. You cannot load the sales for that store in ReSa, if the Integrated Sales option is not selected. |
|
Stockholding |
If the store is intended to be stockholding, this option must be selected. The Stockholding option is selected by default. |
|
Remerchandising |
Select the Remerchandising checkbox, if the store is undergoing a significant remerchandising effort as an indicator to Advanced Inventory Planning (AIP) application. |
|
Customer Order Location |
This option is available if the store type is Company and also for stock holding Franchise Stores. If the option is enabled, the store can be used to source or fulfill customer orders. |
|
Customer |
Only enabled, if the store type Franchise has been selected. Enter, select or search for the customer the franchise store belongs to. |
|
Customer Shipping |
This option allows the retailer to specify if the location supports shipping to the customer for customer orders. The Customer Shipping option is unselected by default. |
|
Gift Wrapping |
This option allows the retailer to specify if the location supports gift wrapping. The Gift Wrapping option is unselected by default. |
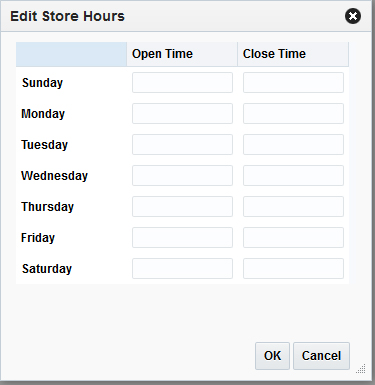
Adding Hours to a Store
The Store Hours dialog allows retailers to capture and manager store operation timings.
-
In the Store page, click the Store Hours icon. The Edit Store Hours dialog appears.
-
Enter the time at which the selected store opens and closes for each day. Times should be entered in the HH:MM AM/PM format. For example, 9:00 AM. If no time is entered for a day, the store is assumed to be closed.
-
Click OK to save the updated store hours and return to the Store page.
Like Store
The Like Store section of the Store page allows you to create a store with the same assortment of items as another store. Also, you can choose to copy replenishment information, delivery schedules, and dates when closed as well as items on clearance from the existing store to the new store.
-
In the Store page, expand the Like Store section.
-
In the Like Store field, enter, select or search for the desired store ID.
-
In the Information to Copy section, select the desired checkboxes to copy the following information from the selected store:
-
Select the Replenishment Information to copy the replenishment information.
-
Select Delivery Schedule to copy delivery schedules.
-
Select Activity Schedule to copy dates when the store is closed.
-
Select Clearance Items to copy items on clearance to the new store.
-
Add a Zoning Location to a Store
In the Zoning Location section of the Store page you can associate a store with a retail price and a cost location. To add this information follow the steps below.
-
In the Store page, expand the Zoning Location section.
-
In the Pricing Store field, enter, select or search for the pricing store ID.
-
In the Cost Location field, select the location type from the list.
-
The field next to the location type enables. Enter, select or search for the cost location ID.
Walk-through Stores Page
The Walk-through Stores page allows you to define several stores in one location. Each store may operate as a separate entity, however the stores are located in the same physical location. You can associate multiple stores as walk through locations. Walk-through stores can be uploaded into the system, or you can add walk through locations to a store. You must set up the stores and then associate one with another.
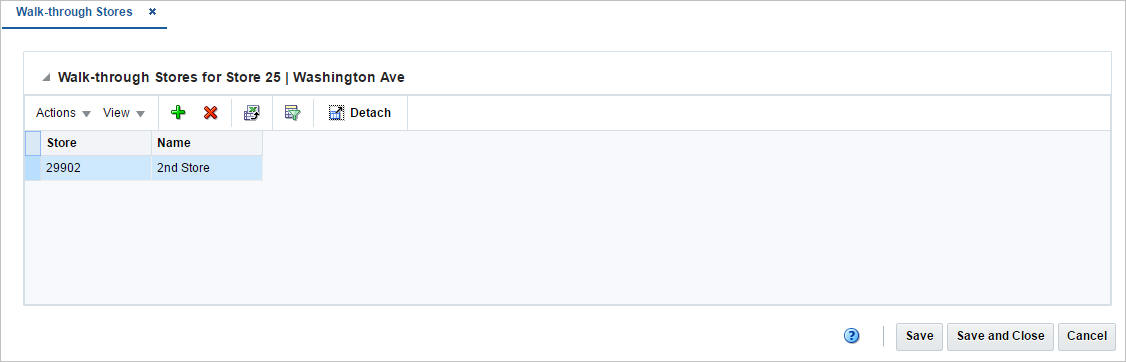
Adding a Walk-Through Store
To add walk through stores to a store, follow the steps below.
-
From the Tasks menu, select Foundation Data > Location Foundation > Organizational Hierarchy. The Organizational Hierarchy page appears.
-
Select the Store button. The available stores are displayed in the table.
-
In the Store column, click the store ID link, or mark a record and select Actions > Edit, or use the Edit icon. The Store page appears.
-
In the Store page, select More Actions > Walk Through. The Walk-through Stores page appears.
-
Then select Actions > Add or use the Add icon. The Add Walk-through Stores page appears.
-
In the Store field, enter the store ID.
-
In the Name field, enter the store name.
-
Then choose one of the following options.
-
Click OK to save the current store as walk-through store and close the page.
-
Click OK and Add Another to save the current store and add additional entries.
-
Click Cancel to reject all entries and close the page.
-
-
In the Walk-through Stores page, choose one of the following options.
-
Click Save to save your changes.
-
Click Save and Close to save your changes and close the page.
-
Click Cancel to reject all entries and close the page.
-
Add Location Traits to a Store
The Store Location Traits page allows you to add, delete, and view location traits. You can group areas, regions, districts, or stores by location traits.
At the store level, location traits can be used as a grouping mechanism when you:
-
Record Attributes for a Store
-
Add Locations to a Location List
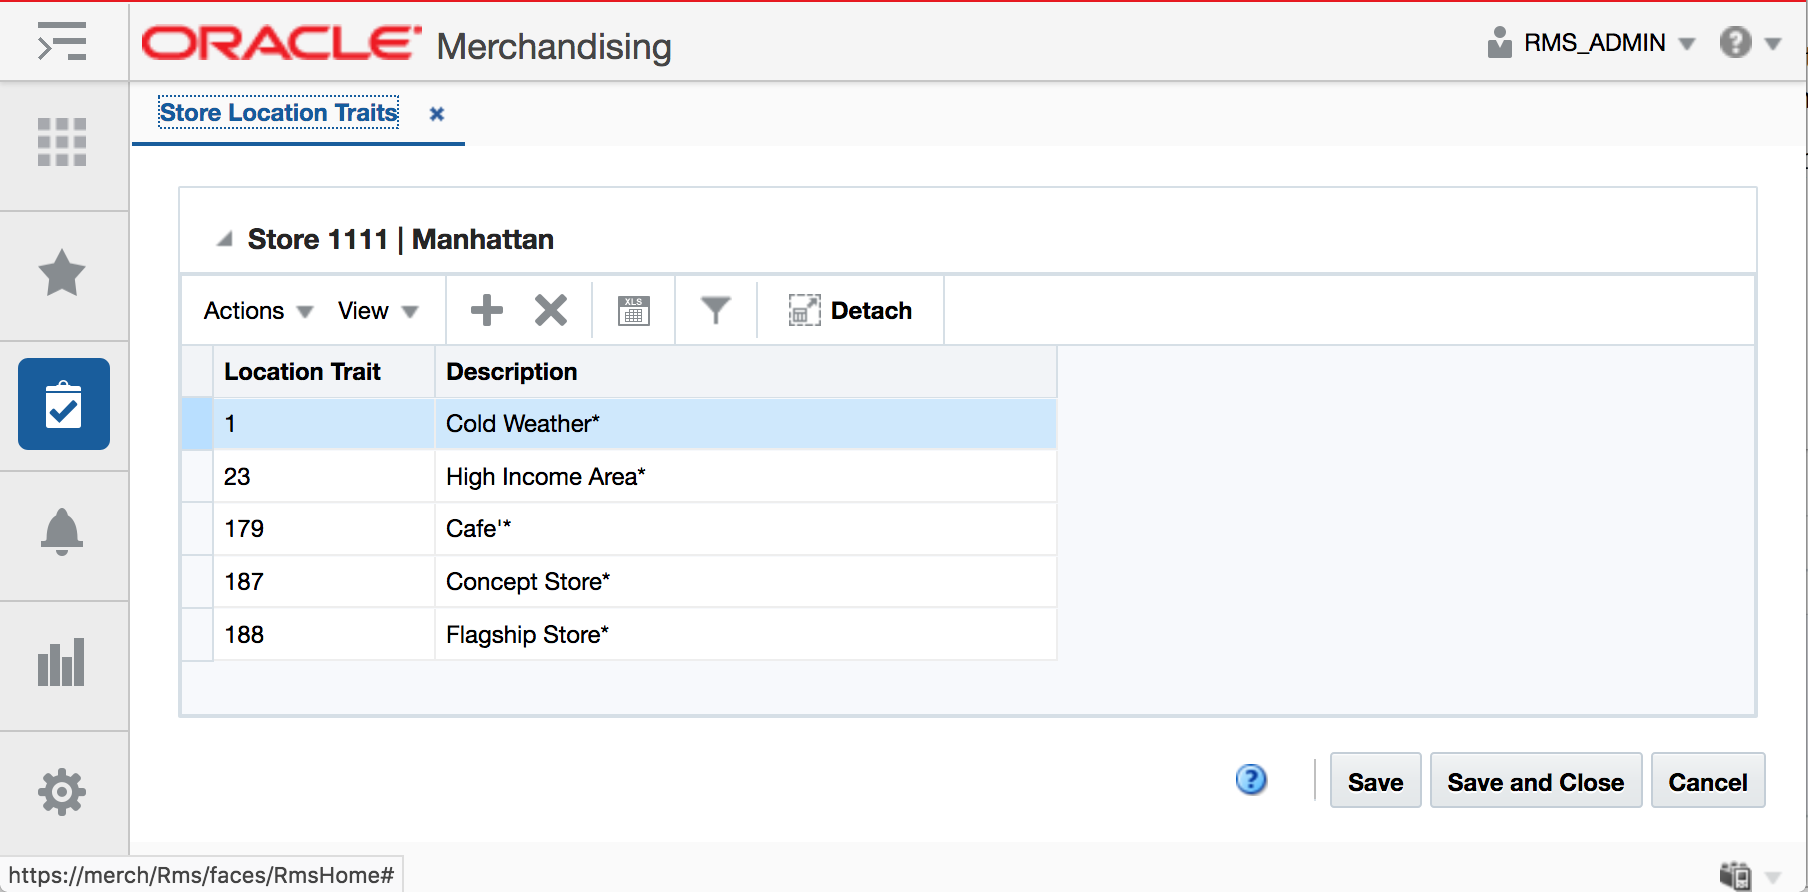
Adding Store Location Traits
To add a location trait to the store, follow the steps below.
-
From the Tasks menu, select Foundation Data > Location Foundation > Organizational Hierarchy. The Organizational Hierarchy page appears.
-
Select the Store button. The available stores are displayed in the table.
-
In the Store column, click the store ID link, or mark a record and select Actions > Edit, or use the Edit icon. The Store page appears.
-
In the Store page, select More Actions > Location Traits. The Store Location Traits page appears.
-
Then select Actions > Add or use the Add icon. The Add Location Trait page appears.
-
In the Location Trait page. Enter, select or search for the desired location trait ID.
-
Then choose one of the following options.
-
Click OK to add the location trait and close the page.
-
Click OK and Add Another to save the current record and add additional entries.
-
Click Cancel to reject all entries and close the page.
-
Create Warehouses
To create a warehouse, follow the steps listed below.
-
From the Tasks menu, select Foundation Data > Location Foundation > Organizational Hierarchy. The Organizational Hierarchy page appears.
-
Select the Warehouse button. All available warehouses are displayed in the table.
-
In the table, select Actions > Create. The Warehouse page appears.
-
Enter all the necessary information. For more information about the available fields in the Warehouse page, see the Warehouse Page section.
Warehouse Page
The Warehouse page allows you to create, edit, delete, and view a warehouse. The warehouse is the entity within Merchandising that defines the physical storage, cross-dock, or distribution facility in an organization. The warehouse has all of the transaction capability of the store, except for sales and price changes. You can specify at which organizational level a warehouse is reported.
You also have the option to designate a warehouse as a redistribution warehouse. A redistribution warehouse does not actually hold stock and cannot be used as a distribution center. With the existence of a redistribution warehouse, you can create purchase orders before the distribution center is known. Orders must be redistributed to actual warehouses or stores when the locations become known and before the merchandise is shipped.
You can access additional pages in order to set up attributes, activity schedules, and delivery schedules.
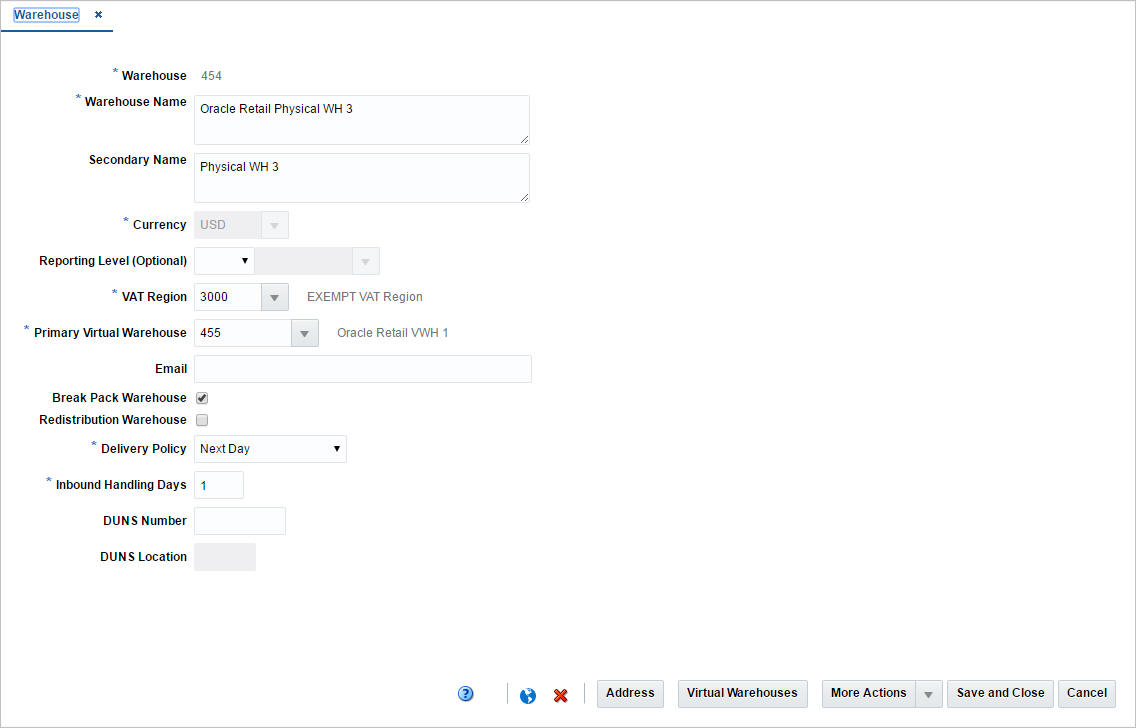
Table 1-3 Warehouse Page - Fields and Description
| Fields | Description |
|---|---|
|
Warehouse |
Enter a unique ID for the warehouse. This field is a required field. |
|
Warehouse Name |
Enter a unique description for the warehouse. This field is a required field. |
|
Secondary Name |
Enter the secondary name for the warehouse. |
|
Currency |
Enter, select or search for the currency code. This field is a required field. |
|
Reporting Level (Optional) |
Select a reporting level from the list. |
|
VAT Region |
Enter, select or search for a VAT region for the warehouse. This field is a required field. |
|
Primary Virtual Warehouse |
This field is enabled when at least one virtual warehouse is created. Enter, select or search for the primary virtual warehouse. |
|
|
Enter an email address for the warehouse. |
|
Break Pack Warehouse checkbox |
Select the checkbox to indicate that the warehouse is capable of distributing less that the supplier case quantity. |
|
Redistribution Warehouse checkbox |
Select the checkbox to indicate that the warehouse distributes to other warehouses. |
|
Delivery Policy |
Select a delivery policy from the list. |
|
Inbound Handling Days |
Enter the number of days that the warehouse requires to receive any item and move the item to the shelf, so that it is ready to be picked. Next Day indicates that the if a location is closed, the warehouse will deliver on the next day. Next Valid Delivery Day indicates that the warehouse will wait until the next scheduled delivery day before delivering the item. |
|
DUNS Number |
Enter the Dun & Bradstreet Data Universal Numbering System (DUNS) number. The DUNS number is a nine digit code that identifies your store. |
|
DUNS Location Number |
Enter the DUNS location number. The DUNS location number is a four digit code that identifies the locations of your store. This field is only enabled, if have entered the DUNS number for your store. |
|
Zoning Location section: This section is only available, when you create a new warehouse |
|
|
Cost Location |
Select a cost location type from the list. The location ID field enables, enter, select or search for the location. |
Add Virtual Warehouses
To add a virtual warehouse to a physical warehouse, follow the steps below.
-
From the Tasks menu select Foundation Data > Location Foundation > Organizational Hierarchy. The Organizational Hierarchy page appears.
-
Select the Warehouse button. The available warehouses are displayed in the table.
-
Select a record in the table.
-
Then, select Actions > Edit or use the Edit icon. The Warehouse page appears.
-
Click the Virtual Warehouses button. The Virtual Warehouses page appears.
-
Select Actions > Add or use the Add icon. The Add Virtual Warehouse page appears.
-
In the Virtual Warehouse field, enter a unique warehouse ID. This field is a required field.
-
In the Name field, enter the name of the warehouse. This field is a required field.
-
In the Secondary Name field, enter the secondary name for the warehouse.
-
In the Org Entity Type field, select the org entity type from the list. This field is a required field.
-
In the Transfer Entity field, enter, select or search for the transfer entity. This field is a required field.
-
In the Org Unit field, enter, select or search for the org unit. This field is a required field.
-
In the Virtual Warehouse Type field, select a warehouse type from the list. This field is a required field.
-
In the Channel field, enter, select or search for a channel. This field is a required field.
-
In the Default Warehouse field, enter, select or search for the warehouse.
-
In the Pricing Location field, enter, select or search for the pricing location ID. This field is a required field.
-
In the Rounding Warehouse field, enter select or search for the warehouse.
-
Select the Stock Holding checkbox to indicate that the warehouse is a stock holding one.
Note:
If you select Regular Warehouse as the Org Entity Type, the Stock Holding checkbox is selected and disabled. You cannot deselect this checkbox. -
Select the Finisher checkbox to indicate that the warehouse is a finisher location.
-
Select the Customer Order Location checkbox to indicate that the warehouse is a location where the customer places orders.
-
Select the Customer Shipping checkbox to specify if the warehouse supports shipping to the customer for customer orders.
-
Select the Gift Wrapping checkbox to specify if the warehouse supports gift wrapping.
-
Select the Protected checkbox to indicate that the warehouse is affected last in transactions where inventory is removed or affected first in short-shipment type transactions where inventory is being added.
-
Select the Restricted checkbox to indicate that the virtual warehouses is restricted from receiving stock during an inbound transaction.
-
Select the Forecast checkbox to indicate that the warehouse should be included in forecast calculations.
-
Select the Replenishment checkbox to indicate that the virtual warehouse is included in the net inventory calculations for the replenish able warehouse.
-
In the Warehouse Link field, enter, select or search for the corresponding link.
-
Then select one of the following options.
-
Click OK to add the current warehouse and close the page.
-
Click OK and Add Another to add the current warehouse and add additional warehouses.
-
Click Cancel to reject all entries and close the page.
-
-
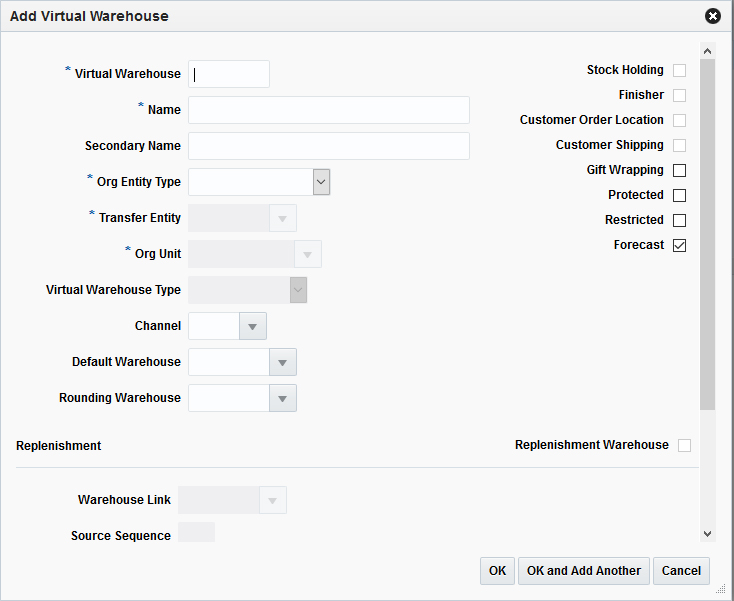
Virtual Warehouses Page
The Virtual Warehouse page allows you to divide a physical warehouse into one or more virtual warehouses. Virtual warehouses are used in a multi-channel environment to track ownership of inventory by channel. You associate each virtual warehouse with a channel. If the virtual warehouse contains a finishing location, you can indicate an additional virtual warehouse within the channel.
Virtual warehouses are considered stockholding locations, while the physical warehouse is considered a non-stockholding location.
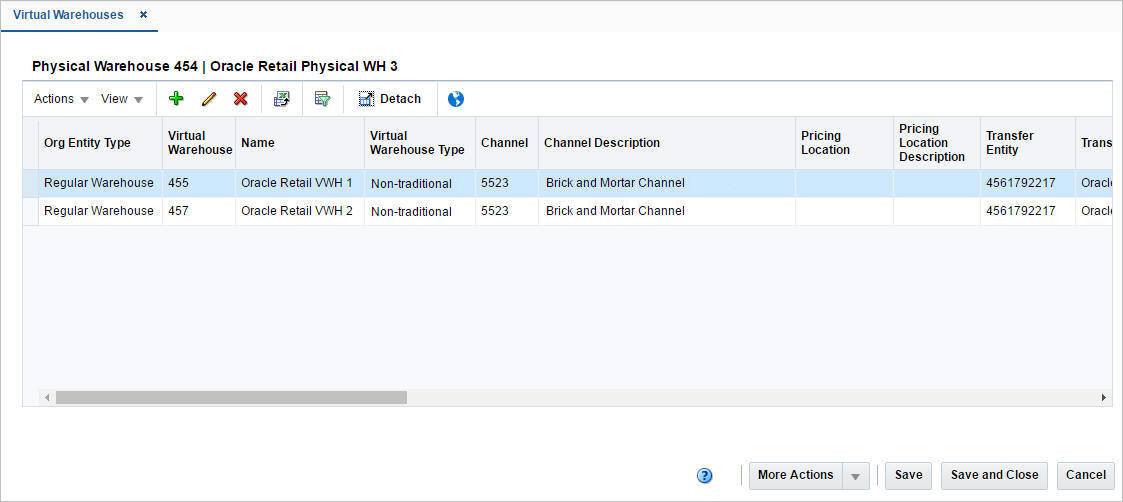
To edit a virtual warehouse to a physical warehouse, follow the steps below.
-
From the Tasks menu select Foundation Data > Location Foundation > Organizational Hierarchy. The Organizational Hierarchy page appears.
-
Select the Warehouse button. The available warehouses are displayed in the table.
-
Select a record in the table.
-
Select Actions > Edit or use the Edit icon. The Warehouse page appears.
-
Click the Virtual Warehouses button. The Virtual Warehouses page appears.
-
Select a record in the table.
-
Select Actions > Edit or use the Edit icon. The Edit Virtual Warehouse page appears.
-
Edit the fields, if necessary.
-
Then select one of the following options.
-
Click OK to save your changes and close the page.
-
Click Cancel to reject all entries and close the page.
-
-
Manage Warehouses
Editing Warehouses
To edit a warehouse, follow the steps below.
-
From the Tasks menu, select Foundation Data > Location Foundation > Organizational Hierarchy. The Organizational Hierarchy page appears.
-
Select the Warehouse button. The available warehouses are displayed in the table.
-
Select a record in the table.
-
Then click the warehouse ID link, or select Actions > Edit, or use the Edit icon. The Warehouse page appears.
-
Edit the fields, if necessary. For more information about the fields in the Warehouse page, see the Warehouse Page section.
Note:
You cannot edit the Warehouse ID, Currency, and Primary Virtual Warehouse fields.
Editing Virtual Warehouses
To edit a virtual warehouse to a physical warehouse, follow the steps below.
-
From the Tasks menu select Foundation Data > Location Foundation > Organizational Hierarchy. The Organizational Hierarchy page appears.
-
Select the Warehouse button. The available warehouses are displayed in the table.
-
Select a record in the table.
-
Select Actions > Edit or use the Edit icon. The Warehouse page appears.
-
Click the Virtual Warehouses button. The Virtual Warehouses page appears.
-
Select a record in the table.
-
Select Actions > Edit or use the Edit icon. The Edit Virtual Warehouse page appears.
-
Edit the fields, if necessary.
-
Then select one of the following options.
-
Click OK to save your changes and close the page.
-
Click Cancel to reject all entries and close the page.
-
-
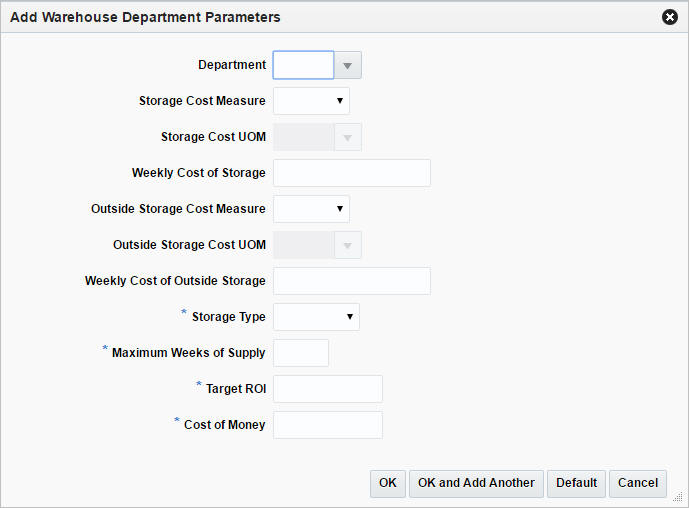
Add Warehouse Department Parameters
The Warehouse Department page allows you to specify investment buy parameters at the warehouse or warehouse/department level. You can set up costs of storage and other parameters for a specific warehouse. Within the warehouse, you can set up several sets of investment buy parameters which are specific for a set of items, such as frozen goods.
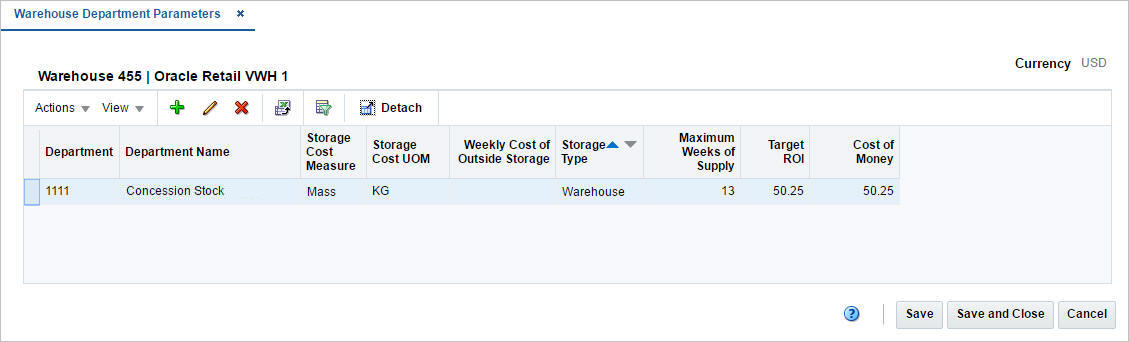
Adding Warehouse Department Parameters
To add warehouse department parameters, follow the steps below.
-
From the Tasks menu select Foundation Data > Location Foundation > Organizational Hierarchy. The Organizational Hierarchy page appears.
-
Select the Warehouse button. The available warehouses are displayed in the table.
-
Select a record in the table.
-
Select Actions > Edit or use the Edit icon. The Warehouse page appears.
-
Click the Virtual Warehouse button. The Virtual Warehouses page appears.
-
Select More Actions > Warehouse Department Parameters. The Warehouse Department Parameters page appears.
-
Then, select Actions > Add or use the Add icon. The Add Warehouse Department Parameter page appears.
-
In the Department field, enter, select or search for the department.
-
In the Storage Cost Measure field, select the cost measure from the list. The Storage Cost UOM field enables.
-
In the Storage Cost UOM field, enter, select or search for the unit of measure.
Note:
This field is disabled, if you select Eaches as a storage cost measure. -
In the Weekly Cost of Storage field, enter the weekly cost of storage value.
-
In the Outside Storage Cost Measure field, select an outside cost measure from the list. The Outside Storage Cost UOM field enables.
-
In the Outside Storage Cost UOM field, enter, select or search for the unit of measure.
-
In the Weekly Cost of Outside Storage field, enter the weekly cost of outside storage value.
-
In the Storage Type field, select the type from the list. This field is a required field.
-
In the Maximum Weeks of Supply field, enter the number of weeks. This field is a required field.
-
In the Target ROI field, enter the target ROI (Return of Investment). This field is a required field.
-
In the Cost of Money field, enter the cost.
-
Then choose one of the following options.
-
Click OK to save the current parameter and close the page.
-
Click OK and Add Another to save the current parameter and add additional entries.
-
Click Default to save the current parameter and set it as the default value.
-
Click Cancel to reject all entries and close the page.
-
-
Editing Warehouse Department Parameters
To edit warehouse department parameters, follow the steps below.
-
From the Tasks menu select Foundation Data > Location Foundation > Organizational Hierarchy. The Organizational Hierarchy page appears.
-
Select the Warehouse button. The available warehouses are displayed in the table.
-
Select a record in the table.
-
Select Actions > Edit or use the Edit icon. The Warehouse page appears.
-
Click the Virtual Warehouses button. The Virtual Warehouses page appears.
-
Select More Actions > Warehouse Department Parameters. The Warehouse Department Parameters page appears.
-
Select a record in the table.
-
Select Actions > Edit or use the Edit icon. The Edit Warehouse Department Parameter page appears. The parameters of the selected record are shown.
-
Edit the values, if necessary.
-
Then choose one of the following options.
-
Click OK to save your changes and close the page.
-
Click Default to save the current parameter and set it as default value.
-
Click Cancel to reject all entries and close the page.
-
-
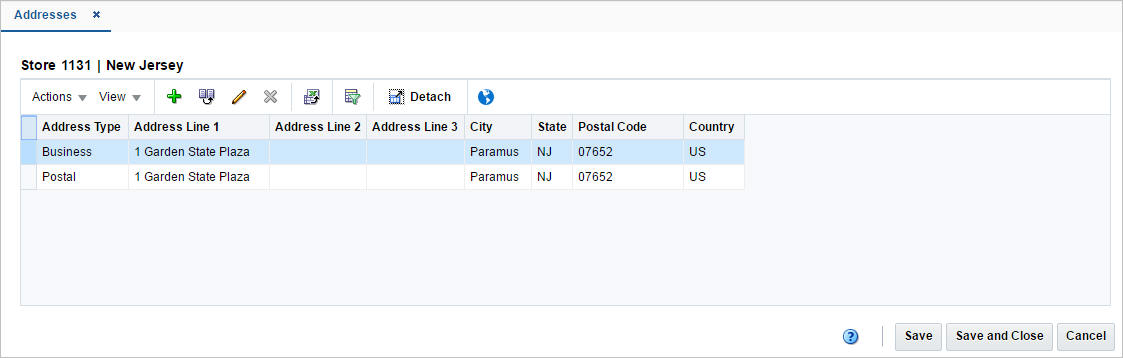
Manage Location Addresses
The Addresses page allows you to add, add from existing, edit, delete or view multiple addresses and contact information for either stores, warehouses, suppliers, or partners. You can set up multiple addresses per address type. Each location or vendor that is added requires that a mandatory address is added. Once you have entered a mandatory address, you cannot delete it. However, you can edit the mandatory address to maintain the correct address.
Maintaining Addresses
To maintain addresses, follow the steps below.
Maintaining Addresses for a Store
To maintain an address for a store:
-
From the Tasks menu, select Foundation Data > Location Foundation > Organizational Hierarchy. The Organizational Hierarchy page appears.
-
Select the Store button. The available stores are displayed in the table.
-
In the Store column, click the store ID link, or mark a record and select Actions > Edit, or use the Edit icon. The Store page appears.
-
Then select More Actions > Address. The Addresses page appears.
Maintaining Addresses for a Warehouse
To maintain an address for a warehouse:
-
From the Tasks menu, select Foundation Data > Location Foundation > Organizational Hierarchy. The Organizational Hierarchy page appears.
-
Select the Warehouse button. The available stores are displayed in the table.
-
In the Warehouse column, click the store ID link, or mark a record and select Actions > Edit, or use the Edit icon. The Warehouse page appears.
-
Then select More Actions > Address. The Addresses page appears.
Maintaining an Address for a Supplier
To maintain an address for a supplier:
-
From the Tasks menu, select Foundation Data > Suppliers and Partner Foundation > Manage Suppliers. The Supplier Search page appears.
-
Enter or select search criteria as desired to make the search more restrictive.
-
Click Search. The suppliers that match the search criteria are displayed in the Results section.
-
In the Supplier/Supplier Site column, click the supplier/supplier site ID link, or mark a record and select Actions > Edit, or use the Edit icon. The Supplier/Supplier Site page appears.
-
Select More Actions > Address. The Addresses page appears.
Maintaining an Address for a Partner
To maintain an address for a partner:
-
From the Tasks menu, select Foundation Data > Suppliers and Partner Foundation > Manage Partners. The Partner Search page appears.
-
Enter or select search criteria as desired to make the search more restrictive.
-
Click Search. The partners that match the search criteria are displayed in the Results section.
-
In the Partner Site column, click the partner ID link, or mark a record and select Actions > Edit, or use the Edit icon. The Partner page appears.
-
Select More Actions > Address. The Addresses page appears.
Adding an Address
To add an address in the Addresses page:
-
In the table, select Actions > Add or use the Add icon. The Add Address page appears.
-
In the Address Type field, select the corresponding type.
-
The Apply to all Undefined Required Types checkbox, indicates that the current address information is added to each required address type. This checkbox is selected by default.
-
In the Address information section, enter the following details.
-
In the Address field, enter the full address. This field is a required field.
-
In the City field, enter the city in which the store is located. This field is a required field.
-
In the State field, select a state from the list.
-
In the Postal Code field, enter the postal code of the store.
-
In the Country field, enter, select or search for the country. This field is a required field.
-
Select the Primary Address checkbox to indicate that the current address is a primary address.
-
-
In the Contact information section, you can enter the following details.
-
In the Name field, enter the name of the contact person associated to the store.
-
In the Phone field, enter the phone number of the contact.
-
In the Fax field, enter the fax number.
-
In the Pager field, enter the pager number.
-
In the Email field, enter the email address.
-
-
Then choose one of the following options.
-
Click OK to save the current address and close the page.
-
Click OK and Add Another to save the current address and add additional entries.
-
Click Cancel to reject all entries and close the page.
-
Adding an Address from Existing
To add a new address from an existing address, follow the steps below.
-
In the Address page, select a record in the table.
-
Select Actions > Add from Existing or use the Add from Existing icon. The Add Address page appears.
-
In the Address Type field, select the corresponding type.
-
The address and contact fields enable and display the data of the selected address. Change the entries as necessary.
Note:
The Primary Address field is disabled. -
Then choose one of the following options.
-
Click OK to save the current address and close the page.
-
Click OK and Add Another to save the current address and add additional entries.
-
Click Cancel to reject all entries and close the page.
-
Editing an Address
To edit an address, follow the steps below.
-
In the Addresses page, select a record in the table.
-
Select Actions > Edit or use the Edit icon. The Edit Address page appears.
-
In the Address Type field shows the type of the selected address. You cannot edit this field.
-
The address and contact fields display the data of the selected address. Change the entries as necessary.
Note:
The Primary Address field is disabled. -
Then choose one of the following options.
-
Click OK to save the your changes and close the page.
-
Click Cancel to reject all entries and close the page.
-
Manage Location Lists
The Manage Location Lists option opens the Location List Search page. In the Location List Search page you can perform the following actions.
-
Search for a location list by various search criteria
-
View the entered search results
-
View a location list
-
Create a location list
-
Create a location list from an already existing location list
-
Edit a location list
You can access the Location List Search page from the Task menu, select Foundation Data > Location Foundation > Manage Location Lists. The Location List Search page appears.
Searching for a Location List
To search for a location list:
-
From the Task menu, select Foundation Data > Location Foundation > Manage Location Lists. The Location List Search page appears.
-
You can search for a location list by using basic or advanced search criteria, depending on the requirement. The basic mode is the default search mode.
-
Click Advanced to access the search section in advanced mode.
-
Click Basic to return to basic mode.
-
Searching for a Location List Through the Basic Search Criteria
To search for a location list by using basic search criteria:
-
Enter, select or search for one or all of the following basic search criteria.
Table 1-4 Location List Search - Basic Search Criteria and Description
Fields Description Match option
Check radio button All or Any.
All - only location lists matching all entered search criteria are shown.
Any - location lists matching any of the entered search criteria are shown.
Location List
Enter the location list ID.
Description
Enter a location list description.
Type
Select the location list type, Static or Dynamic, from the list.
Created Date
Enter the create date of the location list or use the Calendar icon to select a date.
Store
Enter, select or search for the store ID.
Store Name
Enter the store name.
Warehouse
Enter, select or search for the Warehouse ID.
Warehouse Name
Enter the name of warehouse.
-
Click the Saved Search list to select one of the saved search criteria. Selecting a saved search populates the search section with the saved search criteria. If the run automatically function is enabled for the search, the search is executed immediately.
You can also personalize your saved searches by selecting Personalize. The Personalized Saved Searches page appears.
For more information about the Personalized Saved Search, see Personalize Saved Search in the Oracle® Retail Merchandising Foundation Cloud Service Do the Basics User Guide.
-
Click Search. The location lists that match the search criteria are displayed in the Results section.
-
Click Reset to clear the search section and results.
-
Click Save As... to save the current search criteria. The Create Saved Search page appears.
For more information about how to save your search criteria, see Create Saved Search in the Oracle® Retail Merchandising Foundation Cloud Service Do the Basics User Guide.
-
Click Done to close the page.
Searching for a Location List Through Advanced Search Criteria
To search for a location list by using advanced search criteria:
-
To search by using advanced search criteria, enter or select one or all of the advanced search criteria.
-
To narrow down the search, use the list next to the search fields. For example, determine if the entered value should be equal or not equal to the search result.
-
Click the Saved Search list to select one of the saved search criteria. Selecting a saved search populates the search section with the saved search criteria. If the run automatically function is enabled for the search, the search is executed immediately.
You can also personalize your saved searches by selecting Personalize. The Personalized Saved Searches page appears.
For more information about the Personalized Saved Search, see Personalize Saved Search in the Oracle® Retail Merchandising Foundation Cloud Service Do the Basics User Guide.
-
Click Search. The location lists that match the search criteria are displayed in the Results section.
-
Click Reset to clear the search section and results.
-
Click Save As... to save the current search criteria. The Create Saved Search page appears.
For more information about how to save your search criteria, see Create Saved Search in the Oracle® Retail Merchandising Foundation Cloud Service Do the Basics User Guide.
-
Click Add Fields to add more fields for the advanced search. To remove the field from the search, click the x right next to the field.
-
Click Reorder to change the order of the available search fields. The Reorder Search Fields page appears.
-
Select the desired search field and use the up and down arrows to rearrange the order of the fields.
-
Click OK to confirm the new order of the fields and close the page.
-
Click Cancel to reject any changes and close the page.
-
-
Click Done to close the page.
Results
The Results section lists the retrieved location lists. The Results table shows the following columns by default.
-
Location List
-
Description
-
Type
-
Created and Last Rebuild Date
-
Total Locations
Creating Location Lists from Existing
To create a location list from an existing location list, follow the steps below.
-
From the Tasks menu, select Foundation Data > Location Foundation > Manage Location Lists. The Manage Location List page appears.
-
Enter or select search criteria as desired to make the search more restrictive.
-
Click Search. The items that match the search criteria are displayed in the Results section.
-
Select a record in the Results section.
-
Then select Actions > Create from Existing, or use the Create from Existing icon. The Location List page appears. The data of the existing location list is displayed.
-
Change the fields, if necessary.
For more information about the available fields in the Location List page, see the Location List Page section.
-
Then choose one of the following options.
-
Click Save to save the new location list.
-
Click Save and Close to save the new location list and close the page.
-
Click Cancel to reject all entries and close the page.
-
Editing Location Lists
To edit a location list, follow the steps below.
-
From the Tasks menu, select Foundation Data > Location Foundation > Manage Location Lists. The Manage Location List page appears.
-
Enter or select search criteria as desired to make the search more restrictive.
-
Click Search. The items that match the search criteria are displayed in the Results section.
-
Select a record in the Results section.
-
Then select Actions > Edit, or use the Edit icon. The Location List page appears. The data of the selected location list is displayed.
-
Change the fields, if necessary.
For more information about the available fields in the Location List page, see the Location List Page section.
-
Then choose one of the following options.
-
Click Save to save your changes.
-
Click Save and Close to save your changes and close the page.
-
Click Cancel to reject all entries and close the page.
-
Creating Location Lists
To create a location list, follow the steps below.
You can enter the Create Location List page in different ways.
-
From the Tasks menu, select Foundation Data > Location Foundation > Create Location List. The Create Location List page appears.
-
From the Tasks menu, select Foundation Data > Location Foundation > Manage Location Lists. Search for location lists. Then select Actions > Create or use the Create icon. The Create Location List page appears.
-
Enter the data, as necessary.
For more information about the available fields in the Location List page, see the Location List Page section.
Location List Page
The Location List page allows you to create, edit, or view basic information about a location list. You can indicate whether the location list is static or dynamic. Dynamic lists can be rebuilt on demand. You can indicate whether a dynamic location list can also be rebuilt by a scheduled batch program. The ID of the user who created the location list and the date on which it was created appear. You can also view the number of locations that make up the location list.
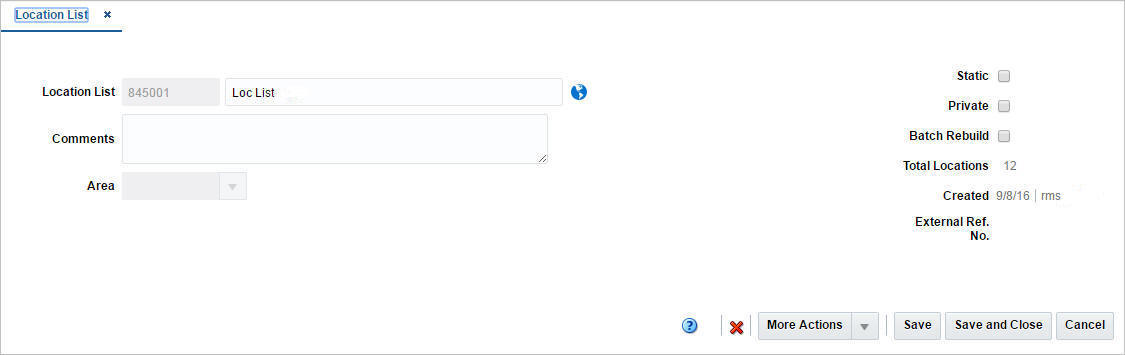
The Location List page contains the following fields.
Table 1-5 Location List - Fields and Description
| Fields | Description |
|---|---|
|
Location List |
Displays the location list ID and description of the selected list. |
|
Comments |
Add comments to the selected location list. |
|
Hierarchy Level: |
|
|
The name of this field depends on the hierarchy level the location list is associated to. |
|
|
Chain |
Enter, select or search for the chain. |
|
Area |
Enter, select or search for the area. |
|
Region |
Enter, select or search for the region. |
|
District |
Enter, select or search for the district. |
|
Store |
Enter, select or search for the store. |
|
Warehouse |
Enter, select or search for the warehouse. |
|
Static checkbox |
If selected, the location list is static. You can not add additional locations to the list. If not selected, the location list is dynamic. |
|
Private checkbox |
This checkbox Select the checkbox to indicate that the security for a location list is on. |
|
Batch Rebuild checkbox |
If selected, the dynamic location list is rebuilt automatically by a scheduled batch program based on the original criteria. |
|
Total Locations |
Displays the total number of locations on the selected location list. |
|
Created |
Displays the date, when list has been created, and the user, who created the list. |
|
External Ref. No |
Displays a reference number, if available. |
Location List Detail Page
The Location List Detail page allows you to add, delete, and view the locations that make up a location list.
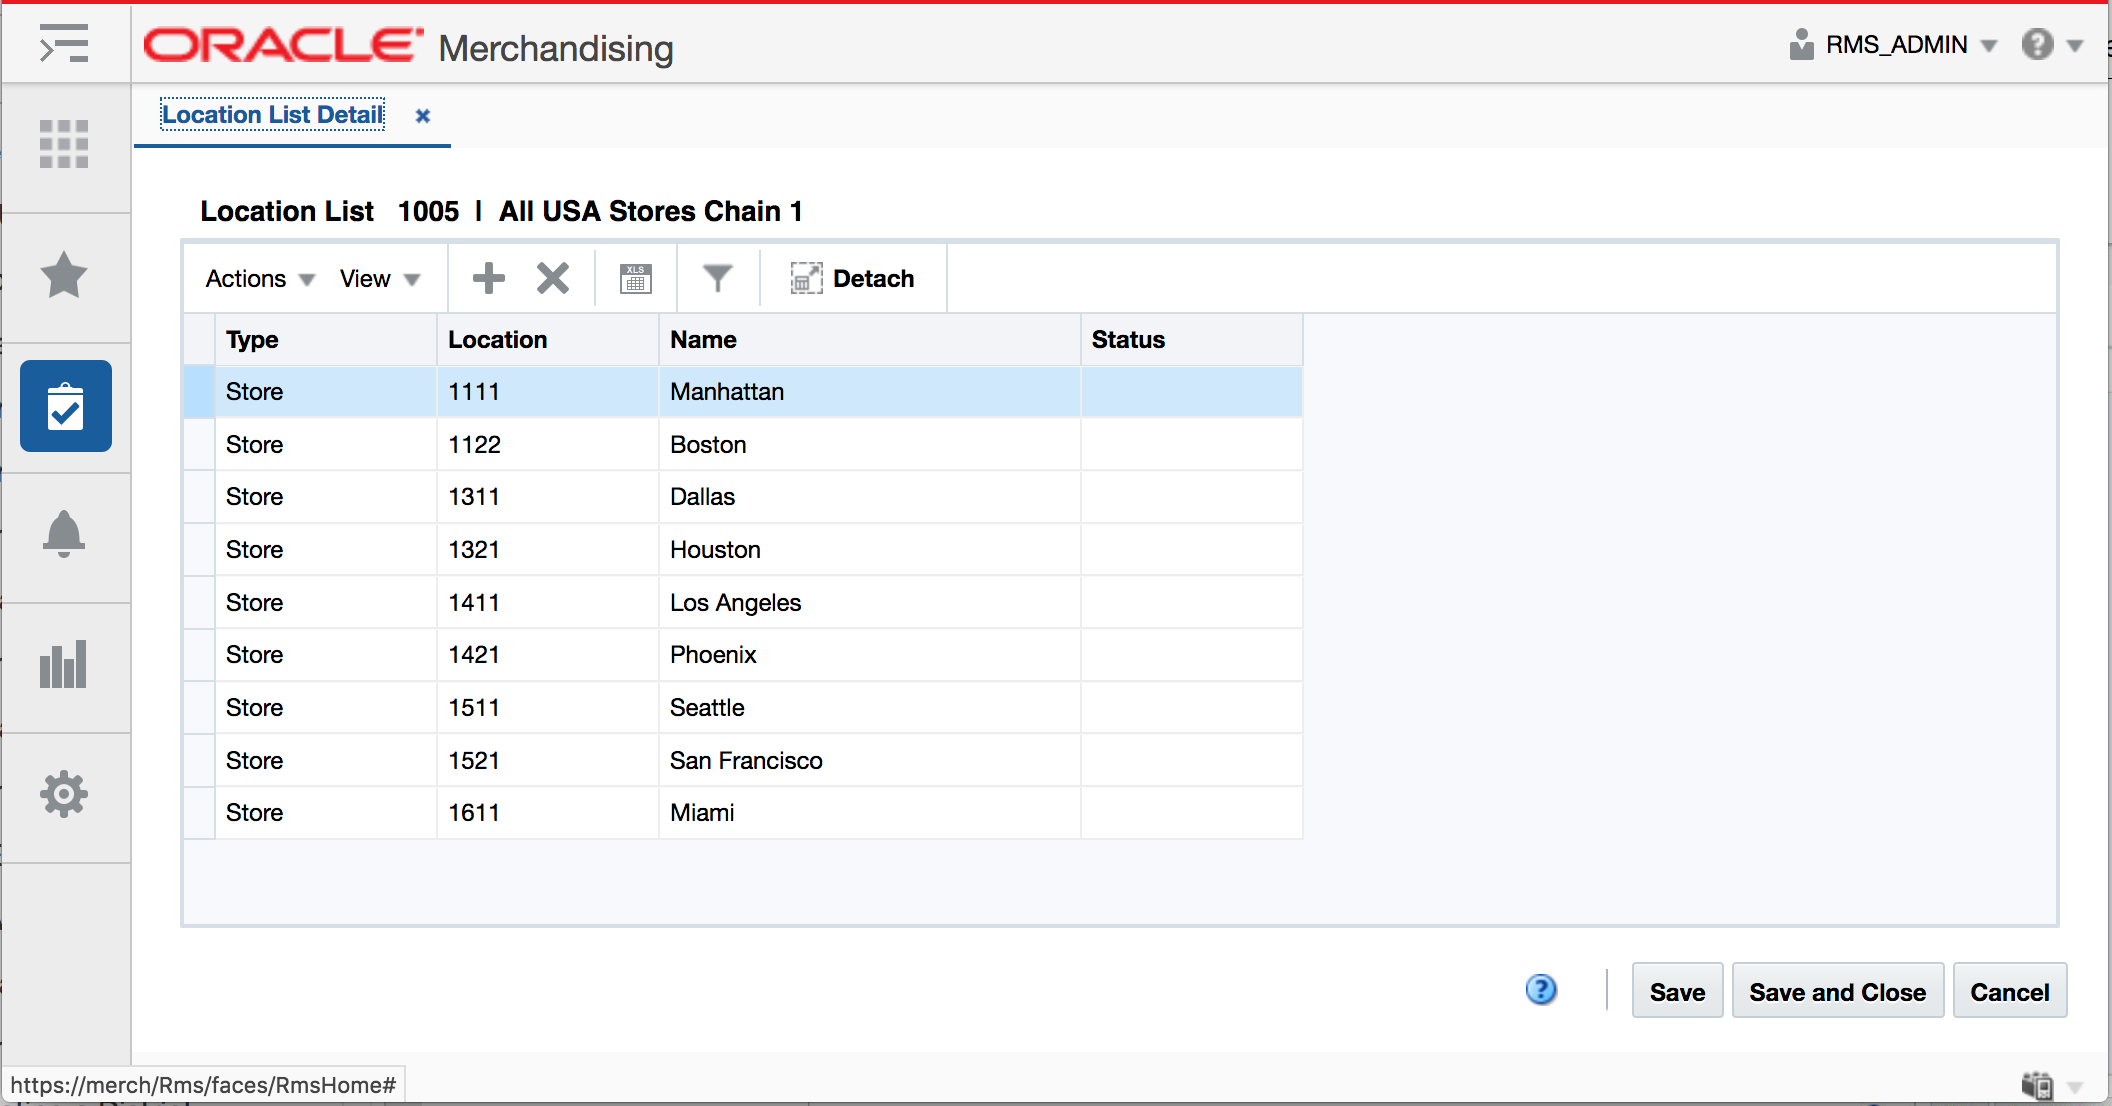
The table displays all the locations making up the location list. The location type, location ID, name and status are displayed by default.
Adding Locations to Location Lists
To add a location to the selected location list, follow the steps below.
-
From the Tasks menu, select Foundation Data > Location Foundation > Manage Location Lists. The Manage Location List page appears.
-
Enter or select search criteria as desired to make the search more restrictive.
-
Click Search. The items that match the search criteria are displayed in the Results section.
-
Select a record in the Results section.
-
Then select Actions > Edit, or use the Edit icon. The Location List page appears.
-
Select More Actions > Locations. The Location List Detail page appears.
-
Then select Actions > Add or use the Add icon. The Add Location page appears.
-
In the Type field, enter the location type. For example, select Warehouse.
-
In the Location field, enter, select or search for the location ID.
-
Then select one of the following options.
-
Click OK to add the new location and close the page.
-
Click OK and Add Another to add additional entries.
-
Click Cancel to reject all entries and close the page.
-
-
Location List Criteria Page
The Location List Criteria page allows you to add, edit, delete and view the criteria by which locations are grouped on a location list. The criteria that you enter become the conditions of a Where clause in a SQL statement. You can test the criteria and view the SQL statement before they are applied to the location list.
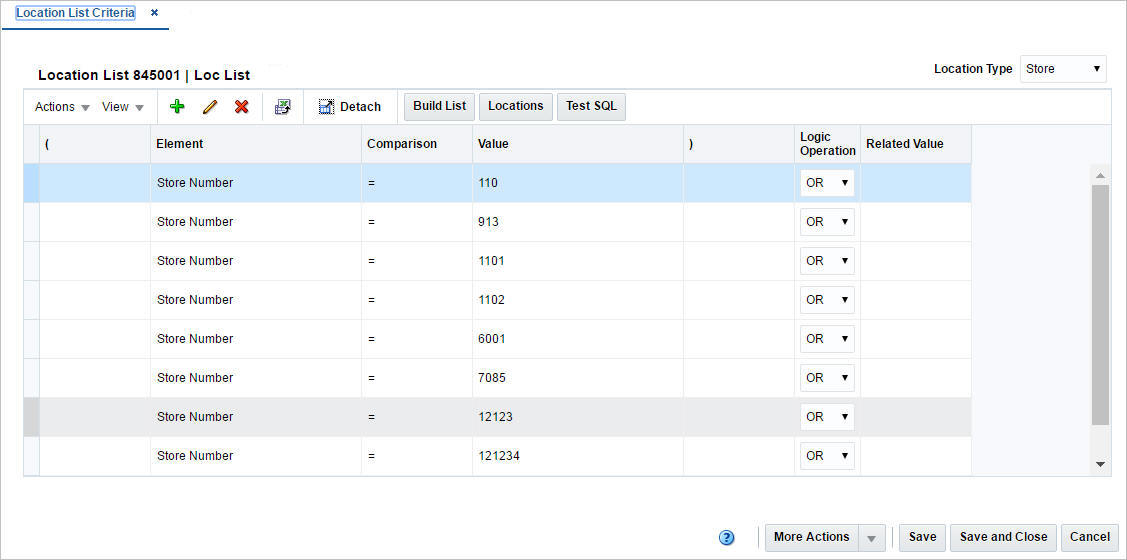
The table lists the elements and values of the criteria.
Maintaining Location List Criteria
To maintain location list criteria, follow the steps below.
-
From the Tasks menu, select Foundation Data > Location Foundation > Manage Location Lists. The Manage Location List page appears.
-
Enter or select search criteria as desired to make the search more restrictive.
-
Click Search. The items that match the search criteria are displayed in the Results section.
-
Select a record in the Results section.
-
Then click the location list link, or select Actions > Edit, or the Edit icon. The Location List page appears.
-
Select More Actions > Criteria. The Location List Criteria page appears.
-
Update the location list criteria, as necessary.
To add location list criteria, follow the steps below.
-
Go to the Location Type field, in the top right corner of the page. Select a location type.
-
Then select Actions > Add or use the Add icon. The Add Criteria page appears.
-
In the Element field, select an element from the list.
Note:
If the Element is Cost Zone or Store Grade, you can specify which group (cost zone group or store grade group) the zone or grade is a member of. -
In the Comparison field, select a sign from the list.
-
In the Value field, enter a value.
-
In the Logic Operation field, select an option from the list.
-
In the Related Value field, enter, select or search for the value.
-
Then choose one of the following options.
-
Click OK to add your entries and close the Add Criteria page.
-
Click OK and Add Another to add additional entries.
-
Click Cancel to reject all entries and close the Add Criteria page.
-
-
-
Click the Test SQL button to test, if the entered criteria is valid.
Note:
If the location list criteria is not valid, a message is displayed. -
Click Build List to rebuild the location list.
-
Then choose one of the following options.
-
Click Save to save your entries.
-
Click Save and Close to save your entries and close the page.
-
Click Cancel to reject all entries and close the page.
-
Editing Location List Criteria
To edit location list criteria, follow the steps below.
-
Select a record in the table.
-
Then select Actions > Edit or use the Edit icon. The Edit Criteria page appears.
-
Edit the fields, as necessary.
-
Then choose one of the following options.
-
Click OK to save your changes and close the Edit Criteria page.
-
Click Cancel to reject all entries and close the Edit Criteria page.
-
-
-
Click the Test SQL button to test, if the entered criteria is valid.
Note:
If the location list criteria is not valid, a message is displayed. -
Click Build List to rebuild the location list.
-
Then choose one of the following options.
-
Click Save to save your changes.
-
Click Save and Close to save your changes and close the page.
-
Click Cancel to reject all entries and close the page.
-
Rebuild Location Lists
To rebuild a location list, follow the steps below.
-
From the Tasks menu, select Foundation Data > Location Foundation > Manage Location Lists. The Manage Location List page appears.
-
Enter or select search criteria as desired to make the search more restrictive.
-
Click Search. The items that match the search criteria are displayed in the Results section.
-
Select a record in the Results section.
-
Then select Actions > Edit, or use the Edit icon. The Location List page appears.
-
Select More Actions > Location List Rebuild. The Location List Rebuild page appears. The location list details are displayed.
-
Select the Rebuild Location List checkbox, to rebuild the current list.
-
Then choose one of the following options.
-
Click Execute and Close to rebuild the selected location list and close the page.
-
Click Cancel to reject all entries and close the page.
-
Use Location Lists
Changing Cost Zones
The Change Cost Zones page allows you to change the cost zone for all stores and warehouses on a location list.
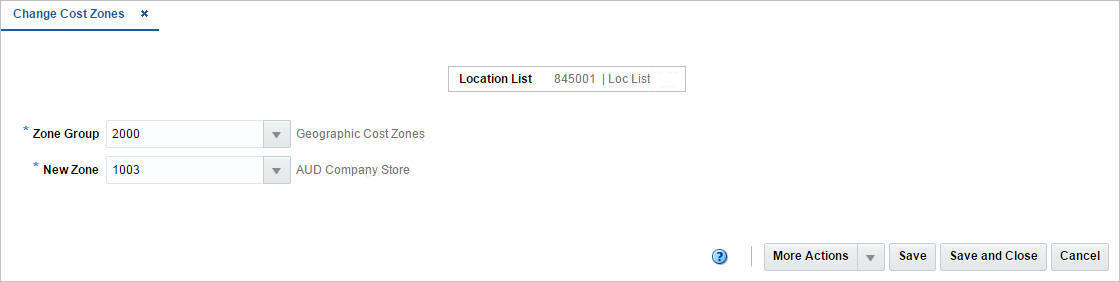
The Changing Cost Zones page contains the following fields.
Table 1-6 Cost Zones - Fields and Description
| Fields | Description |
|---|---|
|
Location List |
This field displays the location list number and description. |
|
Zone Group |
Enter, select or search for the current zone group. This field is a required field. |
|
New Zone |
Enter, select or search for the new cost zone. This field is a required field. |
To update the cost zone for all stores and warehouses on a location list, follow the steps listed below.
-
From the Tasks menu, select Foundation Data > Location Foundation > Manage Location Lists. The Location List Search page appears.
-
Enter or select search criteria as desired to make the search more restrictive.
-
Click Search. The location lists that match the search criteria are displayed in the Results section.
-
Select a record in the Results table.
-
Then select Actions > Mass Update > Create Cost Zone Change. The Change Cost Zones page appears.
-
In the Zone Group field, enter, select or search for the group.
-
In the New Zone field, enter, select or search for the new cost zone.
-
Then choose one of the following options.
-
Click Save to save the new cost zone.
-
Click Save and Close to a save the new cost zone and close the page.
-
Click Cancel to reject all entries and close the page.
-
Changing Location Traits
In the Change Location Traits page you can update location traits for a specific location list.
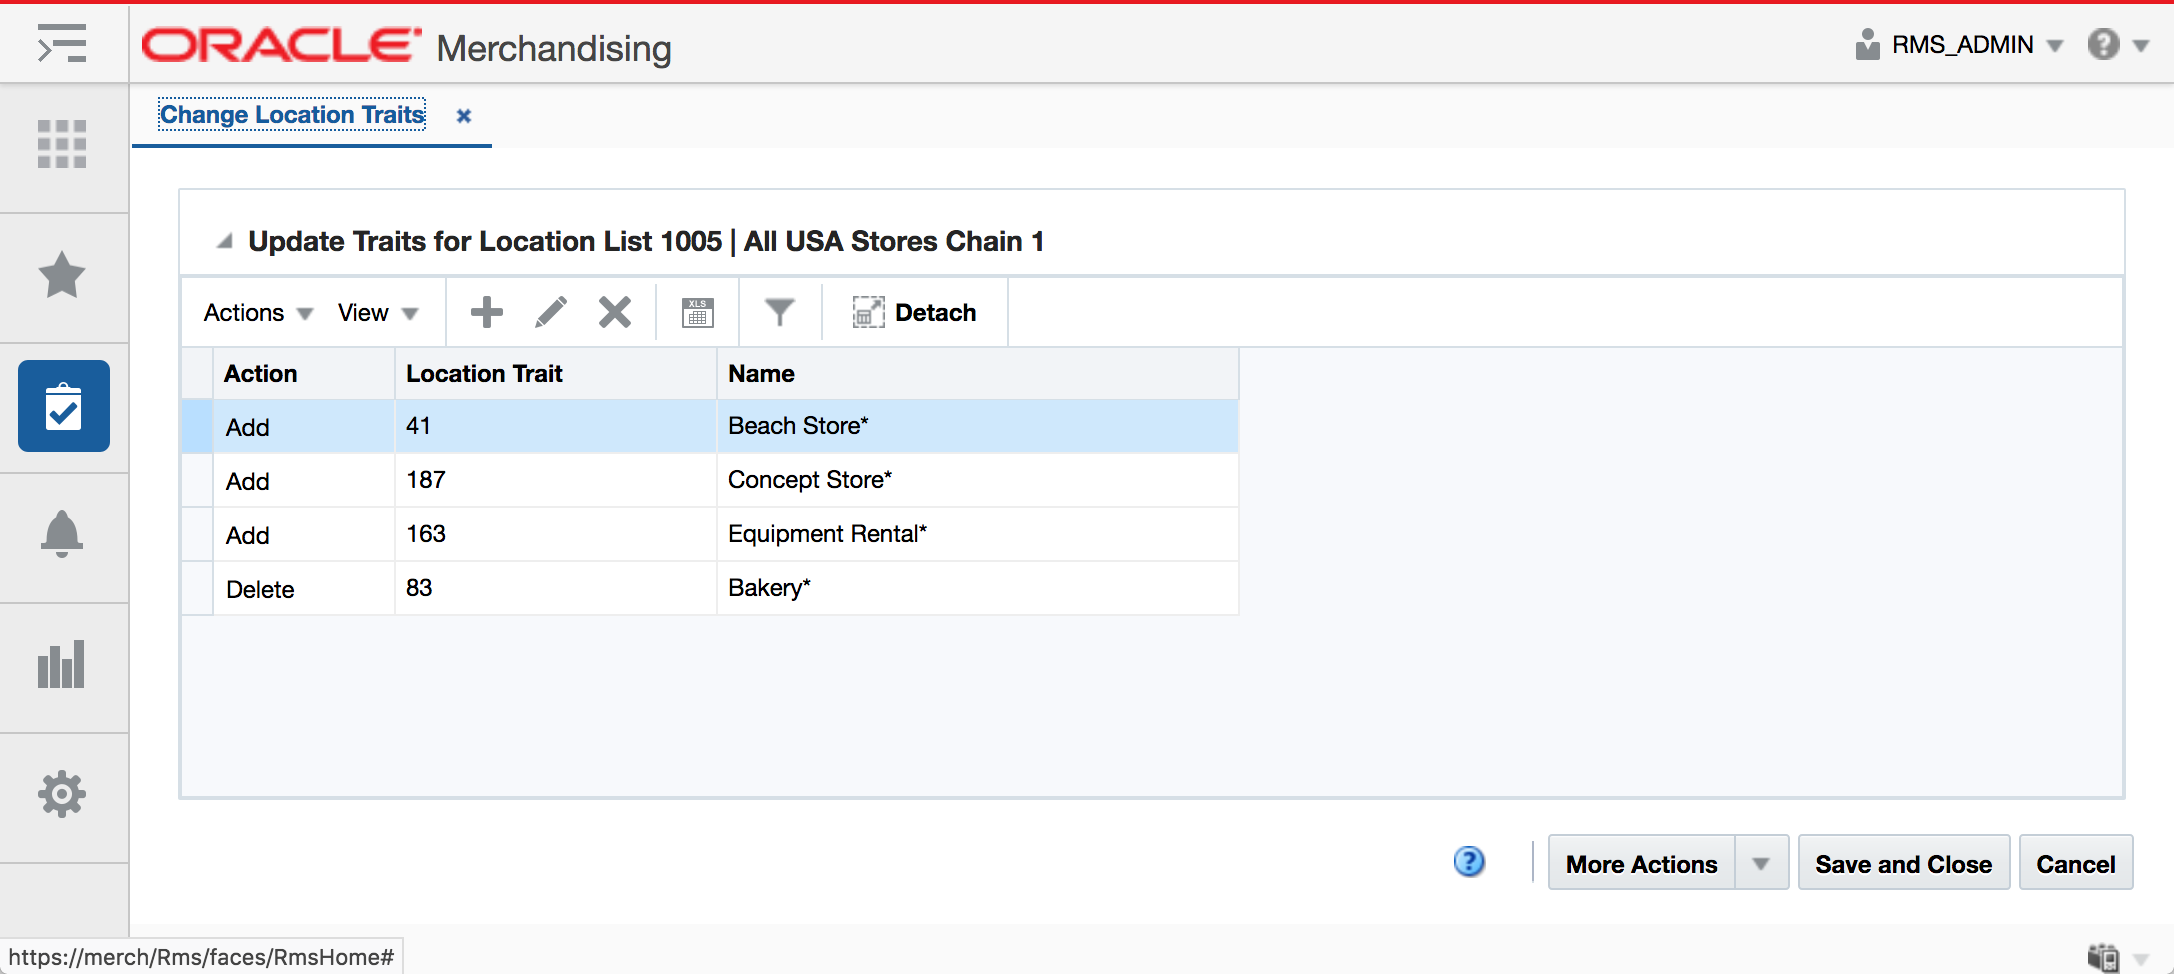
In the table add, edit or delete traits of the selected location list.
To update the location traits by location list, follow the steps listed below.
-
From the Tasks menu, select Foundation Data > Location Foundation > Manage Location Lists. The Location List Search page appears.
-
Enter or select search criteria as desired to make the search more restrictive.
-
Click Search. The location lists that match the search criteria are displayed in the Results section.
-
Select a record in the Results table.
-
Then select Actions > Mass Update > Change Location Traits. The Change Location Traits page appears.
-
Update the traits for the selected location list.
To add a location trait, follow the steps below.
-
In the Change Location Traits page, select Actions > Edit or use the Edit icon. The Edit Location Trait page appears.
-
In the Action field, select if you want to Add or Delete the location trait. This field is a required field.
Note:
You can also delete a location trait by selecting the Delete icon in the table. -
In the Location Trait field, enter, select or search for the location trait. This field is a required field.
-
Then choose one of the following options.
-
Click OK to add the trait and close the page.
-
Click OK and Add Another to add the current trait and add additional entries.
-
Click Cancel to reject all entries and close the page.
-
To edit a location trait, follow the steps below.
-
In the Change Location Traits page, select Actions > Edit or use the Edit icon. The Edit Location Trait page appears.
-
In the Action field, change the action, if necessary.
-
In the Location Trait field, enter select or search for another location trait, if necessary.
-
Then choose one of the following options.
-
Click OK to edit the current trait and close the page.
-
Click OK and Add Another to add the current trait and add additional entries.
-
Click Cancel to reject all entries and close the page.
-
Manage Cost Zones
The Cost Zones page allows you to create, maintain, and view the cost zones for a selected cost zone group. You can categorize stores into zones based on a costing strategy. For each cost zone group, one cost zone is set as the base cost zone. The base cost zone indicates that the price for the item is based on the price of the item in the zone. When a new cost zone group is created, all locations must be added to the group. The locations can exist individually within a group or locations can be grouped into cost zones.
Cost Zone Groups
The Cost Zone Groups section allows you to add, delete, or view cost zone groups. A cost zone group is a grouping mechanism that allows you to categorize stores into zones based on a costing strategy. This grouping mechanism is available only when you are tracking Estimate Landed Costs (ELC).
The table displays the zone group, cost level and description by default.
-
Description
You can edit the Description column directly in the table.
Cost Zones
The Cost Zones section allows you to add, delete, and view the cost zones for a selected cost zone group.
The table displays the zone ID, description, locations, currency and base cost checkbox by default.
-
Description
You can edit the Description column directly in the table.
-
Base Cost
Select the Base Cost checkbox, to indicate that the price for the item is based on the price of the item in the zone.
Cost Zone Locations
The Cost Zone Locations section allows you to add, edit, delete, or view locations in the cost zone. In edit mode, you may add locations to a cost zone or move locations to a different cost zone.
Locations cannot be edited for any cost zone group at the location level because the location is a cost zone group.
The table displays the location type, ID and location name as well as the primary discharge port and port description by default.
-
Primary Discharge Port
You can edit the primary discharge port for a location directly in the table.
Maintaining Cost Zones
To maintain Cost Zones, follow the steps below.
-
From the Tasks menu, select Foundation Data > Location Foundation > Cost Zones. The Cost Zones page appears.
-
Update the cost zones, as necessary.
Adding Cost Zone Groups
To add cost zone groups, follow the steps listed below.
-
Open the Cost Zones Group section.
-
Then select Actions > Add or use the Add icon. The Add Cost Zone Groups page appears.
-
In the Zone Group field, enter a unique zone group ID. This field is a required field.
-
In the Description field, enter a unique description for the zone group.
-
In the Cost Level field, select the cost level from the list.
-
In the Like Group field, enter, select or search for a group to copy the zones and locations of the selected group to the new group.
-
Then select one of the following options.
-
Click OK to add the new cost zone group and close the page.
-
Click OK and Add Another to add additional cost zone groups.
-
Click Cancel to reject all entries and close the page.
-
-
Adding Cost Zones
To add a new cost zone to a cost zone group, follow the steps below.
-
In the Cost Zones page, select a record in the Cost Zone Groups section.
-
All the available cost zones for the selected cost zone group are displayed in the Cost Zones section.
-
In the Cost Zones section, select Actions > Add or use the Add icon. The Add Cost Zone page appears.
-
In the Zone field, enter a unique Zone ID.
-
In the Description field, enter a unique zone description.
-
In the Currency field, enter, select or search for the currency ID.
-
Then choose one of the following options.
-
Click OK to add the new cost zone and close the page.
-
Click OK and Add Another to add additional cost zones.
-
Click Cancel to reject all entries and close the page.
-
-
Note:
If the cost level of the new cost zone group is Location, a cost zone for each location is created automatically.You have to add all locations for a new cost zone group. If any location is missing from the group, you will receive a message listing all missing locations when you save your changes in the Cost Zones page.
Adding Cost Zone Locations
To add cost zone locations to a cost zone, follow the steps listed below.
-
In the Cost Zones page, select a record in the Cost Zones section.
-
The available locations for the selected cost zone are displayed in the Cost Zone Locations table.
-
In the Cost Zone Locations table, select Actions > Add or use the Add icon. The Add Cost Zone Locations page appears.
-
In the Location field, select the location type from the list. The field next to the location type enables. Enter, select or search for the location ID.
-
In the Discharge Port field, select, enter or search for the port.
-
Then choose one of the following options.
-
Click OK to add the location and close the page.
-
Click OK and Add Another to add additional locations.
-
Click Cancel to reject all entries and close the page.
-
-
Editing Cost Zone Locations
To edit a cost zone location, follow the steps listed below.
-
In the Cost Zones page, select the record you want to edit in the Cost Zone Locations table.
-
Then select Actions > Edit or use the Edit icon. The Edit Cost Zone Location page appears.
-
The warehouse/store ID and description of the selected record are displayed.
-
In the New Zone field, enter, select or search for a new zone, if you want to move the current location to another zone.
-
In the Discharge Port field, enter, select or search for another port.
-
Then choose one of the following options.
-
Click OK to save your changes and close the page.
-
Click Cancel to reject all entries and close the page.
-
-
Other Location Foundation Data
In addition to the organization hierarchy, location lists and cost zone there are few other foundational data components related to locations that can be set up in Merchandising. These are mostly used for classification of locations to into various groups for operation efficiency.
-
Banners and Channels – Channels in retail are basically different touch points from where the sales happen to customers. Examples include brick and mortar, kiosk, and web store. Banners are groupings of channels that can be used to distinguish one line of business from another.
-
Cost Components – Cost components are various types of costs that can be used to build total landed cost of an item in international trade. They can also be used to define upcharges that are applied when items are transferred between locations or used for building up franchise costing.
-
Location Traits – Location traits are user defined classification characteristics that can be associated with a store.
-
Outside Locations – Used in international trade processing, which requires the definition of locations that are outside retailer's business but required for business process, such as lading and discharge ports, clearing zones, and bill-to locations.
-
Store Formats – Store formats are another optional way of classifying and grouping stores based on common characteristics.
-
Store Grades – Store grades are used for store clustering. Each store grade can be associated with a buyer and used to support distributing items on purchase orders, reporting, or mass maintenance.
-
Transfer Zones – Transfer zones are used to group stores to restrict transfers of merchandise only within a zone to optimize transportation costs.
Banners and Channels
Channels are a method of grouping like locations based on business they serve. Examples include Brick and Mortar, Kiosk, and Web Store. Channels can be added to a store or virtual warehouse as an attribute. Banners are groupings of channels that can be used to distinguish one line of business from another. Banners and Channels are maintained through the upload/download process. This functionality is accessed from the main Merchandising task list under Foundation Data > Download Foundation Data and Foundation Data > Upload Foundation Data.
To add, update, or remove banners or channels, select the template type of Foundation from the Download Data screen and then the template Banners and Channels. Click the Download button and when prompted, choose to either open the .ods file that is generated or save the file and open it separately in the spreadsheet application of your choice.
To add a banner, select the action type of Create on an empty row of the Banners tab. Next, enter a unique number up to 4 digits in length for the Banner ID, and the description of the banner in the primary language (as defined in the Merchandising system options) of up to 120 characters. To add a channel, select the action type of Create on an empty row of the Channels tab. Next, enter a unique number up to 4 digits in length for the channel ID, along with the banner ID, channel type and a description for the channel in the primary language (as defined in the Merchandising system options) of up to 120 characters. The channel type can be selected from a dropdown which is maintained under code 'CHTY' in the Codes table. To modify the valid channel types, you can update the descriptions or add new values by accessing the Codes and Descriptions template (see ). Adding a banner translation or channel translation can be done in a similar manner on the Banner Translations tab or Channel Translations tab, respectively. This facilitates the ability to translate the banner description or channel description in multiple languages.
If you would like to update any details for banners and channels, a similar process will be followed as that described above for creating new. First, download the spreadsheet, and then navigate to the tab where you would like to make your updates.
The following columns can be updated in each tab:
-
Banner – Description
-
Banner Translations – Description
-
Channel – Banner, Channel Type, Description
-
Channel Translations – Description
In the tab where you are going to make your updates, select the action type of Update, and then correct the value in the spreadsheet.
If you wish to remove a banner, select the Delete action on the row of the banner you which to delete on the Banners tab. Removing a banner translation, a channel, or a channel translation can be done in a similar manner on their respective tabs. Deleting a channel is not allowed if it is still associated with a store or virtual warehouse. In addition, all channels associated with a banner must be deleted before the banner can be deleted.
For all actions defined above, once all the updates have been made to the data in the spreadsheet, save the file and close it. Then, return to the Merchandising screens and select Foundation Data > Upload Foundation Data from the main task list. In this screen, you'll again select the template type Foundation and the template Banners and Channels. This will generate a process description automatically, but this can be updated if desired. Lastly, select the Browse button and navigate to the directory where you saved the updated spreadsheet.
To review the status of the upload and check whether any errors occurred, select the Foundation Data > Review Status task from the main task list.
See also Download/Upload Data from Spreadsheets and View Data Loading Status.
Cost Components
Cost components are various types of costs that can be used to build total landed cost of an item in domestic and international trade. They can also be used to define upcharges that are applied when items are transferred between locations or used for building up franchise costing. Cost components are created, maintained or deleted in Merchandising through spreadsheet upload and download processes. Updates can be made to take effect immediately or can be scheduled to go into effect on a specific date. These processes are accessed through the main Merchandising tasks list under Foundation Data > Download Foundation Data and Foundation Data > Upload Foundation Data.
To add or update cost components, you will select the template type of Foundation from the Download Data screen and then the template Cost Components. Click the Download button and when prompted, choose to either open the .ods file that is generated or save the file and open it separately in the spreadsheet application of your choice. Once opened, there will be three sheets that can be modified - Cost Components, Cost Component Translations and Component Rate Updates.
To add a new cost component, start in the Cost Components tab, and, in a blank line in the template, select the action type of Create. Next enter a new Component ID (up to 10 characters) and Component Description in the primary language (as defined in the Merchandising system options) of up to 250 characters. Next, specify the Component Type which can be Assessment, Expense, or Up Charge.
Assessments
For assessments, if the charge is a fee or tax, specify the assessment type. Valid assessment types are fee types or tax types associated with one or more HTS definitions. Fee types and tax types can be found in the HTS Fees and HTS Taxes tabs of the HTS Definition template (which can be downloaded from the Import template type). Next, specify the Import Country for which the charge will be assessed. Next, if the assessment is calculated as a percentage of a calculated value, enter the Computation Value Base (CVB) that will be used as the basis for the calculation. Value based assessment components without a computation value base will be calculated as a percentage of the item's order cost. For more information on CVBs, see Computation Value Bases.
Next, specify the Calculation Basis. Calculation basis indicates whether the assessment is calculated on a per-unit (Specific) or ad valorem (Value) basis. Then, enter the Component Rate, which is the rate to be charged against the calculation base. Enter a percentage value if the calculation basis is Value, else a monetary amount if the calculation basis is Specific. Next, enter the Computation Level, which determines the calculation order, and the Display Order. If one or more assessments have same computation level then they will be calculated in the order they appear in the table. Next, specify the Always Default value and the Component Currency. Every assessment for a given import country must have the same currency. Assessments with Always Default set to Y will default to the item along with the duty related assessments when HTS codes are added. Then, enter the Component Per Count and Component Per Count UOM. Specification of per count and per count unit of measure is mandatory if calculation basis is Specific and must be left blank for calculation basis of Value.
Finally, select +, -, or N/A for the nomination flags. These flags indicate whether or not the value of the component should be added to or subtracted from the associated CVB. For more information on nomination flags, see Computation Value Bases. Any other columns not mentioned above are not relevant for assessments. For more details see the RTM Whitepaper.
Expenses
For expenses, enter a value of Country or Zone in the Expense Type column. Country expenses are those incurred when moving goods from the country of sourcing to the import country. Zone level expenses are those incurred when moving goods from the discharge port to the final destination. Next, if the expense is calculated as a percentage of a calculated value, enter the Computation Value Base (CVB) that will be used as the basis for the calculation. Value based expense components without a computation value base will be calculated as a percentage of the expense's order cost basis. For more information on CVBs, see Computation Value Bases.
Next, specify the Calculation Basis, which indicates whether the component is calculated on a per-unit (Specific) or ad valorem (Value) basis. Then, enter the Order Cost Basis, which indicates the basis the expense will be calculated against if there is no CVB attached; valid values are Supplier or Order. If the cost basis is supplier then when calculating the expense, the item's supplier cost will be used. If the cost basis is order, then the cost of the item on the order will be used to calculate the expense. Next, enter the Expense Category, if applicable. The valid values for expense category can be selected from a dropdown which is maintained under the code type EXPC. To modify the valid categories, you can update the descriptions or add new values by accessing the Codes and Descriptions template (see ).
Then, enter the Component Rate, which is the rate to be charged against the calculation base. Enter a percentage value if the calculation basis is Value, else a monetary amount if the calculation basis is Specific. Next, enter the Computation Level, which determines component calculation order. If one or more components have same computation level then they will be calculated in the order they appear in the table. Then, enter the Display Order of the component and a value for Always Default. Expenses with Always Default set to Y will default to the items along with the expense profile records if the always default component wasn't already added to the item/supplier/discharge port/zone or item/supplier/country/lading port/discharge port combination. Also, when a user manually adds a shipping route (discharge port/zone or lading port/discharge port) to an item/supplier or item/supplier/country, all expenses (of the matching expense type) with Always Default set to Y will default. Next, enter the Component Currency, Component Per Count, and Component Per Count UOM in which the component per count is specified. Specification of per count and per count unit of measure is mandatory if calculation basis is Specific and must be left blank for calculation basis of Value.
Finally, select +, -, or N/A for the nomination flags. These flags indicate whether or not the value of the component should be added to or subtracted from the associated CVB. For more information on nomination flags, see Computation Value Bases. Any other columns not mentioned above are not relevant for expenses. For more details see the RTM Whitepaper.
Up Charges
For up charges, enter the Up Charge Type and Up Charge Group. Valid values for up charge type are Expense or Profit. Expense up charges are charges incurred by the sending location when transferring goods to the receiving location, like Freight or Insurance. Profit up charges are used when the sending location is trying to become a profit center, for examples storage fees and processing fees. Up charge group is used for grouping up charges together. The valid up charge groups can be selected from a dropdown which is maintained under the code type UCHG. To modify the valid up charge groups, you can update the descriptions or add new values by accessing the Codes and Descriptions template (see ).
Next, specify the Calculation Basis, which indicates whether the up charge is calculated on a per-unit (Specific) or ad valorem (Value) basis. Then, enter the Component Rate, which is the rate to be charged against the calculation base. For value based up charges, the calculation base will be the item/from location weighted average cost on transfers or allocations. Enter a percentage value if the calculation basis is Value, else a monetary amount if the calculation basis is Specific. Next, enter the Display Order which determines the order in which the up charge will display in the Department and Item Up Charges screens. Finally, enter the Component Currency, Component Per Count, and Component Per Count UOM. Specification of per count and per count unit of measure is mandatory if calculation basis is Specific; and should be left blank for a calculation basis of Value. Any other columns not mentioned above are not relevant for up charges.
If you wish to add translations for the cost component description in languages other than the primary language, this can be done in the Cost Component Translations tab. Navigate to a blank row and select the action type of Create and the language in which the translated description will be entered. Then, enter the component ID for which the translation applies. Finally, enter the translated description. The translated description can also be up to 250 characters long. This is an optional step.
To add a component rate update for an existing cost component, start in the Component Rate Updates tab, and, in a blank line in the template, select the action type of Create. Next enter an existing component and type. Next, you may specify the expense type if component type is expense. Next, enter the new values for component rate, per count, per count UOM and component currency, as applicable. Next, enter the effective date from when the new values will be effective in the system. Finally, indicate if you want this rate update to impact existing entities or transactions. For assessments, you can update items and orders. For expenses, you can update items, orders, country profiles, supplier profiles, and partner profiles. For up charges, you can update items, departments, and transfers and allocations.
Update Cost Components or Component Rate Updates
If you would like to update any details for existing cost component or component rate update, a similar process will be followed as that described above for creating new component or component rate updates, respectively. First, download the spreadsheet, and then navigate to the tab where you would like to make your updates.
In the tab where you are going to make your updates, select the action type of Update, and then correct the value in the spreadsheet.
The following fields in each template can be edited:
-
Cost Components – Component Description, Assessment Type, Import Country, Up Charge Group, Computation Value Base, Calculation Basis, Order Cost Basis, Expense Category, Component Rate, Computation Level, Display Order, Always Default, Component Currency, Component Per Count, Component Per Count UOM, Nom Flag 1, In Duty, Nom Flag 3, In Exp, In ALC
-
Cost Component Translations – Component Description
-
Component Rate Updates – Component Rate, Per Count, Per Count UOM, Component Currency, Effective Date, New Effective Date, Item, Order, Country, Supplier, Partner, Dept, Trans and Alloc Ind
Deleting a Cost Component or Component Rate Update
If you wish to delete a cost component or component rate update, update the action column to select Delete in each of the tabs where it occurs.
For all actions defined above, once all the updates have been made to the data in the spreadsheet, save the file and close it. Then, return to the Merchandising screens and select Foundation Data > Upload Foundation Data from the main task list. In this screen, select the template type Foundation and the template Cost Components. This will generate a process description automatically, but this can be updated if desired. Lastly, select the Browse button and navigate to the directory where you saved the updated spreadsheet.
To review the status of the upload and check whether any errors occurred, select the Foundation Data > Review Status task from the main task list.
See also Download/Upload Data from Spreadsheets and View Data Loading Status.
Computation Value Bases
Landed cost is the total cost of an item received from a vendor inclusive of the supplier cost and all costs associated with moving the item from the supplier's warehouse or factory to the final destination (warehouse or store). Estimated Landed Cost (ELC) is the bottom-up cost estimate created by the buying organization and is composed of cost components from the supplier, trading partners, item, origin country, and banks which are brought together during purchase order creation to develop an estimate of costs associated with purchasing a particular item. Cost components are combinations of individual expenses, assessments and the calculations associated with that expense or assessment.
Computation Value Bases (CVBs) describe how expenses and assessments are combined to provide a base for the calculation of other expenses or assessments. There are two types of CVBs - those with predefined details and those with dynamically determined components.
CVBs can be created and deleted through spreadsheet download and upload processes. These processes are accessed through the main Merchandising task list under Foundation Data > Download Foundation Data and Foundation Data > Upload Foundation Data.
To add or delete CVBs, you will select the template type of Foundation from the Download Data screen and then the template Computation Value Bases (CVBs). Click the Download button and when prompted, choose to either open the .ods file that is generated or save the file and open it separately in the spreadsheet application of your choice. Once opened, there will be three sheets that can be modified - CVBs, CVB Translations, and CVB Details.
Note:
CVBs and CVB Details cannot be updated after creation, however additional details can be added to or deleted from an existing CVB definition. If you wish to make a change, you can delete a CVB detail and re-add it with the desired change. You can also delete and entire CVB if it is not already in use, and re-add it with the desired details.The value of CVBs with predefined details is determined by summing the values of the cost components that are added as details as part of the CVB definition.
For example, an expense, Agent Commission, is defined as 2% of the sum of the supplier's unit cost, freight, and insurance, less buyer's commission:
(.02 * (unit cost + freight + insurance - buyer's commission)).
-
Create four simple new expense components:
-
unit cost (UNCST = 100% with no CVB, when no CVB is used the expense is based on unit cost)
-
freight (FRGHT = 8% with no CVB)
-
insurance (INSUR = 2% with no CVB)
-
buyer's commission (BUYCOM = 1% with no CVB)
-
-
Define a CVB called Agent Commission Base (ACBASE). ACBASE will include all of the expenses that the agent's commission is based on.
Computation Value Base ACBASE is defined as:
-
Create a fifth new expense for Agent Commission called AGCOM with the computation value base ACBASE attached to it, and with a component rate of 2%.
-
The value of AGCOM for an item with a unit cost of 10.00 will then be calculated as follows:
ACBASE = UNCST + FRGHT + INSUR - BUYCOM
                 = 10.00 + .80 + .20 - .10
                 = 10.90

AGCOM = Component Rate * Computation Value Base (ACBASE)
                = 2% * 10.90
                        = .22
CVBs with Dynamically Determined Components
For CVBs with dynamically determined components, nomination flags are used to determine which cost components to include in the calculation. The value of this type of CVB is calculated by summing the values of all cost components with the nomination flag set in the same way that the flags are set on the CVB definition. There are five nomination flags; three of the flags are reserved for a specific purpose in the system. The other two flags are open for use in calculations as desired. The labels of all of the nomination flags can be changed by updating the code descriptions found under the Label code type (LABL) via the Codes and Descriptions spreadsheet download and upload processes, however it should be noted that changing the label for the system reserved flags will not change how they are used. For additional information, see the Oracle Retail Merchandising Cloud Services Implementation Guide.
-
Nom Flag 1 – This is an open flag that can be used as desired. Label code NOMF1.
-
In Duty – This flag is used to include assessment components in the calculation of Total Duty. Label code NOMF2.
-
Nom Flag 3 – This is an open flag that can be used as desired. Label code NOMF3.
-
In Exp – This flag is used to include expense components in the calculation of Total Expenses. Label code NOMF4.
-
In ALC – This flag is used to directly nominate internal fees into actual landed cost. This is to be utilized for expenses a retailer needs to account for, but for which an external vendor will not send an invoice. Label code NOMF5.
An example will help illustrate the use a CVB with dynamically determined components. Using the same Agent Commission example as above, this example will show how to calculate it using the nominations flags instead of CVB details.
-
Define a CVB called Agent Commission Base (ACBASE). ACBASE will not have any details attached to it; instead, set the first nomination flag, Nom Flag 1, to Yes.
-
Using the Cost Component download/upload template, create four simple new expense components:
-
Unit cost (UNCST = 100% with no CVB, when no CVB is used the expense is based on unit cost) – Set Nom Flag 1 to +
-
Freight (FRGHT = 8% with no CVB) – Set Nom Flag 1 to +
-
Insurance (INSUR = 2% with no CVB) – Set Nom Flag 1 to +
-
Buyer's commission (BUYCOM = 1% with no CVB) – Set Nom Flag 1 to -
-
Agent commission (AGCOM = 2% with the new ACBASE CVB attached) – No nominations flags set
Then, when the five expenses are attached to an item with a unit cost of 10.00 USD, the value of AGCOM will be calculated as follows:
ACBASE = UNCST + FRGHT + INSUR - BUYCOM
                 = 10.00 + .80 + .20 - .10
                 = 10.90
AGCOM = Component Rate * Computation Value Base (ACBASE)
                 = 2% * 10.90
                 = 0.22
If instead the first nomination flag was not set for FRGHT, then value of AGCOM would only be 0.20.
ACBASE = UNCST + INSUR - BUYCOM
                 = 10.00 + .20 - .10
                 = 10.10
AGCOM = Component Rate * Computation Value Base (ACBASE)
                 = 2% * 10.10
                 = 0.20
-
Add CVBs, CVB Translations and CVB Details
To add a new CVB, start in the CVBs tab, and, in a blank line in the template, select the action type of Create. Next enter a unique computation value base identifier (up to 10 characters), and a description for the CVB in the primary language (as defined in the Merchandising system options) of up to 250 characters. When creating CVBs with dynamically determined components, the desired nomination flag should be set to Yes, with the rest set to No. Only one of the five nomination flags can be set to Yes for each CVB using this approach. When creating CVBs with predefined details, all nomination flags should be set to No.
Next, if you wish to add translations for the CVBs in languages other than the primary language, this can be done in the CVB Translations tab. Navigate to a blank row and select the action type of Create and the language in which the translated description will be entered. Then, enter the computation value base for which the translation applies. Finally, enter the translated description. The translated description can also be up to 250 characters long. This is an optional step.
Lastly, when creating CVBs with predefined details only, the desired details must be added. To do this, move to the CVB Details tab in the spreadsheet. Again, navigate to a blank row in the sheet and select an action type of Create. Enter your new computation value base and then the first cost component to be included. The Combination Operator allows you to define whether the value of the cost component will be added to (+) or subtracted from (-) the total value of the CVB. Continue this process until all the details for the CVB have been added. If you are adding a new detail to an existing CVB, this same process would apply, just using the existing ID instead.
Delete CVBs, CVB Translations or CVB Details
If you would like to delete an existing CVBs or any CVB Details, a similar process will be followed as that described above for creating new CVBs. First, download the spreadsheet, and then navigate to the tab where you would like to mark the desired CVBs or CVB Details for delete. Select the action type of Delete on the desired rows in the spreadsheet.
Note:
Only CVBs that have not already been associated with a cost component can be deleted.If you would like to update any translations for existing CVBs, a similar process will be followed as that described above for deleting CVB Translations. First, download the spreadsheet, and then navigate to the CVB Translations tab.
The following column can be updated:
-
CVB Translations – Description
Select the action type of Update, and then correct the value in the spreadsheet.
For all actions defined above, once all the updates have been made to the data in the spreadsheet, save the file and close it. Then, return to the Merchandising screens and select Foundation Data > Upload Foundation Data from the main task list. In this screen, select the template type Foundation and the template Computation Value Bases (CVBs). This will generate a process description automatically, but this can be updated if desired. Lastly, select the Browse button and navigate to the directory where you saved the updated spreadsheet.
To review the status of the upload and check whether any errors occurred, select the Foundation Data > Review Status task from the main task list.
See also Download/Upload Data from Spreadsheets and View Data Loading Status.
Location Traits
Location traits are user defined text tags that can be associated with stores. The association of a location trait to a store is done in the Store screen. They can be used to identify common characteristics in locations, which can then be used to support various business functions such as reporting, item ranging and location list creation. Location traits are also used in Sales Audit for assigning auditors to stores. Location traits are maintained through the upload/download process. This functionality is accessed from the main Merchandising task list under Foundation Data > Download Foundation Data and Foundation Data > Upload Foundation Data.
To add, update, or remove location traits, select the template type of Foundation from the Download Data screen and then the template Location Traits. Click the Download button and when prompted, choose to either open the .ods file that is generated or save the file and open it separately in the spreadsheet application of your choice.
To add a new location trait, select the action type of Create on an empty row of the Location Traits tab. Next enter a unique number up to 4 digits in length for the location trait, the filter organization id, and a description for the trait in the primary language (as defined in the Merchandising system options) of up to 120 characters. The filter organization ID is optional, but if used will limit the location trait from being accessed to only those that are associated with the selected organizational ID when data filtering is turned on. The organizational ID that should be entered here will be a chain, area, region, or district, depending on the system option setting of the LOV Filtering Organizational Hierarchy attribute for Location Traits. Adding a location trait translation can be done in a similar manner on the Location Trait Translations tab. This facilitates the ability to translate the location trait description in multiple languages.
If you would like to update any details for location traits, a similar process will be followed as that described above for creating new. First, download the spreadsheet, and then navigate to the tab where you would like to make your updates.
The following columns can be updated in each tab:
-
Location Traits – Description, Filter Organization ID
-
Location Trait Translations – Trait Description
In the tab where you are going to make your updates, select the action type of Update, and then correct the value in the spreadsheet.
To update a location trait, select the action type of Update on the row you wish to change on the Location Traits tab. Next, update the column you wish to change. Note that the Location Trait column cannot be changed, but any of the other columns can be updated. The entries on the Location Trait Translations tab can be updated in a similar manner.
If you wish to remove a location trait, select the Delete action on the row of the location trait you which to delete on the Location Traits tab. Removing a location trait translation can be done in a similar manner on the Location Trait Translations tab. Note that removing a location trait is not allowed if it is still in use.
For all actions defined above, once all the updates have been made to the data in the spreadsheet, save the file and close it. Then, return to the Merchandising screens and select Foundation Data > Upload Foundation Data from the main task list. In this screen, you'll again select the template type Foundation and the template Location Trait. This will generate a process description automatically, but this can be updated if desired. Lastly, select the Browse button and navigate to the directory where you saved the updated spreadsheet.
To review the status of the upload and check whether any errors occurred, select the Foundation Data > Review Status task from the main task list.
See also Download/Upload Data from Spreadsheets and View Data Loading Status.
Outside Locations
Outside locations are locations used in the import process to define external locations, such as lading and discharge ports, clearing zones, and bill-to locations. Outside Locations are maintained through the upload/download process. This functionality is accessed from the main Merchandising task list under Foundation Data > Download Foundation Data and Foundation Data > Upload Foundation Data.
To add, update, or remove Outside Locations, select the template type of Foundation from the Download Data screen and then the template Outside Locations. Click the Download button and when prompted, choose to either open the .ods file that is generated or save the file and open it separately in the spreadsheet application of your choice.
To add a new outside location, select the action type of Create on an empty row of the Outside Locations tab. Next enter a unique 5 character field for the location field. The description for the outside location must be entered in the primary language (as defined in the Merchandising system options) of up to 150 characters. The secondary name is not required, but is intended to be used to store the Roman lettering for Japanese descriptions of up to 150 characters. The location type is required, and can be selected from a dropdown, which is maintained using the 'LOCT' Code type in the Codes table. To modify the valid outside location types, you can update the descriptions or add new values by accessing the Codes and Descriptions template (see ). The country and VAT region are required for all location types. Currency is required for location types: Bill to Location, Discharge Port, and Routing Location. The rest of the address fields are optional including: Address 1, Address 2, City, State, Postal Code, Contact Name, Contact Phone, Contact Fax, Contact Telex, Contact E-mail, and Jurisdiction.
The Primary column is only used when location type is Clearing Zone, otherwise it should be set to No. When location type is Clearing Zone, one row per country should have primary set to Yes. If only one Clearing Zone is added for a country, the Primary column will automatically be set to Yes. Subsequently, if a new clearing zone is added or updated for the country with the Primary column set to Yes, the existing primary clearing zone for the country should be updated to change Primary to No.
Adding an outside location translation can be done in a similar manner on the Outside Location Translations tab. This facilitates the ability to translate the outside location address information in multiple languages.
If you would like to update any details for outside locations, a similar process will be followed as that described above for creating new. First, download the spreadsheet, and then navigate to the tab where you would like to make your updates.
The following columns can be updated in each tab:
-
Outside Locations – Outloc Description, Currency, Address 1, Address 2, City, State, Country, Postal Code, VAT Region, all contact columns, secondary name, jurisdiction, primary flag
Note:
If the primary flag is changed from Yes to No on a Clearing Zone location type, ensure that another Clearing Zone for the same country is selected as primary or an error may occur. Similarly, if changing from No to Yes, then make sure to also update the currently flagged location for the country to not be the primary. -
Outside Location Translations – Outloc Description, Address 1, Address 2, City, Contact Name, Secondary Name
In the tab where you are going to make your updates, select the action type of Update, and then correct the value in the spreadsheet.
If you wish to remove an outside location, select the Delete action on the row of the outside location you which to delete on the Outside Locations tab. Removing an outside location translation can be done in a similar manner on the Outside Location Translations tab. Note that the removing an Outside Location is not allowed if it is still in use.
For all actions defined above, once all the updates have been made to the data in the spreadsheet, save the file and close it. Then, return to the Merchandising screens and select Foundation Data > Upload Foundation Data from the main task list. In this screen, you'll again select the template type Foundation and the template Outside Locations. This will generate a process description automatically, but this can be updated if desired. Lastly, select the Browse button and navigate to the directory where you saved the updated spreadsheet.
To review the status of the upload and check whether any errors occurred, select the Foundation Data > Review Status task from the main task list.
See also Download/Upload Data from Spreadsheets and View Data Loading Status.
Store Formats
Store Formats are optional attributes of a store. Examples could include Convenience Store or Hypermarket. Store format are used in Merchandising as part of the criteria when building location lists or for reporting. Store Formats are maintained through the upload/download process. This functionality is accessed from the main Merchandising task list under Foundation Data > Download Foundation Data and Foundation Data > Upload Foundation Data.
To add, update, or remove a store format, select the template type of Foundation from the Download Data screen and then the template Store Formats. Click the Download button and when prompted, choose to either open the .ods file that is generated or save the file and open it separately in the spreadsheet application of your choice.
To add a new store format, select the action type of Create on an empty row of the Store Formats tab. Next enter a unique number up to 4 digits in length for the store format along with the description in the appropriate columns. The description should be entered in the primary language (as defined in the Merchandising system options) of up to 60 characters. Adding a store format translation can be done in a similar manner on the Store Format Translations tab. This facilitates the ability to translate the store format description in multiple languages.
If you would like to update any details for store formats, a similar process will be followed as that described above for creating new. First, download the spreadsheet, and then navigate to the tab where you would like to make your updates.
The following columns can be updated in each tab:
-
Store Formats – Description
-
Store Format Translations – Description
In the tab where you are going to make your updates, select the action type of Update, and then correct the value in the spreadsheet.
If you wish to remove a store format, select the Delete action on the row of the store format you which to delete on the Store Formats tab. Removing a store format translation can be done in a similar manner from the Store Format Translations tab. Note that the removing a store format is not allowed if the format is still in use for a store.
For all actions defined above, once all the updates have been made to the data in the spreadsheet, save the file and close it. Then, return to the Merchandising screens and select Foundation Data > Upload Foundation Data from the main task list. In this screen, you'll again select the template type Foundation and the template Store Formats. This will generate a process description automatically, but this can be updated if desired. Lastly, select the Browse button and navigate to the directory where you saved the updated spreadsheet.
To review the status of the upload and check whether any errors occurred, select the Foundation Data > Review Status task from the main task list.
See also Download/Upload Data from Spreadsheets and View Data Loading Status.
Store Grades
Store Grades are a way of grouping stores together, usually as a result of store clustering. Store grade groups are associated with a buyer, as it usually represents a clustering of locations for a particular group of departments or classes in the merchandise hierarchy. Store Grades are used to support distributing items on a purchase order, for building location lists, and for reporting. Store Grades are maintained through the upload/download process. This functionality is accessed from the main Merchandising task list under Foundation Data > Download Foundation Data and Foundation Data > Upload Foundation Data.
To add, update, or remove store grades or store grade groups, select the template type of Foundation from the Download Data screen and then the template Store Grades. Click the Download button and when prompted, choose to either open the .ods file that is generated or save the file and open it separately in the spreadsheet application of your choice.
To add a store grade group, select the action type of Create on the Store Grade Group tab on an empty row. Next, enter a unique number with up to 8 digits. Then enter a description in the primary language (as defined in the Merchandising system options) and an existing buyer.
Note:
Valid buyers are also managed via spreadsheet download/upload under the Template Type of Foundation and the Template Buyers and Merchandisers (see ).To add a store grade, select the action type of Create on an empty row of the Store Grades tab. Next, enter a newly created or a previously existing store grade group, a store grade description in the primary language of up to 120 characters, and, optionally, a comment up to 2,000 characters. This facilitates the ability to translate the store grade group descriptions in multiple languages. Finally, stores should be added for a store grade group/store grade combination using the Create action on an empty row on the Store Grade Stores tab.
If you would like to update any details for store grade groups or store grades, a similar process will be followed as that described above for creating new. First, download the spreadsheet, and then navigate to the tab where you would like to make your updates.
The following columns can be updated in each tab:
-
Store Grade Groups – Description, Buyer
-
Store Grade Group Translations – Description
-
Store Grades – Comments
-
Store Grade Stores – Store Grade
In the tab where you are going to make your updates, select the action type of Update, and then correct the value in the spreadsheet.
If you wish to remove a store grade, select the Delete action on the row of the store grade you wish to delete on the Store Grades tab. Removing an entry from the Store Grade Groups tab, the Store Grade Group Translations tab, or the Store Grade Stores tab can be done in a similar manner. Note that removing an entry that is still in use is not allowed.
For all actions defined above, once all the updates have been made to the data in the spreadsheet, save the file and close it. Then, return to the Merchandising screens and select Foundation Data > Upload Foundation Data from the main task list. In this screen, you'll again select the template type Foundation and the template Store Grades. This will generate a process description automatically, but this can be updated if desired. Lastly, select the Browse button and navigate to the directory where you saved the updated spreadsheet.
To review the status of the upload and check whether any errors occurred, select the Foundation Data > Review Status task from the main task list.
See also Download/Upload Data from Spreadsheets and View Data Loading Status.
Transfer Zones
Transfer zones are used to restrict transfers from store to store in a specified group of stores (zone), usually to help manage transportation costs. Zones are linked to stores as an attribute. Transfer Zones are maintained through the upload/download process. This functionality is accessed from the main Merchandising task list under Foundation Data > Download Foundation Data and Foundation Data > Upload Foundation Data.
To add, update, or remove a transfer zone, select the template type of Foundation from the Download Data screen and then the template Transfer Zones. Click the Download button and when prompted, choose to either open the .ods file that is generated or save the file and open it separately in the spreadsheet application of your choice.
To add a new transfer zone, select the action type of Create on an empty row of the Transfer Zones tab. Next enter a unique number up to 4 digits in length for the transfer zone, and the transfer zone description in the primary language of up to 120 characters. Adding a transfer zone translation can be done in a similar manner on the Transfer Zone Translations tab. This facilitates the ability to translate the transfer zone description in multiple languages.
If you would like to update any details for transfer zones, a similar process will be followed as that described above for creating new. First, download the spreadsheet, and then navigate to the tab where you would like to make your updates.
The following columns can be updated in each tab:
-
Transfer Zones – Description
-
Transfer Zone Translations – Description
In the tab where you are going to make your updates, select the action type of Update, and then correct the value in the spreadsheet.
If you wish to remove a transfer zone, select the Delete action on the row of the transfer zone you which to delete on the Transfer Zones tab. Removing a transfer zone translation can be done in a similar manner on the Transfer Zone Translations tab. Note that removing a transfer zone is not allowed if it is still assigned to a store.
For all actions defined above, once all the updates have been made to the data in the spreadsheet, save the file and close it. Then, return to the Merchandising screens and select Foundation Data > Upload Foundation Data from the main task list. In this screen, you'll again select the template type Foundation and the template Transfer Zone. This will generate a process description automatically, but this can be updated if desired. Lastly, select the Browse button and navigate to the directory where you saved the updated spreadsheet.
To review the status of the upload and check whether any errors occurred, select the Foundation Data > Review Status task from the main task list.
See also Download/Upload Data from Spreadsheets and View Data Loading Status.