3 Managing Attributes
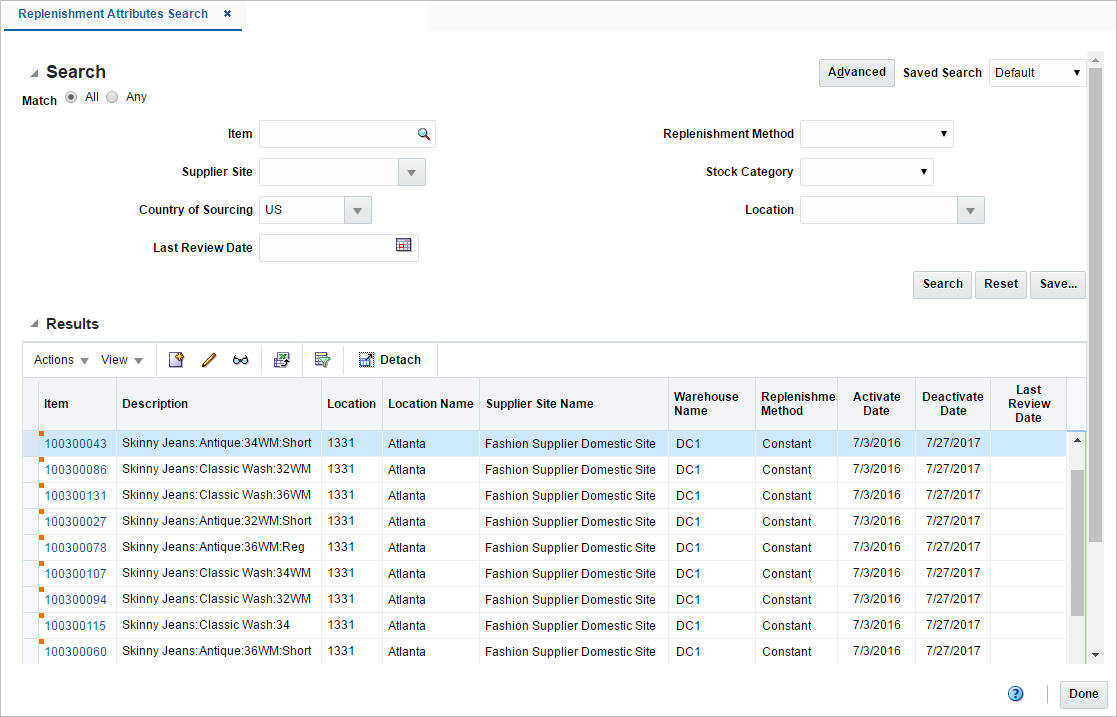
The Manage Attributes option opens the Replenishment Attributes Search window. This window allows you to search for replenishment attributes, as well as view and edit the results of the search.
The Replenishment Attributes Search window contains the following sections:
-
Search
For more information about how to search for replenishment attributes, see the Searching for a Replenishment Attribute section.
Searching for a Replenishment Attribute
To search for a replenishment attribute:
-
From the Task menu, select Replenishment > Manage Attributes. The Replenishment Attributes Search window appears.
-
You can search for replenishment attributes using basic or advanced search criteria, depending on the requirement. The basic mode is the default search mode.
-
Click Advanced to access the search section in advanced mode.
-
Click Basic to return to the basic mode.
-
Searching for a Replenishment Attribute Through the Basic Search Criteria
To search for a replenishment attribute using basic search criteria.
-
Enter, select or search for one or all of the following basic search criteria.
Table 3-1 Replenishment Attributes Search - Basic Search Criteria and Description
Fields Description Match option
Check radio button All or Any.
All - only attribute/attributes matching all entered search criteria are shown.
Any - attribute/attributes matching any of the entered search criteria are shown.
Item
Enter, select or search for an item ID.
Location
Enter, select or search for a location.
Supplier Site
Enter, select or search for the supplier site.
Country of Sourcing
Enter, select or search for the country of sourcing.
Last Review Date
Enter a date or use the Calendar icon to select the last review date.
Replenishment Method
Select a replenishment method from the list.
Stock Category
Select a stock category from the list.
-
Click the Saved Search list to select one of the saved search criteria. Selecting a saved search populates the search section with the saved search criteria. If the run automatically function is enabled for the search, the search is executed immediately.
You can also personalize your saved searches by selecting Personalize. The Personalized Saved Search window appears.
For more information about the Personalized Saved Search, see Personalize Saved Search in the Oracle® Retail Merchandising Foundation Cloud Service Do the Basics User Guide.
-
Click Search. The replenishment attributes that match the search criteria are displayed in the Results section.
-
Click Reset to clear the search section and results.
-
Click Save As... to save the current search criteria. The Create Saved Search window appears.
For more information about how to save your search criteria, see Create Saved Search in the Oracle® Retail Merchandising Foundation Cloud Service Do the Basics User Guide.
-
Click Done to close the window.
Searching for a Replenishment Attribute Through Advanced Search Criteria
To search for a replenishment attribute using advanced search criteria, follow the steps below.
-
To search using advanced search criteria, enter or select one or all of the advanced search criteria.
-
To narrow down the search, use the list next to the search fields. For example, determine if the entered value should be equal or not equal to the search result.
-
Click the Saved Search list to select one of the saved search criteria. Selecting a saved search populates the search section with the saved search criteria. If the run automatically function is enabled for the search, the search is executed immediately.
You can also personalize your saved searches by selecting Personalize. The Personalized Saved Search window appears.
For more information about the Personalized Saved Search, see Personalize Saved Search in the Oracle® Retail Merchandising Foundation Cloud Service Do the Basics User Guide.
-
Click Search. The replenishment attributes that match the search criteria are displayed in the Results section.
-
Click Reset to clear the search section and results.
-
Click Save As... to save the current search criteria. The Create Saved Search window appears.
For more information about how to save your search criteria, see Create Saved Search in the Oracle® Retail Merchandising Foundation Cloud Service Do the Basics User Guide.
-
Click Add Fields to add more fields for the advanced search. To remove the field from the search, click the x right next to the field.
-
Click Reorder to change the order of the available search fields. The Reorder Search Fields window appears.
-
Select the desired search field and use the up and down arrows to rearrange the order of the fields.
-
Click OK to confirm the new order of the fields and close the window.
-
Click Cancel to reject any changes and close the window.
-
-
Click Done to close the window.
Results
The Results section lists the retrieved item/location combinations. The Results table shows the following columns by default.
-
Item
-
Description
-
Location
-
Location Name
-
Supplier Site Name
-
Warehouse Name
-
Replenishment Method
-
Activate Date
-
Deactivate Date
-
Review Date
Result - Actions Menu and Icons
Use the Actions Menu and icons to apply actions to the Results table. You can perform the actions listed below.
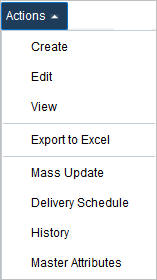
Table 3-2 Results - Actions Menu/Icons and Description
| Actions Menu/Icons | Description |
|---|---|
|
Create and Create icon |
Select Actions > Create or use the Create icon For more information about how to create an attribute, see chapter Activating Items on Replenishment, section "Creating Attributes". |
|
Edit and Edit icon |
To edit the attributes of the selected item:
For more detailed information about the Replenishment Attributes window, see chapter Activating Items on Replenishment, section "Replenishment Attributes Window". |
|
View and View icon |
To view replenishment attributes for an item:
For more details about the Replenishment Attributes window, see chapter Activating Items on Replenishment, section "Replenishment Attributes Window". |
|
Export to Excel and Export to Excel icon |
You can copy the records in the table to a Microsoft Excel spreadsheet by selecting Actions > Export to Excel or by using the Export to Excel icon |
|
Mass Update |
Opens the Mass Update Attributes window to create mass updates for replenishment attributes. For more information about how to create mass updates for replenishment attributes, see the Mass Update section. |
|
Delivery Schedule |
Opens the Location Delivery Schedule window to view and maintain delivery schedules for a supplier to several locations. For more information about the delivery schedule, see the Manage Replenishment Foundation Data chapter, section "Location Delivery Schedules Window". |
|
History |
Opens the Replenishment Attribute History window to view the history of a replenishment attribute. For more information about viewing the replenishment attribute history, see the Replenishment Attribute History section. |
|
Master Attributes |
Opens the Master Attributes window to view and maintain the master replenishment attributes for an item/location combination. For more information about master attributes, see the Master Replenishment Attributes section. |
Results - View Menu and Icons
You can customize the view of the table by using the options in the view menu.
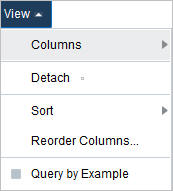
Table 3-3 Results - View Menu/Icons and Description
| View Menu/Icons | Description |
|---|---|
|
Columns |
You can manage which of the columns will be shown in the table by clicking the Show All and Manage Columns options. |
|
Detach and Detach icon |
You can view the tables in the application in a separate window by clicking Detach or by using the Detach icon |
|
Sort |
You can sort columns by the following options:
|
|
Reorder Columns |
You can reorder columns by clicking the Reorder Columns option. |
|
Query by Example and Query by Example icon |
You can filter the attributes by one or multiple column values by clicking the Query by Example option or by using the Query by Example icon |
Replenishment Attributes Search Toolbar
The toolbar contains the following icons and buttons.
Mass Update
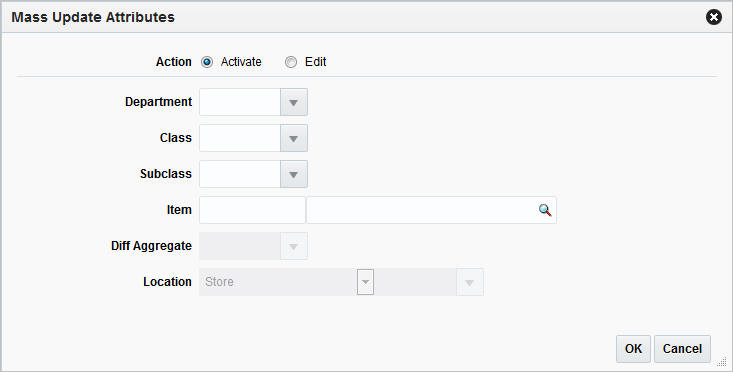
To update multiple attributes follow the steps below.
-
From the Tasks menu, select Replenishment > Manage Attributes. The Replenishment Attributes Search window appears.
-
Then select Actions > Mass Update. The Mass Update Attributes window appears.
-
In the Action section, select if you want to activate or edit the attributes.
-
In the Department field, enter, select or search for the department.
-
In the Class field, enter, select or search for the class.
-
In the Subclass field, enter, select or search for the subclass.
-
In the Item field, enter, select or search for the item ID.
-
In the Diff Aggregate field, select the differentiator for the parent items with the diff aggregate defined.
Note:
This field is only enabled for Item/Diff Aggregate level maintenance. -
In the Location field, select the location type from the list. Then enter, select or search for the location ID.
-
Then choose one of the following options.
-
Select OK to apply your updates and close the window.
-
Select Cancel to reject all entries and close the window.
-
-
Replenishment Attribute History
The Replenishment Attribute History window allows you to view the update history of a replenishment attribute for item/location.
The Replenishment Attribute contains the following sections.
-
Header
The header displays the item ID and description as well as the location type, the location ID and location name.
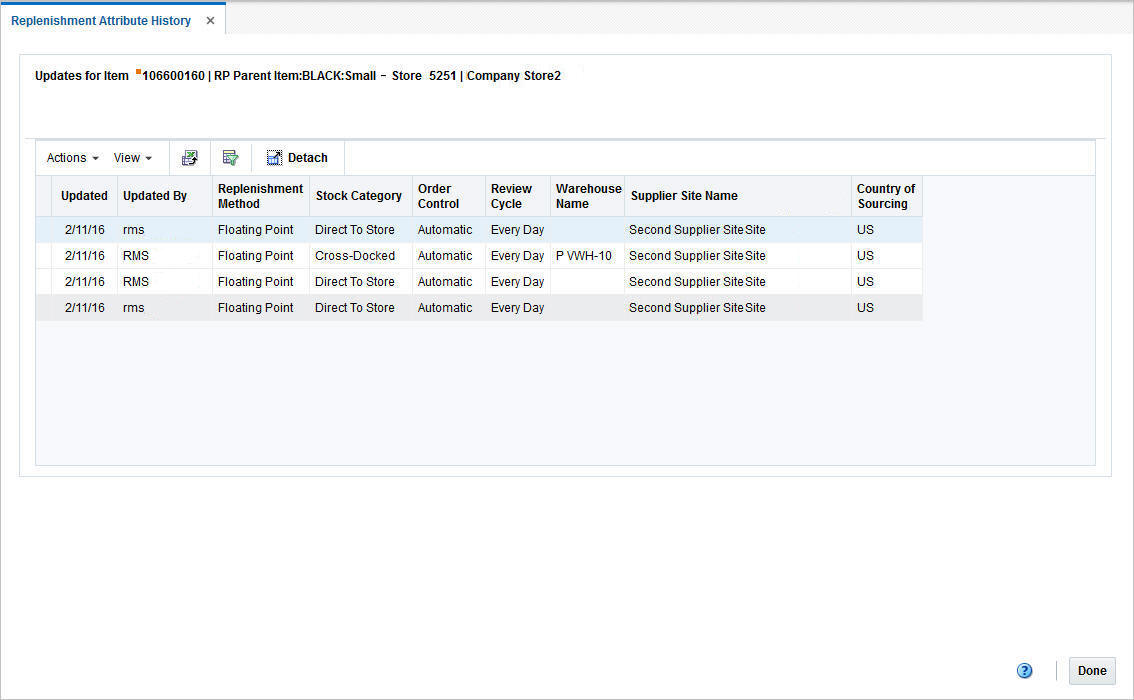
Replenishment Attribute History Table
The table lists all the completed updates for the item/location.
Replenishment Attribute History - Actions Menu and Icons
Use the Actions Menu and icons to apply actions to the table. You can perform the actions listed below.
Replenishment Attribute History - View Menu and Icons
You can customize the view of the table by using the options in the View menu.
Table 3-6 Replenishment Attribute History - View Menu/Icons and Description
| View Menu/Icons | Description |
|---|---|
|
Columns |
You can manage which of the columns will be shown in the table by clicking the Show All and Manage Columns options. |
|
Detach and Detach icon |
You can view the tables in the application in a separate window by clicking Detach or by using the Detach icon |
|
Sort |
You can sort columns by the following options:
|
|
Reorder Columns |
You can reorder columns by clicking the Reorder Columns option. |
|
Query by Example and Query by Example icon |
You can filter the items by one or multiple column values by clicking the Query by Example option or by using the Query by Example icon |
Replenishment Attribute History Toolbar
The toolbar contains the following icons and buttons.
View Replenishment Attribute History
To view the replenishment attribute history, follow the steps listed below.
-
From the Tasks menu, select Replenishment > Manage Attributes. The Replenishment Attributes Search window appears.
-
Enter or select search criteria as desired to make the search more restrictive.
-
Click Search. The attributes that match the search criteria are displayed in the Results section.
-
Select a record in the Results section.
-
Then select Actions > History. The Replenishment Attribute History window appears. View the updates for the selected item.
-
Click Done to close the window.
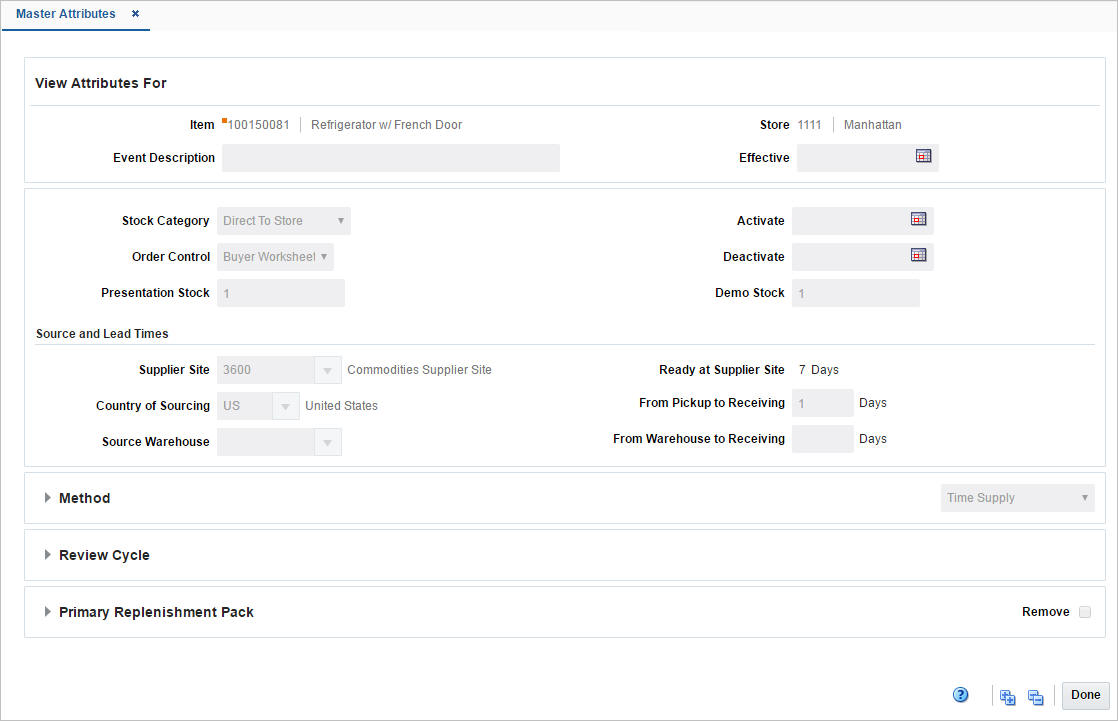
Master Replenishment Attributes
The Master Replenishment Attributes window maintains a record of the master attribute that can be used to restore item/location settings after a temporary change.
-
When you create the replenishment parameters for an item/location, the master replenishment attributes are created automatically.
For more information about how to create replenishment parameters for an item, see chapter Activating Items on Replenishment, section "Creating Attributes" section.
-
When you update the replenishment attributes for an item/location, you can choose to update the master replenishment attributes at the same time, by selecting the Update Master checkbox in the Replenishment Attributes window. For more information about the individual fields displayed in this window, see chapter Activating Items on Replenishment, section "Replenishment Attributes Window".
Master Attributes Toolbar
The toolbar contains the following icons and buttons.
Table 3-8 Master Attributes Toolbar - Icons/Buttons and Description
| Icons/Buttons | Description |
|---|---|
|
Help icon |
You can access the online help for a particular page by clicking the Help icon |
|
Expand and Collapse icons |
You can expand all the sections and collapse all the sections in the window by clicking the Expand and Collapse icons. |
|
Done |
Click Done to close the window. |
Viewing Master Attributes
To view master replenishment attributes for an item/location follow the steps below.
-
From the Tasks menu, select Replenishment > Manage Attributes. The Replenishment Attributes Search window appears.
-
Enter or select search criteria as desired to make the search more restrictive.
-
Click Search. The items that match the search criteria are displayed in the Results section.
-
Select a record in the Results section.
-
Then select Actions > Master Attributes. The Master Replenishment Attributes window appears.
You can also access the Master Replenishment Attributes window through the Replenishment Attributes window:
-
In the Item column, click the item link, or mark a record and select Actions > Edit/View or use corresponding icons. The Replenishment Attributes window appears.
-
In the Replenishment Attributes toolbar, select More Actions > Master Attributes. The Master Replenishment Attributes are displayed.
-
-
View the master replenishment attributes for the selected item/location.
-
Click Done to close the window.