Using the PeopleSoft Fluid User Interface to Work with Documents as Managers
This topic discusses a list of pages that managers can access from a single place in the PeopleSoft Fluid User Interface to work with documents.
For general information about fluid pages in PeopleSoft HCM, see Understanding PeopleSoft Fluid User Interface Home Pages.
|
Page/Tile Name |
Definition Name |
Usage |
|---|---|---|
|
HC_EP_MSS_SELECT_FLU_GBL (cref for the tile) EP_MSS_TILE_FLU (page for dynamic data) |
View the total count of current documents that are owned by and delegated to the logged-in manager. |
|
|
EP_MSS_CURR_FL |
Access the current documents that are owned by the logged-in manager. |
|
|
HR_PSEL_FLU |
Select employees for whom documents are to be created. |
|
|
EP_CREATE_MSS_FLU |
Enter criteria to be used to create documents. |
|
|
EP_MSS_DELGATE_FL |
Access the documents that are delegated to the logged-in manager. |
|
|
EP_MSS_HIST_FL |
Access completed or canceled documents that are owned by the logged-in manager. |
|
|
EP_MSSADM_SELCT_FL |
Transfer documents to other managers. |
|
|
HR_PSEL_FLU |
Select a manager for the document transfer. |
|
|
EP_MSSADM_CONF_FL |
Review and confirm the document transfer. |
|
|
EP_MSSADM_SELCT_FL |
Change the status of documents that are currently in the evaluation phase back to Evaluation in Progress. |
|
|
EP_MSSADM_CONF_FL |
Review and confirm the status change of the selected documents back to Evaluation in Progress. |
|
|
EP_MSSADM_SELCT_FL |
Cancel documents. |
|
|
EP_MSSADM_CONF_FL |
Review and confirm the cancelation of selected documents. |
|
|
EP_MSSADM_SELCT_FL |
Delete canceled documents. |
|
|
EP_MSSADM_CONF_FL |
Review and confirm the deletion of selected documents. |
|
|
EP_MSSADM_CONF_FL |
Enter preliminary performance ratings for documents that are currently in progress. |
|
|
View-Only Documents - Select Employee Page (Team Performance) |
HR_PSEL_FLU |
Select employees and review their documents. |
|
EP_MSS_VIEWONLY_FL |
View the list of documents for the selected employee. |
|
|
Create Documents by Group - Select Group Page (Team Performance) |
HR_PSEL_GROUP_FL |
Select a group of employees for whom documents are created. |
|
Create Documents by Group - Select Employees Page (Team Performance) |
HR_PSEL_GROUP_FL |
Select employees from the selected group for whom documents are created. |
|
Create Documents by Group - Document Creation Details Page (Team Performance) |
EP_CREATE_MSS_FLU |
Select the document template and dates that are used to create documents. |
|
EP_CREATE_M_RS_FLU |
View the document creation results. |
|
|
HC_EP_DOCSTS_PGLT_FLU (cref for the tile) EP_PG_DOCSTS_FLU (page for dynamic data) |
View the performance status of the documents that are owned by the logged-in manager. |
|
|
EP_PG_DOCSTS_FLU |
View the performance status of the documents in details, and modify chart displays if necessary. |
|
|
EP_PG_CHNG_SET_SCF |
Edit the default settings used for launching the Performance Status page. |
Use the Team Performance tile (EP_MSS_TILE_FLU) to view the total count of current documents that are owned by and delegated to the logged-in manager.
Navigation
Select the Manager Self Service home page. The Team Performance tile is available on the Manager Self Service landing page.
As a manager, you can add the tile, through personalization, to a system-delivered home page or a home page that you create.
Image: (Tablet) Team Performance tile
This example illustrates the Team Performance tile for the tablet.
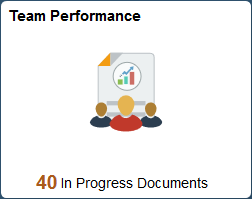
Image: (Smartphone) Team Performance tile
This example illustrates the Team Performance tile for the smartphone.
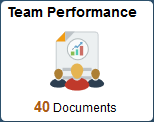
If no documents are available, no information is displayed on the Team Performance tile.
Click the tile to access the Team Performance page and navigate to these manager self-service transactions easily without using traditional menu navigations:
Current Documents
Delegated Documents
Historical Documents
Administrative Tasks
Transfer Documents
Reopen Documents
Cancel Documents
Delete Documents
Enter Preliminary Ratings
View-Only Documents
Create Documents by Group
Use the Current Documents page (Team Performance) (EP_MSS_CURR_FL) to access the current documents that are owned by the logged-in manager.
Navigation
Click the Team Performance tile on the Manager Self Service page or a home page where the tile is added. The Current Documents page appears as default.
Image: (Tablet) Current Documents page (Team Performance)
This example illustrates the fields and controls on the Current Documents page (Team Performance) for the tablet.
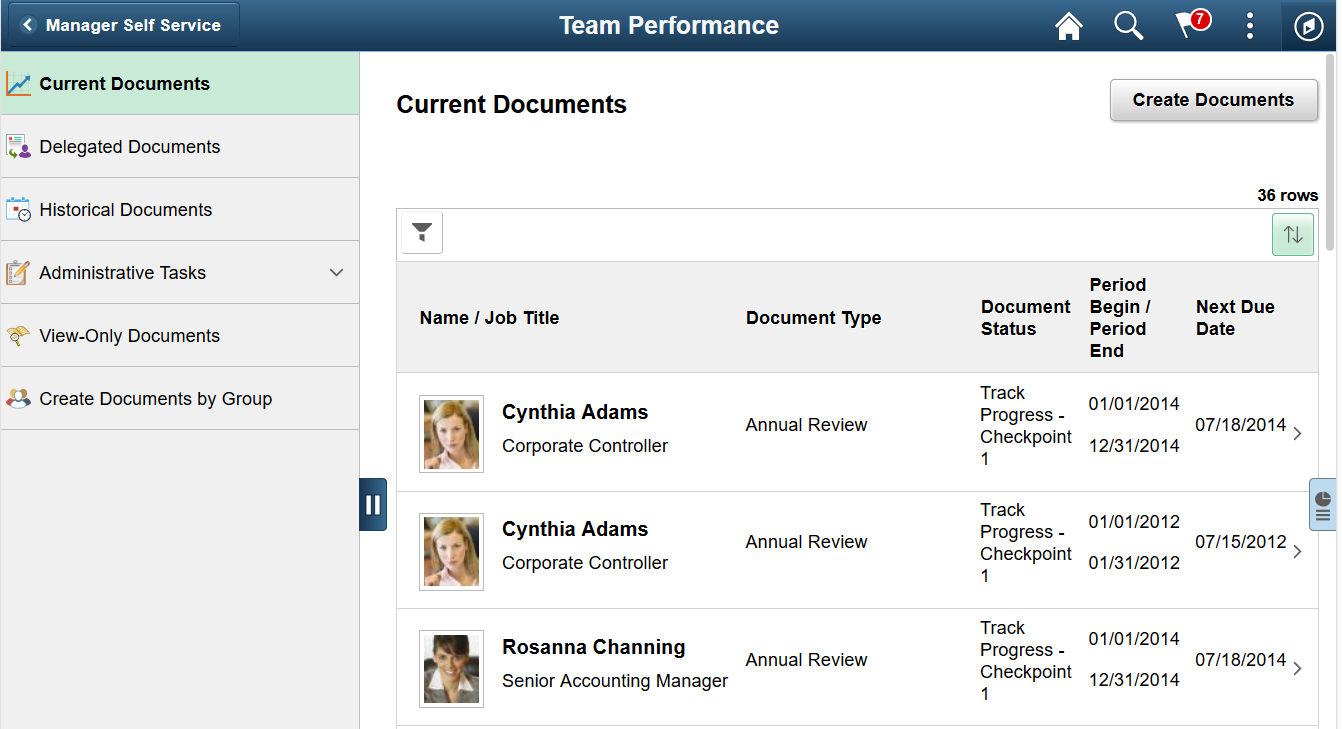
Image: (Smartphone) Current Documents page (Team Performance)
This example illustrates the fields and controls on the Current Documents page (Team Performance) for the smartphone.
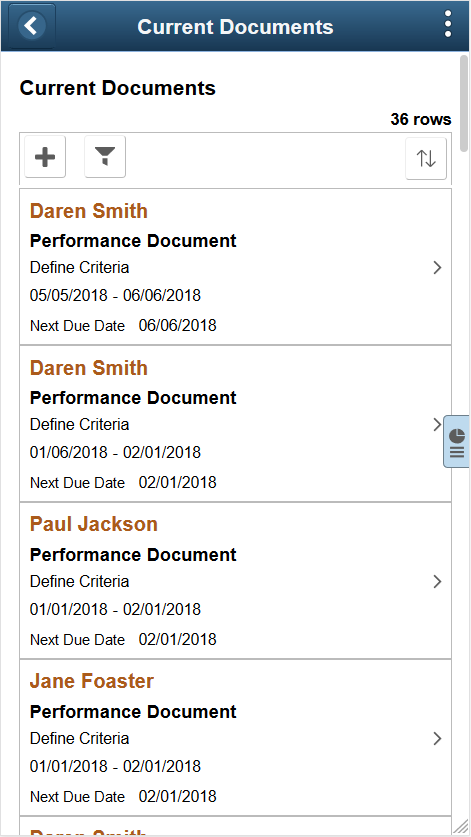
(Smartphone) To return to the navigation menu, click the back button on the banner.
The grid on this page lists all current documents (document status is not Completed or Canceled) that are owned by the logged-in manager, which include both performance and development documents. On the top right corner of the grid, row count is displayed. Information shown in this grid contains most or all of this information:
Employee name and job title
Document type
Document status
Evaluation period
Next due date
Click a row to open the corresponding document for edits in the ePerformance WorkCenter. From the WorkCenter, you can click the Team Performance button on the page banner to return to the Team Performance page.
|
Field or Control |
Definition |
|---|---|
Create Documents or  |
Click the button to access the Create Document page to create new documents as a manager. |
 |
Click the icon to enter parameters used to filter the list of documents to be displayed. Documents can be filtered by employee name, document type, document status, and evaluation period. |
 |
Click the icon to select a field that the system uses to sort the documents. All column headings that appear on the grid are available for sorting. |
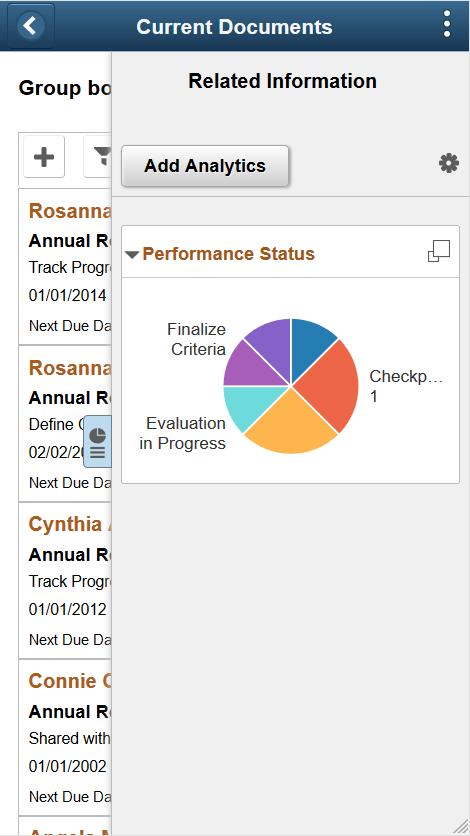
Supplementary Panel for the Team Performance Page
If you use PeopleTools 8.57 or later, several Team Performance pages include a supplementary panel that provides access to related information and simplified analytics.
For more information about simplified analytics, see product documentation for PeopleTools: Pivot Grid, “Working with Simplified Analytics.”
Navigation
Click the Supplementary Panel tab on the Current Documents, Delegated Documents or Historical Documents page.
Image: (Tablet) Supplementary panel for Team Performance
This example illustrates the supplementary panel for Team Performance for the tablet.
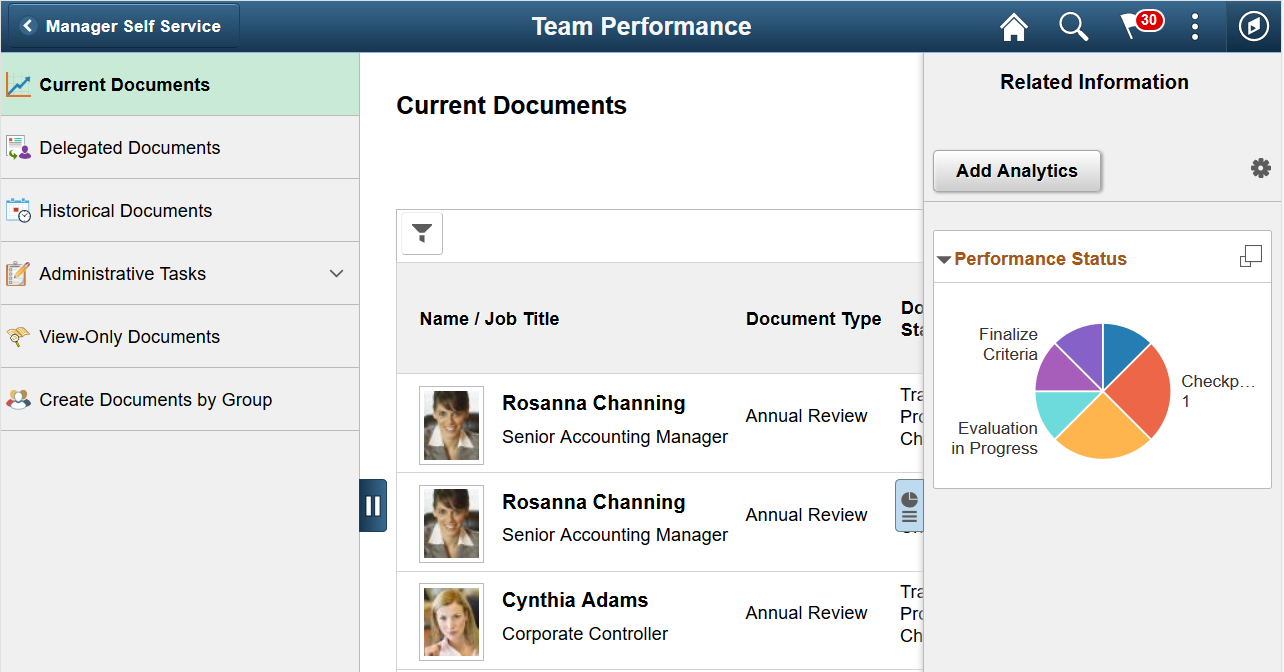
Image: (Smartphone) Supplementary panel for Team Performance
This example illustrates the supplementary panel for Team Performance for the smartphone.
|
Field or Control |
Definition |
|---|---|
 (Supplementary Panel tab) (Supplementary Panel tab) |
Click this tab to open the Related Information panel. |
| Related Information |
Displays the Performance Status pivot grid chart by default. This chart is the Simplified Analytics version of the Team Performance Status Page. For information on how to use the Related Information panel (also known as the Unified Related Content Analytics pane), see PeopleTools: Pivot Grid, “Working with Simplified Analytics,” Accessing Simplified Analytics. |
| Add Analytics |
Click the button to create a new simplified analytics chart using the Create Analytics Wizard. The delivered role PivotGridSuperUser gives users the ability to create and publish reports. For information on how to create simplified analytics, see PeopleTools: Pivot Grid, “Working with Simplified Analytics,” Creating Simplified Analytics. |
 [Personalize RC (Related Content) icon] [Personalize RC (Related Content) icon] |
This icon appears at the top of the Related Information panel. Click to open the Personalize page. This page lists the available related content so you can choose whether the Related Information panel shows or hides each item. |
| [Simplified Analytics links] |
Click to open the corresponding analytic in modal window. |
 (Display Performance Status in Modal
Window icon) (Display Performance Status in Modal
Window icon) |
This icon appears at the top of each individual item in the Related Information panel. Click to expand the item to open a modal dialog with a larger interactive version of the chart. |
Use the Select Employee(s) page (HR_PSEL_FLU) to select employees for whom documents are to be created.
Navigation
Click the Create Documents button or Add icon on the Current Documents page.
Image: Select Employee(s) page
This example illustrates the fields and controls on the Select Employee(s) page.
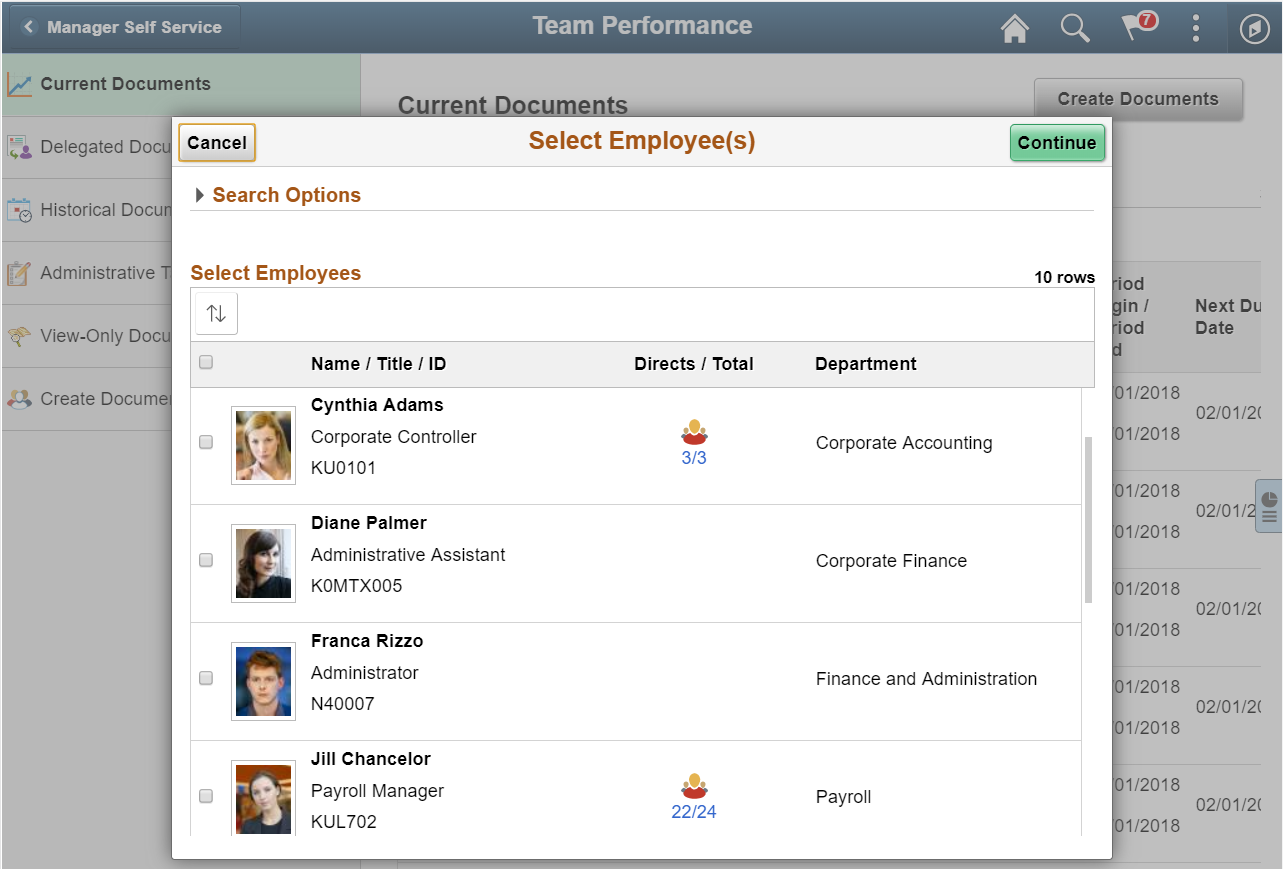
The ability for managers to create documents for employees is configured in the document type definition. For managers to create documents for any given document type, the option for the manager role to initiate the document creation process must be enabled on the Document Types Page.
The Select Employee(s) page displays all direct and indirect reports of the logged-in manager based on that manager’s job. Select from the grid one or more employees (or search for direct or indirect reports in the Search Options section) and click the Continue button.
Note: Indirect report information appears if the Allow Indirect Reports option is enabled on the Direct Reports Transaction Configuration Page for the PeopleSoft Fluid User Interface - Manager Self-Service transaction.
Use the Create Documents page (Team Performance) (EP_CREATE_MSS_FLU) to enter criteria to be used to create documents.
Navigation
Click the Continue button on the Select Employee(s) page.
Image: Create Documents page (Team Performance)
This example illustrates the fields and controls on the Create Documents page (Team Performance).
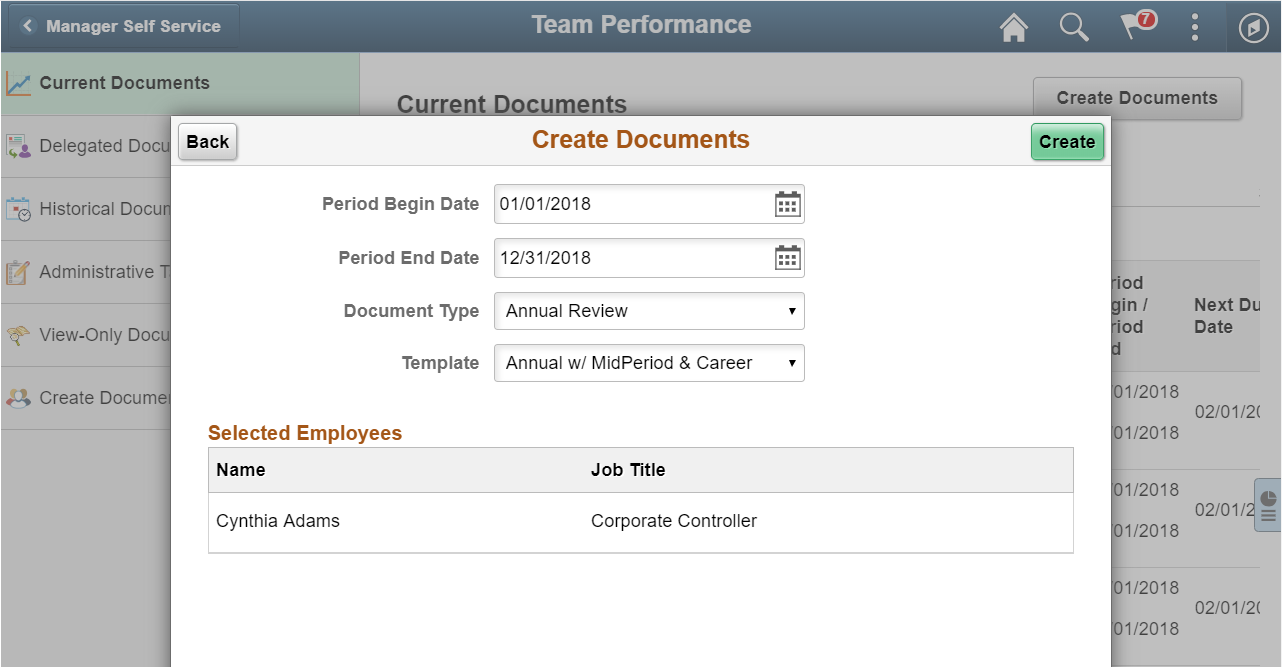
Managers use this page to specify the criteria used to create new documents. If default values (document type and evaluation period) are specified on the Assign Document Defaults Page for the Manager Self Service page, the system prepopulates them on this page. It also populates the Document Type drop-down field with document types that allow managers to initiate the document creation process.
|
Field or Control |
Definition |
|---|---|
| Create |
Click the button to start the document creation process. After documents are created successfully, a confirmation message with the created document count is displayed, and a new row for each document is added to the grid in the Current Documents page. Click the row to access the newly created document for the corresponding employee. If documents fail to create successfully, the system lists the information in a modal page as reference. |
Selected Employees
This grid lists the direct and indirect reports who were selected in the previous step.
Use the Delegated Documents page (EP_MSS_DELGATE_FL) to access the documents that are delegated to the logged-in manager.
Navigation
Click the Delegated Documents tab on the left panel of the Team Performance page.
Image: Delegated Documents page (Team Performance)
This example illustrates the fields and controls on the Delegated Documents page (Team Performance).
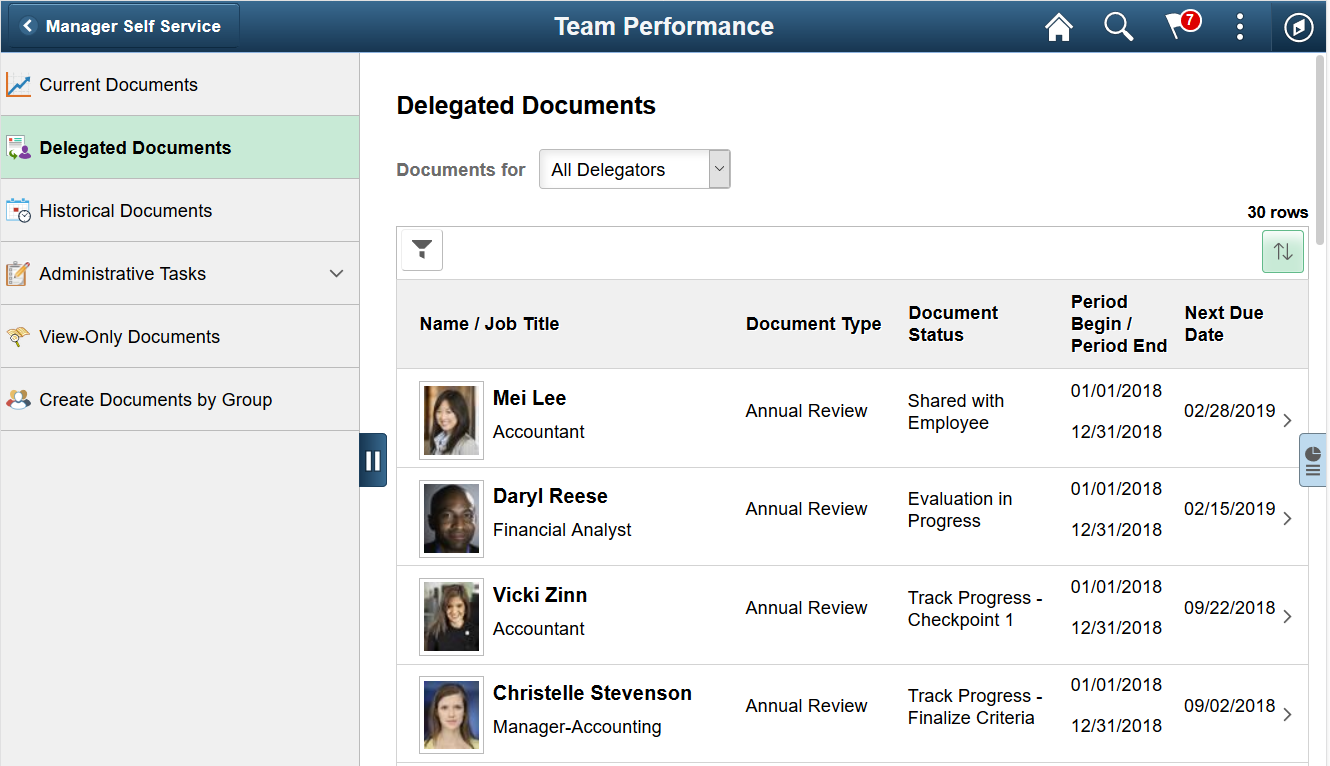
(Smartphone) To return to the navigation menu, click the back button on the banner.
If the logged-in manager has accepted one or more requests to be the delegated manager on someone’s behalf and delegated documents are available, they are accessible on the Delegated Documents page.
The same grid layout is used for displaying current documents and delegated documents. On the top right corner of the grid, row count is displayed.
|
Field or Control |
Definition |
|---|---|
| Documents for or Delegated Documents For |
Select a manager for whom the documents are shown on the grid. By default, all delegated documents are displayed. This field appears if the logged-in manager is delegated by more than one manager. If the logged-in manager is delegated by one manager, that manager’s name appears instead. |
Click a row to open the corresponding document for review in the ePerformance WorkCenter. From the WorkCenter, you can click the Team Performance button on the page banner to return to the Team Performance page.
Use the Historical Documents page (Team Performance) (EP_MSS_HIST_FL) to access completed or canceled documents that are owned by the logged-in manager.
Navigation
Click the Historical Documents tab on the left panel of the Team Performance page.
Image: Historical Documents page (Team Performance)
This example illustrates the fields and controls on the Historical Documents page (Team Performance).
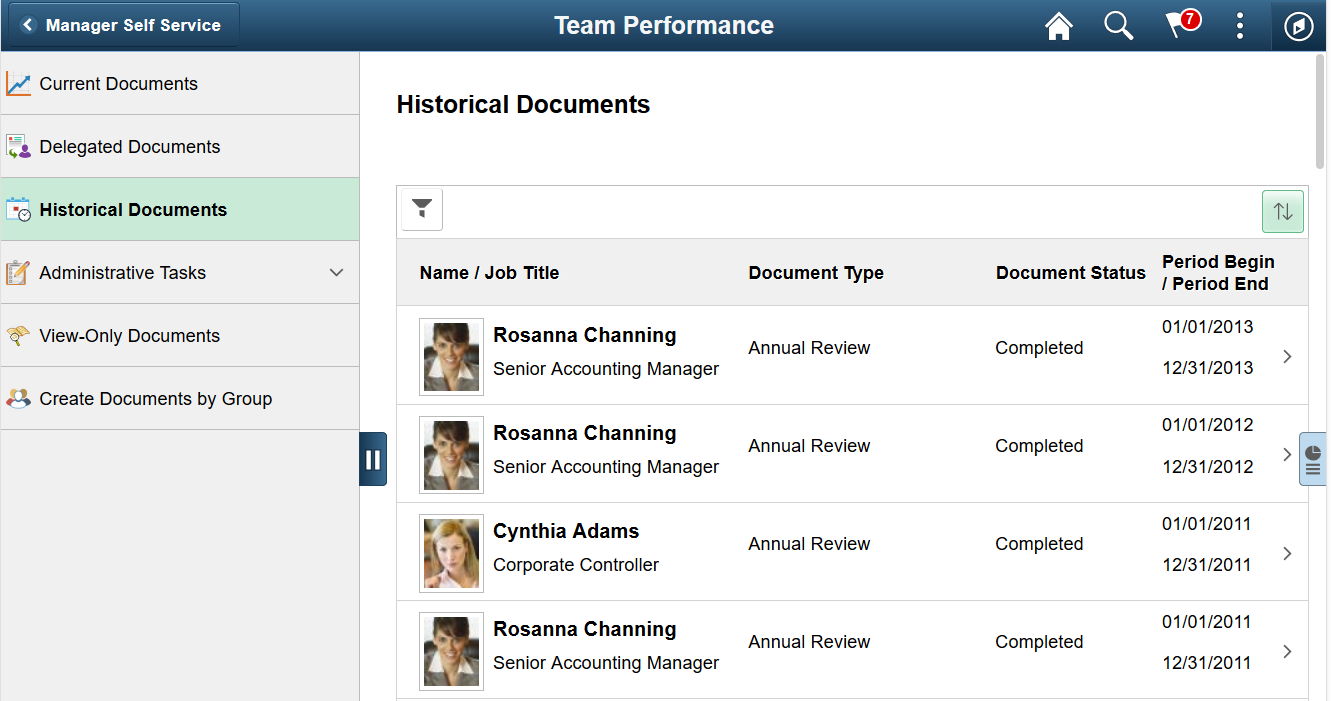
(Smartphone) To return to the navigation menu, click the back button on the banner.
The grid on this page lists all historical documents (document status is either Completed or Canceled) for the logged-in manager, which include both performance and development documents. Information shown in this grid contains:
Employee name and job title
Document type
Document status
Evaluation period
Click a row to open the corresponding document for review in the ePerformance WorkCenter. From the WorkCenter, you can click the Team Performance button on the page banner to return to the Team Performance page.
Use the Transfer Documents page (EP_MSSADM_SELCT_FL) to transfer documents to other managers.
Navigation
Click Administrative Tasks and then the Transfer Documents tab on the left panel of the Team Performance page.
Image: Transfer Documents page (Team Performance)
This example illustrates the fields and controls on the Transfer Documents page (Team Performance).
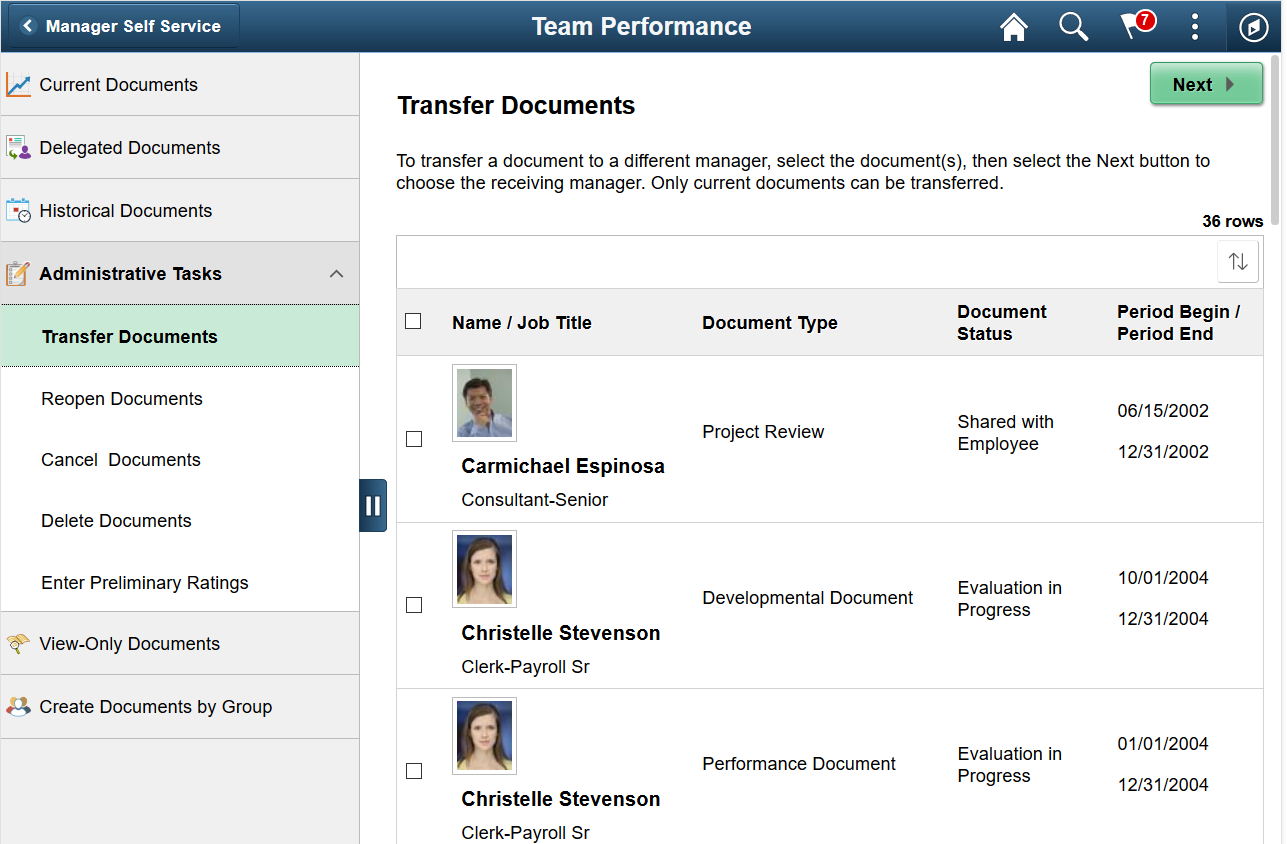
The grid on this page lists all current documents that are owned by the logged-in manager. To transfer documents to another manager, select one or more documents and click the Next button.
Use the Select a Manager page (HR_PSEL_FLU) to select a manager for the document transfer.
Navigation
Click the Next button on the Transfer Documents page.
Image: Select a Manager page
This example illustrates the fields and controls on the Select a Manager page.
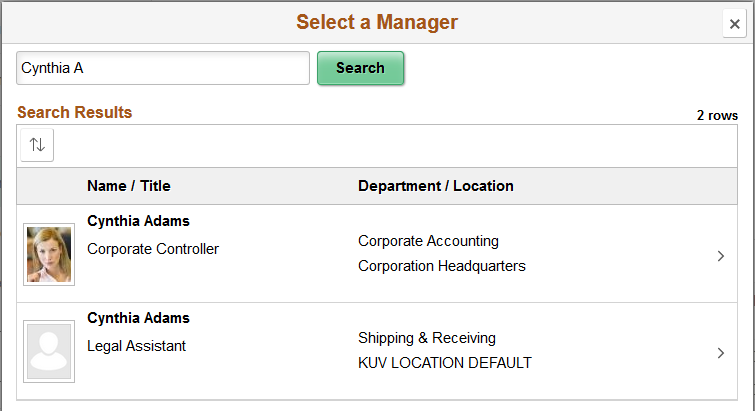
To select a manager to whom the documents are transferred, enter the full or partial name, alternate character name, or email address of the manager, and click the Search button. Click to select the desired manager from the search result.
Use the Transfer Documents - Confirmation page (EP_MSSADM_CONF_FL) to review and confirm the document transfer.
Navigation
Click a manager row for the transfer on the Select a Manager page.
Image: Transfer Documents - Confirmation page (Team Performance)
This example illustrates the fields and controls on the Transfer Documents - Confirmation page (Team Performance).
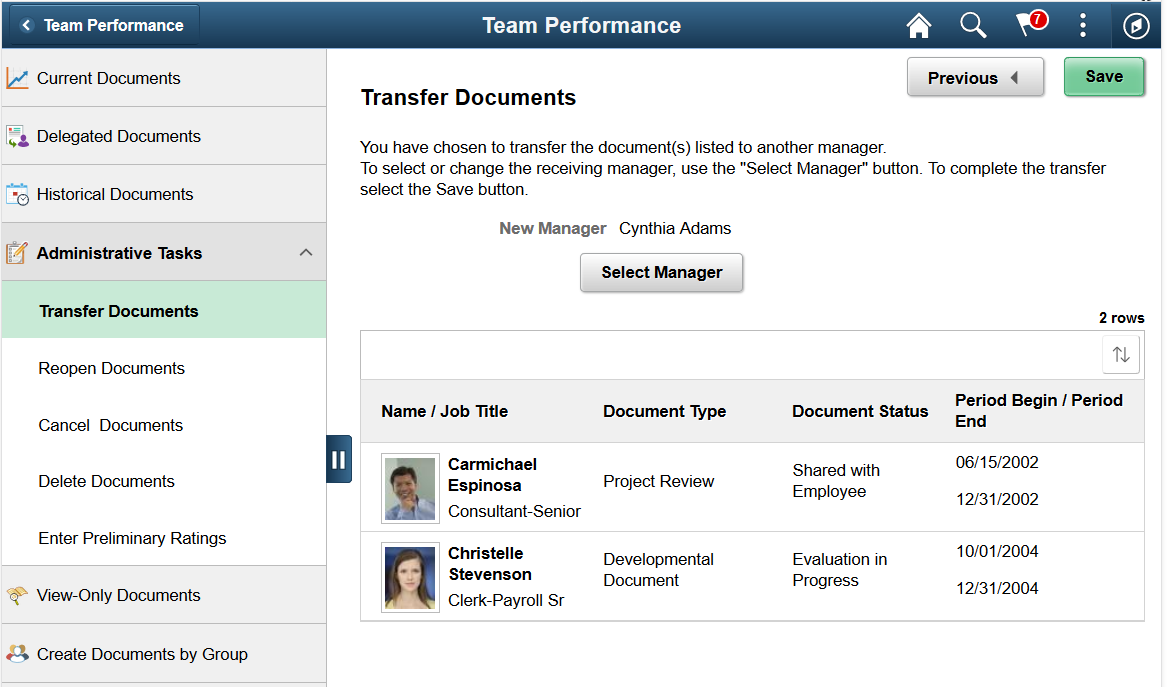
The grid on this page lists the selected documents and the receiving manager for the transfer. Click the Select Manager button to choose a different manager if necessary. Click the Save button to complete the document transfer.
Use the Reopen Documents page (EP_MSSADM_SELCT_FL) to change the status of documents that are currently in the evaluation phase back to Evaluation in Progress.
Navigation
Click Administrative Tasks and then the Reopen Documents tab on the left panel of the Team Performance page.
Image: Reopen Documents page (Team Performance)
This example illustrates the fields and controls on the Reopen Documents page (Team Performance).
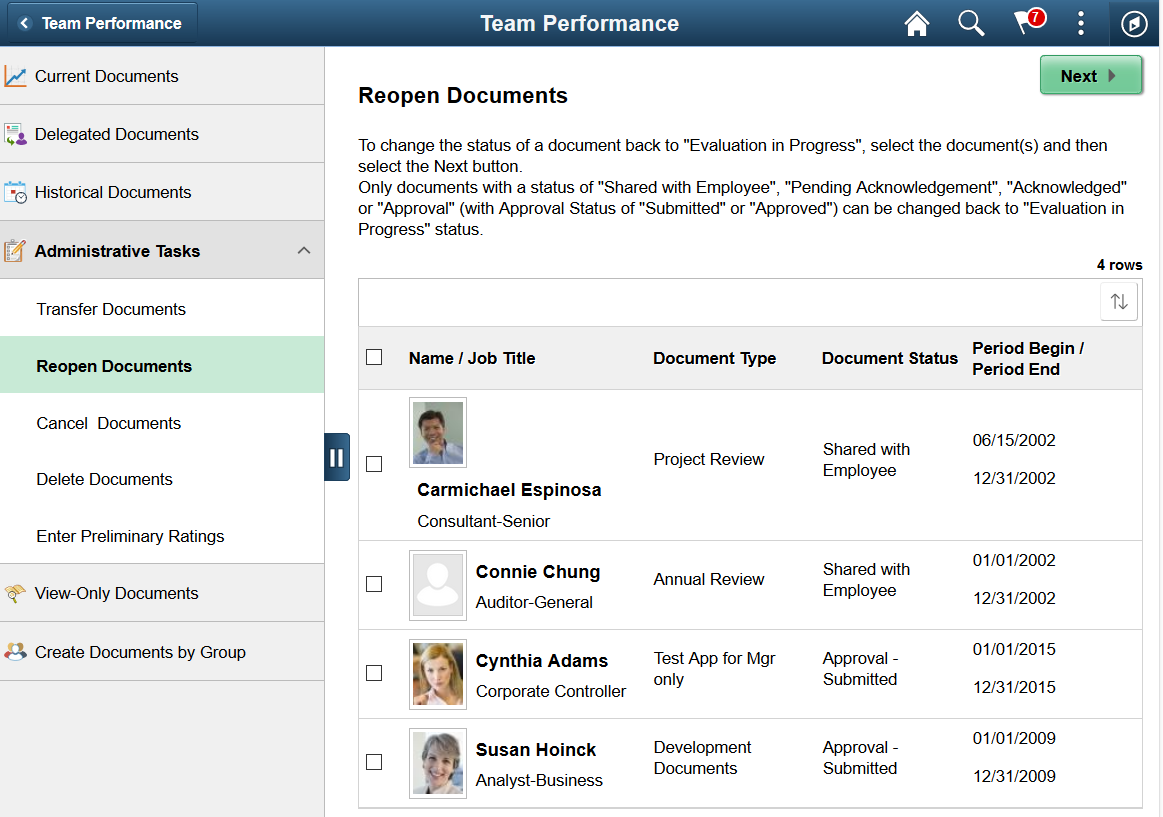
The grid on this page lists the documents (owned by the logged-in manager) that are in any these statuses:
Shared with Employee
Pending Acknowledgement
Acknowledged
Approval - Submitted
Approval - Approved
To change the status of documents back to Evaluation in Progress for further updates, select one or more documents and click the Next button.
Use the Reopen Documents page (EP_MSSADM_CONF_FL) to review and confirm the status change of the selected documents back to Evaluation in Progress.
Navigation
Click the Next button on the Reopen Documents page.
Image: Reopen Documents - Confirmation page (Team Performance)
This example illustrates the fields and controls on the Reopen Documents - Confirmation page (Team Performance).
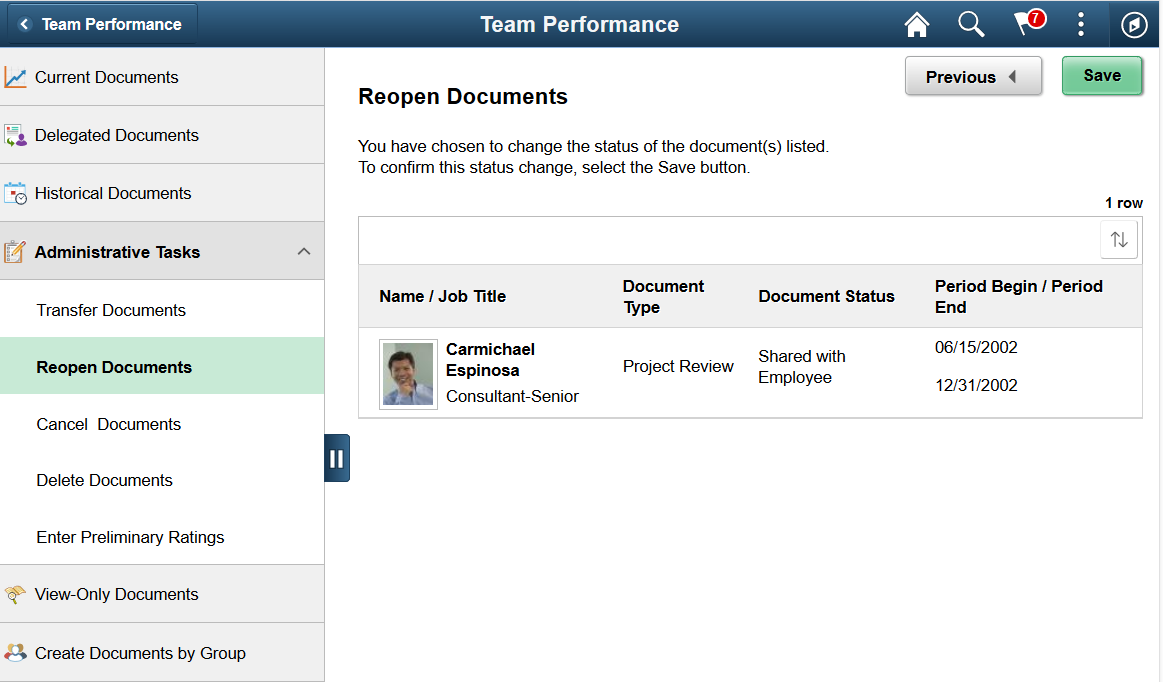
The grid on this page lists the selected documents to be reopened. Click the Save button to complete the transaction.
Use the Cancel Documents page (EP_MSSADM_SELCT_FL) to cancel documents.
Navigation
Click Administrative Tasks and then the Cancel Documents tab on the left panel of the Team Performance page.
Image: Cancel Documents page (Team Performance)
This example illustrates the fields and controls on the Cancel Documents page (Team Performance).

The grid on this page lists the documents (owned by the logged-in manager) that are in any these statuses:
Define Criteria
Track Progress
Evaluation in Progress
Select one or more documents you wish to cancel, and click the Next button.
Use the Cancel Documents - Confirmation page (EP_MSSADM_CONF_FL) to review and confirm the cancelation of selected documents.
Navigation
Click the Next button on the Cancel Documents page.
Image: Cancel Documents - Confirmation page (Team Performance)
This example illustrates the fields and controls on the Cancel Documents - Confirmation page (Team Performance).
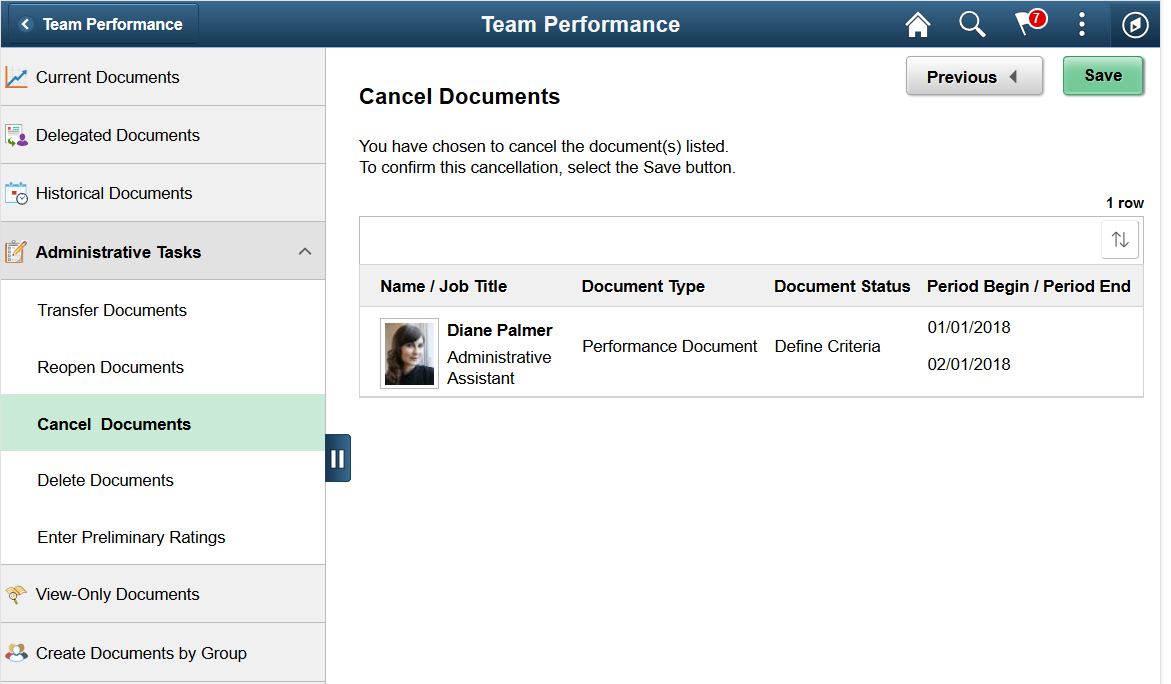
The grid on this page lists the selected documents to be canceled. Click the Save button to complete the transaction.
Use the Delete Documents page (EP_MSSADM_SELCT_FL) to delete canceled documents.
Navigation
Click Administrative Tasks and then the Delete Documents tab on the left panel of the Team Performance page.
Image: Delete Documents page (Team Performance)
This example illustrates the fields and controls on the Delete Documents page (Team Performance).
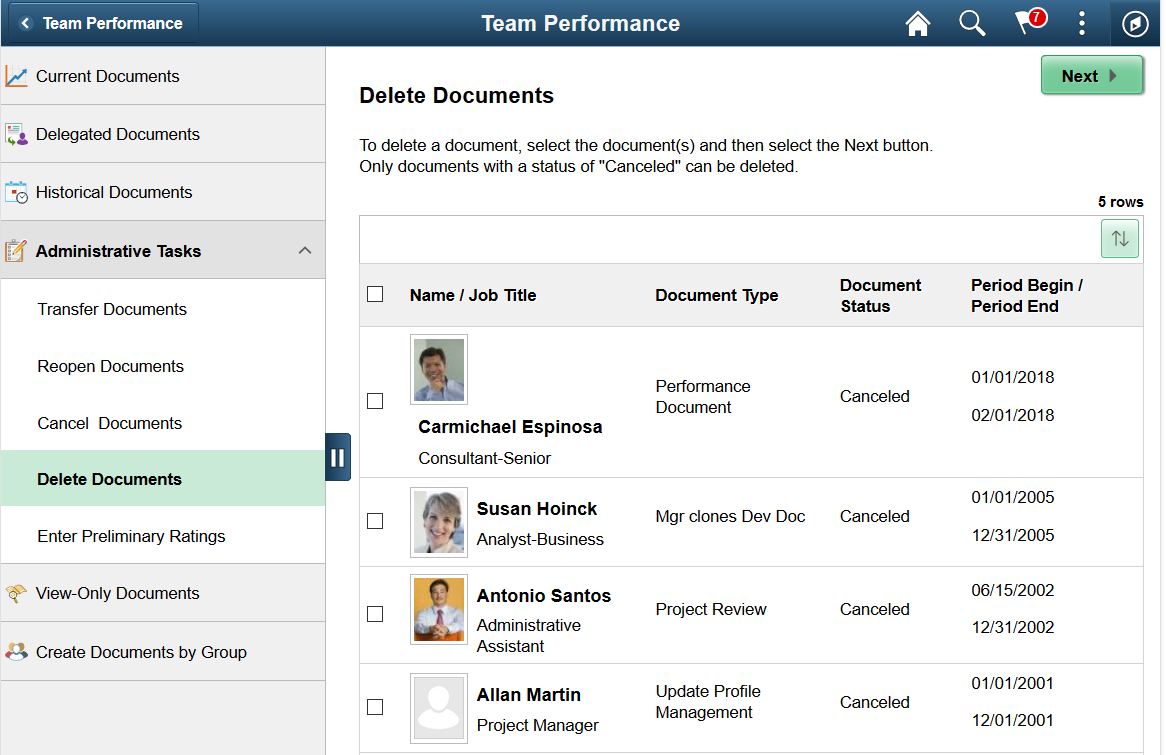
The grid on this page lists the documents (owned by the logged-in manager) that are in the Canceled status:
Select one or more documents you wish to delete, and click the Next button.
Use the Delete Documents - Confirmation page (EP_MSSADM_CONF_FL) to review and confirm the deletion of selected documents.
Navigation
Click the Next button on the Delete Documents page.
Image: Delete Documents - Confirmation page (Team Performance)
This example illustrates the fields and controls on the Delete Documents - Confirmation page (Team Performance).
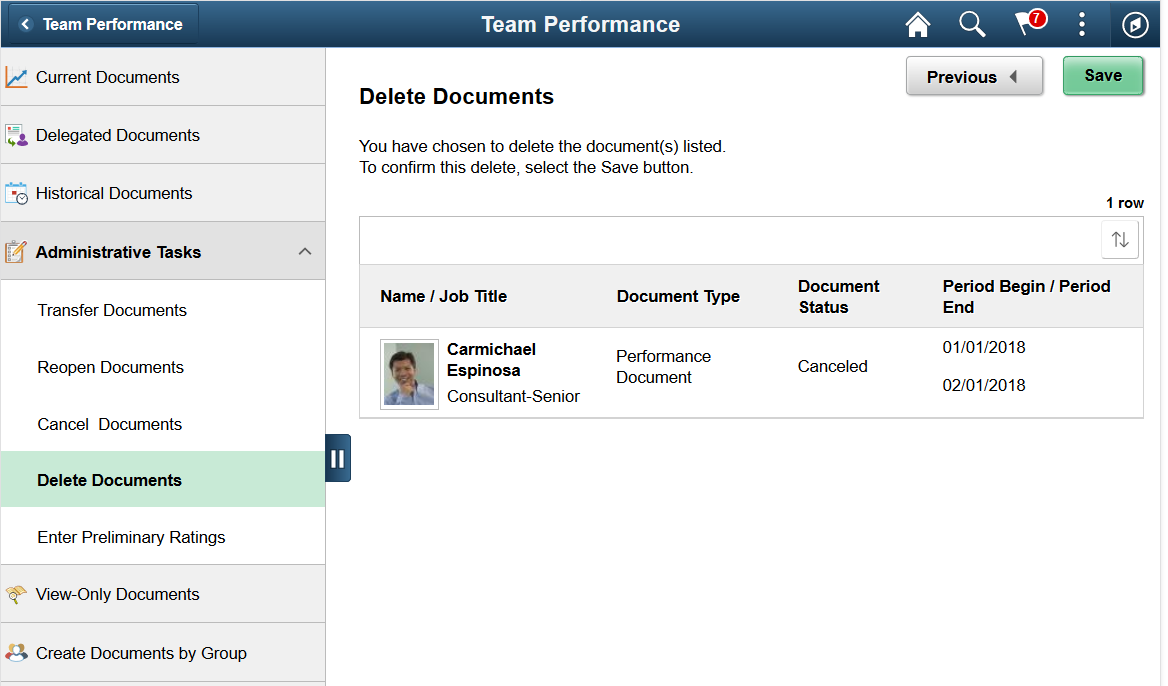
The grid on this page lists the selected documents to be deleted. Click the Save button to complete the transaction.
Use the Enter Preliminary Ratings page (EP_MSSADM_CONF_FL) to enter preliminary performance ratings for documents that are currently in progress.
Navigation
Click the Enter Preliminary Rating tab on the left panel of the Team Performance page.
Image: Enter Preliminary Ratings page (Team Performance)
This example illustrates the fields and controls on the Enter Preliminary Ratings page (Team Performance).
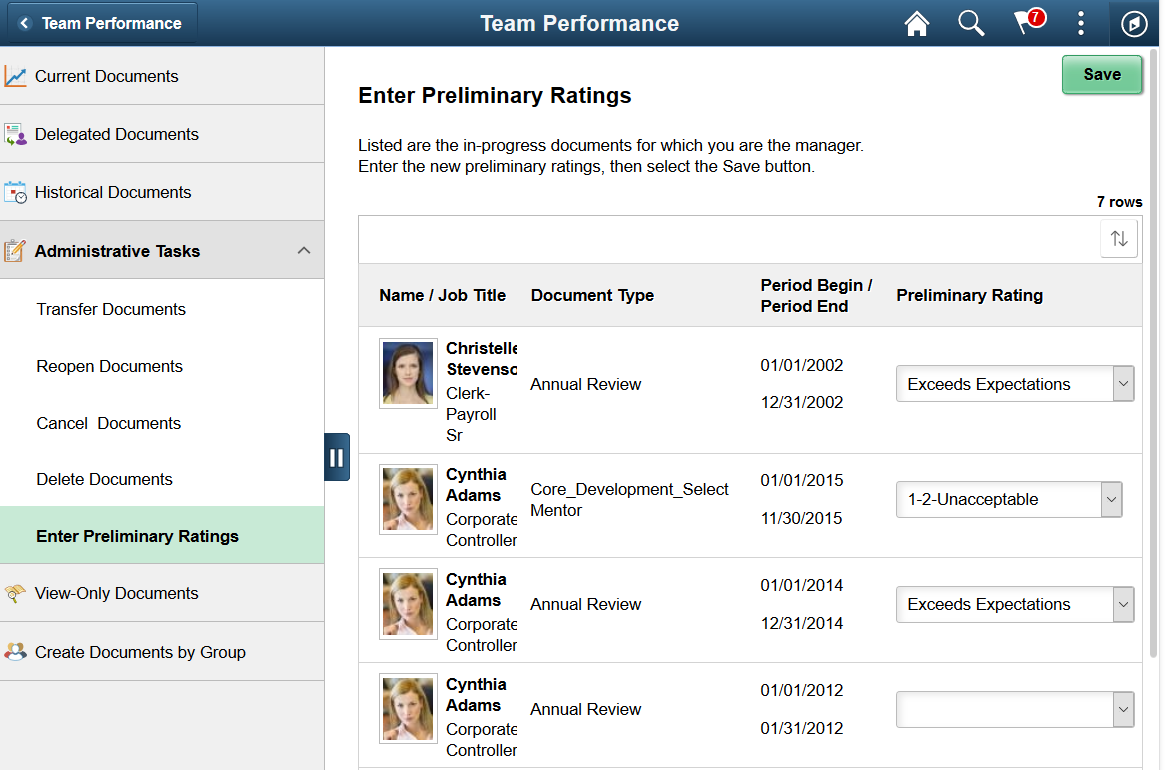
You can enter the preliminary performance ratings for documents (owned by the logged-in manager) that are currently in progress. The rating values of each document come from the rating model that is associated with the Overall Summary section of the document.
Use the View-Only Documents - Select Employee page (HR_PSEL_FLU) to select employees and review their documents.
Navigation
Click the View-Only Documents tab on the left panel of the Team Performance page.
Image: View-Only Documents - Select Employee page (Team Performance)
This example illustrates the fields and controls on the View-Only Documents - Select Employee page (Team Performance).
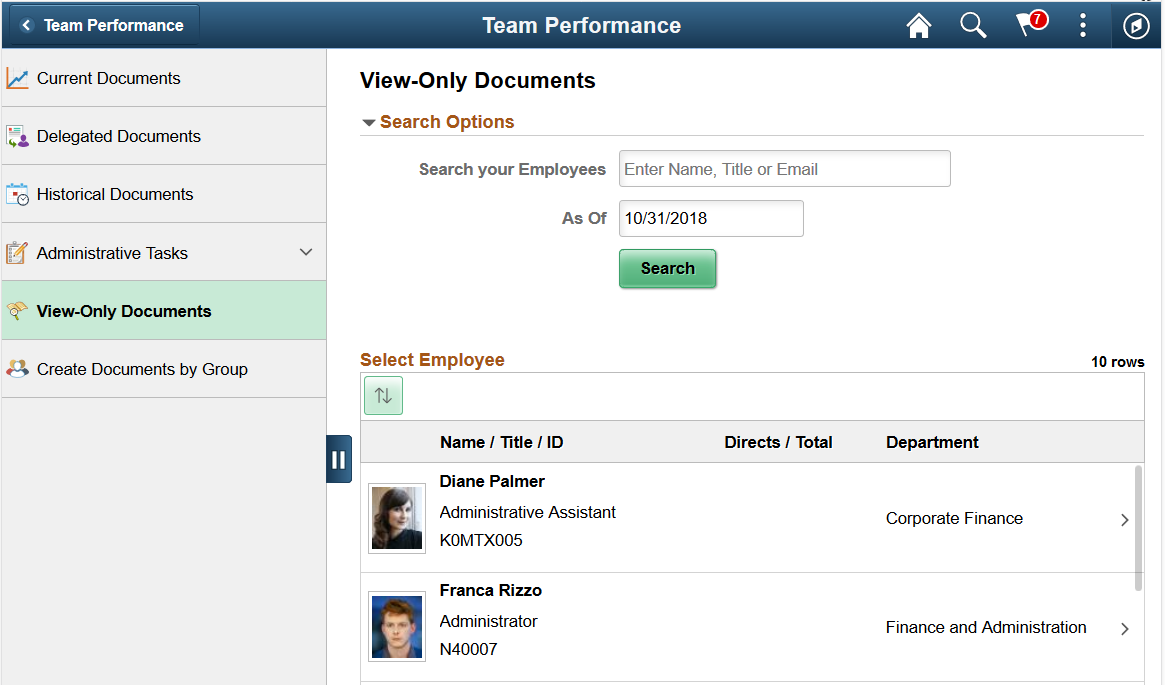
Use this page search for an employee in your reporting organization for whom the documents are displayed. You can either select the individual from the Select Employee section, or search by entering the full or partial name, title or email address of the individual in the Search Options section.
Use the View-Only Documents - Document List page (EP_MSS_VIEWONLY_FL) to view the list of documents for the selected employee.
Navigation
Click an employee row on the View-Only Documents - Select Employee page.
Image: View-Only Documents - Document List page (Team Performance)
This example illustrates the fields and controls on the View-Only Documents - Document List page (Team Performance).
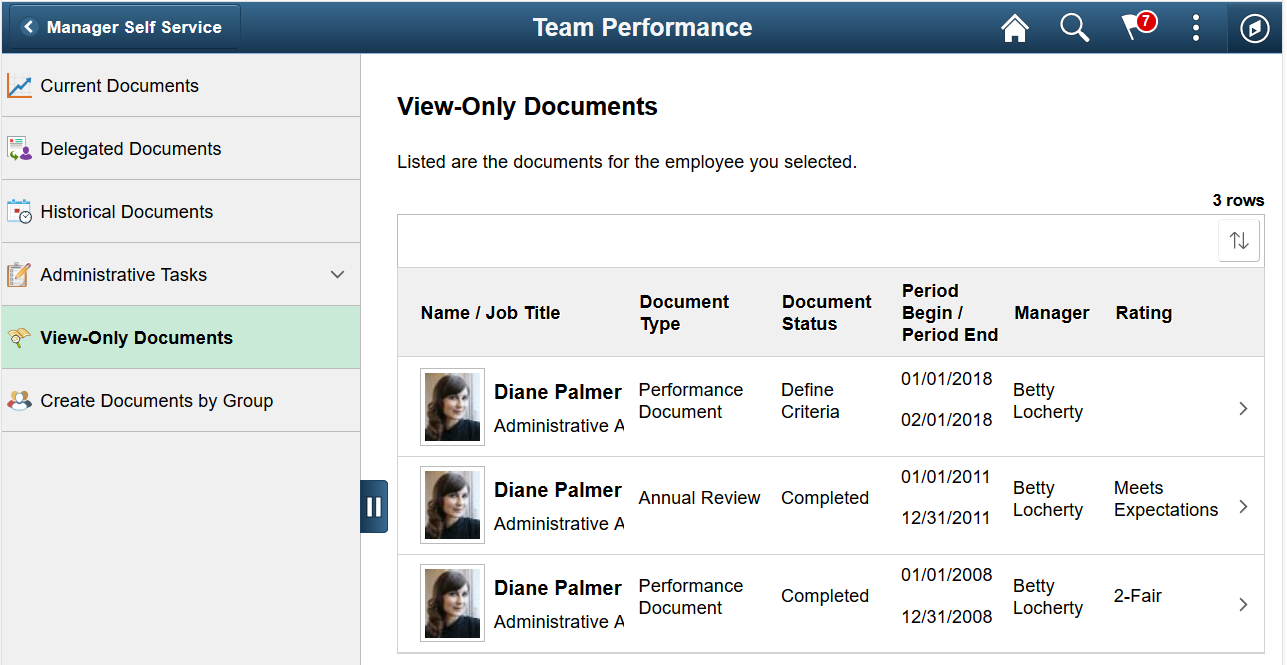
The grid on this page lists all the documents created for the selected employee, with the exception of the deleted ones. Click a document row to view the it in detail.
Use the Create Documents by Group - Select Group page (HR_PSEL_GROUP_FL) to select a group of employees for whom documents are created.
Navigation
Click the Create Documents by Group tab on the left panel of the Team Performance page.
Image: Create Documents by Group - Select Group page (Team Performance)
This example illustrates the fields and controls on the Create Documents by Group - Select Group page (Team Performance).
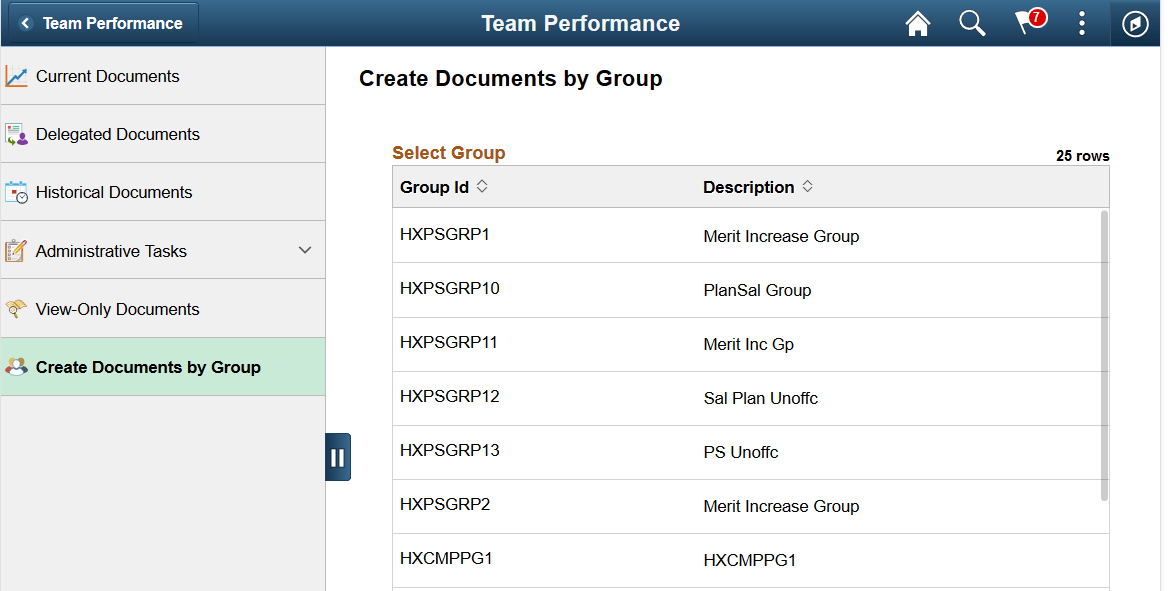
Click a group row for which documents are to be created.
Use the Create Documents by Group - Select Employees page (HR_PSEL_GROUP_FL) to select employees from the selected group for whom documents are created.
Navigation
Click a group row on the Create Documents by Group - Select Group page.
Image: Create Documents by Group - Select Employees page (Team Performance)
This example illustrates the fields and controls on the Create Documents by Group - Select Employees page (Team Performance).
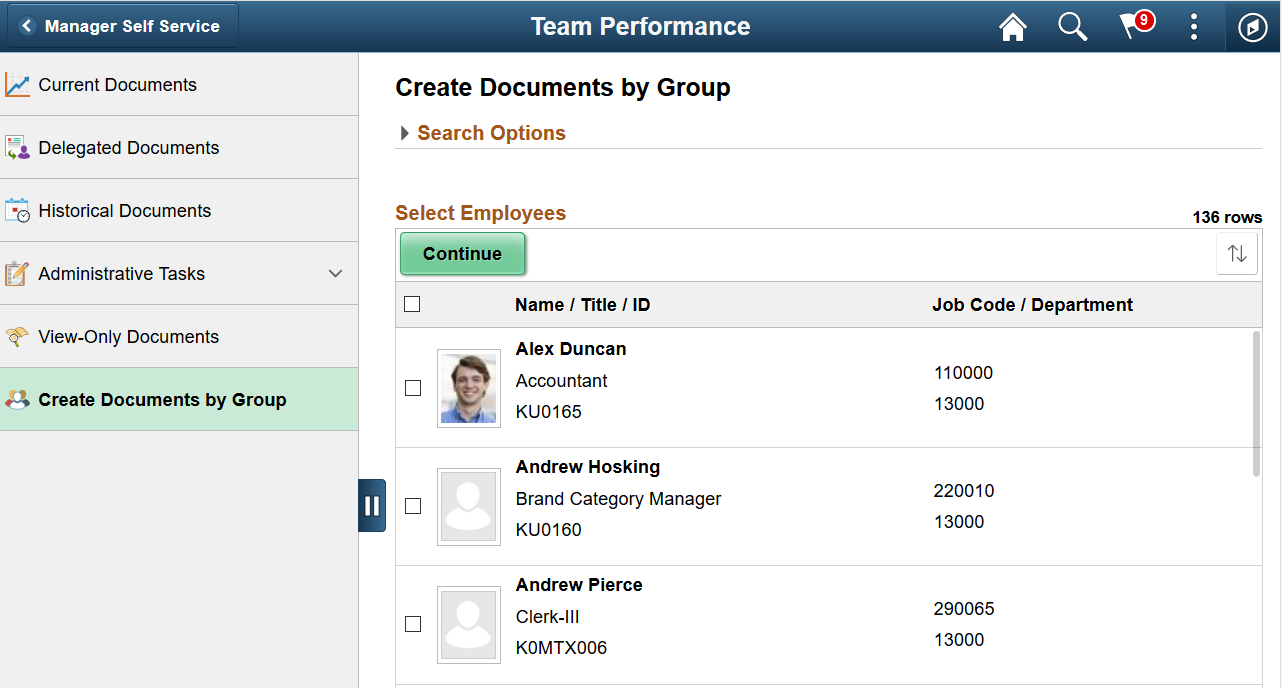
Select one ore more employees from the group for whom documents are created, and click the Continue button to move to the next step.
Use the Create Documents by Group - Document Creation Details page (EP_CREATE_MSS_FLU) to select the document template and dates that are used to create documents.
Navigation
Click the Continue button on the Create Documents by Group - Select Employees page.
Image: Create Documents by Group - Document Creation Details page (Team Performance)
This example illustrates the fields and controls on the Create Documents by Group - Document Creation Details page (Team Performance).
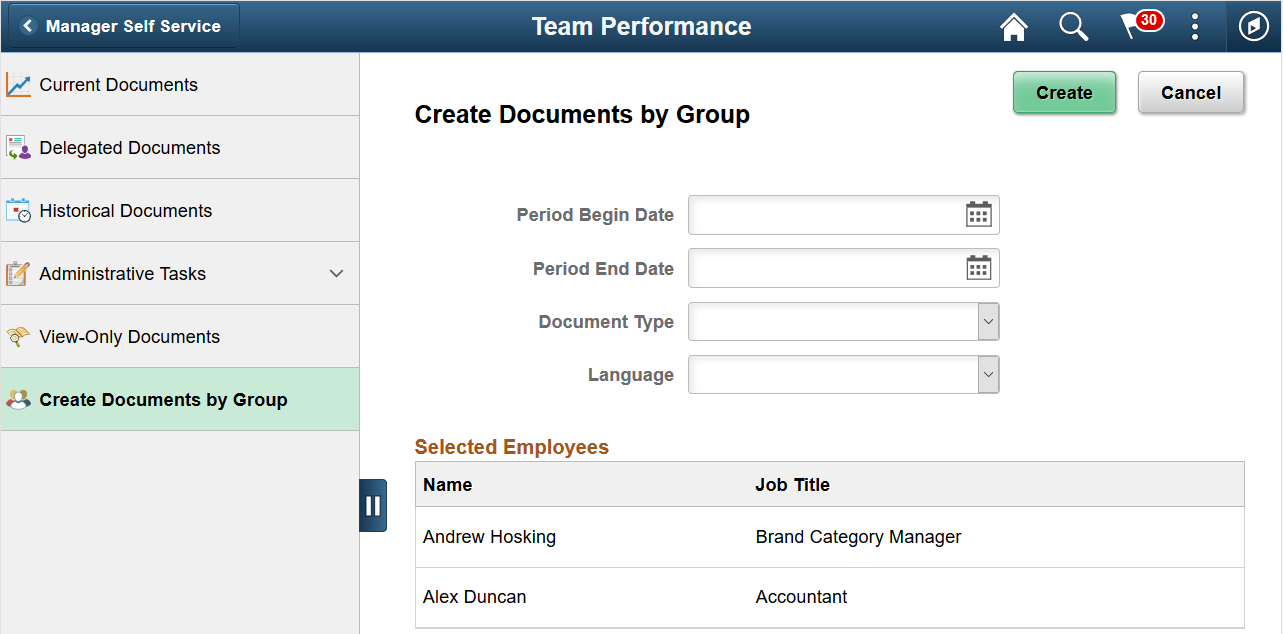
Specify the evaluation period and document type of the documents to be created for the selected employees. Depending on the selected document type, select additional information as needed, such as the template, the language used, and whether to create documents by cloning from prior ones. Click the Create button to generate the documents.
Use the Create Documents by Group - Results page (EP_CREATE_M_RS_FLU) to view the document creation results.
Navigation
Click the Create button on the Create Documents by Group - Document Creation Details page.
Image: Create Documents by Group - Results page (Team Performance)
This example illustrates the fields and controls on the Create Documents by Group - Results page (Team Performance).
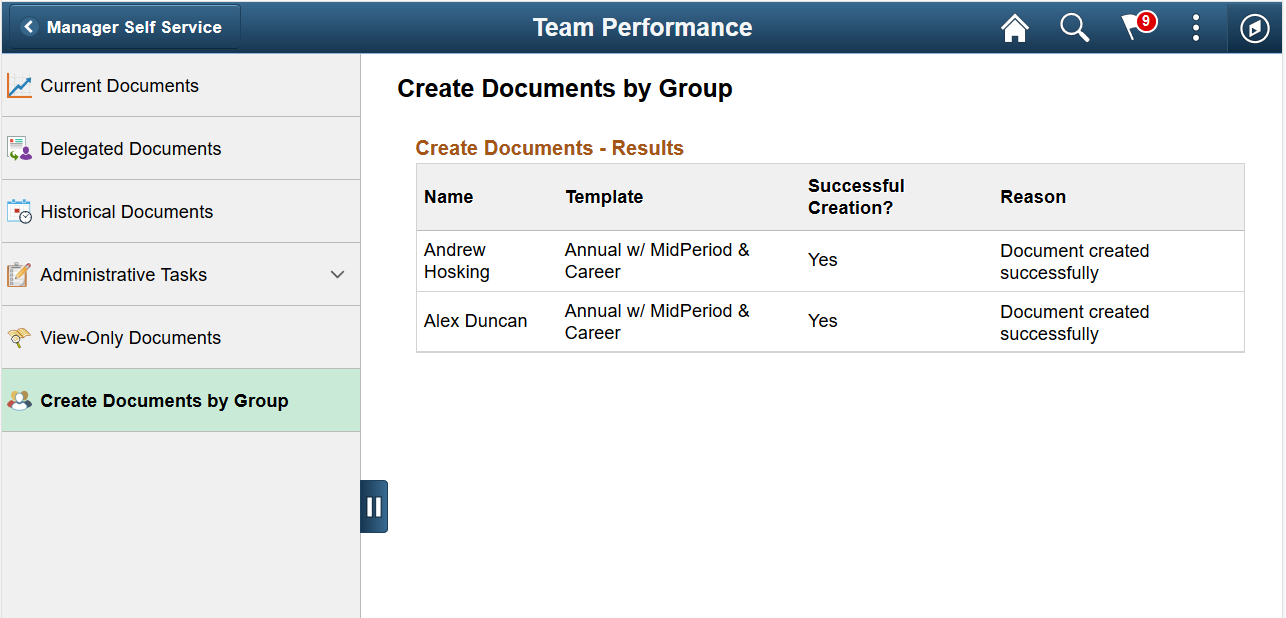
Use this page to view the document creation results.
Use the Team Performance Status tile (EP_PG_DOCSTS_FLU) to view the performance status of all documents in which the logged-in user (or anyone reporting up to the logged-in user) is listed as the manager.
Navigation
(For the first time) Select Personalize Homepage from the Actions List. On the Personalize Homepage for Manager Self Service or any preferred home page, add the Team Performance Status tile.
Select the home page where the Team Performance Status tile is added (for example, the Manager Self Service landing page).
Image: Team Performance Status tile
This example illustrates the fields and controls on the Team Performance Status tile.
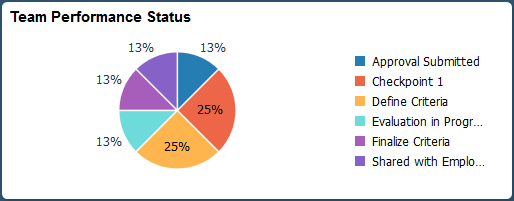
The tile displays the status of all documents in the manager’s organization. Click the tile to access the Team Performance Status Page.
By default, it shows the information of the logged-in manager. However, the manager can change settings on the Team Performance Status page and selects a different manager (direct or indirect), in which case the information for that manager's organization is displayed. For example, if Betty Locherty logs in the first time, she sees her organization (including all documents owned by her direct and indirect reports). Later, if Betty Locherty changes the manager to Rosanna Channing, the chart refreshes and shows all documents in Rosanna's organization when Betty views the tile again.
Use the Team Performance Status page (EP_PG_DOCSTS_FLU) to view the performance status of documents in details, and modify chart displays if necessary.
Navigation
Click the Team Performance Status tile on the Manager Self Service page or a home page where the tile is added.
Image: (Tablet) Team Performance Status page
This example illustrates the fields and controls on the Team Performance Status page for the tablet.
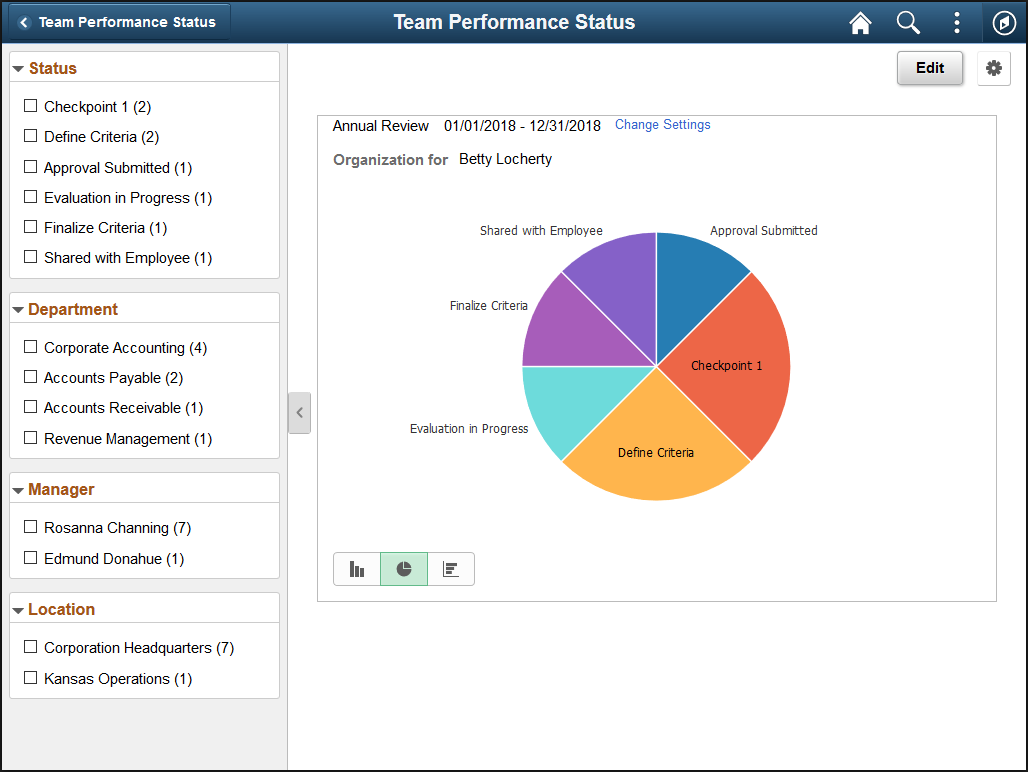
Image: (Smartphone) Team Performance Status page
This example illustrates the fields and controls on the Team Performance Status page for the smartphone.
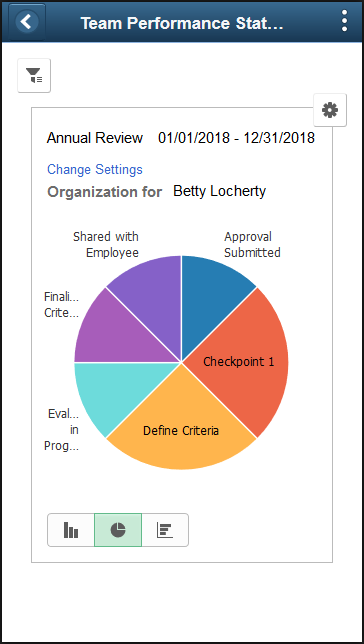
This page mimics the My Team’s Performance Status Pagelet and displays the performance status of all documents in which the logged-in user (or anyone reporting up to the logged-in user) is listed as the manager. In addition to the chart, document information is also presented in a grid view.
|
Field or Control |
Definition |
|---|---|
| Organization for |
Displays the name of the manager for which the document status chart is built. The chart includes all documents that have the logged-in user (or anyone reporting up to him or her) as the manager initially. However, you have the option to select a different manager and view the documents that are specific to his or her organization. |
 |
Click the icon to select filter values (by status, by manager, by location, and by department) for the chart. This option is applicable to the smartphone view only. |
 |
Click the icon to perform one of these actions:
|
| Change Settings |
Click the link to select or update parameters (document type, evaluation period, and manager) that are used to build the chart on a modal page. |
Filter Criteria
From the filter criteria area, managers can:
View the document count by filtering parameter.
Filter document information by status, by manager (which can be direct and indirect reports within the same organization), by location, and by department.
Chart
From the chart, managers can:
View the distribution of manager’s documents by status.
Click pie segments to view document details of corresponding statuses in a modal window.
Open documents for edits or viewing from the modal window.
|
Field or Control |
Definition |
|---|---|
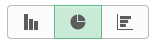 |
Click to display data in the chart type represented by the icon. Available chart types include vertical bar, pie (default value) and horizontal bar. |
Use the Change Settings page (EP_PG_CHNG_SET_SCF) to edit the default settings used for launching the Team Performance Status page.
Navigation
Click the Change Settings link on the Team Performance Status page.
Image: Change Settings page
This example illustrates the fields and controls on the Change Settings page.
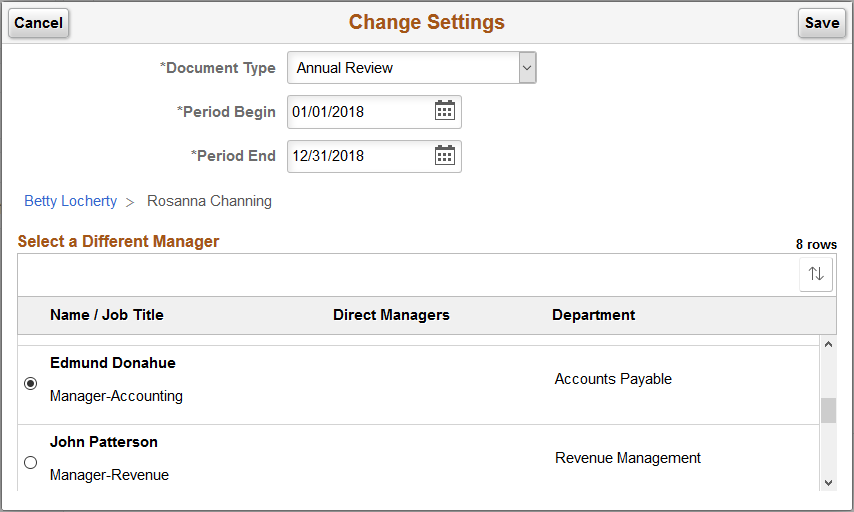
Use this page to change the document settings (document type, evaluation period, and manager) that are used populate the chart.
|
Field or Control |
Definition |
|---|---|
| <name link> and <organization hierarchy> |
Click to refresh the Select a Different Manager section to display the organization of the logged-in manager (self). This is useful when you have previously selected a manager for the chart and now you wish to reposition and select a different manager within the organization. As you expand the organization of a direct manager, the page refreshes and shows the current level of the organizational hierarchy you are on in a path. |
Select a Different Manager
To choose a manager whose name is not available because he or she is a lower level manager reporting to another manager on the list, click the Direct Managers Count icon to expand the organizational hierarchy of that other manager, and select the person of your choice.