Defining Earning Elements
To define earning elements, use the Earnings (GP_EARNING) component.
|
Page Name |
Definition Name |
Usage |
|---|---|---|
|
GP_PIN |
Name the element and define its basic parameters. |
|
|
GP_PIN_USR_FLD_SEC |
Define user fields to create unique instances of an element. |
|
|
GP_ERN_DED_CALC |
Define calculation rules for an earning element. |
|
|
GP_ERN_DED_RND |
Specify rounding and proration options for the components of an earning element. |
|
|
GP_AUTOGEN_ACUM |
Define characteristics of automatically generated accumulators for an earning element. |
|
|
GP_ERN_DED_ACM_SEC |
Define which accumulators the system creates. This page is also used to view deduction elements. |
|
|
GP_AUTOGEN_SEC |
Displays the system- generated components and accumulators that have been created for an earning element. This page is also used to view deduction elements. |
|
|
GP_ERN_DED_AC_ADDL |
Indicate the accumulators (already defined in the system) to which the earning element contributes. |
|
|
GP_ELM_DFN_SOVR |
Override the value of certain supporting elements that are used by the earning element or override the supporting elements when they are not part of the earning definition. This page is also used to override deductions. |
Earnings are any type of compensation, such as salary, fees, and bonuses, that a person receives for work or services performed. You define earning elements to represent your organization's earning rules.
To create an earning element:
Define the earning name, security levels, and allowable overrides on the Earnings Name page.
You can also associate the earning element with a driver accumulator or user fields.
Set up the calculation rule on the Earnings - Calculation page.
You select the components that make up the calculation rule: an amount or a combination of a base, percent, rate, and unit. You also define the frequency of the earning and select any generation control parameters that apply. You define pre processing and post processing formulas for the earning as well as retroactive recalculation options.
Note: If the earning has been processed (has results in the output results) or has more than one effective-dated row, you cannot change a calculation rule once you define it.
Specify the rounding and proration rules for the element on the Earnings - Rounding/Proration page.
You can select rounding and proration rules that are defined on the Pay Group Defaults page, specify your own rules, or use no rounding or proration.
Define the characteristics of the automatically generated accumulators on the Earnings - Auto Generated Accumulators page.
You define the characteristics of the accumulators that track and maintain balances for a payee's earning. You specify the type of accumulator, indicate when and how the accumulator gets updated, and select the calendar and fiscal periods for the accumulator.
Select the accumulators that the earning element contributes to on the Earnings - Accumulators page.
You can indicate which accumulators this earning is a member of. For each accumulator, you specify the element name, begin and end dates, whether the earning adds or subtracts from the accumulator, and the percentage of the earning to add to or subtract from the accumulator.
Override a supporting element, as needed.
You can override a supporting element that may or may not be used in the calculation of the earning.
Use the Earnings Name page (GP_PIN) to name the element and define its basic parameters.
Navigation
Image: Earnings Name page
This example illustrates the fields and controls on the Earnings Name page.
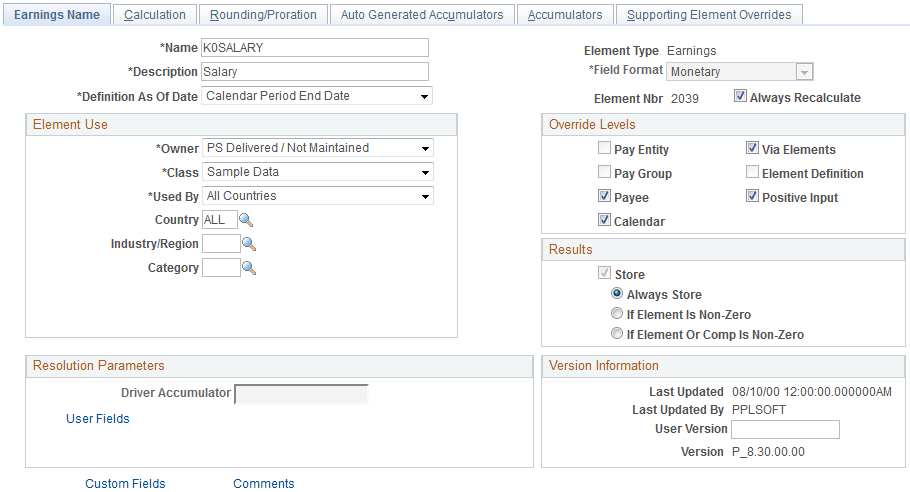
Note: You name every element and define its basic parameters on an Element Name page. All element components within Global Payroll share the same first Element Name page (GP_PIN). However, the Earnings Name page contains the following additional fields that apply only to earnings.
|
Field or Control |
Definition |
|---|---|
| Driver Accumulator |
To drive multiple resolutions of an earning using an accumulator, designate the accumulator in the Driver Accumulator field. For each instance of the accumulator, the system resolves a separate instance of the earning. Note: When you link a driver accumulator to an earning, the earning inherits the user keys of the accumulator as user fields. |
| User Fields |
Click to access the User Fields page, where you can:
See Earnings - User Fields for Element <name> Page, Understanding Multiple Resolutions. |
Note: All other fields on the Earnings Name page are discussed elsewhere in this documentation.
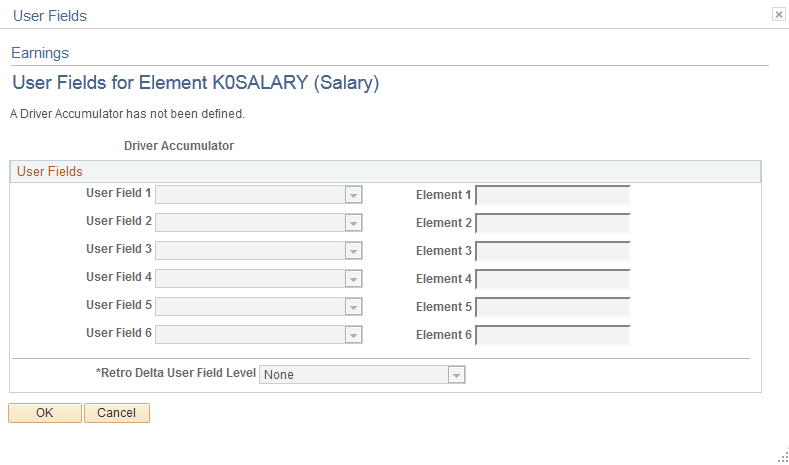
Use the Earnings - User Fields for Element <name> page (GP_PIN_USR_FLD_SEC) to define user fields to create unique instances of an element.
Navigation
Click the User Fields link on the Earnings Name page.
Image: Earnings - User Fields for Element <name> page
This example illustrates the fields and controls on the Earnings - User Fields for Element <;name> page.
|
Field or Control |
Definition |
|---|---|
| User Field 1– 6 |
Define the type of element that you want to hold the value of the user field. Valid values are Variable and System Element. If your rules design calls for the value of this field to be defined on the element assignment (recurring) pages, you must select Variable. This is because the only supporting elements you can override on these pages are variables. If you plan to override the value of this element through positive input, you can select either Variable or System Element. Note: The values of these fields can also be set by other elements such as formulas, brackets, and arrays. Note: If you enter an accumulator driver on the Earnings Name page, these fields become unavailable for data entry. The user keys of the driver accumulator automatically become the user fields of the earning element, and the User Fields display the entry type (Variable or System Element) of the inherited accumulator keys. In addition, once an earning has been processed, the user fields cannot be changed. They can only be viewed. |
| Element 1 – 6 |
If you select Variable for User Field 1– 6, enter the name of the variable element that you want to hold the value of this field. Note: You must have previously defined the variable on the variable definition pages. If you select System Element for User Field 1– 6, enter the name of the system element that you want to hold the value of this field. Note: If you enter an accumulator driver on the Earnings Name page, the Element fields become unavailable for data entry. The user keys of the driver accumulator automatically become the user fields of the earning element, and Elements 1–6 display the variables or system elements that have been defined to hold the values of the accumulator keys. |
| Retro Delta User Field Level |
Select a user field level to control how the system groups retroactive deltas for different instances of an earning with different user field values:
Note: The values available for selection depend on the number of user fields defined. For example three user fields give the choices None, Through User Field 1, Through User Field 2, and All User Fields Defined. If you change the user fields or alter the user keys of the driver accumulator, the system automatically updates the available values. If you reduce the number of user fields so that the current Retro Delta User Field Level value is no longer valid, the system changes the Retro Delta User Field Level value to be All User Fields Defined and issues a message to that effect. The Retro Delta User Field Level value can subsequently be changed. Important! If a deduction is defined with user fields, the system automatically transfers these fields to the deduction's auto-generated arrears accumulator as user keys. If you change the user fields, the system automatically synchronizes the accumulator keys of the arrears accumulator with the user fields. After an element has been processed, you cannot change the user fields. |
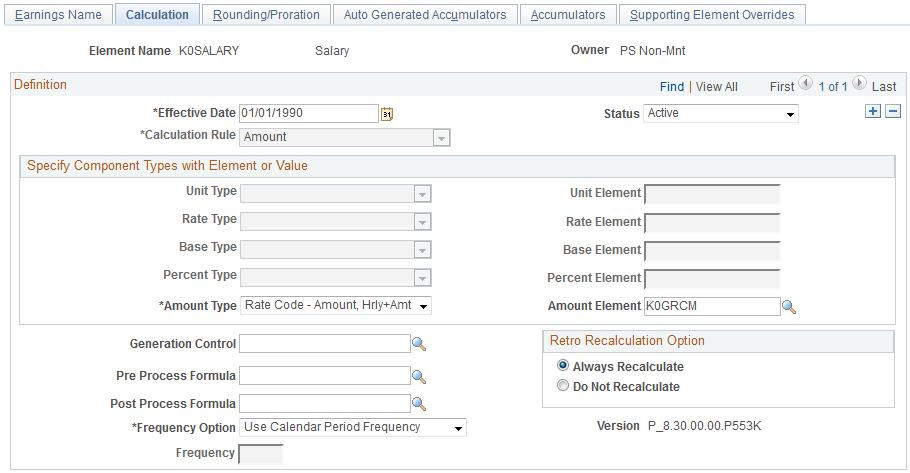
Use the Earnings - Calculation page (GP_ERN_DED_CALC) to define calculation rules for an earning element.
Navigation
Image: Earnings - Calculation page
This example illustrates the fields and controls on the Earnings - Calculation page.
|
Field or Control |
Definition |
|---|---|
| Calculation Rule |
Define the calculation rule for the element. Valid values are Amount, Base x Percent, Unit x Rate, and Unit x Rate x Percent. Your selection affects the availability of other fields. Once you define a calculation rule for an element, you cannot change the rule unless all of the following conditions are met:
Note: If you define a calculation rule and discover that one of these conditions exists, create a new element. This restriction primarily exists because of retroactive considerations. Let's say that you define an earning element with a calculation rule of Unit x Rate. After several payroll runs, you add a new effective-dated row and change the calculation rule to Amount. Now, a retroactive event causes the system to recalculate the element and forward the deltas to the current period. Since the calculation rule has changed, an adjustment that is made to units, for example, is not compatible with the current calculation rule of amount. |
| Unit Type, Rate Type, Base Type, Percent Type, and Amount Type |
Specify how the system is to determine the amount or component values, as applicable. The fields that you can update here depend on the selected calculation rule. For example, if the calculation rule is Unit x Rate, you can select the type of elements that are to retrieve the unit value and the rate value in the Unit Type field and the Rate Type field respectively. Values vary by component type. A value of Payee Level tells the system to resolve the element only if the value of the component is found on the Element Assignment By Payee page, the Payee Assignment By Element page, or in positive input. To define a component at the payee level, select the Payee Override and/or Positive Input check boxes on the Earnings Name page. |
| Unit Element, Rate Element, Base Element, Percent Element, Amount Element, Amount Value and Amount Currency |
Select the element name that corresponds to the component type in the calculation rule. Note: If you select a Numeric Amount Type, the Amount Element field will not display. Instead, the Amount Value and Amount Currency fields will be available for entry. Similarly, if you select Numeric for the rate or base components, you will see fields for Rate Value and Rate Currency, and Base Value and Base Currency, respectively. If you select Numeric for Unit Type and Percent Type, the Unit Value field and Percent Value field will be available for entry. The value of the currency code is based on the currency that is defined for the user, which is based on the User Preference definition. Regardless of what currency you enter for the earning element, the system converts it to the processing currency during the element's resolution. You define the processing currency when you're setting up your pay entity information. If you enter an element type, such as a variable, for a component in a calculation rule, the system uses the currency that was defined for that element and performs a currency conversion, if that currency is different from the processing currency. |
| Generation Control |
To restrict the conditions under which the element is resolved, select the applicable generation control element. For example, you can use generation control to specify that an element be resolved for active payees only. Define generation control elements using the Generation Control component. Note: If generation control prevents the resolution of a deduction, the system still processes the arrears payback if there is an arrears balance. It also processes retroactive adjustments. |
| Pre Process Formula and Post Process Formula |
Select a formula to execute immediately before or immediately after the system resolves each instance of the earning or deduction element. |
| Frequency Option |
Select the frequency option with which you are stating a value. Values are: Use Calendar Period Frequency: The system assumes that the element value is in the frequency of the calendar period that you have defined. Use Specified Frequency: If you select this value, you will define the frequency in the Frequency field. |
| Frequency |
If you selected a frequency option of Use Specified Frequency, you'll define the frequency type here. Examples are Annual, Biweekly, Contract, Daily, Fourweekly, Hourly, Monthly, Quarterly, Semimonthly, and Weekly. These values come from the Frequency Table in HR. |
| Retro Recalculation Option |
Specify whether to recalculate an element during retroactive processing. Values are: Always Recalculate Do Not Recalculate If you select Always Recalculate , the element is recalculated during retroactive processing. Note: You can override this field on the Retro Process Overrides page. See Retroactivity Calculations, Understanding General Rules of Retroactive Processing. |
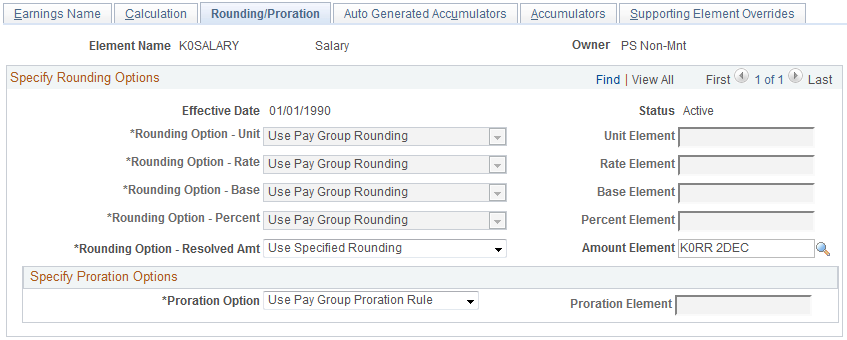
Use the Earnings - Rounding/Proration page (GP_ERN_DED_RND) to specify rounding and proration options for the components of an earning element.
Navigation
Image: Earnings - Rounding/Proration page
This example illustrates the fields and controls on the Earnings - Rounding/Proration page.
|
Field or Control |
Definition |
|---|---|
| Rounding Option - Unit, Rounding Option - Rate, Rounding Option - Base, and Rounding Option - Percent |
Select a rounding option for the component. Values are: Use Pay Group Rounding: (Default) Select to use the rounding rule that you defined on the Pay Group − Defaults page. Use Specified Rounding: Enables you to select a rounding rule element in the field to the right. Note: Before you can select a rounding option for the earning component, you must first define the rounding rule element. Rounding rules are defined on the Rounding Definition page. No Rounding: Select if you do not want the system to perform rounding. |
| Rounding Option - Resolved Amount |
Indicate how to round elements that have a calculation rule of amount and how to round the resolved value of elements that have a calculation rule that uses other components. For example, the calculation rule for earning E1 is Unit × Rate. If you select No Rounding in the Rate and Unit field, and you select a rounding rule here, the system rounds the resolved value of Unit × Rate. Or, let's say you want to round the rate to four decimal points, and then round the result of Unit x Rate to two decimal points. In this case, you select a rounding rule in both the Rate field and in this field. Usually you select Use Pay Group Rounding or Use Specified Rounding, because you want the Resolved Amount to be a rounded value. It is not common to select No Rounding. Note: The system does not assume any decimal precision in the calculation process. Certain countries may have limitations on rounding because of their currency. In the Unites States, you can only make payments with two places to the right of the decimal. For example, you would probably round up a payment of 200.6778 to 200.68. However, in another country, you may be able to make payments for amounts with less than two places to the right of the decimal. It is extremely important that you consider this when defining your resolved amount rounding options. Rounding for the resolved amount happens before Net Pay Validation processing for a deduction. If you are using a Partial Formula for Net Pay Validation processing, you need to round the partial amount in that formula, according to your rounding requirements. |
| Unit Element, Rate Element, Base Element, Percent Element, and Amount Element |
Enter an element for each applicable rounding option. |
| Proration Option |
Select a proration option that defines if and how the system prorates the component value or amount when there is segmentation, or if the system element, PRORATE, is not equal to zero. Values are: Use Pay Group Proration Rule: (Default) Select to use the standard proration rule you defined on the Pay Group - Defaults page. Use Specified Proration Rule: Enables you to select a proration rule element in the field to the right. No Proration: Select if you don't want to apply a proration rule to the earning. |
| Proration Element |
If you select Use Specified Proration Rule in the Proration Option field, select the proration element here. |
Use the Earnings - Auto Generated Accumulators page (GP_AUTOGEN_ACUM) to define characteristics of automatically generated accumulators for an earning element.
Navigation
Image: Earnings - Auto Generated Accumulators page
This example illustrates the fields and controls on the Earnings - Auto Generated Accumulators page.
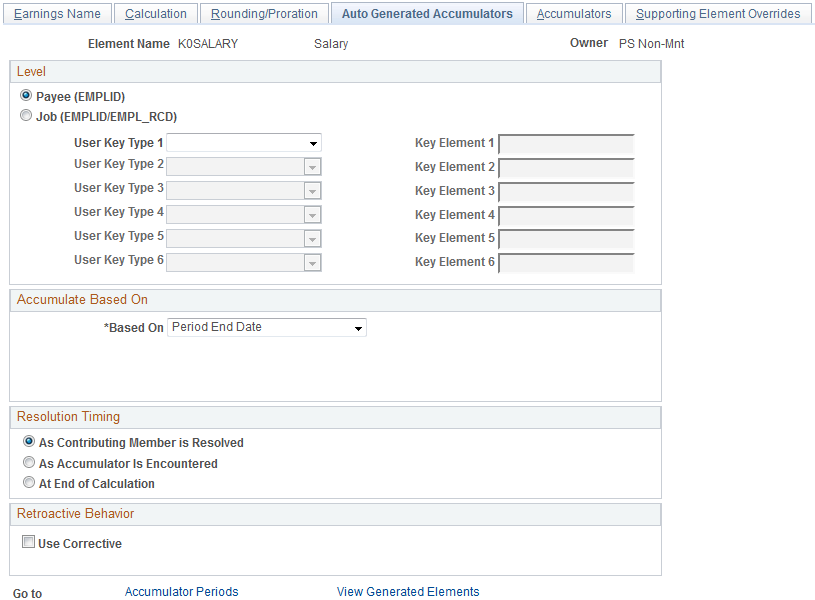
Note: All fields on this page, except the Copy User Fields button, the Accumulator Periods link, and the View Generated Elements link, are the same as those on the Level page of the Accumulators component and are discussed elsewhere in this documentation.
See Accumulators - Level Page.
|
Field or Control |
Definition |
|---|---|
| Copy User Fields |
Click to copy the user fields associated with the earning to the auto-generated accumulators. These fields become the user keys of the accumulators. If you do this, the system generates different accumulator instances for each resolution of the earning with different user field values. Note: This button becomes available only when there are user fields defined on the User Fields page. Important! If a deduction has user fields, the system automatically transfers these fields to the deduction's auto-generated arrears accumulator as user keys (you do not need to click the Copy User Fields button to transfer the user fields to the arrears accumulator). If you change the user fields, the system automatically synchronizes the accumulator keys of the arrears accumulator with the user fields. After an element has been processed, you cannot change the user fields. |
| Accumulator Periods |
Click to access the Accumulator Periods page where you define the periods for which you want the earning element to accumulate. |
| View Generated Elements |
Click to access the Generated Elements page to view the automatically generated components and accumulators that have been created. |
Use the Earnings - Accumulator Periods for Element (name) page (GP_ERN_DED_ACM_SEC) to define which accumulators the system creates.
This page is also used to view deduction elements.
Navigation
Click the Accumulator Periods link on the Earnings - Auto Generated Accumulators page.
Image: Earnings - Accumulator Periods for Element <name> page
This example illustrates the fields and controls on the Earnings - Accumulator Periods for Element <;name> page.
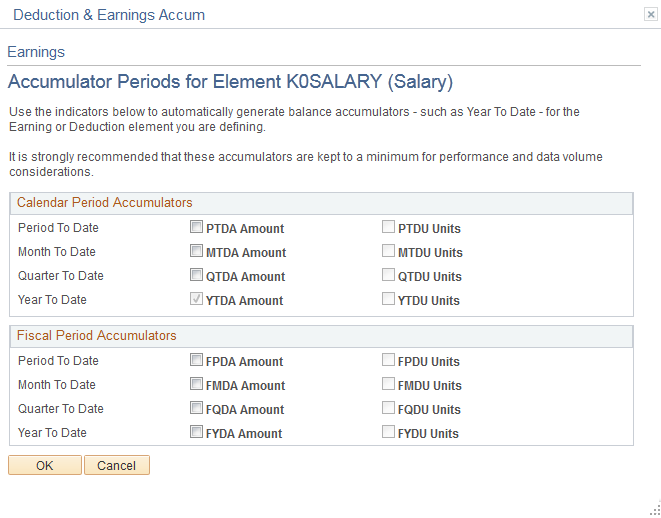
Note: Automatically generated accumulators take on the name of the earning element plus a suffix. Suffixes appear next to the accumulator check boxes and are determined by the country you specify for the earning or deduction element on the Element Name page.
|
Field or Control |
Definition |
|---|---|
| Calendar Period Accumulators/Fiscal Period Accumulators |
Select the accumulators you want to create. You can select as many as you need, keeping in mind performance and data volume considerations. |
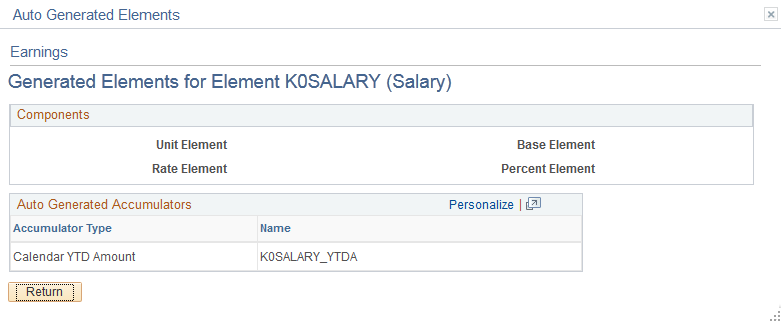
Use the Earnings - Generated Elements for Element <name> page (GP_AUTOGEN_SEC) to displays the system-generated components and accumulators that have been created for an earning element.
This page is also used to view deduction elements.
Navigation
Click the View Generated Elements link on the Earnings - Auto Generated Accumulators page.
Image: Earnings - Generated Elements for Element <name> page
This example illustrates the fields and controls on the Earnings - Generated Elements for Element <name> page.
|
Field or Control |
Definition |
|---|---|
| Components |
Displays the automatically generated element for each component of the earning element. |
| Arrears Elements |
For deduction elements, these arrears elements are assigned: Payback Amount, Amount Not Taken, Add to Arrears, and Arrears Balance. The first three are deduction components; Arrears Balance is an accumulator. |
| Auto Generated Accumulators |
Displays automatically generated accumulators. |
Use the Earnings - Accumulators page (GP_ERN_DED_AC_ADDL) to indicate the accumulators (already defined in the system) to which the earning element contributes.
Navigation
Image: Earnings - Accumulators page
This example illustrates the fields and controls on the Earnings - Accumulators page.
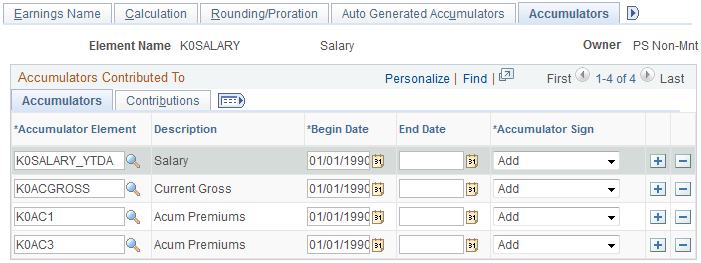
Accumulators
Specify whether the earning element adds to or subtracts from other accumulators. For example, you can add the results of the earning element to the Gross Base and Taxable Gross accumulators.
For each accumulator, specify the element name, the begin and end dates, and whether the earning element adds to or subtracts from the accumulator.
|
Field or Control |
Definition |
|---|---|
| Accumulator Element |
Select the element name. |
| Begin Date |
Specify when you want the earning element to begin adding or subtracting from the accumulator. In Add mode, the default date is the earliest effective date for that element. Otherwise, the default is today's date. |
| End Date |
Specify when you want the earning element to stop adding to or subtracting from the accumulator. Note: Enter a begin date and an end date if you want the earning element to accumulate only for a specified period of time. If the begin date or end date occurs during a pay period, the system accumulates the earning element for that period. If you leave the End Date blank, the system starts accumulating on the date that you enter the data and accumulates during all pay periods until you enter an End Date. |
| Accumulator Sign |
Select Add or Subtract to indicate whether you want the earning element to add to or subtract from the accumulator. |
Contributions
Select the Contributions tab.
Image: Earnings - Accumulators page: Contributions tab
This example illustrates the fields and controls on the Earnings - Accumulators page: Contributions tab.
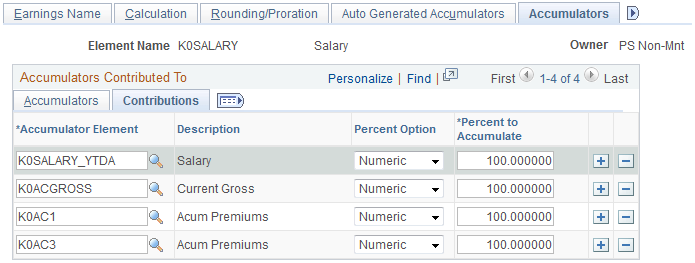
For each accumulator, specify the percentage of the earning to add to or subtract from the accumulator.
|
Field or Control |
Definition |
|---|---|
| Percent Option |
Specify the percentage of the earning to contribute to or subtract from the accumulator: Numeric: Select to specify a percentage. Variable or Formula: Select if you want a variable or formula element to return the value to accumulate or subtract. |
| Percent to Accumulate |
If you selected a percent option of Numeric, enter a percentage of up to 100 percent here. |
| Percent Element |
If you selected a percent option of Variable or Formula, select the name of the variable or formula here. |
Use the Earnings - Supporting Element Overrides page (GP_ELM_DFN_SOVR) to override the value of certain supporting elements that are used by the earning element or override the supporting elements when they are not part of the earning definition.
This page is also used to override deductions.
Navigation
You can use the Supporting Element Overrides page in the Earnings component to override the value of a bracket, date, duration, formula, or variable element that is used in the definition of the earning element. You can also use the override feature to have the system resolve a bracket, date, duration, formula or variable when it resolves an earning element—even when the supporting element is not part of the earning's definition.