9Managing Vehicles
Managing Vehicles
This chapter provides information about standard Siebel Automotive functionality for vehicle management. It consists of the following topics:
Vehicles in Siebel Automotive
In Siebel Automotive, vehicles are a specialized kind of asset. Vehicles can be owned by an account, a dealer, or an individual contact. Vehicles can also be associated in relationships other than ownership. Every vehicle is an instance of a defined product.
Scenario for Working with Vehicles
This scenario is an example of a workflow performed by the administrator and end user. Your company may follow a different workflow according to its business requirements.
A call center representative for an automotive manufacturer receives an inbound call from a customer who has a question about getting service for his car. The call center representative asks the caller for the vehicle’s VIN, but he does not know it. She searches on his last name and phone number in the Contacts view, and then she goes to the Contact Vehicles view to find that two vehicles are associated with this contact. From the vehicle make and model, she identifies the correct vehicle identification number (VIN) and drills down on the VIN to access the Vehicles screen.
On the Vehicles screen, the call center representative finds detailed information about the vehicle, such as where and when it was built, its service and transaction history, and the individual contacts and accounts that are associated with the vehicle.
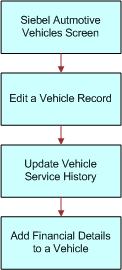
Vehicles Process Workflow
The image illustrates the end-user workflow for working with vehicles.
Entering Vehicle Records
Most vehicle records are entered into Siebel Automotive through EIM rather than through manual entry. End users follow this procedure to manually enter a vehicle record. It includes a table that lists and describes selected fields that are specific to vehicles.
To view, edit, create, and delete a vehicle
Navigate to the Administration - Vehicle screen.
In the Vehicles list, add, edit, or delete a record.
Process of Managing Vehicle Records
To manage vehicle records, end users perform the following tasks:
Editing a Vehicle Record
Use this procedure to make changes to vehicle records. End users cannot add or delete vehicles.
This task is a step in Process of Managing Vehicle Records.
To edit a vehicle record
Navigate to the Vehicles screen.
Click the VIN link for a selected vehicle record.
Make changes to the record as needed.
Click the More Info tab to edit additional information for the vehicle.
Note: For fleet information, click a VIN link, and then click More Info. In the Fleet Information field, the Fleet check box is a flag set to identify whether a vehicle belongs to Fleet or not, the Company field is the fleet company to which the vehicle belongs, and Fleet Type is the type of fleet the vehicle belongs to, such as, rental, ambulance, and so on.
Related Topics
Changing Vehicle Status
Use this procedure to change the status of a vehicle from Allocated to Available using the Vehicle Administration screen. This view should not ordinarily be used; it exists only to correct errors when a vehicle has been removed from a quote, but its Status field is still Allocated.
This task is a step in Process of Managing Vehicle Records.
For more information about vehicle allocation, see Allocating Vehicles to a Quote.
To change the status of a vehicle
Navigate to the Administration - Vehicle screen.
Drill down on the VIN field link for a selected vehicle record.
Click the More Info view tab.
In the Inventory Information section, select the new status from the Status field drop-down list.
Related Topics
Deleting a Vehicle
Use this procedure to delete a vehicle.
This task is a step in Process of Managing Vehicle Records.
To delete a vehicle
Navigate to the Administration - Vehicle screen.
Select a vehicle record, and click Delete.
Related Topics
Updating Vehicle Service History
Use this procedure to view, edit, create, and delete service history for a vehicle.
This task is a step in Process of Managing Vehicle Records.
To view, edit, create, and delete vehicle service history
Navigate to the Administration - Vehicle screen.
Drill down on a VIN.
Click Service History.
In the Service History list, add, edit, or delete records.
Note: To edit a service history record, select the record from the Service History list, and make any changes as needed.
Related Topics
Managing Vehicle Financial Details
Use this procedure to view, edit, create, and delete details about a vehicle’s lease, loan, or cash payment options.
This task is a step in Process of Managing Vehicle Records.
To view, edit, create, and delete financial details for a vehicle
Navigate to the Administration - Vehicle screen.
Drill down on the VIN field link for a selected vehicle record.
Click the Financial Detail view tab.
In the Financial Detail list, add, edit, or delete records.