12Example Workflow Processes
Example Workflow Processes
This chapter describes example workflow processes. It includes the following topics:
Defining a Workflow Process That Creates an Activity for a Sales Representative
Defining a Workflow Process That Traverses a Record Set to Close Service Requests
Defining a Workflow Process That Attaches an Activity Plan to an Opportunity
Defining a Workflow Process That Manages Research Activities for a Service Request
Defining a Workflow Process That Creates a Service Request and Navigates the User
Defining a Workflow Process That Creates an Activity for a Sales Representative
In this topic you create a workflow process that creates an activity for a sales representative. To develop this example, do the following tasks:
Defining Properties and Arguments for Workflow Process Steps
Defining the Run-Time Event That Starts the Workflow Process
In this workflow process, if a user creates a new opportunity, then Siebel CRM evaluates the opportunity revenue. If the value of the opportunity is over $10,000, then it creates an activity that directs the sales representative to pursue the deal. The WriteRecord run-time event starts this workflow process.
Creating the Workflow Process
This task is a step in Defining a Workflow Process That Creates an Activity for a Sales Representative.
You begin by creating the new workflow process.
To create the new workflow process
In the Object Explorer in Siebel Tools, click Project.
In the Projects list, create a new project named Workflow Examples.
Make sure the Locked property contains a check mark.
For brevity, example workflow processes in this book use the Workflow Examples project. In a development environment, you can use a project that more closely meets your development requirements. For more information, see Using Siebel Tools.
In the Object Explorer, click Workflow Process.
For more information, see Object Hierarchy That Workflow Processes Use.
In the Workflow Processes list, right-click, and then click New Record to create a new workflow process using values from the following table.
Property
Value
Process Name
Large Opportunity Creates Activity
Workflow Mode
Service Flow
Business Object
Opportunity
Project
Workflow Examples
For more information, see the topic about the Workflow Process object type in Siebel Object Types Reference
Choose the File menu, then the Save menu item.
Adding Steps and Connectors to the Workflow Process
This task is a step in Defining a Workflow Process That Creates an Activity for a Sales Representative.
In this topic you add steps and connectors to the workflow process.
To add steps and connectors to the workflow process
In the Workflow Processes list, right-click the workflow you defined in Creating the Workflow Process, and then choose Edit Workflow Process.
Add steps and connectors until your workflow process resembles the workflow illustrated in the following figure:

For more information, see Overview of Workflow Process Steps, and Diagramming a Workflow Process.
Click the decision point, and then use the Properties window to change the Name property to the value described in the following table.
Property
Value
Name
Is Opportunity Over 10k?
The Properties window is context-sensitive. If you click a step or connector in the Process Designer, then Siebel Tools displays the properties for the step or connector in the Properties window. If the Properties window is not visible, then right-click a step, and then click View Properties Window.
Clicking each remaining step in succession, use the Properties window to change the Name property for each step according to values described in the following table.
Step Type
Name Property
Siebel Operation
Insert Activity to Follow Up
End
End
Clicking each connector in succession, use the Properties window to change the Name property for the connector according to values described in the following table.
Connector
Name Property
Between the start step and the decision point
Evaluate Oppty
Between the decision point and the Siebel operation
Yes
Between the decision point and the end step
No
Tip: Siebel Tools sets the name of the connector that emanates from the start step to Connector 0 by default. To suppress the text label for a connector, you can right-click the connector, choose the Edit menu, and then click Hide Text.Choose the File menu, and then the Save menu item.
Defining Properties and Arguments for Workflow Process Steps
This task is a step in Defining a Workflow Process That Creates an Activity for a Sales Representative.
In this topic, you define properties and arguments for workflow process steps.
To define properties and arguments for workflow process steps
Click the Insert Activity to Follow Up step, and then use the Properties window to set properties using values from the following table.
Property
Value
Business Component
Action
Operation
Insert
Make sure the Insert Activity to Follow Up step is still chosen in the Process Designer.
Add an input argument in the MVPW using values from the following table.
Field Name
Type
Value
Description
Literal
This is a large opportunity. Please call the customer ASAP.
For more information, see Arguments That You Can Define for a Process Property.
You must first define the Field Name, and then the Value.
Add a second process property using values from the following table.
Field Name
Type
Value
Type
Literal
To Do
Defining the Run-Time Event That Starts the Workflow Process
This task is a step in Defining a Workflow Process That Creates an Activity for a Sales Representative.
In this topic, you define the run-time event that starts the workflow process.
To define the run-time event that starts the workflow process
Choose the No connector, and then use the Properties window to make sure the Type property is set to Default.
Choose the Yes connector, and then set the Type property to Condition.
In the Process Designer, click the Evaluate Oppty connector, and then use the properties window to define values described in the following table.
Property
Value
Event Object Type
BusComp
Event Object
Opportunity
Event
WriteRecord
Type
Default
When you define these properties, enter them in the same top to bottom order that this table lists them. Event Object and Event are context-sensitive according to the value you enter in Event Object Type. You must define Event Object Type first.
Defining a Decision Condition for the Decision Point
This task is a step in Defining a Workflow Process That Creates an Activity for a Sales Representative.
In this topic, you define a decision condition for the decision point.
To define a decision condition for the decision point
In the Process Designer, right-click the Yes connector, and then choose Edit Conditions.
For more information, see Adding a Branch Connector.
In the Compare To drop-down list, choose Business Component.
The value you choose in the Compare To drop-down list instructs Siebel CRM to use an object, expression, or process property in the comparison. In this example, it compares the run-time value of a field from the Opportunity business component, as defined in the Object drop-down list. The items in the Object drop-down list are context- sensitive. Siebel Tools changes them according to the value you choose in the Compare To drop-down list.
In the Object drop-down list, choose Opportunity.
In the Operation drop-down list, choose Greater Than.
In this example, if the value you define in the Values window of the Compose Condition Criteria dialog box is greater than the run-time value of the Revenue field for the business component, then the Operation drop-down list defines the decision condition. You define the Revenue field in the Field window.
In the Field window, choose Revenue.
In the Values window, click New to add a new value.
In the Add Value dialog box, type 10000, and then click OK.
In the Compose Condition Criteria dialog box, click Add.
Siebel Tools adds the decision condition that you define in the lower portion of the Compose Condition Criteria dialog box to the Conditions list in the upper portion of the dialog box. You can now add another decision condition. For this example, you add only a single decision condition.
The decision condition you set in the Compose Condition Criteria dialog box must resemble the condition illustrated in the following figure. At run time, if the Revenue field of an opportunity is greater than 10000, then Siebel CRM runs the Yes branch. Otherwise, it runs the No branch:

Click OK.
Choose the File menu, and then the Save menu item.
You can make the following modifications after you define a decision condition:
Update a condition. Click the condition in the Conditions window of the Compose Condition Criteria dialog box, modify the condition, and then click Update.
Delete a condition. Click the condition in the Conditions window of the Compose Condition Criteria dialog box, and then click Delete.
When you delete a Condition,
It is deleted from the canvas and from the list applet for new workflows.
It is deleted from the canvas and becomes inactivate in the list applet for existing workflows.
For more information, see Creating a Decision Condition on a Branch Connector.
Preparing This Example for Testing
This task is a step in Defining a Workflow Process That Creates an Activity for a Sales Representative.
To prepare this example for testing, you create an opportunity that matches the test criteria, and then note the Row Id of the opportunity. To run the test, you can then use this Row Id in the properties of the workflow process.
To prepare this example for testing
Validate the workflow process.
For more information, see Validate Tool.
Log in to the Siebel client, and then navigate to the Opportunities list.
Add an opportunity using values from the following table.
Name Revenue Large Opportunity to Test Workflow
$400,000
Right-click the record you created and choose About Record.
Note the value of the row Id in the Row # field.
In Siebel Tools, in the Process Designer, click the canvas, making sure no workflow process step or connector is chosen.
If you click an empty space in the canvas, then the Multi Value Property Window (MVPW) displays the process properties for the workflow process.
In the MVPW, find the Object Id process property, and then set the Default String field for the property to the Row Id for the opportunity identified in step 5.
Simulating the Workflow Process
This task is a step in Defining a Workflow Process That Creates an Activity for a Sales Representative.
In this topic you simulate the workflow process, and then examine simulation results.
To simulate the workflow process
Use the Process Simulator to step through the entire workflow process.
For more information, see Preparing to Use the Process Simulator.
In the Siebel client, navigate to the Opportunities screen.
In the Opportunities list, drill down on the opportunity named Large Opportunity to Test Workflow.
Click the Activities view tab.
A new Activity must exist and it must contain the description you defined in Defining Properties and Arguments for Workflow Process Steps. If it does, then the simulation finishes successfully.
Remove the modifications you made for testing:
In Siebel Tools, close the Simulator.
In the WF Process Props list, choose the Object Id process property for your workflow process.
In the Properties window, delete the row ID in the Default String property.
In the WF Process Props list, step off the record to save your changes.
Deploying and Verifying the Workflow Process
This task is a step in Defining a Workflow Process That Creates an Activity for a Sales Representative.
In this topic you deploy the workflow process and to verify that it implements the required functionality.
To deploy and verify the workflow process
Deploy the workflow process:
In the Siebel client, navigate to the Administration-Business Process screen, and then the Workflow Deployment view.
In the Repository Workflow Processes list, query the Name field for Large Opportunity Creates Activity.
-
Click Activate.
In the Active Workflow Processes list, query the Name field for Large Opportunity Creates Activity.
The record displays a status of Active. For more information, see Process of Deploying a Workflow Process.
For more information, see Process of Deploying a Workflow Process.
In the Siebel client, add a new opportunity that includes a Revenue that is greater than $10,000.
Step off the record, return to the record, drill down on the name of the record, and then verify that Siebel CRM added an activity that is associated with the opportunity, and that it includes the custom description you defined earlier in this example.
If you must modify the workflow process, then you can click Revise on the WF/Task Editor toolbar in Siebel Tools. For more information, see Using Process Properties.
Defining a Workflow Process That Traverses a Record Set to Close Service Requests
In this topic you create a workflow process that traverses a record set to close obsolete service requests. To develop this example, you do the following tasks:
This example identifies, and then closes obsolete service requests. If a service request is more than one year old, and if the Status for this service request is not Closed or is Cancelled, then Siebel CRM must consider the service request as obsolete. The workflow process identifies obsolete service requests, and then traverses the resulting record set. It does the following:
Changes the Status for each obsolete service request to Cancelled
Changes the Sub-Status to Resolved
Changes the Close Date to the current date
Adds a message to the Description field that indicates that the service request was cancelled due to obsolescence
For more information about the configuration used in this example, see Using a Siebel Operation Step to Traverse a Record Set.
Creating the Child Business Component
This task is a step in Defining a Workflow Process That Traverses a Record Set to Close Service Requests.
This workflow process must do the following work:
Process a record from the primary business component. For more information, see Defining the Primary Business Component.
Process a batch of records. It must loop through the records only of a nonprimary business component. This nonprimary business component must reference the same business object that the workflow process references. This example uses the Service Request business object.
Configure the nonprimary business component as a child of the business object that references the primary business component.
The Service Request business component is the primary business component of the Service Request business object. To satisfy these requirements, you create a new, nonprimary business component named Service Request No Link. This new business component is a child of the primary Service Request business component.
The child business component includes the minimum number of fields to meet the business requirement. These fields reference the same table columns as their corresponding fields in the primary business component. If Siebel CRM modifies a field in the child business component, then it modifies the corresponding field in the primary business component. The child business component and the primary business component modify the same record.
To create a relationship between the child business component and the business object, you define the child as a business object component in the business object that references the primary business component.
To create the child business component
In the Object Explorer, click Business Component.
In the Business Component list, right-click, and then click New Record.
Define properties for the new business component using values from the following table.
Property Value Name
Service Request No Link
Project
Workflow Examples
Class
CSSBCBase
Table
S_SRV_REQ
Make sure Service Request No Link is chosen in the Business Components list.
In the Object Explorer, expand the Business Component tree, and then click Field.
In the Field list, right-click, and then click New Record to add fields to the Service Request No Link business component. Add four new fields using values in the following table.
Name Column Text Length Type Status
SR_STAT_ID
30
DTYPE_TEXT
Sub-Status
SR_SUB_STAT_ID
30
DTYPE_TEXT
Closed Date
ACT_CLOSE_DT
(Leave this field empty.)
DTYPE_UTCDATETIME
Description
DESC_TEXT
2,000
DTYPE_TEXT
Siebel Tools adds the Created field, which is a system field. You do not explicitly define it as a field on the primary business component or on the child business component.
Tip: To reduce the number keystrokes you must perform, you can define the Column property first. If you define the Column property, and then step out of the Column field in the list, then Siebel Tools updates the Text Length and Type properties.
Creating a Relationship Between the Child and the Business Object for the Primary
This task is a step in Defining a Workflow Process That Traverses a Record Set to Close Service Requests.
In this topic, you create a relationship between the child and the business object for the primary.
To create a relationship between the child and the business object for the primary
If necessary, display the Business Object Component object type, which is a child of the Business Object object type.
For more information, see Displaying Object Types You Use to Develop a Workflow Process.
In the Object Explorer, click Project.
In the Project list, query the Name property for Service.
Make sure the Locked property for the Service project contains a check mark.
In the Object Explorer, click Business Object.
In the Business Objects list, query the Name property for the Service Request business object.
In the Object Explorer, expand the Business Object tree, and then click Business Object Component.
In the Business Object Components list, right-click, and then click New Record.
Set the Bus Comp property to Service Request No Link. Do not define a link.
Choose the Tools menu, and then the Compile Projects menu item.
Choose Locked Projects, and then compile to the repository that your sample database uses.
Creating the Workflow Process
This task is a step in Defining a Workflow Process That Traverses a Record Set to Close Service Requests.
In this topic you create a workflow process that does the following:
Accepts a record of the Service Request business component. It does not process this record.
To identify obsolete service requests, it queries the Service Request No Link business component for records whose Created date is more than one year old and whose Status is not Closed or Cancelled.
Traverses records in the query result, modifying the Status, Sub-Status, Close Date, and Description fields so that they indicate the obsolete status of the record. For more information, see Using a Siebel Operation Step to Traverse a Record Set.
To create the workflow process
In Siebel Tools, create a new workflow process using values from the following table.
Property Value Process Name
Close Obsolete SRs
Workflow Mode
Service Flow
Business Object
Service Request
For an example, see Creating the Workflow Process.
Add steps and connectors until your workflow process resembles the workflow illustrated in the following figure.
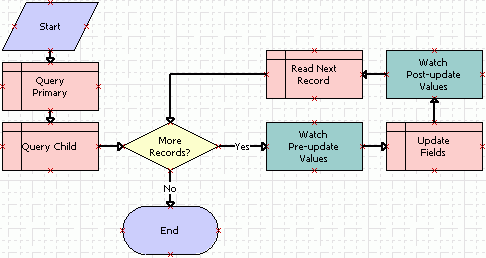
The business service steps allow you to use the Watch window to debug the workflow. You remove them later.
For more information, see Overview of Workflow Process Steps, and Diagramming a Workflow Process.
Click the canvas, making sure no workflow process step or connector is chosen.
Add seven new process properties using values from the following table.
Name In/Out Business Object Data Type SR Close Date
In/Out
Service Request
String
SR Created Date
In/Out
Service Request
String
SR Description
In/Out
Service Request
String
SR Status
In/Out
Service Request
String
noRecord
None
Service Request
String
numAcceptedRecords
None
Service Request
Number
vRowId
None
Service Request
Number
The SR Close Date, SR Created Date, SR Description, and SR Status process properties allow you to use the Watch window in this example. They are not required to traverse record set. The noRecord, numAcceptedRecords, and vRowId process properties are required to traverse record set. For more information, see Using Process Properties.
Tip: To simplify defining a process property, you can define a process property, and then define fields for it. Right-click this process property, and then click Copy Record. Siebel Tools creates a copy of the process property that includes the same values as the original. For the copy, you can modify only those fields that require modification from the original.Choose the File menu, and then the Save menu item.
Configuring the Query Steps
This task is a step in Defining a Workflow Process That Traverses a Record Set to Close Service Requests.
In this topic you configure the Query Primary and Query Child steps.
To configure the query steps
Click the Query Primary workflow step, and then use the Properties window to define values described in the following table.
Property
Value
Business Component
Service Request
Operation
Query
Click the Query Child workflow step.
Use the Properties window to define values described in the following table.
Property
Value
Business Component
Service Request No Link
Operation
Query
Make sure the Query Child workflow step is still chosen in the Process Designer.
Click the MVPW, and then click the Search Spec Input Arguments tab. Add a new record using values from the following table.
Field
Value
Expression Business Component
Service Request No Link
Filter Business Component
Service Request No Link
Search Specification
"([Created] < Timestamp()-365.0) AND ([Description] = 'Test SR') AND ([Status] <> 'Closed') AND ([Status] <> 'Cancelled')"
Enter the argument for the Search Specification exactly as described in the table. You must enclose the entire search specification in double quotes. You must use single quotes to enclose each search string. You must include a space before and after each operator, such as the equal sign (=) and the not equal sign (<>).
Click the Output Arguments tab. Add a new record using values from the following table.
Field
Value
Property Name
NumAcceptedRecords
Type
Output Argument
Output Argument:
NumAffRows
The Query operation uses NumAffRows to store the total number of rows that the query returns. This example stores the value in NumAffRows in the NumAcceptedRecords process property, which makes the value available later in the workflow process on the Yes connector. This configuration handles the situation where the query returns no records.
Add a new output argument using values from the following table.
Argument
Value
Property Name
noRecord
Type
Literal
Value
false
If the query returns one or more records at run time, then the Yes decision condition uses the value in noRecord to determine if the current record is the last record in the record set. The Read Next Record step processes this record.
Add a new output argument using values from the following table.
Argument
Value
Property Name
vRowId
Type
Business Component
Business Component Name
Service Request No Link
Business Component Field
Id
VRowId allows you to display the record number in the Watch window while the workflow processes each record in the record set. You can use it for debugging purposes. Traversing a record set does not require this variable.
Defining a Decision Condition for the Decision Point
This task is a step in Defining a Workflow Process That Traverses a Record Set to Close Service Requests.
In this topic you define a decision condition for the decision point.
To define a decision condition for the decision point
Click the Yes connector.
In the Properties window, set the Type property to Condition.
Right-click the Yes connector, and then choose Edit Conditions.
Define the following decision condition, and then click Add.
Property
Value
Compare To
Process Property
Operation
Greater Than
Object
NumAcceptedRecords
Value
0
This decision condition handles the situation where the query returns no records. If this condition is met, then the workflow process runs the No connector.
Define the following decision condition, and then click Add.
Property
Value
Compare To
Process Property
Operation
All Must Match (Ignore Case)
Object
noRecord
Value
false
This decision condition determines when the workflow process reaches the end of the record set in situations where the query returns at least one record. For more information, see Creating a Decision Condition on a Branch Connector.
Click OK.
Click the No connector. Make sure the Type property in the Properties window is set to Default.
Configuring the Remaining Workflow Steps
This task is a step in Defining a Workflow Process That Traverses a Record Set to Close Service Requests.
In this topic you configure the remaining workflow steps.
To configure the remaining workflow steps
Click the Watch Pre-update Values workflow step.
Use the Properties window to define values described in the following table.
Property
Value
Business Service Name
Workflow Utilities
Business Service Method
Echo
The Workflow Utilities business service allows you to view variables that the Watch window displays. For more information, see Workflow Utilities Business Service.
In the MVPW, click the Output Arguments tab. Add four new output arguments using values from the following table.
Property Name Type Business Component Name Business Component Field SR Close Date
Business Component
Service Request No Link
Closed Date
SR Description
Business Component
Service Request No Link
Description
SR Created Date
Business Component
Service Request No Link
Created
SR Status
Business Component
Service Request No Link
Status
This workflow process step provides data that the Workflow Utility business service uses to display field values for the business component record that Siebel CRM is currently processing. Siebel Tools displays these values in the Watch window before it updates them.
Depending on your testing requirements, you can display more descriptive record data, such as data from the Abstract field. To display other record data, you can define another field, similar as you did with the fields described in Creating the Child Business Component. In the workflow process, you define a process property that references this field, and then add an Output Argument on the Workflow Utility business service that references the new process property.
Click the Update Fields workflow step.
Use the Properties window to define values described in the following table.
Property Value Business Component
Service Request No Link
Operation
Update
In the MVPW, click the Field Input Arguments tab. Add three new input arguments using values from the following table.
Field Name Type Value Closed Date
Expression
Timestamp()
Description
Literal
This SR's Status set to Cancelled due to this SR's obsolescence
Status
Literal
Cancelled
Click the Watch Post-update Values workflow step.
Use the Properties window to define values described in the following table.
Property
Value
Business Service Name
Workflow Utilities
Business Service Method
Echo
In the MVPW, click the Output Arguments tab, and then add four new output arguments using values from the following table.
Property Name Type Business Component Name Business Component Field SR Close Date
Business Component
Service Request No Link
Closed Date
SR Description
Business Component
Service Request No Link
Description
SR Created Date
Business Component
Service Request No Link
Created
SR Status
Business Component
Service Request No Link
Status
Click the Read Next Record workflow step.
Use the Properties window to define values described in the following table.
Property
Value
Business Component
Service Request No Link
Operation
NextRecord
In the MVPW, click the Output Arguments tab, and then add a new output argument using values from the following table.
Field
Value
Property Name
noRecord
Type
Output Argument
Output Argument
NoMoreRecords
Add a second argument using values from the following table.
Field
Value
Property Name
vRowId
Type
Business Component
Business Component Name
Service Request No Link
Business Component Field
Id
Choose the File menu, and then the Save menu item.
Preparing Test Records
This task is a step in Defining a Workflow Process That Traverses a Record Set to Close Service Requests.
In this topic, you prepare test records.
To prepare test records
Log in to the Siebel client, connected to the Sample database.
Navigate to the Service Requests screen, and then the Service Request List view.
Locate three records that contain an Opened date that occurs more than one year from the date that the workflow process runs.
For example, if you test the workflow on February 15, 2012, then make sure the Opened date for each service request occurs before February 15, 2011.
Modify the records you located so that the Siebel database contains one service request that includes a Description of Test SR, another request is Open, another request is Closed, and another request is Cancelled. Use the values described in the following table.
Status
Description
Open
Test SR
Closed
Test SR
Cancelled
Test SR
These modifications allow you to test the workflow process on a small, constricted set of records.
Create a new service request. Set the Status for this service request to Open, and then enter the following value in the Description:
Test SR
Log out of the Siebel client.
Validating and Simulating the Workflow Process
This task is a step in Defining a Workflow Process That Traverses a Record Set to Close Service Requests.
In this topic, you validate the workflow process, and then you use the Process Simulator and Watch window to test it. This example tests a small set of service request records. For a more thorough test, you can create more service request records that meet or do not meet the decision condition that you define in the workflow process. For more information, see Using the Watch Window.
To validate and simulate the workflow process
Validate the workflow process.
For more information, see Validating the Workflow Process.
In Siebel Tools, right-click the Process Designer canvas, and then choose Simulate.
For more information, see Preparing to Use the Process Simulator.
Click Start Simulation. Wait for the Siebel client to start, for control to return to Siebel Tools, and for the simulator to highlight the Query Primary workflow process step.
For caution information, see Preparing Test Records.
Choose the View menu, Debug Windows, and then the Watch menu item.
Click the push pin to dock the window.
Click the expand icon located next to PS:Property Set, and then expand the Process Properties entry in the Property Set list.
Siebel Tools displays the process properties that are defined for this workflow process and the current value for each property. To examine this list, you can stop the simulation, and then compare the list of properties in the Watch window to the list of records in the Multi-Value Property Window.
Siebel Tools does not display any values in the Process Properties section of the Watch window until after the simulator calls the Workflow Utilities business service. The simulator calls this business service when it runs the Watch Pre-update Values step.
Click Simulate Next, and then expand the BusComp entry in the Watch window.
The simulator runs the Query Primary step, and then highlights the Query Child step. The Query Primary step runs an unrestricted query on the Service Request business component, returning every service request that exists in the Siebel database. The Watch window displays a BusComp entry that contains a list of values for the current business component record.
Click Simulate Next.
The simulator runs the Query Child step, and then highlights the More Records decision point.
The simulator runs the Query Child step, and then highlights the More Records decision point. The search specification on the Query Child workflow process step results in Siebel Tools creating a record set that contains four service request records. The Query Child step updates the Service Request No Link business component with these metadata records.
The Process Properties section of the Watch window now displays the values for several system variables. It also displays the values for two process properties that reference important variables that the traversing a record set configuration uses, as described in the following table.
Property
Value
Explanation
NumAcceptedRecords
1
NumAcceptedRecords is a process property that references NumAffRows, which is a variable that the traversing a record set configuration uses.
NumAffRows maintains a count of the number of rows that the query on the Query Child workflow process step returns.
In this example, one record meets the search specification that is defined on the Query Child step.
noRecord
false
noRecord is a process property that references NoMoreRecords, which is a variable that the traversing a record set configuration uses.
The NextRecord operation sets NoMoreRecords to true if there are no more records to traverse in the record set.
The NextRecord operation on the Read Next Record workflow process step writes the value of NoMoreRecords to the noRecord process property. It does this write operation for every iteration through the record set.
The BusComp section of the Watch window only displays record data from the query that Siebel Tools runs on the primary business component. This information does not change for the remainder of the simulation. For more information, see Defining the Primary Business Component.
Click Simulate Next.
The simulator runs the More Records decision point, and then highlights the Watch Pre-update Values step. To determine if flow continues or stops, the Yes connector performs two tests:
A value of 0 in NumAcceptedRows indicates that no records match the search specification on the Query Child workflow process step.
A value of true in noRecord indicates that there are no more records to process in the record set.
If either of these situations is true, then the workflow process ends.
In this example, the value for NumAcceptedRecords is 1 and noRecord is false. Siebel CRM runs the Yes connector.
Click Simulate Next.
The simulator runs the Watch Pre-update Values step, and then highlights the Update Fields step.
Several values under the Process Properties entry in the Watch window update when this step runs. Four service request fields that Siebel Tools modifies during the example are defined. Writing to the Watch window before and after the Update Fields workflow process step allows you to determine if the workflow process correctly updates the business component fields. The following table describes these values.
Property
Value
Explanation
SR Close Date
(empty)
The search specification on the Query Child workflow process step excludes closed records. The Close Date is empty.
SR Description
Test SR
The test records include Test SR in the Description. This value makes sure that Siebel Tools evaluates only the records that exist in the test record set.
SR Status
Open
The search specification on the Query Child workflow process step:
Excludes service requests that are Closed or Cancelled.
Includes service requests that are Open, Pending, Field Visit, or Quoted. The record set in this example includes only one record and it is Open.
noRecord
false
The NextRecord operation does not run, so noRecord contains false.
Click Simulate Next.
The simulator runs the Update Fields step, and then highlights the Watch Post-update Values step. The Update Fields step updates values in three service request fields. Siebel Tools does not display the new values until the workflow process writes the updated information to the Watch window.
Click Simulate Next.
The simulator runs the Watch Post-update Values step, and then highlights the Read Next Record step. The Watch window displays the updated values for the business component record, as described in the following table.
Property
Value
Description
SR Close Date
11/12/2007 14:21:04
Set by the Input Argument on the Update Fields process step.
SR Description
The Status for this service request is set to Cancelled due to the obsolescence for the service request.
Set by the Input Argument on the Update Fields process step.
SR Status
Cancelled
Set by the Input Argument on the Update Fields process step.
noRecord
false
NextRecord operation is not run, so noRecord still contains false.
Click Simulate Next.
The simulator runs the Read Next Record step, and then highlights the More Records decision point. Values for the process properties remain constant in the Watch window except for noRecord. The record set includes only one record, so the NextRecord operation sets noRecord to true.
Click Simulate Next.
The simulator runs the decision point, and then highlights the End workflow process step. To run the simulation again, you must first reset values that the simulation changed in the record set. This simulation modifies one record. You must reset the SR Description for this record to SR Test and reset Status to Open.
Preparing the Workflow Process for Production
This task is a step in Defining a Workflow Process That Traverses a Record Set to Close Service Requests.
To prepare the workflow process for a production environment, you can remove some of the configuration that is specific to supporting debugging activities.
To prepare the workflow process for production
Delete the Watch Pre-update Values and Watch Post-update Values workflow steps.
In the MVPW, delete SR Close Date, SR Created Date, SR Description, and SR Status.
Click the Query Child workflow step.
In the MVPW, click the Search Spec Input Arguments tab.
In the Search Specification, in the Description string, replace the search specification that you used for testing with the search specification that you must use for production, as described in the following table.
Search Specification Used for Testing
Search Specification Used for Production
"([Created] < Timestamp()-365.0) AND ([Description] = 'Test SR') AND ([Status] <> 'Closed') AND ([Status] <> 'Cancelled')"
"([Created] < Timestamp()-365.0) AND ([Status] <> 'Closed') AND ([Status] <> 'Cancelled')"
Caution: The traversing a record set configuration might modify a large number of records in your database. To avoid unwanted modifications to numerous records, if you use this configuration then make sure you fully test your workflow process. In this example, changing the description in the search specification broadens the search. This change might result in Siebel CRM modifying every service request that is over one year old and that is not Closed or Cancelled.If required, restore your test records to their original data.
If you modified the Service Request No Link business component, such as adding new fields, then recompile your work.
Identify, and then implement a way to start the workflow process.
This example supports administrative work that occurs on a regularly scheduled interval, such as daily, weekly, or monthly. To start the workflow process, you can configure a repeating job for the Workflow Process Manager server component. For more information on how to configure a server component to run repeatedly at specific times over specific intervals, see Configuring Batch Processing to Run Repeatedly at a Specific Interval.
Defining a Workflow Process That Attaches an Activity Plan to an Opportunity
In this topic you create a workflow process that attaches an activity plan to an opportunity. To develop this example, do the following tasks:
In this example, you define a workflow process that creates an activity plan for an opportunity, and then navigates the user to a view that displays the new plan. The workflow then waits for the user to enter more data and save changes before continuing. You use the Process Simulator and the Siebel client to test the workflow process.
Creating the New Workflow Process
This task is a step in Defining a Workflow Process That Attaches an Activity Plan to an Opportunity.
To begin, you create the new workflow process, define step properties, and then validate the workflow.
To create the new workflow process
In Siebel Tools, create a new workflow process using values from the following table.
Property Value Process Name
Create Plan
Business Object
Opportunity
Workflow Mode
Interactive Flow
For an example, see Creating the Workflow Process.
In the Workflow Processes list, right-click the new workflow process, and then choose Edit Workflow Process.
Add steps and connectors until your workflow process resembles the workflow illustrated in the following figure:

For more information, see Overview of Workflow Process Steps, and Diagramming a Workflow Process.
Defining Properties for Workflow Process Steps
This task is a step in Defining a Workflow Process That Attaches an Activity Plan to an Opportunity.
In this topic you define properties for workflow process steps
To define properties for workflow process steps
In the Process Designer, click the Add Activity Plan to Oppty step.
In the Properties window, define the business component and the operation. Use values described in the following table.
Property
Value
Business Component
Activity Plan
Operation
Insert
If you configure an Insert operation on a business component, then you must supply a value for each business component fields that is required. To insert a new activity plan, you must provide the name of the template that Siebel CRM uses for the activity plan.
Make sure the Add Activity Plan to Oppty workflow step is still chosen in the Process Designer.
In the MVPW, add a new input argument using values from the following table.
Field Name
Type
Value
Template
Literal
A valid activity template name, such as Introductory Sales Call.
For more information, see Arguments That You Can Define for a Process Property.
In the Process Designer, choose the Display Activity Plan step.
Use the Properties window to the view that Siebel CRM displays for the Display Activity Plan user interact step. Use values described in the following table.
Property
Value
User Interact View
Opportunity Activity Plan
Click the connector that is located between the Display Activity Plan step and the end step, and then define properties in the Properties window using values from the following table.
Property
Value
Event Object Type
BusComp
Event
WriteRecordUpdated
Event Object
Activity Plan
Type
Condition
The WriteRecordUpdated run-time event signals the end of the Display Activity Plan user interact step. Siebel CRM must wait for the user to make and save a change to the Activity Plan before it resumes the workflow process. WriteRecordUpdated signals this change.
Preparing Example Data for the Simulation
This task is a step in Defining a Workflow Process That Attaches an Activity Plan to an Opportunity.
Before you can test the workflow process, you create an opportunity that matches the test criteria. You create this opportunity, and then note the Row Id of the opportunity. To run the test, you then use this Row Id in the properties of the workflow process.
To prepare example data for the simulation
Log in to the Siebel client as SADMIN connected to the Sample database.
Navigate to the Opportunities list.
Choose an opportunity, right-click, and then click About Record.
Note the value of the row ID that the Row # field contains, and then click OK.
In Siebel Tools, in the MVPW, find the Object Id process property, and then set the Default String field for this property to the row Id of the opportunity you identified.
If the MVPW is not visible, then choose the View menu, Windows, and then the Multi Value Property Window menu item.
Validating and Testing the Workflow Process
This task is a step in Defining a Workflow Process That Attaches an Activity Plan to an Opportunity.
In this topic, you validate, and then test the workflow process.
To validate and test the workflow process
Validate, and then simulate the workflow process.
For more information, see Process of Testing a Workflow.
After the test reaches the user interact step in the simulation, you can use the Siebel client to change a value in the activity plan, and then save your changes. For example, change the value in the Planned Start Date field or in the Description field. To reach the end step, you cannot click Next after the Opportunity Activity Plan view displays in the Siebel client. You must satisfy the condition that you defined on the branch to allow the workflow process to proceed to the end step.
Acknowledge the message that Siebel CRM displays at the end of the workflow process.
When Siebel CRM reaches the last step, it displays a message in the client that is similar to the following:
Simulation terminated! Please check the Watch window for details.
Enter Alt+Tab to return to Siebel Tools, and then click Next to finish the end step.
In the Watch window, view the Simulator Status field.
If the Simulator Status field displays a message that is similar to the following, then the workflow process ended without error:
Simulation ended successfully
Configuring the Button That Starts the Workflow Process
This task is a step in Defining a Workflow Process That Attaches an Activity Plan to an Opportunity.
To start the workflow process in this example, you add a button to the Opportunity list. If the user clicks this button, then Siebel CRM starts the workflow process. For more information, see Starting a Workflow Process.
To how the workflow process is started
In Siebel Tools, in the Object Explorer, click Applet.
In the Applets list, query the Name property for Opportunity List Applet.
Right-click, and then click Edit Web Layout.
In the Controls/Columns window, set the Mode to 3: Edit List.
Siebel Tools sets the Mode to 1:Base, by default. You must set it to 3:Edit List. If the Controls/Columns window is not visible, then choose the View menu, Windows, and then the Controls Window menu item.
Drag a Button control from the palette to the layout, and then set the properties for the control using values from the following table.
Property Value Caption-String Override
Create Plans
HTML Type
MiniButton
MethodInvoked
EventMethodCreateActivityPlan
Siebel Tools does not display the value that the table describes for the MethodInvoked property. You must manually enter the value for MethodInvoked.
A method that uses the following naming format does not require an applet or script on a business component to allow the event:
EventMethod a string valueIf you do not use this naming format, and if you must use the event, then you must write a WebApplet_PreCanInvokeMethod script.
Preview the applet. Make sure the new Create Plan button displays as illustrated in the following figure.

Save your changes.
In the Object Explorer, click Workflow Process.
In the Workflow Processes list, query the Process Name property for the Create Plan workflow process that you created in Creating the New Workflow Process.
Right-click the workflow process, and then choose Edit Workflow Process.
Click the connector that resides between the start step and the step named Add Activity Plan to Oppty, and then use the Properties window to set properties for the connector using values from the following table.
Property Value Type
Condition
Event Object Type
Applet
Event Object
Opportunity List Applet
Event
PreInvokeMethod
Subevent
EventMethodCreateActivityPlan
EventCancelFlag
TRUE
This configuration defines a start condition for the workflow process so that Siebel CRM starts it if the EventMethodCreateActivityPlan event occurs on the Opportunity List Applet.
Validate, and then simulate the workflow process.
For more information, see Process of Testing a Workflow.
Deploying the Workflow Process
This task is a step in Defining a Workflow Process That Attaches an Activity Plan to an Opportunity.
In this topic you deploy the workflow process.
To deploy the workflow process
Deploy the workflow process.
For more information, see Process of Deploying a Workflow Process.
In the Active Workflow Processes list, set the Monitoring Level to 4-Debug.
Make sure you reload run-time events.
Make sure Siebel CRM created a run-time event for this workflow process:
Navigate to the Administration-Runtime Events screen, and then the Events view.
Query the Subevent for EventMethodCreateActivityPlan.
This configuration starts the workflow process. Siebel CRM must return one record.
Verifying the Functionality of the Workflow Process
This task is a step in Defining a Workflow Process That Attaches an Activity Plan to an Opportunity.
In this topic, you verify that the workflow process implements the required functionality.
To verify the functionality of the workflow process
In the Siebel client, navigate to the Opportunities screen, and then the All Opportunities view.
In the All Opportunities list, click Create Plan.
This step starts the workflow process for an opportunity. The workflow navigates you to the Opportunity Activity Plan view.
Edit the Description field for the plan, and then save your changes.
Navigate to the Administration-Business Process screen, and then the Workflow Instance Monitor view.
For more information, see Monitoring Workflow Process Instances.
In the Workflow Process list, query the Name field for the Create Plan workflow process.
Siebel CRM displays the related instance data in the bottom list.
Choose the Step Instances tab to view step instance details.
If the workflow process runs without error, then you can turn off monitoring:
Navigate to the Administration-Business Process screen, and then the Workflow Deployment view.
In the Active Workflow Processes list, query the name field for the Create Plan workflow process.
Set the Monitoring Level field to 0-None.
Defining a Workflow Process That Manages Research Activities for a Service Request
In this topic you create a workflow process that manages research activities for a service request. To develop this example, do the following tasks:
In this example, a workflow process detects if user takes ownership of a service request, and then creates an activity of type Research. It then provides the service request owner with items that the owner can use to research the service request. You define a simple workflow process that a run-time event starts. You become familiar with the items that are involved in setting up this workflow process and you make sure that the workflow process and the run-time event work correctly.
Creating the Workflow Process
This task is a step in Defining a Workflow Process That Manages Research Activities for a Service Request.
In this topic you create the workflow process.
To create the workflow process
In Siebel Tools, create a new workflow process using values from the following table.
Property Value Process Name
SR Assigned-Auto Create Activities
Business Object
Service Request
Group
(Leave this field empty.)
Workflow Mode
Service Flow
Auto Persist
No
Description
Automatically creates a research activity when SR ownership change is detected by using RTE
For an example, see Creating the Workflow Process.
Add steps and connectors until your workflow process resembles the workflow illustrated in the following figure:

For more information, see Overview of Workflow Process Steps, and Diagramming a Workflow Process.
Configuring the Workflow Process Steps and Connectors
This task is a step in Defining a Workflow Process That Manages Research Activities for a Service Request.
In this topic you configure the workflow process steps and connectors.
To configure the workflow process steps and connectors
Click the SR Owner Field Updated connector.
In the Properties window, define properties for the connector using values from the following table.
Property
Value
Type
Condition
Event Object Type
BusComp
Event
SetFieldValue
Event Object
Service Request
Subevent
Owner
Click the Create Research Activity step, and then use the Properties window to define values described in the following table.
Property
Value
Operation
Insert
Business Component
Action
Make sure the Create Research Activity step is chosen.
Define two new input arguments using values from the following table.
Field Name Type Value Type
Literal
Research
Description
Literal
Research the following: Siebel Bookshelf
For more information, see Arguments That You Can Define for a Process Property.
If you configure Siebel CRM to do an insert in a business component, then you must make sure that you define the fields that the business component requires. As an alternative, you can define a value in the Pre Default Value property for these fields. To access this property, you can expand the Business Component tree in the Object Explorer, and then click Field.
Choose the File menu, and then the Save menu item.
Testing, Deploying, and Verifying the Workflow Process
This task is a step in Defining a Workflow Process That Manages Research Activities for a Service Request.
In this topic you test, deploy, and verify the workflow process.
To test, deploy and verify the workflow process
Validate, and then simulate the workflow process.
For more information, see Process of Testing a Workflow.
Navigate to the Workflow Processes list.
Query the Process Name property for the SR Assigned-Auto Create Activities workflow process.
Deploy the workflow process.
For more information, see Process of Deploying a Workflow Process.
If you must debug the workflow process, then, in the Siebel client, in the Active Workflow Processes list, set the Monitoring Level to 4-Debug.
For more information, see Diagnosing a Workflow Process That Has Failed.
Verify that the workflow process implements the required functionality:
In the Siebel client, navigate to the Service Requests screen, and then the All Service Requests view.
Create a new service request, and then step off the record.
In the Service Request list, click the link in the SR # field.
Examine the Activities tab.
If the workflow runs correctly, then Siebel CRM displays the following values in the Activities list:
Type: Research
Description: Will research the following: Siebel Bookshelf
Defining a Workflow Process That Creates a Service Request
In this topic you create a workflow process that creates a service request. To develop this example, do the following tasks:
The workflow process that you create in this topic does the following:
Detects when a user creates a new service request
Assigns the new service request to the user who created the service request
Changes the SR Sub-Status to Assigned
Sets the commit time for the service request, depending on the priority
Creates an activity that includes a description of research steps that the service request owner can perform to resolve the service request
You define a simple workflow process that a run-time event starts. You become familiar with the items that are involved in setting up this workflow process and you observe how a workflow process uses a run-time event to modify a service request.
Creating the Workflow Process
This task is a step in Defining a Workflow Process That Creates a Service Request.
In this topic, you create the workflow process.
To create the workflow process
In Siebel Tools, create a new workflow process using values from the following table.
Property Value Process Name
Manage New SR
Business Object
Service Request
Group
(Leave this field empty.)
Workflow Mode
Service Flow
Auto Persist
No
Description
For new SRs, automatically modifies several SR fields. Considers SR priority during modifications.
For an example, see Creating the Workflow Process.
Add steps and connectors until your workflow process resembles the workflow illustrated in the following figure:

For more information, see Overview of Workflow Process Steps, and Diagramming a Workflow Process.
Defining Connectors for the Workflow Process
This task is a step in Defining a Workflow Process That Creates a Service Request.
In this topic, you define connectors for the workflow process.
To define the connectors for the workflow process
Click the Start Workflow connector, and then use the Properties window to define properties using values from the following table.
Property
Value
Type
Condition
Event Object Type
BusComp
Event
WriteRecordNew
Event Object
Service Request
This configuration starts the workflow process if Siebel CRM detects that a WriteRecordNew run-time event occurs on a service request.
Make sure the Type property in the Properties window is set to Condition for each connector that emanates from the decision point.
Click each connector in succession that emanates from the decision point. In the figure in Creating the Workflow Process, these connectors are labeled ASAP, High, Medium, and Low. As you click each connector, make sure the Type property in the Properties window is set to Condition.
Click the connector labeled Priority Not Set, and then define properties using values from the following table.
Property
Value
Type
Default
Right-click the ASAP connector, and then choose Edit Conditions.
In the Compose Condition Criteria dialog box, define the decision condition using values from the following table.
Property Value Compare To
Business Component
Operation
All Must Match (Ignore Case)
Object
Service Request
Field
Priority
Value
1-ASAP
You define a separate decision condition for each of the ASAP, High, Medium, and Low connectors. Each conditional statement corresponds to a Priority value. This workflow process adjusts the Commit Time in the subsequent Siebel operation step depending on the outcome of the evaluation it makes for each priority in the decision condition for the priority connector. For more information, see Creating a Decision Condition on a Branch Connector.
Right-click the High connector, and then choose Edit Conditions to access the Compose Condition Criteria dialog box.
In the Compose Condition Criteria dialog box, define the decision condition using values from the following table.
Property Value Compare To
Business Component
Operation
All Must Match (Ignore Case)
Object
Service Request
Field
Priority
Value
2-High
Right-click the Medium connector, and then choose Edit Conditions to access the Compose Condition Criteria dialog box.
In the Compose Condition Criteria dialog box, define the decision condition using values from the following table.
Property Value Compare To
Business Component
Operation
All Must Match (Ignore Case)
Object
Service Request
Field
Priority
Value
3-Medium
Right-click the Low connector, and then choose Edit Conditions to access the Compose Condition Criteria dialog box.
In the Compose Condition Criteria dialog box, define the decision condition using values from the following table.
Property Value Compare To
Business Component
Operation
All Must Match (Ignore Case)
Object
Service Request
Field
Priority
Value
4-Low
In this example you define several connectors, and then place them on the canvas consecutively. If your workflow process includes multiple connectors, and if each of the definitions for these connectors are similar to one another, then you can use an alternative technique. You can define a single branch connector, define the decision condition for it, and then copy and paste it for use elsewhere in the workflow process. You can then modify the condition for each connector, as necessary. In this example you only modify the Value. You can use the same cut and paste technique to define the Siebel operation steps in this example.
Choose the File menu, and then the Save menu item.
Close the Process Designer.
Defining Properties for the Siebel Operation Steps
This task is a step in Defining a Workflow Process That Creates a Service Request.
In this topic, you define properties for the Siebel operation steps.
To define properties for the Siebel operation steps
If necessary, display the WF Step Branch object type in the Object Explorer.
For more information, see Displaying Object Types You Use to Develop a Workflow Process.
In the Workflow Processes list, query the Process Name property for the Manage New SR workflow process.
In the Object Explorer, expand the Workflow Process tree, and then click WF Step.
Right-click in the WF Steps list, and then choose Columns Displayed.
Set the Business Component property and the Operation property for each of the Siebel operation steps in the workflow process. The resulting properties must resemble the properties displayed in the following figure.

Defining Input Arguments That Set the Commit Time
This task is a step in Defining a Workflow Process That Creates a Service Request.
You can define some properties of a workflow process in the Process Designer or the Workflow Processes list, depending on your personal preference. In this topic, you use the Workflow Processes list to add several properties for workflow process steps. To configure these properties in the Process Designer, you use the Properties window.
To define input arguments that set the commit time
Locate the Manage New SR workflow process.
For more information, see Locating a Workflow Process in the Workflow Processes List.
Right-click the Manage New SR workflow process, and then click Edit Workflow Process.
Click the Siebel operation step named Set Commit Time in 1 Hour.
In the MVPW, define three new input arguments using values from the following table.
Field Name
Type
Value
Business Component Name
Business Component Field
Sub-Status
Literal
Assigned
(Leave this field empty.)
(Leave this field empty.)
Owner
Business Component
(Leave this field empty.)
Service Request
Created By Name
Commit Time
Expression
[Created]+0.4166
(Leave this field empty.)
(Leave this field empty.)
For more information, see Arguments That You Can Define for a Process Property.
These arguments provide instructions to the Siebel operation if Siebel CRM runs the ASAP branch. In this situation, it sets the Sub-Status field to Assigned, assigns the Owner field to the value that Created By Name contains, and sets the Commit Time to one hour after the time that the user created the service request.
Commit Time includes a Type property of DTYPE_UTCDATETIME, which is a datetime field. Created includes a time stamp that stores the time when the user created the service request. If a user enters a number in a datetime field, then Siebel CRM displays it as an integer and hours. It displays minutes and seconds as fractions. For more information, see Using the Timestamp.
You must enclose the entire expression in the Value property of the Commit Time field input argument in double quotes. You must include a space before and after the plus sign (+).
Click the Siebel operation step named Set Commit Time in 2 Hours.
In the MVPW, define three new input arguments using values from the following table.
Field Name
Type
Value
Business Component Name
Business Component Field
Sub-Status
Literal
Assigned
(Leave this field empty.)
(Leave this field empty.)
Owner
Business Component
(Leave this field empty.)
Service Request
Created By Name
Commit Time
Expression
[Created]+0.
(Leave this field empty.)
(Leave this field empty.)
Click the Siebel operation step named Set Commit Time in 24 Hours.
In the MVPW, define three new input arguments using values from the following table.
Field Name
Type
Value
Business Component Name
Business Component Field
Sub-Status
Literal
Assigned
(Leave this field empty.)
(Leave this field empty.)
Owner
Business Component
(Leave this field empty.)
Service Request
Created By Name
Commit Time
Expression
[Created]+24
(Leave this field empty.)
(Leave this field empty.)
Click the Siebel operation step named Set Commit Time in 48 Hours.
In the MVPW, define three new input arguments using values from the following table.
Field Name
Type
Value
Business Component Name
Business Component Field
Sub-Status
Literal
Assigned
(Leave this field empty.)
(Leave this field empty.)
Owner
Business Component
(Leave this field empty.)
Service Request
Created By Name
Commit Time
Expression
[Created]+48
(Leave this field empty.)
(Leave this field empty.)
Click the Siebel operation step named Create Plan of Action.
This step creates an activity for the service request that includes a description. This description describes a set of actions that the owner can follow.
In the MVPW, define two new input arguments using values from the following table.
Field Name
Type
Value
Type
Literal
Research
Comment
Literal
Plan of Action: 1. Make sure customer logged description. 2. Reproduce the behavior. 3. Request logs.
Save your work, and then close the Process Designer.
Testing, Deploying, and Verifying the Workflow Process
This task is a step in Defining a Workflow Process That Creates a Service Request.
In this topic, you test and deploy the workflow process, and then verify that the workflow implements the required functionality.
To test, deploy, and verify the workflow process
Validate, and then simulate the workflow process.
For more information, see Process of Testing a Workflow.
Deploy the workflow process.
For more information, see Process of Deploying a Workflow Process.
While performing the deploy procedure, make sure you reload run-time events.
In the Siebel client, navigate to the Service Requests screen, and then the All Service Requests view.
Create a new service request.
Set a value for the Priority field, or leave it blank.
Save the record.
When you step off the record, Siebel CRM delays slightly and displays an hourglass. This behavior indicates that it is running the workflow process.
Choose the service request you just saved, and then examine the Owner, Substatus, and Date Committed fields. Verify that they are populated correctly.
Click the Activities tab.
Siebel CRM displays the new activity that the workflow process creates.
Examine the Comments field to verify that Siebel CRM entered information in this field according to the input arguments you defined on the Siebel operation named Create Plan of Action.
Create service requests that include different Priority values and observe how the decision point of the workflow process performs.
Modifying the Existing Workflow Process
This task is a step in Defining a Workflow Process That Creates a Service Request and Navigates the User.
In this topic, you copy and modify an existing workflow process.
To modify the existing workflow process
Log in to Siebel Tools as SADMIN connected to the sample database.
In the Object Explorer, click Workflow Process.
In the Workflow Processes list, right-click the workflow process named Manage New SR, and then choose Copy Record.
This example assumes you defined and tested the Defining a Workflow Process That Creates a Service Request. In this example, you can use the Revise button on the WF/Task Editor Toolbar instead of the copy feature. If you must modify the Manage New SR workflow process at some point in the future without including the modifications that this topic describes, then you can use the Copy button.
Set the properties for the new workflow process using values from the following table.
Property
Value
Process Name
Manage New SR-Navigate User to SR Activity
Workflow Mode
Interactive Flow
Right-click the workflow process named Manage New SR-Navigate User to SR Activity, and then choose Edit Workflow Process.
Drag, and then drop a User Interact step from the palette to the canvas, placing it between the Create Plan of Action step and the End step.
Add connectors between the Create Plan of Action step and the user interact step, and between the user interact step and the End step, as illustrated in the following figure:

Click the user interact step, and then use the Properties window to set properties using values from the following table.
Property
Value
Name
Display SR Activities View
User Interact View
Service Request Detail View
Confirm the value that you set for the User Interact View property:
In the Siebel client, navigate to the Service Requests screen, and then the All Service Requests view.
Click the Activities view tab.
Choose the Help menu, and then the About View menu item.
Siebel CRM displays the required view name.
Click the connector that connects the user interact step with the end step, and then use the Properties window to set properties using values from the following table.
Property
Value
Type
Condition
Event Object Type
BusComp
Event Object
Service Request
Event
WriteRecordUpdated
Choose the File menu, and then the Save menu item.
Testing and Deploying the Workflow Process
This task is a step in Defining a Workflow Process That Creates a Service Request and Navigates the User.
In this topic you test and deploy the workflow process.
To test and deploy the workflow process
Validate, and then simulate the workflow process.
For more information, see Process of Testing a Workflow.
Deploy the workflow process.
For more information, see Process of Deploying a Workflow Process.
Verifying Functionality of the Workflow Process
This task is a step in Defining a Workflow Process That Creates a Service Request and Navigates the User.
In this topic you verify that the workflow process implements the required functionality.
To verify functionality of the workflow process
In the Siebel client, navigate to the Administration-Business Process screen, and then the Workflow Deployment view.
Deactivate previous workflow processes where the Business Object property of these workflow processes is set to Service Request:
In the Active Workflow Processes list, query the Business Object field for Service Request.
Choose the Edit menu, and then the Select All menu item.
In the Active Workflow Processes list, click Menu, and then choose Deactivate Process.
In the Repository Workflow Processes list, query the Name field for New SR-Take User to Activity.
Click Activate.
In the Active Workflow Processes list, query the Name field for New SR-Take User to Activity. Siebel Tools displays one row for every active version.
Make sure only the latest version is active.
Set the Monitoring Level to 4-Debug.
In the Repository Workflow Processes list, click Menu, and then choose Reload Runtime Events.
Navigate to the Service Request list view.
Create a new service request, define a Priority level, and then step off the record.
Siebel CRM displays an hourglass, and then enters information in the Owner, Sub-Status, and Date Committed fields. It creates a new activity that is associated with the new service request, navigates the user to the Activities view of the Service Request screen, and then displays the new activity.
Make sure that a workflow process instance exists for New SR Created-Take User to Activity in the Workflow Process Log view.