3Accounts in Siebel Communications
Accounts in Siebel Communications
This chapter defines some basic concepts about accounts. It also provides the procedures for setting up account hierarchies and updating account information. It includes the following topics:
About Accounts in Siebel Communications
Administrators, such as call center administrators, sales administrators, and sales managers, benefit from reading this chapter. It describes how customer service representatives (end users) enter information into the accounts screens, which form the hub of customer information. After becoming familiar with the end-user procedures, you can customize the software to fit the needs of your company.
An account is any external organization with which your company does business. It negotiates agreements, receives service and bills, and raises trouble tickets. An account is usually the central entity of a Siebel CRM implementation. After adding accounts in Siebel Communications, end users at your company contribute information for tracking customer service, processing requests, viewing agreements, and so on.
Account Hierarchy
A single account for each customer probably meets your company’s needs to track the accounts of residential customers. However, for large commercial clients, end users can build an account hierarchy. An account hierarchy is a multilevel structure reflecting parent-child relationships within the organization.
Within a complex account hierarchy, an account usually represents one of the following entities:
A customer, prospective customer, or household
An individual service or billing account
An aggregate account for billing or service accounts
A division in an organization
An entire organization
Hierarchies can accommodate subsidiaries and complex organizations that have, for example, a world headquarters, multiple regional headquarters, and many branch locations, each with its own service and billing requirements.
This multiple-level structure supports a hierarchical view of the customer. Separate child accounts can be used to designate which information pertains to one subsidiary or another within the organization.
A hierarchy has the following further advantages:
It allows you to maintain customer information, such as address and contact name at each point in the hierarchy.
It aids in specifying usage and billing roll-up relationships.
It allows you to create and maintain aggregation points and to support complex discounting methods.
To fully support mergers, demergers and corporate restructuring, Siebel Communications automatically updates the master account or parent account of an account record and its children when the changes are made to the account hierarchy. In particular, it is possible to change the parent of a child account if that subsidiary is sold to another holding company, or to change the parent of a whole organization if it is purchased by another entity. These changes take effect by changing the parent account of the account record.
Account Classes
An account class is a method for classifying an account according to its position and role in an account hierarchy. When setting up the hierarchy, end users define parent-child relationships among the accounts. Then they designate which account class applies to each new account, according to your customer’s requirements and organizational structure.
For example, with communications companies, it is common for the service to be delivered to one subsidiary while bills get sent to another subsidiary. Separate accounts are created for each subsidiary, one with the account class service and the other with the account class billing to reflect their different functions. An account given the account class service generally stores service item information and allows end users to analyze the customer’s usage or orders. An account given the account class billing generally stores information for the financial transaction or invoice.
Siebel Communications does not restrict parent-child associations by using the account class. Any class can be a child of any other class. For example, a customer account can be placed anywhere in the hierarchy, and a billing account can be the parent or the child of a service account. To enforce hierarchy rules by using the account class, you must set them up through state models. For more information about state models, see Siebel Business Process Framework: Workflow Guide.
By default,Siebel Communications provides the following classes for accounts:
Customer Class. An account with this class represents the actual customer, person, or organization that is receiving service. A customer account includes basic customer information, such as the company name and headquarters address. It can receive both service and bills.
Service Aggregator Class. An account with this class receives aggregate usage details for all of its subsidiary accounts. It can be anywhere in the account hierarchy. It allows you to generate and view multiple service accounts that share some specifications.
Implementation example: A company has three offices in different states, and each office receives a wired phone service and a mobile phone service. Each office can have both services set up as separate service accounts, with each office set up as a service aggregate account for the services.
Service Class. An account with this class receives service, but not bills. In the account hierarchy, it is the account level at which the physical delivery of the service or product occurs. It can represent a person or organization with multiple service addresses.
Billing Aggregator Class. An account with this class receives aggregate billing details for all of its subsidiary accounts. It can be anywhere in the account hierarchy. It allows you to generate and view multiple billing accounts that have some of the same specifications. It can be set up to bill the customer by using certain requests, such as creating bills for the different services and rolling those separate billing statements into a billing aggregate account. It also allows you to create and maintain billing aggregation points and to support complex discounting methods. It receives and aggregates bills.
Implementation example: A company has offices in different states, and each office receives services two different services: broadband TV and broadband Internet. Each office can have both services set up as separate billing accounts, and each office can be set up as a billing aggregate account for the services. Then the corporate headquarters can be set up as a billing aggregate for the three offices and a single payment can be made for the services.
Billing Class. An account with this class is used to invoice the customer for products and services. In the account hierarchy, it is the account level at which the financial transactions for the service or product occur. It shows the collection of all charges applied to a customer in a given time frame for which the customer must submit payment.
Siebel Communications displays the following information that is based on the account class:
The Service Account and Billing Account Explorers filter on account class.
In the Quotes and Order Entry views, only those accounts with the appropriate account class appear in the dialog box for association.
The following image shows an example of an account hierarchy in which parent-child relationships are established along service and billing account classes.
Account Roles and Responsibilities
Sales administrators and sales managers usually oversee the creation and maintenance of accounts by their teams. All team members (end users) can create an account and update account information.
The following information lists the roles and responsibilities related to account procedures.
| Role | Description |
|---|---|
Administrator |
Sales administrator or sales manager
|
End User |
Customer service representative
|
Sales representative
|
Scenario for Using Accounts in Siebel Communications
This topic gives one example of how accounts might be used. You might use accounts differently, depending on your business model.
A customer service representative (CSR) receives a call from a prospective customer. The inbound call is arbitrarily routed to the CSR, since IVR (Interactive Voice Response) is unable to locate the account.
The caller explains that he is the owner and CEO of a small company that develops specialized software for the high-tech industry. He wants to use the CSR’s company as its sole provider.
The CSR first verifies that no account currently exists for the caller and then gathers the following information about the caller’s company:
It has the following service locations:
The headquarters or administrative office is located in Newcastle, England.
A development office is based in York.
A sales office is located in Birmingham.
All services for the Northern England offices (Newcastle and York) are to be billed on a single invoice. However, each location is to receive a statement.
The Birmingham site is to receive its own invoice.
The caller wants a discount that is based on all the services he has at all three locations, and he wants to receive a statement for all services.
The following image shows the account hierarchy that the CSR creates.
Using this hierarchy, the CSR must set up the following information to establish service for the caller:
One customer account for the entire company
Two billing accounts (one for Northern England and one for Birmingham)
Three service accounts (one for Newcastle, one for York, and one for Birmingham)
One billing aggregator account for both billing accounts so that a complete statement can be invoiced
Next, the CSR receives a call from a customer who wants to add broadband Internet service to his account. The CSR accesses the customer’s account and updates the information. While on the phone with the customer, the CSR checks the existing infrastructure to verify that the service is available in the customer’s neighborhood.
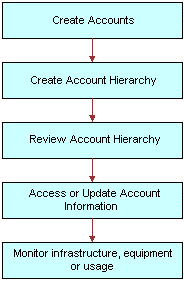
The following image shows the sequence of procedures an end user might perform to manage accounts. The steps in the sequence are as follows:
Create Accounts.
Create Account Hierarchy.
Review Account Hierarchy.
Access or Update Account Information.
Monitor infrastructure, Equipment or Usage.
Setting Up External Organizations for Siebel Communications
Administrators must set up external organizations to create the values that can appear in external organization fields in the Siebel application. For more information about external organizations, see Siebel Security Guide.
External organizations appear in the dialog box that appears when an end user enters a value in an external organization field. The following information lists some fields for external organizations.
| Screen | View | Field |
|---|---|---|
Accounts |
Equipment, Other Equipment |
Supplier |
Accounts |
Infrastructure |
Owner |
Premises |
Infrastructure |
Owner |
Work Orders |
Work Order List |
Provider |
Creating an Account in Siebel Communications (End User)
You can enter detailed information about customers in an account. After adding accounts in Siebel Communications, end users can contribute information for tracking customer service, processing requests, viewing agreements, and so on.
Adding an Account Record
To add an account record in Siebel Communications, follow this procedure.
To add an account record
Navigate to the Accounts screen, then the Accounts List view.
Add a record, and complete the necessary fields in the record and the More Info form. To access more fields, click the show more button in the form.
Some fields are described in the following table.
Field Comments Site
Type a description of the location or function of the account, such as headquarters, corporate, or San Francisco.
Account Team
Select the user ID of the team for the account. This field determines who can access information about the account.
Account Class
Select the class for the account. Account classes distinguish an account within an account hierarchy when dividing accounts into billing or service accounts. The Billing Account Explorer and Service Account Explorer views filter using this field. Also, account classes determine the accounts available for association in the Quotes and Entry views.
Select a value of Customer in this field when you create a residential customer account. For more information about account classes, see About Accounts in Siebel Communications.
Address
Select the addresses for the account. You can also enter a new address for the account. In the Account Addresses dialog box, the Premise check box indicates when the address is a premises.
Good Standing
Select this check box to indicate when the account is centrally blocked and certain activities cannot be performed for it. This field is not the same as the status of the account.
Synonyms
Select other names for the account. This field allows you to refer to accounts (and their sites) in the way that you prefer. For example, an account named A/B Products, Inc., might have the following synonyms: AB, A/B, and AB Products.
When you search for an account or enter an account in another part of Siebel Communications, you can use a synonym instead of the actual name.
Lock Assignment
Select this check box if you do not want Assignment Manager to run for the account. If you do not select this check box, then Assignment Manager can reassign the account to another team according to the account territory. For example, if you want to allow the same account manager to handle a commercial account with three different locations, then even though two of the locations are in another account manager’s territory, do not select this check box.
Creating an Account Hierarchy in Siebel Communications (End User)
Creating an account hierarchy includes creating child accounts and associating them with a parent account. You must create the parent account before adding child accounts. For information about creating an account, see Creating an Account in Siebel Communications (End User).
Setting Up an Account Hierarchy
To create an account hierarchy, follow this procedure.
To create an account hierarchy
Navigate to the Accounts screen, then the Accounts List view.
Add a record for each child account, and complete the necessary fields.
In the Parent field, select the parent account.
Changing a Parent-Child Account Relationship
To change parent and child account relationship in an account hierarchy, follow this procedure.
To change a parent-child account relationship
Navigate to the Accounts screen, then the Accounts List view.
In the Accounts list, select the child account.
In the Parent field, select a different parent account.
Reviewing an Account Hierarchy in Siebel Communications (End User)
End users can review the entire account hierarchy to check its structure.
Viewing the Hierarchy for Accounts
To view the hierarchy for an account, follow this procedure.
To review the hierarchy for an account
Navigate to the Accounts screen.
Complete one of the following steps:
To review the hierarchy for billing or service accounts, navigate to Billing Account Explorer view or the Service Account Explorer view, and then expand the subfolders in the explorer tree.
The explorer view contains only those accounts for the designated account class, including corresponding aggregator accounts.
To review all account hierarchies, navigate to the Account Management view, and then expand the subfolders in the explorer tree.
The explorer view displays accounts under the subfolders Accounts (shows all child accounts, regardless of class), Billing Accounts, and Service Accounts.
Viewing an Account Hierarchy as an Organization Chart
To display an account hierarchy as an organization chart, follow this procedure.
To view the account hierarchy as an organization chart
Navigate to the Accounts screen, then the Accounts List view.
Drill down on the name of the account.
Click the Account Hierarchy view tab.
Scroll down to view the organization chart showing the account hierarchy.
Viewing Child Accounts for Parent Accounts
To display a list of child accounts for a parent account, follow this procedure.
To view a list of child accounts
Navigate to the Accounts screen, then the Accounts List view.
Drill down on the name of the account.
Click the Account Hierarchy view tab.
Scroll down and select Account Org Hierarchy from the Show drop-down list.
A list of child accounts appears.
Accessing or Updating Account Information in Siebel Communications (End User)
Siebel Communications allows end users to access the same account information through different views. Specific views allow end users to find the information most relevant to them, according to the procedure they want to perform at that moment.
Most views allow end users to record interactions with a customer and to update the customer’s information. The functionality available to end users depends on the end user access rights.
From all views, end users can access information about billing, service, quotes, agreements, contacts, and so on.
The end-user views follow:
Customer portal view (call center agent). While talking to the customer, call center agents generally need an overview of a customer’s account. The customer portal view allows them to access the most commonly needed information in a compact presentation.
Account views (sales representative). Sales representatives access the same account information as call center agents, but they might do it through the Account views. Each view displays a specific piece of account information. For example, while preparing a report, a sales representative might want to review the usage details or order history for an account. The sales representative does not need the account overview information available in the customer portal because the representative is normally not talking to the customer on the telephone while reviewing information for the report.
Accessing the Customer Portal View
To access the Customer Portal view, follow this procedure.
To access the Customer Portal view
Navigate to the Accounts screen, then the Accounts List view.
Drill down on the name of the account.
The Customer Portal view appears with several lists and forms summarizing the account information.
Accessing Account Views
To access the Accounts screen’s views, follow this procedure.
To access the account views
Navigate to the Accounts screen, then the Accounts List view.
Drill down on the name of the account.
Click a view tab to access specific information for that account.
Viewing Agreements for Accounts
To display the agreements that are associated with an account, follow this procedure.
To view an agreement for an account
Navigate to the Accounts screen, then the Agreement Accounts Explorer view.
In the explorer tree, expand the folder for the account.
Subfolders appear for the selected account’s agreements.
Expand the folders and select the specific agreement or subagreement to view.
Monitoring Infrastructure, Equipment, and Usage in Siebel Communications (End User)
End users can record and monitor the infrastructure, equipment, and usage information for service customers.
Viewing Usage Details
To display usage details, follow this procedure.
To view usage detail information
Navigate to the Accounts screen, then the Accounts List view.
Drill down on the name of the account.
Click the Usage Detail view tab.
A list of services appears with usage history. The history displays period-by-period or monthly usage information about the account and service you select.
In the Usage Detail list, select the service.
In the Usage History list, select the type of usage information you want to view from the drop-down list.
All options except Usage History and Usage Information display the information in charts.
Adding Installed or Planned Equipment
To add installed or planned equipment, follow this procedure.
In the Equipment list, record and view items supplied by your company, and in the Other Equipment list, record and view items supplied by other companies, including competitors and alliance partners.
You can also use these lists to record information about the equipment your customers own or plan to acquire For instance, if your company offers digital service to high-end digital set-top boxes, you might record information about the premises equipment currently installed at a large apartment building or the future wiring needs of a developer.
If you create separate service accounts for customers with multiple locations, then you can associate installed and planned equipment for a location with its corresponding service account. If you use a single account to represent a customer with multiple locations, then associate the installed and planned equipment for each of the customers’ various locations with the one account for that customer.
To add installed or planned equipment
Navigate to the Accounts screen, then the Accounts List view.
Drill down on the name of the account.
Click the Equipment view tab.
In the Equipment or Other Equipment list, add a record, and complete the necessary fields.
Some fields are described in the following table.
Field Comments Type
Select the type of service available for the equipment.
Product
Select the product for the equipment. The value you select in the Type field determines the values available for selection in this field. Most of the other fields are populated automatically with data about the product you select.
Install Date
Select the date and time when the equipment was installed, or the date and time when the customer plans to purchase the equipment.
Adding Related Infrastructure
To add related infrastructure, follow this procedure.
In the Infrastructure list, you record information or attributes for the telecommunications-related infrastructure at the sites to which you provide services. This information can be important at large industrial or commercial sites such as factories, warehouses, and office buildings.
If you use multiple service accounts to represent a customer with multiple locations, then associate infrastructure items at each location with its corresponding service account. If you use a single account to represent a customer with multiple locations, then associate the infrastructure items at all the customer’s locations with the one account for that customer.
To add telecommunications-related infrastructure
Navigate to the Accounts screen, then the Accounts List view.
Drill down on the name of the account.
Click the Infrastructure view tab.
In the Infrastructure list, add a record, and complete the necessary fields.
Some fields are described in the following table.
Field Comments Attribute
Select the attribute of the infrastructure item. The value you select in the Service Type field determines the values available for selection in this field.
Value
Type the value of the attribute.
Owner
Select the name of the owner of the infrastructure item.