3Installing Desktop Integration Siebel Agent
Installing Desktop Integration Siebel Agent
This chapter includes the following topics:
DISA Installation Process
To install and Deploy DISA, perform the following tasks:
Downloading the DISA Installer
The Desktop Integration Siebel Agent (DISA) Installer is available on My Oracle Support.
Installing and Configuring DISA
To install and configure DISA, perform the following tasks:
Installing GUI Based DISA
DISA is installed in the following two modes:
GUI mode: Takes through a step-by-step user interface for installation. GUI mode can be also used to create a response file, which is used while deploying DISA on Agent desktops.
Silent mode: Uses the response file to deploy DISA on Agent desktops. For more information, see Deploying DISA to Siebel Desktops.
To install DISA in the GUI mode
After you download the latest DISA version, double-click on the Desktop_Integration_Siebel_Agent.exe to run the DISA Installer.
Select an appropriate location for installation.
In the Configure DISA screen, enter the following:
Port Number: a valid and unique port number within the specified range. The default port number is 18443.
White List: a list of domains names using semicolons (;) as separators.
In the DISA Certificate screen, select one of the two options:
Option 1: Generate Keystore and Certificate (recommended for the first time setup).
Generates keystore (disa.jks) and certificate (disa.der).
Creates files in "<CURRENT_DISA_HOME>/DesktopIntSiebelAgent"
Option 2: Generate Certificate Using Existing Keystore.
Creates a new certificate (disa.der) from an existing keystore file (disa.jks).
Copies both keystore (disa.jks) and certificate (disa.der) in "<CURRENT_DISA_HOME>/DesktopIntSiebelAgent".
In the Choose Shortcut Folder screen, choose where to add shortcuts for the DISA application (Desktop Integration Siebel Agent) and the uninstaller (Change DISA Installation).
In the Pre-Installation Summary screen, click the Installation. The installation begins.
In the Install Complete screen, click Done.
Verifying DISA Installation Folder
Navigate to the DISA folder and drill down to verify that it contains the following sub-folders and files.
Folder Name:
DesktopIntSiebelAgent
Sub folders names:
lib
log
plugins
config.properties
File Names:
disa.der
disa.exe
disa.jks
Enabling DISA in Mozilla Firefox
To enable DISA in Mozilla Firefox
Make sure DISA is running.
Open Mozilla Firefox, and then from the Tools menu, select Options.
Navigate to Advanced, and then to the Certificates tab.
Click View Certificates.
In the pop-up window, select the Servers tab.
Select the default localhost 18443 and click Add Exception... .
In the Add Security Exception window, in the Location field, enter the following address:
https://localhost:18443.
Note: The port 18443 must be changed to the port number which you configured for disa.exe in config.properties file.Click Get Certificate, and then Confirm Security Exception.
You will find a new record is added in the Servers tab.
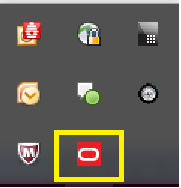
Verifying the DISA Installation
In the Task Tray, verify whether the DISA icon appears as shown in the following image:
Re-configuring DISA
To re-configure DISA after installation
Navigate to the DISA Install folder and open the config.properties file.
In the config.properties file, configure the following:
Add the server hostname (without the port number), then the separate server names using semi-colons (;) as separators. For example:
whiteList=example.com;www.example.com;2ndexample.com
For example: whiteList=sla02kfo.us.oracle.com;slc02kfo
port=18443
You can update Whitelist information as needed.
Restart DISA for the changes to take effect.
Troubleshooting DISA
To troubleshoot DISA, set the Log Level.
To set the log level
Navigate to the DISA Install folder and open the config.properties file.
Add the log level value. For example, to set the log level to 8, add the following in the config.properties
file: logLevel=8
The following are the statuses for each log level:
Log Level Status 0
OFF
1
SEVERE
2
WARNING
3
INFO
4
CONFIG
5
FINE
6
FINER
7
FINEST
8
ALL
Check the log file after the log level is reset.
Deploying DISA to Siebel Desktops
To deploy DISA to agents' desktops
Generate a response file:
Run the following command in a command line window:
Desktop_Integration_Siebel_Agent.exe -r d:\resp.txt
- Finish the installation steps as described in Installing GUI Based DISA. All the user selection and inputs will be recorded in the response file D:\resp.txt.
On the agent’s desktop machines, perform DISA Silent Mode Installation. In a command line window, run the following:
Desktop_Integration_Siebel_Agent.exe -i silent -f d:\resp.txt
This command will launch DISA installer in silent mode using the recorded user inputs in the D:\resp.txt file.
Note: Depending on the corporate policy, customers can skip certificate import and use other means to import the certificate into the Trusted Root on agents' desktop machines.To skip certificate import, the recommended install steps for Administrator are:
Run the DISA Installer once; choose Generate Keystore and Certificate in the DISA Certificate panel.
Find and copy disa.jks and disa.der files in the DISA install folder \DesktopIntSiebelAgent.
Record a response file by running the following command:
Desktop_Integration_Siebel_Agent.exe -r d:\resp.txt
Choose Generate Certificate Using Existing Keystore and specify the Keystore Location path to disa.jks, which was copied in the previous sub-step.
Clear the Import Certificate into Trusted Root check box.
Deploy the disa.der certificate, which was copied in the previous sub-step to agents' machine by any other means.
To deploy DISA on agents' machines, run the command:
Desktop_Integration_Siebel_Agent.exe -i silent -f d:\resp.txt
The administrator can also modify the variable USER_INPUT_KEY_LOC in the response file and specify the disa.jks location as needed.
Deploying DISA on Multi-User Environments
Desktop Integration Siebel Agent (DISA) provides background service for Siebel application by listening to a local port. However, on multi-user environments, because of system limitation, a DISA instance cannot share the same port for different users. Each instance of DISA requires a unique port number for each user on the same machine.
In a multi-user environment, DISA and Siebel server each can use a file to maintain the user-port map in place of the config.properties file and system preferences.
The deployment of DISA on a multi-user environment involves the following steps:
Deploying DISA on Agent machines.
Making configurations on the Siebel server side.
Applicable Patches
Latest release of Desktop Integration Siebel Agent
Siebel Innovation Pack 2016, Patchset 12 or later (version 2016.12 or later)
Siebel Innovation Pack 2017
DISA Deployment Process on a Multi-User Environment
Perform the following tasks to deploy DISA on a multi-user environment:
Preparing the Port List
The administrator assigns each agent a port number. Normally the range of port number is 1 to 65535, of which some numbers may be reserved. Choose valid port number and ensure that it does not conflict with other service on agents' machine. For agents who may have logged in to the same terminal server, each agent must have a unique port number to avoid conflict with that of others.
An agent will have in the following accounts in the two port lists where the agent's port number must be consistent in both the lists.
Windows user account
Siebel user account
Windows User to Port (For DISA)
This file must be a text file; contain agent's window user names in uppercase; the port number assigned to the agent and connected with Equal to (=). Each record takes a single line as follows:
<WINDOWS_USER_NAME>=<port number>
Note: In Windows, open a command line window and run the following command:echo %username%
It will print the current user name, use this name in uppercase as the Windows user name in the list.
>C:\Users\winuser1>echo %username%
>winuser1
Windows user name is case insensitive, but for consistency, the port list accepts only uppercase Windows user name. For example:
WINUSER1=18445
WINUSER2=18446
WINUSER3=18447
WINUSER4=18448
WINUSER5=18449
WINUSER6=18450
…
Siebel User ID to Port (For Siebel Server)
This file must be a text file; contain the agent's Siebel user ID in uppercase; the port number assigned to the agent and connected with Equal to (=). Each record takes a single line as following:
<SIEBEL_USER_ID>=<port number>
Note: In Siebel application, go to Administration - User view and then Employees view. The User ID filed value must be used as the Siebel user ID in uppercase.Siebel User ID accepts uppercase only. For example:
SIEBELUSER1=18445
SIEBELUSER2=18446
SIEBELUSER3=18447
SIEBELUSER4=18448
SIEBELUSER5=18449
SIEBELUSER6=18450
…
Configuring DISA on an Agent Machine
To configure DISA on an agent machine
Install and configure DISA. Refer to Installing and Configuring DISA. For multi-user environment, users on the same machine can share one DISA installation.
Configure DISA for multi-user environment. Do the following:
Open the <DISA_Install_Dir>\DesktopIntSiebelAgent folder.
Open the onfig.properties file with a text editor and add the following line:
portListPath=<path_to_port_list_file>
Replace the place holder <path_to_port_list_file> with the path that points to the Windows user to port file from the previous step. The path can point to a shared location.
Note: If the path contains a back slash (\), replace the single back slash with a forward slash (/) or a double back slash (\\).Every time DISA starts, it will try to find the port number with the current Windows user name, if no such record is found, DISA will use the port number that is specified in the config.properties file.
To verify the change, set logLevel to 8 and restart DISA. In the newest DISA log file, you will see a log entry similar to this:2017-01-19 10:52:37.623:INFO:info: Start server @127.0.0.1:18443
Check if the port number is correct.Note: The portListPath property must be applied only to DISA for multiple-user environment agents. It is not recommended for regular environments.
Installing Patch for Siebel Server
To install the Siebel IP2016 patchset 12 on the Siebel server
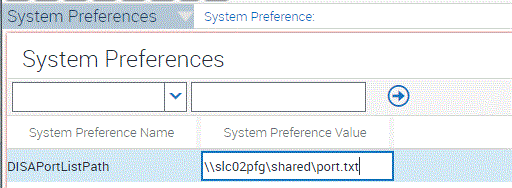
Add System Preference
Log in to Siebel with administrative privileges.
Go to Administration - Application, and then to System Preference.
Add a new System Preference as follows - (this is also shown in the following image):
System Preference Name: For example, DISAPortListPath.
System Preference Value: The path to the Siebel user ID to port list file in previous tasks. For example:
\\slc02pfg\shared\port.txt.
Make sure the path is accessible to the Siebel server machine. Restart the server for changes to take effect.
To verify the change, log in to a Siebel application with a Siebel User ID, from the list file. If DISA is running and configured, you will be able to use DISA functionalities. If DISA is not running, you will see the following message in the browser console:WebSocket connection to ‘wss://localhost:18443/’ failed:Error in connection establishment
Check thewss://localhost:<port>, to see if the port number is correct in this message.
Upgrading DISA
The DISA installer can automatically detect a DISA installation on a machine. If the DISA installer detects an older version, it prompts the user to upgrade to the current installed version of DISA.
In Upgrade mode, DISA installer will pick up install settings from the previous DISA installation, user input is not required in upgrade mode.
After the upgrade process is complete, the configuration file, key store file, and custom plugins from the old DISA installation are retained.
Uninstalling DISA
To uninstall DISA
Locate the DISA Uninstaller Change DISA Installation.exe.
Double-click on the DISA uninstaller - Change DISA Installation.exe file to begin the process of uninstallation.
Note: At any point during the uninstall process, if you choose to cancel the uninstallation and close the wizard, an alert dialog box will appear. Select Quit to exit. To continue with uninstallation, click Resume.In the Configure DISA wizard, the default selection is Uninstall Product. Click Next to continue the uninstallation.
On selecting Repair Product, the wizard repair process checks the DISA installation steps once again and corrects the missing files and key store problems, if any.
Click Next in the Uninstall DISA screen. The uninstallation begins.
In the Uninstall Complete screen, if DISA files are still in use, there will be a prompt to restart the system and the option Yes, restart my system is selected by default. The system restart is required if DISA is still running during the uninstall process and the uninstaller could not remove some files that are still in use.
Select, No, I will restart myself to continue with your work. The uninstalled files will be removed the next time the system restarts.
Click Done. Based on the option selected, the system either restarts or the Configure DISA wizard closes.
Note: It is recommended to exit DISA before the uninstallation process to avoid restarting the computer after uninstall.