3Creating and Maintaining Integration Objects
Creating and Maintaining Integration Objects
This chapter describes how to use the Integration Object Builder wizard in Siebel Tools to create new Siebel integration objects. This wizard guides you through the process of selecting objects (either from the Siebel repository or from an external system) on which you can base your new Siebel integration object. This chapter also describes how to fine-tune and refine the integration object you have created.
The chapter consists of the following topics:
Creating Integration Objects Using the EAI Siebel Wizard Business Service
Creating an Integration Object Based on Another Root Business Component
Creating an Integration Object with Many-To-Many Relationships
Resolving Synchronization Conflicts for Integration Objects and User Properties
About Business Component Restrictions for Integration Components
About the Integration Object Builder
The Integration Object Builder wizard in Siebel Tools builds a list of valid components from which you can choose the components to include in your Siebel integration object.
About the EAI Siebel Wizard Business Service
You can use the Integration Object Builder to create integration objects that represent Siebel business objects. During the process of creating a new integration object, described in Creating Integration Objects Using the EAI Siebel Wizard Business Service, you can choose the EAI Siebel Wizard as the business service to help create the object. This wizard understands the structure of Siebel business objects. It returns a list of the available business objects on which you can choose to base your integration object.
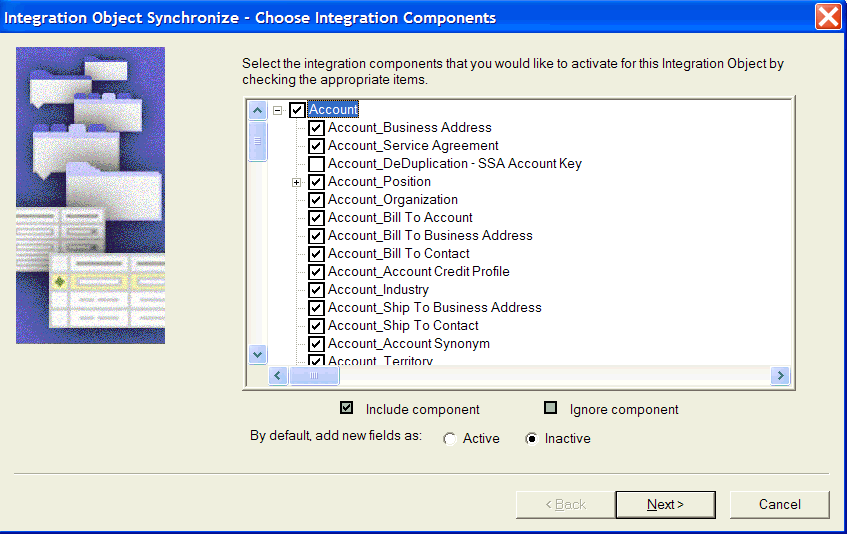
The wizard also returns a list of the available components contained within the object you have chosen, shown in the following figure. When you select certain components in the wizard, you are activating those components in your integration object. Your integration object contains the entire structural definition of the business object you selected in the first wizard dialog box. Only the components you checked, or left selected, are active within your integration object. That means any instances you retrieve of that integration object contains only data represented by the selected components.

After the wizard creates your integration object, you can edit the object in Siebel Tools, as shown in the following figure. You might choose to drill down into the integration components and activate or inactivate particular components or even particular fields within one or more components.
Process of Creating Integration Objects
Perform the following tasks to create an integration object:
Log in to Siebel Tools or Web Tools as an administrator (see Using Siebel Tools).
Create a workspace.
Creating Integration Objects Using the EAI Siebel Wizard Business Service
(Optional) Configuring the integration object (see Guidelines for Configuring Integration Objects)
Deliver the changes to the Integration Branch.
(Optional) Deploying Integration Objects to the Run-Time Database
Creating Integration Objects Using the EAI Siebel Wizard Business Service
Siebel Tools provides the EAI Siebel Wizard business service to walk you through creating an integration object. Use this wizard to create your integration object.
You can also use the wizard to deploy integration objects to the run-time database.
This task is a step in Process of Creating Integration Objects.
To create a new Siebel integration object
In Siebel Tools, create a new project and lock it, or lock an existing project in which you want to create your integration object.
From the File menu, choose New Object to display the New Object Wizards dialog box.
Select the EAI tab, and then double-click Integration Object.
The Integration Object Builder wizard appears.
On the first page of the Integration Object Builder wizard:
Select the project you locked in Step 1.
For the source system, select the EAI Siebel Wizard business service.
Click Next.
The second page of the Integration Object Builder wizard appears.
Select the source object (business object). This is the object model for the new Siebel integration object. Only business objects with Primary Business Components appear on this picklist.
Select the source root (business object component).
Type a unique name in the field for the new Siebel integration object and click Next.
Note: The name of an integration object must be unique among other integration objects. There will be an error if the name already exists.The next page of the wizard, the Integration Object Builder - Choose Integration Components page, displays the available components of the object you chose.
Deselect the components you want the wizard to ignore. This means you cannot integrate data for that component between the Siebel application and another system.
Note: Any component that has a plus sign (+) next to it is a parent in a parent-child relationship with one or more child components. If you deselect the parent component, then the children following that component are deselected as well. You cannot include a child component without also including the parent. The Integration Object Builder enforces this rule by automatically selecting the parent of any child you choose to include.For example, assume you have chosen to build your Siebel integration object on the Siebel Account business object, and you want to create an integration component based on the Account and Contact business components:From the Container Naming Convention drop-down menu, choose either
List Of PrefixorSuffix s.This allows flexibility when generating XML Schema Definition (XSD) files from integration objects. For example, rather than generating container elements such as xsd:ListOfContact, you can choose to have elements generated named xsd:Contacts.
Select the Lower CamelCase for XML Tags check box to use this convention for naming XML tags.
CamelCase is a naming convention in which a name is formed of multiple words that are joined together as a single word, with the first letter of each of the multiple words capitalized so that each word that makes up the name can easily be read. The name derives from the hump or humps that seem to appear in any Camel Case name. In Lower CamelCase, the first letter of the name is lowercase, for example
myNewIntegrationObject.The default convention is Upper CamelCase, for example MyNewIntegrationObject.
Click Next. The next page displays error or warning messages generated during the process. Review the messages, and take the appropriate actions to address them.
(Optional) Select the Deploy the Integration Object check box to deploy the integration object to the run-time database.
For more information, see Deploying Integration Objects to the Run-Time Database.
Click Finish.
Your new Siebel integration object appears in the list of integration objects in Siebel Tools.
On the Integration Components screen, the Account integration component is the only component that has a blank field in the Parent Integration Component column. The blank field identifies Account as the root component. The Siebel integration object also contains the other components selected, such as Contact and its child components.
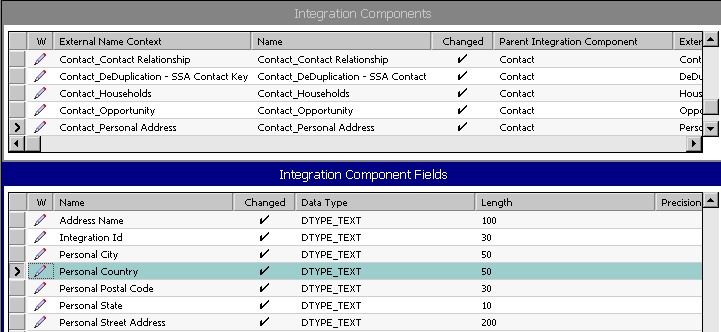
Note: When you create your integration object based on a Siebel business object, do not change its integration component’s External Name Context; otherwise, the synchronization process will not recognize the integration component, and will remove it from the integration object.To view the fields that make up each integration component, select a component from the integration component list in Siebel Tools.
The Integration Component Fields list displays the list of fields for that component. Note the system fields Conflict Id, Created, Id, Mod Id, Updated, operation, and searchspec in the list. This setting prevents the EAI Siebel Adapter Query and QueryPage method from outputting these fields. For more details, see About Using Language-Independent Code with the EAI Siebel Adapter Business Service.
When finished, compile the locked project.
Creating an Integration Object Based on Another Root Business Component
The Integration Object Builder wizard, using the EAI Siebel Wizard, allows you to choose which business object to use. However, the Integration Object Builder wizard will generate the Primary Business Component as the root Integration Component. If it happens that the business object contains multiple root business components (note the difference between root and primary business component), and that the user requires the Integration Object to be created based on another root business component, then you perform the following procedure.
To create an integration object based on another root business component
In Siebel Tools, lock the project containing the business object you want to modify.
Modify the business object definition to have that particular root business component as the Primary Business Component.
Run the Integration Object Builder wizard and choose the business object you want to use.
Undo the changes to the business object definition that you made in Step 2.
Note: This is necessary because unless you are certain about what you are doing in terms of changing the Primary Business Component of the business object, it is recommended that you roll back the changes so that they do not affect any business logic.Compile the locked project.
Creating an Integration Object with Many-To-Many Relationships
The following is an example of how to create an integration object with two components that have a many-to-many (M:M) relationship. In this example, an integration object uses the Contact business object and the Contact and Opportunity business components.
To create an integration object with a many-to-many business component
In Siebel Tools, create a new project and lock it, or lock an existing project in which you want to create your integration object.
From the File menu, choose New Object to display the New Object Wizards dialog box.
Select the EAI tab, and then double-click the Integration Object icon.
In the Integration Object Builder wizard:
Select the project you locked in Step 1.
Select the EAI Siebel Wizard business service.
Click Next and in the second page of the Integration Object Builder wizard:
Select the source object Contact to be the base for the new Siebel integration object.
Type a unique name in the field for the new Siebel integration object, for example Sample Contact M:M, and then click Next.
Select the source root for the new integration object from the list.
From the list of components, select Contact and Opportunity.
Note: There is also a component named Contact_Opportunity in the list. This component is an MVGAssociation component, and you pick it only if you need this integration object to set the primary opportunity for contact. For information on multivalue groups, see About the Search Spec Input Method Argument.Inactivate all integration component fields in the Contact integration component except First Name, Last Name, Login Name, and Comment. (In this example, these are the only fields you need for Contact.)
Inactivate all integration component fields in the Opportunity integration component except Account, Account Location, Budget Amt, Name, and Description. (In this example, these are the only fields you need for Opportunity.)
Compile the locked project.
Creating Integration Object Instances Programmatically
Because integration objects adhere to a set of structural conventions, they can be traversed and transformed programmatically, using Siebel eScript objects, methods, and functions, or transformed declaratively using the Siebel Data Mapper.
This topic outlines the steps required to create an integration object instance programmatically, using the EAI Account integration object as an example.
To create the correct integration object instance programmatically, follow these rules:
The root property set must have its type set to ListOf concatenated with the integration object name (ListOfIOName).
The next property set of the hierarchy must have the root integration component name as its type. The root integration component is the one that has no Parent Integration Component set (RootICName).
All other integration components must have the Parent Integration Component set. For those integration components, create a property set with type set to ListOf concatenated with the integration component name (ListOfICName) and then add as child to this property set another one with type set to the integration component name.
The following hierarchy demonstrates the rules:
  ListOfIOName
	RootICName
 		 ListOfICName1
			ICName1
 				 ListOfICName1_1
				ICName1_1
  		ListOfICName2
			ICName2
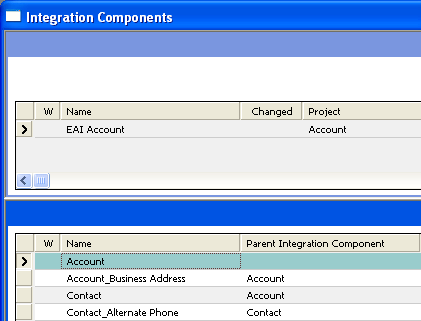
The following figure shows some of the integration components in the hierarchy of the EAI Account integration object.
Based on its hierarchy, the integration object instance will have the following property set hierarchy:
 	ListOfEAI Account
	Account
		  ListOfAccount_Business Address
			Account_Business Address
 		 ListOfContact
			Contact
 				 ListOfContact_Alternate Phone
					Contact_Alternate Phone
The following Siebel eScript example creates an instance of the hierarchy shown in the previous figure:
// Local variable creation, error handling, and object destruction are omitted for
clarity.
psConAltPhone.SetType("Contact_Alternate Phone");
psConAltPhone.SetProperty("Alternate Phone #", "555-5555");
psListOfConAltPhone.SetType("ListOfContact_Alternate Phone");
psListOfConAltPhone.AddChild(psConAltPhone);

psContact.SetType("Contact");
psContact.SetProperty("First Name", "John");
psContact.SetProperty("Last Name", "Smith");
psContact.AddChild(psListOfConAltPhone);

psListOfContact.SetType("ListOfContact");
psListOfContact.AddChild(psContact);

psAccBusAdd.SetType("Account_Business Address");
psAccBusAdd.SetProperty("Email Address", "john.smith@email.com");

psListOfAccBusAdd.SetType("ListOfAccount_Business Address");
psListOfAccBusAdd.AddChild(psAccBusAdd);

psAccount.SetType("Account");
psAccount.SetProperty("Name", "MyAccount");

// Add the children to the Account IC.
psAccount.AddChild(psListOfAccBusAdd);
psAccount.AddChild(psListOfContact);

psListOfEAIAccount.SetType("ListOfEAI Account");
psListOfEAIAccount.AddChild(psAccount);

...
Guidelines for Configuring Integration Objects
After you create your integration object you can configure it based on your business requirements. The following is a list of guidelines for configuring an integration object:
In Siebel Tools, inactivate the fields that do not apply to your business requirements.
If necessary, activate the fields that have been inactivated by the Siebel Wizard. For information, see Integration Objects.
Add the fields that have not been included by the Siebel Wizard, including custom integration component fields. For information on the implications of adding or activating such fields, see Custom Integration Component Fields, Calculated Fields and Integration Objects, and Inner Joins and Integration Components.
Validate the user keys. For information, see Integration Objects.
Update the user properties for your integration object to reflect your business requirements. For information, see:
This task is a step in Process of Creating Integration Objects.
Validating Integration Objects
When you have created your integration object and made the necessary modifications to meet your business requirements, you must validate it.
This task is a step in Process of Creating Integration Objects.
To validate your integration object
In Siebel Tools, select your integration object.
Right-click the integration object and select Validate.
Review the report, and modify your integration object as needed.
Testing Integration Objects
After validating and compiling integration objects, test them using the Workflow Simulator. For information on creating, modifying, and simulating workflows, see Siebel Business Process Framework: Workflow Guide.
This task is a step in Process of Creating Integration Objects.
To test a newly created integration object
In Siebel Tools, select the Workflow Process object in the Object Explorer.
Create a new workflow that runs the EAI Siebel Adapter business service against the new integration object.
For example, create a workflow to query with the new integration object and write the output message to an XML file, as in the following:

Test the workflow using the Workflow Simulator.
Deploying Integration Objects to the Run-Time Database
You can deploy integration objects, which you have created in Siebel Tools, to the Siebel run-time database. Siebel object manager processes build a cache of the deployed integration objects to improve performance. These deployed integration objects are read from the cache at run time.
This saves time by allowing you to modify integration object definitions without having to shut down your production environment, create and open a workspace in Siebel Tools or Web Tools, edit integration objects in Siebel Tools, and deliver the changes to the Integration Branch.
Integration objects are read first from the cache and then from the runtime repository. The deployed integration objects are maintained in the object manager cache so that performance is not slowed by rereading these integration objects from the run-time database.
This task is a step in Process of Creating Integration Objects.
Deploying an Integration Object to the Run-Time Database
The following procedure is used to deploy integration objects that have already been created in Siebel Tools. To deploy an integration object while creating it with the Integration Object Builder wizard, see Creating Integration Objects Using the EAI Siebel Wizard Business Service.
If you make changes in Siebel Tools to a deployed integration object, then you must redeploy it. If you do not redeploy it, then the object definitions will differ between Siebel Tools and your production environment, which can cause unexpected application behavior.
To deploy an integration object to the run-time database
In the Object Explorer in Siebel Tools, select Integration Object.
The Integration Objects list appears.
Right-click the integration object to deploy, and then choose Deploy to Runtime Database.
The integration object is deployed.
In the Siebel client, navigate to the Administration- Web Services screen, Inbound (or Outbound) Web Services view.
Click Clear Cache to invalidate the integration object and Web services definitions in the run-time database.
Note: Object definitions are reloaded when requested in the client.
Deployed integration objects are shown in the Administration - Web Services screen, Deployed Integration Objects view in the Siebel client.
Removing an Integration Object from the Run-Time Database
You can also remove deployed integration objects.
To remove a deployed integration object from the run-time database
In the Object Explorer in Siebel Tools, select Integration Object.
The Integration Objects list appears.
Right-click the integration object to remove, and then choose Undeploy.
The integration object is removed from the run-time database.
In the Siebel client, navigate to the Administration- Web Services screen, Inbound (or Outbound) Web Services view.
Click Clear Cache to invalidate the integration object and Web services definitions in the run-time database.
Note: Object definitions are reloaded when requested in the client.
About Synchronizing Integration Objects
Business objects often require updates to their definitions to account for changes in data type, length, edit format, or other properties. It is common to want to alter database metadata, but if you do so you have to also update your integration objects to account for these updates. Otherwise, you can cause undesirable effects on your integration projects.
Some examples of these changes are:
A field removed
A new required field
A new picklist for a field
A change of relationship from one-to-many to many-to-many
An upgrade to a new version of Siebel Business Applications
To help simplify the synchronization task, Siebel EAI provides the Integration Object Synchronize wizard. Although the process of synchronizing your integration object with its underlying business object is straightforward, review the integration objects you have modified to make sure that you have not inadvertently altered them by performing a synchronization. After synchronization, validate your integration object.
The following topics are also covered:
Synchronization Rules
During the synchronization process, the wizard follows particular update rules. Consider a simple example involving the Siebel Account integration object with only Contact and its child components marked as active in the object. The following figure helps you to visualize this example.

Because the Account component is the parent of Contact, it is also selected, even though you cannot see it in the previous figure.
Updating the Entire Integration Object
Either the business object or the integration object might have changed since the integration object was first created. The Synchronization wizard creates a new object that takes into account any business object and integration object changes.
The following figure illustrates how the Synchronization wizard takes into account any changes.

The following figure shows how the resulting integration object is structured after the synchronization.
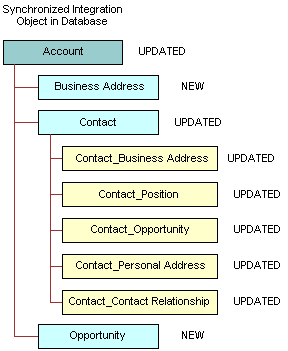
The integration object now contains two new components, Business Address and Opportunity. Other components are updated with the definitions of the corresponding components in the business object.
Deleting a Component from the Integration Object
If you choose to deselect a component in the Synchronization wizard, then you specify to the wizard to delete the component in the integration object with the matching External Name Context property. The integration object that exists in the database has a component with the same External Name, External Name Sequence, and External Name Context as the unchecked component in the component selection tree.
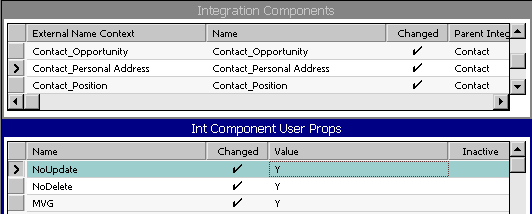
In the following figure, the Contact_Personal Address in the existing Account integration object is unchecked in the Synchronization wizard tree. This is represented by an X in this figure. The following figure illustrates this concept. The second figure in this topic shows the integration object after synchronization.

The component Contact_Personal Address has been deleted. When you use the updated integration object, you cannot pass data for that component between a Siebel application and an external application. This example shows you how you might cause unexpected results by deselecting components. However, if you do want to delete a particular component from the integration object, then deleting a component from the integration object method accomplishes that goal.
Guidelines for Maintaining Integration Objects

As the examples illustrate, you must be aware of the possible changes that can occur when you synchronize business objects and integration objects. The Integration Objects Synchronize wizard can provide assistance in managing your integration objects, but you must have a clear understanding of your requirements, your data model, and the Siebel business object structure before undertaking a task as important as synchronization.
To make maintenance of integration objects easier, adhere to the following guidelines when creating or editing your integration objects:
Use a meaningful name for any user key you have added that is different from the generated user keys. Using meaningful names helps with debugging.
Inactivate user keys instead of deleting them.
Inactivate fields instead of deleting them.
Synchronizing Integration Objects
You use the Integration Object Synchronize wizard in Siebel Tools to update and synchronize integration objects.
To update an integration object with updated business object definitions
In Siebel Tools, select the integration object you want to update.
Click Synchronize in the Integration Objects list.
The Integration Object Synchronize wizard appears.
Click on the plus sign to list all the related integration components, as shown in the following figure.
The process of retrieving Siebel integration objects and Siebel business object definitions can take varying amounts of time, depending on the size of the selected objects.
Uncheck the boxes beside the objects and components you do not want to include in the synchronization of your Siebel integration object. Note that only the objects that are included in the new integration object are marked.
Choose to add new fields as active or inactive and click Next. Inactive is the default.
The process of performing the synchronization can take some time, depending on the complexity of the selected objects.
The Integration Object Synchronize Summary screen appears, providing feedback from the synchronization.
Each added field is checked as to whether or not it is required for use with the integration object.
Review the summary. If changes are needed, then click Back and make the needed changes.
If no changes are needed, then click Finish to synchronize the Siebel integration object and the Siebel business object.
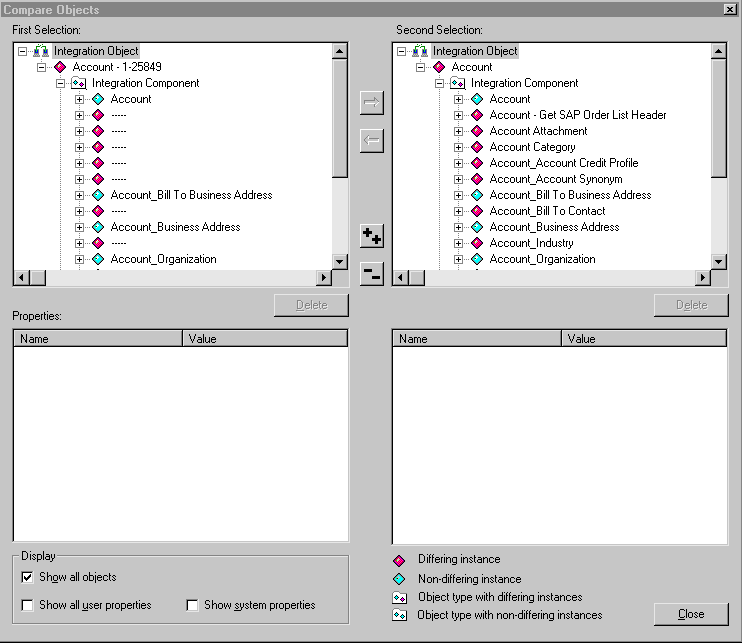
The Compare Objects dialog box appears. This tool allows you to move properties and objects between versions using arrow buttons.
When you synchronize the Siebel integration object and the Siebel business object, the Synchronization wizard performs update, insert, and delete operations on the existing integration object definition. The Synchronization wizard selects or deselects components to make the Siebel integration object look like the definition of the Siebel business object you chose.
The wizard generally updates the Siebel integration object either by updating the object and its components or by updating some components and deleting others. For information, see Updating the Entire Integration Object and Deleting a Component from the Integration Object.
Copy custom properties and custom user keys as needed. The wizard includes any new fields added to the business object in your integration object for the new version of your Siebel application. All these fields are set to active.
Inactivate any new fields that you do not need in a component of your updated integration object.
Right-click on your integration object, and select the Validate option to validate your integration object.
Resolving Synchronization Conflicts for Integration Objects and User Properties
This topic serves as a guide to resolving synchronization conflicts if any arise.
The following table illustrates the behavior of the merging logic for each of the integration object parts that have to be synchronized.
Table Merging Logic Used for Synchronizing Integration Objects
| Integration Object Metadata | Merging Rules |
|---|---|
Objects |
Validate that Business Object still exists. |
Components |
Present the tree of components based on current business object definition. The components present in the current integration object are checked in the UI tree, other components presented as Inactive. User decides which components to add or delete. This is done by the Synchronization wizard UI. |
Fields |
Keep the current integration component fields if still present in the business component, otherwise delete. Add new fields in a way that does not conflict with existing ones (see the row about External Sequence for more information). System fields are created when appropriate (for example, searchspec, IsPrimaryMVG, and operation). If the system field is inconsistent with the integration component definition, then delete it. Active/Inactive. Preserve the current integration component field value unless Business Component Field is Required (field must be present during Insert). Otherwise, new fields are created Inactive. |
XML Properties |
Preserve the current integration object values to keep XML compatible. Add new components/fields properties avoiding conflict with existing XML. XML Properties are processed according to the XML sequence. New components/fields that sequence within the parent component element will be higher than current. Reuse existing processing code (and check for correct behavior). |
External Sequence (on components or fields) |
Preserve the component or field sequence within the parent component. Set the sequence on new components or fields higher than the existing ones. |
Name |
Preserve Names in the current integration object. |
User key, Hierarchy key, Other keys (for example, Status Key) |
Existing Keys:
New Keys:
|
User Properties |
Preserve valid cases, remove invalid ones, and generate warnings. See the following table for more information. |
The following table shows the logic that is used when synchronizing user properties.
Table Logic Used for Synchronizing User Properties
| User Property Name | Values (Default is in italics) | Level (Object, Component, or Field) | Merging Rules |
|---|---|---|---|
AdminMode |
Y, N |
C, O |
Entered by the user; if the value exists, then keep it. Otherwise, the wizard sets the value to N. |
AllLangIndependentVals |
Y,N |
O |
Entered by the user; if the value exists, then keep it. Otherwise, the wizard sets the value to N. |
AssocFieldName |
Any valid field name in the Association business component |
F |
Siebel Wizard generates the value based on current business component definition. The Wizard overwrites the user change, because in order for the integration component to be functional, the User Property has to be consistent with the business component. (component MVGAssociation is set to Y) |
Association |
Y, N |
C |
Siebel Wizard generates the value based on current business component definition. The Wizard overwrites the user change, because in order for the integration component to be functional, the User Property has to be consistent with the business component. |
EDEnabled |
Y, N |
F |
For each integration component field, the Synchronize wizard adds an integration component field user property named EDEnabled with the value set to Y if the corresponding business component field is effective dating enabled. The wizard will not overwrite user changes. |
FieldDependencyFieldName |
Any active integration component name within the same integration component |
F |
Entered by the user. Keep the current value if valid (if FieldName field is Active). |
ForceUpdate |
Y, N |
O |
Entered by the user. Keep the current value. |
Ignore Bounded Picklist |
Y, N |
O, C, F |
Entered by user, keep if valid (if component Picklist is set to Y). |
IgnorePermissionErrorsOnUpdate, IgnorePermissionErrorsOnInsert, IgnorePermissionErrorsOnDelete |
Y, N |
C |
Entered by the user. Keep the current value. |
MVG |
Y, N |
C |
Siebel Wizard generates the value based on the current business component definition. The Wizard overwrites the user change, because in order for integration component to be functional, the User Property has to be consistent with the business component. IsPrimaryMVG system field is created in the merged integration object. |
MVGAssociation |
Y, N |
C |
Siebel Wizard generates the value based on the current business component definition. The Wizard overwrites the user change, because in order for integration component to be functional, the User Property has to be consistent with the business component. IsPrimaryMVG system field is created in merged integration object. |
MVGFieldName |
Any valid field name in the MVG business component |
F |
Siebel Wizard generates the value based on current business component definition. The Wizard overwrites the user change, because in order for integration component to be functional, the User Property has to be consistent with the business component. (component MVG is set to Y) |
NoInsert, NoDelete, NoUpdate, NoQuery, NoSynchronize |
Y, N |
C, F (NoUpdate) |
Entered by the user. Keep the current value. |
Picklist |
Y, N |
F |
Siebel Wizard generated. The user change is kept if valid (if Picklist component). Review the input object for a user property of PICKLIST. Copy from the current field. |
PicklistUserKeys |
Any active fields |
F |
Entered by user, keep only Active fields. User property is valid only if PICKLIST is set to Y on the integration component. If no Active fields left, then remove the user property. |
SuppressQueryOnInsert |
Y, N |
C |
Entered by the user. Keep the current value. When using the Insert method for the EAI Siebel Adapter, if this integration component user property is defined, then the EAI Siebel Adapter will not perform a query before inserting a record. |
ViewMode |
All, Manager, Sales Rep, and any others |
O |
Entered by the user; if the value exists, then keep it. Otherwise, the wizard sets the value to All. |
Using Formatted Values in Integration Objects
The UseFormattedValues integration object user property allows you to configure the EAI Siebel Adapter to use formatted values.
The Siebel application stores a phone number’s format as well as the phone number itself in the Siebel Database to display the phone number in the GUI. How a phone number displays is dependent on the preconfigured format for a specific country.
For example, a +55 555 5555 phone number in an English - ENU database is stored as +555555555 000 0000, where 000 0000 is the formatting mask.
By default, the value of the UseFormattedValues user property is set to N, indicating no formatted values are used. However, you can use scripting or a workflow to configure the EAI Siebel Adapter to force the use of formatted values by setting an integration object’s UseFormattedValues user property to Y. In the previous example, the EAI Siebel Adapter will then return the phone number as +55 555 5555, ignoring the zeroes.
Generating Integration Object Schemas
At certain points in your integration project, you might want to generate schemas from an integration object. If you export Siebel integration objects as XML to other applications, then you might have to publish the schemas of such objects so that other applications can learn about the structure of the XML to expect.
To generate an integration object schema
In Siebel Tools, select the integration object for which you want to generate a schema.
Click Generate Schema to access the Generate XML Schema wizard.
Choose the business service to use to generate the schema:
EAI XML DTD Generator. Generates a Document Type Definition (DTD).
EAI XML XDR Generator. Generates an XML-Data Reduced (XDR) schema.
EAI XML XSD Generator. Generates an XML Schema Definition (XSD).
Choose an envelope type to use in the schema, either none or Siebel Message Envelope.
Choose a location where you want to save the resulting schema file.
(Optional) Select the Include length information for String type check box to generate simple types for all string elements in the integration object schema.
Click Finish.
The wizard generates the selected type of schema for the integration object. Use this to help you map external data directly to the integration object. The schema serves as the definition for the XML elements you can create using an external application or XML editing tool.
<!-- Shared Element List.  These elements are guarenteed -->
<!-- to have the same datatype, length, precision, and scale.-->
<!ELEMENT ErrorMessage (#PCDATA) >
<!ELEMENT ErrorCode (#PCDATA) >
Optimizing the Performance of Integration Objects
To optimize your integration object performance, you might want to consider the following:
Size of Integration Object
The size of an integration object and its underlying business components can have an impact on the latency of the EAI Siebel Adapter operations. Inactivate unnecessary fields and components in your integration objects.
Force-Active Fields
Reexamine any fields in the underlying business component that have the force-active specification. Such fields are processed during the integration even if they are not included in the integration component. You might want to consider removing the force-active specification from such fields, unless you absolutely need them.
Picklist Validation
Siebel Business Applications have two classes of picklists: static picklists based on lists of values and dynamic picklists based on joins.
Setting the property PICKLIST to Y in the integration object field directs the EAI Siebel Adapter to validate that all operations conform to the picklist specified in the field. For dynamic picklists, this setting is essential to make sure the joins are resolved properly. However, for unbounded static picklists, this validation might be unnecessary and can be turned off by setting the PICKLIST property to N. Even for bounded static picklists, you can turn off validation in the adapter, because the Object Manager can perform the validation. Turning off the validation at the EAI Siebel Adapter level means that picklist-related warnings and debugging messages do not show up along with other EAI Siebel Adapter messages. This also means that bounded picklist errors will not be ignored, even if Ignore Bounded Picklist is set to Y.
As well as certain warnings and messages not appearing, setting the integration component field user property PICKLIST to N can also cause fields to be auto-completed. Providing only part of the value for a particular field causes the field to be auto-filled with the first matching entry in the picklist. This occurs especially when the picklist is based on a multilingual list of values (MLOV). For example, if the incoming message contains the string "On-" and there exists an entry "On-Hold," then the field will be set to "On-Hold."
If the EAI Siebel Adapter performs the validation (PICKLIST is set to Y), auto-filling of the field does not occur. In this case, the EAI Siebel Adapter supports only an exact match for the particular field (in the previous example, the value "On-" will fail; only "On-Hold" will pass).
About Business Component Restrictions for Integration Components
The business components underlying the Integration Components might have certain restrictions. For example, only an administrator can modify the Internal Product. The same restrictions apply during integration. In many cases, the Siebel Integration Object Builder wizard detects the restrictions, and sets properties such as No Insert or No Update on the integration components.
System Fields
Integration object fields marked as System are not exported during a query operation. This setting prevents the EAI Siebel Adapter from treating the field as a data field, which means for the Query and QueryPage method the EAI Siebel Adapter do not write to the field. For the Synchronize and Update method, the field will not be directly set in the business component unless the ISPrimaryMVG is set to Y.
If you want to include System fields in the exported message, then change the Integration Component field type to Data.
Guidelines for Using Integration Components
The following are the guidelines for using integration components:
Familiarize yourself with the business logic in the business components. Integration designers must use the presentation layer, or the user interface, to get a good sense of how the business component behaves, and what operations are allowed and not allowed.
Design with performance in mind. For more information on performance and using integration objects, see Optimizing the Performance of Integration Objects.
Design with maintenance in mind. For more information on maintenance, see Guidelines for Maintaining Integration Objects.
Resolve configuration conflicts. During the development of your integration points, you might encounter issues with the configuration of business components that are configured to support interactive GUI usage, but do not satisfy your integration requirements.
The following scenarios demonstrate two situations in which you might encounter such conflicts, and a possible solution for each case:
Scenario 1. A business component such as Internal Product is made read-only for regular GUI usage, but you want your integration process to be able to update the Internal Product business component.
Solution. Set the AdminMode user property on the integration object to Y. This allows the EAI Siebel Adapter to use the business component in an administrator mode.
Scenario 2. Similar to scenario 2, a business component such as Internal Product is made read-only for regular GUI usage, but you want your integration process to be able to update the Internal Product business component. The only difference in this scenario is that the business component is used through a link that has NoUpdate property set to Y.
Solution. Because there is a link with NoUpdate property set to Y, setting the AdminMode user property on the integration object to Y is not going to help. You must create the following exclusively for integration purposes:
A new link based on the original link with NoUpdate property Set to N.
A copy of the original business object referencing the new link instead of the original. Note that both links must use the same business component.
Note: Customized configurations are not automatically upgraded during the Siebel Repository upgrade, so use this option as a last resort.