5Scheduling Using Siebel Scheduler

About Using Siebel Scheduler

Siebel Scheduler is only available to new customers in controlled availability. For more information, contact your Oracle sales representative. An alternative scheduling method is available using Siebel Field Service Integration to Oracle Real-Time Scheduler. For more information, see Scheduling Using Oracle Real-Time Scheduler Version 2.x.

Note: The license for Siebel Field Service does not include the functionality for Siebel Scheduler. You must obtain a license for Siebel Scheduler to implement its functionality.

You can specify the scheduling method to use for each service region. For more information about migrating service regions, see Administering Service Regions.

Note: Siebel Scheduler is not supported on the 32-bit HP/UX operating system.

About Schedules

A schedule describes the hours in a week when the customer is entitled to receive service.

Note: Depending on the Siebel application and screen, schedule means the same as service hours or service calendar.

Schedules are based on a typical work week. For each schedule, an administrator can also specify holidays and excluded days when you do not offer contractually covered service to a customer.

About Siebel Scheduler

Dispatchers, who review and manually rearrange region schedules, and service center representatives, who answer the customer calls and make appointments for service activities, can assign and schedule personnel to complete service activities. Also, automated process (for example, workflows) can identify activities and perform automatic scheduling.

The process of scheduling field service engineers must consider a wide range of factors, including availability of personnel, proximity of service engineers to the customer site, skills of service engineers, availability of parts, efficiency of scheduling, and optimization of costs for the service provider.

Siebel Field Service includes the following features for assigning and scheduling activities:

  • Manual assignment. Manual assignment is available in any Activities view, where a dispatcher or customer service representative can enter data in the Employees field. For more information, see Assigning Activities to Field Service Engineers (End User).

  • Dispatch Board. This screen lets a dispatcher or customer service representative manually assign and schedule individual activities by selecting and then moving the activities to a Gantt chart. For more information, see Dispatch Board.

  • Assignment Manager. Assignment Manager provides a list of personnel who are qualified to complete a service activity or service request. The list, based on a set of rules, is ranked by a score that indicates the suitability of the engineer. The dispatcher or customer service representative selects a field service engineer from this list. For more information, see Siebel Assignment Manager Administration Guide.

  • Appointment Booking System (ABS). Using the ABS, a customer service representative can schedule future appointments using a choice of time periods that a customer can select, and book appointments. The ABS assigns specific field service engineers to service activities on specific dates and times. For more information, see About the Appointment Booking System.

  • Optimizer. The main purpose of the Optimizer (or Optimization Engine) is to reorganize and reassign a schedule to reduce the cost of the schedule. The Optimizer uses a flexible set of constraints, availability information, and cost considerations. For more information, see Defining Cost Functions for the Optimizer.

    The Optimizer can reorganize schedules to meet contractual commitments for service, accommodate emergency service calls, and meet unforeseen events in the service organization (for example, sick days for field service engineers). These functions of the Optimizer are Contract Scheduling.

    Contract Scheduling inserts high-priority service activities into a schedule with minimal disruption to the schedule and without a significant increase in the cost of the schedule. Contract Scheduling requires an immediate response. For contractual commitments, the Optimizer can fit the service activity into an available time slot in a schedule or reschedule and reoptimize an entire schedule to accommodate a new activity. For more information, see About the Schedule Optimizer.

After an activity is assigned and scheduled, the Workflow Manager can notify a field service engineer of the assignment by sending, for example, an email or a notification to a mobile device. The engineer can then synchronize a mobile computer or mobile device to obtain details about an activity.

    Business Requirements for Schedules

    Typically, businesses that schedule personnel have the following needs:

    • Match the appropriate employee to an activity. (For example, the employee with the appropriate skills must complete the activity.)

    • Minimize the cost of service. (For example, minimize overtime, down time, and travel.)

    • Consider contractual commitments. (For example, a contract might indicate that service personnel must arrive onsite within 24 hours.)

    Businesses schedule service for the following time spans:

    • Emergencies today. Make sure that the best person can respond in the promised time frame.

    • Activities that occur over the next 2 weeks. Make sure that the appropriate employees are efficiently utilized and not spending excess time traveling from site to site.

    • The weeks and months ahead. Book future activities, such as preventive maintenance and installations, using available resources efficiently.

      About the Appointment Booking System

      A significant portion of a service business involves activities that occur in the future, such as installations or preventive maintenance. The Appointment Booking System (ABS) automates the process of offering appointments to customers. The ABS operates in real time.

      The ABS provides a list of available time slots for future appointments, and then reserves a selected appointment slot. Customers might prefer a shorter time slot, but the window must be long enough so that the engineer can probably meet the commitment.

      Scenario for Using the Appointment Booking System

      This topic gives one example of how the Appointment Booking System might be used. You might use the Appointment Booking System differently, depending on your business model.

      A cable service company employs customer service representatives who answer calls from customers who want cable service installed. The cable installation requires that customers are present to let the field service engineer into their homes. Customers generally do not want to spend the entire day waiting for the engineer to arrive. They prefer that the service representative provide them a time range when the engineer will arrive.

      When a customer calls to schedule the cable installation, the service representative asks the customer for an approximate time when he expects to be at home. The customer service representative then attempts to book an appointment for this approximate time. During this process, the ABS provides a time window when the field service engineer can arrive. The customer service representative can then book the appropriately skilled field service engineer for a time range. Installing the cable takes about an hour, so the service representative might give the customer a time slot from 8:00 A.M. to 12:00 P.M. Booking field service engineers for a time range and not a specific time allows some leeway if problems occur (for example, traffic jams or activities that take more time than anticipated).

      About the Schedule Optimizer

      The Optimizer uses complex algorithms to meet the following objectives:

      • Assign field service engineers to service activities.

      • Schedule these activities.

      • Maximize the efficiency and the quality of service.

      • Minimize the cost to the service organization.

      The Optimizer can also respond to immediate scheduling demands to provide repair activities that meet the requirements of service entitlements (for example, a response within 4 hours), emergencies (for example, breakdowns of service vehicles), and changes in service personnel.

        Optimization of Schedules

        Because most service costs include labor, efficient use of labor is a primary goal of a service organization. Efficiency encompasses numerous objectives. Some objectives can conflict with each other. Examples of objectives follow:

        • Assign field service engineers who have the appropriate skills and parts to tasks so that they can resolve service requests the first time.

        • Because skilled engineers can finish a task faster, assign these engineers to more challenging work so that their time is not wasted on trivial tasks.

        • Minimize travel between activities by grouping activities in an area.

        • Schedule engineers so that they appear on site within contractually committed times.

        The Optimizer provides automated, background optimization of the schedule for service activities and optimal use of resources in each service region.

          Business Priorities

          Each business has a different definition of efficiency in delivering service. Businesses that handle critical responses (for example, a utility company that handles downed power lines) define efficiency as placing someone on site in the shortest time. In this case, response is more important than full utilization. Other businesses do not require stringent responses but require higher utilization to preserve profits. In either case, a service business must set priorities when scheduling and dispatching personnel.

            Repairs and Schedules

            Most service businesses start the day with a schedule of activities to perform, such as maintenance, installations, and other scheduled repairs. During the day, customers can call for repairs that require modification of schedules.

            Customers with service agreements often have specific entitlements with a required response time. This response time might be tiered according to the agreement. Standard agreements might specify that engineers are onsite within 24 hours of the service call, and premium agreements might specify response times as short as 2 hours.

            You must insert repair activities into the schedule that the Optimizer carefully optimized during the previous night. Optimizing the schedule again is usually not practical because optimization routines can run for hours to determine good solutions. Customers want a service commitment immediately, often while they are on the phone. You must achieve a balance between trading optimized schedules for quick responses and customer satisfaction while still enforcing business requirements.

            When responding to service requests, the ideal solution for the customer service representatives is to click a button and receive a time for a service call that considers contractual agreements and other constraints. The Optimizer addresses this need.

              About Schedule Horizons and Time Zones

              The ABS and Optimizer use the following time periods for scheduling activities:

              • Glued period. A time period, starting from today, when you cannot schedule activities. This period prevents changes to schedules and assignments that are already sent to field service engineers. A Glued period is not required. You can set the value to 0.

              • Contract Scheduling period. The period of time in days for scheduling immediately pending activities for a specific service region. Typically, this period covers days 2 to 7 (from the end of the Glued period to a week from today).

              • Optimizer horizon. A period of time that includes the Contract Scheduling period. The Optimizer operates in this time period.

              • ABS horizon. The period of time in days for scheduling future activities extending from the end of the Optimizer horizon to some time in the future. The ABS horizon is the length of time that is available to book appointments for a service region. Typically, this horizon is from day 8 to day 56 (a week from today to 8 weeks from today).

              Both the ABS and the Optimizer horizons are represented by a single time line because both horizons are measured from a current time (the time for loading data). For more information, see About Loading and Reloading Data for Service Regions.

              The following figure shows an example of how you typically define these schedule horizons.

              Scheduling Horizons

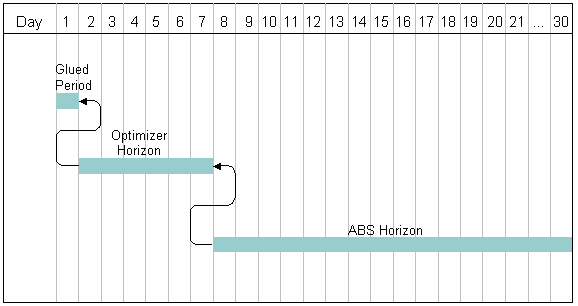
              The Glued period is day 1. The Contract Scheduling period is days 2 to 7. The Optimizer horizon spans the Contract Scheduling period and is also days 2 to 7. The ABS horizon is days 8 to 21, and appointment booking occurs for that period of time.

              The schedule horizon is relative to the current day (today). Therefore, as time passes, activities move (from day 1 to 30) along this time line. For example, a service activity might fit the following situation:

              • An appointment to perform an activity is scheduled into a time slot some time 8 to 15 days from now. The ABS assigns the activity to an employee during the ABS horizon.

              • As time passes, the scheduled activity moves closer to today. On day 8, the activity moves from the ABS horizon to the Optimizer horizon. In the Optimizer horizon, the Optimizer evaluates the schedule, and determines the best time for the service activity and person to complete the service activity. During this processing, the Optimizer tries to minimize the costs of a schedule.

              • The activity remains in the Optimizer horizon for 6 days. The Optimizer might adjust the schedule at regular intervals but at least once each day. This schedule adjustment might be necessary because of changes in personnel, emergency service calls, or service activities that contractual commitments regulate (for example, a warranty repair that is required within 12 hours).

              • On day 1, the Glued period begins and the schedule for the activities in a service region is locked.

                ABS Horizons and Long-Range Appointments

                You do not have to use the ABS to schedule activities that are far into the future, such as 6 months ahead. Some companies schedule preventive maintenance activities months ahead of time. The activities are automatically scheduled when they are loaded into the ABS if an ABS horizon exists.

                For example, today is March 1st, and the ABS horizon is 14 days. You can set a preventive maintenance activity for May 1st. (Earliest Start is May 1st 9:00 A.M. Latest Start is May 1st 12:00 P.M.) This activity remains unscheduled until April 17th. When the ABS is reloaded that evening, the ABS queries and finds the activity. Because the activity is unscheduled, the ABS attempts to automatically schedule it by using the Earliest Start and Latest Start values.

                You might want to use the ABS to schedule long-range appointments when you think that maximum capacity is near, and you are concerned about overbooking.

                Note: Longer horizons require more memory. Also, note the 10,000 query limit on activities for each service region.

                  Time Zones for Schedules

                  Siebel Field Service stores all times using the UTC (Universal Time Coordinate). To display the local time in the user interface, the UTC is converted to the appropriate local time zone. Service calendars use Universal Time Coordinate conversions. For more information about ongoing application administration tasks, see Siebel Applications Administration Guide. For more information about UTC, see Siebel Global Deployment Guide.

                  Note: UTC is not the same as GMT (Greenwich Mean Time). UTC does not observe daylight savings time, but GMT observes daylight savings time.

                  Scheduling uses the following time zones:

                  • The customer time zone. Appointments are scheduled in the time zone for the customer. The time zone for the customer is the same as the time zone for the service region.

                  • The service center time zone. Siebel Scheduler ignores the time zone for the service center and uses time zone for the service region.

                  • The service region time zone. Activities that appear on the Gantt chart of the Dispatch Board are in the time zone for the service region.

                  • The employee (field service engineer) time zone. Siebel Scheduler ignores the time zone for the employee and uses time zone for the service region.

                    Note: You must specify activity times (for example, the earliest start time and latest start time) and exception hours for employees in the service region time zone. If the dispatcher or service administrator is in a different time zone, then that person must manually convert the activity times and the exception hours for employees to the service region time zone. If that person is in the same time zone, then no manual conversion is necessary.

                    About Heuristic Methods for Schedules

                    The ABS and the Optimizer use heuristic methods to schedule appointments. These heuristic methods are included in the parameter set configuration. For more information, see Creating Parameter Sets for Schedules.

                      Heuristic Methods for the Appointment Booking System

                      To schedule appointments, the ABS can use the following heuristic methods:

                      • Earliest First. The earliest available time slots are selected for the set. The ABS examines each person in the schedule to find the first open slots after the date in Earliest Start field. This method can provide the fastest response for an activity. Companies that book activities for the same day prefer this method because it maximizes the amount of work service engineers perform.

                      • Resource Loading. Time slots are selected so that the schedules for employees are completed 1 employee at a time, to the extent possible. If multiple qualified employees are available, then the time slots for the employee with the most complete (filled-up) schedule are selected for the set. Companies primarily use this heuristic method for scheduling partners or on-call resources when they want to use as few resources as possible to meet the service needs.

                        Tip: You can configure the number of time slots returned in response to the request by using the ABS - Default Number of Slots parameter.
                      • Resource Leveling. Time slots are selected so that the schedules for qualified employees are evenly loaded, to the extent possible. Companies use this heuristic method when they employ salaried field service engineers who must work when scheduled.

                        Note: Selecting this heuristic method does not mean that the time slots for all employees in the schedule appear. Multiple slots from the same employee might appear if that employee is more lightly loaded.

                        Heuristic Methods for the Optimizer

                        The Optimizer provides a choice of methods to obtain solutions for a service region schedule. Each of these methods involves a different strategy to improve the schedule. All methods use operations to move appointments and activities in a schedule and then verify improvements in the overall cost of the schedule. For example, the Optimizer might try to swap a pair of activities between two field service engineers. This swap can change the cost of the schedule by changing the cost of travel, the amount and cost of overtime, and the rate that the field engineer bills. Any reduction in cost is an improvement in the schedule. For more information, see Defining Cost Functions for the Optimizer.

                        The Optimizer can use 2 basic optimization methods alone. The Optimizer can use 3 additional methods in combination with the basic methods. The following basic methods consistently search for and accept only improvements (lower costs) in the schedule:

                        • Greedy search. This method starts with an existing schedule, finds the first move that improves the schedule, accepts the move, and then uses this solution to find the next improvement. A Greedy search repeats this process until there are no more opportunities for improvement or until a time limit is reached. This method is relatively fast, but the resulting solution is not as good as other methods.

                        • Steepest search. This method starts with an existing schedule, tries all moves, accepts the move that provides the greatest improvement in the schedule, and then uses this solution to find the next improvement. A Steepest search repeats this process until there are no more opportunities for improvement or until a time limit is reached. This method takes longer, but generally produces lower-cost schedules.

                        Additional methods, combined with the Greedy search or the Steepest search, allow moves that temporarily increase the cost of a schedule to arrive at significant, overall improvements in the schedule. In all cases, the Greedy search or the Steepest search quickly finds an improved schedule, and then one of the following methods searches for improvements:

                        • Tabu search. This method accepts the next best solution even if it is not an improvement over the previous schedule. This method keeps a tabu list of finite length that contains the results of previous moves. The Optimizer cannot repeat a move until the move is no longer on the list.

                        • Fast Guided Local search. This method adjusts the cost of a solution to reflect the number of times the Optimizer tried a move so that the Optimizer can try a wider range of changes.

                        • Fast Guided Tabu search. This method combines the Tabu search and the Fast Guided Local search. This method often finds good solutions faster than the Tabu or Fast Guided Local search.

                          About Appointment Booking for Siebel Scheduler

                          This topic describes the business and technical process flows that apply when a customer service representative tries to book an appointment. For more information, see Booking Appointments for Activities Using Siebel Scheduler (End User).

                            Business Process Flow for Appointment Booking

                            A typical business process for a customer service center follows:

                            1. A customer initiates a request for service.

                            2. The customer service representative creates a service request, and selects an activity plan to generate activities for the request.

                            3. The agent clicks the Book Appt button in the Service screen or the Activities screen to see a list of appointment choices for the selected activity.

                            4. The customer service representative, who sees these choices in a dialog box, selects a time slot and clicks Confirm.

                            If the customer does not want any of the time slots, then the customer service representative clicks Cancel.

                              Technical Process Flow for Appointment Booking

                              When the business process for appointment booking occurs, the following ABS processing occurs:

                              1. When the customer service representative clicks the Book Appt button, the ABS searches for available time slots by using the Earliest Start field and Latest Start field for the activity to limit the search.

                              2. If the activity does not include a value for the earliest and latest start, then the ABS selects from all of the time slots in the ABS horizon.

                                The ABS returns time slots and reserves them with a timed lock.

                                Note: The ABS returns possible time slots for only the earliest start time.
                              3. If the customer service representative confirms a time slot, then the ABS marks the selected slot as permanently used. The ABS then releases the other reserved time slots, writes the details of the selected slot to the activity record, and returns control to the client.

                                If the customer service representative cancels the time slot, then the ABS releases all of the reserved time slots for the activity and returns control to the client.

                                Note: If the service representative does not cancel the time slots, then the time-out releases the slots.

                                Factors for Setting Up Schedules

                                Consider the following factors when setting up schedules:

                                • Business model. Review your business model to determine the part that scheduling plays in the model. Determine the Siebel CRM modules that you want to use.

                                • Service regions. Plan service regions so that movement of service personnel between regions is the exception. Geographic areas that define service regions can overlap. In addition, service regions can have parent regions that effectively widen the primary service region when manually assigning activities by using the Dispatch Board. Thus, you can share resources across areas by setting up regional hierarchies. For more information, see Defining Service Regions.

                                • Server mapping. Set up servers and processors to distribute the scheduling tasks efficiently. For more information, see Setting Up Server Key Mappings and Setting Parameters for Server Component Tasks.

                                • Employees. Assign employees to service regions.

                                  Note: You can assign an employee to only 1 service region. For more information, see Loading Employee Data for Service Regions.
                                • ZIP or postal codes. Load ZIP Code and geocode data. For more information, see Defining Geographic Areas for the Optimizer.

                                • Constraints. Set up hard constraints for the ABS and both hard and soft constraints for the Optimizer. The ABS uses only hard constraints. The Optimizer can use either hard or soft constraints. For more information, see Creating Constraint Sets for Schedules.

                                • Cost functions. Set up cost functions for the Optimizer. The Optimizer calculates a cost function for each proposed schedule. This function is the sum of variables that drive the optimization of a schedule (for example, the cost of overtime, travel distance, and penalties for violating soft constraints). For more information, see Defining Cost Functions for the Optimizer.

                                  Rules for the Appointment Booking System

                                  When preparing a list of possible time slots, the ABS enforces the following rules:

                                  • The offered time slots must equal the availability of the personnel for a service region.

                                  • The offered time slots must match the personnel with the required skills. You can enforce this rule with the Use Assignment Manager scheduling parameter.

                                    Note: Assignment Manager scores do not affect the order or ranking of the returned time slots. The scores determine only whether an employee is eligible to own an activity.
                                  • Time slots must meet other constraints. For example, an engineer must never perform more than 4 installations in a day. Other constraints for service activities might meet business or union requirements.

                                  • Activities can extend over multiple days.

                                  • The Optimizer and ABS treat activities that cross between the end of the Optimizer horizon and the beginning of the ABS period as locked.

                                    Schedule Integration for Mobile Updates

                                    Schedules constantly change in a service region because a field service engineer calls in sick, a customer cancels an appointment, or a repair takes longer than scheduled. Service businesses must continuously change to accommodate unexpected occurrences.

                                    Mobile communications allow service resources to respond flexibly to change. For example, an engineer calls in sick. Using an ABS or Optimizer solution, Siebel Field Service can send pages or Short Message Service (SMS) messages to cell phones (mobile phones) to reschedule appointments. SMS messages can be up to 160 characters in length and can request confirmation of message delivery.

                                    In another example, when time is available unexpectedly, you can slot repair activities into the available time. You must reach the engineer through a mobile device and obtain acceptance. The mobile device can also provide basic information about the customer and the problem, preparing the engineer to enter the customer site informed and to fix the problem without assistance from the service center.

                                    If an activity runs over the scheduled time, then an engineer can use a mobile device to send a message to a dispatcher or customer service representative. The customer service representative can then proactively inform the customer of the additional time.

                                      Schedule Integration for Inventory Applications

                                      Repair calls frequently require a part. Because most repair calls occur during the day, field service engineers might not have the parts in their trunk inventories or the time to pick up replacement parts from a local depot. You must schedule a field service engineer who has the parts. When selecting appropriate personnel, you can use this option as a constraint.

                                      If the response can wait until the next day, then you can reschedule the service call and drop-ship the parts to the customer overnight. Tight integration with an inventory application that tracks to trunks is critical to any scheduling application. You use parameters to set up part utilization. For more information, see Creating Parameter Sets for Schedules.

                                        Preventive Maintenance Integration with the Appointment Booking System

                                        The optional Preventive Maintenance module lets users to set triggers for assets that automatically create service requests and activities for the assets. Triggers can be time-based and threshold-based.

                                        Threshold-based preventive maintenance depends on asset readings (such as the number of copies made on a copier) and is reactive (taking a reading results in creating a service request). The service requests that the Preventive Maintenance Engine creates usually require immediate, not future action. Immediate actions use the Contract Scheduling module. The ABS is involved only if you can delay the service more than a specified number of days. For more information, see About Running Contract Scheduling.

                                        Time-based preventive maintenance triggers, require periodic, proactive checks of equipment for legal or contractual reasons. The Preventive Maintenance Engine generates service requests and future activities. One of the activities might be a call from the dispatcher or customer service representative to schedule a time for service. When the customer service representative calls the customer, the representative can use the ABS to negotiate the time for service.

                                          Optimization of Schedules

                                          The Optimizer is appropriate for field service businesses that have a large number of engineers in a concentrated area. Generally, if over 30% of a service force is located in the 10 most popular areas, then optimization is appropriate. However, businesses with other needs can consider optimization.

                                            Centralized Dispatch Model

                                            In a centralized dispatch model, a team of dispatchers handles most dispatching for the full service business. Follow-the-sun support often drives this model. Customers can call 24 hours a day and are routed to an open service center somewhere in the world.

                                            Customer support representatives must assign engineers to a call even though they do not know the local requirements and rules. The Optimizer has constraints so that when central dispatchers submit the activity, optimization is consistent with local priorities. Most activities can be automatically scheduled at a central location. A local service manager can manually handle any exceptions, eliminating the need for dedicated dispatch personnel.

                                              Travel Time Decreases

                                              Service engineers can waste time traveling to and from customer sites. Many service businesses find that employees are either spending too much time in the office or are traveling needlessly back and forth between appointments.

                                              By handling 2 calls in 1 area, travel time is decreased significantly and performance is increased. As service businesses move to a revenue base, an increase in revenue can yield a higher increase in profits.

                                                Levels of Optimization

                                                A schedule can be too optimized. A schedule with high utilization (little available time) is usually preferable. However, past a certain point, further optimization can bring diminished cost savings. Furthermore, highly optimized schedules are easily corrupted. Minor changes can cause problems that affect the whole schedule.

                                                For example, consider a schedule for an engineer who is scheduled from 9:00 A.M. to 5:00 P.M. with no available time. If a single appointment runs over, then the engineer cannot complete all activities, leaving at least 1 activity to overtime or the next day. Plus, unexpected events such as a vehicle breakdown can completely disrupt this full schedule.

                                                The goal is to create a schedule that is optimized but still flexible enough to accommodate change. To accomplish this goal, you can use one of the following methods:

                                                • Create constraints limiting the percentage of scheduled hours.

                                                • Extend the duration of activities to leave extra time.

                                                The first method is preferable because it allows managers to set up a dependable level of work. With the second method, managers are not sure of the actual workload for their region.

                                                The balance of working time and available time depends on the business needs. Businesses that require more flexibility (and therefore lower utilization) have the following business requirements:

                                                • High repair volume

                                                • Critical responses (for example, a downed power line)

                                                • Highly variable times for service delivery

                                                • Many short activities (especially in a high-traffic areas)

                                                • Tight contractual requirements

                                                Service businesses that need higher utilization usually have the following business requirements:

                                                • Longer activities (and therefore less travel)

                                                • Preventive maintenance as the main type of service

                                                • Low repair volume

                                                • Longer contractual response times

                                                When determining the best level of utilization, consider your service needs and set an approximate level. Then, adjust the optimization parameters to give the best results.

                                                  About Information in Employee Schedules

                                                  Consider the following factors when defining employee schedules:

                                                  You can set up constraints to limit employee working hours, the types of activities that employees can perform, and so on. For more information, see Creating Constraint Sets for Schedules.

                                                    Shifts

                                                    An employee can have only 1 shift for each day. This shift can include rate types of regular time (RT), overtime (OT), and extended overtime (EOT). A shift must use rate types in the following order:

                                                    1. EOT

                                                    2. OT

                                                    3. RT

                                                    4. OT

                                                    5. EOT

                                                    A shift includes the work time of multiple employees. The first EOT and OT rate types apply to the employees in the prior shift who work overtime that extends into the current shift, and the last OT and EOT rate types apply to the employees in the current shift who work overtime.

                                                    You can omit any of these rate types from the definition of a shift, but the remaining types must be in this order. For example, if you omit EOT rate type, then the order for the remaining type is OT, RT, and then OT.

                                                    You configure the rates for overtime and extended overtime in the Standard OT % field and the Extended OT % field in the Cost List Line Items view in the Cost List view of the Administration - Pricing screen as a percentage increase over regular time. These fields are part of the cost list for a service region. The Optimizer uses this cost list to calculate overtime costs. You define cost lists in the Cost List view of the Administration - Pricing screen. For more information, see Siebel Pricing Administration Guide.

                                                    You set regular time in the Service Details view in the Employees view of the Administration - User screen.

                                                      Skills

                                                      Siebel Scheduler can perform skill-based routing to assign only employees with a skill set to an activity. For more information about how to set up skills and evaluation rules, see Siebel Assignment Manager Administration Guide.

                                                      The engines use Assignment Manager to evaluate skills and return a list of appropriate employees as follows:

                                                      1. Each activity is submitted to Assignment Manager.

                                                      2. Using assignment rules, Assignment Manager returns the appropriate employee records.

                                                      3. The Optimizer uses only these employee records to schedule the activity.

                                                        Role Priorities

                                                        To assign field service engineers to activities, administrators can add a role priority to each field service engineer who is a member of the asset service team. Assignment Manager reviews the role priority of the associated engineers when scheduling field service engineers. For example, Assignment Manager tries to assign the primary engineer. If the primary engineer is not available, then Assignment Manager tries to assign the secondary engineer, and so on. A field service engineer can have a role priority of primary, secondary, or tertiary.

                                                        Note: You can associate employees with an account to form an account service team. You can also assign role priorities to these team members. For more information, see Configuring Account Service Teams.

                                                          Breaks

                                                          Schedules can include any number of breaks. Breaks include the following types:

                                                          • Employee. You define employee breaks in the employee schedule or as exceptions to this schedule.

                                                          • Activity. You define activity breaks in the Time Tracker view of the Activities screen as time periods with a Type field of Break. For more information, see Recording Labor for Activities (End User).

                                                          The following rules apply to the way the Optimizer uses breaks:

                                                          • Breaks can have a start time equal to the Start Time field plus 1 second. A break from 12:00 noon to 1:00 P.M. is the same as a break from 12:00:01 to 1:00:01.

                                                          • Break times during overtime or extended overtime are paid.

                                                            Note: Because breaks during overtime are paid time, it is recommended that you do not define breaks during overtime. Calculating these breaks can slow the Optimizer calculations.
                                                          • You can allow breaks during activities or exclude breaks from specific activities.

                                                            You set breaks for a selected activity by selecting the Allow Breaks check box in the Schedule view in the Activity List view of the Activities screen.

                                                          Note: The ABS is not designed to handle activities longer than a day. However, it supports activities that contain breaks.

                                                          When you select the Breakable check box in the Service Details view in the Activity Templates view of the Administration - Data screen, an activity can stop and resume. For example, a schedule is 9:00 A.M. to 1:00 P.M. and 2:00 P.M. to 6:00 P.M., and appointments are 6 hours long to accommodate the length of the activities. In this example, appointments are not scheduled if you do not select the Breakable check box because no contiguous 6-hour time slots are available.

                                                          Selection of the Breakable check box is optional because there are some circumstances when the activity can break (for example, when you turn the water or the power off during a weekend). Because activities can break, the activity duration is not the same as the activity work time.

                                                          Note: When the ABS returns time slots for an activity for which the Breakable check box is selected, the ABS first displays slots without breaks that are between the dates in the Earliest Start field and Latest Start field. If there are enough slots without breaks to equal the value for the ABS – Default Number of Slots parameter, then the ABS displays only those slots. If there are not enough slots without breaks to equal the value for this parameter, then the ABS displays slots with or without breaks. For more information about the ABS – Default Number of Slots parameter, see Parameters for Schedules.

                                                            Travel

                                                            The Optimizer uses employee travel conditions and travel time to obtain the lowest-cost solution for a schedule. You set these values in the Service Details view in the Employees view of the Administration - User screen. The Start Shift From field and End Shift At field define the starting and ending conditions for travel to and from service calls. These fields can include the following values:

                                                            • Home (Travel incl.). The employee travels from home directly to the first activity. The Optimizer includes the cost of this travel to calculate schedules.

                                                            • Home (Travel Not incl.). The employee travels from home directly to the first activity. The Optimizer does not include the cost of this travel to calculate schedules.

                                                            • Depot. The employee starts each day by going to a service depot or office. The Optimizer tracks travel costs starting from the depot.

                                                              About Running Contract Scheduling

                                                              Contract Scheduling is a feature of the Optimizer for rapid scheduling of service appointments while maintaining the critical Optimizer requirements: enforcement of contractual deadlines and use of constraints when searching for solutions.

                                                              When Contract Scheduling is called, the Optimizer does not unschedule any other activities. However, the Optimizer attempts to create available time before inserting an activity. For example, if there are 2 half-hour spaces in an employee schedule, and a user wants to schedule a 45-minute appointment, then the Optimizer attempts to move the other appointments to create a contiguous 45-minute space for the appointment.

                                                              The Optimizer is multithreaded and can handle multiple requests at the same time. For example, 2 users can call Contract Scheduling at the same time. However, because the Optimizer can process only 1 request at a time, simultaneous requests are queued so that multiple users can submit requests to the Optimizer. While the Optimizer performs optimization, users can still submit requests. The Optimizer queues the requests and processes them at the level for the Optimizer – Save Interval parameter or when optimization completes.

                                                              Companies with the following business requirements can use Contract Scheduling:

                                                              • Same-day calls for repair activities are a higher percentage of service calls.

                                                              • Service agreements specify penalties for failing to meet response times (for example, free labor or free parts).

                                                              • A large number of constraints exist.

                                                              Users can run Contract Scheduling by clicking the following buttons in Siebel Field Service:

                                                              • Insert Activity button in the Unscheduled Activities view of the Dispatch Board screen. Clicking this button sends a request to either the ABS or the Optimizer to schedule an appointment or insert the selected activity into the optimized schedule, depending on times relative to the horizons. For more information, see Insert Activity Button.

                                                              • Contract Schedule button in the Schedule view in the Activity List view of the Activities screen. Clicking this button sends a request for scheduling the selected activity. For more information, see Contract Schedule Button.

                                                              • Load button in the Activities view in the Service Regions view of the Administration - Scheduling screen. This button is similar to the Insert Activity button in the Dispatch Board screen. For more information, see Load Button.

                                                                Insert Activity Button

                                                                The Insert Activity button either obtains a confirmed appointment from the ABS or runs the Optimizer to schedule the selected activity. The Insert Activity button is similar to the Contract Schedule button in the Schedule view in the Activity List view of the Activities screen.

                                                                Before clicking this button, make sure the following conditions apply:

                                                                • The service region is set in the Dispatch Board Gantt chart.

                                                                • The activity is not repeating.

                                                                • The Status field of the activity has a value of Unscheduled.

                                                                • If the Lock Schedule check box is selected, then the values in the Planned Start field and Planned End field are not null.

                                                                • If the Lock Assignment check box is selected, then the activity assignee is not null.

                                                                The choice of sending the Insert Activity request to the ABS or Optimizer depends on the values in the Earliest Start field and the Latest Start field. These values determine whether the activity is in the ABS or the Optimizer horizon, as follows:

                                                                • If the Latest Start field is null, then sends the request to the ABS.

                                                                • If the Latest Start field is in the Glued period, then does not insert the activity and returns an error message.

                                                                • If the Latest Start field is less than the ABS start, then sends the request to the Optimizer.

                                                                  Contract Schedule Button

                                                                  The Contract Schedule button functions like the Insert Activity button. For more information, see Insert Activity Button.

                                                                    Load Button

                                                                    The Load button for activities synchronizes data in the cache if there are manual changes to an activity. For more information, see Loading Activity Data for Service Regions.

                                                                    The choice of sending the activity to the ABS or the Optimizer cache depends on the following conditions:

                                                                    • If the Planned Start field and Planned End field have values, then the choice of the ABS or Optimizer depends on matching these values to the dates for either the ABS or the Optimizer horizon.

                                                                    • If the Planned Start field and Planned End field do not have values, then the values for Earliest Start field and Earliest End field are used. If these values are in the Optimizer horizon, then the activity goes to the Optimizer cache.

                                                                    • If neither of these conditions succeeds, then an error message appears.

                                                                      Troubleshooting the Appointment Booking System and Optimizer

                                                                      Typically, the following main types of problems can occur when using the ABS:

                                                                      • Schedules and the associated activities do not load into the ABS on startup.

                                                                      • When you try to book appointments, an error appears stating that no appointments are found.

                                                                      You can analyze problems that you encounter. For more information, see Troubleshooting the Appointment Booking System.

                                                                      Also, review the recommendations about how to extract the best solutions in the least amount of time when you use the Optimizer. For more information, see Troubleshooting the Optimizer.

                                                                      Tip: It is recommended that you set up distinct administrator users for running the ABS and Optimizer processes. You can trace and understand Siebel Scheduler operations if the ABS and the Optimizer are associated with different users (for example, ABSAdmin and OptAdmin). If the user remains as SADMIN, then you might have difficulty determining whether other workflows affect the activity. Knowing whether a user, a workflow, or Siebel Scheduler is responsible for an action can help you to diagnose problems.

                                                                        Troubleshooting the Appointment Booking System

                                                                        This topic includes some recommended values for the setup configurations and information that you can review if problems occur when using the ABS.

                                                                        All of the following settings are required for running the ABS:

                                                                        • Service region for each activity

                                                                        • Values for the Earliest Start field and Latest Start field for each activity

                                                                        • Server key mappings

                                                                        • Time windows

                                                                        • Parameter set

                                                                        • Parameters, which include:

                                                                          • Month Start Date

                                                                          • Week Start Day

                                                                          • ABS - Days to Start

                                                                          • ABS - Days to End

                                                                          • Optimizer - Default Priority

                                                                          Service Region Configuration

                                                                          Service regions include the following information:

                                                                          • A defined schedule.

                                                                          • A defined time window.

                                                                          • A defined parameter set.

                                                                          • Employees who are assigned to a service region and who have a defined schedule.

                                                                          • ZIP codes (or postal codes for international users) that are associated with the service region. ZIP codes automatically associate service regions with activities.

                                                                            Activity Configuration

                                                                            Activities to schedule include the following information:

                                                                            • A defined service region.

                                                                            • A specified duration and work time. For testing purposes, set the duration and work time to 30 minutes.

                                                                              Note: Work time can be less than or equal to the duration of the activity.
                                                                            • A cleared Lock Schedule check box in the Schedule view in the Activity List view of the Activities screen. If you use Assignment Manager, then clear the Lock Assignment check box.

                                                                            • A selected Allow Breaks check box if the activities are long. Long activities span more than a day, or the schedules include breaks.

                                                                              Appointment Booking System Parameter Configuration

                                                                              The following table describes the recommended settings for parameter values in the ABS.

                                                                              Table Recommended Parameter Values for the ABS

                                                                              Parameter Recommended Value

                                                                              Month Start Date

                                                                              Set this parameter to 1. This parameter is primarily relevant if you use constraints for monthly capacity.

                                                                              Week Start Date

                                                                              Set this parameter to 1. This parameter is primarily relevant if you use constraints for weekly capacity.

                                                                              ABS - Days to Start

                                                                              Set this parameter value to at least 0. To allow booking on the same day, set this parameter value to 0.

                                                                              ABS - Days to End

                                                                              Set this parameter to a value greater than the ABS - Days to Start value, but less than 60. Setting this value higher results in longer loading times and the possibility of exceeding the 10,000 record limit.

                                                                              ABS - Logging Level

                                                                              Set this parameter to 3, but when you encounter problems, set it to 4.This parameter is the logging level for the ABS. This logging level is not the same as the general logging level.

                                                                              ABS - Default Number of Slots

                                                                              Set this parameter to between 5 and 10.

                                                                              ABS - Timeout

                                                                              Set this parameter to 5.

                                                                              Use Assignment Manager

                                                                              For debugging purposes, set this parameter to 0 so that all employees in the service region who are on duty are considered. If you use Assignment Manager, then set this parameter to 1.

                                                                                Schedule Configuration

                                                                                For testing purposes, create a simple 9:00 A.M. to 5:00 P.M. schedule for both employees and the service region.

                                                                                Note: The service region schedule overrides the employee schedule. If the service region schedule indicates that employees do not work on weekends, then employees are not scheduled on weekends, even if their schedules indicate that they work on weekends.

                                                                                  Employee Configuration

                                                                                  All employees in the service region must have a defined schedule. For employees who do not have a defined schedule, create a schedule with no defined times. You might name this schedule Empty Schedule.

                                                                                  Note: If you use Assignment Manager, then the employees must have the appropriate skills.

                                                                                    Time Window Configuration

                                                                                    Set up time windows contiguously. Make sure time windows are long enough to cover the maximum activity duration to schedule.

                                                                                      Server Key Mapping Configuration

                                                                                      To configure server key mapping, perform the following tasks:

                                                                                      • Verify that the Appointment Booking Engine server component (ApptBook) for the service region is mapped to the correct Siebel Server.

                                                                                      • Verify the total number of unique servers. You use this information to set server components. For more information, see Setting Parameters for Server Component Tasks.

                                                                                        Assignment Rule Configuration

                                                                                        If you use Assignment Manager, then perform the following tasks to configure assignment rules:

                                                                                        • Check all assignment rules. In each rule, the Check Employee Calendar check box must be cleared. The ABS does not use this field.

                                                                                        • Use Assignment Manager in interactive assignment mode to try to assign the activity. Select an activity record (in the List view of the Activities screen), click the menu button on the Activity form, and select the Assign command. If the Assignment Manager rules are set up correctly, then a list of candidates is returned for the activity.

                                                                                        • For debugging purposes, it is recommended that you disable Assignment Manager by setting the Use Assignment Manager parameter to 0. For more information, see Appointment Booking System Parameter Configuration.

                                                                                          Appointment Booking System Constraint Set Configuration

                                                                                          Constraint sets can cause loading or booking problems if the constraints contradict each other. For testing purposes, set the constraint set in the service region to blank, and then check to see whether the problems no longer apply.

                                                                                            Disablement of Scripting on the Activity Business Object

                                                                                            If you check all the appropriate configuration values, and the problem still exists, then try disabling the scripting on the Activity business objects.

                                                                                            Caution: The Action business component has numerous data integrity checks. Overriding or removing these checks can introduce subtle errors to the scheduling process.

                                                                                            Note the following recommendations when changing the Activity business objects, especially the Action business component:

                                                                                            • Do not change the code around work time and duration.

                                                                                            • Do not disable calculated field logic.

                                                                                              Troubleshooting the Optimizer

                                                                                              This topic includes some recommended values for the setup configurations and information that you can review if problems occur when using the Optimizer.

                                                                                              All of the following settings are required to run the Optimizer:

                                                                                              • A service region

                                                                                              • Server key mapping

                                                                                              • Cost function

                                                                                              • Cost list

                                                                                              • Travel cost

                                                                                              • Minimum travel time

                                                                                              • Travel U/M

                                                                                              • Parameter set

                                                                                              • Parameters, which include:

                                                                                                • Optimizer - Activity Category

                                                                                                • Optimizer - Default Priority

                                                                                                • Optimizer – Glued

                                                                                                • Optimizer – Save Interval

                                                                                                • Optimizer – Tardiness Cost

                                                                                                • Optimizer – Task Excl Cost

                                                                                                • Optimizer – Timeout

                                                                                              Note: You can set the values for these parameters. For more information, see Creating Parameter Sets for Schedules.

                                                                                              The Optimizer has the following additional requirements:

                                                                                              • An activity cannot span more than 1 day. Multiday activities are not scheduled. The Optimizer can schedule other activities during the time intended for multiday activities. However, the penalties for not scheduling these activities still contribute to evaluating the potential success of an optimized schedule. For more information, see Defining Cost Functions for the Optimizer.

                                                                                              • The Optimizer and ABS treat activities that cross between the end of the Optimizer horizon and the beginning of the ABS period as locked.

                                                                                              When loading activities into the Optimizer cache for the first time, the Optimizer produces an initial solution to the schedule by accepting the existing order and assignment of appointments. While finding the initial solution, the Optimizer first processes the activities with Lock Assignment and Lock Schedule check boxes that are selected to make sure that these activities are considered in the optimized schedule. For more information, see Locking Assignments and Schedules for Activities (End User).

                                                                                              While the schedule for a service region is optimized, only Insert Activity and Stop Optimization requests are accepted. These requests are queued, and the queue is processed when the optimization finds the next solution. Any other request is returned. For more information, see About Running Contract Scheduling and Stopping Optimization of Schedules for Service Regions.

                                                                                                Guidelines for Obtaining Good Results for Optimization

                                                                                                This topic provides guidelines for obtaining good results for optimization.

                                                                                                The following recommendations can help you to obtain good optimization results at the best speed:

                                                                                                • Make sure that the Optimizer is on its own process in the server key mappings. This guideline is the most important way to return good results from the Optimizer.

                                                                                                Run the Optimizer when the server has a light load, preferably overnight. For more information, see Setting Up Server Key Mappings.

                                                                                                • Examine the Optimizer heuristic settings for the scheduling parameters.

                                                                                                  In general, a higher number produces a better result quality, but the time to find a solution is longer. Most companies find that setting the Optimizer heuristic parameters to 5 or 6 and running the Optimizer for 3 to 4 hours is sufficient. The Optimizer - Timeout parameter determines how long the Optimizer is run. For more information, see Creating Parameter Sets for Schedules and About Heuristic Methods for Schedules.

                                                                                                • Check the service region setup because more constraints lead to a faster solution.

                                                                                                  The Optimizer frames the scheduling problem as a solution space to explore and find the best answer. More constraints mean that the solution space decreases, and the Optimizer must explore fewer permutations to arrive at the best solution. For more information, see Defining Service Regions.

                                                                                                • Subdivide your field service engineers into types to help speed up optimization.

                                                                                                  For example, a cable company has several different activity types (cable install, cable problems, cable modem install, and cable modem problems). Specific field service engineers handle each type. Even in a large service region of over 50 engineers, the company can receive optimum solutions quickly because the engineers are subdivided in this way. The Optimizer solves several small problems instead of 1 large problem.

                                                                                                  Optimizer Parameter Set Configuration

                                                                                                  The following table describes the recommended parameter value settings for the Optimizer.

                                                                                                  Table Recommended Parameter Values for the Optimizer

                                                                                                  Parameter Recommended Value

                                                                                                  Optimizer - Save Interval

                                                                                                  Set this parameter to 15.

                                                                                                  Optimizer - Logging Level

                                                                                                  Set this parameter to 3, unless you want to diagnose a problem.

                                                                                                  Optimizer - Optimize Heuristic

                                                                                                  Set this parameter to 5. Set this parameter higher for more accurate results and lower for faster results.

                                                                                                  Optimizer - Timeout

                                                                                                  Set this parameter to 180. Three hours is generally enough time to find a good solution.

                                                                                                  ABS - Days to Start

                                                                                                  Set this parameter to 1. This parameter controls how many days out the schedule is optimized. Setting this parameter to higher than 5 greatly increases memory usage and is not recommended.

                                                                                                  Month Start Date

                                                                                                  Set this parameter to 1. This parameter is primarily relevant if you use constraints for monthly capacity.

                                                                                                  Week Start Day

                                                                                                  Set this parameter to 1. This parameter is primarily relevant if you use constraints for weekly capacity.

                                                                                                  Optimizer - Glued

                                                                                                  Set this parameter to 120. This parameter is primarily relevant if you use Contract Scheduling during the day instead of batch scheduling overnight.

                                                                                                  Optimizer - Default Priority

                                                                                                  Set this parameter to 3.

                                                                                                  Optimizer - Consider Parts

                                                                                                  Set this parameter to 0.

                                                                                                  Optimizer - Task Excl Cost

                                                                                                  Set this parameter to 500 so that tasks are not deleted from the schedule unless absolutely necessary.

                                                                                                  Optimizer - Hard Latest Start

                                                                                                  Set this parameter to 0.

                                                                                                  Use Assignment Manager

                                                                                                  Set the parameter to 1 if you use skills to restrict candidates.

                                                                                                    About Configuring the Book Appointment Dialog Box

                                                                                                    To suit your company requirements, you can change the information that appears in the Book Appointment dialog box and the format for this information.

                                                                                                    Some suggestions about changing the information that appears follow:

                                                                                                    • By default, the employee name does not appear with the available time slots. Many service companies, especially companies that schedule partners or people working on commission, do not want to allow employees to see the names of the field service engineers to schedule so that the company can avoid favoritism. If you want to display the employee names with the available time slots, then you must display employees in the Abs Result Pick Applet.

                                                                                                    • By default, the Book Appointment dialog box displays the start and end times of the time window. The time windows are generally longer than the actual duration of the activity. Set the time window to equal the length of the activity if you want to allow customer service representatives to view the exact times for the activities instead of the time window ranges.

                                                                                                      Tip: The Planned Start field and Planned End field are available in the list columns of the Abs Result Pick Applet. However, to display these fields in the user interface, the corresponding applet Web template items (Planned End, Planned End - SR Time Zone, Planned Start, and Planned Start - SR Time Zone) must be active. These Web template items are inactive by default.
                                                                                                      Note: You can change the time window values in the Time Windows List view of the Administration - Scheduling screen. For more information, see Creating Time Windows for Schedules.
                                                                                                    • To return of only 1 time slot for each employee, set the Earliest Start field and Latest Start field for the activity to less than the time window. For example, if the time window is 40 minutes, then set the Earliest Start field to 11:00 A.M. and the Latest Start field to 11:30 A.M. to make sure that only 1 slot is returned for each employee with the available time and appropriate skills. For more information, see Adding Schedule Information to Activities (End User).

                                                                                                      Held Time Slots

                                                                                                      Occasionally, users might not see time slots when they know some are available. This situation can occur because the time slots are held. Time slots are held for customer service representative viewing until the representative clicks Cancel or the ABS timeout limit is reached. When only a few time slots remain, a single user can hold all of the time slots. For more information about the ABS - Timeout parameter, see the Parameters for Schedules table.

                                                                                                      To mitigate this situation in high-volume service centers, you can set the ABS - Timeout parameter to a low value (for example, 1 minute). Alternatively, you can reduce the value of the ABS – Default Number of Slots parameter so that fewer slots are offered to each user.

                                                                                                        About Enhancing the Performance of Siebel Scheduler

                                                                                                        Each Siebel Server can run 1 or more service regions. Large service regions can run on a dedicated server.

                                                                                                        Each service region can run on only 1 application server so that the information for 1 service region is cached in memory instead of continually read from the Siebel database, reducing the load on the Siebel database during schedule optimization.

                                                                                                        Caution: It is recommended that you include no more than 400 service regions on 1 physical server because of the limitations on the Server Request Broker scalability. If your service regions exceed that amount for the ABS or Optimizer, then you must test performance and scalability carefully. For more information, see About Siebel Scheduler and the Server Request Broker.

                                                                                                        The ABS and Optimizer interact with the Siebel database only for the following functionality:

                                                                                                        • Data loading. The ABS and Optimizer read large amounts of information from the Siebel database on start up, or when the service region is reloaded. Therefore, avoid reloading during a busy time. For more information, see About Loading and Reloading Data for Service Regions.

                                                                                                        • Saving schedules. The Optimizer can save its result sets to the Siebel database at specified time intervals. Unless the data set is very large, the Optimizer does not noticeably affect Siebel database performance. For more information, see the Optimizer – Save Interval parameter in Parameters for Schedules.

                                                                                                        Caution: Although acceptable for testing, it is recommended that you keep the Siebel Application Object Manager and the Siebel Scheduler components on separate computers in the production environment to prevent surges in user activity from hindering the Siebel Scheduler operations.

                                                                                                          Balance of the CPU Load for Service Regions

                                                                                                          In general, the number of processes must be less than or equal to the number of CPUs on the server because the operating system (OS) farms out the work on each process to a separate CPU. When a small number of service regions exist, include each service region on a separate process number in a server. When the number of service regions exceeds the number of CPUs, and when each service region is approximately the same size, divide the regions equally across the processes. If the service regions are not the same size, then balance the regions according to size. For example, put a 50-person service region on Process 1 and two 25-person service regions on Process 2. Another way to load balance is to note the amount of time to load and aim for an equivalent amount of load time on each process.

                                                                                                          Note: You cannot specify the CPU for a process. The OS indicates this specification. It generally has its own algorithms to maximize performance in a multi-CPU environment.

                                                                                                            About Siebel Scheduler and the Server Request Broker

                                                                                                            When a request is made to Siebel Scheduler (through the user interface or the application programming interface), the Server Request Broker (SRB) routes the call to the correct server in the following manner:

                                                                                                            1. When the ABS server is started, it loads all the activities into the cache. It registers all the unique service region keys in the shared memory file of the Siebel Server. The SRB uses the information stored in shared memory to determine the components that are running. No SRB threads are established at that time.

                                                                                                            2. At the first attempt to connect to a service region (for example, a Book Appt request from a client), the Siebel Application Object Manager contacts the SRB on the Siebel Application Object Manager computer. That SRB sends the BookAppt request to the SRB on the ABS server. After the first request is submitted to the region, the SRB on that server establishes a connection to the local ABS.

                                                                                                            3. The response is sent from Siebel Scheduler to the SRB on the service region computer. The SRB then sends the response to the SRB on the Siebel Application Object Manager computer. Then, the SRB on the Siebel Application Object Manager computer relays that response to the Siebel Application Object Manager.

                                                                                                            4. Each local SRB connecting to the SRB on the service region computer makes subsequent connections from any Siebel Application Object Manager. Responses are similarly passed back through the 2 SRBs. The Siebel Application Object Manager connects only to the Server Request Broker. If there is a connection between the SRB and the ABS on the local computer, then it does not open another connection to the ABS.

                                                                                                            5. The ABS contacts Assignment Manager, if used, by using the SRB mechanism. Having multiple rule sets does not affect the routing. Assignment Manager has a default rule set that applies when no rule set is defined.

                                                                                                            The only persistent SRB threads are on the computer containing the SRB and the service regions on that computer.

                                                                                                            For example, 3 servers exist in an enterprise. The Siebel Application Object Manager and an SRB run on Computer 1. Computers 2 and 3 have SRBs and 4 processes of ABS that run with 16 separate service regions (two for each ABS process). The user connects and books an appointment on each of the service regions. At this point, the environment looks as follows:

                                                                                                            • The caches for all SRBs on all computers include the server key maps for all 16 service regions.

                                                                                                            • The Computer 2 SRB has 8 open threads to the 4 ABS processes (two each). Each ABS service region listens on a unique port for calls from the Computer 2 SRB. Because there is a unique port for each service region in the ABS process, there is 1 connection (thread) from the Computer 2 SRB to that port on the ABS.

                                                                                                            • Computer 3 appears the same as Computer 2.

                                                                                                            • Computer 1 has connections only to the SRBs on Computers 2 and 3. The SRB on Computer 1 does not connect directly to the ABS on other computers because that defeats the broker purpose.

                                                                                                            When Siebel Scheduler shuts down, the keys are deregistered in shared memory and the connection between the SRB and Siebel Scheduler is lost. If there are any Sync requests for Siebel Scheduler, then it fails and the user sees an error. If the request is an Async request stored in the Siebel database, then it remains in queued state until Siebel Scheduler is brought back up and the Service Request Processor (SRP) or the SRB then routes the request accordingly.

                                                                                                            About Loading and Reloading Data for Service Regions

                                                                                                            Because the service region information is cached, it must be loaded into the caches from the Siebel database when the service is started periodically to synchronize updates. Initial loading and reloading of data are automatic processes. The data for a service region is automatically copied to the caches each time the server is restarted, and manually copied by clicking the Load buttons. Repeating component jobs can also automatically load service region data by using the Appointment Booking Service business service. For more information, see Creating Workflows to Reload Data for Service Regions to the Appointment Booking System Cache and Troubleshooting the Appointment Booking System and Optimizer.

                                                                                                            Every night, information must move from the ABS (future) cache into the Optimizer (present) cache. For example, if today is July 1st, then the Optimizer horizon holds all activities from July 1st to July 7th. The ABS horizon is defined as 14 days, so the ABS cache holds all activities from July 8th to July 15th. Both horizons are measured from the beginning of the Glued period. The end of the Optimizer horizon is set to the same calendar day (at midnight) as the start of the ABS horizon.

                                                                                                            On July 2nd, the old July 1st data is no longer necessary. It is in the past and discarded. At the same time, the Optimizer horizon is still 7 days out, so the Optimizer must load the July 9th data into the Optimizer cache. However, before the data can be loaded into the Optimizer cache, the data must be unloaded from the ABS cache. If the data is in both caches at the same time, then the data can change in both engines simultaneously. Therefore, the activities and data for July 9th are released from the ABS cache, and then loaded into the Optimizer cache.

                                                                                                            When a service region is loaded, it is not available for requests. The request is returned with a return code.

                                                                                                            When the data from a service region is first loaded, the Optimizer assumes that the data coming from the Siebel database was previously optimized. So while generating an initial solution, the Optimizer tries to retain the assignee and the sequence of activities for each field service engineer. It also retains the time stamp of this load in the cache.

                                                                                                              Reload of Service Region to the Appointment Booking System

                                                                                                              When a service region is reloaded, the ABS performs the following steps:

                                                                                                              1. Queries for employees currently in the service region.

                                                                                                              2. Gets the schedule for both the service region and each employee.

                                                                                                              3. Queries for any exceptions for employees.

                                                                                                              4. Constructs a master schedule.

                                                                                                                First, the ABS applies the service region schedule for all employees. It then applies a schedule for each employee.

                                                                                                                Note: The service region schedule overrules both employee schedules and employee exceptions. For example, if the service region schedule indicates the company does not operate on Sundays, then activities are not scheduled for that day. The advantage of setting a liberal service region (24 hours) is that you can set exceptions, such as employees working on Sundays.
                                                                                                              5. Reads in any constraints.

                                                                                                              6. Queries for any activities in the next 15 days. The horizon is usually set from the start time of the day (00:00:00 A.M.).

                                                                                                                The ABS does not load historical activities unless you define a weekly or monthly constraint for the service region. If you define only weekly constraints, then the ABS loads another week of data. If you define monthly constraints, then the ABS loads another month of data. However, when you define no weekly or monthly constraints, the ABS loads only activities in the ABS horizon.

                                                                                                                The query appears as follows:

                                                                                                                Planned Start > ABS Load Range End and Planned End < ABS Load Rang Start

                                                                                                                The ABS attempts to insert the activities in the schedule in the following order:

                                                                                                                • Activities with the Locked Schedule and Lock Assignment check boxes selected

                                                                                                                • Activities with the Locked Schedule check box selected

                                                                                                                • Activities with the Locked Assignment check box selected

                                                                                                                • Activities with the Locked Schedule and Lock Assignment check boxes not selected

                                                                                                                  If 2 activities that are both locked for schedule and assignment overlap, then only the first attempted activity is scheduled. The second is set as unscheduled.

                                                                                                                  When loading, the ABS generally attempts to insert the activities exactly as they are stored in the Siebel database. If nothing changes (same employees, same schedules, no manual changes), then the activities in the cache are exactly the same. However, if changes occur, then the ABS attempts to reschedule activities. After the initial load completes, the ABS uses the following rules to reschedule any remaining appointments:

                                                                                                                • The Earliest Start and Latest Start fields are considered.

                                                                                                                • The Locked Schedule and Locked Assignment check boxes are considered.

                                                                                                                  If the ABS can find an open spot for an activity, then the Owner field, Planned Start field, and Planned End field are updated in the cache and written to the Siebel database. If the ABS cannot insert an activity, then the status of the activity is set to Unscheduled but the Owner field, Planned Start field, and Planned End field remain unchanged so that a service manager can see the original committed time for the customer. The new status is written to the Siebel database and recorded in the log if the logging level is set to level 3 or higher. The activity is not kept in the ABS cache.

                                                                                                                  Unless an activity changes during the load, the ABS does not modify the activity in the Siebel database. If the ABS fails, then the version in the Siebel database is consistent with the version in the cache. Any manual changes you make in the Siebel database are exceptions to this rule.

                                                                                                                Reload of Migrated Data for Activities

                                                                                                                If you want to migrate activity data to a new application, then use Siebel Enterprise Integration Manager (EIM). For more information, see Siebel Enterprise Integration Manager Administration Guide.

                                                                                                                The following fields are critical for migrating the activity data:

                                                                                                                • Earliest Start

                                                                                                                • Lock Schedule

                                                                                                                • Service Region

                                                                                                                • Duration

                                                                                                                • Owner

                                                                                                                • Status

                                                                                                                • Latest Start

                                                                                                                • Planned End

                                                                                                                • Travel Time

                                                                                                                • Lock Assignment

                                                                                                                • Planned Start

                                                                                                                • Work Time

                                                                                                                When you load the ABS after migration, activities are scheduled according to the employee and service region schedule. If an activity can be scheduled for its original owner, planned start, and planned end, then no change is made to the activity data and the employee is scheduled for the activity. If the activity cannot be scheduled in this way, then the activity is rescheduled by using its Earliest Start and Latest Start fields. The Planned Start field, Planned End field, Owner field (if such a change is required), and Status field are updated for the activity.

                                                                                                                To make sure that the migrated activities can be loaded into ABS and scheduled for the original owner, planned start, and planned end, the following conditions must apply:

                                                                                                                • The Planned End field less the Planned Start field must equal the Duration field.

                                                                                                                • The Work Time field plus the Travel Time field must equal the Duration field.

                                                                                                                  Travel time is the average travel time for the service region, not the activity.

                                                                                                                • No doublebooking of the original activities occurs.

                                                                                                                  If doublebooking occurs, then an overbooked activity is rescheduled, unless both the Lock Assignment and Lock Schedule check boxes are selected for the activity.

                                                                                                                • Original activities do not violate any of the constraints for the service region.

                                                                                                                • Original activities can fit into the service region schedule and employee working hours.

                                                                                                                  Process of Administering Schedules Using Siebel Scheduler

                                                                                                                  The following list shows the tasks that administrators typically perform to administer schedules. Your company might follow a different process according to its business requirements. For more information about the checks to complete after setting up schedules, see Troubleshooting the Appointment Booking System and Optimizer.

                                                                                                                  To administer schedules, administrators perform the following tasks:

                                                                                                                  Defining Schedule Hours

                                                                                                                  For each schedule, you set schedule hours that define the hours of availability. The schedule can also include a set of exceptions (in the Exception Name field) that you define in the All Exceptions view and the Exception Hours view. For more information about how Siebel Scheduler uses schedule periods and time zones, see About Schedule Horizons and Time Zones.

                                                                                                                  To enter the hours for a schedule, perform the following procedures:

                                                                                                                  This task is a step in Process of Administering Schedules Using Siebel Scheduler.

                                                                                                                    Setting Hours of Availability

                                                                                                                    For each schedule, you set schedule hours that define the hours of availability (days of week, hours for each day, and holidays) for service-providing entities (employees, partners, or business units). Exception hours are specific days or hours in a schedule for working (for example, Saturday morning in a Monday through Friday schedule) or for not working (for example, a midweek holiday in a Monday through Friday schedule).

                                                                                                                    The Schedule Hours view includes the days and time periods in each day that are included in a schedule. For example, an 8x5 schedule defines time periods within 8 hours on 5 days (for example, 9:00 A.M. to 5:00 P.M. Monday through Friday). However, each day might have multiple records, each with a separate time period (for example, 9:00 to 12:00 A.M. on Monday and 2:00 to 5:00 P.M. on Monday).

                                                                                                                    To set the hours of availability

                                                                                                                    1. Navigate to the Administration - Service screen, then the Schedules view.

                                                                                                                    2. Create a new schedule record, and complete the fields as appropriate.

                                                                                                                    3. Click the Schedule Hours view tab.

                                                                                                                    4. Create a new schedule hours record, and complete the fields as appropriate.

                                                                                                                      Some fields are described in the following table.

                                                                                                                      Field Comments

                                                                                                                      Start Day

                                                                                                                      Select a day of the week for the schedule hours.

                                                                                                                      Start Time

                                                                                                                      Type the starting time of a period on the selected day.

                                                                                                                      End Time

                                                                                                                      Type the ending time of a period on the selected day.

                                                                                                                      Type

                                                                                                                      Select the type of work for the schedule hours. Values include Normal, Overtime, and Extended Overtime. The Appointment Booking System and Optimizer use this value.

                                                                                                                      Note: An Overtime period must come before an Extended Overtime period.

                                                                                                                      Shift Start Flag

                                                                                                                      Select this check box to indicate a time period that begins a work shift. Anything before the next flagged time period is in the same shift. This field helps the Optimizer handle swing shifts that start on one day and finish on another day.

                                                                                                                      You must select this field for each shift in the schedule. Usually, each day has 1 shift start flag, except for the last day of a swing shift. For more information about setting shift starts, see Defining Schedules and Availability for Employees.

                                                                                                                    5. Repeat Step 2 through Step 4 for each day of the week that you want to set up in this schedule.

                                                                                                                      Note: Schedule hour records can reflect different time periods on the same day of the week. However, only one of these records can contain the start of a shift.

                                                                                                                      Setting Exception Hours

                                                                                                                      Exceptions represent special nonworking days or working days. Different exception records can define exceptions for different sites (for example, U.S. holidays for a site and Canadian holidays for another site). You can define a day or continuous blocks of days as an exception to a schedule. In some cases, exception hours can define nonworking periods (for example, no work on Sunday from 6:00 A.M. to 12:00 A.M. in a 7x12 schedule). In other cases, exception hours can define work periods on days that are not normal work days (for example, Saturday morning in a 5x8 schedule).

                                                                                                                      To associate an exception with a schedule, define the exception and include this exception in the definition of a schedule.

                                                                                                                      You can also use exception hours to block the scheduled time slot for the owner of an activity to allow for another employee assignment to the activity in the same time slot. If the defined exception hours block a time slot when an activity is scheduled for the owner of the activity, then the activity is rescheduled when you reload the service region. For more information, see Defining Hours for Employees.

                                                                                                                      The All Exceptions view includes a set of exceptions to the hours that you define in the Schedule Hours view. The Exception Hours view includes the definition of these exceptions.

                                                                                                                      To set the exception hours

                                                                                                                      1. Navigate to the Administration - Service screen, then the Schedules view.

                                                                                                                      2. Drill down on the Name field for a selected schedule, and click the All Exceptions view tab.

                                                                                                                      3. Create a new exception record, and complete the fields as appropriate.

                                                                                                                      4. Click the Exception Hours view tab.

                                                                                                                      5. Create a new exception hour record, and complete the fields as appropriate.

                                                                                                                        Some fields are described in the following table.

                                                                                                                        Field Comments

                                                                                                                        Name

                                                                                                                        Type a name of that describes the exception hours.

                                                                                                                        Start Date Time

                                                                                                                        Select the date and time for the start of the exception hours.

                                                                                                                        End Date Time

                                                                                                                        Select the date and time for the end of the exception hours.

                                                                                                                        Working

                                                                                                                        Select this check box to indicate the exception hours apply to a work period.

                                                                                                                        Type

                                                                                                                        Select the type of work for the exception hours. Values include Normal, Overtime, and Extended Overtime. Overtime and Extended Overtime apply to exception hours for which you select the Working check box. The Appointment Booking System and the Optimizer use this value. For more information, see About the Appointment Booking System and About the Schedule Optimizer.

                                                                                                                        Note: Overtime hours must precede Extended Overtime hours.

                                                                                                                        Defining Breaks

                                                                                                                        Schedules can include any number of breaks. To define breaks, you first define a break type. For more information, see Breaks.

                                                                                                                        This task is a step in Process of Administering Schedules Using Siebel Scheduler.

                                                                                                                        To define a break type

                                                                                                                        1. Navigate to the Administration - Data screen, then the Work Types view.

                                                                                                                        2. Create a new work type record, and complete the fields as appropriate.

                                                                                                                        After you define the break type, you set the name of the break type.

                                                                                                                        To set the name of a break type

                                                                                                                        1. Navigate to the Administration - Application screen, then the System Preferences view.

                                                                                                                        2. Select the Sch:Break Time Id system preference.

                                                                                                                        3. In the System Preference Value field, enter the row ID for the break.

                                                                                                                        Defining Service Regions

                                                                                                                        A service region is a grouping of field service engineers in a geographical area for a purpose, such as supporting a certain set of products. Service managers try to manage the load in a service region by balancing proactive calls (installations and preventive or scheduled maintenance) with reactive calls. Service regions ease the administrative burden by allowing service managers to set consistent schedules, constraints, and costs for a large number of employees. For information about defining service regions using Siebel Field Service Integration to Oracle Real-Time Scheduler, see Administering Service Regions.

                                                                                                                        Also, a service region is a grouping of field service engineers and the activities that they perform. Thus, Siebel Scheduler creates a bounded solution set with a finite solution space and a finite number of activities to schedule. An assumption for a service region is that 2 employees with the same skill set are both capable of performing an activity. For an application that deals with only employees, employees are not grouped together well, and the interchangeability rules are too vague to effectively determine.

                                                                                                                        Every employee and service region has a predefined schedule that includes the days and hours that work can occur (normal work hours) and exceptions that deviate from normal work hours.

                                                                                                                        To define a service region, perform the following procedures:

                                                                                                                        1. Create a service region record. For more information, see Creating Service Regions.

                                                                                                                        2. Associate a schedule with the service region. For more information, see Associating Schedules with Service Regions.

                                                                                                                        3. Specify any regions that function as parent service regions. For more information, see Specifying Parent Service Regions.

                                                                                                                        4. Define the geographic area of the service region. For more information, see Defining Geographic Areas for the Optimizer.

                                                                                                                        This task is a step in Process of Administering Schedules Using Siebel Scheduler.

                                                                                                                          Caches for Service Regions

                                                                                                                          The information relating to each service region (for example, the employees assigned to the service region) is cached in memory. Instead of allowing the ABS and the Optimizer to operate directly on the Siebel database, the server copies data from the Siebel database into memory caches for the ABS and for the Optimizer. The ABS cache holds the time slots in the future, and the Optimizer cache holds the activities occurring in the next few days. This approach allows for quick and efficient scheduling and reduces traffic and the CPU load for the Siebel database.

                                                                                                                          Each service region has its own cache so that Siebel Scheduler processes occur independently. You can run Siebel Scheduler on separate CPUs in 1 server or separate servers as required. The ABS and the Optimizer are also multithreaded, and each service region can accept multiple requests at the same time. For more information, see Reloading the ABS and Optimizer Caches and About Loading and Reloading Data for Service Regions.

                                                                                                                            Creating Service Regions

                                                                                                                            A service region is a geographic area with ZIP Codes and a service team. The ABS and the Optimizer use service regions and associated data when scheduling activities.

                                                                                                                            You can define the employees who are assigned to a service region, geographic coordinates (geocodes and ZIP Codes or postal codes) for a service region, and the operation of the ABS and Optimizer for a service region.

                                                                                                                            To create a service region

                                                                                                                            1. Navigate to the Administration - Scheduling screen, then the Service Region List view.

                                                                                                                            2. Create a new service region record, and complete the fields as appropriate.

                                                                                                                              Some fields are described in the following table.

                                                                                                                              Field Comments

                                                                                                                              Parent Region

                                                                                                                              Select an existing service region as the parent region for the service region. For more information, see Specifying Parent Service Regions.

                                                                                                                              Time Zone

                                                                                                                              Select the name of the time zone that the ABS and Optimizer use. Administrators define time zones in the Time Zone Administration view of the Administration - Data screen. For more information, see Siebel Applications Administration Guide.

                                                                                                                              Schedule

                                                                                                                              Select the name of the schedule that the ABS uses. For more information, see Defining Schedule Hours.

                                                                                                                              Cost List

                                                                                                                              Select a cost list for labor. The Optimizer uses this field to calculate overtime costs. Administrators define costs lists in the Cost List view of the Administration - Pricing screen. For more information, see Siebel Pricing Administration Guide.

                                                                                                                              Travel Cost

                                                                                                                              Type the cost for each unit of travel. The Optimizer uses this field to calculate the cost function for a schedule.

                                                                                                                              Cost Function

                                                                                                                              Select the cost function. The Optimizer uses this field to optimize the schedule for the service region. For more information, see Defining Cost Functions for the Optimizer.

                                                                                                                              Parameter Set

                                                                                                                              Select the set of parameters. The ABS and Optimizer use this field. For more information, see Creating Parameter Sets for Schedules.

                                                                                                                              Constraint Set

                                                                                                                              Select the constraint set. The ABS and Optimizer use this field to optimize the schedule for the service region. Administrators define constraint sets in the Constraint Sets view of the Administration - Scheduling screen and in the Constraints view of the Administration - Scheduling screen.

                                                                                                                              Time Window

                                                                                                                              Select the name of a set of time windows. The ABS uses this field. For more information, see Creating Time Windows for Schedules.

                                                                                                                              Minimum Travel Time

                                                                                                                              Type the minimum travel time. If the calculated travel time between 2 activities is less than this time, then the Optimizer uses this field.

                                                                                                                              Average Travel Time

                                                                                                                              Type the average travel time (in minutes). The ABS adds this time to the work time for an activity to calculate the duration of the activity.

                                                                                                                              Average Travel Speed

                                                                                                                              Type the average speed for each hour of travel for field service engineers in the service region. The Optimizer uses this field to calculate costs. For more information, see Defining Cost Functions for the Optimizer.

                                                                                                                              Unit of Measure

                                                                                                                              Select the unit of measurement for travel. The Optimizer uses this field to calculate the cost function for a schedule. Values include Miles and Km.

                                                                                                                              Associating Schedules with Service Regions

                                                                                                                              A service region can have only 1 schedule. You assign each service region a schedule that the ABS and Optimizer use. This schedule might be different than the schedule associated with each employee. You define schedules in the Schedules view of the Administration - Service screen. For more information, see Defining Schedule Hours.

                                                                                                                              The ABS uses the service region schedule as a base, and then refines time slot choices by using the employee schedules. The Optimizer uses the schedules for the field service engineers, not the service region schedule, when calculating the best deployment of personnel. For more information, see Defining Schedules and Availability for Employees.

                                                                                                                              To associate a schedule with a service region

                                                                                                                              1. Navigate to the Administration - Scheduling screen, then the Service Region List view.

                                                                                                                              2. Select a service region, and select a schedule in the Schedule field.

                                                                                                                              Specifying Parent Service Regions

                                                                                                                              You can set a parent region for any service region. Parent regions affect the list of available employees in the Dispatch Board screen, but do not affect processing for scheduling.

                                                                                                                              Note: Selecting a parent region does not affect scheduling for the ABS or the Optimizer.

                                                                                                                              To specify a parent service region

                                                                                                                              1. Navigate to the Administration - Scheduling screen, then the Service Region List view.

                                                                                                                              2. Select a service region, and select a service region in the Parent Service Region field.

                                                                                                                              Defining Geographic Areas for the Optimizer

                                                                                                                              ZIP Codes and geocodes define the geographic area of a service region. The Optimizer uses geocode data and ZIP Codes (or postal codes for international users) to identify addresses.

                                                                                                                              The ABS does not directly use ZIP Codes. The service region for an activity, and not the ZIP Code that is associated with the activity, determines ABS processing. However, ZIP Codes are critical to the Optimizer because the Optimizer uses ZIP Codes and country codes to find the underlying geocodes (latitude and longitude). The Optimizer uses these geocodes to calculate the distance from activity to activity. If an activity is missing a ZIP Code or country code, then the activity is not loaded into the cache because the Optimizer cannot evaluate the activity. The Optimizer does not verify whether a Zip Code is a correct Zip Code for a service region.

                                                                                                                              The Optimizer uses the following rules for ZIP Codes:

                                                                                                                              • A service region can include multiple ZIP Codes.

                                                                                                                                Caution: It is recommended that you use that no more than 150 ZIP Codes for each service region, especially if you use optimization. Optimization routines store the solutions in memory for speed. Past iterations are stored to prevent reexamination of the same solutions. If your service regions include more than 150 ZIP Codes, then test performance and scalability carefully. Very large service regions can cause the process memory to grow extremely large, sometimes reaching the limit inherent in Microsoft Windows. In such cases, consider using UNIX.
                                                                                                                              • More than 1 service region can include the same ZIP Code. Service regions can geographically overlap.

                                                                                                                                Note: A workflow uses the ZIP Code to perform automatic assignment to a service region.

                                                                                                                              Geocode data contains longitude and latitude coordinates (in minutes and seconds) for physical locations (for example, a customer site). The Optimizer can use data at any level of detail (for example, ZIP Codes or ZIP + 4 codes).

                                                                                                                              Because a ZIP Code can apply to several square miles, use a ZIP + 4 code. This code generally brings the accuracy to buildings for businesses or to within a few blocks for residential addresses.

                                                                                                                              The Optimizer requires, at minimum, a ZIP Code or postal code, country, longitude, and latitude. Five-digit ZIP Codes for the United States are included in the seed data for Siebel Field Service. ZIP Code information is included in the S_ZIPCODE data model table. The following table describes the columns in this table.

                                                                                                                              Table S_ZIPCODE Data Model Table

                                                                                                                              Column Description

                                                                                                                              ZIP Code

                                                                                                                              The postal or ZIP Code in alphanumeric text.

                                                                                                                              City

                                                                                                                              The name of the city.

                                                                                                                              State

                                                                                                                              The name of the state or province.

                                                                                                                              Country

                                                                                                                              The name of the country.

                                                                                                                              Longitude

                                                                                                                              The longitude number (0 to + or – 180 degrees, + for the eastern hemisphere and – for the western hemisphere) up to 6 decimal places.

                                                                                                                              Latitude

                                                                                                                              The latitude number (0 to + or – 90 degrees, + for the northern hemisphere and – for the southern hemisphere) up to 6 decimal places.

                                                                                                                              Note: When longitude and latitude values are the same for 2 locations, the Optimizer uses the Minimum Travel Time field. For more information about this field, see Creating Service Regions.

                                                                                                                              The Zip Codes view lists the ZIP Codes or postal codes that are included in a service region as well as the city, state, country, longitude, and latitude for each ZIP Code.

                                                                                                                              For the Optimizer to schedule an activity, the address of the activity must have a valid ZIP Code and a country. The ZIP Code must have a corresponding geocode. The ZIP Code value can be a ZIP Code or a ZIP + 4 code.

                                                                                                                              To add a ZIP Code to a service region

                                                                                                                              1. Navigate to the Administration - Scheduling screen, then the Service Region List view.

                                                                                                                              2. Drill down on the Name field for a selected service region, and click the Zip Codes view tab.

                                                                                                                              3. Create a new ZIP code record, and complete the fields as appropriate.

                                                                                                                              There are several vendors of geocode data. You can use either of the following methods to load data into the S_ZIPCODE table:

                                                                                                                              • Use the Siebel Enterprise Integration Manager (EIM). For more information, see Siebel Enterprise Integration Manager Administration Guide.

                                                                                                                              • Import data from the ZIP Code Administration view of the Administration - Data screen.

                                                                                                                              To import geocode data

                                                                                                                              1. Navigate to the Administration - Data screen, then the ZIP Code Administration view.

                                                                                                                              2. Click the menu button, and select Import.

                                                                                                                                The Import wizard appears.

                                                                                                                              3. Specify the filename containing the data to import, and click Next.

                                                                                                                              4. Complete the information, including field mapping for the data records.

                                                                                                                                Specifications for Geocode Data

                                                                                                                                Specify the following information in geocode data:

                                                                                                                                • Latitude format. North of the equator is positive. South of the equator is negative. The data is interpreted to 6 decimal places.

                                                                                                                                • Longitude format. East of the prime meridian (at Greenwich, UK) is positive. West of the prime meridian is negative. The data is interpreted to 6 decimal places.

                                                                                                                                The Siebel application stores the latitude and longitude in the decimal degree format because this format is the most widely used and is easy to use for distance calculations. Most data sets are in decimal degree format. You can use the following formula to convert a data set to decimal degrees from the degrees, minutes, and seconds:

                                                                                                                                Decimal degrees = Degrees + (Minutes/60) + (Seconds/3600)

                                                                                                                                For example:

                                                                                                                                37 Degrees, 25 Minutes, 40.5 Seconds

                                                                                                                                = 37. + (25/60) + (40.5/3600)

                                                                                                                                = 37. +.416666 +.01125

                                                                                                                                = 37.427916 degrees

                                                                                                                                  Data Cleansing for Zip Codes

                                                                                                                                  Address and ZIP Code accuracy are critical for a schedule optimization. It is highly recommended that you use a data cleansing application, such as the Siebel Data Quality module, to correct data for addresses and ZIP Codes. For more information, see Siebel Data Quality Administration Guide.

                                                                                                                                    ZIP Code Usage in Multiple Service Regions

                                                                                                                                    The Activity business object code uses the ZIP Code of the address of the contact or account for an activity to assign the activity to a service region. You might have to override this behavior by inserting your own processing logic if ZIP Codes apply to multiple service regions.

                                                                                                                                    In general, it is recommended that you set up 1 service region for each ZIP Code, and use skills for the employees to differentiate between products. The service manager can then redistribute employees by changing their skills and reloading the skills into Assignment Manager. If you use separate regions, then you must unload employees from a service region and into another service region.

                                                                                                                                    Note: More service regions mean a higher load time.

                                                                                                                                    Siebel Scheduler does not validate a service region against the ZIP Code after the service region is set for the activity so that users can move activities to other service regions as required (for example, to cover additional activities for a marketing campaign in that service region). Validate the ZIP Code up-front, preferably when a user creates the record.

                                                                                                                                    Siebel Field Service uses the ZIP Code of the address for the contact or account that is associated with an activity to automatically assign the activity to a service region. (An activity is automatically assigned to a service region only if the Service Region field has no value.) If the contact address has a ZIP Code, then that ZIP Code is used to identify the service region. Otherwise, the ZIP Code of the account address is used to identify the service region. If only 1 service region is identified, then that service region is automatically assigned to the service request. If multiple service regions are identified, then a customer service agent must select the appropriate service region for the service activity.

                                                                                                                                      Defining Schedules and Availability for Employees

                                                                                                                                      The Schedule field in the Service Details view in the Employees view of the Administration - User screen and the exception records in the Employee Exception Hours view in the Employees view of the Administration - User screen determine employee schedules (available and unavailable hours). In the Schedules view of the Administration - Service screen, you set the definition of the schedules that appear in the Schedule field.

                                                                                                                                      The ABS uses the service region schedule as a base, and then refines time slot choices by using the employee schedules. For more information, see Defining Schedule Hours.

                                                                                                                                      The Optimizer uses only the employee schedules.

                                                                                                                                      To define schedules and availability for employees, perform the following procedures:

                                                                                                                                      This task is a step in Process of Administering Schedules Using Siebel Scheduler.

                                                                                                                                        Rules for Defining Employee Schedules

                                                                                                                                        When setting schedules for field service engineers, note with the following rules:

                                                                                                                                        • A schedule must have only 1 shift start for each day.

                                                                                                                                          To set up multiple shift start times, use multiple schedules, each for a separate shift.

                                                                                                                                        • You must select the Shift Start Flag field for the first time period in a day (except when a shift spans 2 days).

                                                                                                                                          If a shift spans more than 1 day (for example, Monday 9:00 P.M. to 11:59 P.M. and Tuesday 12:00 A.M. to 4:00 A.M.), then the first day must include the start of the shift.

                                                                                                                                        • The ABS, but not the Optimizer, can have activities that span more than 1 day.

                                                                                                                                        • It is recommended that you assign no more than 150 employees to each service region, especially if you use optimization.

                                                                                                                                        • You can schedule 1 or more breaks in a day.

                                                                                                                                        • The ABS does not consider overtime for a field service engineer.

                                                                                                                                        • The Optimizer can schedule activities in overtime and extended overtime.

                                                                                                                                        Caution: Do not define breaks during overtime. The Optimizer ignores breaks that are scheduled during overtime and treats these breaks as working time. Consequently, inaccuracies appear in cost calculations.

                                                                                                                                          Defining Hours for Employees

                                                                                                                                          The hours for an employee determine when the employee is available to work. To define the hours for an employee, you define a schedule for the employee.

                                                                                                                                          To define a schedule for an employee

                                                                                                                                          1. Navigate to the Administration - User screen, then the Employees view.

                                                                                                                                          2. Drill down on the Last Name field for a selected employee, and click the More Info view tab.

                                                                                                                                          3. In the Schedule field, select a schedule.

                                                                                                                                            You also define the exception hours for the employee.

                                                                                                                                          To define exception hours for an employee

                                                                                                                                          1. Navigate to the Administration - User screen, then the Employees view.

                                                                                                                                          2. Drill down on the Last Name field for a selected employee, and click the Employee Exception Hours view tab.

                                                                                                                                          3. Create a new exception hour record, and complete the fields as appropriate.

                                                                                                                                            Some fields are described in the following table.

                                                                                                                                            Field Comments

                                                                                                                                            Start

                                                                                                                                            Select the date and time that the employee is unavailable for scheduling.

                                                                                                                                            End

                                                                                                                                            Select the date and time that the employee is again available for scheduling.

                                                                                                                                            Working

                                                                                                                                            Select this check box to indicate the exception hours apply to a working period.

                                                                                                                                            For example, you specify a Saturday morning exception for an employee who normally works only from Monday to Friday. You select the Working check box to indicate the employee works these additional hours and can be scheduled for activities during these hours. However, if you specify exception hours for a midweek holiday for the same employee and do not select the Working check box, then Siebel Scheduler assumes that the employee does not work that day and cannot be scheduled for activities on that day.

                                                                                                                                            Reason

                                                                                                                                            Select the reason for the exception hours for the employee. Values include Vacation and Sick Time.

                                                                                                                                            Type

                                                                                                                                            Select the type of work for the exception hours. Values include Normal, Overtime, and Extended Overtime. For more information, see Shifts.

                                                                                                                                            Specifying Employees as Unavailable

                                                                                                                                            Use the Unavailable button to instruct the Optimizer that the selected employee is unavailable for a period. Clicking this button sends an asynchronous request to the Optimizer to load the data for the selected employee, including exception hours, and reassign or reschedule activities.

                                                                                                                                            Tip: Before using the Unavailable button, you might have to create a new record (in the Employee Exception Hours view in the Employees view of the Administration - User screen) describing the time when the selected engineer is unavailable. If you do not define at least 1 exception hour for the engineer, then the Optimizer displays an error message. For more information, see Defining Hours for Employees.

                                                                                                                                            To specify an employee as unavailable

                                                                                                                                            1. Navigate to the Administration - Scheduling screen, then the Service Region List view.

                                                                                                                                            2. Drill down on the Name field for a selected service region, and click the Employees view tab.

                                                                                                                                            3. Select an employee record, and click Unavailable.

                                                                                                                                              Creating Time Windows for Schedules

                                                                                                                                              You use time windows to define the interval of time for starting an activity. Time windows are associated with a service region in the Service Region List view of the Administration - Scheduling screen. For more information, see Defining Service Regions.

                                                                                                                                              The Details view in the Time Window List view of the Administration - Scheduling screen includes specific mappings that make up each time window record. To accommodate activities that vary in duration, you map each range of durations to a time window. For example, a work time of 1 to 60 minutes might require a time window of 120 minutes to provide the Optimizer with the flexibility to change the schedule for optimization.

                                                                                                                                              The ABS uses time windows and the work time or duration for an activity to find the available time slots for the activity. The customer service representative then selects one of these time slots to book an appointment for the activity. To see how the ABS finds the available time slots, consider the following example. In the Time Window List view, you set the Default Time Window field to 240 minutes (or 4 hours), the Duration From field to 0 minutes, the Duration To field to 30 minutes, and the Time Window field to 60 minutes.

                                                                                                                                              If the work time for an activity is 30 minutes, then the ABS divides employee schedules into 60 minute time slots because the time window for 30 minute activities is 60 minutes. The ABS considers start shift times and the type of work hours in employee schedules when dividing these schedules into time slots. If the customer service representative selects an ABS-provided time slot of 8:00 A.M. to 9:00 A.M., then the planned start time for the activity can be between 8:00 A.M. and 9:00 A.M., and the planned end time for the activity is 30 minutes later.

                                                                                                                                              If the duration of another activity is 500 minutes (8 hours and 20 minutes), if breaks are allowed during the activity, and if the work hours are from 9:00 A.M. to 5:00 P.M., then the ABS does not provide 500 minute time slots (for example, 9:00 A.M. on Monday to 9:20 A.M. on Tuesday) because there is no time window for 500 minutes. Instead, the ABS provides 240 minute (or 4 hour) time slots (for example, 9:00 A.M to 1:00 P.M.) because the default time window is 240 minutes.

                                                                                                                                              This task is a step in Process of Administering Schedules Using Siebel Scheduler.

                                                                                                                                              To create a time window for schedules

                                                                                                                                              1. Navigate to the Administration - Scheduling screen, then the Time Window List view.

                                                                                                                                              2. Create a new time window record, and complete the fields as appropriate.

                                                                                                                                                Some fields are described in the following table.

                                                                                                                                                Field Comments

                                                                                                                                                Name

                                                                                                                                                Type the name of the set of time window mappings.

                                                                                                                                                Default Time Window

                                                                                                                                                Type the time window (in minutes) that is applied to an activity when the Details view for the time window does not include a mapping for the specific duration of the activity.

                                                                                                                                              3. Scroll down to the Details view, and create a new record for each activity duration range.

                                                                                                                                              4. To view the service regions that are associated with the time window, click the Service Regions view tab.

                                                                                                                                              Creating Constraint Sets for Schedules

                                                                                                                                              Service businesses must operate under numerous union, legal, or business constraints. For more information, see Examples of Constraints.

                                                                                                                                              These constraints include the following types:

                                                                                                                                              • Hard constraints. The ABS and Optimizer cannot violate hard constraints. Activities that do not fit these constraints are not scheduled. Consequently, the engines quickly find solutions, but fewer solutions are obtained. The solutions result in higher costs for service.

                                                                                                                                              • Soft constraints. The Optimizer can weigh the cost of using or violating a soft constraint when calculating solutions for a schedule. Compared to hard constraints, soft constraints result in longer optimization times (lower performance of the Optimizer), more solutions, and lower costs for service. Violating soft constraints can result in a more costly schedule.

                                                                                                                                              Schedules that violate hard constraints are discarded even though they might be better than other solutions. The Optimizer can use solutions that violate soft constraints, but it assigns a penalty to these violations that can make a solution less favorable than another solution. The calculated cost function for each solution includes the penalties for violating soft constraints. For more information, see Defining Cost Functions for the Optimizer.

                                                                                                                                              To create constraint sets, perform the following procedures:

                                                                                                                                              This task is a step in Process of Administering Schedules Using Siebel Scheduler.

                                                                                                                                                Examples of Constraints

                                                                                                                                                The following constraints limit work hours:

                                                                                                                                                • Union agreements stipulate that no person work more than 10 hours of overtime in a week.

                                                                                                                                                • Laws regulating worker safety restrict employees from working more than 12 hours a day.

                                                                                                                                                • To keep costs down, management specifies that no service manager can authorize more than forty hours of overtime for each week for all of their employees.

                                                                                                                                                • An engineer cannot work more than 45 hours for each week.

                                                                                                                                                • An engineer cannot engage in an activity type (for example, working with hazardous materials) more than 4 hours in each day.

                                                                                                                                                • Total workload must be less than 95%.

                                                                                                                                                • Total workload must be greater than 60%.

                                                                                                                                                • An engineer cannot travel more than 4 hours a day.

                                                                                                                                                The following constraint limits timing of an activity: All waste disposal activities must start before 8:00 P.M.

                                                                                                                                                  Predefined Constraints

                                                                                                                                                  The following table describes the predefined constraints for the ABS and Optimizer.

                                                                                                                                                  Table Constraints for the ABS and Optimizer

                                                                                                                                                  Constraint Description

                                                                                                                                                  Appointment Booking Activity Time

                                                                                                                                                  Limits the time of day an activity of a specified type or priority can start or end.

                                                                                                                                                  Appointment Booking FSE Limit

                                                                                                                                                  Limits the number of activities of any type or of a specified type, or time that any employee or a specific employee spends on activities. Or, limits the number of activities or time spent on activities for a specified service role (for example, Installation or Preventive Maintenance).

                                                                                                                                                  Appointment Booking Schedule Activity Type

                                                                                                                                                  Limits the number of activities of any type or the time spent on activities of a specified type for a whole schedule.

                                                                                                                                                  Optimizer Activity Time Hard

                                                                                                                                                  Limits when an activity of a specified type or priority must begin or end. This constraint is a hard constraint.

                                                                                                                                                  Optimizer Activity Time Soft

                                                                                                                                                  Limits when an activity of a specified type or priority can begin or end. Also, specifies the penalty for violating this soft constraint.

                                                                                                                                                  Optimizer FSE Limit Hard

                                                                                                                                                  Limits the following values for any employee or a specific employee during a specified period:

                                                                                                                                                  • Workload percentage

                                                                                                                                                  • umber of activities of any type or of a specified type

                                                                                                                                                  • Total hours of travel time

                                                                                                                                                  • Total work hours

                                                                                                                                                  This constraint is a hard constraint.

                                                                                                                                                  Optimizer FSE Limit Soft

                                                                                                                                                  Limits the following values for any employee, a specific employee, or a specified service role (for example, Installation or Preventive Maintenance) during a specified period:

                                                                                                                                                  • Workload percentage

                                                                                                                                                  • umber of activities of any type or of a specified type

                                                                                                                                                  • Total hours of overtime

                                                                                                                                                  • Total hours of travel time

                                                                                                                                                  • Total work hour

                                                                                                                                                  Also, specifies the penalty for violating this soft constraint.

                                                                                                                                                  Optimizer Fairness

                                                                                                                                                  Promotes an equal distribution of the following values for workload, specified as a percentage, for all employees or for a specified service role (for example, Installation or Preventive Maintenance):

                                                                                                                                                  • Number of activities of any type or of a specified type

                                                                                                                                                  • otal hours of overtime

                                                                                                                                                  • Total hours of travel time

                                                                                                                                                  • Total work hours

                                                                                                                                                  Also, specifies the penalty for violating this soft constraint.

                                                                                                                                                  Note: Optimizer Fairness is a leeway constraint because it is based on a percentage and not an absolute value. Because this number is approximate, the Optimizer can achieve acceptable schedule assignments within acceptable times.

                                                                                                                                                  Optimizer Schedule Activity Type Hard

                                                                                                                                                  Limits the following values for a whole schedule in a specified period:

                                                                                                                                                  • Hours of work time for activities of a certain type

                                                                                                                                                  • umber of activities of a certain type

                                                                                                                                                  • Percentage count of activities of a certain type

                                                                                                                                                  • Percentage hours for activities of a certain typ

                                                                                                                                                  This constraint is a hard constraint.

                                                                                                                                                  Optimizer Schedule Activity Type Soft

                                                                                                                                                  Limits the following values for a whole schedule:

                                                                                                                                                  • Hours of work time for activities of a certain type

                                                                                                                                                  • umber of activities of a certain type

                                                                                                                                                  • Percentage count of activities of a certain type

                                                                                                                                                  • Percentage hours for activities of a certain typ

                                                                                                                                                  Also, specifies the penalty for violating this soft constraint.

                                                                                                                                                  Optimizer Schedule Overtime Soft

                                                                                                                                                  Limits the hours of overtime in a specified period for a whole schedule.

                                                                                                                                                  Also, specifies the penalty for violating this soft constraint.

                                                                                                                                                  Optimizer Travel Time

                                                                                                                                                  Limits the travel time between activities for all employees, specific employees, or a specified service role (for example, Installation or Preventive Maintenance).

                                                                                                                                                  This constraint can be a hard or soft constraint.

                                                                                                                                                    Defining Constraints

                                                                                                                                                    You create constraints using the Constraint Wizard. This wizard guides you step-by-step through the process. You select a constraint template and then either select or enter the appropriate values.

                                                                                                                                                    Do not define contradictory constraints. For example, the following constraints conflict with each other if both constraints are hard constraints and if the duration of the activities is less than 2 hours:

                                                                                                                                                    • A field service engineer must work a minimum of 4 hours in each day.

                                                                                                                                                    • A field service engineer can work on no more than 2 activities in each day.

                                                                                                                                                    In this example, the Optimizer cannot find a solution and fails to schedule the activities.

                                                                                                                                                    Test new constraints before releasing the constraints into a production environment. Leaving the constraints as soft constraints might help to avoid problems. However, too many soft constraints and not enough hard constraints can hamper performance.

                                                                                                                                                    After you define constraints, you can define constraint sets that are associated with service regions. For more information, see Defining Constraint Sets.

                                                                                                                                                    To define a constraint

                                                                                                                                                    1. Navigate to the Administration - Scheduling screen, then the Constraints view.

                                                                                                                                                    2. Create a new constraint record, and follow the Constraint Wizard steps.

                                                                                                                                                      For more information about the predefined constraints that you can select, see Creating Constraint Sets for Schedules.

                                                                                                                                                    3. When you complete the constraint, click Save.

                                                                                                                                                      The Save a Constraint dialog box appears.

                                                                                                                                                    4. Enter a name for the constraint, and click Save.

                                                                                                                                                      The Constraints list reappears.

                                                                                                                                                      Defining Constraint Sets

                                                                                                                                                      Constraint sets provide the basic definition for a predefined set of constraints that a service region uses for running the Optimizer. You associate a constraint with a service region in the Service Region List view of the Administration - Scheduling screen. For more information, see Creating Service Regions.

                                                                                                                                                      To define a constraint set

                                                                                                                                                      1. Navigate to the Administration - Scheduling screen, then the Constraint Sets view.

                                                                                                                                                      2. Create a new constraint set record, and complete the field as appropriate.

                                                                                                                                                      3. Scroll down to the Constraints list.

                                                                                                                                                      4. Create a new constraint record, and select a predefined constraint from the Add Constraint dialog box that appears.

                                                                                                                                                      5. Enter a start and end date for the constraint, if applicable.

                                                                                                                                                      6. To view the service regions that are associated with the constraint set, click the Service Regions tab.

                                                                                                                                                        Creating Parameter Sets for Schedules

                                                                                                                                                        Parameter sets contain key information that determines how the ABS and Optimizer operate. Parameter sets are associated with service regions in the Service Region List view of the Administration - Scheduling screen. Each service region uses a parameter set. For more information, see Defining Service Regions.

                                                                                                                                                        If the scheduling server starts without Optimizer or ABS parameters, then the service region is not loaded for the Optimizer or the ABS. The log files (Optimizer_xxx.log and ApptBook_xxx.log) in the log directory on the Siebel Server specify the missing parameters.

                                                                                                                                                        Note: If a service region fails to load, then you must restart the ABS or Optimizer. You do not have to reboot the computer.

                                                                                                                                                        The Parameter Sets view includes the basic definition of the parameters that the ABS and the Optimizer use. The Parameters view includes each parameter in a parameter set.

                                                                                                                                                        This task is a step in Process of Administering Schedules Using Siebel Scheduler.

                                                                                                                                                        To create the parameter set for a schedule

                                                                                                                                                        1. Navigate to the Administration - Scheduling screen, then the Parameter Sets view.

                                                                                                                                                        2. Create a new parameter set record, and complete the fields as appropriate.

                                                                                                                                                          Enter a meaningful name for the parameter set (for example, East Coast Parameters).

                                                                                                                                                        3. Scroll down to the Parameters list, create a new parameter record, and complete the fields as appropriate.

                                                                                                                                                          Some fields are described in the following table.

                                                                                                                                                          Field Comments

                                                                                                                                                          Variable Code

                                                                                                                                                          Select the appropriate parameter. For more information about the parameters that you can select, see Parameters for Schedules.

                                                                                                                                                          Variable Value

                                                                                                                                                          Type a value for the parameter.

                                                                                                                                                        4. To view the service regions that are associated with the parameter set, click the Service Regions view tab.

                                                                                                                                                          Parameters for Schedules

                                                                                                                                                          The following table lists the various parameters that you can use to specify a parameter set.

                                                                                                                                                          Table Scheduling Parameters

                                                                                                                                                          Parameter Required? Value Description

                                                                                                                                                          Month Start Date

                                                                                                                                                          No

                                                                                                                                                          Number, 1–28

                                                                                                                                                          Determines the day that the month starts. Use this parameter for constraints that are defined in months. Most users set this parameter to 1. The default value is 1.

                                                                                                                                                          Use Assignment Manager

                                                                                                                                                          No

                                                                                                                                                          0 or 1

                                                                                                                                                          Indicates whether the activity is submitted to Assignment Manager to receive a list of engineers capable of performing this work. Set this parameter to 1 to use the AM, unless all employees in a service region have the same skills, or all employees are eligible to perform all the activities. The default value is 1.

                                                                                                                                                          Week Start Day

                                                                                                                                                          No

                                                                                                                                                          Number, 1–7

                                                                                                                                                          Determines the day that the week starts. Use this parameter for constraints that are defined in weeks. Most users set this parameter to 1 (Sunday) or 2 (Monday). The default value is 1.

                                                                                                                                                          ABS – Activity Category

                                                                                                                                                          No

                                                                                                                                                          Order number for the Activity Category LOV.

                                                                                                                                                          Indicates only activities with the specified category are loaded into the ABS. The default value is all categories. The value can be comma-separated for multiple categories.

                                                                                                                                                          The order number for an activity category LOV appears in the List of Values view of the Administration - Data screen. For example, this view shows the order number for a Repair Activity category (FS_ACTIVITY_CLASS type).

                                                                                                                                                          ABS – Activity Status

                                                                                                                                                          No

                                                                                                                                                          Order number for the Activity Status LOV.

                                                                                                                                                          Indicates activities with the specified status are not loaded into the ABS. The recommended default value is the order number for the Cancelled status. The value can be comma separated for multiple statuses.

                                                                                                                                                          The order number for an activity status LOV appears in the List of Values view of the Administration - Data screen. For example, this view shows the order number for a Cancelled status (EVENT_STATUS type).

                                                                                                                                                          ABS – Days to End

                                                                                                                                                          Yes

                                                                                                                                                          Number

                                                                                                                                                          Specifies a number of days (not an absolute date) after the current date. The ABS does not schedule activities for the days that are after the date that this parameter indicates. Consequently, the ABS does not load activities that are scheduled after the date that this parameter indicates.

                                                                                                                                                          ABS – Days to Start

                                                                                                                                                          Yes

                                                                                                                                                          Number

                                                                                                                                                          Specifies a number of days (not an absolute date) after the current date. The ABS schedules activities for the days that are on or after the date that this parameter indicates and that are on or before the date that the ABS - Days to End parameter indicates. Then, the ABS loads activities that are scheduled on or after the first day of the month that contains the date that this parameter indicates and that are scheduled on or before the date that the ABS - Days to End parameter indicates. (Because you can define ABS constraints in months, the ABS must load activities that are scheduled on or after the first day of the month.)

                                                                                                                                                          This parameter activates at 12:00 A.M. If this parameter is set to 1, then the ABS starts scheduling activities later than midnight after the region is loaded (subject to the schedule used). A value of 0 is not supported for this parameter.

                                                                                                                                                          Note: Activities that start in the past but that end after the date that this parameter indicates are still loaded to the ABS.

                                                                                                                                                          ABS – Default Number of Slots

                                                                                                                                                          No

                                                                                                                                                          Number

                                                                                                                                                          Specifies how many choices (maximum number of appointment slots) are returned to the user. A higher number of slots gives more flexibility, but can slow the ABS because searching for more slots takes longer. The default value is 5.

                                                                                                                                                          ABS – Logging Level

                                                                                                                                                          No

                                                                                                                                                          Number, 1–5

                                                                                                                                                          Controls the amount of information that is written to the ABS log (ApptBook_xxx.log) stored on the server. The lowest level, 1, writes only basic information about the server activities, and the highest level, 5, writes detailed logs that show all actions that occurred.

                                                                                                                                                          Note: You must set the Appointment Booking and Optimization Execution event for the ApptBook component to 5 to generate log files when the ABS is loaded.

                                                                                                                                                          ABS – Range of Heuristic

                                                                                                                                                          No

                                                                                                                                                          Number

                                                                                                                                                          Determines the time range (in days) that the selection heuristic uses. Values include:

                                                                                                                                                          • 1. A day.

                                                                                                                                                          • 7. A week

                                                                                                                                                          ABS – Selection Heuristic

                                                                                                                                                          No

                                                                                                                                                          Number

                                                                                                                                                          Determines the method for finding time slots. For more information about the methods, see About Heuristic Methods for Schedules.

                                                                                                                                                          Values include:

                                                                                                                                                          • 1. Earliest First method.

                                                                                                                                                          • 2. Resource Loading method.

                                                                                                                                                          • 3. Resource Leveling method.

                                                                                                                                                          ABS – Timeout

                                                                                                                                                          No

                                                                                                                                                          Number (Minutes)

                                                                                                                                                          Sets how long time slots are locked (in minutes) after the user requests but does not select the slots. After this time, the slots are released and made available for booking by other users. If the user closes the browser or loses a connection, then the slots are again available. Do not set this parameter to zero.

                                                                                                                                                          Optimizer – Activity Category

                                                                                                                                                          Yes

                                                                                                                                                          Sequence number for the Activity Category LOV.

                                                                                                                                                          Indicates only activities with the specified category are loaded into the Optimizer. The default value is all categories.

                                                                                                                                                          Optimizer – Activity Status

                                                                                                                                                          No

                                                                                                                                                          Sequence number for the Activity Status LOV.

                                                                                                                                                          Indicates activities with the specified status are not loaded into the Optimizer. The recommended default value is Cancelled.

                                                                                                                                                          Optimizer – Default Priority

                                                                                                                                                          Yes

                                                                                                                                                          Sequence number for the Activity Priority LOV.

                                                                                                                                                          Indicates the priority for an activity that has no priority.

                                                                                                                                                          Optimizer – Glued

                                                                                                                                                          Yes

                                                                                                                                                          Number (Hours)

                                                                                                                                                          Indicates the period when the Optimizer does not change the assigned employees (and schedules) for activities. This period extends from the time when the optimization task begins until the time that this value designates. The optimization task begins when you click the Optimize button in the Service Region List view of the Administration - Scheduling screen.

                                                                                                                                                          For example, if you click the Optimize button at 10:00 A.M. and if you set this value to 4 (4 hours), then the Optimizer does not reassign employees for activities (and does not reschedule activities) that are scheduled to occur between 10:00 A.M and 2:00 P.M.

                                                                                                                                                          Optimizer – Hard Latest Start

                                                                                                                                                          No

                                                                                                                                                          0 or 1

                                                                                                                                                          Indicates whether the Latest Start field value is a hard or soft constraint. Values include:

                                                                                                                                                          • 0. Soft constraint

                                                                                                                                                          • 1. Hard constrain

                                                                                                                                                          The default is 0.

                                                                                                                                                          Optimizer – Logging Level

                                                                                                                                                          No

                                                                                                                                                          Number, 1–5

                                                                                                                                                          Controls the amount of information that is written to the Optimizer log (Optimizer_xxx.log) stored on the server. The lowest level, 1, writes only basic information about the server activities, and the highest level, 5, writes detailed logs that show all actions that occurred.

                                                                                                                                                          Optimizer – Optimize Heuristic

                                                                                                                                                          No

                                                                                                                                                          Number, 1–8

                                                                                                                                                          Indicates the heuristic used to improve the optimization solution. For more information about the methods, see About Heuristic Methods for Schedules.

                                                                                                                                                          Values include:

                                                                                                                                                          • 1. Greedy search

                                                                                                                                                          • 2. Steepest search

                                                                                                                                                          • 3. Greedy search followed by a Tabu search

                                                                                                                                                          • 4. Steepest search followed by a Tabu search

                                                                                                                                                          • 5. Greedy search followed by Fast GLS

                                                                                                                                                          • 6. Steepest search followed by Fast GL

                                                                                                                                                          • 7. Greedy search followed by GTS

                                                                                                                                                          • 8. Steepest search followed by GTS

                                                                                                                                                          where:

                                                                                                                                                          GLS is Guided Local Search.

                                                                                                                                                          GTS is Guided Tabu Search.

                                                                                                                                                          Optimizer – Consider Parts

                                                                                                                                                          No

                                                                                                                                                          0 or 1

                                                                                                                                                          Indicates whether the Optimizer considers the parts in the trunk inventory of an engineer when evaluating the engineer for assignment to an activity. Values include:

                                                                                                                                                          • 0. No

                                                                                                                                                          • 1. Yes

                                                                                                                                                          Optimizer – Parts Period

                                                                                                                                                          No

                                                                                                                                                          Integer (Hours)

                                                                                                                                                          Indicates how far in advance the Optimizer considers the parts in the trunk inventory of an engineer.

                                                                                                                                                          Optimizer – Save Interval

                                                                                                                                                          Yes

                                                                                                                                                          Integer (Minutes)

                                                                                                                                                          Indicates the frequency with which the Optimizer saves results during optimization.

                                                                                                                                                          Because of this parameter, if an application failure occurs during optimization, then some optimized results are not lost. For example, if the optimization time is 3 hours, and the save interval is 1 hour, then the Optimizer saves results every hour during the 3 hour run. If an application failure occurs 2.5 hours after the Optimizer starts, then the first 2 hours of the optimization results are saved. When you restart optimization, the Optimizer uses the 2 hours of results from the previous run.

                                                                                                                                                          The time the Optimizer uses to save the results at the save interval is part of the optimization time. Saving the optimized results at the save interval uses extra resources and time. Consider both the importance of saving partially optimized results and the efficiency of optimization time usage. If losing partially optimized results because of an application failure is not an important consideration, then set the save interval parameter to a time that is the same as or longer than the optimization time. Consequently, the Optimizer saves results only when optimization is complete. If losing partially optimized data because of an application failure is an important consideration, then do not set the save interval parameter to less than 1 hour. Consequently, the Optimizer saves results infrequently and uses optimization time efficiently.

                                                                                                                                                          Optimizer – Tardiness Cost

                                                                                                                                                          Yes

                                                                                                                                                          Number (Float)

                                                                                                                                                          Indicates the cash value, in dollars, for each hour of violating a soft constraint in the Optimizer – Hard Latest Start parameter.

                                                                                                                                                          Optimizer – Task Excl Cost

                                                                                                                                                          Yes

                                                                                                                                                          Number

                                                                                                                                                          Indicates the penalty used to calculate the cost function if an activity is unscheduled.

                                                                                                                                                          Optimizer – Timeout

                                                                                                                                                          Yes

                                                                                                                                                          Integer (Minutes)

                                                                                                                                                          Indicates the maximum time in minutes for each optimization.

                                                                                                                                                            Defining Cost Functions for the Optimizer

                                                                                                                                                            The cost function is the sum of variables that drive the optimization of a schedule. For each activity in the schedule, the Optimizer minimizes the value of the cost function while optimizing the schedule. The cost function indirectly calculates the monetary cost of completing the activities in a schedule.

                                                                                                                                                            Each service region has only 1 cost function. However, many service regions can use the same cost function. You associate cost functions with service regions in the Service Region List view of the Administration - Scheduling screen. For more information, see Defining Service Regions.

                                                                                                                                                            The Cost Functions view includes the function that the Optimizer uses for assessing the success of each iteration of a schedule. The Cost Function Details view includes each variable in a cost function.

                                                                                                                                                            This task is a step in Process of Administering Schedules Using Siebel Scheduler.

                                                                                                                                                            To define a cost function for the Optimizer

                                                                                                                                                            1. Navigate to the Administration - Scheduling screen, then the Cost Functions view.

                                                                                                                                                            2. Create a new cost function record, and complete the fields as appropriate.

                                                                                                                                                              Some fields are described in the following table.

                                                                                                                                                              Field Comments

                                                                                                                                                              Function Type

                                                                                                                                                              Select a function type. Values include Normal and Emergency. For Siebel Field Service scheduling purposes, select Normal.

                                                                                                                                                              Function Area

                                                                                                                                                              Select a function area. Values include Field Service, Workforce Management, and Professional Services. For Siebel Field Service scheduling purposes, select Field Service.

                                                                                                                                                            3. Scroll down to the Details list.

                                                                                                                                                            4. Create a new detail record, and complete the fields as appropriate.

                                                                                                                                                              Some fields are described in the following table.

                                                                                                                                                              Field Comments

                                                                                                                                                              Active

                                                                                                                                                              Select this check box to indicate the variable is active.

                                                                                                                                                              Variable

                                                                                                                                                              Select the variable to use for the cost function. For more information, see Variables for Cost Functions.

                                                                                                                                                              Weight

                                                                                                                                                              Type the weighting value to allocate to the cost function variable. For all weights in the cost function, start with a value of 1. (This value approximates the real cost of scheduling an activity.) Then change the values as needed.

                                                                                                                                                            5. To view the service regions that are associated with the cost function, click the Service Regions view tab.

                                                                                                                                                              Variables for Cost Functions

                                                                                                                                                              The following table describes the variables for the cost function.

                                                                                                                                                              Table Variables in the Cost Function for the Optimizer

                                                                                                                                                              Variable Calculation of the Variable

                                                                                                                                                              Constraint Violation

                                                                                                                                                              Σ RuleViolationCost x Weight

                                                                                                                                                              This calculation includes the sum of Rule Violation Costs for each violated soft constraint. A violation is proportional to the degree of the violation. The units for the amount of the violation are the same as the defined units for the constraint. Time units are in hours. All other cases use the activity.

                                                                                                                                                              FSE Overtime

                                                                                                                                                              FSEOTCost x (EndtimeoflastactivityinOT - Endofnormalshift) x Weight

                                                                                                                                                              where:

                                                                                                                                                              FSEOTCost is (StdCost x StdOTpercent) + (StdCost x ExtOTpercent).

                                                                                                                                                              Tardiness

                                                                                                                                                              TardinessCost x Amountofdelay x Weight

                                                                                                                                                              Task Exclusion Penalty

                                                                                                                                                              TaskExclusionPenalty x (1/TaskPriority) x Weight

                                                                                                                                                              Task priority allows high priority tasks to take precedence over low priority tasks. Task priority is important when there are not enough resources to schedule all activities.

                                                                                                                                                              The task priority term uses the numeric value from the Order field in the List of Values view of the Administration - Data screen. This value also appears in the Priority field in the More Info view of the Activities screen. For more information, see Siebel Applications Administration Guide.

                                                                                                                                                              Task Exclusion Penalty and Weight cannot be zero. If they are zero, then no activities are scheduled.

                                                                                                                                                              Travel Distance

                                                                                                                                                              TravelDistance x TravelCost x Weight

                                                                                                                                                                Setting Up Server Key Mappings

                                                                                                                                                                Service regions are self-contained so that they can run on separate CPUs and even separate servers. You use server key mappings to specify the location and routing of requests to these service regions. Server key mappings also assign the service regions to different processes and determine whether the servers process them in parallel or serially. There are server key mappings for the ABS and for the Optimizer.

                                                                                                                                                                When a user clicks the Book Appointment button, the request is sent to the enterprise server. The enterprise server then reviews the mapping of the service regions and routes the request to the appropriate Siebel Server that stores that service region.

                                                                                                                                                                In the Server Key Mappings view, you assign servers to processes and associated service regions.

                                                                                                                                                                This task is a step in Process of Administering Schedules Using Siebel Scheduler.

                                                                                                                                                                To set up a server key mapping

                                                                                                                                                                1. Navigate to the Administration - Scheduling screen, then the Server Key Mappings view.

                                                                                                                                                                2. Create a new server key mapping record, and complete the fields as appropriate.

                                                                                                                                                                  Some fields are described in the following table.

                                                                                                                                                                  Field Comments

                                                                                                                                                                  Server

                                                                                                                                                                  Type the name of a Siebel Server.

                                                                                                                                                                  Process #

                                                                                                                                                                  Type the number of a process that runs on the server. This number groups service regions into the same process.

                                                                                                                                                                  Caution: If you specify multiple processes on a server, then you must set the Maximum MT Servers server component parameter to the same number of processes so that multiple processes are spawned. If you do not, then only the first process is created and not all regions are loaded. It is recommended that you set the Minimum MT Servers server component parameter to the number of needed processes and the Maximum MT Servers parameter to a value greater than or equal to the Minimum MT Servers parameter. For more information about these parameters, see Siebel Performance Tuning Guide and Setting Parameters for Server Component Tasks.

                                                                                                                                                                  Leaf Service Region

                                                                                                                                                                  Select the name of a service region from the Pick Service Region dialog box.

                                                                                                                                                                  Component

                                                                                                                                                                  Select the name of a component, either ABS or Optimizer, from the Pick Component dialog box.

                                                                                                                                                                  Note: If the Server Key Mappings - Optimizer Component is not available for selection in the Component field, then the server installation is incomplete. To correct this problem, use the Synchronize button in the Synchronize view in the Enterprises view of the Administration - Server Configuration screen. For more information about the complete procedure, see Siebel System Administration Guide.
                                                                                                                                                                3. Restart the relevant server component (for example, the Appointment Booking Engine or Optimizer) for the changes to take effect.

                                                                                                                                                                  You must also restart the relevant server if you add or remove a key value.

                                                                                                                                                                  Multiple Processor Support

                                                                                                                                                                  If the underlying operating system can support multiple processors on 1 computer, then Siebel Scheduler can take advantage of the processors by running different service regions for the ABS and Optimizer on different processors. You must set different process numbers in a server key mapping. A server with a single processor can run multiple processes, but this setup can adversely affect performance. Service regions in different processes are run in parallel, while service regions in the same process are run serially.

                                                                                                                                                                  Note: The number of processes running on a server computer is not related to the number of processors in that computer.

                                                                                                                                                                  Because the ABS and Optimizer are different modules, they are already running as separate processes, even though the process number is the same. A module for 1 service region can run in only 1 process at a time.

                                                                                                                                                                  For example, consider a 4-processor computer with only 2 processors in use. The following table shows an example of the key mapping when 1 service region runs with both the ABS and Optimizer. Process refers to the number of processes for that component, not the processor number on the server.

                                                                                                                                                                  Table Server Key Mapping: Example 1

                                                                                                                                                                  Server Service Region Process Module

                                                                                                                                                                  AppServer1

                                                                                                                                                                  West Coast Region

                                                                                                                                                                  1

                                                                                                                                                                  ABS

                                                                                                                                                                  AppServer1

                                                                                                                                                                  West Coast Region

                                                                                                                                                                  1

                                                                                                                                                                  Optimizer

                                                                                                                                                                  Note: You cannot run 1 module for a service region as 2 processes.

                                                                                                                                                                  The following table shows an example of the key mapping when 2 service regions run on a 4-processor computer. In this example, you can use all 4 processors. Process refers to the number of processes for that component, not the processor number on the server.

                                                                                                                                                                  Table Server Key Mapping: Example 2

                                                                                                                                                                  Server Service Region Process Module

                                                                                                                                                                  AppServer1

                                                                                                                                                                  West Coast Region

                                                                                                                                                                  1

                                                                                                                                                                  ABS

                                                                                                                                                                  AppServer1

                                                                                                                                                                  East Coast Region

                                                                                                                                                                  2

                                                                                                                                                                  ABS

                                                                                                                                                                  AppServer1

                                                                                                                                                                  West Coast Region

                                                                                                                                                                  1

                                                                                                                                                                  Optimizer

                                                                                                                                                                  AppServer1

                                                                                                                                                                  East Coast Region

                                                                                                                                                                  2

                                                                                                                                                                  Optimizer

                                                                                                                                                                  If there are more than 2 service regions on a 4-processor computer, then you can run the modules as different processes. The following table shows an example of the key mapping for the best use of the processors on a server when the West Coast Region is very large and the Central Region and East Coast Region are smaller. Process refers to the number of processes for that component, not the processor number on the server.

                                                                                                                                                                  Table Server Key Mapping: Example 3

                                                                                                                                                                  Server Service Region Process Module

                                                                                                                                                                  AppServer1

                                                                                                                                                                  West Coast Region

                                                                                                                                                                  1

                                                                                                                                                                  ABS

                                                                                                                                                                  AppServer1

                                                                                                                                                                  East Coast Region

                                                                                                                                                                  2

                                                                                                                                                                  ABS

                                                                                                                                                                  AppServer1

                                                                                                                                                                  Central Region

                                                                                                                                                                  2

                                                                                                                                                                  ABS

                                                                                                                                                                  AppServer1

                                                                                                                                                                  West Coast Region

                                                                                                                                                                  1

                                                                                                                                                                  Optimizer

                                                                                                                                                                  AppServer1

                                                                                                                                                                  East Coast Region

                                                                                                                                                                  2

                                                                                                                                                                  Optimizer

                                                                                                                                                                  AppServer1

                                                                                                                                                                  Central Region

                                                                                                                                                                  2

                                                                                                                                                                  Optimizer

                                                                                                                                                                  The West Coast Region requires more computation and uses 2 processors. The East Coast Region and Central Region run in the same processes and on the same 2 processors.

                                                                                                                                                                  Each server component is multithreaded and can load schedules for multiple service regions. Multiple threads can share these schedules. Each request to the Optimizer runs on a new thread.

                                                                                                                                                                  A request identifies the required schedule for 1 service region and locks the schedule. Requests for schedules for other service regions can continue while requests for the same schedule are queued. Because the response time for the ABS is fast, high latency for the returned booking times does not result because the processing time between ABS transactions is usually several minutes.

                                                                                                                                                                    Setting Parameters for Server Component Tasks

                                                                                                                                                                    Set up the parameters that configure shell (process) startup for the Server Request Broker and the Appointment Booking Engine server components in accordance with the number of service regions and the number of users. For more information about changing these parameters for server components, see Siebel System Administration Guide.

                                                                                                                                                                    This task is a step in Process of Administering Schedules Using Siebel Scheduler.

                                                                                                                                                                      Number of Tasks for Server Request Broker

                                                                                                                                                                      Each service region used keeps a Server Request Broker (alias SRBroker) task permanently running. You might have to increase the default MaxTasks parameter setting of 100 for the SBBroker server component when using more than approximately 70 service regions. This precaution prevents errors such as the following from appearing in the SRBroker log: The Multithreaded Server has reached the maximum number of concurrent tasks (100).

                                                                                                                                                                        Number of Tasks for Appointment Booking System

                                                                                                                                                                        The following table lists the recommended parameter settings for the Appointment Booking Engine (alias ApptBook) server component.

                                                                                                                                                                        Table Recommended Parameter Values for the Appt Book Server Component

                                                                                                                                                                        Parameter Alias Recommended Value

                                                                                                                                                                        Maximum Tasks

                                                                                                                                                                        MaxTasks

                                                                                                                                                                        10-20% of the total number of users who access the ABS.

                                                                                                                                                                        Minimum MT Servers

                                                                                                                                                                        MinMTServers

                                                                                                                                                                        The same as the number of entered servers in the Server Key Mapping view of the Administration - Scheduling screen.

                                                                                                                                                                        Maximum MT Servers

                                                                                                                                                                        MaxMTServers

                                                                                                                                                                        The same as the value for the Minimum MT Servers parameter.

                                                                                                                                                                        The ApptBook server component uses key-based routing. If you see an error message indicating that the maximum number of keys is reached, then you can use the Maximum Routing Keys parameter for this server component to increase the keys. For example, if you have 1,200 service regions, then you can increase the value of this parameter to 1,500.

                                                                                                                                                                          Reloading the ABS and Optimizer Caches

                                                                                                                                                                          Dispatchers and field service engineers can change the following specifications for service activities:

                                                                                                                                                                          • Planned start date for an activity

                                                                                                                                                                          • Planned end date for an activity

                                                                                                                                                                          • Engineer assigned to an activity (in the Employees field)

                                                                                                                                                                          Note: Planned End field, Planned Completion field, and End field designate the same date. All these fields appear in the user interface.

                                                                                                                                                                          All changes require updating the in-memory cache of the activities. If a user changes an activity in the Siebel database, then the activity is not the same as the activity in the in-memory cache. You can manually reload activity data into memory by clicking the Load button in the Activities view in the Service Region List view of the Administration - Scheduling screen. For more information, see Loading Activity Data for Service Regions.

                                                                                                                                                                          Users can also lock the scheduled time or assignment for an activity. For more information, see Locking Assignments and Schedules for Activities (End User).

                                                                                                                                                                          Caution: Keep manual changes to a minimum because the Optimizer works on the principles of constraint propagation and domain reduction. These principles are critical to solving complex schedules quickly. No activity that violates a hard constraint, including implicit constraints such as using the employee work schedules or excluding double-booking, can load into the memory cache. Therefore, the Optimizer might reject a manual change when it loads the activity. Even if the activity loads successfully, the Optimizer might later change the schedule for the activity.

                                                                                                                                                                          Reloading the ABS cache daily accomplishes the following tasks:

                                                                                                                                                                          • Old activities are released from the cache.

                                                                                                                                                                          • Manual activity changes are loaded to the cache.

                                                                                                                                                                          • Days in the future are available for booking. Any existing appointments are loaded into these days.

                                                                                                                                                                          To load employee and activity data for the service regions and reload the ABS and Optimizer caches, perform the following procedures:

                                                                                                                                                                          This task is a step in Process of Administering Schedules Using Siebel Scheduler.

                                                                                                                                                                            Guidelines for Reloading Data for Service Regions

                                                                                                                                                                            This topic provides guidelines for reloading service region data. For more information, see About Loading and Reloading Data for Service Regions.

                                                                                                                                                                            Use the following guidelines when reloading service region data:

                                                                                                                                                                            • Reload the caches daily, preferably after hours.

                                                                                                                                                                              The ABS - Days to End parameter controls the length of time in the ABS horizon. If this parameter is 14, and you do not reload the caches for 3 days, then you can book appointments for only 11 of the 14 days.

                                                                                                                                                                            • Reload the ABS before the Optimizer, so that there are no conflicts in scheduling between the ABS and the Optimizer.

                                                                                                                                                                            • Complete both reloads in the same day.

                                                                                                                                                                              Loading Employee Data for Service Regions

                                                                                                                                                                              A field service engineer can belong to only 1 service region. This rule applies because employee information is cached in memory for performance reasons. Also, if each Siebel Scheduler process has its own cache, then employee information cannot exist in more than 1 cache at a time. Otherwise, each instance of Siebel Scheduler produces conflicting schedules for the employee. Attempting to keep 2 service regions synchronized around common employees consumes heavy amounts of resources and is difficult to manage.

                                                                                                                                                                              Employee data is loaded with service region data into the ABS or Optimizer cache. You can manually load data, or the Workflow Manager can automatically load data. When activities are loaded, Assignment Manager retrieves the list of eligible employees, and the ABS or Optimizer loads this data.

                                                                                                                                                                              When you load the data for a new employee, the list of employees eligible for existing activities is not updated. The result is that the new employee might not be eligible to complete any of the existing activities, but is eligible for new activities. At the next reload of the service region and its employee data, the new employee is eligible for all activities.

                                                                                                                                                                              You specify service regions for employees by using the Service Region field in the Service Details view in the Employees view of the Administration - User screen. All the employees for a service region are then listed on the Employees view in the Service Region List view of the Administration - Scheduling screen.

                                                                                                                                                                              To manually load employee data for a service region

                                                                                                                                                                              1. Navigate to the Administration - Scheduling screen, then the Service Region List view.

                                                                                                                                                                              2. Drill down on the Name field for a selected service region, and click the Employees view tab.

                                                                                                                                                                              3. Select the employees to load for the service region.

                                                                                                                                                                              4. Click Load ABS.

                                                                                                                                                                                An asynchronous request is sent to the Optimizer to refresh the data for 1 or more selected employees in the ABS cache. You must manually initiate this command, or the Workflow Manager can automatically initiate this command. Do not use a repeating component job.

                                                                                                                                                                              You can remove data for an employee from the Appointment Booking System cache.

                                                                                                                                                                              To remove employee data from the ABS cache

                                                                                                                                                                              1. Navigate to the Administration - Scheduling screen, then the Service Region List view.

                                                                                                                                                                              2. Drill down on the Name field for a selected service region, and click the Employees view tab.

                                                                                                                                                                              3. Select an employee record.

                                                                                                                                                                              4. Click Unload ABS.

                                                                                                                                                                                An asynchronous request is sent to the Optimizer to remove the data. You must manually initiate this command. Do not use a repeating component job.

                                                                                                                                                                              Loading Activity Data for Service Regions

                                                                                                                                                                              Activity data for each service region must be loaded into the ABS or Optimizer cache. You can manually load data, or the Workflow Manager can automatically load data.

                                                                                                                                                                              You specify the service region for an activity in the Service Region field in the Schedule view in the Activity List view of the Activities screen. All the activities for a service region are then listed in the Activities view in the Service Region List view of the Administration - Scheduling screen.

                                                                                                                                                                              Use the Load button on the Activities view in the Service Region List view of the Administration - Scheduling screen to manually load activities for a selected service region. You can also use this button for Contract Scheduling. For more information, see About Running Contract Scheduling.

                                                                                                                                                                              Clicking the Load button sends an asynchronous request to the Siebel Server to load the selected activities into the ABS or Optimizer cache. The data goes to either the ABS or Optimizer cache. The values of the Planned Start field and Planned End field for an activity and the start and end times for the ABS and Optimizer horizons determine the cache.

                                                                                                                                                                              Note: Normally, use the Workflow Manager instead of the Load button to load activities.

                                                                                                                                                                              Before clicking the Load button, make sure that the following conditions apply:

                                                                                                                                                                              Administrators must also load employee data to the ABS or Optimizer cache. For more information, see Loading Employee Data for Service Regions.

                                                                                                                                                                              To manually load activity data for a service region

                                                                                                                                                                              1. Navigate to the Administration - Scheduling screen, then the Service Region List view.

                                                                                                                                                                              2. Drill down on the Name field for a selected service region, and click the Activities view tab to view the activities.

                                                                                                                                                                              3. Select the activities that you want to load for the service region.

                                                                                                                                                                              4. Click Load.

                                                                                                                                                                              Moving Activities Between Service Regions

                                                                                                                                                                              An employee can belong to only 1 service region. However, an employee can perform activities in other service regions. For example, an engineer is based in the San Francisco service region. Today is a light day for the engineer, but the San Jose service region is completely scheduled. You can handle this situation by manually scheduling activities for the engineer using the Dispatch Board. However, the Optimizer can schedule the engineer in the San Jose service region, but you must move the activity between service regions.

                                                                                                                                                                              You can create a button or workflow that completes the following procedure. Alternatively, the Workflow Manager can initiate this process when an activity from Service Region 1 is rejected.

                                                                                                                                                                              To move an activity between service regions

                                                                                                                                                                              1. Cancel the activity from Service Region 1 (for example, San Francisco).

                                                                                                                                                                              2. Set the activity to Service Region 2 (for example, San Jose).

                                                                                                                                                                              3. Load the activity into Service Region 2.

                                                                                                                                                                              Reloading Data for Service Regions to the Appointment Booking System Cache

                                                                                                                                                                              Perform the following procedure to reload the ABS cache with all the data for a selected service region. If a data row limit is imposed, then all the data might not load into the ABS cache. For more information, see Overriding the Data Row Limit.

                                                                                                                                                                              To reload data for a service region to the ABS cache

                                                                                                                                                                              1. Navigate to the Administration - Scheduling screen, then the Service Region List view.

                                                                                                                                                                              2. Select a service region.

                                                                                                                                                                              3. Click Load ABS.

                                                                                                                                                                                All data is erased for a service region in the ABS cache and reloaded from the Siebel database. For each service region, this process uses an asynchronous request to the Siebel Server.

                                                                                                                                                                              Overriding the Data Row Limit

                                                                                                                                                                              When you restart the ApptBook component, or click the Load ABS button, all the data in the service region must load into the ABS cache. If a limit of 10,000 rows is imposed, and the service region has more than 10,000 activity records, then all the required activity data does not load. To resolve this issue, override the data row limit.

                                                                                                                                                                              To override the data row limit

                                                                                                                                                                              1. Create a new Named Subsystem for the ABS.

                                                                                                                                                                              2. Set the DSMaxFetchArraySize parameter to -1.

                                                                                                                                                                                You set the parameter to this value to impose no limits on the number of allowed records.

                                                                                                                                                                              Coalescing the Appointment Booking System

                                                                                                                                                                              You can improve appointment schedules by coalescing the ABS to remove time gaps from between scheduled appointments. You complete this asynchronous request for 1 service region at a time.

                                                                                                                                                                              To coalesce the ABS

                                                                                                                                                                              1. Navigate to the Administration - Scheduling screen, then the Service Region List view.

                                                                                                                                                                              2. Select a service region.

                                                                                                                                                                              3. Click Coalesce ABS.

                                                                                                                                                                              Reloading Data for Service Regions to the Optimizer Cache

                                                                                                                                                                              You can reload the Optimizer cache with all data for a selected service region. For more information about running the Optimizer on a service region schedule, see Optimizing Schedules (End User).

                                                                                                                                                                              To reload data for a service region to the Optimizer cache

                                                                                                                                                                              1. Navigate to the Administration - Scheduling screen, then the Service Region List view.

                                                                                                                                                                              2. Select a service region.

                                                                                                                                                                              3. Click Load Optimizer.

                                                                                                                                                                                All data is erased for a service region in the Optimizer cache and reloaded from the Siebel database. For each service region, this process uses an asynchronous request.

                                                                                                                                                                                When an optimization is in progress, this request is not sent to the server. The user receives an error message.

                                                                                                                                                                              Creating Workflows to Reload Data for Service Regions to the Appointment Booking System Cache

                                                                                                                                                                              You can automatically reload service regions by using the predefined Server Requests business service to call the Appointment Booking Engine server component (alias ApptBook). You can set up a workflow process to submit the server job to ApptBook. For more information about setting up workflows, see Siebel Business Process Framework: Workflow Guide. For more information about creating repeating component jobs, see Siebel System Administration Guide. For more information about the various input arguments that the ABS methods use and about the values that the ABS methods return, see Methods for the ABS and About Calling the ABS and Optimizer Methods.

                                                                                                                                                                              You can also set up workflows to specifically handle the following situations:

                                                                                                                                                                              • Unscheduled activities. If the capacity in a service region changes (due to personnel changes or manual changes), then some activities can be unscheduled during a reload. To handle these unscheduled activities, you can create a workflow that sends an email to the service region manager about the unscheduled activities or that creates an activity to perform rescheduling with a customer.

                                                                                                                                                                                Note: You can also set up a predefined query to find those activities with a value of Unscheduled in the Status field.
                                                                                                                                                                              • Manual changes. If the users make manual changes to activities, and these changes must appear in the cache immediately (without waiting for the next reload), then you can create a workflow that calls the LoadActivities method when the Owner, Planned Start, or Planned End field values change.

                                                                                                                                                                              Caution: When loading the ABS, use either Siebel eScript or a workflow process. Do not use the Appointment Booking Service business service for this purpose.

                                                                                                                                                                              To create a workflow to automatically reload data for service regions

                                                                                                                                                                              1. Create a workflow process with the following steps:

                                                                                                                                                                                • Start

                                                                                                                                                                                • Business Service

                                                                                                                                                                                • End

                                                                                                                                                                              2. To define the Business Service step, specify the Server Requests business service and SubmitRequests method.

                                                                                                                                                                                Caution: You can use the Server Requests, Asynchronous Server Requests, or Synchronous Server Requests business services to submit a request to the Appointment Booking Engine. However when using any of these business services in Siebel eScript or in a workflow, you must provide an appropriate value for the Request Key input argument in the SubmitRequests method. The value of this input argument is the Service Region ID value of the activity. You can map each service region to a different process number. The business service must use the Request Key value to identify the correct ABS process to which to send each request. Without the Request Key input argument, the request might be sent to the wrong ABS process, causing the Appointment Booking Engine to return an error message. For more information, see Setting Up Server Key Mappings.
                                                                                                                                                                              3. Define the input arguments in the following table.

                                                                                                                                                                                Input Argument Type Value

                                                                                                                                                                                Appt.SvcRegnId

                                                                                                                                                                                Literal

                                                                                                                                                                                The required ROW_ID for the service region.

                                                                                                                                                                                Request Key

                                                                                                                                                                                Literal

                                                                                                                                                                                The required ROW_ID for the service region.

                                                                                                                                                                                Component

                                                                                                                                                                                Literal

                                                                                                                                                                                ApptBook.

                                                                                                                                                                                Method

                                                                                                                                                                                Literal

                                                                                                                                                                                ReloadServiceRegion.

                                                                                                                                                                                Mode

                                                                                                                                                                                Literal

                                                                                                                                                                                Sync or Async:

                                                                                                                                                                                • Use Sync if you want the workflow process to wait for the ABS to finish.

                                                                                                                                                                                • se Async if you want the workflow process to submit requests to the ABS and then end the workflow without determining whether the ABS successfully reloaded the service region.

                                                                                                                                                                              4. Deploy and activate the workflow process.

                                                                                                                                                                              5. Create a new repeating component job, and select Workflow Process Manager as the Component/Job field value.

                                                                                                                                                                              6. Create a new job parameter, and specify Workflow Process Name in the Name field and the name of the workflow process (ReloadServiceRegion) in the Value field.

                                                                                                                                                                              7. Start the job.

                                                                                                                                                                                A new instance of the job is created with a Queued status. When the start date arrives, the queued instance is executed.

                                                                                                                                                                              Process of Managing Schedules Using Siebel Scheduler

                                                                                                                                                                              The following list shows the tasks that end users typically perform to manage schedules. Your company might follow a different process according to its business requirements.

                                                                                                                                                                              To manage schedules, end users perform the following tasks:

                                                                                                                                                                                Adding Schedule Information to Activities (End User)

                                                                                                                                                                                You can add to activities the schedule information that the Optimizer and ABS require. For more information about setting up and recording activities, see Service Activities.

                                                                                                                                                                                This task is a step of Process of Managing Schedules Using Siebel Scheduler.

                                                                                                                                                                                To add schedule information to an activity

                                                                                                                                                                                1. Navigate to the Activities screen, then the Activity List view.

                                                                                                                                                                                2. Drill down on the Type field for a selected activity.

                                                                                                                                                                                3. Click the Schedule view tab.

                                                                                                                                                                                4. Complete the form fields as appropriate.

                                                                                                                                                                                  Some fields are described in the following table.

                                                                                                                                                                                  Field Comments

                                                                                                                                                                                  Service Region

                                                                                                                                                                                  Select the service region for the activity.

                                                                                                                                                                                  Work Time

                                                                                                                                                                                  Type the time needed to complete the activity, not including breaks and travel time.

                                                                                                                                                                                  To see the difference between the work time and duration, consider an example. A company schedule is from 9:00 A.M. to 1:00 P.M. and from 2:00 P.M. to 6:00 P.M. The scheduled activities last for 6 hours and can contain breaks. If a dispatcher starts an appointment at 4:00 P.M., then the activity finishes at 1:00 P.M. the next day. The work time is 6 hours, but the duration is 21 hours.

                                                                                                                                                                                  Duration

                                                                                                                                                                                  Select the time required to complete the activity, including breaks and travel time.

                                                                                                                                                                                  The ABS or Optimizer sets the value in this field to the Planned End field less the Planned Start field.

                                                                                                                                                                                  Earliest Start

                                                                                                                                                                                  Select the earliest time and date the activity can begin. This field usually indicates contractual commitments or deadlines. In some configuration settings, this field is described as NST (No Sooner Than).

                                                                                                                                                                                  When you use the ABS to schedule the activity, this field is populated with the slot start time for the record that you select from the time slots that the ABS provides.

                                                                                                                                                                                  Latest Start

                                                                                                                                                                                  Select the latest time and date the activity can begin. This field usually indicates contractual commitments or deadlines. In some configuration settings, this field is described as NLT (No Later Than).

                                                                                                                                                                                  When you use the ABS to schedule the activity, this field is populated with the slot end time for the record that you select from the time slots that the ABS provides.

                                                                                                                                                                                  For reactive calls, Earliest Start field and Latest Start field represent the contractually committed date and time for service. For proactive calls, these fields represent when a customer is available for service.

                                                                                                                                                                                  Planned Start

                                                                                                                                                                                  Select the planned time for starting the activity. The service organization and the field service engineer usually know this time. Depending on the service business model, employees might communicate this time to the customer.

                                                                                                                                                                                  If you specify values for the Earliest Start or Latest Start fields, then the Planned Start field must be later than the Earliest Start field and earlier than the Latest Start field.

                                                                                                                                                                                  When you use the ABS to schedule the activity, this field is populated with the planned start time for the record that you select from the time slots that the ABS provides.

                                                                                                                                                                                  Planned End

                                                                                                                                                                                  Select the planned time for completing the activity. This field also appears as Planned Completion in the user interface.

                                                                                                                                                                                  When you use the ABS to schedule the activity, this field is populated with the value in the Planned Start field plus the duration of the activity.

                                                                                                                                                                                  Lock Assignment

                                                                                                                                                                                  Select this check box to indicate the Optimizer cannot reassign the activity.

                                                                                                                                                                                  Note: If you do not select this check box, then specify the employee for an activity. For more information, see Locking Assignments and Schedules for Activities (End User).

                                                                                                                                                                                  Allow Breaks

                                                                                                                                                                                  Select this check box to allow scheduling of the activity around breaks. For more information, see Breaks.

                                                                                                                                                                                  Lock Schedule

                                                                                                                                                                                  Select this check box to prevent the ABS and the Optimizer from changing the values in the Planned Start and Planned End fields.

                                                                                                                                                                                  Note: If you select this check box, then provide values in the Planned Start and Planned End fields. In this case, no time slots are required, and the Book Appointment dialog box does not appear. For more information, see Locking Assignments and Schedules for Activities (End User).
                                                                                                                                                                                5. (Optional) If you want to navigate to the MapQuest Web site, then click Account Address Map.

                                                                                                                                                                                  Siebel does not guarantee the availability or accuracy of any content or service that MapQuest provides.

                                                                                                                                                                                  Booking Appointments for Activities Using Siebel Scheduler (End User)

                                                                                                                                                                                  Customer service representatives can click a button to obtain a list of appointment choices for a selected activity. Clicking this button runs the ABS.

                                                                                                                                                                                  Before booking an appointment, make sure that the activity is associated with a work time and service region and that the activity is not repeating.

                                                                                                                                                                                  Note: Do not use the ABS to schedule appointments that are far in the future (for example, preventive maintenance activities that are 6 months in the future). For more information about ABS horizons and long-range appointments, see About Schedule Horizons and Time Zones.

                                                                                                                                                                                  Booking appointments and optimizing the schedule for activities requires the following data:

                                                                                                                                                                                  • Service regions

                                                                                                                                                                                  • Existing activities and appointments

                                                                                                                                                                                  • Service region parameters

                                                                                                                                                                                  • Service activities

                                                                                                                                                                                  • Employees

                                                                                                                                                                                  • System parameters

                                                                                                                                                                                  • Parts that are available to employees

                                                                                                                                                                                  • Constraints

                                                                                                                                                                                  • Schedules for service regions and employees

                                                                                                                                                                                  • Time windows

                                                                                                                                                                                  • Scheduling parameters

                                                                                                                                                                                  • A cost function

                                                                                                                                                                                  This topic contains the following information:

                                                                                                                                                                                  This task is a step of Process of Managing Schedules Using Siebel Scheduler.

                                                                                                                                                                                    Booking Appointments from the Activities Screen

                                                                                                                                                                                    The Schedule view in the Activity List view of the Activities screen provides the Book Appointment and Cancel Appointment buttons for interactively running the ABS and Optimizer. For more information about canceling a scheduled appointment, see Canceling Appointments for Activities (End User).

                                                                                                                                                                                    To book an appointment from the Activities screen
                                                                                                                                                                                    1. Navigate to the Activities screen, then the Activity List view.

                                                                                                                                                                                    2. Drill down on the Type field for a selected activity.

                                                                                                                                                                                    3. Click the Schedule view tab.

                                                                                                                                                                                    4. Click Book Appointment.

                                                                                                                                                                                      A synchronous request is sent to the ABS for time slots in which to book the selected activity. The available appointments are returned in a dialog box.

                                                                                                                                                                                      Note: If you do not specify values in Earliest Start or Latest Start fields for the activity, then the ABS - Days to Start and ABS - Days to End parameter values, and the schedule for the service region, are used for these values. For example, if today is March 16th, the ABS - Days to End parameter is 1, and the start time for the service region is 8:00 A.M., then the earliest start is 8:00 A.M. on March 17th. Unless the service region is extremely full, the value of the ABS - Days to End parameter does not apply. The activity does not have to end before the time for Latest Start field, but it must start before that time.
                                                                                                                                                                                    5. In the dialog box, complete either of the following steps:

                                                                                                                                                                                      • To confirm an appointment, select an appropriate record, and click Confirm.

                                                                                                                                                                                        A server request is sent to confirm the selected appointment and release the lock on the remaining appointment slots.

                                                                                                                                                                                      • If you do not want to select any of the available appointments, then click Cancel.

                                                                                                                                                                                        A server request is sent to reject all proposed appointment slots and to release the lock on these slots.

                                                                                                                                                                                        Tip: You do not have to cancel an activity before rebooking it for another time. Instead, you can click the Book Appointment button. When you confirm a time slot, the old time slot is automatically released in the ABS. You click the Cancel Appointment button when you want to cancel an appointment and not rebook it.

                                                                                                                                                                                      Booking Appointments from the Service Screen

                                                                                                                                                                                      The Activities view in the Service Request List view of the Service screen provides the Book Appt and Cancel Appt buttons for running the ABS. The Activities view displays the activities associated with service requests.

                                                                                                                                                                                      To book an appointment from the Service screen
                                                                                                                                                                                      1. Navigate to the Service screen, then the Service Request List view.

                                                                                                                                                                                      2. Drill down on the SR number (#) field for a selected service request.

                                                                                                                                                                                      3. In the Activities list, select an activity record.

                                                                                                                                                                                      4. Click Book Appt.

                                                                                                                                                                                      5. In the dialog box, select and confirm an appointment, or cancel if no appointments are appropriate.

                                                                                                                                                                                        For more information about using the Book Appointments dialog box, see Booking Appointments from the Activities Screen in Booking Appointments from the Activities Screen.

                                                                                                                                                                                        Canceling Appointments for Activities (End User)

                                                                                                                                                                                        To cancel an appointment, set the service region, and make sure the activity is not repeating and that the range indicated by the Planned Start and Planned End fields is not in the Glued period. If the Cancel Appt request is successful, then the fields for the activity do not change except for the Status field. This field is set to Cancelled.

                                                                                                                                                                                        The choice of sending the Cancel Appt request to the ABS or the Optimizer depends on the following conditions:

                                                                                                                                                                                        • If the times for the Planned Start and Planned End fields are earlier than the start time for the ABS horizon, then send a request to the Optimizer.

                                                                                                                                                                                        • If the time for the Planned Start field is earlier than the start time for the ABS horizon, and the time for Planned End field is later than the start time for the ABS horizon, then send a request to the Optimizer and the ABS.

                                                                                                                                                                                        • If the time in the Planned Start field is later than or the same as the start time for the ABS horizon, and the time for the Planned End field is earlier than the end time of the ABS horizon, then send a request to the ABS.

                                                                                                                                                                                        This topic contains the following related information:

                                                                                                                                                                                        This task is a step of Process of Managing Schedules Using Siebel Scheduler.

                                                                                                                                                                                          Canceling Appointments from the Activities screen

                                                                                                                                                                                          You can cancel an activity appointment from the Activities screen.

                                                                                                                                                                                          To cancel an activity appointment from the Activities screen

                                                                                                                                                                                          1. Navigate to the Activities screen, then the Activity List view.

                                                                                                                                                                                          2. Drill down on the Type field for a selected activity.

                                                                                                                                                                                          3. Click the Schedule view tab.

                                                                                                                                                                                          4. Click Cancel Appointment.

                                                                                                                                                                                            Canceling Appointments from the Service Screen

                                                                                                                                                                                            You can cancel an activity appointment from the Service screen.

                                                                                                                                                                                            To cancel an activity appointment from the Service screen

                                                                                                                                                                                            1. Navigate to the Service screen, then the Service Request List.

                                                                                                                                                                                            2. Drill down on the SR number (#) field for a selected service request.

                                                                                                                                                                                            3. In the Activities list, select an activity record.

                                                                                                                                                                                            4. Click Cancel Appt.

                                                                                                                                                                                              A synchronous request is sent to the ABS or the Optimizer to cancel the appointment, release the appointment for other schedules, and set the status of the selected activity to Cancelled.

                                                                                                                                                                                              The request is sent to the ABS or Optimizer, depending on the horizon that contains the activity. If the range indicated by the Planned Start and Planned End fields overlaps the ABS and the Optimizer horizons, then the request goes to both the ABS and Optimizer.

                                                                                                                                                                                              Locking Assignments and Schedules for Activities (End User)

                                                                                                                                                                                              Users can select the following check boxes for an activity to lock its assignment and scheduled time:

                                                                                                                                                                                              • Lock Assignment check box. When you select this check box, the Optimizer cannot change the assignment in Employees field on the activity. However, you can manually change this value.

                                                                                                                                                                                              • Lock Schedule check box. When you select this check box, the ABS or the Optimizer cannot change the values for Planned Start and Planned End fields on the activity. However, you can manually change these values.

                                                                                                                                                                                              Even if you select these check boxes, an activity can be rejected from the schedule if it violates a hard constraint. Oracle Real-Time Scheduler automatically cancels the activity and sends the cancel status back to Siebel CRM. However, the Optimizer does not attempt to change the Planned Start, Planned End, or Employees fields for the activity so that the activity remains on the user calendar. Reducing the number of hard constraints used in the schedule can minimize the possibility of rejecting an activity.

                                                                                                                                                                                              Note: It is recommended that you select the Lock Assignment and Lock Schedule check boxes for activities with a status of Done.

                                                                                                                                                                                              When an activity violates a hard constraint, the Lock Assignment and Lock Schedule check boxes are both selected, and the activity is not loaded into memory or updated.

                                                                                                                                                                                              The following table describes the general behavior of the ABS and the Optimizer for the Lock Assignment and Lock Schedule check boxes.

                                                                                                                                                                                              Table Behavior of ABS and Optimizer for Lock Assignment and Lock Schedule Check Boxes

                                                                                                                                                                                              Lock Assignment Lock Schedule Behavior

                                                                                                                                                                                              No

                                                                                                                                                                                              No

                                                                                                                                                                                              The ABS can change both the time and owner when loading. The Optimizer can change both the time and owner when optimizing.

                                                                                                                                                                                              Yes

                                                                                                                                                                                              No

                                                                                                                                                                                              The ABS can change the time but not the owner when loading. The Optimizer can change the time but not the owner when optimizing.

                                                                                                                                                                                              No

                                                                                                                                                                                              Yes

                                                                                                                                                                                              The ABS can change the owner but not the time when loading. The Optimizer can change the owner but not the time when optimizing.

                                                                                                                                                                                              Yes

                                                                                                                                                                                              Yes

                                                                                                                                                                                              The ABS cannot change the time or owner when loading. The Optimizer cannot change the time or owner when optimizing.

                                                                                                                                                                                              The following table describes the effects of the Lock Assignment and Lock Schedule check boxes on appointment booking.

                                                                                                                                                                                              Table Effects of Lock Assignment and Lock Schedule Check Boxes on Appointment Booking

                                                                                                                                                                                              Lock Assignment Lock Schedule Behavior

                                                                                                                                                                                              No

                                                                                                                                                                                              No

                                                                                                                                                                                              The ABS returns multiple time slots for multiple employees.

                                                                                                                                                                                              Yes

                                                                                                                                                                                              No

                                                                                                                                                                                              The ABS checks only the calendar for the activity owner to return a list of available time slots.

                                                                                                                                                                                              No

                                                                                                                                                                                              Yes

                                                                                                                                                                                              Clicking the Book Appointment button does not return a list of time slots. Instead, the Insert Activity method (for Contract Scheduling) is called internally to insert the activity at its originally scheduled planned start and end. If the activity cannot be scheduled at that time, then a No Appointment message is returned to the user.

                                                                                                                                                                                              Yes

                                                                                                                                                                                              Yes

                                                                                                                                                                                              Clicking the Book Appointment button does not return a list of time slots. Instead, the Insert Activity method (for Contract Scheduling) is called internally to insert the activity at its originally scheduled planned start and end. If the activity cannot be scheduled at that time, then a No Appointment message is returned to the user.

                                                                                                                                                                                              The ABS performs validation before scheduling an activity. If the Lock Assignment check box is selected for an activity without an owner, then the ABS generates a validation error, and the activity is not loaded into the cache. The user must correct the error and rebook the appointment. Similarly, if the Lock Schedule check box is selected, then the Planned Start field and Planned End field must have a value before the user clicks the Book Appointment button. Otherwise, the ABS cannot find an appointment.

                                                                                                                                                                                              Note: During loading or when the Insert Activity method is called, if an activity with both check boxes selected cannot be scheduled, then the ABS does not reset the activity status to Unscheduled. The activity status remains unchanged. However, the activity is not present in the ABS cache. It appears as scheduled only in Siebel Field Service. The Insert Activity method is the same as the GetConfirmedAppointment method. For more information, see GetConfirmedAppointment Method.

                                                                                                                                                                                              This task is a step of Process of Managing Schedules Using Siebel Scheduler.

                                                                                                                                                                                              To lock assignments and schedules for an activity

                                                                                                                                                                                              1. Navigate to the Activities screen, then the Activity List view.

                                                                                                                                                                                              2. Drill down on the Type field for a selected activity.

                                                                                                                                                                                              3. Click the Schedule view tab.

                                                                                                                                                                                              4. To lock assignments, select the Lock Assignment check box.

                                                                                                                                                                                              5. To lock schedules, select the Lock Schedule check box.

                                                                                                                                                                                              Optimizing Schedules (End User)

                                                                                                                                                                                              You optimize schedules to efficiently use labor in your service organization. For more information about optimizing schedules, see About the Schedule Optimizer.

                                                                                                                                                                                              You can optimize the schedule for a service region by using either of the following methods:

                                                                                                                                                                                              This task is a step of Process of Managing Schedules Using Siebel Scheduler.

                                                                                                                                                                                                Using the Workflow Manager to Optimize Schedules

                                                                                                                                                                                                Scheduling is a business process. To use the Optimizer, you must fully integrate it into the normal process of delivering service. The Workflow Manager is the primary vehicle for this integration. For more information about the input arguments that the Optimizer methods use and about the values that the Optimizer methods return, see Business Service Methods for Fulfillment and About Calling the ABS and Optimizer Methods.

                                                                                                                                                                                                Most customers using the Optimizer use the Workflow Manager to accomplish the following tasks:

                                                                                                                                                                                                • Manually update a schedule.

                                                                                                                                                                                                • Lock in manual changes.

                                                                                                                                                                                                • Synchronize a schedule with manual changes.

                                                                                                                                                                                                • Update a schedule for contractual commitments.

                                                                                                                                                                                                • Notify a manager by email of rejected activities.

                                                                                                                                                                                                • Move activities to a secondary service region.

                                                                                                                                                                                                • Verify a declined assignment through mobile means and then reassign.

                                                                                                                                                                                                  Optimizing Schedules for Service Regions

                                                                                                                                                                                                  You can optimize a service region schedule.

                                                                                                                                                                                                  To optimize a schedule for a service region

                                                                                                                                                                                                  1. Navigate to the Administration - Scheduling screen, then the Service Region List view.

                                                                                                                                                                                                  2. Select a service region.

                                                                                                                                                                                                  3. Click Optimize.

                                                                                                                                                                                                    A request is sent to the Optimizer to run optimization on the selected service region. The Workflow Manager or repeating component jobs can start an optimization.

                                                                                                                                                                                                    Stopping Optimization of Schedules for Service Regions

                                                                                                                                                                                                    You can stop an ongoing optimization of a selected service region. Stopping an optimization might not happen immediately because the Optimizer completes the solution that is in process and saves the solution in the Siebel database.

                                                                                                                                                                                                    Note: You must manually stop an optimization. The Workflow Manager or repeating component jobs cannot send this command.

                                                                                                                                                                                                    To stop the optimization of a schedule for a service region

                                                                                                                                                                                                    1. Navigate to the Administration - Scheduling screen, then the Service Region List view.

                                                                                                                                                                                                    2. Select a service region.

                                                                                                                                                                                                    3. Click the menu button, and select Stop Optimization.

                                                                                                                                                                                                      About Availability of Parts

                                                                                                                                                                                                      Part availability is a constraint only for the Optimizer, not the ABS. Data loaded into the Optimizer cache includes all trunk inventories for all field service engineers in a service region.

                                                                                                                                                                                                      The Optimizer - Consider Parts parameter uses the part availability in the trunk inventory for an engineer when considering the engineer for assignment to an activity. The Optimizer - Parts Period parameter determines the number of hours that the loaded part list is valid for an optimization. For more information, see Defining Cost Functions for the Optimizer and Parameters for Schedules.

                                                                                                                                                                                                      If the Optimizer considers part availability, and if the activity includes a part with an order line item number, then you can drop-ship the part for the service call. The Optimizer does not consider the part as a constraint in scheduling.

                                                                                                                                                                                                      Note: To use parts in a trunk inventory for a service call, the parts must have a Status field of Good and an Availability field of On Hand.

                                                                                                                                                                                                        About Optimization and Activity Statuses

                                                                                                                                                                                                        The Optimizer can change the status of activities to obtain the best scheduling.

                                                                                                                                                                                                        When you click the Load Optimizer button in the Service Region List view of the Administration - Scheduling screen, the Optimizer loads activities (with associated statuses) from the Siebel database. Likewise, when you click the Load button in the Activities view in the Service Region List view of the Administration - Scheduling screen, the Optimizer loads the activity (with the associated status) from the Siebel database.

                                                                                                                                                                                                        If you change the status of an activity, immediately click the Load Optimizer button or the Load button, and click the Optimize button in the Service Region List view of the Administration - Scheduling screen, then the changed activity status is in effect after the Optimizer runs.

                                                                                                                                                                                                        However, the Optimizer can change the status of activities. So if you change the status of an activity and do not click the Load Optimizer button or the Load button, then the changed activity status can revert to the status value in the Optimizer cache if the Optimizer runs again.