9Dispatch Board
Dispatch Board
This chapter provides information about setting up and using the Dispatch Board. It includes the following topics:
About the Dispatch Board
The Dispatch Board screen includes an interface for selecting employees to complete activities and manually scheduling these activities.
Generally, businesses use the Dispatch Board in the following ways:
Local dispatch. A local business uses the Dispatch Board. A local service manager uses the Dispatch Board to manually schedule activities. The dispatcher is familiar with the territory (or territories) and the employees. For more information about this method, see About the Process Flows for Dispatch Board Scheduling.
Centralized dispatch. A geographically disperse business with a centralized, dedicated dispatch team uses the Dispatch Board. The dispatch personnel search for and schedule employees according to their skill and their proximity to activities. For more information about this method, see About the Process Flows for Dispatch Board Scheduling.
About the Process Flows for Dispatch Board Scheduling
The following figure shows the process flows for local dispatch procedures and for centralized dispatch procedures.
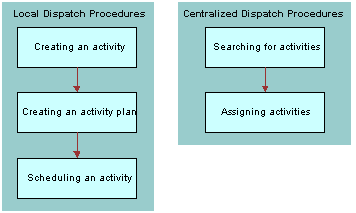
In a local dispatch situation, the dispatcher creates an activity, creates an activity plan, and then schedules an activity. In the centralized dispatch situation, the dispatcher searches for activities and then assigns activities. This topic includes details about each task in these situations.
Local Dispatcher tasks for Scheduling Activities
Local dispatchers can perform the following tasks to schedule activities:
Create an activity. For more information, see Creating Service Activities (End User).
Create an activity plan. For more information, see Service Activity Templates and Activity Plans.
Schedule an activity. For more information, see Assigning Activities to Field Service Engineers (End User).
Central Dispatcher Tasks for Scheduling Activities
Central dispatchers can perform the following tasks to schedule activities:
Search for activities. They search for activities in the Unscheduled Activities list of the Dispatch Board.
Assign activities. For more information, see Assigning Activities to Field Service Engineers from the Dispatch Board.
About Using the Dispatch Board
The Dispatch Board provides an interface for manually assigning and scheduling service activities. The Dispatch Board includes the following sections:
Gantt chart (at the start of the Dispatch Board)
Unscheduled Activities list (at the end of the Dispatch Board)
To schedule activities, you relocate activities from the Unscheduled Activities list to the Gantt chart as follows: you select the activities from the Unscheduled Activities list and without releasing the selection, then move the activities to the Gantt chart. You can use specific features of the Gantt chart and the Unscheduled Activities list to improve activity scheduling.
Displayed Schedule Information
The Dispatch Board queries the Siebel database for the schedule information so that it can show any date and time range that the user wants to see. It does not show the content in the Appointment Booking System (ABS) and Optimizer caches. The ABS immediately writes any changes to the Siebel database so that the activities in the Siebel database reflect the cache content. However, activities that you move to the Dispatch Board are not automatically loaded into the cache. For more information, see Scheduling Using Siebel Scheduler and About Rescheduling Appointments on the Dispatch Board.
Gantt Chart
The Gantt chart shows the scheduled and unscheduled time periods for a group of employees associated with a service region. The chart is divided by a frame boundary into two frames as follows:
First frame. Lists employees and related information that helps users to select employees for activities. To see all of the information in this frame, select the frame boundary and without releasing the selection, then move the frame boundary out.
Second frame. Shows the activities associated with employees in different time periods, and appears in a calendar format. Activities appear in colors that represent priority, status, and type. For more information, see Setting User Preferences for the Dispatch Board(End User). To zoom in or out on a time period in this frame, click a zoom interval (1/4, 1/2, 1, 2, or 4) at the start of the Gantt chart.
The second frame is positioned beside the first frame.
The date (or the first date of the date range) and service region of the Gantt chart default to the values that you set most recently using the following methods:
From the application-level menu, select Tools, then User Preferences. On the link bar, click Dispatch Board, and select the appropriate options. If you select a value of Today in the Date Shown field, then the date (or the first date of the date range) on the Gantt chart is today. If you select a value of Last Date Chosen in the Date Shown field, then the date (or the first date of the date range) on the Gantt chart is the date that displayed when you last accessed the Dispatch Board.
From the Activities List view of the Activities screen, drill down on the Status field for an activity. The date (or the first date of the date range) on the Gantt chart defaults to the field values in the Schedules view of the just-visited activity. This date is the Planned Start date field for the activity. If this field contains no data, then this date is the Earliest Start date field for the activity. If this field contains no data, then this date is the date designated in the user preferences for the Dispatch Board. The service region on the Gantt chart of the Dispatch Board defaults to the Service Region field for the activity. If this field contains no data, then the Gantt chart contains no data.
The Gantt chart data is associated with a designated service region. Each service region is associated with a time zone. To change the service region and time zone for the Gantt chart data, click the Select Service Region button.
Unscheduled Activities List
By default, the Unscheduled Activities list displays all activities that have a status value of Unscheduled. To change the number of records that appear on the list, click the show more button and the show less button.
In addition to unscheduled activities, you can select the following views in the visibility filter:
Declined Activities
Timed Out Activities
Not Acknowledged Activities
About Rescheduling Appointments on the Dispatch Board
You can reassign or reschedule any activity on the Gantt chart by selecting the activity and then moving the activity, but these activities are not automatically loaded into the Appointment Booking System (ABS).
You can override the drag-and-drop business service (which is used to relocate activities) to attempt activity loads and provide real-time feedback, but manual and automated scheduling do not combine well. When loading activities into an existing schedule, Siebel Scheduler does not attempt to schedule activities currently in the same time slot because the coding logic for these types of decisions is implemented on only a case-by-case basis. Large numbers of users simultaneously attempting to manually schedule activities (by selecting the Lock Assignment or Lock Schedule check boxes) creates conflicts and a brittle schedule that you cannot easily change if you move people. For more information about these check boxes, see Locking Assignments and Schedules for Activities (End User).
Process of Administering the Dispatch Board
The following list shows the tasks that administrators typically perform to administer the Dispatch Board. Your company might follow a different process according to its business requirements.
To administer the Dispatch Board, administrators perform the following tasks:
Set up rules for Assignment Manager. For more information about assignment rules, see Siebel Assignment Manager Administration Guide.
Associate service regions and schedules with employees. For more information, see Defining Schedules and Availability for Employees.
Define employee exception hours. For more information, see Setting Exception Hours.
Assign responsibilities to employees. For more information, see Siebel Applications Administration Guide.
Change the system preference for the Dispatch Board. For more information, see Changing the System Preference for the Dispatch Board.
Configure assignment scores for the Gantt chart of the Dispatch Board. For more information, see Configuring Assignment Scores for the Dispatch Board Gantt Chart.
Add users with dispatcher responsibility. For more information, see Setting Up Dispatcher Users.
Changing the System Preference for the Dispatch Board
The Dispatch Board allows a dispatcher or customer service representative to select an activity from the Unscheduled Activities list and then move the activity to a block of time and employee on the Gantt chart. If the service region of the activity is different from the selected service region for the Gantt chart, then the following settings for the FSDB:Override Service Region system preference determine the result:
If the value of the system preference is TRUE, then the dispatcher can drop the activity on the Gantt chart, and the service region for the activity is automatically changed to the selected service region for the Gantt chart.
If the value of the system preference is FALSE, then the dispatcher cannot drop the activity on the Gantt chart, and an error is returned.
This task is a step in Process of Administering the Dispatch Board.
To changing the system preference for the Dispatch Board
Navigate to the Administration - Application screen, then the System Preferences view.
Select the FSDB:Override Service Region system preference.
In the System Preference Value field, enter TRUE or FALSE.
To implement changes to system preferences, restart the Field Service server.
Configuring Assignment Scores for the Dispatch Board Gantt Chart
The Score field on the Gantt chart of the Dispatch Board displays scores that indicate the degree to which the skills of each employee match the skills that are required to complete an activity. This field is populated for all employees on the Gantt chart when you select an activity and click the Assignment Score button.
The value of the assignment score for an employee on the Gantt chart is calculated as follows:
(Score that is associated with the assignment rule for the selected activity on the Gantt chart) plus (Score that is associated with the assignment rule for that employee)
However, the score that is associated with the assignment rule for the employee is not included in the calculation if this score does not exceed the Candidate Passing Score field value for the employee in the assignment rule.
This task is a step in Process of Administering the Dispatch Board.
To configure the assignment scores for the Dispatch Board Gantt chart
Enable the Assignment Manager server component group.
For more information about enabling server component groups, see Siebel System Administration Guide.
Make sure that the appropriate schedule, schedule hours, parameter set, time window, and service region are set up.
For more information about this setup, see Scheduling Using Siebel Scheduler
Associate the appropriate employees with the schedule and service region.
Set up an assignment rule, criteria, employee candidates, and scores.
For more information about this setup, see Siebel Assignment Manager Administration Guide.
Setting Up Dispatcher Users
Siebel Field Service includes responsibilities for employees. Responsibilities determine the views that employees can access. Employees see only the views that they need to complete their job. An employee with the responsibility of a dispatcher can assign activities to employees. For more information about responsibilities and visibility, see Siebel Applications Administration Guide.
This task is a step in Process of Administering the Dispatch Board.
To set up a dispatcher user
Navigate to the Administration - Application screen, then the Responsibilities view.
In the Responsibilities list, select the Dispatcher record.
If this record is not in the list, then create a new record with the responsibility of Dispatcher.
To add the name of the employee for the Dispatcher role, create a new user record in the Users list.
In the Views list, make sure that the selected user can access the following views:
FS AxGanttChart View
FS AxGanttChart Declined View
FS AxGanttChart Timed Out View
FS AxGanttChart Not Acknowledged View
These views are associated with the applet for the Gantt chart.
Process of Configuring the Dispatch Board
Developers can configure any Dispatch Board enhancements that dispatchers need to efficiently perform their job.
To configure the Dispatch Board, developers perform the following tasks:
Displaying Additional Information on the Y-Axis of the Dispatch Board Gantt Chart
Changing Displayed Tooltip Details on the Dispatch Board Gantt Chart
Creating Time Zoom Intervals on the Dispatch Board Gantt Chart
Enabling Applets for Relocation to the Dispatch Board Gantt Chart
Adding User Preference Colors to the Dispatch Board Gantt Chart
Configuring Colors for Activities on the Dispatch Board Gantt Chart
Changing Colors for Periods on the Dispatch Board Gantt Chart
Restricting the Displayed Employees on the Dispatch Board Gantt Chart
Changing Colors for Employee Name Text on the Dispatch Board Gantt Chart
Optimizing Display Speeds for the Dispatch Board
To speed up the display of the Dispatch Board, the Dispatch Board user interface component gets activity data from a cache and not from the Siebel database. You can further improve the display speed of the Dispatch Board by changing the cache size.
With a large cache, a user can retrieve more data without accessing the Siebel database. Thus, a larger cache size increases the display speed of the Dispatch Board. However, a larger cache also requires more browser memory.
The cached data is valid only until the user navigates from the Dispatch Board screen to another screen. Each time the user navigates back to the Dispatch Board screen, the cache is reloaded.
The following table shows the default cache settings for the time scale identifiers that are associated with major time value and minor time value combinations. To increase the cache size, you increase the default cache setting for the time scales. For more information about customizing the cache size for time scales, see Configuring Siebel Open UI.
Table Default Cache Settings for Time Scale Values
| Major Time Value | Minor Time Value | Time Scale Identifier | Default Cache Setting |
|---|---|---|---|
Day |
Quarter Hour |
4096 |
2 |
Day |
Half Hour |
2048 |
2 |
Day |
Hour |
4 |
2 |
Day |
2 Hours |
512 |
2 |
Day |
4 Hours |
1024 |
2 |
Week |
Day |
1 |
1 |
Month |
Day |
64 |
0 |
Month |
Week |
32768 |
0 |
Year |
Week |
16384 |
0 |
Year |
Month |
8192 |
0 |
This task is a step in Process of Configuring the Dispatch Board.
Displaying Additional Information on the Y-Axis of the Dispatch Board Gantt Chart
Generally, employee names appear on the y-axis of the Gantt chart of the Dispatch Board. If dispatchers want to see additional information, then the administrator must configure the Dispatch Board. The following example tasks describe how to add a new work phone number field to the y-axis information on the Gantt chart of the Dispatch Board. For more information about performing configuration tasks with Siebel Tools, see Using Siebel Tools.
To display phone number information on the y-axis of the Gantt chart of the Dispatch Board, perform the following procedures:
This task is a step in Process of Configuring the Dispatch Board.
Creating a New Field on the Business Component
Perform the following procedure to create a new field on the Employee business component.
To create a new field on the business component
Log in to Siebel Tools or Web Tools as an administrator (see Using Siebel Tools).
Create a workspace.
Lock the Employee project for editing.
In Object Explorer, navigate to Business Component, and query for the Employee business component.
Navigate to Business Component, then Field, and query for the Phone number (#) field.
Copy the record, and name the new record Phone.
Caution: The hash symbol (#) is a special character in the Dispatch Board user properties, so do not include this symbol in the name of any new fields that you create in the Dispatch Board.
Creating the Applet User Properties
Perform the following procedure to create a new applet user property named Pane 0 Field 6 and applet user properties for the new column.
To create the applet user properties
Lock the FS Dispatch Board project for editing.
In Object Explorer, navigate to Applet, and query for the FS Dispatch Board Gantt Applet.
Navigate to Applet, then Applet User Prop.
Note: If Applet User Prop is not visible, then navigate to View, then Options, select the Object Explorer tab, and then select the Applet User Prop object definition.Query for Pane 0 Field*, making sure to include the wildcard asterisk symbol (*).
All the Employee business component Pane 0 Fields that currently appear on the Gantt chart of the Dispatch Board are listed in order.
Copy the Pane 0 Field 3 record, and update the fields in the new record as follows:
Enter Pane 0 Field 6 as the name for the record.
Enter Phone in the Value field.
The value field is the name of the field in the business component.
Create user property records for the new column.
Information about the records is described in the following table.
Name Value Pane 0 Col 6
NM, Phone NM denotes Header Display Text.
Pane 0 Col 6 Attr 0
IID, 211 IID denotes Unique ID.
Pane 0 Col 6 Attr 1
FLD, Phone FLD denotes the field of the business component.
Pane 0 Col 6 Field 0
Phone, Val
Viewing the New Field
Deliver the changes to the Integration Branch and view the new field on the Gantt chart of the Dispatch Board.
Adding Drilldowns to the Dispatch Board Gantt Chart
You can add drilldowns to the Gantt chart of the Dispatch Board to help streamline navigation to and from this screen. In the following tasks, you configure a drilldown for the Phone field that you added in Displaying Additional Information on the Y-Axis of the Dispatch Board Gantt Chart. For more information about performing configuration tasks with Siebel Tools, see Using Siebel Tools.
To allow users to drill-down on the new Phone field, perform the following procedures:
This task is a step in Process of Configuring the Dispatch Board.
Creating the Drilldown Object
Perform the following procedure to create a new Phone drilldown object.
To create the drilldown object
Log in to Siebel Tools or Web Tools as an administrator (see Using Siebel Tools).
Create a workspace.
Lock the FS Dispatch Board project for editing.
In Object Explorer, navigate to Applet, then Drilldown Object.
Create a new record, and update the fields with the following information:
Enter Phone as the name of the record.
Enter Phone as the Hyperlink Field value.
Enter Employee List More Info View as the View value.
Enter ID as the Source Field value.
Enter Employee as the Business Component value.
Enter ID as the Destination field value.
Note: In the applet control, the control name and the field name must match so that users can successfully drill down from the Gantt chart of the Dispatch Board.
Creating the Applet User Properties for the Drilldown
Perform the following procedure to create the applet user properties for drilldown on the Pane 0 Col 6 Phone field.
To create the applet user properties for the drilldown
Lock the FS Dispatch Board project for editing.
In the Object Explorer, navigate to Applet, and query for the FS Dispatch Board Gantt Applet.
Navigate to Applet, then Applet User Prop, and query for Pane 0 Col 6*, making sure to include the wildcard asterisk symbol (*).
To add these records, see Creating the Applet User Properties.
The user properties for the new column appear.
Create user property records for the drilldown.
Information about the records is described in the following table.
Name Value Pane 0 Col 6 Attr 2
IDO, Phone IDO denotes Drilldown Object.
Pane 0 Col 6 Attr 3
DDFLD, Id DDFLD denotes Drilldown Field.
Pane 0 Col 6 Field 1
Id, DDID DDID denotes Drilldown ID.
Viewing the New Drilldown Object
Deliver the changes to the Integration Branch and view the new Phone drilldown object on the Gantt chart of the Dispatch Board.
Adding Query Fields to the Dispatch Board Gantt Chart
A dispatcher must enter specific query parameters to search for the appropriate employee or set of employees. If the Search pane for the Gantt chart of Dispatch Board does not include a parameter that the dispatchers need, then you can add this parameter by completing the tasks in this topic. For more information about performing configuration tasks with Siebel Tools, see Using Siebel Tools.
To add a query field to the Search pane for the Gantt chart of the Dispatch Board, perform the following procedures:
This task is a step in Process of Configuring the Dispatch Board.
Creating the Applet Controls
Perform the following procedure to create new applet control named Phone.
To create the applet controls
Query again for the FS Dispatch Board Gantt Applet.
Navigate to Applet, then Control.
Create a new record, and update the fields with the following information:
Enter Phone as the name for the record.
Enter Phone as the value for the Caption - String Override field.
Enter Phone # as the value for Field.
Navigate to Applet, Control, and then Control User Property.
Create a new record, and update the fields with the following information:
Enter Field Name as the name for the record.
Enter Phone as the value for the record.
Creating the Applet Web Template Item
Perform the following procedure to create a new Phone Web template item.
To create the applet Web template item
Log in to Siebel Tools as an administrator.
Lock the FS Dispatch Board project for editing.
In the Object Explorer, navigate to Applet, and query for the FS Dispatch Board Gantt Applet.
Navigate to Applet, Applet Web Template, and then Applet Web Template Item.
Create a new record, and update the fields with the following information:
Enter Phone as the name of the record.
Enter Phone as the value for the Control field.
Enter a numeric value in the Item Identifier field.
Tip: Siebel Tools assigns controls unique numbers. It is recommended that you enter a high numeric value to prevent identifiers from overlapping and causing conflict.
Using the New Query Field
Deliver the changes to the Integration Branch and test the new Phone Number query field.
To use the new query field
Relaunch the application, and navigate to the Dispatch Board.
Click Search in the header of the Name field in the Gantt chart.
In the Search pane, enter a query using Phone Number.
A successful query demonstrates that you can use the phone number as an additional search parameter in the Search pane.
Changing Information for the Dispatch Board Gantt Chart
By default, activities appear on the Gantt chart of the Dispatch Board. You can show other information needed for decision-making on the Gantt chart. In the following example task, you configure the Gantt chart to display account names instead of activities. For more information about performing configuration tasks with Siebel Tools, see Using Siebel Tools.
This task is a step in Process of Configuring the Dispatch Board.
To change the information for the Dispatch Board Gantt chart
Log in to Siebel Tools or Web tools as an administrator (see Using Siebel Tools).
Create a workspace.
Lock the Activity project for editing.
In the Object Explorer, navigate to Business Component, and query for the Action business component.
Navigate to Business Component, then Field, and query for the TXTCLRField.
Change the Calculated Value field to the field name to appear as text in the Gantt chart.
In this example, the value is Account Name.
Note: Do not change the Calculated Value field if it is Priority, Type, or Status.Deliver the changes to the Integration Branch.
Restart the client, and view the changes on the Dispatch Board.
The names of the accounts and not the names of the activities appear on the Gantt chart.
Changing Displayed Tooltip Details on the Dispatch Board Gantt Chart
Users can position the mouse pointer over an activity on the Gantt chart to view activity details. Also, users can position the mouse pointer over an employee name on the Gantt chart to view employee details. You can change the details that users see when they position the mouse pointer. For more information about performing configuration tasks with Siebel Tools, see Using Siebel Tools.
To change displayed Tooltip details on the Dispatch Board Gantt chart, complete the following procedures:
This task is a step in Process of Configuring the Dispatch Board.
Creating a User Property for the Tooltip Field
Perform the following procedure to create a new user property for the Tooltip field.
To create a user property for the Tooltip field
Log in to Siebel Tools or Web Tools as an administrator (see Using Siebel Tools).
Create a workspace.
Lock the FS Dispatch Board project for editing.
In the Object Explorer, navigate to Business Service, and query for the FS Dispatch Board Utils business service.
Navigate to Business Service, then Business Service User Prop, and create a new user property for the activity Tooltip as follows:
Enter Pane 2 Tooltip Field x as the name of the user property, where x is the next available integer in the list of user properties for Tooltip fields.
Note: Make sure that you enter the next available integer. Do not skip integers.Enter the business component field as the value of the user property.
This field appears when users position the mouse pointer over an activity in the Gantt chart.
Create a new user property for the employee name Tooltip as follows:
Enter Pane 0 Tooltip Field x as the name of the user property, where x is the next available integer in the list of user properties for Tooltip fields.
Note: Make sure that you enter the next available integer. Do not skip integers.Enter the business component field as the value of the user property.
This field appears when users position the mouse pointer over an employee name in the Gantt chart.
Deliver the changes to the Integration Branch.
Creating a Value for the Tooltip Field
Perform the following procedure to create a value for the new Tooltip field in the list of values for Tooltip fields.
To create a value for the Tooltip field
Navigate to the Administration - Data screen, then the List Of Values view.
Query for the Type field value of FSDB_TOOLTIP_OBJECTS.
The current values for Tooltip fields appear.
Create a record for the Tooltip field, and enter the field name for the business service in the Language-Independent Code field.
Creating Time Zoom Intervals on the Dispatch Board Gantt Chart
By default, the zoom intervals on the Gantt chart are 1/4, 1/2, 1, 2, and 4. However, dispatchers might have to work with time frames that are larger than these default values. You can configure the zoom intervals to different time spans, making the information appear more compact. For more information about using the time zoom intervals with the Gantt chart, see Setting User Preferences for the Dispatch Board(End User).
To create a time zoom interval on the Dispatch Board Gantt chart, complete the following procedures:
This task is a step in Process of Configuring the Dispatch Board.
Creating a Value for the Time Zoom Interval
Perform the following procedure to create a value for the new time zoom interval in the list of values for time zoom intervals.
To create a value for the time zoom interval
Navigate to the Administration - Data screen, then the List Of Values view.
Query for the Type field value of DISPATCH_BOARD_TIME_UNIT.
The current values for time zoom intervals appear.
Create a record for the time zoom interval.
Configuring the Applet Control and User Properties
Perform the following procedure to configure the applet control and user properties for the new time zoom interval.
For more information about performing configuration tasks with Siebel Tools, see Using Siebel Tools.
To configure the applet control and user properties
Log in to Siebel Tools or Web Tools as an administrator (see Using Siebel Tools).
Create a workspace.
Lock the FS Dispatch Board project for editing.
In the Object Explorer, navigate to Applet, and query for the FS Dispatch Board Gantt Applet.
Navigate to Applet, then Control, and complete the following steps:
Create a new applet control with a type of MiniButton.
Make sure the button name is a unique ID. You can pattern the name to be consistent with the one hour or two hour button control.
Create the appropriate symbolic string for the button caption.
Edit the Web layout of the applet, and then select and move the new button to the placeholder for the time zoom interval button.
Navigate to Applet, then Applet User Prop, and complete the following steps:
Query for the SupportedTSMapping user property, and add details for the new time zoom interval in the following format:
#Major Time Value#Minor Time Value#ID of the time zoom interval#
Query for the DateBar Navigation TS user property, and add the ID for the new time zoom interval in the following format:
ID of new time zoom interval:1,7
In the Object Explorer, navigate to Applet, and query for the User Profile Dispatch Board OUI Applet.
Navigate to Applet, then Applet User Prop, and complete the following steps:
Query for the SupportedMajorTS user property, and add the new time zoom interval to the available major time values, if necessary.
This user property has a default value of #Year#Month#Week#Day#
Query for the SupportedMinorTS user property for a major time value, and add the new time zoom interval to the available minor time values for the major time value.
This user property has a default value of #4 Hours#2 Hours#Hour#Half Hour#Quarter Hour.
Deliver the changes to the Integration Branch.
Configuring the JavaScript Files
Perform the following procedure to configure the JavaScript files for the time zoom interval.
To configure the JavaScript files
Navigate to the following directory:
<build root>\swsm\applicationcontainer\webapps\siebel\scripts\siebel
In the siebelconstants.js file, create a constant, and assign the applet control ID that you create in Step 5.
You can pattern the constant to be consistent with the SWE_GANTT_DAY_TWOHOUR constant.
In the fsdispatchboardpmodel.js file, complete the following steps:
Create a variable inside the fsDispatchBoardPM constructor function, and assign the constant value.
Add the new time zoom interval value to timeScaleMap{} map.
The map key is the LIC (Language-Independent Code) for the time zoom interval in Major Time Value/Minor Time Value format. The value is the applet control ID that you create in Step 5.
In the createPeriod() function, create a new case for the time zoom interval under the DAY_HOUR case.
The case ID is the variable name that you create inside the fsDispatchBoardPM constructor function.
Add the time zoom interval check with the OR condition where the calcDayLeft() function is invoked at the end of the createPeriod() function.
In the ganttrenderer.js file, complete the following steps:
Create a variable inside the GanttRenderer constructor function, and assign the constant value.
In the renderTimeScale() function, add the new case for the time zoom interval under the DAY_HOUR case.
The case ID is the variable name that you create inside the GanttRenderer constructor function.
In the ganttpmodel.js file, complete the following steps:
Create a variable inside the GanttPresentationModel constructor function, and assign the constant value.
In the getTimeUnits() function, add a new case for the new time zoom interval, and set the unit value for time zoom interval.
The case ID is the variable name that you create inside the GanttPresentationModel constructor function.
Restart the client, and view the new time interval on the Dispatch Board.
Enabling Applets for Relocation to the Dispatch Board Gantt Chart
By default, users can relocate only activities in the Unscheduled Activities list to the Gantt chart of the Dispatch Board. However, you can configure additional applets so that users can relocate activities on the other lists to the Gantt chart of the Dispatch Board. The Dispatch Board can include multiple source applets for the relocate event. In the following example task, you configure the FS DB Timed Out Activity List Ax Applet to allow users to relocate activities from the Timed Out Activities list to the Gantt chart of the Dispatch Board. For more information about performing configuration tasks with Siebel Tools, see Using Siebel Tools.
This task is a step in Process of Configuring the Dispatch Board.
To enable applets for relocation to the Dispatch Board Gantt chart
Log in to Siebel Tools or Web Tools as an administrator (see Using Siebel Tools).
Create a workspace.
Lock the FS Dispatch Board project for editing.
In the Object Explorer, navigate to Applet, and query for the FS DB Timed Out Activity List Ax Applet.
Navigate to Applet, then Applet User Prop.
Create two new applet user properties, and perform the following steps:
In the Name field for the first user property, enter EnableDragAndDropInList.
In the Value field for the first user property, enter TRUE.
In the Name field for the second user property, enter ClientPMUserProp.
In the Value field for the second user property, enter EnableDragAndDropInList.
Deliver the changes to the Integration Branch.
Relaunch the client, navigate to the Dispatch Board, and select Timed Out Activities from the visibility filter.
You are can relocate activities from this list to the Gantt chart of the Dispatch Board.
Adding User Preference Colors to the Dispatch Board Gantt Chart
Applet user properties define the colors on the Gantt chart of the Dispatch Board. You specify the color definitions using hexadecimal format. For more information about performing configuration tasks with Siebel Tools, see Using Siebel Tools.
Although you can add new colors for user selection on the Gantt chart of the Dispatch Board, do not change or deactivate the existing colors. The following activity fields determine the colors that appear on the Gantt chart of the Dispatch Board:
Priority (LOV type: ACTIVITY_PRIORITY)
Status (LOV type: EVENT_STATUS)
Type (LOV type: TODO_TYPE)
This task is a step in Process of Configuring the Dispatch Board.
To add a user preference color to the Dispatch Board Gantt chart
Log in to Siebel Tools or Web Tools as an administrator (see Using Siebel Tools).
Create a workspace.
Lock the FS Dispatch Board project for editing.
In the Object Explorer, navigate to Applet, and query for the FS Dispatch Board Gantt Applet.
Navigate to Applet, then Applet User Prop.
Create a new applet user property record, and perform the following steps:
In the Name field, enter an appropriate value.
For example, to add a color named Blue Royal, enter the following in the Name field: #Color#Blue Royal#.
In the Value field, enter the value that corresponds to the hexadecimal value for that color.
For example, #800000 is the HEX number for a dark blue in BGR format.
Deliver the changes to the Integration Branch.
Relaunch the client, navigate to the Dispatch Board, click the menu button, and select User Preferences.
You can select Blue Royal as a color option.
Configuring Colors for Activities on the Dispatch Board Gantt Chart
For activities on the Gantt chart, users can configure the major color scheme, the minor color scheme, and the color of grid objects. In the Dispatch Board view of the User Preferences screen, they can configure color schemes for only the Priority, Status, and Type field values in activity records. For more information, see Setting User Preferences for the Dispatch Board(End User).
You can use Siebel Tools to configure colors for other field values in activity records. Your color configurations override the color configurations that users set up in the User Preferences screen. For more information about performing configuration tasks with Siebel Tools, see Using Siebel Tools.
This task is a step in Process of Configuring the Dispatch Board.
To configure colors for activities on the Dispatch Board Gantt chart
Log in to Siebel Tools or Web Tools as an administrator (see Using Siebel Tools).
Create a workspace.
Lock the FS Dispatch Board project for editing.
In the Object Explorer, navigate to Applet, and query for the FS Dispatch Board Gantt Applet.
Navigate to Applet, then Applet User Prop, and complete the following steps:
Query for the DispatchBoardColourAttrib1 user property, and change the Value field as follows:
To change the major color scheme, change the value to #BGRCLR#Class#.
To change the minor color scheme, change the value to #BDRCLR#Class#.
To change the color of the grid object, change the value to #TXTCLR#Class#.
Add the following user properties:
DispatchBoard_Class_LOVMap with a value of #Research#Follow-Up#Urgent# Outsourced#Customer Retention Activity#Field Engineer Activity#Repair Activity#.
Each item in this value is a language-independent code for the Type field value of FS_ACTIVITY_CLASS in the List of Values view of the Administration - Data screen.
DispatchBoard_Class_ColMap with a value that contains items that designate the colors of the items in the value for the DispatchBoard_Class_LOVMap user property (for example, #Blue#Blue Medium#Blue Light#Blue Dark#Green#Green Light#Gray#).
Lock the Activity project for editing.
In the Object Explorer, navigate to Business Component, and query for the Action business component.
Navigate to Business Component, then Field, and query for the appropriate field as follows:
To change the major color scheme, query for BGRCLRField.
To change the minor color scheme, query for BDRCLRField.
To change the color of the grid object, query for TXTCLRField.
Change the Calculated Value field to [Class].
Deliver the changes to the Integration Branch.
Changing Colors for Periods on the Dispatch Board Gantt Chart
On the Gantt chart, each of the following periods for an employee appears in a different color:
Working periods
Nonworking periods
Overtime periods
Extended overtime periods
You can change these colors.
This task is a step in Process of Configuring the Dispatch Board.
To change the colors for the periods on the Dispatch Board Gantt chart
Navigate to the theme-gray.css file in the following directory:
<build root>\swsm\applicationcontainer\webapps\siebel\files
Open this file in the CSS (Cascading Style Sheet) editor.
Search for the appropriate class as follows:
To change the colors for working periods, search for the siebui-taskBoxNormal class.
To change the colors for nonworking periods, search for the siebui-taskBoxUnavail class.
To change the colors for overtime periods and extended overtime periods, search for the siebui-taskBoxOT class.
Change the value of the background-color property to the hexadecimal value of the new color.
Restricting the Displayed Employees on the Dispatch Board Gantt Chart
Users can determine the employees that appear by selecting a service region and entering a date on the Gantt chart of the Dispatch Board. They can also query to filter the list of displayed employees. Administrators can use Siebel Tools to further restrict the employees that users can view on the Gantt chart of the Dispatch Board. For more information about performing configuration tasks with Siebel Tools, see Using Siebel Tools.
This task is a step in Process of Configuring the Dispatch Board.
To restrict the displayed employees on the Dispatch Board Gantt chart
Log in to Siebel Tools or Web Tools as an administrator (seeUsing Siebel Tools).
Create a workspace.
Lock the FS Dispatch Board project for editing.
In Object Explorer, navigate to Applet, and query for the FS Dispatch Board Gantt Applet.
Navigate to Applet, then Applet User Prop, and query for the Pane 0 BC Search Spec user property.
Note: If Applet User Prop is not visible, then navigate to View, then Options, select the Object Explorer tab, and select the Applet User Prop object definition.Define the search specification in the Value field of this user property.
Deliver the changes to the Integration Branch.
Changing Colors for Employee Name Text on the Dispatch Board Gantt Chart
In the preconfigured application, the color of the text for an employee name designates the type of employee (for example, intern, contractor, and employee). For more information, see Viewing Employee Details in the Dispatch Board Gantt Chart (End User).
You can change the colors for employee names and the field that determines these colors. For more information about performing configuration tasks with Siebel Tools, see Using Siebel Tools.
To change the colors for employee name text on the Dispatch Board Gantt chart, complete the following procedures:
This task is a step in Process of Configuring the Dispatch Board.
Create a New Color for the Employee Name Text
Perform the following procedure to create a new color for the employee name text.
To create a new color for the employee name text
Navigate to the theme-gray.css file in the following directory:
<build root>\swsm\applicationcontainer\webapps\siebel\files
Open this file in the CSS (Cascading Style Sheet) editor.
Search for the siebui-resourcecolor-a class.
Copy this class, and name the copy siebui-resourcecolor-d.
For the siebui-resourcecolor-d class, change the value of the color property to the hexadecimal value of the new color.
Add the New Color to the Field on the Business Component
Perform the following procedure to add the new color to the field on the business component.
To add the new color to the field on the business component
Log in to Siebel Tools or Web Tools as an administrator (see Using Siebel Tools).
Create a workspace.
Lock the Employee project for editing.
In Object Explorer, navigate to Business Component, and query for the Employee business component.
Navigate to Business Component, then Field, and query for the Status field.
Change the Calculated Value field as necessary.
For example, to designate the new color in the name text of employees that are available for scheduling, change the Calculated Value field as follows:
IIf ( [Availability Status] = LookupValue("AVAILABILITY_STATUS",
"Unavailable"),"resourcecolor-a", IIf ( [Availability Status] =
LookupValue("AVAILABILITY_STATUS", "Fully Available"),"resourcecolor-b",
"resourcecolor-d"))
Deliver the changes to the Integration Branch.
Process of Managing the Dispatch Board
The following list shows the tasks that end users typically perform to manage the Dispatch Board. Your company might follow a different process according to its business requirements.
To managing the Dispatch Board, end users perform the following tasks:
Setting User Preferences for the Dispatch Board(End User)
You can set user preferences to control some aspects, such as date and time parameters, color schemes, and display options, for the Dispatch Board. These user preferences are in effect during the current session of Siebel Field Service and when you later access a new session of Siebel Field Service.
This task is a step in Process of Managing the Dispatch Board.
To set the user preferences for the Dispatch Board
Navigate to the Dispatch Board screen.
Click the menu button, and select User Preferences.
The Dispatch Board view of the User Preferences screen appears.
In the Date/Time section of the Dispatch Board form, complete the fields as necessary.
Some fields are described in the following table.
Field Comments Major Time Value
Select the time span (for example, 1 day) that you can view without scrolling on the Gantt chart of the Dispatch Board. Values include Year, Month, Week, and Day.
Minor Time Value
Select the time increments (for example, 24 1-hour slots) of the Major Time Value field.
The value in the Major Time Value field determines the values that you can select in this field. Note the following situations:
If you select a value of Year in the Major Time Value field, then you can select a value of Month or Week in this field.
If you select a value of Month in the Major Time Value field, then you can select a value of Week or Day in this field.
If you select a value of Week in the Major Time Value field, then you can select a value of Day in this field.
If you select a value of Day in the Major Time Value field, then you can select a value of 4 Hours, 2 Hours, Hour, Half Hour, or Quarter Hour in this field.
Start Day At
Type the starting time for a workday. The default value is 7:00:00 AM.
If you display the time in hour (or shorter) increments on the Gantt chart of the Dispatch Board, then the Start Day At and End Day At fields determine the time period that appears on the Gantt chart and thus the time period when you can schedule activities. If you display time in longer time increments, then this field has no effect. For example, if you display day time increments, then you can schedule activities only at the beginning of the day (12:00 A.M.).
End Day At
Type the ending time for a workday. The default value is 7:00:00 PM.
Days in a Week
Select the number of days that appear in a week on the Gantt chart of the Dispatch Board.
Weekly Start Day
Select the day of a week from which a week begins on the Gantt chart of the Dispatch Board.
In the Color section of the Dispatch Board form, complete the fields as necessary.
The color scheme fields set the colors of the time bars representing activities on the Gantt chart. Some fields are described in the following table.
Field Comments Enable Default Colors
Select this check box to indicate the default color scheme overrides the user preferences, and the Grid Object field displays the account name by default.
Activity Priority
Select a corresponding color for each activity priority value.
Activity Status
Select a corresponding color for each activity status value.
Activity Type
Select a corresponding color for each activity type value.
Note: When you select the values in the activity fields and the corresponding colors, your selections are automatically saved.Major Color Scheme
Select an activity field. This field determines the body color of the time bars for that field.
Minor Color Scheme
Select an activity field. This field determines the border color of the time bars for that field.
Grid Object
Select an activity field. This field determines the text that appears on the time bars for that field. When you select the Enable Default Colors field, the Grid Object field displays the account name by default.
In the Display Options section of the Dispatch Board form, complete the fields as necessary.
Some fields are described in the following table.
Field Comments Service Region
Select the service region to show on the Gantt chart of the Dispatch Board.
If you drill down on the Status field in the Activities List view of the Activities screen, then the service region on the Gantt chart of the Dispatch Board defaults to the Service Region field in the Schedules view of the just-visited activity. If this field contains no data, then the Gantt chart contains no data.
Date Shown
Select the date (or the first date of the date range) to show on the Gantt chart of the Dispatch Board. If you select a value of Today, then the date (or the first date of the date range) on the Gantt chart is today. If you select a value of Last Date Chosen, then the date (or the first date of the date range) on the Gantt chart is the date that displayed when you last accessed the Dispatch Board.
If you drill down on the Status field in the Activities List view of the Activities screen, then the date (or the first date of the date range) on the Gantt chart of the Dispatch Board defaults to the field values in the Schedules view of the just-visited activity. This date is the Planned Start date field for the activity. If this field contains no data, then this date is the Earliest Start date field for the activity. If this field contains no data, then this date is the date designated in the user preferences for the Dispatch Board.
Auto-Update Service Region
Select this check box to indicate the last service region on the Gantt chart appears the next time the user accesses the Dispatch Board screen.
Enable Service Region Constraint on Unplan Activity
Select this check box to indicate only activities for the selected service region appear in the Unscheduled Activities list (instead of all unscheduled activities).
Enable Earliest/Latest Start Violation
Select this check box to indicate the Dispatch Board - Generic workflow determines whether the current time is earlier than the earliest start time for the selected activity, or whether the current time is later than the latest start time for the activity. If the current time violates the earliest or latest time constraints, then the workflow stops.
Load Activity into ABS
Select this check box to indicate the Dispatch Board - Generic workflow loads the activity into the Appointment Booking System cache.
In the Travel Time section of the Dispatch Board form, complete the fields as necessary.
Some fields are described in the following table.
Field Comments Enable Travel Time Display
Select this check box to display the travel time between appointments on the Gantt chart of the Dispatch Board.
Hatch Pattern Color
Select the color for travel time.
Displaying Data in the Dispatch Board Gantt Chart (End User)
You can display the needed data on the Gantt chart of the Dispatch Board.
When you select a service region that is a parent region, the list of available employees on the Gantt chart includes the following employees:
Employees of the selected service region.
Employees of the child service region and all its descendants. For more information, see Specifying Parent Service Regions.
Activities appear as horizontal bars on the Gantt chart. You can specify the colors for these horizontal bars in the Dispatch Board view of the User Preferences screen.
If there is a large amount of legacy data, then older activities that users did not schedule using the Dispatch Board can also appear in the list of activities in the Dispatch Board. To make sure that extraneous data does not appear in the list of activities, it is recommended that you display only records that users create after the Dispatch Board installation.
On the Gantt chart, each of the following periods for an employee appears in a different color:
Working periods
Nonworking periods
Overtime periods
Extended overtime periods
You define these periods for a schedule in the Schedule Hours view in the Schedules view of the Administration - Service screen. You define these periods for an employee by selecting a schedule in the Service Details view in the Employees view of the Administration - User screen. You further define the exception periods for an employee in the Employee Exception Hours view in the Employees view of the Administration - User screen. For information about changing the colors for these time periods, see Changing Colors for Periods on the Dispatch Board Gantt Chart.
This task is a step in Process of Managing the Dispatch Board.
To display data in the Dispatch Board Gantt chart
Navigate to the Dispatch Board screen.
To display data on the Gantt chart for a specific service region, perform the following steps:
Click Select Service Region.
In the Pick Service Region dialog box, select a service region, and click OK.
The employees associated with the selected service region and descendant service regions (child and grandchild service regions) appear on the Gantt chart.
To change the number of records that appear on the Gantt chart, click the show more button and the show less button.
To further refine the records that appear in the Gantt chart, perform the following steps:
Click Search in the header of the Name field of the Gantt chart.
In the Search pane that appears, enter search criteria for the records that you want to see.
Click Search.
The records that met the search criteria appear in the Gantt chart.
Click Search again to close the Search pane.
To display data on the Gantt chart for a specific date or date range, complete at least one of the following steps:
To navigate to a previous date:
Click the single arrow preceding the Gantt chart date range to navigate to the data for the date range that is immediately before the Gantt chart date range, or click the double arrow preceding the Gantt chart date to navigate to the data for the date range that is exactly one week, month, or year before the Gantt chart date range.
For example, the major time value is Week, and the minor time value is Day. If the Gantt chart date range is August 6, 2012 - August 12, 2012, and if you click the singe arrow, then the Gantt chart date range changes to July 30, 2012 - August 5, 2012. If the Gantt chart date range is August 6, 2012 - August 12, 2012, and if you click the double arrow, then the Gantt chart date range changes to July 6, 2012 - July 12, 2012.
To navigate to a date in the future:
Click the single arrow following the Gantt chart date range to navigate to the data for the date that is immediately after the Gantt chart date, and click the double arrow following the Gantt chart date to navigate to the data for the date that is exactly one week, month, or year after the Gantt chart date.
For example, the major time value is Week, and the minor time value is Day. If the Gantt chart date range is July 3, 2013 - July 31, 2013, and if you click the singe arrow, then the Gantt chart date range changes to July 31, 2013 - August 28, 2013. If the Gantt chart date range is July 3, 2013 - July 31, 2013, and if you click the double arrow, then the Gantt chart date range changes to July 3, 2014 - July 31, 2014.
Click the Today button to navigate to the data for the current date.
Click the calendar select button, and then click a date in the calendar control that appears to navigate to the data for that date.
To view more details about an activity, complete one of the following steps:
Position the mouse pointer over an activity on the Gantt chart.
A Tooltip appears.
Drilldown on the text in an activity on the Gantt chart.
The Schedule view in the Activity List view of the Activities screen appears.
Drilldown on the Type field for an activity in the Unscheduled Activities list.
The Schedule view in the Activity List view of the Activities screen appears.
Viewing Employee Details in the Dispatch Board Gantt Chart (End User)
You can view details about the employee names that appear on the Gantt chart of the Dispatch Board.
The color of the text for an employee name designates the type of employee (for example, intern, contractor, and employee). The Employee Type field in the Employees view of the Administration - User screen shows the type of employee. Administrators might set up icons that designate additional information about employees on the Gantt chart of the Dispatch Board. These icons appear next to the employee names. For more information about setting up icons in Gantt charts, see Configuring Siebel Open UI.
This task is a step in Process of Managing the Dispatch Board.
To view employee details in the Dispatch Board Gantt chart
Navigate to the Dispatch Board screen.
To view details about an employee, position the mouse pointer over the name of the employee.
Select the frame boundary next to the Primary Region field column and without releasing the selection, then move the frame boundary out to display the additional fields on the Gantt chart.
The fields are described in the following table.
Field Comments Availability
Displays information about the availability of the employee. This field is populated when you click the Select Service Region button, and select a service region to populate the Gantt chart with the names of the employees in the selected service region.
Score
Displays a score that indicates the degree to which the skills of each employee match the skills that are required to complete an activity. This field is populated for all employees on the Gantt chart when you select an activity, and click the Assignment Score button. For more information about assignment scores, see Configuring Assignment Scores for the Dispatch Board Gantt Chart.
Distance
Displays the distance (in miles) between the employee location and the work site location. This field is populated for all employees on the Gantt chart when you select an activity, and click the Calculate Distance button. A distance of -1 indicates an incomplete or incorrect source or destination address.
If the employee is at an activity, then the source address is the ZIP Code of the current activity for the employee. If the employee is in transit, then the source address is the ZIP Code of the previous activity for the employee. Otherwise, the source address is the ZIP Code of the start depot address for the employee.
The destination address is the ZIP Code of the contact service location for the activity, unless there are multiple contact service locations. If there are multiple contact service locations, then the destination address is the ZIP Code of the account service location.
Wireless
Displays a value of Y if the wireless device of the selected employee is in the coverage area and a value of N if the wireless device of the selected employee is not in the coverage area. This field is populated only for the selected employee when you select the employee on the Gantt chart, and click the Wireless Coverage button.
Click the name of an employee to see information about the employee in the Employees view of the Administration - User screen.
Assigning Activities to Field Service Engineers (End User)
After creating activities and activity plans, local dispatchers who are familiar with their territory and field engineers can schedule activities (assign activities to field service engineers) by using the following screens:
Service screen. For more information, see Assigning Activities to Field Service Engineers from the Service Screen.
Activities screen (using Assignment Manager). For more information, see Assigning Activities to Field Service Engineers with Assignment Manager.
Dispatch Board screen. For more information, see Assigning Activities to Field Service Engineers from the Dispatch Board.
This task is a step in Process of Managing the Dispatch Board.
About Using the Dispatch Board to Assign Activities
Note the following information when using the Dispatch Board to assign activities to field service engineers:
An unlimited number of activities can overlap (apply to the same hours for an field service engineer). All overlapping activities appear on the Gantt chart. Adding multiple activities to a time slot reduces the height of the bar representing the activity and removes the description of the activity.
You can reassign and reschedule any activity on the Gantt chart. Instead of selecting the appointment and then moving the appointment to a different time on the Gantt chart, click the Book Appointment button if you want to reschedule an appointment. For more information, see Booking Appointments for Activities Using Siebel Scheduler (End User) and About Rescheduling Appointments on the Dispatch Board.
You can assign activities to available or unavailable hours in the schedule for a field service engineer.
You can change the field service engineer who is assigned to an activity from the Unscheduled Activities list or from the Activity List view.
You can change the duration of an activity from the Unscheduled Activities list or from the Activity List view. You can also change the duration of an activity by selecting the activity bar and then moving the activity bar outwards on the Gantt chart of the Dispatch Board.
You cannot schedule repeated activities on the Dispatch Board.
Assigning Activities to Field Service Engineers from the Service Screen
You can assign activities to engineers from the Service screen.
To assign an activity to a field service engineer from the Service screen
Navigate to the Service screen, then the Service Request List view.
Drill down on the SR number (#) field for a selected service request, and click the Activities view tab.
Drill down on the Status field for the selected activity you want to assign.
The Dispatch Board screen appears. The unscheduled activity list appears after the Gantt chart. The Gantt chart displays the names of field engineers and associated activities, if any.
Note: The Gantt chart displays only the names of field engineers associated with a selected service region or a service region hierarchy.If no names appear on the Gantt chart, then select a service region for the activity.
In the Unscheduled Activities view, select and then move the activity to the schedule of a field service engineer on the Gantt chart.
The activity appears as a horizontal bar. You can position the mouse pointer over this bar to see a description of the activity.
To remove the activity from the schedule, complete one of the following steps:
Drill down on the text in the activity on the Gantt chart, and change the Status field value to Unscheduled and the Employees field value to your user ID in the Schedule view in the Activity List view of the Activities screen.
The Status field for the activity changes to a value of Unscheduled, and the Employees field for the activity changes to the value for your user ID.
Assigning Activities to Field Service Engineers with Assignment Manager
You can assign activities to engineers with Assignment Manager.
To assign an activity to a field service engineer with Assignment Manager
Navigate to the Activities screen, then the Activities List view.
Select an activity.
Click the menu button in the activity form, and select Assign.
A dialog box appears with names of field service engineers ranked in order of preference.
The suggested assignments are based on a variety of criteria including workload and skills that you set up by using Assignment Manager. For instructions about configuring Assignment Manager, see Siebel Assignment Manager Administration Guide.
Select the field service engineer to perform the activity, and click OK.
Assigning Activities to Field Service Engineers from the Dispatch Board
You can assign activities to engineers from the Dispatch Board. For more information, see About Using the Dispatch Board to Assign Activities.
To assign an activity to a field service engineer from the Dispatch Board
Navigate to the Dispatch Board screen.
In the Unscheduled Activities view, select an activity.
Note: To assign an activity, it must have a type.Select and then move the selected activity to the schedule of a field service engineer on the Gantt chart.
The activity appears as a horizontal bar. You can position the mouse pointer over this bar to see a description of the activity.
To remove the activity from the schedule, complete one of the following steps:
Drill down on the text in the activity on the Gantt chart, and change the Status field value to Unscheduled and the Employees field value to your user ID in the Schedule view in the Activity List view of the Activities screen.
Creating Activities from the Dispatch Board (End User)
Instead of working with the activities that appear on the Dispatch Board, you can create a new activity while viewing the Dispatch Board.
This task is a step in Process of Managing the Dispatch Board.
To create an activity from the Dispatch Board
Navigate to the Dispatch Board screen.
In the Unscheduled Activities view, create a new activity record, and complete the fields as appropriate.
Centralized dispatchers can assign and schedule activities after searching for activities in a service region.