8Agreements and Entitlements
Agreements and Entitlements
This chapter describes how to create and manage agreements and specific levels of service (entitlements) for agreements. It includes the following topics:
About Agreements
An agreement describes products or services provided to a customer and the financial relationship between your organization and the customer. This chapter usually uses the term agreements, and not the term contracts.
You can manually create many types of agreements in the Agreements screen. You can also automatically create an agreement from a quote in the Quotes screen. Agreements can have a hierarchical relationship. A master agreement can include multiple child agreements.
Automatic Entitlements for Agreements
You can automatically apply entitlements to agreement line items by using entitlement templates that are associated with specific products. Each agreement line item can include multiple entitlements that apply to specific costs, contacts, accounts, metrics, service hours, responsiveness, and preventive maintenance plans.
Management of Agreements
Siebel Agreements provides functionality for agreements relating to renting, leasing, financing, and usage. You set up renting, leasing, and financing using nonrecurring charges, recurring charges, and schedules for agreement invoicing. You set up usage using use plans, asset measurements, and readings.
Nonrecurring charges (NRCs, for example, the one-time fee for a service agreement) and recurring charges (RCs, for example, a monthly service fee) apply to agreements. Usage-based agreements can include service components.
Charges and Invoicing for Agreements
The Charge Engine creates charges and the Charge Consolidation business service creates invoices. You can configure the associated workflows as needed. For more information about agreement charges and invoicing, see Charges and Invoices.
Co-Terms for Agreements
Co-terms refer to the consolidation of the terms for multiple line items in an agreement. Typically, an agreement includes multiple line items for different service products. These service products can have different start and end dates, resulting in different payment schedules. Customers can ask for the consolidation of these terms into a single start and end date. If a new product is added to an existing service agreement, and the term is already partially complete, then a customer might ask to prorate the charges by using the remaining term of the agreement.
The Financials view in the List view of the Agreements screen can help you to better understand the co-term and prorate choices that are required for an agreement according to its term and remaining months.
Agreement Copying
When a user clicks the Revise button for an agreement, the following actions occur:
The agreement is revised, deep copied, and its version number is increased.
Fields in the original agreement are read-only.
The following table shows how the Read Only Upon Revise user property determines the read-only behavior of the fields in the original agreement record. You can edit the Read Only Upon Revise user property to configure this read-only behavior after a user clicks the Revise button for an agreement. For more information about editing user properties, see Configuring Siebel Business Applications.
Table Read Only Upon Revise and Read-Only Behavior
| Value for Read Only Upon Revise User Property | Read-Only Behavior of Fields in Original Agreement Record |
|---|---|
All |
All fields are read-only. |
Partial |
All fields except End Date, Valid, and Status are read-only. |
None |
No fields are read-only. |
The Revise button uses signals and data maps. For more information about signals and data maps, see Siebel Order Management Infrastructure Guide.
In the preconfigured Siebel Field Service application, the Revise button is available in views that use the Service Agreement business object (for example, in the Agreements List view of the Agreements screen). The functionality associated with the Revise button uses an integration object. For the Service Agreement business component, the Instance Uniform Name EAI Object:Service Agreement user property sets this integration object. In the name of this user property, Service Agreement denotes the business object that the Service Agreement business component is in at run time. For the Service Agreement business component, the value of this user property is ISS Agreement. This value denotes the integration object.
If you want to set up the Revise button in a view that uses another business object, then you must add a new Instance Uniform Name EAI Object:BusObj user property (where BusObj is the name of the business object) to the business component associated with the business object. For the value of this user property, enter ISS Agreement.
Agreement Charts
The following table lists the charts in the Charts view for agreements.
Table Descriptions of Charts for Agreements
| Chart | Description |
|---|---|
Trend Analysis by Effective Date |
The number of agreements beginning as a function of effective date. |
Trend Analysis by Expiration Date |
The number of agreements ending as a function of expiration date. |
About Entitlements
Entitlements contain information about the level of service for a customer. An entitlement that is associated with a service call can result in adjustments to charges. For example, an important machine part is defective, and a field service engineer must fix the part. This repair requires 3 hours of the engineer’s time. If you bill the engineer at a rate of $50 an hour, then the final charge for the customer is $150. However, if the customer has a service-level agreement with entitlements that apply to all time and material for that part, then the charge includes an additional charge adjustment to subtract the $150 leaving an outstanding balance of $0. Siebel Field Service can inform the customer of the charge adjustment and the reason for the adjustment.
An agreement can have many associated entitlements. One agreement typically encompasses several products or assets. Multiple service packages can apply to these products and assets. Each service package can then include different entitlements. Complex pieces of machinery can have many associated components. The service package associated with each product can then have different entitlements for the various components and labor.
Roadmap for Administering Agreements
The following list shows the tasks and processes that administrators typically perform to administer agreements. Your company might follow a different roadmap according to its business requirements.
To administer agreements, administrators perform the following tasks and processes:
Defining Pricing for Agreements
You can define the following types of pricing for agreements:
Asset-based pricing. For more information, see Defining Asset-Based Pricing.
Service-based pricing. For more information, see Defining Service-Based Pricing.
Order or quote entitlement-based pricing. For more information, see Generating Entitlement-Based Pricing for Orders or Quotes.
This task is a step in Roadmap for Administering Agreements.
Defining Asset-Based Pricing
For an agreement line item, the combination of a product (typically a service product, in the Product field in the Line Items view of an agreement) and an asset (in the Asset number (#) field in the Line Items view of an agreement) determines a unique price. This capability is asset-based pricing.
You use asset-based pricing for pricing products related to assets that a customer purchased. The Reprice and Reprice All menu commands activate the Pricing Engine. The Pricing Engine uses the appropriate price list and pricing procedure to calculate the price. If you select the Reprice menu command, then the price of the selected line item is calculated. If you select the Reprice All command, then the price of the all line items is calculated. The Pricing Engine calculates the price of the product and asset combination and retrieves the price from the price list, or the price list entry, and the supply information about volume discounts.
To enable asset-based pricing, you enable the Dynamic Pricing Procedure workflow instead of the Pricing Procedure - Default workflow or the Basic Pricing Procedure workflow. Unlike the Basic Pricing Procedure workflow, the Dynamic Pricing Procedure workflow includes covered asset details. For more information about pricing procedures and the Product Selection and Pricing (PSP) Engine, see Siebel Pricing Administration Guide.
To enable asset-based pricing
Navigate to the Administration - Business Process screen, then the Workflow Deployment view.
Enable the Dynamic Pricing Procedure workflow.
The Service Pricing view allows you to specify multiple products that together define a unique price. The combination of the service product in the Service Pricing view and an asset in the Service Price Details list defines a unique price.
The Service Pricing Details list includes products that represent the targeted installed base of assets that a service product covers. In an agreement line item, specifying a service product (for example, Platinum Coverage) and selecting an asset that asset-based pricing covers (for example, component G with serial number XYZ) returns a line item price by using the combination of service product and asset.
To set up asset-based pricing
Navigate to the Administration - Pricing screen, then the Price Lists view.
Select a price list, and click the Service Pricing view tab.
Create a new service pricing record, and complete the fields as appropriate.
Defining Service-Based Pricing
Customers often require an after-sales service package for the products that they purchase. This requirement is included in the quote or order. Administrators can define a service package to apply to a set of products. The combination of the service package and the covered product allows for price calculation. This practice is service-based pricing.
You manage service pricing on covered assets by using the Pricing Procedure - Calculate Net Price workflow. For more information about pricing procedures and setting up service pricing, see Siebel Pricing Administration Guide.
To create a service package for service-based pricing
Navigate to the Administration - Product screen, then the Products view.
Create a product record, and complete the fields as appropriate.
Some fields are described in the following table.
Field Comments Product
Type an appropriate name for the service package, such as Platinum Service Package or Gold Service Package.
Service Product
Select this check box to indicate the product is a service product.
After you create a service package for service-based pricing, you can set up this pricing.
To set up service-based pricing
Navigate to the Administration - Pricing screen, then the Price Lists view.
Select a price list, and click the Service Pricing view tab.
Create a new service pricing record, and complete the fields as appropriate.
Some fields are described in the following table.
Field Comments Product
Select the product that the service package covers. Create a record for each product.
List Price
Enter a fixed price in this field or enter a percentage of the covered product in the Service Price % field.
Service Price %
Enter the percentage of the covered product in this field or a fixed price in the List Price field.
Generating Entitlement-Based Pricing for Orders or Quotes
Orders and quotes can include associated entitlements that provide special pricing for all line items in the order or quote. This capability is entitlement-based pricing.
Order and quote entitlement-based pricing is managed through the Pricing Procedure - Calculate Net Price workflow. For more information about pricing procedures and the Product Selection and Pricing (PSP) Engine, see Siebel Pricing Administration Guide.
To generate entitlement-based pricing for an order
Navigate to the Service Orders screen, then the List view.
Drill down on the Order number (#) field for a selected order, and click the Line Items view tab.
Make sure that an entitlement is selected in the Entitlement field of the appropriate line items.
Select an order line item with an entitlement, click the menu button, and select one of the following commands:
Reprice. The Pricing Engine calculates the price for the entitlement in the selected order line item.
To calculate this price, the Pricing Engine uses the associated price list and pricing procedure.
Reprice All. The Pricing Engine calculates the price for the entitlements in the appropriate line items.
To calculate these prices, the Pricing Engine uses the associated price list and pricing procedure.
In the Totals view, click the menu button, and select Save.
You can also generate entitlement-based pricing for a quote.
To generate entitlement-based pricing for a quote
Navigate to the Quotes screen, then the List view.
Select a quote record, and then scroll down to the Quotes form.
Click the show more button to display additional fields.
In the Entitlement field, select an entitlement.
Drill down on the Name field for the quote, and click the Line Items view tab.
Select quote line item, click the menu button, and select one of the following commands:
Reprice. The Pricing Engine calculates the price for the entitlement in the selected quote line item.
To calculate this price, the Pricing Engine uses the associated price list and pricing procedure.
Reprice All. The Pricing Engine calculates the price for the entitlements in the appropriate line items.
To calculate these prices, the Pricing Engine uses the associated price list and pricing procedure.
Setting Up Renewal for Agreements
Users can manually renew agreement line items by entering a current or previous day in the Start Date field and then clicking the Renewal button. For more information, see Renewing Line Items for Agreements (End User).
You can use workflows to automatically renew agreement line items. You can use the FS - Agreement Renewal Item workflow and the FS - Agreement Renewal All workflow to set up a repeating component job to automatically renew agreement line items for predefined time periods. For example, a workflow process can run daily to find any start dates equal to the current date, and then automatically renew the line items. For more information, see FS - Agreement Renewal Item Workflow and FS - Agreement Renewal All Workflow.
Renewal terms for an agreement line item follow:
Start date (required)
End date (required)
Price adjustments
Charge adjustments
Use plan
This task is a step in Roadmap for Administering Agreements.
To set up renewal for agreements
Navigate to the Administration - Server Management screen, then the Jobs view.
In the Jobs list, create a new Job record.
In the Component/Job field, select Workflow Process Manager.
Enter the appropriate Repeat Interval and Repeat Unit in the Job Detail view.
For example, a Repeat Unit of Weeks and a Repeat Interval of 1 runs the renewal process on a weekly basis.
Scroll down to the Job Parameters list, and create a new parameter record.
In the Name field, select Workflow Process Name, and in the Value field, enter FS - Agreement Renewal Item or FS - Agreement Renewal All.
Click Start in the Jobs list.
Process of Setting Up Agreement Validation
Users can verify an agreement to validate that it includes the correct data. Agreement validation helps to make sure that agreement details are in accordance with company policies regarding agreement creation, updating, and renewal. For more information about setting up data validation, see Siebel Order Management Guide.
To set up validation for agreements, administrators perform the following tasks:
This process is a step in Roadmap for Administering Agreements.
Creating Rule Sets for Agreement Validation
Typically, the Agreement Validation validation rule set is provided in the preconfigured Siebel Field Service application. However, if no such rule set exists in your installation, then perform the steps in the following procedure.
This task is a step in Process of Setting Up Agreement Validation.
To create a validation rule set for an agreement
Navigate to the Administration - Data Validation screen, then the Rule Sets view.
Create a new rule set record, and complete the fields as appropriate.
Some fields are described in the following table.
Field Comments Name
Type a name for the validation rule (for example, Agreement Validation).
Business Component
Select the appropriate business component (typically, Service Agreement).
Business Object
Select the appropriate business object (also typically, Service Agreement).
Click Activate to release the rule set.
Note: To revise the validation rule set, click Revise, and update the rule set. Click Activate again to release the rule set.
Creating Messages for Agreement Validation
Before defining rules for the rule set, create the error messages that are used for data validation. The rule creation process references these error messages and codes.
This task is a step in Process of Setting Up Agreement Validation.
To create an agreement validation message
Navigate to the Administration - Data Validation screen, then the Validation Messages view.
Create a new validation message record, and complete the fields as appropriate.
Some fields are described in the following table.
Field Comments Message Code
Type an appropriate message code.
Message Level
Type the appropriate level (for example, Agreement) for the message.
Message Source
Type the appropriate source (for example, Agreement Validation) of the message.
Message Text
Type the text (for example, Account is Null) to describe the error.
(Optional) In the Translations list, create translation records for the message text in other supported languages.
Creating Rules for Agreement Validation
After you create the agreement rule set and data validation error messages, create the rules that the rule set governs. For the following procedure, you have not yet released the rule set.
This task is a step in Process of Setting Up Agreement Validation.
To create an agreement validation rule
Navigate to the Administration - Data Validation screen, then the Rule Sets view.
Select a rule set, and click the Rules view tab.
Create a new rule record, and complete the fields as appropriate.
Some fields are described in the following table.
Field Comments Sequence #
Type the sequence number for the rule. This number indicates the order in which the rule is evaluated relative to the other rules in the rule set.
Name
Type a name for the rule (for example, Price list is Null).
Expression
Use the Expression Designer to create a sophisticated validation expression for verification. For example, the [Price List] IS NOT NULL expression verifies that the agreement is associated with a price list. The field of the business component to validate is in the brackets.
Business Component
Select the business component for the rule.
Apply To
Select a value to indicate the records that apply to the rule. Values include Current Record and All Records.
Return Code
Select the code of the validation message for the rule. For more information, see Creating Messages for Agreement Validation.
Setting Up Approval for Agreements
You can set up agreement approval to make sure that when an agreement is worth more than a specified sum, users must obtain approval from the appropriate employee.
By default, users must submit an agreement for approval if the agreement total exceeds $50,000. You can change this validation rule or add additional rules for further validation before users submit agreements for approval. For more information, see Creating Rules for Agreement Validation and Submitting Agreements for Approval (End User).
This topic contains the following related information:
This task is a step in Roadmap for Administering Agreements.
Viewing Data for Agreement Approval
Before you set up approval for agreements, view the data for agreement approval.
To view the workflows that the agreement approval signal calls
Navigate to the Administration - Order Management screen, then the Signals view.
In the Signals list, select the ApproveItem record.
In the Versions list, drill down on the latest workspace.
The Actions view appears.
Note the following information in the Actions list:
The Sequence field shows the order of the calls to the business services.
The Service Name field shows the names of the workflows that the signal calls.
The signal updates the process for the order, quote, or agreement before the agreement is submitted for approval. For more information about agreement approval, see ISS Approval (Agreement) Workflow.
If you want the approver to receive an email in addition to placing the agreement in the Inbox of the approver, then change the SendMail parameter to TRUE in the ApproveItem signal.
You can also view the rule for agreement approval.
To view the rule for agreement approval
Navigate to the Administration - Data Validation screen, then the Rule Sets view.
Select the Agreement Approval record, and click the Rules view tab.
The Rules view shows the expression, business component, and return code for the rule.
(Optional) Change the default amount of 50,000, or make any other changes to the rule.
Defining the List of Agreement Approvers
You must define a list of approvers so that the agreement is forwarded to the appropriate approver Inbox for approval or rejection.
To view a list of the agreements for approval, approvers can navigate to the Inbox Items view of the Inbox screen. For more information about using the Inbox, see Siebel Applications Administration Guide.
To define the list of agreement approvers
Navigate to the Administration - Application screen, then the Approval Admin view.
In the Approval Item list, select the Agreement Approval record.
In the Approval Flow Type field, select the correct option as follows:
Select Sequential to distribute the agreement approval to approvers in the sequence specified in the Sequence number (#) field.
The agreement approval is routed to the next approver only if the current approver approves the request. If any approver in the approval chain declines the approval request, then the approval is rejected and no further routing is conducted.
Select Parallel to distribute the agreement approval to all approvers simultaneously for approval.
The agreement approval is rejected if at least 1 approver declines the approval request.
In the Approval Stage list, create a new record for each user who must approve the agreement, and complete the fields as appropriate.
Some fields are described in the following table.
Field Comments Sequence #
Displays a number for the sequence of the approval stage in the current agreement approval. Approval stages are executed in numerical order by using this number.
Approval Type
Select a value for the approval type. Values include Position, Employee, and Either.
Owner Login Name
Select the login name for the approval stage. This field is relevant only if the Approval Type field is Employee.
Owner Position
Select the position for the approval stage. This field is relevant only if the Approval Type field is Position.
Creating Agreements from Orders and Quotes
When a user clicks the Auto Contract button from either a quote or an order, the created agreement contains a large amount of information from the original record. This data is copied from the quote or order to the new agreement.
The process for copying information from orders and quotes to agreements uses signals and data maps. For more information about signals and data maps, see Siebel Order Management Infrastructure Guide.
This task is a step in Roadmap for Administering Agreements.
Process Flow for Data Copying
Data mapping and signals work together to call the ISS Copy Service business service to the copy the appropriate data. For more information about this business service, see ISS Copy Service Business Service.
A description of this copy process follows:
An administrator makes sure that the signals are set up appropriately.
An administrator defines a data map. This definition is stored in the Siebel database.
A user makes a request (for example, by clicking the Revise button). The request initiates a signal (for example, ReviseCopyAgreement) that launches the ISS Copy Service business service.
The ISS Copy Service business service retrieves the variable map definition, either from the Siebel database or from the cache.
The ISS Copy Service business service issues the required queries and business service calls to construct a property set.
The controller workflow calls the Copy method for ISS Copy Service business service and passes the ReviseAgreement data map as a parameter.
The ISS Copy Service business service writes the updated field values back to the Siebel database.
Viewing Signals that Control Data Copying
Every interaction between order management and agreement components occurs through an application programming interface (API) invocation. These API invocations are signals. A signal is a request to perform a business function.
You can configure or redirect signals. A signal action property specifies the business service or workflow to call when the signal is raised. Signal action parameters are the input arguments that signal action workflows or business service methods. You can configure these input arguments. You can define the business service methods and workflows using the Signals view of the Administration - Order Management screen.
To view the signals that control the data copying
Navigate to the Administration - Order Management screen, then the Signals view.
In the Signals list, select the following signal names:
AutoAgreeFromOrder. This signal is called when a user clicks Auto Contract in the Agreements view in the List view of the Service Orders screen. The current order is copied to an agreement using the ISS Copy Service business service.
AutoAgreement. This signal is called when a user clicks Auto Contract in the Quotes screen. The current quote is copied to an agreement using the ISS Copy Service business service.
ReviseCopyAgreement. This signal is called when a user clicks Revise in the form in the Line Items view of the Agreements screen. The agreement record and the fields in the agreement are copied, and then the original agreement object is locked.
In the Versions list, drill down on the latest workspace for each of these signals.
The Actions view appears.
Note the following information in the Actions list:
The Sequence field shows the order of the calls to the business services.
The Service Name field shows the names of the workflows that the signal calls.
(Optional) If you want to change the sequence of calls by adding additional signal actions, then complete the required changes in the Actions list.
Viewing Data Maps for Copying Data
Data maps align the fields from the source object to the destination object. The MapName process maps the fields copied between objects.
AutoAgreeFromOrder and AutoAgreement data maps map the quote and order data to the agreement when the ISS Copy Service business service is called. These data maps are passed into the business service as a parameter. You can extend these data maps if you must pass more data from the quote or order to the agreement.
Alternatively, if users want to create an order or quote from an agreement, then administrators can create a new signal to call the ISS Copy Service business service, and map between the agreement and the quote or order. For example, complete this process to create a quote for a renewal. Then call the signal from the Renewal button to automatically create the quote or order.
To view the data maps for copying data
Navigate to the Administration - Application screen, then the Data Map Administration view.
In the Data Map Object list, select the following data maps:
AutoAgreeFromOrder. This data map maps order data to the agreement.
AutoAgreement. This data map maps quote data to the agreement.
Note the following information in the Data Map Component list:
The Source Business Component field shows the source business components for the order or quote.
The Destination Business Component field shows the destination business component for the agreement.
For example, in the AutoAgreeFromOrder data map, the Order Entry - Line Items source business component maps to the FS Agreement Item destination business component.
(Optional) If you want to change the mapping, then select the new source and destination business components in the Data Map Component list.
Configuring Data Maps to Copy Specified Data
You can use conditional data mapping capabilities to specify that only certain information is copied to the agreement. To accomplish this copying, you can add a source search specification to the data map. The ISS Copy Service business service then copies a source expression to a destination field.
This task is a step in Roadmap for Administering Agreements.
To configure a data map to copy specified data
Navigate to the Administration - Application screen, then the Data Map Administration view.
In the Data Map Object list, select the appropriate data map record.
Scroll down to the Data Map Component list, and select the appropriate component record.
In the Advanced Options field, add a source search specification as follows:
Click the Select button in the Advanced Options field.
Create a new search specification.
In the Name field, select Source Search Specification.
In the Value field, add a source expression in the CSSQuery language used for calculated fields using the format in the following example:
IIf ([Flag] = 'Y', [Field], "")
This expression copies the field if the flag is set. Otherwise, it copies the null string.
Example: Copying Only Service Products from Orders to Agreements
The following example uses a search specification to specify that only service products are copied from an order to an agreement.
To copy only service products from orders to agreements
Navigate to the Administration - Application screen, then the Data Map Administration view.
In the Data Map Object list, select the AutoAgreeFromOrder data map record.
Tip: You can make similar changes to the AutoAgreement data map (for mapping data from the quote to the agreement) if you want to quote only service products.Scroll down to the Data Map Component list, and select the Line Items record.
In the Advanced Options field, add a source search specification using the following expression:
IIF ([Sales Service Flag] = 'Y', ([Sales Service Flag], "").
The data map now copies only service products from the order.
Asset-Based Ordering
Users can create assets from orders using asset-based ordering. When asset-based ordering is enabled in Siebel Order Management, users can use the Installed Assets view of the Accounts screen to create orders by using the existing assets for the customer. Installed assets can include both products and services. When you use the appropriate views with the automated asset-based order workflows, the time to create quotes, orders, and agreements for asset records is reduced because many tasks are automated.
The user covers the assets with the service product on the order, and clicks Auto Contract in the Agreements view in the List view of the Service Orders screen. The agreement is created with only the service product for the agreement line item and the added assets as covered assets. Line items that are not related to service are not included in the agreement.
Allowing Automatic Creation of Renewal Quotes and Opportunities
Frequently, 90, 60, or 30 days prior to an agreement expiration date, a company wants to contact the customer about an agreement renewal. This customer contact is an opportunity for the appropriate salesperson to get reacquainted with the customer and to deliver a quote for renewing the maintenance agreement. Such customer contact can help avoid costly expiration of maintenance agreements and the associated revenue loss.
You can automate this renewal process for agreements and entitlements in the following ways:
Renew the agreement line item and all the assets related to it.
Create an opportunity for the account.
Create a quote for the agreement renewal and associate the opportunity and the agreement with the quote.
In the preconfigured Siebel Field Service application, the automated renewal process creates only another agreement line item for the agreement. Typically, administrators want to create a new opportunity and corresponding quote for the renewal.
Administrators automate the creation of an opportunity and quote to make sure that renewal terms and the renewal schedule are always current. This automation can produce renewal quotes well in advance of the renewal date so that customers are prepared to adjust purchase orders and accounts payable to accommodate the new invoice. Consequently, you do not overlook renewal dates, and you avoid lapses in service coverage.
This task is a step in Roadmap for Administering Agreements.
To allow automatic creation of renewal quotes and opportunities
Add steps to the following workflows to set up the source object (Agreement Item) and the destination object (Quote or Opportunity):
FS - Agreement Renewal Item
FS - Agreement Renewal All
For more information, see FS - Agreement Renewal Item Workflow and FS - Agreement Renewal All Workflow.
Create a data map setup to copy the correct fields to the destination objects.
When the renewal process runs, it creates the corresponding agreement line item records, quote, and opportunity. For more information, see Configuring Data Maps to Copy Specified Data.
Asset Process Flow from Quotes and Orders to Agreements
When a customer wants a quote, the following steps occur:
The user creates a quote for numerous products. This quote contains an after-sale service component to cover the quoted products.
When the customer agrees with the quote, the users creates the order for the products and the product service coverage.
In the Assets view in the Catalog view in the List view of the Sales Order screen, the user selects the Auto-Asset command in the menu. An instance of the asset is created from the quoted products, and the instance is associated with the quote.
In the Agreements view in the List view of the Quotes screen, the user clicks the Auto Contract button to create an agreement with the header information corresponding to the order. The agreement line item is now the service product, and the assets created from the quote are associated with the agreement line item. The user can add assets to or remove assets from this list as required.
Note: The pricing of the service agreement is a combination of the pricing of the service product and the asset that the service product covers.
Adding Multiple Assets to Agreement Line Items
Any additional assets that you add to an agreement line item do not affect on the overall price for the agreement line item. Only the primary asset affects the price. To allow the pricing to change by using all assets in an agreement line item, you must perform some additional configuration. For more information, see Defining Asset-Based Pricing.
The intersection table between Line Items and Asset allows the same line item to include multiple assets. The original Foreign Key to Asset, Covered Asset Id, defines the primary asset.
This task is a step in Roadmap for Administering Agreements.
To add multiple assets to an agreement line item
Navigate to the Agreements screen, then the List view.
Drill down on the Name field for a selected agreement, and click the Pricing view tab.
On the link bar, click Assets.
In the Line Items list, select the record to which you want to add the assets.
Scroll down to the Assets list, create a new record for each asset, and complete the fields as appropriate.
Some fields are described in the following table.
Field Comments Primary
Select this check box to indicate the asset is the primary asset for the line item.
Asset #
Select the number of the asset. When you select the appropriate asset from the dialog box that appears, the rest of the fields in this view are populated with the related asset information.
Creating Revenue Plan Templates
You must set up revenue plan templates before users can add the templates to agreement line items. In the template, you can assign the units to use (for example, days, weeks, or months). You must also specify the product associated with the revenue template. For more information about adding the plans to agreement line items, see Managing Line Item Revenue for Agreements (End User). For more information about creating revenue plan templates, see Siebel Forecasting Guide.
This task is a step in Roadmap for Administering Agreements.
To create a revenue plan template
Navigate to the Administration - Forecast screen, then the Revenue Templates view.
Create a new revenue template record, and complete the fields as appropriate.
Creating Term Templates
You use term templates to create standard terms that users can add to agreements. Force Majeure is a special term that protects against events beyond the control of the service company. For more information about adding defined terms to agreements, see Adding Terms to Agreements (End User).
The following paragraph is an example of a description of the Force Majeure term:
Each party is excused from performance for any period when it is prevented from performing any obligation, in whole or in part, as a result of socioeconomic, global or natural causes beyond its control, and without its fault or negligence including acts of God, strikes, lockouts, riots, acts of war, epidemics, terrorism, and power failures.
This task is a step in Roadmap for Administering Agreements.
To create a term template
Navigate to the Administration - Contracts screen, then the Term Templates view.
Create a new term template record, and complete the fields as appropriate.
Some fields are described in the following table.
Field Comments Term #
Displays an automatically assigned term number that you can change to an identifiable name for the term.
Term Name
Type a representative description for the term (for example, Term Length).
Type
Select the legal type of the term (for example, Standard, Non-Standard, or Special).
Description
Type a description of the actual term for the agreement.
Running Charge Plans for Agreement Line Items Using Workflows
You can use workflows to automatically run charge plans and create charges for agreement line items. For more information, see Defining Charge Plans for Agreement Line Items (End User).
You can use the FS - Generate Agreement Charge workflow and the FS - Generate All Agreement Charges workflow to set up a repeating component job to run charges. For more information, see FS - Generate Agreement Charge Workflow and FS - Generate All Agreement Charges Workflow.
This task is a step in Roadmap for Administering Agreements.
To run charge plans for agreement line items using a workflow
Navigate to the Administration - Server Management screen, then the Jobs view.
In the Jobs list, create a new Job record.
In the Component/Job field, select Workflow Process Manager.
Enter the appropriate Repeat Interval and Repeat Unit in the Job Detail view.
For example, a Repeat Unit of Weeks and a Repeat Interval of 1 runs the charge generation process on a weekly basis.
Scroll down to the Job Parameters list, and create a new parameter record.
In the Name field, select Workflow Process Name, and in the Value field, enter FS - Generate Agreement Charge or FS - Generate All Agreement Charges.
Click Start in the Jobs list.
Process of Administering Entitlements
The following list shows the tasks that administrators typically perform to administer entitlements. Your company might follow a different process according to its business requirements.
To administer entitlements, administrators perform the following tasks:
Changing System Preferences for Entitlements
The system preferences for entitlements determine the functionality of the Verify button. For more information about this button, see Entitlement Selection.
This task is a step in Process of Administering Entitlements.
To change the system preferences for entitlements
Navigate to the Administration - Application screen, then the System Preferences view.
Select a system preference for entitlements.
For more information about the system preferences for entitlements, see Changing System Preferences for Entitlements.
In the System Preference Value field, enter TRUE or FALSE.
To implement changes to system preferences, restart the Field Service server.
The following table describes the system preferences for entitlements.
Table System Preferences for Verifying Entitlements
| System Preference Name | Description |
|---|---|
Entitlement: Verify Consumer |
Sets the conditions for checking the authorization of the contact requesting service. If the value is TRUE, then the displayed entitlements must meet one of the following criteria:
If no contact is selected, then the entitlement is verified using the other entitlement system preferences. |
Entitlement: Verify Dates |
Checks that the service request is in the time span of the entitlement. If the value is TRUE, then only entitlements that provide coverage on the opened date of the service request, a date between the start and end dates for the entitlement, appear. If the entitlement has no start or end date, then it does not appear. |
Entitlement: Verify Product |
Checks that the asset or product is entitled to service. If the value is TRUE, then the displayed agreements must meet one of the following criteria:
If no product is selected, then the entitlement is verified using the other entitlement system preferences. |
Viewing User Properties for Entitlements
You set the Post Default Created Date to Date Saved user property in the Service Request business component to control the behavior of the Opened field in new service request records. This setting can affect how entitlements are handled. For more information about the values for this user property, see Setting Default Date and Time for Opened Field.
This task is a step in Process of Administering Entitlements.
To view the user properties for entitlements
Log in to Siebel Tools as an administrator.
In the Object Explorer, navigate to Business Component.
Query for the Service Request business component.
Navigate to Business Component, then Business Component User Prop.
Query for the Post Default Created Date To Date Saved user property.
Creating Entitlement Templates
Entitlement templates allow you to predefine entitlements that specify the type of service provided. An entitlement template includes information about the default coverage for the accounts, contacts, preventive maintenance, billing, products, and pricing.
For example, your organization sells a range of products and associated service products for after-sales service. You can create a service product, such as Bronze Service, as an entitlement template and associate this service product with a service product that includes a price for the after-sales service package. The package can denote the availability of technical support, a preventive maintenance schedule, and whether parts and labor are additional costs.
When you use automated entitlement (by clicking the Auto Entitlement button in the Line Items view of the Agreements screen), the correct entitlements are automatically located from the entitlement templates that correspond to the service products in an agreement.
This task is a step in Process of Administering Entitlements.
To create an entitlement template
Navigate to the Administration - Contracts screen, then the Entitlement Templates view.
Create a new entitlement template record, and complete the fields as appropriate.
Some fields are described in the following table.
Field Comments Name
Displays an automatically assigned template number that you can change to an identifiable name for the template.
Units
Select the unit of measurement for the initial covered quantity. Values include Calls and Service Requests.
Initial Quantity
Type the number of covered units in the entitlement.
Service Hours
Select the hours of service that the entitlement covers. For example, a service package might cover only 5 days a week between the hours of 9:00 A.M. and 5:00 P.M. The service hours influence the committed date and time for responding to the service request.
You add service hours schedules in the Schedules view of the Administration - Service screen.
In the More Info view, complete the fields as appropriate.
Some fields are described in the following table.
Field Comments Billable
Select this check box to indicate services that this entitlement provides are billable to the customer.
Activity Override
Select this check box to indicate the rate and price lists for the entitlement override the rate and price lists for a service request. For entitlement-based invoicing, select this check box.
Include Account
Select this check box to indicate the entitlement automatically covers the account on the agreement header.
Account All Contacts
Select this check box to indicate the entitlement covers all contacts associated with the account. The effect is to select the All Contacts check box in the Accounts view in the Entitlements view in the List view of the Agreements screen.
Account All Products
Select this check box to indicate all products associated with the account under this entitlement are covered. The effect is to select the All Products check box in the Accounts view in the Entitlements view in the List view of the Agreements screen.
Include Contact
Select this check box to indicate the entitlement automatically covers the contact from the agreement header.
Contact All Products
Select this check box to indicate the entitlement automatically covers all products for the contact. The effect is to check the All Products check box in the Contacts view in the Entitlements view in the List view of the Agreements screen.
Defining Metrics for Entitlement Templates
In the Metrics view, you can add performance requirements for an entitlement template. These metrics are usually associated with a service-level agreement within an agreement. The agreement often indicates the target metrics for response time and resolution time. The response and resolution times are frequently associated with the priority of the service request.
For example, the response time value sets the Date Committed field in the service request. This metric indicates that the service organization is committed to responding to issues by a certain date and time. You can use resolution time interchangeably with response time. However, the 2 metrics indicate different values to track. The service organization is committed to resolve the issue before the resolution time.
Another example of a metric that you can set is the escalation time. This metric sets the Agent Escalation Time field (in the Service Requests List of the Service screen). This metric indicates that if no action occurs for the service request by the escalation time, then an email is sent to a manager warning that the service department might not meet a key metric in a service-level agreement. Such violations of service agreements can have both financial and legal repercussions for a service department.
You can add more metrics for monitoring in the Service Metrics view of the Administration - Service screen.
This task is a step in Process of Administering Entitlements.
To define a metric for an entitlement template
Navigate to the Administration - Contracts screen, then the Entitlement Templates view.
Select an entitlement template record, and click the Metrics view tab.
Create a new metric record, and complete the fields as appropriate.
Some fields are described in the following table.
Field Comments Value
Select the value of the metric.
Units
Select the unit of measurement for the Value field. Values include Days, Hours, and Seconds.
The Hours value does not support decimal places in the Value field. For example, you cannot select Hours in this field, and enter 0.25 in the Value field to specify 15 minutes. Instead, select Seconds in this field, and enter 900 in the Value field to specify 15 minutes.
You can also add Minutes to the List of Values (LOV) for this field. For more information about adding a value to an LOV for a field, see Siebel Applications Administration Guide.
Defining Products for Entitlement Templates
You define specific products or assets in an entitlement template in the Products view. You can also define products or assets in an entitlement template in the Service Products view.
This task is a step in Process of Administering Entitlements.
To define a product for an entitlement template
Navigate to the Administration - Contracts screen, then the Entitlement Templates view.
Select an entitlement template record, and click the Products view tab.
Create a new product record, and complete the fields as appropriate.
Associating Entitlement Templates with Products
You associate entitlement templates with products in the Service Information view.
This task is a step in Process of Administering Entitlements.
To associate an entitlement template with a product
Navigate to the Administration - Product screen, then the Products view.
Select a product record, and click the Service Information view tab.
On the link bar, click Entitlements.
Create a new entitlement record, and complete the fields as appropriate.
Some fields are described in the following table.
Field Comments Name
Select an entitlement template.
Agree Line Item Products
Select this check box to indicate the product from the agreement line item is copied to an automatically generated entitlement that users create by clicking the Auto Entitlement button.
Entitlement Template Products
Select this check box to indicate all products associated with the entitlement template are copied to an automatically generated entitlement that users create by clicking the Auto Entitlement button.
All Contract Line Prod Flag
Select this check box to indicate the products from all agreement line items are copied to an automatically generated entitlement that users create by clicking the Auto Entitlement button.
Defining Service Details for Entitlement Templates
In the Service Details view, you can define each type of service that an entitlement covers and the billing terms for each service. Terms can include a fixed service charge and specific billable time, expenses, and parts.
Note the following effects of a service detail record:
Service Details apply to the selected activity type and not to a specific entitlement template.
No additional charges or discounts are applied to a service request activity if no corresponding service detail record is associated with the entitlement template for the service request.
No additional charges or discounts are applied to a billable item for an activity in a service request if no corresponding exception record is associated with the service detail record in the entitlement template for the service request.
This task is a step in Process of Administering Entitlements.
To define service details for an entitlement template
Navigate to the Administration - Contracts screen, then the Entitlement Templates view.
Select an entitlement template record, and click the Service Details view tab.
Create a new service detail record, and complete the fields as appropriate.
Some fields are described in the following table.
Field Comments Type
Select the type of activity for the service detail record. This required value determines the values in other fields that appear in the Service Details view.
Expenses Billable
Select this check box to indicate the service expenses for the entitlement are billable to the customer.
Parts Billable
Select this check box to indicate the parts for the entitlement are billable to the customer.
Service Charge
Type the amount of a fixed charge to include in the invoice. If service is based on a flat rate, then this charge might be the only charge on the invoice.
Defining Pricing Details for Entitlement Templates
In the Pricing Details view, you can define entitlement-based pricing for quotes and orders. You can discount products purchased under the agreement. When creating a sales or service order, the user can select an entitlement that applies special pricing. For example, when a product is faulty and needs replacement under the agreement, the full list price is not paid.
This task is a step in Process of Administering Entitlements.
To define pricing details for an entitlement template
Navigate to the Administration - Contracts screen, then the Entitlement Templates view.
Select an entitlement template record, and click the Pricing Details view tab.
Create a new pricing detail record, and complete the fields as appropriate.
Some fields are described in the following table.
Field Comments Type of Calculation
Select the type of price adjustment. Values include Discount Amount and Markup Amount.
Adjustment Value
Type the amount of the price adjustment for the value in the Type of Calculation field.
Defining Preventive Maintenance Plans for Entitlement Templates
In the Preventive Maintenance view, you can add a record for each preventive maintenance plan to include in the entitlement template. When selecting a plan from the Add Preventive Maintenance Plans dialog box, select the check box in the Active field to select a plan. Selecting a record without selecting this check box fails to select the plan.
This task is a step in Process of Administering Entitlements.
To define a preventive maintenance plan for an entitlement template
Navigate to the Administration - Contracts screen, then the Entitlement Templates view.
Select an entitlement template record, and click the Preventive Maintenance view tab.
Create a new preventive maintenance plan record, and complete the fields as appropriate.
Defining Exceptions for Service Activities
In the Service Details view, you can define exceptions for time, expenses, and products. For example, if labor (time) is generally not billable, then only the exceptions are billed. Conversely, if time is generally billable, then the exceptions are not billed.
Exceptions for time, expenses, and products define the pricing of time, expenses, and products that are associated with an activity type that does not have standard pricing. Time and expense exceptions include a fixed service charge, discounts, and a limit on the billable amount. Product exceptions include discounts, markups, and overrides.
This task is a step in Process of Administering Entitlements.
To define an exception for a service activity
Navigate to the Administration - Contracts screen, then the Entitlement Templates view.
Select an entitlement template record, and click the Service Details view tab.
Select a service detail record, scroll down to the Time Exceptions list, and complete the following steps:
Create a new time exception record, and complete the fields as appropriate.
From the drop-down list at the start of the Time Exceptions list, select Expense Exceptions, create a new expense exception record, and complete the fields as appropriate.
From the drop-down list at the start of the Expense Exceptions list, select Product Exceptions, create a new product exception record, and complete the fields as appropriate.
Adding Schedule Information to Entitlements
You must define the service schedule for an entitlement. You can also specify exceptions so that the entitlement does not apply to holidays and other nonwork days. For more information about how to define hours of availability and exception hours for a schedule, see Defining Schedule Hours.
This task is a step in Process of Administering Entitlements.
Configuring Auto-Entitlement for Quotes and Orders
Entitlements are part of an agreement and provide a set of pre-negotiated prices that you can use in transactions (quotes and orders). In the quote or order, a user can select an entitlement to apply the order header. The user can also use the auto-entitlement functionality to determine the best entitlement for an order line item. You can configure Siebel Field Service to determine a suitable entitlement for the quote or order header. For more information about generating charges and invoices from agreements, see Charges and Invoices
To allow entitlement-based pricing, you can add an Auto Entitlement button to the Quote Detail View and Order Entry - Line Items Detail View (Sales). Users can then click this button to automatically associate an entitlement with a quote or order. This button allows entitlement-based pricing for quotes and orders. The prices of the products on the order or quote line item are adjusted by using the entitlement. For more information about how to add buttons to Siebel Business Applications, see Configuring Siebel Business Applications.
This task is a step in Process of Administering Entitlements.
To configure auto-entitlement for quotes and orders
Add a button to the following quote and order applets:
Quote Item List Applet. The FS - Verify Entitlement Quote Best Price workflow uses this applet.
Order Entry - Line Item List Applet (Sales). The FS - Verify Entitlement Order Best Price workflow uses this applet.
For each button, call the VerifyEntitlement method.
Change the event object for the FS - Verify Entitlement Order Best Price workflow to point to the Order Entry - Line Item List Applet (Sales).
Typically, this event object points to the Order Entry - Line Item List Applet. For more information, see FS Create Entitlement Business Service.
Process of Managing Agreements
The following list shows the tasks that end users typically perform to manage agreements. Your company might follow a different process according to its business requirements.
To manage agreements, end users perform the following tasks:
Creating Agreements (End User)
You can create agreements to describe the products and services that you organization provides to a customer and the financial relationship between your organization and the customer. After you create an agreement, you can copy it. For more information about copying agreements, see About Agreements.
This task is a step in Process of Managing Agreements.
To create an agreement
Navigate to the Agreements screen, then the List view.
Create a new agreement record, and complete the fields as appropriate.
Some fields are described in the following table.
Field Comments Valid
Select this check box to indicate the agreement is valid. You must select this check box to enable entitlement evaluation when verifying coverage with the Verify button. For more information, see Entitlement Selection.
Also, preventive maintenance actions for assets are generated only if you select this check box, and the selected entitlement is active according to its start and end dates.
Start
Select the date and time the agreement is planned to start.
End
Select the date and time the agreement ends.
Currency
Select a code for the type of currency (for example, USD for U.S. dollars) for the agreement.
For agreement-based invoicing, this value is used as the target, or overriding, currency. Before performing invoice calculations, all the entered currency values, such as the values in the NPR plan and the usage plan, are converted to the target currency. Calculations are then performed in the target currency. After the calculations are complete, these values are written back to invoices, invoice line items, and invoice line item details, in the target currency.
Effective
Select the actual date and time the agreement is effective. This field value can be later than, earlier than, or the same as the Start field value.
If you want to copy the agreement, then complete the following steps:
Drill down on the Name field for the agreement.
In the Agreements form, click Revise.
The agreement is copied, and the revision number is increased. The revision number is suffixed to the original agreement name. For example, a copied agreement for Customer Agreement might be Customer Agreement (002).
Verifying Agreements (End User)
When your verify an agreement, the agreement details are validated against a set of rules.
This task is a step in Process of Managing Agreements.
To verify an agreement
Navigate to the Agreements screen, then the List view.
Select an agreement.
In the agreement form, click the menu button, and select Verify.
The results of the validation process then appear in a dialog box.
Associating Other Records with Agreements (End User)
Complete the procedures in this topic to associate other records with agreements.
This topic contains the following information:
This task is a step in Process of Managing Agreements.
Associating Primary Contacts with Agreements
You can associate a primary contact with an agreement.
To associate a primary contact with an agreement
Navigate to the Agreements screen, then the List view.
Drill down on the Name field for a selected agreement, and click the Primary Contacts view tab.
On the Primary Contacts form, the fields for the Legal Contact, Billing Contact, and Shipping Contact are populated with the primary contact for the account.
If you want to change a primary contact, then drill down on the Account field for a selected agreement.
In the Last Name field, select another contact.
The list of available contacts is limited to the contacts that are associated with the account.
Associating Activity Plans with Agreements
When you associate an activity plan with an agreement, the activities in that activity plan are automatically associated with the agreement.
To associate an activity plan with an agreement
Navigate to the Agreements screen, then the List view.
Drill down on the Name field for a selected agreement, and click the Activity Plans view tab.
Create a new activity plan record, and complete the fields as appropriate.
In the More Info view, select Lock to prevent Assignment Manager from assigning activities that are already in this activity plan.
Associating Activities with Agreements
Instead of using activity plans to automatically associate activities with an agreement, you can manually associate activities with the agreement.
To associate an activity with an agreement
Navigate to the Agreements screen, then the List view.
Drill down on the Name field for a selected agreement, and click the Activities view tab.
Create a new activity record, and complete the fields as appropriate.
Associating Financial Details with Agreements
The Financials view of the Agreements screen includes the following sections:
Origin and Renewal Details. This section contains order and quote information for the agreement. In the Agreements view in the List view of the Quotes screen and the Agreements view in the List view of the Service Orders screen, users can click the Auto Contract button to automatically create an agreement by using the quote and order content. Data mapping determines the fields that are copied into the agreement. For more information, see Configuring Data Maps to Copy Specified Data.
This section also includes renewal information for the agreement line items.
Total Amounts. This section contains the revenue totals for the agreement and includes net discounts, adjustments, taxes, and shipping. You can synchronize this section with an accounts receivable application to provide suitable visibility for agreement revenue.
Estimated and Actual Revenue. This section contains revenue and cost information. Base revenue on price lists and cost lists in the Administration - Pricing screen. This estimated and actual information is useful for agreement renewals. For example, an agreement can have estimated revenue that is calculated using all the products with a service agreement up for renewal. However, when the negotiation of the agreement renewal occurs, support for some of the products no longer applies because the products are no longer used, the products are obsolete, or the products are bundled differently.
Revenue Recognition and Invoice Details. This section contains information about the invoiced amount, the date of the invoice, and the invoice schedule. The Charge and Invoice module can populate this information.
This view is also useful for co-term information. For more information, see Co-Terms for Agreements.
To associate financial details with an agreement
Navigate to the Agreements screen, then the List view.
Drill down on the Name field for a selected agreement, and click the Financials view tab.
In the Financials form, complete the fields as appropriate.
Some fields are described in the following table.
Field Comments Term Months
Displays the number of months in the term of the agreement header. This field is calculated as follows: (Agreement End Date - Agreement Start Date)/30.
Renewal Term
Type the time interval for the next term, if the customer decides to renew the agreement.
Renewal %
Type the percentage likelihood of the customer renewing.
Months Left
Displays the number of months remaining in the term. This field is calculated as follows: (Agreement End Date - Current Date)/30.
Est Margin
Displays the difference between the estimated cost and estimated revenue.
Actual Margin
Displays the difference between the actual cost and the actual revenue.
Rev Recognition
Select a value for revenue recognition. Revenue recognition is based on the months remaining in the term. Values include Annually, As Received, Daily Monthly, and Quarterly.
Associating Terms and Shipping Information with Agreements
You can associate terms and shipping information with an agreement.
To associate terms and shipping information with an agreement
Navigate to the Agreements screen, then the List view.
Drill down on the Name field for a selected agreement, and click the Terms and Totals view tab.
Complete the fields as appropriate.
Some fields are described in the following table.
Field Comments Products
Displays the sum of the agreement line items for which the Service field (in the Line Detail view for the line item) is not selected, less discounts.
Services
Displays the sum of the agreement line items for which the Service field (in the Line Detail view for the line item) is selected, less discounts.
Adjustment
Type an adjustment amount for the term. After you enter an amount in this field, that amount is subtracted from the value in the Total field.
Shipping
Displays the shipping cost. The value is this field is the same as the value in the Shipping Charges field.
Associating Products with Agreements
The Line Items view includes a description of each product sold or provided under a selected service agreement.
To associate a product with an agreement
Navigate to the Agreements screen, then the List view.
Drill down on the Name field for a selected agreement.
In the Line Items view, create a new line item record, and complete the fields as appropriate.
Some fields are described in the following table.
Field Comments Line #
Displays a number for the agreement line.
Product
Select the product for the line item. The product can be a service product.
If you select a product that includes child products (components), then the parent product appears on the agreement line, and the child products appear on additional child lines for the parent line.
On the link bar, click Line Detail.
Note: Some fields in the Line Detail view are automatically populated. The product that you select in the Line Items view determines the fields that are populated.Create a new line detail record, and complete the fields as appropriate.
Some fields are described in the following table.
Field Comments Sequence
Displays a number for the sequence of the line item. This field indicates the hierarchical relationship between line items.
Asset #
Select the number of an asset associated with the product for the line item or the number of an asset for a different product. This field is used for asset-based pricing. For more information, see Defining Pricing for Agreements.
Specify an asset of the product described for the line item, for example, when you specify a trade-in. This situation can include a discount available only for trade-ins.
Usage Asset #
Select the number of the asset to use for billing of usage. For more information, see Creating Charge Consolidation Plans.
Manual Discount Amount
Type the discount amount applied directly to the selected line item.
Manual Discount %
Type the discount percentage applied directly to the selected line item.
Line Discount %
Displays the discount percentage for the selected line item. This field is calculated as follows: Discount Amount/Start Price.
Associating Files with Agreements
You can add files that were created in another program (for example, spreadsheet files) to agreements. These files are stored in compressed form.
To associate a file with an agreement
Navigate to the Agreements screen, then the List view.
Drill down on the Name field for a selected agreement, and click the Attachments view tab.
Create a new attachment record, and complete the fields as appropriate.
Submitting Agreements for Approval (End User)
After you create an agreement and associate other records with it, you can submit the agreement to the appropriate employees for approval.
This task is a step in Process of Managing Agreements.
To submit an agreement for approval
Navigate to the Agreements screen, then the List view.
Drill down on the Name field for a selected agreement.
In the Agreements form, click the menu button, and select Generate Approvals.
The list of approvers is updated with the approvers for the approval group. When the approver changes the status of the approval to Approved or Rejected, the list is updated.
Viewing Entitlements and Products for Agreements (End User)
Occasionally, you might want to view the entitlements and products for an agreement.
This task is a step in Process of Managing Agreements.
To view the entitlements and products for an agreement
Navigate to the Agreements screen, then the List view.
Drill down on the Name field for a selected agreement, and click the Entitlements view tab.
The start and end dates indicate whether the entitlement is active.
Select an entitlement record, and click the Product view tab.
Viewing Agreements for Contacts (End User)
Occasionally, you might want to view all of the agreements for a contact.
This task is a step in Process of Managing Agreements.
To view the agreements for a contact
Navigate to the Contacts screen, then the Contacts List view.
Drill down on the Last Name field for a selected contact, and click the Agreements view tab.
Renewing Line Items for Agreements (End User)
You can create and modify renewal terms of agreement line items. You can then manually renew the line items.
This task is a step in Process of Managing Agreements.
To renew a line item of an agreement
Navigate to the Agreements screen, then the List view.
Drill down on the Name field for a selected agreement.
In the Line Items view, select a line item record.
On the link bar, click Renewal Escalator.
To define the renewal terms of the line item, create a new record for renewal escalation in the Renewal Escalator list, and complete the fields as appropriate.
Some fields are described in the following table.
Field Comments Line Price Adjustment Type
Select the type of adjustment for the line price. Values include:
Discount Amount. Decreases the price of the renewed line item by the amount in the Line Price Adjustment Amount field.
% Discount. Decreases the price of the renewed line item by the percentage amount in the Line Price Adjustment Amount field.
Markup Amount. Increases the price of the renewed line item by the amount in Line Price Adjustment Amount field.
% Markup. Increases the price of the renewed line item by the percentage amount in Line Price Adjustment Amount field.
Price Override. Preserves the price of the renewed line item regardless of the amount in Line Price Adjustment Amount field.
Line Price Adjustment Amount
Type an amount or a percentage for the value in the Line Price Adjustment Type field.
NRC Adjustment Type
Select the type of adjustment for the nonrecurring charge. Values include:
Discount Amount. Decreases the nonrecurring charge of the renewed line item by the amount in the NRC Adjustment Amount field.
% Discount. Decreases the nonrecurring charge of the renewed line item by the percentage amount in the NRC Adjustment Amount field.
Markup Amount. Increases the nonrecurring charge of the renewed line item by the amount in NRC Adjustment Amount field.
% Markup. Increases the nonrecurring charge of the renewed line item by the percentage amount in NRC Adjustment Amount field.
Price Override. Preserves the nonrecurring charge of the renewed line item regardless of the amount in NRC Adjustment Amount field.
NRC Adjustment Amount
Type an amount or a percentage for the value in the NRC Adjustment Type field.
In the Line Items view, click Renewal.
For the selected line item in the Line Items view, a new line item is created according to the renewal terms that you designate.
Defining Charge Plans for Agreement Line Items (End User)
You must set up charges for agreement payments. Most agreements include the following types of charges:
An initial payment to establish the agreement. This payment is referred to as a nonrecurring charge (NRC)
A recurring charge (RC). This charge is usually a monthly charge for the service package
Note: A third kind of charge applies to usage charges.
For example, a company has a service package with a price of $15,000. There is an initial charge of $3,000 to activate the service package, followed by 12 monthly charges of $1,000 on the first day of each month. To manage this service package, you can set up a contract schedule, an NRC, and RCs for the charge plan. If you pay the NRC in installments, then you might also set up a charge plan for the NRC.
This task is a step in Process of Managing Agreements.
Defining Charge Plans
Before you can define and run a charge plan, administrators must define contract schedules and set up the plans. For more information about these tasks, see Process of Administering Charges.
You add NRC, RC, and any charges, adjustments, and use plan details to the agreement line items. This information includes the following data:
A schedule plan for the first charge to create
The start time for the first charge
Note: If you add a use plan to the agreement line item, then make sure that you select the appropriate product and asset to associate with the line item. You must select an asset that has measurements to allow usage recording.
To define a charge plan for an agreement line item
Navigate to the Agreements screen, then the List view.
Drill down on the Name field of a selected agreement.
In the Line Items view, select a line item.
On the link bar of the Line Items view, click Charge Plan.
In the Charge Plan form, complete the fields as appropriate.
Some fields are described in the following table.
Field Comments NRC Schedule
Select a value for how frequently and when the nonrecurring charges are generated. The NRC schedule can be different than the invoice schedule.
NRC Start
Select the starting date for nonrecurring charges.
Non-Recurring
Type the total amount of the nonrecurring charge. Payments occur according to the NRC schedule. A nonrecurring charge can include a service charge or a discount.
NRC Plan
Select the NRC billing plan. If this field is blank, then the NRC amount is divided by the number payment installments in the NRC Qty field to determine the charge for each period.
NRC Qty
Type the number of payment installments for the nonrecurring charge.
RC Schedule
Select a value for how frequently and when the recurring charges are generated.
Note: If a product measurement record is associated with the product in the line item, then the RC Schedule field value must match the Frequency field value in the Measurements view in the Service Information view in the Products view of the Administration - Product screen.RC Start
Select the starting date for the recurring charges.
Recurring
Type the amount of the recurring charge.
RC Adjust
Type the amount to charge for partial periods in the RC schedule. This field defines the dollars for each unit of time that the Charge Engine uses to calculate the recurring charge for the line item.
RC Adjust U/M
Select the length of time applicable to the adjustment amount.
Adjust Charge
Type a positive or negative adjustment amount for the amount of a charge. The Charge Engine clears this field after generating a charge.
Commit
Select this check box to activate the Charge button.
Charge End
Select the last possible date to generate a charge.
Charge Basis
Select the method of charging. Values include:
Advance. Generates advance charges 1 period in advance.
Schedule. Generates charges according to the contract schedule.
Use Start
Select the starting date for the usage charge.
Use Plan
Select the use plan. Only the plans that apply to the product in the selected line item are available for selection.
(Optional) If you add a use plan to the agreement line item, then complete the following steps so that the appropriate product and asset are added to the agreement line item, and users can record the measurements for usage:
On the link bar, click Line Detail.
In the Service Asset number (#) field, select the assets that track usage.
You can add multiple assets to an agreement line item in the Assets view in the Pricing view in the Line Items view in the List view of the Agreements screen.
Running Charge Plans Using the Charge Button
After you define a charge plan, you can run the plan to create the charges for an agreement line item. All the charges for the RC and NRC schedules are created with the amounts and adjustments that the charge plan indicates.
You can generate multiple charges for an agreement line item by configuring the FS - Generate Agreement Charge workflow to run on a periodic basis. For more information, see Running Charge Plans for Agreement Line Items Using Workflows.
To run a charge plan using the Charge button
Navigate to the Agreements screen, and then the List view.
Drill down on the Name field for a selected agreement.
In the Line Items view, select a line item.
On the link bar of the Line Items view, click Charge Plan.
In the Advance To field at the start of the Charge Plan view, select the date up to which to create charges.
You can create charges no later than the date in this field, or no later than the date in the Charge End field in the form for the charge plan, whichever date is earlier.
Click Charge.
Defining Conditional Charge Plans for Agreement Line Items (End User)
After administrators set up conditional charge plans in the Conditional Charge Plan view of the Administration - Contracts screen, users can select the appropriate conditional charge plans for agreement line items. For more information, see Setting Up Conditional Charge Plans.
For example, the administrator creates a conditional charge plan named Termination Plan. This plan specifies that if a customer cancels an agreement early, then the customer must pay 8.33% of a penalty charge for each remaining month in the agreement period. A user sets up a photocopier maintenance agreement for a customer and associates the Termination Plan with the photocopier agreement line item. The user specifies that a total penalty of $150 applies to this line item if the customer cancels the agreement before the 12-month term of the agreement expires.
The customer cancels the agreement after just 6 months. According to the Termination Plan, the customer must pay 8.33% of the total cancellation fee for each of the remaining 6 months. The customer must pay $74.97 (8.33% x $150 x 6 months).
This task is a step in Process of Managing Agreements.
To define a conditional charge plan for an agreement line item
Navigate to the Agreements screen, then the List view.
Drill down on the Name field for a selected agreement.
On the link bar of the Line Items view, click Conditional Charges.
In the Conditional Charges list, create a new conditional charge record, and complete the fields as appropriate.
Some fields are described in the following table.
Field Comments Type
Select the type of conditional charge. Value include Penalty and Refund.
Start Date
Select the date the conditional charge starts unless you specify an effective date.
End Date
Select the date the conditional charge ends. For example, cancellation fees apply only if the customer cancels the agreement before a 12-month period elapses. After this period, the company cannot charge for customer cancellation.
Effective Date
Select the date the conditional charge is effective.
Plan
Select the conditional charge plan that controls the conditional charge.
Amount
Type the total amount that the customer must pay for the conditional charge.
Reason
Type a description of the reason for creating the charge.
In the Advance To field at the start of the Conditional Charges view, select a date that is after the specified effective date and before the specified end date.
The date in this field represents the time remaining for the agreement.
Click Charge.
The total charges to apply to the customer (in accordance with the conditional charge values) are calculated. For example, if the customer cancels a 12-month agreement after just 6 months, then the customer must pay 50% of the cancellation fee over the next 6 months.
(Optional) On the link bar, click Charges to view the calculated charges for the line item.
Managing Line Item Revenue for Agreements (End User)
Line item revenue for agreements includes the amounts that you invoice to a customer according to the terms in the agreement. Customers can make payments periodically or up-front, and they can disburse payments by account. These payments can include additional service charges such as Time and Material (T&M).
For opportunity management, you can track agreements after obtaining an opportunity by forecasting the expected revenue for each year of the agreement term and tracking the revenue for each year on a monthly basis. You can perform revenue forecasting by using revenue plans in conjunction with the Siebel Forecasting module.
Forecasting is an important aspect of tracking. Organizations must track not only the sale of products, but also the revenue generated by the sale of after-sale services. Using revenue plans, an organization can track the revenue associated with the agreement line items. For more information about forecasting, see Siebel Forecasting Guide.
This topic contains the following information:
Adding Line Item Revenue to Agreement Line Items
The Line Item Revenue view in the List view of the Agreements screen displays all revenue records associated with an agreement line item.
To add line item revenue to an agreement line item
Navigate to the Agreements screen, then the List view.
Drill down on the Name field for a selected agreement, and click the Line Item Revenue view tab.
Scroll down to the Revenue list.
The list shows all the revenue for the selected agreement line item. For example, if the service agreement is for $15,000 with a nonrecurring charge of $3,000 and 12 additional charges of $1,000 for each month, then 13 revenue line items appear for the 13 payments.
You use the 2 drop-down lists at the start of the Revenue list to query of existing revenue records in this list. One field allows you to select records for specific products, the other field allows you to select records for specific users.
Create a new revenue record, and complete the fields as appropriate.
Some fields are described in the following table.
Field Comments Revenue Date
Select the date of expected revenue.
Amount
Type the amount of revenue expected on the date in the Revenue Date field.
Alternatively, you can click Revenue Wizard. A script wizard (Revenue Schedule Script) appears to help you enter multiple revenue records over time. The wizard asks you questions about the number of payments, account, opportunity information, and so on. You can customize the Revenue Schedule Script, if required.
(Optional) To view the information in different formats, click the Chart or the Spreadsheet view tab.
The Spreadsheet view shows the service product associated with the agreement line item and the revenue associated with the line item. The revenue appears in its own column for each line item, and a total appears in the last column.
The Chart view shows the revenue in a chart.
Adding Revenue Plans to Agreement Line Items
After the administrator creates the revenue plan templates, you can then add the templates to agreement line items. For more information, see Creating Revenue Plan Templates.
When you select a revenue plan and enter an amount, the revenue items are created. For example, a revenue template applies to 12 months. You select this template and enter an amount of $100. When you save the record, 12 revenue items are automatically created for $100 each.
To add a revenue plan to an agreement line item
Navigate to the Agreements screen, then the List view.
Drill down on the Name field for a selected agreement, and click the Line Item Revenue view tab.
Scroll down, and click the Revenue Plans view tab.
Create a new revenue plan record, and complete the fields as appropriate.
Generating Documents for Agreements (End User)
You can automatically generate documents required to implement a service agreement (for example, subcontractor agreements and work orders). For more information about how to create document templates using proposals, see Siebel Correspondence, Proposals, and Presentations Guide.
You can automatically generate a document for an order in the Documents view in the List view of the Service Orders or Sales Order screen. You can automatically generate a document for a quote in the Documents view in the list view of the Quotes screen. For information about terms for agreements, see Adding Terms to Agreements (End User).
This task is a step in Process of Managing Agreements.
To generate a document for an agreement
Navigate to the Agreements screen, then the List view.
Drill down on the Name field for a selected agreement, and click the Documents view tab.
Create a new document record, and complete the fields as appropriate.
Some fields are described in the following table.
Field Comments Name
Type the name of the document.
Template
Select a template for the document.
Local
Displays a check in the check box to indicate the document is stored locally. This field is for information only, and does not affect other fields or functions.
Click Generate Draft.
Microsoft Word or Lotus WordPro is launched. A draft agreement is created and appears in Microsoft Word or Lotus WordPro.
Alternatively, you can click Auto Document to create a standard document from the default document template.
Process of Managing Entitlements
The following list shows the tasks that end users typically perform to manage entitlements. Your company might follow a different process according to its business requirements.
To manage entitlements, end users perform the following tasks:
Creating Entitlements (End User)
You can automatically and manually create entitlements. Entitlements contain information about the level of service for a customer.
You can automatically create entitlements for agreement line items. Entitlement templates must be associated with the product on the agreement line item before you can automatically create entitlements using the Auto Entitlement button. For more information, see Defining Products for Entitlement Templates.
If you later select the Auto Entitlement button again, then any new entitlements are associated with the agreement line item, but the entitlements that are already associated with the agreement line item do not change.
This task is a step in Process of Managing Entitlements.
To automatically create entitlements for agreement line items
Navigate to the Agreements screen, then the List view.
Drill down on the Name field for a selected agreement.
In the Line Items view, click Auto Entitlement.
Entitlements are automatically created for all of the line items in the agreement.
You can also manually create an entitlement for an agreement.
To manually create an entitlement for an agreement
Navigate to the Agreements screen, then the List view.
Drill down on the Name field for a selected agreement, and click the Entitlements view tab.
Create a new entitlement record, and complete the fields as appropriate.
Some fields are described in the following table.
Field Comments Type
Select the type of entitlement.
Transferable Flag
Select this check box to indicate the entitlement transfers from a removed asset to an installed asset when recording an asset swap. For more information, see Asset Swaps.
Associating Other Records with Entitlements (End User)
Complete the procedures in this topic to associate other records with an entitlement.
This topic contains the following information:
This task is a step in Process of Managing Entitlements.
Associating Accounts with Entitlements
In the Accounts view, you can associate accounts with entitlements.
To associate an account with an entitlement
Navigate to the Entitlements screen, then the Agreement Entitlements view.
Select an entitlement, and click the Accounts view tab.
Create a new account record, and complete the fields as appropriate.
Some fields are described in the following table.
Field Comments All Contacts
Select this check box to indicate the entitlement covers all contacts that are associated with the account. Entitlement verification uses this information. For more information, see Entitlement Selection.
All Products
Select this check box to indicate the entitlement covers all products. Entitlement verification uses this information.
Associating Contacts with Entitlements
In the Contacts view, you can associate the contacts at an account with an entitlement. The records in this view apply when the All Contacts check box (in the Accounts view for the entitlement) is not selected, and the entitlement is valid only for specific individuals.
To associate a contact with an entitlement
Navigate to the Entitlements screen, then the Agreement Entitlements view.
Select an entitlement, and click the Contacts view tab.
Create a new contact record, and complete the fields as appropriate.
Some fields are described in the following table.
Field Comments Last Name
Displays the last name of the contact that you associate with the entitlement.
All Products
Select this check box to indicate the entitlement covers all products.
Associating Products and Assets with Entitlements
In the Products view, you can associate assets and products with an entitlement. The records in this view apply when the All Products check box (in the Accounts view for an entitlement) is not selected, and the entitlement is valid only for specific products or assets.
To associate a product and asset with an entitlement
Navigate to the Entitlements screen, then the Agreement Entitlements view.
Select an entitlement, and click the Products view tab.
Create a new product record, and complete the fields as appropriate.
Adding Service Information to Entitlements (End User)
You must associate a service calendar with an entitlement so that you can complete service requests according to customer expectations. You can also add metrics to make sure that the response time is appropriate.
This task is a step in Process of Managing Entitlements.
To add service information to an entitlement
Navigate to the Agreements screen, then the List view.
Drill down on the Name field for a selected agreement, and click the Entitlements view tab.
Select an entitlement, and click the Entitlement Details view tab.
In the Entitlement Details form, and complete the fields as appropriate.
Some fields are described in the following table.
Field Comments Service Hours
Select a service calendar record.
Initial Qty
Type the initial quantity that the entitlement covers.
Current Qty
Type the current quantity that the entitlement covers. The current quantity is not automatically updated. You must manually update it each time it changes.
Activity Override
Select this check box to indicate the billable flag, rate list, and price list for the entitlement override the billable flag, rate list, and price list for a service request.
Adding Metrics for Entitlements (End User)
You can record metrics (performance measurements) for an entitlement (for example, response time for a service call and customer satisfaction rating). The response time metric is required to calculate the Date Committed field in the Service Request view. Only this entitlement metric directly determines a level of service.
The calculation of the Date Committed field for a service request uses a response time according to the service request priority. Define a series of different response times and priorities so that the Date Committed field can change according to the service request priority. Add several metric records of the Response Time type. For each response time record, select a different priority value. Then enter values in the other fields that apply to the corresponding priority. For example, you might enter 1 hour for a 1-ASAP priority, 4 hours for a 2-High priority, and so on. Now, when the Date Committed field is calculated, the resulting time correlates to the service request priority.
This task is a step in Process of Managing Entitlements.
To add a metric for an entitlement
Navigate to the Agreements screen, then the List view.
Drill down on the Name field for a selected agreement, and click the Entitlements view tab.
Select an entitlement, and click the Metrics view tab.
Create a new metric record, and complete the fields as appropriate.
Some fields are described in the following table.
Field Comments Value
Type the value of the metric.
Units
Select the unit of measurement for the Value field. Values include Days, Hours, and Seconds.
The Hours value does not support decimal places in the Value field. For example, you cannot select Hours in this field, and enter 0.25 in the Value field to specify 15 minutes. Instead, select Seconds in this field, and enter 900 in the Value field to specify 15 minutes.
Administrators can also add Minutes to the List of Values (LOV) for this field. For more information about adding a value to an LOV for a field, see Siebel Applications Administration Guide.
Verifying Entitlements for Service Requests (End User)
When you verify entitlements for a service request, you select the appropriate entitlement from a list of entitlements that apply to the service request.
This task is a step in Process of Managing Entitlements.
To verify the entitlements for a service request
Navigate to the Service screen, then the Service Request List view.
Select a service request.
In the service request form, click Verify.
The Pick Entitlement dialog box appears, with a list of the active entitlements for the service request. If no entitlements appear, then the selected service request is not entitled to receive service.
Select an entitlement record from the Pick Entitlement dialog box, and click OK.
The Date Committed field for the service request is calculated from the service calendar associated with the entitlement and from the response time associated with the entitlement metrics. The name of the selected entitlement appears in the Entitlement field. For more information, see Date Committed.
Adding Preventive Maintenance Plans to Entitlements (End User)
You can add preventive maintenance (PM) plans to an entitlement. For information about running preventive maintenance plans for an entitlement associated with an agreement, see Process of Managing Records with Barcode Readers.
This task is a step in Process of Managing Entitlements.
To add a preventive maintenance plan to an entitlement
Navigate to the Entitlements screen, then the Agreement Entitlements view.
Alternatively, you can navigate to the List view of the Agreements screen, drill down on the Name field for a selected agreement, and click the Entitlements tab.
Select an entitlement, and click the Preventive Maintenance view tab.
In the drop-down list at the start of the Preventive Maintenance view, select PM Plans.
Create a new PM plan record, and complete the fields as appropriate.
Workflows for Agreement Renewal and Approval
This topic describes the workflows for agreement renewal and approval. Workflows automate the business processes associated with renewing and approving agreements.
You can modify these workflows to suit your own business needs using Siebel Business Process Designer. For more information, see Siebel Business Process Framework: Workflow Guide.
This topic includes information about the following workflows:
FS - Agreement Renewal Item Workflow
The FS - Agreement Renewal Item workflow automates the process of renewing an agreement line item. For more information, see Setting Up Renewal for Agreements.
This workflow is called when a user clicks the Renewal button.
The following figure shows this workflow.

Workflow Description. This workflow performs the following action:
Renew Agreement. This step calls the RenewAgreement method to renew 1 agreement line item. For more information, see FS Agreement Renewal Business Service.
FS - Agreement Renewal All Workflow
The FS - Agreement Renewal All workflow automates the process of renewing all appropriate agreement line items at once.
You can run this workflow as a batch process.
The following figure shows this workflow.

Workflow Description. This workflow performs the following action:
RenewAllAgreements. This step calls the RenewAllAgreements method to renew all agreement line items with a renewal date greater than the date entered in the input argument. For more information, see FS Agreement Renewal Business Service.
ISS Approval (Agreement) Workflow
The ISS Approval (Agreement) workflow automates the process of approving agreements. This workflow is called for the ISS Approval (Agreement) approval process. For more information, see Setting Up Approval for Agreements.
This workflow is called when a user selects the Generate Approvals menu command for an agreement.
The following figure shows this workflow.
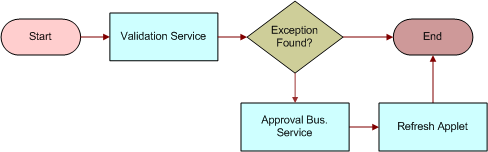
Workflow Description. This workflow performs the following actions:
Validation Service. This step reviews the validation rule for approval of the agreement.
Exception Found? This step determines whether the agreement satisfies the validation rule. If the agreement does not satisfy the rule, then the workflow terminates. If the agreement satisfies the rule, then the workflow proceeds to the next step.
Approval Bus Service. The step calls the ISS Approval Bus Service business service to use the CreateNewApprovalTasks method to place the agreement in the approver Inbox for approval or rejection by the appropriate approvers.
Refresh Applet. After approval or rejection, this step updates the data in the applet for the list of agreement approvers.
Workflows for Entitlement Creation and Verification
This topic describes the workflows for entitlement creation and verification. Workflows automate the business processes associated with verifying and creating entitlements.
You can modify these workflows to suit your own business needs using Siebel Business Process Designer. For more information, see Siebel Business Process Framework: Workflow Guide.
This topic includes information about the following workflows:
The methods for verification workflows are included in the FS Verify Entitlement business service. For more information about the individual methods and for a general description of the business service, see FS Verify Entitlement Business Service.
FS - Create Entitlement Workflow
The FS - Create Entitlement workflow automatically creates entitlements from entitlement templates. This workflow automates the process of associating an entitlement template with a service product. For more information about the methods that this workflow calls, see FS Create Entitlement Business Service.
This workflow is called when a user clicks the Auto Entitlement button in the Line Items view for an agreement. For more information about configuring this button, see Configuring Auto-Entitlement for Quotes and Orders.
The following figure shows this workflow.
Workflow Description. This workflow performs the following actions:
Get Entitlement Template. This step uses the GetEntitlementTemplates method and the CreateCoveredProds method to retrieve the entitlement templates for the agreement and the service products that the entitlement templates cover.
Validate Entitlement Template. This steps uses the ValidateEntitlementTemplates method to check to make sure that the entitlement templates were not already used to create entitlements for the agreement.
Create Entitlements. This step uses the CreateEntitlements method to use the entitlement templates to create entitlements for the agreement.
FS - Verify Entitlement Activity Workflow
The FS - Verify Entitlement Activity workflow automates the process of verifying entitlements on an activity. This workflow searches for the eligible entitlements and displays these entitlements in a dialog box. For more information about the methods that this workflow calls, see FS Verify Entitlement Business Service.
The following figure shows this workflow.
Workflow Description. This workflow performs the following actions:
VerifyEntitlement. This step calls the VerifyServiceEntitlement method to retrieve the eligible service entitlements for an activity.
ShowEntitlementPickList. This step calls the ShowEntitlementPickList method to show the relevant entitlements according to the search specification that is passed from the VerifyServiceEntitlement method.
FS - Verify Entitlement Order Best Price Workflow
The FS - Verify Entitlement Order Best Price workflow automates the process of verifying entitlements on an order. This workflow cycles through all the entitlements for the order line items of an order and identifies the best-priced entitlement for each line item, and then the workflow enters the ID of the best entitlement on each line item. For more information about the methods that this workflow calls, see FS Verify Entitlement Business Service.
This workflow is called when a user selects the Verify command in the Line Items view for an order.
The following figure shows this workflow.
Workflow Description. This workflow performs the following actions:
GenerateList. This step uses the GenerateList method to query for order data by using search specifications and return a property set according to field list values.
GetNextItem (Order Item). This step uses the GetNextItem method to cycle through each order line item in the property set.
True? This step determines whether more order line items exist to process. If no more order line items exist, then the workflow terminates. If more order line items exist, then the workflow continues to the next step.
GetNextItem (Product Item). This step uses the GetNextItem method to cycle through each product in the property set.
VerifyPricingEntitlement. This step calls the VerifyPricingEntitlement method to return the eligible pricing entitlements for the order.
GetNextItem (Adjusted List Price). This step uses the GetNextItem method to cycle through each adjusted price in the property set.
GetBestPricedEntitlement. This step uses the GetBestPricedEntitlement method to use entitlement discounts to retrieve the best-priced entitlement.
Stamp Entitlement. This step enters the ID of the best-priced entitlement on the line item in the order.
FS - Verify Entitlement Quote Best Price Workflow
The FS - Verify Entitlement Quote Best Price workflow automates the process of verifying entitlements on a quote. This workflow cycles through all the entitlements for line items of a quote and identifies the best-priced entitlement for each line item, and then the workflow enters the ID of the best entitlement on each line item. For more information about the methods that this workflow calls, see FS Verify Entitlement Business Service.
The following data setup is required to allow this workflow to function:
The quote account must have an agreement with a pricing-type entitlement.
You must define the values for Products, Type of Calculation and Adjustment Value in the Price Details view in the Entitlements view of the Agreements screen.
This workflow is called when a user selects the Verify command in the Line Items view for a quote.
The following figure shows this workflow.
Workflow Description. This workflow performs the following actions:
GenerateQuoteLineProductList. This step uses the GenerateList method to query for quote data by using search specifications and return a property set according to field list values.
GetNextListItem (Quote Item List). This step uses the GetNextItem method to cycle through each quote line item in the property set.
True? This step determines whether more quote line items exist to process. If no more quote line items exist, then the workflow terminates. If more quote line items exist, then the workflow continues to the next step.
GetNextListItem (Product Item List). This step uses the GetNextItem method to cycle through each product in the property set.
VerifyEntitlement. This step calls the VerifyServiceEntitlement method to retrieve the eligible service entitlements for the quote.
GetNextListItem (Base Price List). This step uses the GetNextItem method to cycle through each base price in the property set.
GetBestPricedEntitlement. This step uses the GetBestPricedEntitlement method to use entitlement discounts to retrieve the best-priced entitlement.
Stamp Entitlement. This step enters the ID of the best-priced entitlement on the line item in the quote.
FS - Verify Entitlement SR Workflow
The FS - Verify Entitlement SR workflow automates the process of verifying entitlements on a service request. This workflow shows a list of entitlements to the user and requests that the user select an entitlement, and then the workflow enters the commit time on the service request. For more information about the methods that this workflow calls, see FS Verify Entitlement Business Service.
This workflow is called when a user clicks the Verify button for a service request.
The following figure shows this workflow.
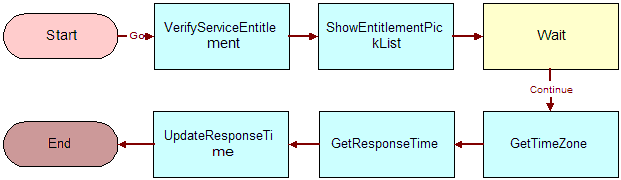
Workflow Description. This workflow performs the following actions:
VerifyServiceEntitlement. This step calls the VerifyServiceEntitlement method to retrieve the eligible service entitlements for a service request.
ShowEntitlementPickList. This step calls the ShowEntitlementPickList method to show the relevant entitlements according to the search specification that is passed from the VerifyServiceEntitlement method.
Wait. This step waits for the user to select an entitlement.
GetTimeZone. This step calls the GetTimeZone method to retrieve the time zone to use for the response time calculation.
GetResponseTime. This step calls the GetResponseTime method to use the entitlement and priority to retrieve the response time. The method evaluates the response time metric that matches the service request priority for the selected entitlement.
UpdateResponseTime. This step calculates the commit time according to the service calendar, and sets the Date Committed and Entitlement fields for the service request.
FS - Verify Entitlement SR Best Response Time Workflow
The FS - Verify Entitlement SR Best Response Time workflow automates the process of verifying entitlements on a service request. This workflow automatically selects the entitlement with the best response time, and then enters the commit time on the service request. For more information about the methods that this workflow calls, see FS Verify Entitlement Business Service.
This workflow is called when a user click the Verify Best Time button for a service request.
The following figure shows this workflow.
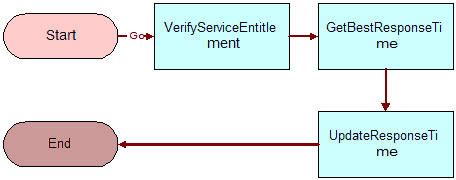
Workflow Description. This workflow performs the following actions:
VerifyServiceEntitlement. This step calls the VerifyServiceEntitlement method to retrieve the eligible service entitlements for a service request.
GetBestResponseTime. This step calls the GetBestResponseTime method to get the entitlement with the best response time. The method selects the entitlement with the best response time metric that matches the service request priority.
UpdateResponseTime. This step calculates the commit time according to the service calendar, and sets the Date Committed and Entitlement field for the service request.