3Service Requests and Solutions
Service Requests and Solutions
This chapter describes how service center employees process service calls from customers, set up service requests, and attempt to find immediate solutions. It includes the following topics:
About Service Requests
When responding to a service call, a customer service representative can create a service request. This service request includes all the activities associated with the call and information about the response to the call, such as orders, part movements, and assignments.
Entitlement Selection
For entitlement selection, the Siebel database is searched for entitlements that match the following data in the service request:
Account
Contact
Product
Asset (from the Service Details view)
Only entitlements that match this data appear in the Pick Entitlement dialog box that appears after you click the Verify button for a service request. If no entitlements appear, then the selected service request is not entitled to receive service. After you select an entitlement from the Pick Entitlement dialog box, the committed date and time for the service request is calculated from the service calendar associated with the entitlement and from the response time associated with the entitlement metrics. For more information about configuring the Verify button, see Changing System Preferences for Entitlements.
Date Committed
Date Committed represents the contractual response period for service. Clicking the Verify button determines the value of the Date Committed field for a service request. The committed date and time are calculated by using the Date Opened field, the response time metric, and the service calendar (schedule hours and exception hours). The result appears in the Date Committed field. The Date Committed field value for the service request populates the Due field for activities in the service request.
The committed time allows the agent either to schedule an event in acceptable time frames, defined by the service calendar, or to tell the customer that a requested event is outside of the service calendar and is therefore billable.
Activities associated with a service request directly (in the Activities view) and indirectly (in the Activity Plans view) inherit the date and time in the Date Committed field.
Assign Command
The Assign menu command produces a dialog box containing a list of field service employees who are ranked using administrative criteria. You select the employee who is best suited for ownership of the selected service request.
The Assign menu command activates Assignment Manager in interactive mode to provide a ranked list of field service engineers who are qualified and available to work on a service request. Assignment Manager can also run in dynamic and batch modes for any Assignment objects, including Accounts, Opportunities, and Campaigns. For more information about mobile users and Assignment Manager, see Siebel Assignment Manager Administration Guide.
Assignment Manager evaluates employees for assignment by using the following rules:
Check calendar. If this option is enabled, then an employee must have calendar availability to perform the task. Calendar availability is based on the assignment rule, the Earliest Start field and Latest Start field for a schedule, and the Duration field for an activity. If the employee is not available, then the employee is removed from the list of candidates.
Assignment availability. Assignment Manager passes a list of potential employees to the Appointment Booking System (ABS). The ABS checks the service schedules (including the geographic service region assignments) for the employees and the activities already on their calendars. The ABS then returns the list of available employees to Assignment Manager. In an optional step, Assignment Manager can request that the ABS create and schedule a new activity for the selected employee. For more information about the ABS, see Scheduling Using Siebel Scheduler.
Workload. For each specified workload rule, the number of activities assigned to the employee that meet all of the workload criteria is calculated. This number is reduced by the maximum workload. This result is used to generate a score that is inversely proportional to the workload rule weight [workload score = weight x (1 – (current workload/maximum workload)]. For example, if the workload rule is for Unassigned and Critical Service Requests, and if the maximum workload for this rule is 10 and the weight for this workload is 20, then an employee workload of 10 or greater receives a score of zero, and an employee with a workload of 2 receives a score of 16.
Attribute match. For each specified condition, the criteria are evaluated. If a condition is met, then the score equals the specified weight. Otherwise, the score is zero. If the condition is not met, and the condition is required, then the total score for that employee or position is zero.
Expertise weighting. For each condition that uses advanced weighting, the score for the condition is adjusted by using the advanced weighting criteria. For the employee column that is matched, the expertise for that attribute type is also applied. For example, if a condition specifies a product (product expertise) match, with a weighting of 15, and expertise weightings of Expert, Intermediate, and Novice are 3, 2, and 1, respectively, then the resulting scores for this factor are 15, 10, and 5, respectively.
The total score for an employee is a sum of the scores for each individual factor, modified by the factors that override the total score and set the score to zero (check calendar, required attribute matches, and so on). The highest score represents the best employee for assignment.
The Assignment Engine is configured for the Service Request object to either automatically assign the highest scoring employee (using SmartScript) or to run in interactive mode. In interactive mode, the user selects the Assign command, and Assignment Manager returns a ranked list of employees in the Assign Employees dialog box. The user can then select an assignee. For more information about setting up interactive assignment for Siebel objects, see Siebel Assignment Manager Administration Guide.
About the Process Flow for Service Requests
The following figure shows the process flow for managing a service request from a customer.
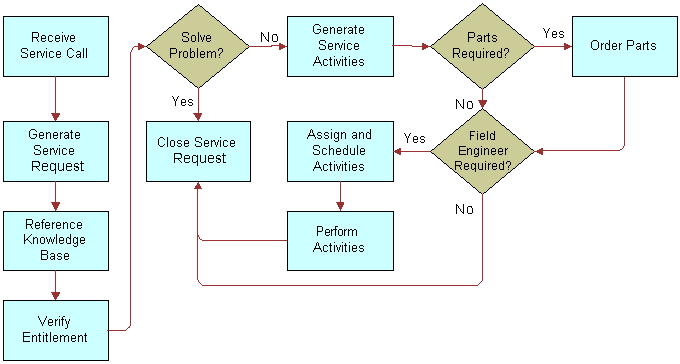
This process flow includes the following steps:
Receive a request for service.
Generate a service request.
Verify the request by confirming the following information:
The account
The caller (contact)
Assets
Entitlements for service
Warranties
Try to solve the problem by using known solutions.
If known solutions do not solve the problem, then generate activities for service.
Order parts, if needed.
Schedule a field service engineer, and assign activities to that field service engineer, if needed. For more information, see Scheduling Using Siebel Scheduler and Dispatch Board.
Perform the activities.
Close the service request.
Service Request Charts
The following table lists the descriptions of the charts in the Agent Charts view for service requests.
Table Descriptions of Agent Charts for Service Requests
| Chart | Description |
|---|---|
Aging Analysis by Priority |
The duration of a service request as a function of priority. |
Aging Analysis by Product |
The duration of a service request as a function of product. |
Aging Analysis by Product Area |
The duration of a service request as a function of field service product area. |
Aging Analysis by Severity |
The duration of a service request as a function of severity. |
Aging Analysis by Status |
The duration of a service request as a function of status (Open, Assigned, Pending, and so on). |
Priority Analysis by Owner |
The priority of service requests assigned to each field service engineer. |
Status Analysis by Owner |
The status of service requests assigned to each field service engineer. |
Closed Service Requests by Owner |
The history of closed service requests assigned to each field service engineer. |
Closed Service Requests by Product |
The history of closed service requests for each product. |
Customer Analysis |
The number of service requests for each customer account. |
New Service Requests |
The number of new service requests for each calendar period. |
New Service Requests by Owner |
The number of new service requests assigned to a field service engineer for each calendar period or for each product. |
New Service Requests by Product |
The number of new service requests for each product for each calendar period. |
Product Analysis |
The number of new service requests for each product. |
Product Version Analysis |
The number of new service requests for each version of a product. |
Severity and Priority Analysis |
This chart contains the following graphs:
|
Status and Area Analysis |
This chart contains the following graphs:
|
Symptom and Resolution Analysis |
This chart contains the following graphs:
|
Trend Analysis by Product |
The number of service requests for each product as a function of calendar period. |
Trend Analysis by Product Area |
The number of service requests for each field service product as a function of calendar period. |
Trend Analysis by Severity |
The number of service requests for each severity level as a function of calendar period. |
Trend Analysis by Source |
The number of service requests logged in by a route (email, phone, and so on) as a function of calendar period. |
Trend Analysis by Status |
The number of service requests with a status as a function of calendar period. |
About Solutions
For many new service requests, customer service representatives previously resolved similar problems. To minimize costs and maximize the effectiveness of a service center, an organization can reuse the solutions for previously resolved problems. You can store, organize, associate, and search a knowledge base for resolutions successfully used for similar problems or for published solutions of potential problems.
After you successfully resolve a problem, you can associate the solution with the service request so that the solution information is available if the customer later reopens the service request. Also, you record the solution so that you can resolve similar service requests without extensive research. You might find an existing service request, solution, or resolution document that provides information relevant to another service request that you are investigating, and you can quickly review the information and associate it with your service request.
About Answers
Sometimes customer service representatives must answer a customer inquiry to resolve a problem that is associated with a service request. Oracle Knowledge includes a database of information that customer service representatives can use to find answers to customer inquiries. Oracle Knowledge uses a patented Intelligent Search technology to search unstructured content, structured data sources, and transactional business applications in parallel. The Oracle Knowledge technology can automatically incorporate customer context and call context in the search for answers to customer inquiries.
To use Oracle Knowledge functionality in Siebel Field Service, you must integrate Oracle Knowledge with Siebel Field Service. For information about completing this integration, see Oracle Knowledge iConnect for Siebel Contact Center Integration Guide on the Oracle Knowledge bookshelf on Oracle Technology Network.
The user interface for Oracle Knowledge is embedded within Siebel Field Service and is designed to maximize the productivity of customer service representatives and to improve call-resolution rates. The answers are more than just links to source content. They also include relevant excerpts that have a high probability of answering the inquiry.
The user interface for Oracle Knowledge significantly streamlines the call wrap-up process by automatically providing embedded links to associate the correct enterprise knowledge with each resolution task for a service request.
About Siebel Audit Trail
Siebel Audit Trail creates a history of the changes to service requests. An audit trail record shows the performed operation, the date and time of the operation, and the change to the value. Therefore, Siebel Audit Trail is useful for examining the history of a service request. Siebel Audit Trail logs information without requiring any interaction with, or input from, users.
By using Siebel Audit Trail, your users can determine the employee who modified a certain field and the data that changed. An audit trail record is created for each status change. This record includes a time stamp and the ID of the user who made the change.
For Siebel Remote users who change records, Siebel Audit Trail works for every Siebel Web deployment and configuration option, including synchronization. Audit trail records show not only successfully committed transactions, but also transactions that are not synchronized to the server because of conflicts.
Audit trail data is written directly into the Siebel database, supporting both remote users and replicated databases. Changes to a Siebel Audit Trail field are cached in the Siebel application. Exiting from a Siebel application and restarting it writes all cached changes to the Siebel database. Alternatively, when the cache size is reached, all cached entries are automatically written to the Siebel database even when a user does not exit from the Siebel application.
The Audit Trail view shows the history of changes to specific service request records. This view is read-only. For more information about Siebel Audit Trail, see Siebel Applications Administration Guide.
Siebel Audit Trail Content
Siebel Audit Trail records the following information:
Field
Row ID of the changed record
Performed operation (for example, Update, New, Delete, or Copy)
Original value
Changed value
User ID for the user who performed the operation
Date and time the operation was performed
Siebel Audit Trail for Remote Users
The following information applies to remote users:
Disconnected users cannot view audit trail records. However, after they synchronize with the server, audit trail records are created on the server for their transactions.
Information that is used to create audit trail records is synchronized, but the records are not synchronized.
If the transaction is rejected during the conflict resolution, then the corresponding audit trail record is also rejected.
Process of Administering Service Requests
The following list shows the tasks that administrators typically perform to administer service requests. Your company might follow a different process according to its business requirements.
To administer service requests, administrators perform the following tasks:
Create service activity templates. For more information, see Creating Activity Templates and Adding Information to Activities in Activity Templates.
Set up service metrics. For more information, see Setting Up Service Metrics.
Set up the default date and time for the Opened field in new service requests. For more information, see Setting Default Date and Time for Opened Field.
Setting Up Service Metrics
You can set up service metrics for service requests. A metric provides a benchmark to measure performance for a service request.
This task is a step in Process of Administering Service Requests.
To set up a service metric
Navigate to the Administration - Service screen, then the Service Metrics view.
Create a new service metric record, and complete the fields as appropriate.
Setting Default Date and Time for Opened Field
The Post Default Created Date To Date Saved user property in the Service Request business component controls the behavior of the Opened field in new service requests. For more information about user properties, see Using Siebel Tools.
The values for the Post Default Created Date To Date Saved user property follow:
TRUE (Default). Sets the value in the Opened field of a new service request (the creation date and time) to the date and time when a user first saves the record (when the record is committed to the Siebel database).
This setting can help your organization to meet its service-level commitments. If the Opened field on a service request displays the time and date a user opens it, instead of the time and date that a user first saves it, then the service request ages by the length of time that it takes the user to enter the service request data before a customer service representative (CSR) can see the service request in Siebel Field Service. If Siebel Field Service uses the time when (and not before) a user completes and saves the service request, then your service personnel can use the fully allotted time to respond to service requests.
For example, a customer has a 24x7 entitlement with a 1-hour response time metric. This customer enters a service request in Siebel Field Service. Note that 30 minutes elapse from the time this customer opens and begins entering a service request until the time the customer completes and saves it. If the time in the Opened field is when the customer first created the service request, then your company CSRs must respond in only 30 minutes. If the time in the Opened field is when the service request is committed to the Siebel database, then your company must respond in 1 hour.
This setting can, however, set the value of the Opened field later than the Last Updated field because the value for the Last Updated field is set when a user creates the record, but not when a user first saves it.
FALSE. Sets the value of the Opened field of a new service request to the date and time when a user first creates the record. If your company business process mandates that the time for a service request starts from when a CSR starts answering a customer call, then use this setting.
This task is a step in Process of Administering Service Requests.
To set the default date and time for the Opened field
Log in to Siebel Tools as an administrator.
Lock the appropriate project for editing.
In the Object Explorer, navigate to Business Component.
Query for the Service Request business component.
Navigate to Business Component, then Business Component User Prop.
Query for the Post Default Created Date To Date Saved user property.
In the Value field, enter the appropriate value.
Process of Administering Solutions
The following list shows the tasks that administrators typically perform to administer solutions. Your company might follow a different process according to its business requirements.
To administer solutions, administrators perform the following tasks:
Creating Solution Records
Solution records contain information that employees can use to resolve service requests. Administrators create solution records in the Administration - Solution screen. Users can view these records in the Solutions screen.
This task is a step in Process of Administering Solutions.
To create a solution record
Navigate to the Administration - Solution screen, then the Solutions view.
Create a new solution record, and complete the fields as appropriate.
Some fields are described in the following table.
Field Comments FAQ
Type frequently asked questions that relate to the solution.
Publish Internal
Select this check box to indicate the information is available to internal users. The solution does not appear in solution lists that customers view on the Web, but appears on internal solution lists.
Publish External
Select this check box to indicate the information is available to external users. The solution appears both in solution lists that customers view on the Web and on internal solution lists.
Drill down on the Name field for the solution record, and click the Resolution Documents view tab.
Create a new resolution document record, and complete the fields as appropriate.
Some fields are described in the following table.
Field Comments File Name
Displays the name of the resolution document that you select. This document contains details about the solution. In the Administration - Resolution Documents screen, administrators set up the resolution documents that you can select.
Description
Displays a description of the resolution document that you select.
Associating Additional Information with Solutions
After you create a solution, you can associate additional information with the solution. This information includes service requests, change requests, solution categories, and other solutions that relate to the solution. Solution categories contain information relevant to a solution.
This task is a step in Process of Administering Solutions.
To associate additional information with a solution
Navigate to the Administration - Solution screen, then the Solutions view.
Drill down on the Name field for a selected solution.
To associate additional information with the solution record, complete the following steps:
Click the Service Requests view tab, create a new service request record, and complete the fields as appropriate.
Click the Change Requests view tab, create a new change request record, and complete the fields as appropriate.
Click the Solution Categories view tab, create a new solution record, and complete the fields as appropriate.
Click the Related Solutions view tab, create a new related solution record, and complete the fields as appropriate.
Allowing Editing of Resolution Documents
Resolution documents are, by default, read-only. Perform the following procedure to allow administrators to edit these documents in the Administration - Solution screen.
This task is a step in Process of Administering Solutions.
To allow editing of resolution documents
Log in to Siebel Tools or Web Tools as an administrator (see Using Siebel Tools).
Create a workspace.
In the Object Explorer, navigate to Applet.
Query for the SR Resolution Item List Frame applet.
Navigate to Applet, List, and then List Column.
Select the ResFileName list column, and clear the check in the Read Only field.
Deliver the changes to the Integration Branch.
Navigate to the Administration - Solution screen to test document editing.
Process of Managing Service Requests
The following list shows the tasks that end users typically perform to manage service requests. Your company might follow a different process according to its business requirements.
To manage service requests, end users perform the following tasks:
Viewing Account Information (End User)
When creating a service request for an account, you might want to review information about contacts for the account, the service profile of the account, agreements and entitlements that apply to the account, and other account information. For more information about using the Accounts screen, see Siebel Applications Administration Guide.
This topic contains the following related information:
This task is a step in Process of Managing Service Requests.
Viewing Contacts and Service Profiles for Accounts
You can view the service profile for the account. This profile contains information about the products and assets that are associated with the account. You can also view information about the customer contacts who handle an account. For more information about using the Contacts view, see Siebel Fundamentals.
To view the contacts and the service profile for an account
Navigate to the Accounts screen, then the Accounts List view.
Some fields are described in the following table.
Field Comments Account Name
Displays the name of the account.
Organization
Displays the organization for the account. The organization limits the visibility of data. If you select All Accounts Across Organizations in the visibility filter, then the accounts for all organizations appear. For more information about setting up organizations, see Siebel Security Guide.
If you own a record, then you can see it when you select My Accounts in the visibility filter, even if the record does not apply to your organization. However, you do not see the record when you select All Accounts in the visibility filter if the record does not apply to your organization.
Drill down on the Account Name field for a selected account.
The Contacts view shows the contacts for the account.
Click the Service Profile view tab.
The Service Profile view shows that products that are associated with the account. The Assets list shows the assets that are associated with a selected product.
Viewing Agreements and Entitlements for Accounts
You can view information about agreements and entitlements for an account. For more information about using the Agreements view, see Agreements and Entitlements
To view the agreements and entitlements for an account
Navigate to the Accounts screen, then the Account List view.
Drill down on the Account Name field for a selected account record, and click the Agreements view tab.
Some fields are described in the following table.
Field Comments Primary
Displays a check in the check box to indicate the agreement is a primary agreement for the selected account. This field is for information only, and does not affect other fields or functions.
Type
Displays the type of agreement. Values include Service Level Agreement and Price Protection.
Start
Displays the date that the agreement is effective.
End
Displays the date that the agreement is no longer effective.
Valid
Displays a check in the check box to indicate the agreement is an active agreement. An active agreement can appear in the list that appears when you click the Verify button. For more information, see Entitlement Selection.
Click the Entitlements view tab.
Some fields are described in the following table.
Field Comments Current Qty
Displays the current quantity that the entitlement covers.
End
Displays the date that the entitlement is no longer effective.
Agreement
Displays the agreement that is associated with the entitlement.
Initial Quota
Displays the initial quantity that the entitlement covers.
Start
Displays the date that the entitlement is effective.
Viewing Other Information for Accounts
You can view other information, such as service requests, billing information, shipping information, and invoices, for an account.
To view other information for an account
Navigate to the Accounts screen, then the Account List view.
Drill down on the Account Name field for a selected account record.
To see more information about the account, complete the following steps:
Click the Service Requests tab to view the service requests for the account.
Click the Bill To/Ship To view tab to view the billing and shipping information for the account.
Click the Invoices view tab to view the invoices for the account.
Creating Service Requests (End User)
To respond to a request for service, you create a service request and attempt to resolve the problem. If you cannot resolve the problem, then you can set up service activities, select and schedule the engineers to perform the activities, and inform the engineers of their assignments.
This task is a step in Process of Managing Service Requests.
To create a service request
Navigate to the Service screen, then the Service Request List view.
Create a new service request record, and complete the fields as appropriate.
Some fields are described in the following table.
Field Comments Status
Displays a status of Open. The state model controls the behavior of this field. For more information about the state model, see Siebel Business Process Framework: Workflow Guide.
Substatus
Displays a substatus of Unassigned. The state model controls the behavior of this field.
Account
Select the appropriate account for the service request. Accounts can include multiple addresses. Make sure that you select the account with the correct address.
Recommendation
Select the next action to take for the service request. Values include:
Dispatch. Creates service activities by associating an activity plan template with the service request. You can configure the activity plan name in the SR Recommendation workflow.
Escalate. Creates a new repair order that inherits the values from the following service request fields: Product, Asset, Return to Account, Price List, and Rate List.
Return. Creates a new order line item and a new repair order (with an RMA Return type) that inherits the values from the following service request fields: Account, Contact, Price List, Entitlement, and Order ID.
Note: You must activate the SR Recommendation workflow to use the Recommendation field.Entitlement
Displays an entitlement name. This entitlement provides special terms for billing the labor, expenses, and parts for this service request and provides the date and hours when the customer is entitled to service.
Date Opened
Displays the date and time that you create the service request. Depending on the Post Default Created Date to Date Saved user property setting, this date and time is when you first save the service request or when you first open it. For more information, see Setting Default Date and Time for Opened Field.
Date Committed
Select the date and time that you expect the service request to close. Selecting an entitlement automatically generates a value for this field by using the response time in the service request metrics, the service calendar, and the requested date the service.
Activities associated with the service request inherit the Date Committed field value. The Date Committed field value in the service request appears in the Due field for activities of the service request. For more information, see Date Committed.
Date Closed
Displays the date and time that you actually close the service request.
Billable
Select this check box to indicate the activities and orders associated with the service request are billable to the account. If you select this check box, then the billable check box for the activities and orders associated with the service request is automatically selected. If you select this check box, and clear the billable check box for the activities and orders associated with the service request, then the activities and orders are not billed to the account, unless an entitlement overrides the billable flag for the activity.
Organization
Displays the organization for the service request. The organization limits the visibility of data. If you select All Service Requests Across Organizations in the visibility filter, then the service requests for all organizations appear. For more information about setting up organizations, see Siebel Security Guide.
If you own a record, then you can see it when you select My Service Requests in the visibility filter, even if the record does not apply to your organization. However, you do not see the record when you select All Service Requests in the visibility filter if the record does not apply to your organization.
Drill down on the SR number (#) field for a selected service request, and click the Service Details view tab.
Complete the fields as appropriate.
Some fields are described in the following table.
Field Comments Symptoms
Select a description of the symptom that initiated the service request.
A service request can be associated with multiple symptoms. A customer can report some symptoms as part of a service request, a field service engineer can report other symptoms as part of an activity, and a repair person can report other symptoms as part of a repair activity. All the reported symptoms appear in the dialog box that appears when you click the select button in this field because the symptoms are stored in an intersection table that also stores the activity and the service request ID.
Service Region
Select the service region that is associated with the service request. Activities for this service request inherit this service region. The Appointment Booking System and Optimizer require a service region. For more information, see Scheduling Using Siebel Scheduler.
Selecting Entitlements for Service Requests (End User)
Entitlements contain information about the level of service for a customer. For a service request, you can select only the entitlements that match the data in the service request. For more information, see Entitlement Selection.
This task is a step in Process of Managing Service Requests.
To select an entitlement for a service request
Navigate to the Service screen, then the Service Request List view.
Select a service request that includes an associated account or contact.
In the menu bar, click one of the following buttons:
Verify. The Pick Entitlement dialog box appears showing only entitlements that match specific data in the service request. If no entitlements appear, then the selected service request is not entitled to receive service. For more information, see Entitlement Selection.
Verify Best Time. The Pick Entitlement dialog box appears showing, of the entitlements that match specific data in the service request, only the entitlement with the earliest date committed. If no entitlement appears, then the selected service request is not entitled to receive service.
These buttons call a workflow. For more information, see Workflows for Entitlement Creation and Verification.
In the Pick Entitlement dialog box, select an entitlement, and click OK.
Entitlements also contain information about the valid hours for completing service requests. After you select an entitlement for a service request, you can view the valid hours for completing the service request.
To view the valid hours for completing a service request
Navigate to the Service screen, then the Service Request List view.
Drill down on the SR number (#) field for a selected service request, and click the Service Hours view tab.
Shaded areas represent service times.
Associating Activities with Service Requests (End User)
Service requests are frequently associated with activities to perform to resolve problems for customers.
This topic contains the following related information:
This task is a step in Process of Managing Service Requests.
Associating Activity Plans with Service Requests
In the Activity Plans view, you can select an activity template to automatically associate the activities in the template with a service request. Engineers work on these activities to resolve the service request. For more information about activity plans and activity templates, see Service Activities
To associate an activity plan with a service request
Navigate to the Service screen, then the Service Request List view.
Drill down on the SR number (#) field for a selected service request, and click the Activity Plans view tab.
Create a new activity plan record, and complete the fields as appropriate.
Some fields are described in the following table.
Field Comments Planned Start
Select the date and time to begin the activities to resolve the service request. The default value is the date and time that the record is created.
Template
Select a template that contains a set of activities for recurring tasks.
Lock Assignment
Select this check box to indicate Assignment Manager cannot assign activities created as part of this activity plan.
Associating Activities with Service Requests Manually
You can manually associate activities with service requests, and then add information to the activities. This information includes the recommended steps that field service engineers can perform to complete the activity, additional instructions about the activity, items (such as parts and tools) that field service engineers need to complete the activity, and the skills (such as language proficiency and product knowledge) that field service engineers must possess to complete the activity.
Assignment Manager uses the skills for an activity to assign the activity to the appropriate employee. For more information about Assignment Manager and about setting up the skills that you can assign to an activity, see Siebel Assignment Manager Administration Guide.
To manually associate an activity with a service request
Navigate to the Service screen, then the Service Request List view.
Drill down on the SR number (#) field for a selected service request, and click the Activities view tab.
Create a new activity record, and complete the fields as appropriate.
Drill down on the Type field for the activity.
To add more information to the activity record, complete the following steps:
Click the Service Activity Steps view tab, create new step records, and complete the fields as appropriate.
Click the Service Activity Instructions view tab, create a new instructions record, and complete the fields as appropriate.
Click the Service Activity Items view tab, create a new item record, and complete the fields as appropriate.
Click the Assignment Skills view tab, create a new skill record, and complete the fields as appropriate.
Associating Change Requests with Service Requests (End User)
You can associate a change request with a service request. A change request might contain information about a manufacturing defect in a component that is associated with a service request.
This task is a step in Process of Managing Service Requests.
To associate a change request with a service request
Navigate to the Service screen, then the Service Request List view.
Drill down on the SR number (#) field for a selected service request, and click the Change Requests view tab.
Click Add, and select a change request in the Add Change Request dialog box.
In the dialog box, you can create a new change request. For more information about creating change requests, see Generating Change Requests from Service Requests.
Adding Assets to Service Requests (End User)
You can add an asset to a service request. For more information about managing defective assets, see Quality Management.
This task is a step in Process of Managing Service Requests.
To add an asset to a service request
Navigate to the Service screen, then the Service Request List view.
Drill down on the SR number (#) field for a selected service request that is not associated with an asset, and click the Activities view tab.
Drill down on the Type field for a selected activity, and click the More Info view tab.
In the Asset number (#) field, enter or select the number for the additional asset.
Creating Orders for Service Requests (End User)
An engineer might need additional parts to complete an activity for a service request. You can create an order for the service request to obtain these needed parts.
This task is a step in Process of Managing Service Requests.
To create an order for a service request
Navigate to the Service screen, then the Service Request List view.
Drill down on the SR number (#) field for a selected service request, and click the Orders view tab.
Create a new order record, and complete the fields as appropriate.
Some fields are described in the following table.
Field Comments Type
Select the type of order.
Approved
Select this check box to indicate the order is approved. This field is for information only and does not affect other fields or functions.
Generating Quotes for Service Requests (End User)
To determine the estimated cost of completing a service request, you can generate a quote. The quote lists the costs to complete a service request, and includes labor hours and part prices. The part prices are based on the recommended parts needed to complete the activities that are associated with the service request. For more information about generating invoices for service requests, see Creating Invoices Manually (End User) and Creating Invoices Automatically (End User).
This task is a step in Process of Managing Service Requests.
To generate a quote for a service request
Navigate to the Service screen, then the Service Request List view.
Drill down on the SR number (#) field for a selected service request, and click the Service Details view tab.
Click Auto Quote.
If the button is disabled, then make sure the Price List and Rate List fields in the Service Details view contain data.
A quote line item appears in the Quotes view.
To view the quote, drill down on the Name field.
Note: The quote line items for labor are not priced.
Viewing Part Movements for Service Requests (End User)
Employees can move parts in the field so that the parts are available to complete the activities in service request. You can view these part movements for a service request.
This task is a step in Process of Managing Service Requests.
To view field part movements for a service request
Navigate to the Service screen, then the Service Request List view.
Drill down on the SR number (#) field for a selected service request, and click the Activities view tab.
Drill down on the Type field for a selected activity, and click the Part Tracker view tab.
Viewing Metrics for Service Requests (End User)
A metric provides a benchmark to measure performance for a service request. Before you can view the metrics for a service request, you must verify the entitlement for the service request. For more information, see Verifying Entitlements for Service Requests (End User).
Administrators define service metrics in the Metrics view in the Entitlement Templates view of the Administration - Contracts screen. For more information, see Agreements and Entitlements
This task is a step in Process of Managing Service Requests.
To view the metrics for a service request
Navigate to the Service screen, then the Service Request List view.
Drill down on the SR number (#) field for a selected service request, and click the Metrics view tab.
Researching Service Requests (End User)
Complete the tasks in this topic to research service requests.
This topic contains the following related information:
This task is a step in Process of Managing Service Requests.
Generating Correspondence for Service Requests
Periodically, you might want to generate correspondence, such as an email message, to communicate with other people about issues for a service request. For more information about correspondence, see Siebel Applications Administration Guide.
To generate correspondence for a service request
Navigate to the Service screen, then the Service Request List view.
Select a service request for which you want to generate correspondence.
Select File, then Send Email.
In the Pick Recipients dialog box, select the contact associated with the selected service request, and click OK.
Note: The selected service request is not associated with any additional contacts added to the Recipients list for service request-related correspondence.In the Send Email dialog box, complete the fields as appropriate.
Click Send.
Associating Service Requests with Related Service Requests
While researching an issue for a service request, you might find another service request that relates to the issue. You can associate this other service request to your service request so that this additional information is readily available from your service request.
To associate a service request with a related service request
Navigate to the Service screen, then the Service Request List view.
Drill down on the SR number (#) field for a selected service request, and click the Related SRs view tab.
Create a new related service request, and complete the fields as appropriate.
Viewing Change Requests for Products
While researching a service request, you might want to view change requests that are associated with the product in the service request.
To view the change requests for a product
Navigate to the Products screen, then the Internal Product List view.
Drill down on the Product field for a selected product, and click the Change Requests view tab.
Associating Decision Issues with Service Requests
Decision issues are explanations that can help to resolve service requests. You can use these explanations in your company, and you can provide them to customers. You associate a decision issue with your service request so that this information is readily available from your service request.
To associate a decision issue with a service request
Navigate to the Service screen, then the Service Request List view.
Drill down on the SR number (#) field for a selected service request, and click the Decision Issues view tab.
Create a new decision issue record, and complete the fields as appropriate.
To see more information related to the decision issue, drill down on the Name field for the decision issue, and complete the following steps:
Click the Attachments view tab to view attachments related to the decision issue.
Click the Literature view tab to view literature related to the decision issue.
Click the Related Issues view tab to view other issues related to the decision issue.
Resolving Service Requests (End User)
Complete the tasks in this topic to resolve service requests.
This topic contains the following related information:
This task is a step in Process of Managing Service Requests.
Recording Resolutions for Activities in Service Requests
After you complete and resolve an activity in a service request, you can record this resolution in a service request.
To record a resolution for an activity in a service request
Navigate to the Service screen, then the Service Request List view.
Drill down on the SR number (#) field for a selected service request, and click the Activities view tab.
Drill down on the Type field for the selected activity, and click the More Info view tab.
In the Resolution field, select a resolution.
Closing Service Requests
After you complete all of the work associated with a service request, you can close the service request.
To close a service request
Navigate to the Service screen, then the Service Request List view.
Select the service request you want to close, then in the Status field, select Closed.
The Substatus field changes to Resolved, and the date and time in the Closed field is set to the current date and time.
Conducting Customer Satisfaction Surveys
After you close a service request, you can record (in a customer satisfaction survey) customer responses to questions about the effectiveness of service. These responses determine a customer satisfaction score.
To conduct a customer satisfaction survey for a service request
Navigate to the Service screen, then the Service Request List view.
Drill down on the SR number (#) field for a selected service request, and click the Surveys view tab.
Create a new survey record, and complete the fields as appropriate.
Process of Managing Solutions
The following list shows the tasks that end users typically perform manage solutions. Your company might follow a different process according to its business requirements.
To manage solutions, end users perform the following tasks:
Viewing Solution Records (End User)
Solution records contain information that you can use to resolve service requests. Administrators create solution records in the Administration - Solution screen.
This task is a step in Process of Managing Solutions.
To view a solution record
Navigate to the Solutions screen, then the Solutions view.
Drill down on the Name field for a selected solution, and click the Resolution Documents view tab.
Drill down on the Filename field for a selected resolution document.
Associating Solutions with Service Requests (End User)
To expedite the resolution of a service request, you can associate a solution record with the service request. Also, you might associate a solution with a service request so that the solution information is available if the customer later reopens the service request.
This task is a step in Process of Managing Solutions.
To associate a solution with a service request
Navigate to the Service screen, then the Service Request List view.
Drill down on the SR number (#) field for a selected service request, and click the Solutions view tab.
Create a new solution record, and complete the fields as appropriate.
You can drill down on the Name field for the record to view more information about the solution.
Adding Information to Solutions (End User)
After you view a solution, you can add information to the solution. This information includes service requests, change requests, customer satisfaction surveys, and other solutions that relate to the solution.
Customer satisfaction surveys contain customer responses to questions about the effectiveness of service. These responses determine a customer satisfaction score.
This task is a step in Process of Managing Solutions.
To add information to a solution
Navigate to the Solution screen, then the Solutions view.
Drill down on the Name field for a selected solution.
To add information to the solution record, complete the following steps:
Click the Service Requests view tab, create a new service request record, and complete the fields as appropriate.
Click the Change Requests view tab, create a new change request record, and complete the fields as appropriate.
Click the Customer Satisfaction Survey view tab, create a new survey record, and complete the fields as appropriate.
Click the Related Solutions view tab, create a new related solution record, and complete the fields as appropriate.
Process of Managing Answers
The following list shows the tasks that end users typically perform to manage answers. Your company might follow a different process according to its business requirements.
To manage answers, end users perform the following tasks:
Configuring the Find Answers View (End User)
You can configure the following options in the Find Answers view:
Show Excerpts. Select this option to show excerpts for the answers in the Search Results list. For a more efficient review of search results, you can scan these excerpts instead of drilling down on the answer links to view the answers in the Oracle Knowledge Information Manager.
Show Left Column. Select this option to show the Filter Search Results pane. You can click the links in this pane to further restrict the answers that appear in the Search Results list. The number in parentheses after a link indicates the total number documents associated with that link value in its associated category.
Show Right Column. Select this option to show the My Recent Searches pane and the Search Feedback pane. You can click the links in the My Recent Searches pane to see the results of your recent searches in the Search Results list. You can click the asterisk (the star icon) in the Search Feedback pane to comment about the usefulness of the answers that appear in the Search Results list.
Autoshow Search Config. Select this option so that when you click in the Search field, the dialog box for configuring searches automatically appears. You do not have to click the Search Config button to see this dialog box.
This task is a step in Process of Managing Answers.
To configure the Find Answers view
Navigate to the Service screen, then the Service Request List view.
Drill down on the SR number (#) field for a selected service request, and click the Find Answers view tab.
The Search Results list shows the answers in Oracle Knowledge that might apply to the service request inquiry.
Click Preferences (the button with a cogged wheel).
The options for the current configuration of the Find Answers view appear. An option with a check is currently configured, and an option with an X is not currently configured.
Click each option that is not configured to configure it, and click each option that is configured to delete its configuration.
Click Preferences again.
The options for the current configuration of the Find Answers view no longer appear.
Reviewing Answers for Service Request Inquiries (End User)
The Search Results list shows the answers in Oracle Knowledge that might apply to the service request inquiry. Oracle Knowledge uses the text in the Summary field of the service request obtain these possible answers. You review these possible answers to determine the answer that applies to the service request inquiry. Then you associate that answer with the service request inquiry. For more information, see Associating Answers with Service Request Inquires (End User).
This task is a step in Process of Managing Answers.
To review the answers for a service request inquiry
Navigate to the Service screen, then the Service Request List view.
Drill down on the SR number (#) field for a selected service request, and click the Find Answers view tab.
The Search Results list shows the answers in Oracle Knowledge that might apply to the service request inquiry.
For each answer, complete the following steps:
Drill down on the link for the answer to view details about it.
The Oracle Knowledge Information Manager appears.
Click Back to Answers to navigate back to the Find Answers view.
Drill down on the Similar Answers link for the answer to view other answers that relate to the answer.
The related answers appear in the Search Results list.
Click Back to Answers to view the original answer in the Search Results list.
Finding Answers for Service Request Inquiries (End User)
If the possible answers in the Search Results list do not answer the service request inquiry, then you can search for additional answers in Oracle Knowledge. Also, if too many answers appear in the Search Results list, then you can restrict the search criteria to limit the number of answers that appear in this list.
This task is a step in Process of Managing Answers.
To find an answer for a service request inquiry
Navigate to the Service screen, then the Service Request List view.
Drill down on the SR number (#) field for a selected service request, and click the Find Answers view tab.
The Search Results list shows the answers in Oracle Knowledge that might apply to the service request inquiry.
Search for additional answers by completing the following steps:
(Optional) Click Search Tips (the button with a light bulb) to open a dialog box that contains general information about searching for answers, read the information in the dialog box, and close it.
Type a text string on which to search in the Search field.
Click Search (the button with a Q letter).
Answers that meet the search criteria appear in the Search Results list.
Restrict the search criteria by completing the following steps:
Click Search Config (the button with some tools).
In the dialog box for configuring searches, click Forum or Article to restrict the search results to either forums or articles, select the check boxes for the answer languages to include in the search results, and click Search Q.
The dialog box closes, and the number of search results can decrease.
Associating Answers with Service Request Inquires (End User)
You associate an existing answer with a service request so that users who access that service request can see that this answer from Oracle Knowledge applies to the service request inquiry.
An answer that you associate with a service request appears in the Linked Answers pane of the Find Answers view. When you access the service request again, this answer appears in the Linked Answers view for the service request.
This task is a step in Process of Managing Answers.
To associate an answer with a service request inquiry
Navigate to the Service screen, then the Service Request List view.
Drill down on the SR number (#) field for a selected service request, and click the Find Answers view tab.
The Search Results list shows the answers in Oracle Knowledge that might apply to the service request inquiry.
Select the check box for the answer.
Click Link.
A link to the answer appears in the Linked Answers pane.
If you want to delete this association, then complete the following steps:
In the Linked Answers pane, select the check box for the answer.
Click Unlink.
The link to the answer no longer appears in the Linked Answers pane.
Adding Answers to Service Request Inquiries (End User)
After reviewing the answers in Oracle Knowledge that might apply to the service request inquiry, and after searching for additional answers in Oracle Knowledge, you might not find an answer to the service request inquiry. However, after investigating the service request inquiry, you might determine its answer yourself. In this situation, you add the answer to the service request inquiry.
An answer that you add to a service request appears in the Linked Answers pane of the Find Answers view. When you access the service request again, this answer appears in the Linked Answers view for the service request.
This task is a step in Process of Managing Answers.
To add an answer to a service request inquiry
Navigate to the Service screen, then the Service Request List view.
Drill down on the SR number (#) field for a selected service request, and click the Find Answers view tab.
The Search Results list shows the answers in Oracle Knowledge that might apply to the service request inquiry.
Click Draft Content.
In the Create Siebel Channel form that appears, complete the following steps:
Complete the applicable fields in the form.
Click Submit.
A link to the answer appears in the Linked Answers pane. You can drill down on this link to access the Siebel Channel.
Requesting Answers for Service Request Inquiries (End User)
After reviewing the answers in Oracle Knowledge that might apply to the service request inquiry, and after searching for additional answers in Oracle Knowledge, you might not find an answer to the service request inquiry. If you cannot determine the answer to the service request inquiry yourself, then you can ask other users for help in finding an answer. In this situation, you can recommend that another user create an answer for the service request inquiry, and you can ask the users in a discussion forum for an answer to the service request inquiry.
When you recommend that another user create an answer, your recommendation appears in the Tasks list of the inbox in the Oracle Knowledge Information Manager. A question that you ask to a discussion forum appears in the Linked Answers pane of the Find Answers view. When you access the service request again, this question appears in the Linked Answers view for the service request.
This task is a step in Process of Managing Answers.
To request an answer for a service request inquiry
Navigate to the Service screen, then the Service Request List view.
Drill down on the SR number (#) field for a selected service request, and click the Find Answers view tab.
The Search Results list shows the answers in Oracle Knowledge that might apply to the service request inquiry.
To recommend that another user create an answer for the service request inquiry, complete the following steps:
Click Request Content.
The Content Recommendation form appears.
Complete the applicable fields in the form.
Click Submit.
The Find Answers view appears again.
To ask the users in a discussion forum for an answer to the service request inquiry, complete the following steps:
Click Post New Topic.
The Post New Topic form appears.
Complete the applicable fields in the form.
In the Topic Type field, select Question Topic.
Click Post Topic.
A link to the question appears in the Linked Answers pane. You can drill down on this link to access the discussion forum.
Viewing Linked Content for Service Request Inquiries (End User)
You can view the following content in the Linked answers view for a service request:
Answers that you associate with the service request. When you drill down on the URL fields for these answers, the Oracle Knowledge Information Manager appears.
Answers that you add to the service request. When you drill down on the URL fields for these answers, the Siebel Channel appears.
Questions about the service request that you ask to the users in a discussion forum. When you drill down on the URL fields for these questions, the discussion forum appears.
After you link content to a service request inquiry in the Find Answers view, you must access the service request again to update the records that appear in the Linked Answers view.
This task is a step in Process of Managing Answers.
To view the linked content for a service request inquiry
Navigate to the Service screen, then the Service Request List view.
Drill down on the SR number (#) field for a selected service request, and click the Linked Answers view tab.
The Linked Answers list shows the content that is linked to the service request inquiry.
Drill down on the URL field for a record to view details about that record.
Details about the record appear in a new browser session.
After you view the details about the record, close the new browser session.