17Quality Management
Quality Management
This chapter describes how to work with change requests and patch requests. It includes the following topics:
About Siebel Quality
Siebel Quality supports the product development and maintenance life cycle by managing change requests. A change request (CR) is a formal report or recommendation aimed at correcting a defect in or adding an improvement to a product. Such products can include hardware, software, manufactured goods, and capital equipment. Siebel Quality can manage multiple types of change requests, including enhancement requests and product defect reports.
Siebel Quality supports the work of the various groups that use the change management process, such as quality assurance, development engineering, and product marketing.
Siebel Quality provides features for creating, responding to, and tracking CRs. Siebel Quality manages CRs in the following ways:
Managing CRs from creation through resolution.
Tracking and analyzing details about CRs.
Coordinating and integrating CR management activities across multiple departments.
Displaying status information about product stability.
If a customer must resolve a CR and cannot wait for the next product release, then Siebel Quality can generate a patch request. A patch request (PR) is a recommendation to create a maintenance release to implement a product defect fix or improvement.
Features of Siebel Quality
Siebel Quality operates through the Quality screen in Siebel Field Service. Siebel Quality includes the following features:
Create, track, and close the various types of change requests (CRs). These features allow an organization to manage a CR from beginning to the end, and also allow different process owners to manage specific phases of the CR life cycle.
Log, track, and resolve multiple occurrences of a CR. When an issue is found in a product, it sometimes occurs in other, related products. In such cases, users can create child CRs, or multiple occurrence CRs, from a primary CR and link the CRs together so that they can manage them as a single unit through resolution.
Siebel Quality also allows users to designate other types of relationships, such as CRs that depend on each other or are duplicates of each other.
Analyze and report on product issues. Because you can run reports and charts on demand, organizations can gauge the overall health and stability of products in development.
Track the history of a CR. Siebel Quality displays information about who the CR is assigned to, if ownership is reassigned, and if the product area associated with the CR is modified.
Siebel Quality and Release Manager
Siebel Quality is packaged with Release Manager, a tool that allows an organization to manage product development through functions such as feature tracking, engineering allocation, test plan management, and test pass management.
Siebel Quality and Release Manager together support the product life cycle management process from beginning to end. For more information about Release Manager, see Release Management.
Best Practices for Administering and Using Siebel Quality
Implement the following best practices for administering and using the Siebel Quality:
Automatically assign change requests (CRs). To help productivity, you can automate the CR assignment process. Use Siebel Business Process Designer to detect the creation of a new CR and call Assignment Manager to assign the CR to the appropriate employee. For more information about Siebel Business Process Designer, see Siebel Business Process Framework: Workflow Guide. For more information about Assignment Manager, see Siebel Assignment Manager Administration Guide.
Link multiple occurrences. When the same issue occurs in different builds, testing environments, or platforms, you can link the CR records as multiple occurrences of each other. When you link CR records, you can track and close multiple CRs together.
Appoint multiple owners. To help manage issue follow-up, assign at least 2 employees to the processing of each CR. For example, an employee can log, prioritize, and assign the CR, while another employee can implement a solution.
Write descriptively. Users can help make the CR life cycle more efficient by writing clear and descriptive CRs that everyone involved in CR processing can understand.
Query frequently. Because owners are not automatically alerted when users log a new CR or update an existing CR, users in all teams that work with CRs must query often for their CRs.
Add comments. To help the employees involved in processing a CR to trace the history and to understand the current status, make sure that everyone who updates a CR writes a comment describing the update.
Process of Administering Siebel Quality
The following list shows the tasks that administrators typically perform to administer Siebel Quality. Your company might follow a different process according to its business requirements.
To administer Siebel Quality, administers perform the following tasks:
Setting Up Roles and Responsibilities. Set up roles and responsibilities to allow the employees who use Siebel Quality to access the Quality screen and its views.
Setting Up Lists of Values. Set up Lists of Values (LOVs) for the fields in the Quality screen.
Mapping Area-Subarea Combinations. After you enter field value LOVs, map Area and Subarea field values to each other. Link each Area-Subarea combination to Product Line, Engineering Group, and QA Owner field values.
Adding Release Product Builds. Add product builds that users can link to change requests.
Setting Up Roles and Responsibilities
You can set up access to the screens and views in Siebel Field Service, including the Quality screen and its associated views, by assigning roles and responsibilities. For more information about setting up roles and responsibilities and associating screens and views with roles and responsibilities, see Siebel Security Guide.
This task is a step in Process of Administering Siebel Quality.
Setting Up Lists of Values
You can set up Lists of Values (LOVs), including LOVs for Siebel Quality, for use in Siebel Business Applications. For more information about setting up LOVs, see Siebel Applications Administration Guide.
The following table lists the LOVs to set up before using Siebel Quality.
Table Siebel Quality LOVs
| Field | Type Value for LOV Items | Description | Example LOV Items |
|---|---|---|---|
Area |
PROD_DEFECT_AREA |
The functional product area. |
Accounts Orders |
Browser |
PSTASK_CLIENT_BROWSER |
The type of Web browser running in the test environment. |
IE 5.5 NS 6.2 |
Client OS |
PSTASK_CLIENT_OS |
The type of operating system running on the client. |
Win 2000 Mac OS |
Database |
PSTASK_CLIENT_DB |
The type of database running in the test environment. |
IBM DB2 MS SQL Svr 7.0 |
Priority |
PROD_DEFECT_PRIORITY |
The relative importance of the issue. |
P1. Critical P3. Medium |
Server OS |
PSTASK_SERVER_OS |
The type of operating system running on the server. |
HP-UX 11i Solaris 8 |
Severity |
PROD_DEFECT_SEVERITY |
The severity of the issue. |
3. Wrong Behavior 4. Minor Error |
Special Tag |
PD_SPEC_TAG |
The statuses or actions that other fields do not identify. Use for reporting, querying, exporting, or localization purposes. |
BETA3 HIGH RISK |
Status |
PROD_DEFECT_SUB_STATUS |
The implementation or development stage. |
Open-Disagree Closed-Verified |
Subarea |
PROD_DEFECT_SUB_AREA |
The functional product area subdivision. |
Expenses Fulfillment |
Substatus |
PROD_DEFECT_SUB_STATUS |
The implementation or development substage. |
Unassigned Approved |
Type |
PROD_DEFECT_TYPE |
The type or classification for the change request. |
Product Defect Enhancement |
Siebel Application Interface |
PSTASK_SERVER_OS |
The type of operating system running on the Siebel Application Interface. |
AIX 4.3.3 Win NT 4.0 |
This task is a step in Process of Administering Siebel Quality.
Mapping Area-Subarea Combinations
The values that are available for selection in the Subarea field in the Quality screen views change dynamically according to the value a user selects in the Area field. When the user then selects a value in the Subarea field, the Product Line, Engineering Group, and QA Owner fields are automatically populated.
You activate this process by setting up mappings for Area-Subarea combinations. After defining the Lists of Values (LOVs) for the Area and Subarea fields, you define each Area-Subarea combination. Then you designate the Product Line, Engineering Group, and QA Owner field values for each Area-Subarea combination.
When product parameters change in the course of development, you might have to map new Area-Subarea combinations.
This task is a step in Process of Administering Siebel Quality.
To map an Area-Subarea combination
Navigate to the Quality screen, then the Quality Administration view.
Create a new record for each Area-Subarea combination.
For example, if you want a selection of Inventory in the Area field to constrain the choices in the Subarea field to Shipping, Receiving, and Cycle Counting, then create the records with the Area and Subarea fields in the following table.
Area Subarea Inventory
Shipping
Inventory
Receiving
Inventory
Cycle Counting
Complete the other fields.
These fields are described in the following table.
Field Comments Product Line
Select the grouping of products associated with the Area-Subarea combination.
Engineering Group
Select the engineering team associated with the Area-Subarea combination.
QA Owner
Select the quality assurance team owner associated with the Area-Subarea combination.
Adding Release Product Builds
You control product version information for the organization by setting up release product builds. Because every Release Manager and Siebel Quality record must be associated with a specific release product build, you must set up product builds before users enter any records.
As a product progresses through the release cycle, increasingly advanced product prototypes apply. (In the case of software development, these prototypes are builds.) When each new prototype is available, enter it into Siebel Quality to allow users of Siebel Quality and Release Manager to record each record for the appropriate build.
Releases include the following types:
Future Releases. Although only 1 active release can be in progress, you must also set up records for future releases. Consequently, if a manager defers a feature or fix from the current release, then a user can target it to a specific future release.
Unspecified Releases. Sometimes you might not know the appropriate future release for a feature or fix. For this contingency, you must set up at least 1 artificial release named Unspecified Release or a similar term. Users can link orphan items to this release. When the appropriate future release is determined, users can then retarget an item to that release.
This task is a step in Process of Administering Siebel Quality.
To add a release product build
Navigate to the Quality screen, then the Release Product Administration view.
In the Release Product Administration list, create a new record for a build, and complete the fields as appropriate.
Some fields are described in the following table.
Field Comments Product
Type the prototype product for the build.
Version
Type the version number of the product.
Build
Type the number or code that identifies the build.
Language
Type the 3-letter language code.
Target Version
Select this check box to make the build available as a value in the Target field of the Change Requests view.
End Date
Select the date after which the build disappears from the Build and Target fields of the Change Requests view.
Note: When you create a record in the Release Product Administration view, the information in the Build, Language, Product, and Version fields is available to users in the Build field in the QA Tests view of the Release screen and the Change Requests view of the Quality screen. If you select the Target Version check box, then this information also is available in the Target field in the Change Requests view of the Quality screen.
Process of Managing Siebel Quality
The following list shows the tasks that end users typically perform to manage Siebel Quality. Your company might follow a different process according to its business requirements.
To manage Siebel Quality, end users perform the following tasks:
Logging Change Requests (End User)
Anyone can log a change request (CR). During testing, quality assurance employees, however, create the vast majority of CRs for product issues. When a QA tester discovers a product issue, the tester creates a new CR.
This topic contains the following related information:
This task is a step in Process of Managing Siebel Quality.
Process Flow for Logging Change Requests
After you set up Siebel Quality, quality assurance testers and others can log change requests (CRs). The following figure shows the process flow for the tasks in logging.
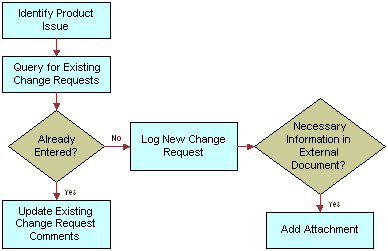
More information about the tasks in this process follows:
Query for Existing Change Requests. After identifying a product issue, but before logging a new CR, the CR creator queries to see whether a duplicate issue already exists. For more information, see Querying for Existing Change Requests.
Update Existing Change Request Comments. If the search reveals an existing CR for the issue, then the CR creator enters a comment with missing relevant information.
Log New Change Request. If the CR creator cannot find an existing issue, then the creator generates a new CR. For more information, see Logging Change Requests and Generating Change Requests from Service Requests.
Add Attachment. Optionally, the CR creator can add attachments, such as screen captures and configuration files, to clarify the issue.
Querying for Existing Change Requests
Before logging a new change request (CR), a CR creator queries to see whether a user already recorded a duplicate issue in an existing CR. The creator can find duplicate issues by searching on various combinations of key words used to describe the problem.
To query for an existing change request
Navigate to the Quality screen, then the Change Request List view.
In the Change Request form, initiate a query.
In the Summary field, enter a phrase that might describe the issue in other CRs.
For example, if you find a problem with attaching documents to a record, then you might query on one of the following phrases:
Attachment not working
Attachment function broken
Run the query.
If the query results show that a CR record already exists for the issue, then drill down on the Change Request number (#) field in the Change Request list.
In the More Info form, update the Comments field with relevant information that is not already recorded.
Logging Change Requests
If the change request (CR) creator cannot find an existing CR that describes the issue, then the creator enters a new CR. The CR creator must enter all relevant details including the functional area for the problem, the environment (operating system, server type, and so on) where the problem occurs, and the precise steps for reproducing the problem.
The creator enters most of this information in the Change Request Description area of the Change Requests form.
To log a change request
Navigate to the Quality screen, then the Change Request List view.
Create a new CR record, and complete the fields as appropriate.
Some fields are listed in the following table.
Field Comments Summary
Type a brief description of the CR. Enter a description that is concise enough so a reader can immediately understand the overall issue.
Type
Select the CR type. Accept the default value of Product Defect, or select another value to identify the CR as an enhancement request, a user interface issue, and so on.
Build
Select the product build in which the issue occurs.
Area
Select the functional product area for the CR.
Subarea
Select the functional product area subdivision related to the Area field that you select. When you select a value in this field, the Product Line, QA Owner, and Engineering Group fields are automatically populated.
Severity
Select an assessment of the seriousness of the issue.
Description/How to Reproduce
Type a detailed description of the issue. If the CR describes a product defect, then enter complete step-by-step directions for reproducing the issue.
Drill down on the Change Request number (#) field.
In the More Info form, complete the fields as appropriate.
Some fields are listed in the following table.
Field Comments Product Line
Displays the product line the CR affects. This field is automatically populated when you select a value in the Subarea field.
QA Owner
Select the quality assurance team owner of the CR. This field is automatically populated when you select a value in the Subarea field.
Special Tag
Select statuses or actions that other fields do not identify. You can use special tags for purposes such as reporting, tracking, querying, exporting, and localization. You can specify multiple tags.
Tag Summary
Displays all the tags that you select in the Special Tag field.
Comments
Type a comment describing actions for the CR and any additional information that other users might need to understand, track, or resolve the issue.
Generating Change Requests from Service Requests
Occasionally, a change request (CR) originates from a customer by way of a service request. If the technical support person who receives the service request for a customer decides that it represents a product issue, then this person can log a CR for the service request.
For more information about service requests, see Service Requests and Solutions.
To generate a change request from a service request
Navigate to the Service screen, then the Service Requests List view.
Drill down on the SR number (#) field for a selected service request, and click the Change Requests view tab.
In the Change Request list, add a new CR record.
Note: In addition to adding existing records in the Change Request list, you can create a new record. First add the required fields to the list. Click the menu button, and select Columns Displayed. In the Columns Displayed dialogue box, move the required fields from the Available Columns list to the Selected Columns list, and click Save.Additional required fields are described in the following table.
Field Comments Area
Select the functional product area for the CR.
Subarea
Select the functional product area subdivision related to the Area field that you select. When you select a value in this field, the Product Line, QA Owner, and Engineering Group fields are automatically populated.
Status
Displays the status of the CR.
Substatus
Displays the substatus of the CR.
Severity
Select an assessment of the seriousness of the issue.
Database
Select the type of database running in the environment.
Complete the fields as appropriate from the information in the service request.
Some fields in the Change Requests view are listed in the table in Closing Resolved Change Requests.
In the Change Request list, drill down on the Change Request number (#) field.
In the Comments field of the More Info form, note that this CR originated from a service request, and add any additional relevant information.
The new CR appears in the Customer Change Requests view of the Quality screen.
Assessing Change Requests (End User)
After users log change requests (CRs), the product marketing team assesses the new CRs in its functional areas.
Product managers assess and assign CRs. A product manager reviews each new logged CR in the assigned area of responsibility. If the product manager determines that an issue is valid, then the product manager defines the priority and assigns the CR to the appropriate engineering manager.
This topic contains the following related information:
This task is a step in Process of Managing Siebel Quality.
Process Flow for Assessing Change Requests
After users enter change requests (CRs), product marketing managers assess the CRs to determine how important they are and who must resolve the issues. The following graphic shows the process flow for the tasks in assessment.
More information about the tasks in this process follows:
Query for Unassigned Change Requests. The product manager queries for new CRs in the manager’s area of responsibility. For more information, see Querying for Unassigned Change Requests.
Close CR. If the product manager decides the CR is not a real issue, then the manager closes it. For more information, see Closing Unassigned Change Requests.
Reassign Change Request. If the product manager decides that the CR is a real issue, then the manager determines whether the manager’s team can resolve the issue. If the manager finds that the functional area of the CR is incorrect, then the manager assigns it to a new owner. For more information, see Reassigning Change Requests.
Close CR. The product manager investigates to determine whether the CR is a duplicate of an existing issue. If appropriate, the manager closes the new CR as a duplicate CR. For more information, see Closing Unassigned Change Requests.
Prioritize and Assign Change Request. If the product manager determines that the CR represents a real issue in the manager’s area of responsibility and is not a duplicate of another CR, then the product manager prioritizes the CR and assigns it to an engineering manager. For more information, see Prioritizing and Assigning Change Requests.
Querying for Unassigned Change Requests
The product manager queries for unassigned change requests in the manager’s functional area.
To query for unassigned change requests
Navigate to the Quality screen, then the Change Request List view.
Create a query with the necessary field values.
Some values that you can use are listed in the following table.
Field Value Area
(your product area)
Owner
IS NULL
Priority
IS NULL
Status
Open
Subarea
(your product subarea)
Substatus
Open
Run the query.
Reassigning Change Requests
If the product manager decides that the change request (CR) describes a real issue, then the manager first confirms that the CR is in the manager’s functional area. If the manager determines that the functional area for the CR is incorrect, then the manager reassigns the CR to the appropriate area.
To reassign a change request
Navigate to the Quality screen, then the Change Request List view.
Select a CR record.
In the Change Request form, change the values in the Area and Subarea fields, as needed.
In the Change Request list, drill down on the Change Request number (#) field.
In the Comments field of the More Info form, add a brief explanation of the reason for reassigning the CR.
Closing Unassigned Change Requests
If the product manager decides the change request (CR) is not a real issue, then the manager can close it for various reasons. For example, the manager might determine that the issue is not a product defect, or the manager might decide to decline an enhancement request.
To close an unassigned change request
Navigate to the Quality screen, then the Change Request List view.
Select a CR record.
In the Change Request form, select Closed in the Status field.
In the Substatus field, complete one of the following steps:
If the CR does not reflect a real issue in the current product, then select a value such as Not a Bug or No Longer Applicable.
If the CR is an enhancement request, and you cannot accommodate the request, then select Enhancement Declined.
If the CR is a duplicate of an existing issue, then select Dup-Double Entry, and enter the CR number for the existing issue in the Primary Occurrence field.
In the Change Request list, drill down on the Change Request number (#) field.
In the Comments field of the More Info form, add a note explaining the reason for closing the CR.
Prioritizing and Assigning Change Requests
If the product manager determines that the issue in a change request (CR) is new and an owner must resolve it, then the manager assigns a priority, a target release, and an owner to the CR. The product manager usually assigns the CR to the engineering manager who is in charge of the product area relating to the issue.
The product manager enters priority and assignment information in the Resolution section of the Change Requests form.
To prioritize and assign a change request
Navigate to the Quality screen, then the Change Request List view.
Select the CR record, and change the fields as appropriate.
Some fields are described in the following table.
Field Comments Owner
Select the engineering manager who manages resolving the reported issue in the CR.
Priority
Select the urgency to resolve the issue compared to other issues at hand. The value in this field can be different from the value in the Severity field.
Targeted Version
Select the release in which to fix the CR issue.
Drill down on the Change Request number (#) field.
In the Comments field of the More Info form, add a comment summarizing the reasons for your prioritization and assignment of this CR.
Complete the other fields as appropriate.
Some fields are described in the following table.
Field Comments Engineering Group
Select the group that delivers the resolution. This field is automatically populated when you select a value in the Subarea field.
Special Tag
Select statuses or actions that other fields do not identify. You can use special tags for purposes such as reporting, tracking, querying, exporting, and localization. You can specify multiple tags.
Tag Summary
Displays all the tags that you select in the Special Tag field.
Resolving Change Requests (End User)
The engineering manager who owns an open change request (CR) assigns the CR to a team engineer. The engineer first tries to re-create the issue by following the description that the CR creator enters. The engineer debugs the issue and isolates its cause. The engineer then implements the appropriate fix, updates the CR with all relevant details, and closes the CR.
This topic contains the following related information:
This task is a step in Process of Managing Siebel Quality.
Process Flow for Resolving Change Requests
After Product Management assigns change requests (CRs) to Engineering, Engineering can proceed to resolve the CRs. The following figure shows the process flow for the tasks in resolution.
More information about the tasks in this process follows:
Assign Change Requests (Manager). The engineering team manager to whom the product manager assigned the CR assigns it to a team engineer. For more information, see Assigning Change Requests to Engineers.
Query for My Change Requests. The engineer performs a query to find the CRs that are assigned to the engineer.
Reproduce the Issue. When receiving a newly assigned CR, the engineer tries to reproduce the issue in the CR.
Close Change Request. At this point, the engineer might close the CR for the following reasons:
The engineer cannot reproduce the issue.
The engineer can reproduce the issue, but the issue does not apply to the current product.
If the engineer closes the CR for these reasons, then the engineer does not take further action. For more information, see Closing Resolved Change Requests.
Create Multiple Occurrence Change Request. If the engineer determines that the CR contains a real issue with the current product, then the engineer checks to see whether the same issue occurs in multiple versions of the same product. If so, then the engineer creates a multiple occurrence CR for each product variant or version with the same issue. For more information, see Creating Multiple Occurrence Change Requests.
Break Multiple Occurrence Link. If subsequent investigation shows that the issue does not occur in another product version, or occurs differently in other product versions, then the engineer breaks the multiple occurrence link. For more information, see Breaking Multiple Occurrence Links.
Define Relationship. If the CR is not a multiple occurrence CR, then the engineer tries to determine whether the CR is related to other CRs in some other way. For example, correcting the issue in the CR might depend on first correcting the issue in another CR. In this case, the engineer determines the relationship. For more information, see Linking Related Change Requests.
Fix Issue. The engineer then applies the appropriate fix and closes the CR. For more information, see Closing Resolved Change Requests.
Assigning Change Requests to Engineers
After the product manager assigns the change request (CR) to an engineering manager, the engineering manager assigns the CR to an engineer with the expertise to resolve the issue.
To assign a change request to an engineer
Navigate to the Quality screen, then the Change Request List view.
Select a CR record.
In the Owner field, select the engineer you want to assign to resolve the issue.
Drill down on the Change Request number (#) field.
In the Comments field of the More Info form, enter any comment or explanation to help the engineer to understand the issue.
Creating Multiple Occurrence Change Requests
In the course of resolving a change request (CR), an engineer might find the same problem in another testing environment, another language version, or another product release version. For this situation, users can create parent-child relationships between CRs. With this functionality, users can create multiple occurrence CRs, and link these CRs to a parent CR.
Multiple occurrence CRs have the same functional description but apply to multiple critical factors such as environment, language, or product. Alternatively, multiple occurrence CRs can describe different symptoms that originate from the same problem and that require the same resolution. Multiple occurrence CRs must have the same owner and the same files or other components to fix.
The ability to create multiple occurrence CRs allows users to manage related issues from a single source, eliminate double-counting of product issues, and track together the linked CRs.
To create a new multiple occurrence CR (child) for an existing primary occurrence CR (parent), use the following procedure.
To create a multiple occurrence change request
Navigate to the Quality screen, then the Change Request List view.
Select a CR record for the parent to multiple occurrences.
In the Change Request form, click the menu button, and select Create Multiple Occurrence.
The original record is copied with a new CR number. The number of the original CR (the parent) appears in the Primary Occurrence field.
In the new CR record, change the field values for information that is different from the original CR.
Some fields in the Change Requests view are listed in the table in Closing Resolved Change Requests.
In the Change Request list, drill down on the Change Request number (#) field.
In the Comments field of the More Info form, record the action you took, and note any additional relevant information.
The parent and child CRs are linked, and the new CR is a multiple occurrence CR.
Breaking Multiple Occurrence Links
In some cases, you must remove the links between multiple occurrence change requests (CRs). For example, further investigation might reveal that multiple occurrence CRs are not related to each other.
You can break a multiple occurrence link either from a parent CR or from a child CR. To break Multiple Occurrence links, use the following procedures.
To break a multiple occurrence link from a parent change request
Navigate to the Quality screen, then the Change Request List view.
Select a CR record for a parent multiple occurrence CR.
Drill down on the Change Request number (#) field, and click the Related CRs view tab.
The Related CRs list displays the CRs with child relationships to the selected primary CR.
In the Related CRs list, select the multiple occurrence CR you want to remove.
Note: Child multiple occurrence CRs have a value of Multiple Occurrence in the Relationship Type field.In the Related CRs list, click the menu button, and select Delete Relationship.
In the confirmation dialog box, click OK.
The CR is removed from the Related CRs list.
You can also break a multiple occurrence link from a child change request.
To break a multiple occurrence link from a child change request
Navigate to the Quality screen, then the Change Request List view.
Select a CR record for a child multiple occurrence CR.
Delete the value in the Primary Occurrence field.
The value in this field is the parent CR.
Drill down on the Change Request number (#) field.
On the Comments field of the More Info form, record the action you took, and note any additional relevant information.
Click the menu button.
If the link is broken successfully, then the Go to Primary Occurrence command is unavailable.
Linking Related Change Requests
Related change requests (CRs) are useful when investigating a solution for a CR that might be similar to other CRs. Siebel Quality uses the following other designations to define the relationships that can occur between CRs:
Duplicate (Dup-Double Entry). The same CR is entered more than once. Not only is the functional description the same, but other critical factors such as environment, language, or product are the same.
Dependent Upon. You cannot resolve the CR until another CR is fixed.
Miscellaneous (Misc). An arbitrary relationship exists between CRs. This designation allows you to track together multiple CRs, although they might not depend on each other or match each other.
This topic includes tasks for creating and managing the related CRs. To create a relationship between 2 existing CRs, perform the following tasks.
To link a related change request from a parent change request
Navigate to the Quality screen, then the Change Request List view.
Select the primary CR to which you want to relate another CR.
Drill down on the Change Request number (#) field, and click the Related CRs view tab.
In the Related CRs list, create a new related CR record.
In the Add Change Request dialog box, select the CR you want to relate to the primary CR as a child, and click OK.
In the Relationship Type field, select the type of relationship that the related CR has to the parent CR.
In the Comments field, record the action you took, and note any additional relevant information.
You can also link a related change request from a child change request.
To link a related change request from a child change request
Navigate to the Quality screen, then the Change Request List view.
Select the CR record you want to link to another CR record as a child.
Note: The child CR cannot have any related child CRs. To check for related child CRs, drill down on the Change Request number (#) field, and check the Related CRs view tab.In the Primary Occurrence field, select the CR number of the parent CR.
Drill down on the Change Request number (#) field.
In the Comments field of the More Info form, record the action you took, and note any additional relevant information.
Click the menu button, and select Go to Primary Occurrence.
The Change Request form displays the CR record you just designated as the parent (primary occurrence).
Click the Related CRs view tab.
In the Related CRs list, select the child CR record you just linked as related to the parent.
In the Relationship Type field, select the type of relationship that the child CR record has to the parent CR record.
Closing Resolved Change Requests
When receiving a newly assigned change request (CR), the engineer tries to reproduce the issue. At this point, the engineer can close the CR for several reasons, such as the issue applies to a third-party product, the issue is no longer applicable to the current release, or the engineer cannot reproduce the issue.
If the engineer determines that the CR is a real issue, then the engineer investigates further, implements the appropriate fix, and tests the fix. After completing the fix, the engineer closes the CR, and enters relevant information about the fix.
When closing a primary occurrence CR, an engineer can close a parent CR and all its child CRs at once, only close the parent CR, or close a child CR independently of its parent.
When closing a CR, the engineer enters information in the Resolution section of the Change Requests form. Use the following procedures to close CRs that are fixed or otherwise resolved.
To close a resolved change request
Navigate to the Quality screen, then the Change Request List view.
Select a CR record that you want to close as fixed.
In the Change Request form, complete the following steps:
Select a value of Closed in the Status field.
Select the reason for closing the CR in the Substatus field. Values include:
FOL. Fact of Life. Because of a limitation such as dependency on a third-party product, the development team has no control over the issue.
No Longer Applicable. The issue applies to an older or different version of the product, and not to the current version or the version under development.
Not Reproducible. You cannot reproduce the issue as described. (It is recommended that before closing the CR, you contact the CR creator to obtain clarification.)
Fixed. You corrected the issue.
In the Change Request list, drill down on the Change Request number (#) field.
In the More Info view, complete the fields as appropriate.
Some fields are described in the following table.
Field Comments Approval
Select a value to track approval for the stage of the resolution.
Special Tag
Select statuses or actions that other fields do not identify. You can use special tags for purposes such as reporting, tracking, querying, exporting, and localization. You can specify multiple tags.
Tag Summary
Displays all the tags that you select in the Special Tag field.
Fixed Build
Select the product version in which you implement the resolution.
Files Fixed
Type the filename and archiving location of each modified electronic file for the resolution. This field is required when the Substatus field or Integration Status field changes to Fixed.
Integration Status
Select the status of the CR on the integration branch. When the Integration Status field is Closed, the Integration Fixed Date field is automatically populated, and the Integration Fixed Build field is required.
Integration Fixed Date
Select the date and time when the resolution is implemented in the integration branch.
Integration Fixed Build
Select the integration branch build number in which the resolution is implemented.
Comments
Type a comment that explains the resolution.
You can also close a resolved parent multiple occurrence change request.
To close a resolved parent multiple occurrence change request
For a parent CR, follow the steps in the procedure for closing resolved change requests in this topic.
When you save the record, a message box appears.
Complete one of the following steps:
Click OK to close all the associated multiple occurrence CRs with the same resolution information as the primary CR.
Click Cancel to close only the primary CR.
Verifying Change Request Closures (End User)
After the engineer resolves a change request (CR), the QA tester or other CR creator who reported the issue verifies that the resolution is correct.
This topic contains the following related information:
This task is a step in Process of Managing Siebel Quality.
Process Flow for Verifying Change Request Closures
After engineers resolve change requests (CRs), the CR creator attempts to verify the resolutions. The following figure shows the process flow for the tasks in verification.
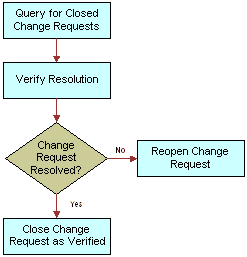
More information about the tasks in this process follows:
Query for Closed Change Requests. The creator queries for logged CRs that are now closed. For more information, see Querying for Closed Change Requests.
Verify Resolution. The creator tries to verify the resolution.
Reopen Change Request. If the creator determines that the issue is not resolved, then the creator reopens the CR to send the CR back to Engineering for further review. For more information, see Reopening Change Requests.
Close Change Request as Verified. If the creator determines that the CR is correctly resolved as stated, then the creator closes the CR as verified. For more information, see Closing Change Requests as Verified.
At this point, the CR life cycle is complete.
Querying for Closed Change Requests
The change request (CR) creator queries for closed CRs in a functional area.
To query for closed change requests
Navigate to the Quality screen, then the Change Request List view.
In the Change Request form, create a query with a Status field of Closed.
Run the query.
Reopening Change Requests
The change request (CR) creator tries to verify the resolution on the version that the engineer identifies. If the creator determines that the issue is not resolved, then the creator reopens the CR. Reopening the CR sends it back to the engineer for further review.
To reopen a change request
Navigate to the Quality screen, then the Change Request List view.
Select a CR record.
In the Change Request form, select Open-Disagree in the Status field.
In the Change Request list, drill down on the Change Request number (#) field.
In the Comments field of the More Info form, enter an explanation of your reason for disagreeing with the resolution.
Closing Change Requests as Verified
If the creator determines that the change request (CR) is correctly resolved, then the creator closes out the CR as verified. At this point, the CR life cycle is complete.
To close a change request as verified
Navigate to the Quality screen, then the Change Request List view.
Select a CR record.
In the Change Request form, select Closed-Verified in the Status field.
In the Change Request list, drill down on the Change Request number (#) field.
In the Comments field of the More Info form, enter a note indicating that you agree with the resolution.
Creating Patch Requests (End User)
The release management team, which might include representatives from the major functional groups, tracks the overall health of the product release. They monitor product status and stability. They monitor the progress of the development effort through reports and charts in Siebel Quality. They then provide the final recommendations for shipment of the product.
The release management group also manages patch requests. A patch request (PR) is a resolved product issue with a resolution that you must deliver to a customer prior to the next scheduled release, through a maintenance release. The release management group makes sure that users immediately resolve in maintenance releases critical issues for which customers need fixes.
This topic contains the following related information:
This task is a step in Process of Managing Siebel Quality.
Process Flow for Creating Patch Requests
After users close change requests (CRs) as verified, the release management group might determine that they must provide a CR fix to a customer immediately and not in the next release of the product. The following figure shows the process flow for the tasks in patch request creation.
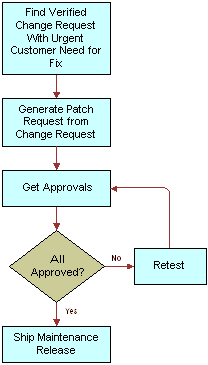
More information about the tasks in this process follows:
Find Verified Change Request with Urgent Customer Need for Fix. A member of the release management group identifies a closed and verified CR that represents a resolution for which a customer cannot wait until the next scheduled release to receive.
Generate Patch Request from Change Request. A release manager generates a patch request (PR) from a CR. For more information, see Generating Patch Requests from Change Requests.
Get Approvals. The release manager obtains the approvals necessary for shipping the patch, and records the approvals in the PR record. For more information, see Approving and Shipping Patch Requests.
Retest. If all approvers do not agree that the patch is ready to ship, then the release manager sends the patch back to engineering for further development, testing, and another approval cycle.
Ship Maintenance Release. After the release manager gathers all the approvals for the PR, the maintenance release is ready to ship to the customer. For more information, see Approving and Shipping Patch Requests.
Generating Patch Requests from Change Requests
A member of the release management team generates a patch request (PR) from a change request (CR). The PR then forms the basis of a maintenance release. To generate a PR, use the procedure that follows.
To generate a patch request from a change request
Navigate to the Quality screen, then the Change Request List view.
Select the closed and verified CR record from which you want to generate a PR.
In the Change Requests form, click the menu button, and select Copy To Patch.
The Patch Requests view appears with the new PR record generated from the CR. Most fields are populated from the CR.
In the Account field, select the customer to receive the patch.
In the Date Required field, enter the date to deliver PR fix to the customer.
Approving and Shipping Patch Requests
You approve a patch request (PR) for shipping as a maintenance release in the Patch Requests view. The release management team uses this view. The main groups involved in product development must approve a patch before you can deliver it to a customer.
To record approvals and clear a patch for shipping, use the procedure that follows.
To approve and ship a patch request
Navigate to the Quality screen, then the Patch Request List view.
Drill down on the Patch Request number (#) field for a selected patch to ship.
When you receive approvals for the patch to ship, complete the Technical Services, Product Marketing, Engineering, and QA fields.
When all teams approve the PR, select Approved to Ship in the Patch Status field.
When you ship the patch, select Closed-Shipped in the Patch Status field.