11Charges and Invoices
Charges and Invoices
This chapter describes how to set up and generate charges and invoices for service requests, activities, and agreements. It includes the following topics:
About Charges and Invoices
You can manually or automatically create charges and invoices for service requests, activities, and agreements. For more information, see About Agreements and About Entitlements.
A charge is an expense item. An invoice is a bill that summarizes a group of incurred charges, or future charges, during a specific time period. You can consolidate all the charges for an individual account into a single invoice, and then send an invoice to each account.
Charges must be generated before an invoice can be automatically generated, but not before you can manually generate an invoice. You can use a charge consolidation plan to define the parameters for consolidating charges into invoices. After you define the charge consolidation plan, you can use it to automatically generate invoices.
Invoices for activities can include charges for parts, labor, and expenses. Invoices for service requests incorporate orders and the charges for all of the activities related to the service requests. Only records with selected Billable check boxes are automatically added to the invoice.
You can print pro forma invoices onsite for customers, and send them to an accounting application to track accounts receivable and revenue. If an invoice is delinquent, then the Workflow Manager can track it and send automatic reminders to customers or employees.
Each invoice can include the following line items:
Time and materials
Miscellaneous expenses and tax
Nonrecurring charges
Recurring charges
Use charges
Project charges
Credits or other adjustments
You can integrate Siebel Invoices with third-party applications to manage taxation for entire invoices or for invoice line items. Without tax integration, Siebel Invoices prepares pro forma invoices, statements of work, and reports to customers. You can collect applicable charges and activities to efficiently pass this information to a financial application.
About Lists for Charges and Invoices
You must set up cost, price, and rate lists to correctly create charges and invoices. For more information about these lists, see Siebel Pricing Administration Guide.
Cost Lists
Siebel Field Service contains a costing infrastructure that allows users to track the costs when they occur and then to export these costs to financial applications for posting to the general ledger. Service organizations can associate costs with service calls when service engineers perform the service.
Most companies include product cost information in financial applications. Incorporating this information into Siebel Field Service provides the following advantages:
Costs are associated with service requests and activities when service engineers perform them.
Costs are associated with orders for profitability analysis.
Cost lists can have time limits so that they provide an accurate record of costs when they occur.
Service inventory is created and valued at any time.
Price Lists
Price lists play an important part in charging and invoicing. The price list provides information to the Charge Engine about the price of parts and materials for an activity associated with a service request. Using a service package might adjust the price.
Price lists link cost lists to service requests, orders, and activities. For example, a cost list, North American Costs, includes the costs of products and resources in North America. When a field service engineer selects a price list for a service request, the associated cost list is automatically linked to the service request.
Rate Lists
Rate lists show the billable rate for company employee labor. When creating a rate list, perform the following main tasks:
Create and release a new product with the necessary resource name (for example, Field Engineer). Make sure you select the Project Resource check box. Then, add the resource to your rate list with the corresponding rate.
Create a new position for the resource product that you create and associate the position with the billing product. You can then enter the users to bill at the newly created rate.
Tip: The service calendar is used to calculate regular, overtime, and extended overtime charges. To set up schedule hours for employees, use the Schedule Hours view in the Schedules view of the Administration - Service screen. You can then associate the appropriate service calendar with an entitlement in the Entitlement Details view in the Entitlements view in the List view of the Agreements screen. For more information, see Defining Schedule Hours and Adding Service Information to Entitlements (End User).The entitlement schedule takes precedence over the schedule for the employee.
About Processing Logic for Generating Invoices
Invoices can be generated for service requests, activities, and agreements. For more information about the business service used to consolidate charges for invoice generation, see FS Generate Conditional Charge Process Business Service.
This topic contains the following information about the processing logic for generating invoices:
Processing Logic for Service Requests
The Charge Consolidation business service uses the following processing logic for service requests:
For a selected service request, find all activity and order records for which the Billable check box is selected.
Find the rate and price lists for the items in these records.
Calculate the price for each billable item.
If an entitlement applies to the service request, then complete the following steps:
Find the price and rate lists associated with the entitlement.
If the Activity Override check box is selected, then recalculate the billable cost for the billable items using the price and rate lists for the entitlement instead of the lists for the activity and the entitlement service price details for the covered activity types.
If there is no entitlement, then access the next billable item.
If there are no more billable items, then create an invoice.
Processing Logic for Activities
The Charge Consolidation business service uses the following processing logic for activities:
For a selected activity, find all expense, time, and part records for which the Billable check box is selected.
Find the rate and price list for the activity.
Calculate the price for each record.
Create an invoice.
Processing Logic for Agreements
To automate the consolidation of agreement charges into invoices, the FS - All Charge Consolidation and FS - Charge Consolidation workflows call the Charge Consolidation business service methods. The following processing logic applies to agreements:
Generate a list of the charge consolidation plans.
For the first charge consolidation plan, if the Next Invoice Date field is before today, then proceed.
Search for charges by using the consolidation rules.
Consolidate the charges, and generate the invoice.
Set the Last Invoiced field to today, and get the new value in the Next Invoice Date field.
Check for additional charge consolidation plans to process.
If there is another plan, then repeat Step 1 through Step 6.
The Charge Consolidation business service can generate periodic invoices that include the following types of charges:
NRC. Installment payments for one-time, nonrecurring charges (for example, a one-time fee for service billed in 1 or more installments).
RC. Payment of periodic, recurring charges (for example, a monthly service charge).
Usage. Payments that are based on the use of an asset (for example, the number of copies produced on a color copier each month).
Adjustments. Credits or charges for the selected period.
Processing Logic for NRC Line Items
The Charge Consolidation business service uses the following processing logic for NRC (nonrecurring charge) line items:
If there is a previous charge, then find the NRC charged amount. If the NRC amount is greater than or equal to the NRC charged amount plus the next amount to invoice, then proceed.
If the charge is the first charge, and if the NRC amount for the line item is greater than zero, then proceed.
Calculate the NRC amount for the next charge using the NRC plan, if selected.
Create an NRC line item.
Processing Logic for RC Line Items
The Charge Consolidation business service uses the following processing logic for RC (recurring charge) line items:
If the recurring charge on the invoice is greater than zero, then proceed.
Calculate the RC amount.
Create an RC line item.
Processing Logic for Usage Line Items
To generate charges from usage line items, you must first define the asset for the usage measurement. You specify this asset in the Usage Asset number (#) field in the Line Detail view in the Line Items view of the Agreements screen. For accurate billing, the charge schedule must match the measurement frequency of the asset.
If you want to charge for estimated usage, then you must define certain fields in the product measurement record of the product for the asset. For more information, see Setting Up Use Plans.
The Charge Consolidation business service uses the following processing logic for usage line items:
If there is a previous charge for the use plan of the agreement line item, then find the reading on the last charge.
If the charge is the first charge for the use plan, then find the reading closest to the date in the Use Start field.
Find the reading closest to the current date or the Advance Invoice date.
If there is no new reading after the last charge or the date in the Use Start field, and if the Estimate check box is selected (in the Use Plans view of the Administration - Service screen), then use the calculated average use in the Usage field (in the Measurements view of the Assets screen) as the estimated reading.
If a reading is found, then verify the following values for the reading:
The Complete check box is selected.
The Counter Type field (in the Measurements view in the Service Information view in the Products view of the Administration - Product screen) is set to Incremental or Absolute.
If the conditions in Step 5 are satisfied, then calculate the usage.
Processing Logic for Adjustment Line Items
The Charge Consolidation business service uses the following processing logic for adjustment line items:
For the charge period and agreement, if any value exists in the Adjustment field, then add a new line item for this amount to the Charges view.
Create an adjustment line item in the Charges view.
Clear the Adjustment and the Adjustment Reason fields.
Improving Performance and Scalability of Workflows for Charges
The performance of the workflows for charges depends on many variables. These variables include the complexity of the recurring charge (RC), nonrecurring charge (NRC), and usage plans, the number of line items for each agreement, and the number of charges to consolidate. For more information, see Workflows for Charges and Invoices.
You can improve the performance of the workflows and the Charge Engine in the following ways:
For the FS - Generate Agreement Charge workflow, remove some of the charge steps. For example, if you run charges only for agreements that are based on nonrecurring charges and recurring charges, then remove the usage plan subprocess.
Disable logging.
Run the processes in parallel. You can run the workflows on different computers or on a multiple processor computer. The performance of the workflows improves if fewer processes are running. For example, run the FS - Generate All Agreement Charges workflow and the FS - All Charge Consolidation workflow in parallel to improve performance.
Run the search specification of a consolidation rule on an indexed field.
Make sure that the consolidation rules are not too complex.
Process of Administering Charges
The following list shows the tasks that administrators typically perform to administer charges. Your company might follow a different process according to its business requirements.
To administer charges, administrators perform the following tasks:
Setting Up NRC Plans
Nonrecurring charge (NRC) plans are used to define installment plans for payment of one-time charges. For example, a service package includes an initial payment to start the service followed by 12 monthly charges that are billed on the first of the month. You can define this type of charge plan, and create invoices for the monthly billing charges. For more information about how NRC plans are associated with agreement line items, see Defining Charge Plans for Agreement Line Items (End User).
This task is a step in Process of Administering Charges.
To set up a NRC plan
Navigate to the Administration - Contracts screen, then the Non-Recurring Plans view.
Create a new nonrecurring plan record, and complete the fields as appropriate.
Some fields are described in the following table.
Field Comments Active
Select this check box to display the NRC plan as an option in the Charge Plan view in the Line Items view of the Agreements screen.
Commit
Select this check box to convert this record and child records to read-only status. When you select this check box, the Plan Details view becomes read-only.
Note: To use an NRC plan, it must be active and committed.Click the Plan Details view tab.
Each record in the Plan Details view denotes the amount to charge for each installment payment.
Create a new plan detail record for each installment, and complete the fields as appropriate.
Some fields are described in the following table.
Field Comments Number
Type the installment number. For example, the number 4 denotes the fourth installment of the nonrecurring charge.
NRC %
Type the percentage of the NRC total amount to charge for the installment.
Additional %
Type the additional percentage amount to charge for the installment, such as an interest charge.
Additional Charge
Type the additional fixed fee to charge for the installment, such as a service fee.
Setting Up Use Plans
Administrators can set up use plans to create usage-based charges for equipment. For example, the number of documents that are printed on a printer can determine a usage charge.
To set up use plans and the corresponding charges, you must first create a serialized product, create a measurement type for the product, and create a service product. A service product is a product sold as a service. You can sell this service independently, package it, or combine it with the physical product. For more information, review the following information:
For more information about creating service products, see Defining Service-Based Pricing.
For more information about creating measurement types for products, see Setting Up Measurement Types for Products.
For more information about associating use plans with agreement line items, see Defining Charge Plans for Agreement Line Items (End User).
This task is a step in Process of Administering Charges.
To set up a use plan
Navigate to the Administration - Contracts screen, then the Use Plans view.
Create a new use plan record, and complete the fields as appropriate.
Some fields are described in the following table.
Field Comments Name
Type the name of the use plan.
Estimate
Select this check box to indicate usage is estimated if the readings do not apply to the specified billing period. When you select this check box, the information in the Expected Usage field and Use Basis (Days) field is used to estimate usage. If this check box is not selected, and the billing period has incomplete data, then the period is not billed.
Click the Plan Details view tab.
In the Plan Details view, create a new plan detail record, and complete the fields as appropriate.
The usage charge is based on asset readings or estimates for this product.
Scroll down to the Pricing list, create a new pricing record, and complete the fields as appropriate.
Some fields are described in the following table.
Field Comments From
Type the lowest value of a measurement for the pricing record.
Units
Select the units for the pricing record. Values include:
Per Count. Charges the amount in the Amount field for each unit of measurement (for example, $0.50 for each mile).
Total. Charges the amount in the Amount field for the total measurement interval that the From and To fields specify, for example, $15 for 0 to 100 miles (100 total miles).
Rollback
Select this check box to indicate discounted pricing for higher usage. If you select this check box for a tier, then the price for that tier overrides the prices for all lower tiers. For an example of tiered pricing, see Adding Pricing Information for Use Plans.
In this example, if you select the Rollback check box for the Over 1,000 tier, then all miles are billed at a rate of $0.40 for each mile, if the usage reaches this tier during the time period.
Repeat Step 4 and Step 5 for each product in the use plan.
In the Plan Details view, and select the Commit check box for each product in the use plan.
The plan detail records are now read-only, and the associated fields in the Pricing list are now read-only.
Adding Pricing Information for Use Plans
The Pricing list in the Plan Details view in the Use Plans view of the Administration - Contracts screen defines the price structure of each product in a use plan. You enter a record for each range of measurement. The Pricing list allows for tiered pricing. The following table shows an example of tiered pricing.
Table Example of Tiered Pricing
| Measurement Range | Price |
|---|---|
0 to 100 miles |
$0.25 |
101 to 500 miles |
$0.30 |
501 to 1,000 miles |
$0.35 |
Over 1,000 miles |
$0.40 |
Setting Up Conditional Charge Plans
Siebel Field Service supports termination of an agreement, specifically, the charges involved in such events as the return of products, overflow, and so on. A termination or prorated plan typically covers these types of charges, and you use conditional charge plans to handle these types of charges. For more information about the business service for conditional charges, see FS Generate Conditional Charge Process Business Service. For more information about associating conditional charge plans with agreement line items, see Defining Conditional Charge Plans for Agreement Line Items (End User).
This task is a step in Process of Administering Charges.
To set up a conditional charge plan
Navigate to the Administration - Contracts screen, then the Conditional Charge Plan view.
Create a new conditional change plan record, and complete the fields as appropriate.
Some fields are described in the following table.
Field Comments Name
Type the name of the conditional charge plan (for example, Termination Plan).
Schedule
Select a schedule for the conditional charge plan. For more information about creating these schedules, see Defining Contract Schedules.
Commit Flag
Select this check box to convert the record to read-only status.
Scroll down to the lower Conditional Charge Plan list.
Create a new record for each charge installment, and complete the fields as appropriate.
Some fields are described in the following table.
Field Comments Sequence #
Type a value for the order of the charge installment. You might want to charge more the earlier a customer cancels or changes an agreement.
Percentage
Type the percentage amount to charge for the installment.
For example, create 12 installments of 8.33% for each month of a 12-month agreement. If the customer cancels or changes the agreement before this 12-month period expires, then the customer must pay each month 8.33% of the total penalty charge until the agreement terminates.
Additional %
Type the additional percentage amount to charge for the installment, such as an interest charge.
Additional Charge
Type the additional fixed fee to charge for the installment, such as a service fee.
Defining Contract Schedules
You can automatically generate charges according to a fixed schedule by defining 1 or more contract schedules. Then, when defining a charge plan for an agreement line item, you can select the appropriate schedule. On a recurring schedule, an invoice is created from the consolidation of charges. For example, you can schedule product charges to generate on the last day of each month or every Sunday.
This task is a step in Process of Administering Charges.
To define a contract schedule
Navigate to the Administration - Contracts screen, then the Contract Schedule view.
Create a new contract schedule record, and complete the fields as appropriate.
Some fields are described in the following table.
Field Comments Repeat Type
Select a value that determines how often an event occurs. The value that you select in this field determines the available fields in the form that appears after the Contract Schedule list. Values include:
Daily. If you select this value, then the Every Number of Days field appears in the form. For example, if you enter 30 in the Every Number of Days field, then the event occurs every 30 days.
Monthly By Day. If you select this value, then the Day field and the of Every Number of Months field appear in the form. For example, if you select 5th of Month in the Day field, and enter 6 in the of Every Number of Months field, then the event occurs on the 5th of the month every 6 months.
Monthly By Week. If you select this value, then 2 fields to designate the day of the week and the of Every Number of Months field appear in the form. For example, if you select Third in the first field, select Wednesday in the second field, and enter 7 in the of Every Number of Months field, then the event occurs the 3rd Wednesday every 7 months.
Weekly. If you select this value, then the Every Number of Weeks field and check boxes for each day of the week appear. For example, if you enter 2 in the Every Number of Weeks field, and select the check boxes for Mon and Wed, then the event occurs each Monday and Wednesday every 2 weeks.
The event occurs at the beginning of the specified day (midnight of the previous day) for the repeat type. Consequently, the charges for the specified day are not included in the consolidation of charges. For example, to consolidate the charges for each month in a calendar year, you create a record with a value of Monthly By Day in the Repeat Type field, select 1st of Month in the Day field, and enter 1 in the of Every Number of Months field. Charges for the previous month are consolidated on the 1st of each month.
Released Flag
Select this check box to indicate the schedule is available for use. After you select this check box, you cannot clear this check box or change the record for the contract schedule, so select this check box only when the record for the contract schedule is complete and correct.
Process of Administering Invoices
The following list shows the tasks that administrators typically perform to administer invoices. Your company might follow a different process according to its business requirements.
To administer invoices, administrators perform the following tasks:
Setting Up Auto-Invoice
Users can use the auto-invoice feature to quickly generate invoices for service requests and activities. To set up the auto-invoice feature, complete the task in this topic.
This task is a step in Process of Administering Invoices.
To set up auto-invoice
Specify a price list for all of the billable items for an activity.
The selected price list must include the billable items as products (in the Price List Line Items view in the Price Lists view of the Pricing screen).
Make sure that there is a rate list line item (a billing product) for each type of resource (for example, a field service engineer) for an activity.
You specify the activities rate list in the More Info view of the Activities screen. In the Rate Lists Line Items view in the Rate Lists view of the Pricing screen, you define the resource, rates, and markups.
Make sure that the rate types in the Type field are identified for billable expenses and labor (in the Expense Tracker view and Time Tracker view of the Activities screen).
Make sure that each user has a position that is associated with a billing product (in the Billing Product field in the Positions view of the Administration - Group screen).
Make sure that price and rate lists are defined for activities and that a price list is defined for orders.
Auto-invoicing uses these lists to determine the total amount to bill to a customer.
Creating Charge Consolidation Plans
You can create customized invoices by creating a charge consolidation plan that searches for and consolidates charges by using predefined criteria, such as account and currency. To automatically generate customized invoices, perform the procedure in this topic, and see Setting Up Auto-Invoice.
A charge consolidation plan consolidates all charges for a charge schedule into a single invoice. You can use this plan to define the charges that are included in an invoice for the invoice period. Ideally, when a service package is associated with a charge consolidation plan, a monthly invoice is created for the recurring and nonrecurring charges. For more information, see About Processing Logic for Generating Invoices and FS Charge Consolidation Business Service.
To specify the charges to include on an invoice for the invoice period, define the following information:
A schedule that determines when consolidation occurs.
Consolidation rules that determine the charges that appear on invoices.
You can restrict the invoice charges to those charges that meet the specified rule criteria. You can consolidate the charges by account name, activity type, agreement, currency code, organization ID, or service request ID. All of the charges applicable to either the activities or the recurring and nonrecurring charges for the agreement are consolidated into a single invoice. This consolidation reduces the requirement for providing multiple invoices to the customer at different billing addresses over a time period.
To use the charge consolidation plan, activate the FS - Charge Consolidation workflow. For more information about activating workflows, see Siebel Business Process Framework: Workflow Guide.
This task is a step in Process of Administering Invoices.
To create a charge consolidation plan
Navigate to the Administration - Contracts screen, then the Charge Consolidation Plans view.
Create a new charge consolidation plan record, and complete the fields as appropriate.
Some fields are described in the following table.
Field Comments Start Date
Select the starting date for charges. Charges dated after this date, and before the ending date, are included in the invoice for the charge consolidation plan.
End Date
Select the ending date for charges. Charges dated after this date are excluded in the invoice for the charge consolidation plan.
Released
Select this check box to release the charge consolidation plan and make it active and available for use.
Last Invoiced
Select the last invoiced date. When a charge consolidation plan is released, the Last Invoiced field value is set to the Start Date field value.
Next Invoice Date
Select the date on the next invoice. When a charge consolidation plan is released, or an invoice is created, this field is recalculated according to the schedule.
Use Bill To Account Flag
Select this check box to create a new invoice for each unique bill-to account on the service request or agreement instead of invoicing the account address.
In the More Info view, complete the fields as appropriate.
Some fields are described in the following table.
Field Comments Advance To
Select the date up to which to execute the charge consolidation plan. For example, select the 20th day of the month to create invoices on the 10th of the following month that include charges up to and including the 20th day of the month.
Payment Term
Select the payment term for the charge consolidation plan (for example, Net 30).
Currency Code
Select the currency code of the invoice to create using the charge consolidation plan.
Click the Consolidation Rule view tab.
Create a new consolidation rule record, and complete the fields as appropriate.
Some fields are described in the following table.
Field Comments Sequence Number
Displays the sequence number of the consolidation rule. This field is not important in the consolidation process because if the consolidation rule contains multiple criteria records, then the records are evaluated using the AND relationship.
Name
Select the name of the consolidation rule. Typically, this name denotes the charge field for comparison purposes in the rule. You can select Search Spec in this field to define a search specification in the Value field.
Operand
Select the criteria applicable to the field in the Name field. If the rule operand is =, LIKE, or NOT LIKE, then you must enter a value in the Value field.
Value
Type the value to compare with the field in the Name field. If the rule operand is =, LIKE, or NOT LIKE, then you must enter a value in this field.
Consolidating Charges to Generate Customized Invoices
Follow the procedures in this topic to consolidate charges to generate customized invoices.
This task is a step in Process of Administering Invoices.
To consolidate charges to generate customized invoices
Navigate to the Administration - Contracts screen, then the Charge Consolidation Plans view.
Select a charge consolidation plan.
In the More Info view, click Execute Now.
You can also use a repeating component job to consolidate charges to generate customized invoices.
To consolidate charges to generate customized invoices using a repeating component job
Navigate to the Administration - Server Management screen, then the Jobs view.
In the Jobs list, create a new Job record.
In the Component/Job field, select Workflow Process Manager.
Enter the appropriate Repeat Interval and Repeat Unit in the Job Details view.
Scroll down to the Job Parameters list, and create a new parameter record.
In the Name field, select Workflow Process Name, and in the Value field, enter FS - Charge Consolidation or FS - All Charge Consolidation.
Click Start in the Jobs list.
Canceling Charges After Charge Consolidation Completion
After the charge consolidation plan runs, and the corresponding invoice is created, you might want to rerun the charge consolidation because of errors or for other reasons. Before you rerun the charge consolidation plan, you must cancel the original charges that were created from the charge consolidation.
This task is a step in Process of Administering Invoices.
To cancel charges after charge consolidation completion
Log in to Siebel Tools or Web Tools as an administrator (see Using Siebel Tools).
Create a workspace.
Display the Consolidate Flag for the FS Charge business component on the FS Charge Form Applet.
Deliver the changes to the Integration Branch.
Relaunch the client, and navigate to the Charges screen, and complete the following steps:
Clear the check in the check box for the Consolidate field.
Change the Status field of the charge to Pending.
Navigate to the Administration - Contract screen, then the Charge Consolidation Plan view.
Change the Next Invoice Date field to the previous schedule date.
Process of Managing Charges
The following list shows the tasks that end users typically perform to manage charges. Your company might follow a different process according to its business requirements.
To manage charges, end users perform the following tasks:
Creating Charges Manually (End User)
Follow the procedures in this topic to manually create charges. To manually create charges, no setup is required.
This task is a step in Process of Managing Charges.
To manually create a charge
Navigate to the Charges screen.
Create a new charge record, and complete the fields as appropriate.
You can also manually create charges as follows:
For service requests in the Charges view in the Service Request List view of the Service screen.
For activities in Charges view in the Activity List view of the Activities screen.
For agreement line items in the Charges view in the Line Items view in the List view of the Agreements screen.
To manually create a charge for an agreement line item
Navigate to the Agreements screen, then the List view.
Drill down on the Name field for a selected agreement.
In the Line Items view, select a line item.
On the link bar, click Charges.
Create a new charge record, and complete the fields as appropriate.
Creating Charges Automatically (End User)
Complete the procedures in this topic to automatically create charges.
This topic contains the following information:
This task is a step in Process of Managing Charges.
Creating Charges for Service Requests Automatically
To automatically create charges for a service request, the service request must contain billable data. For more information about recording billable activities and orders for service requests, see Associating Activities with Service Requests (End User) and Creating Orders for Service Requests (End User).
To automatically create a charge for a service request
Navigate to the Service screen, then the Service Requests List view.
Drill down on the SR number (#) field for a selected service request, and click the Charges view tab.
Click Auto Charge.
Creating Charges for Activities Automatically
To automatically create charges for an activity, the activity must contain billable data. For more information about recording billable data for activities, see the following information:
If the Entitlement field for the activity contains data, then the following information is used to automatically calculate the charge:
Data in the fields for records in the Time Tracker view for the activity (except for the Rate field)
Data in the Rate List field and the Price List field in the More Info view for the activity
Service hours and metrics for the entitlement (service detail definitions and exceptions) that the administrator sets up in the Administration - Contracts screen
Schedule hours and exception hours that the administrator sets up in the Schedules view of the Administration - Service screen
If the Entitlement field for the activity does not contain data, then the following information is used to automatically calculate the charge:
Data in the fields for records in the Time Tracker view for the activity
Data in the Rate List field and the Price List field in the More Info view for the activity
To automatically create a charge for an activity
Navigate to the Activities screen, then the Activity List view.
Drill down on the Type field for a selected activity, and click the Charges view tab.
Click Auto Charge.
A charge is automatically generated for the activity if the check box is selected in the Billable field for the activity and if the Rate List field in the More Info view for the activity contains data.
Creating Charges for Agreement Line Items Automatically
You can automatically create charges for agreement line items.
To automatically create a charge for an agreement line item
Navigate to the Agreements screen, then the List view.
Drill down on the Name field for a selected agreement.
In the Line Items view, select a line item.
On the link bar, click Charges.
Click Charge.
Process of Managing Invoices
The following list shows the tasks that end users typically perform to manage invoices. Your company might follow a different process according to its business requirements.
To manage invoices, end users perform the following tasks:
Creating Invoices Manually (End User)
Follow the procedures in this topic to manually create invoices.
This task is a step in Process of Managing Invoices.
To manually create an invoice
Navigate to the Invoices screen.
Create a new invoice record, and complete the fields as appropriate.
Some fields are described in the following table.
Field Comments State
Displays a color-coded bar that represents the state of the invoice. The values in the Status field and Late field determine this state. For more information, see the Bar Appearances for Invoices table.
Total Due
Displays the total amount due for the invoice. In the Invoice form, click the menu button, and select Refresh Total to update this field. The data in following views for the invoice is used to calculate this total: Line Items, Line Item Details, and Payments.
Late
Displays a check if the current date is past the due date of the invoice. The values in the Invoice Date field in the Invoices view and the Payment Term field in More Info view of the Invoices view determine the due date.
Drill down on the Invoice number (#) field for a selected invoice, and click the Line Items view tab.
Create a new line item record, and complete the fields as appropriate.
Caution: If the amounts recorded for the activity and order do not match the amounts recorded for the invoice line item, then manually associating entered line items with activities or orders can cause data quality issues.Some fields are described in the following table.
Field Comments Order #
Select the number of the order associated with the invoice line item. The Charge Consolidation business service can populate this field value if the Auto Gen feature generated the invoice. For more information, see Recording Expenses for Activities (End User).
If an order is associated with a service request, and the user activates the Auto Invoice command for the service request (in the Invoices view in the Service Requests List view of the Service screen), then the order number is populated for the invoice line item.
Activity #
Select the number of the activity associated with the invoice line item. The Charge Consolidation business service can populate this field value.
Project Role
Select the project team associated with the invoice line item.
Agreement Line Item
Select the number of the agreement line item associated with the invoice line item. The Charge Consolidation business service can populate this field value.
Click the Line Item Details view tab.
In the Details list, create a new line item detail record, and complete the fields as appropriate.
Note: The Charge Consolidation business service uses the line item details. A manual invoice does not use this data.Some fields are described in the following table.
Field Comments Expense Item
Select the number the expense item associated with the invoice line item. The Charge Consolidation business service can populate this field value.
Time Item
Select the number of the time item associated with the invoice line item. The Charge Consolidation business service can populate this field value.
Part Movement #
Select the number of the part movement associated with the invoice line item. The Charge Consolidation business service can populate this field value.
Order Line Item ID
Select the number of the order line item associated with the invoice line item. The Charge Consolidation business service can populate this field value.
In the State field of the Invoices screen, a bar indicates the status of the invoice. The following table describes the bar appearance for invoices.
Table Bar Appearance for Invoices
| Status Field Value | Amount of Fill When Late | Amount of Fill When Not Late | Color When Late | Color When Not Late |
|---|---|---|---|---|
Closed Cancelled Written Off Submitted |
100% |
100% |
Yellow |
Gray |
New Draft In-Process Consolidated Paid |
50% |
100% |
Red |
Green |
Prepared Partially Paid Open Billed |
75% |
75% |
Red |
Green |
Partially Written Off On-Hold Pending Rejected |
100% |
50% |
Red |
Green |
You can also manually create invoices as follows:
For service requests in the Invoices view in the Service Request List view of the Service screen.
For activities in the Invoices view in the Activity List view of the Activities screen.
For contacts in the Invoices view in the Contacts List view of the Contacts screen.
For accounts in the Invoices view in the Accounts List view of the Accounts screen.
For agreement line items in the Invoice view in the Line Items view in the List view of the Agreements screen.
To manually create an invoice for an agreement line item
Navigate to the Agreements screen, then the List view.
Drill down on the Name field of a selected agreement.
In the Line Items view, select a line item.
On the link bar, click Invoice.
Create a new invoice record, and complete the fields as appropriate.
Some fields are described in the following table.
Field Comments Invoice #
Displays the number of the invoice.
Late
Displays a check if the current date is past the due date of the invoice.
If you want to cancel the invoice, then change the Status field to Cancelled.
Creating Invoices Automatically (End User)
Follow the procedures in this topic to automatically create invoices. The Charge Consolidation Engine (Invoice Engine) automatically creates records in the Invoices view when you click the Auto Invoice button or when a workflow calls the engine. The Auto Invoice command executes the following steps:
Any billable expenses, time, or parts related to the service request or activity are located.
The associated price and rate lists are applied.
Invoices for the service request or activity are generated.
The Charge Consolidation business service does not consider entitlements for service. This business service requires the following information to automatically generate an invoice:
Billable flags. Only records for which the Billable check box is selected are included in the invoice.
Price list. You must specify the price list.
Product prices. In the Price List Line Items view in the Price Lists view of the Administration - Pricing screen, billable products must belong to the selected price list.
Rate list. You must specify the rate list for service activities in the More Info view of the Activities screen.
Activity prices. In the Rate List Line Items view in the Rate Lists view of the Administration - Pricing screen, the position (the resource) that performs billable service activities must be associated with the selected rate list.
Positions. You must specify the Billing Product field for the person (the resource on the rate list) providing the service in the Positions view of the Administration - Group screen. This position applies to the employee who is associated with the billable service recorded in the time tracker for the activity and does not apply to the owner of the activity.
Rate types. You must identify the rate types (Rate field) for billable expenses and labor in the Expense Tracker view and the Time Tracker view of the Activities screen.
Note: The Rate field does not appear by default. Click the menu button and select Columns Displayed. In the Columns Displayed dialogue box, move the Rate field from the Available Columns list to the Selected Columns list and click Save.
This task is a step in Process of Managing Invoices.
To automatically create an invoice for a service request
Navigate to the Service screen, then the Service Request List view.
Drill down on the SR number (#) field for a selected service request, and click the Invoices view tab.
Click Auto Invoice.
You can also automatically create invoices for activities.
To automatically create an invoice for an activity
Navigate to the Activities screen, then the Activity List view.
Make sure that the billable check box is selected for the activity.
Drill down on the Type field for a selected activity, and click the Invoices view tab.
Click Auto Invoice.
Printing Invoices (End User)
After you generate invoices, you might want to print them.
This task is a step in Process of Managing Invoices.
To print an invoice
Navigate to the Invoices screen.
Select an invoice record.
Click Reports.
The Run Report dialog box appears showing the Customer Invoice report in the Report Name field.
Run and print the report.
For more information about running and printing reports, see Siebel Reports Guide.
Associating Payments with Invoices (End User)
After you generate invoices, you can associate payments with them.
This task is a step in Process of Managing Invoices.
To associate a payment with an invoice
Navigate to the Invoices screen.
Drill down on the Invoice number (#) field for a selected invoice, and click the Payments view tab.
Create a new payment record, and complete the fields as appropriate.
Some fields are described in the following table.
Field Comments Payment #
Select the payment associated with the invoice. You can also create a payment in the Pick Payment dialog box. Payment records can originate from a back-office application.
Reference
Displays a reference number that the customer assigns to the payment.
Workflows for Charges and Invoices
This topic describes the workflows for charges and invoices. Workflows automate the business processes associated with charges and invoices.
You can modify these workflows to suit your own business needs using Siebel Business Process Designer. For more information, see Siebel Business Process Framework: Workflow Guide.
This topic includes information about the following workflows:
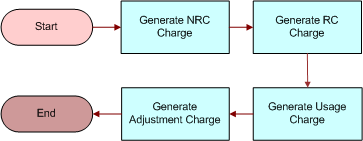
FS - Generate Agreement Charge Workflow
The FS - Generate Agreement Charge workflow automates the process of creating agreement charges. The child workflows in this workflow process all the charges in the charge plan, including recurring charges, nonrecurring charges, usage plan charges, and adjustments. For more information about running the workflow as a batch process without these steps, see FS - Generate All Agreement Charges Workflow.
This workflow is called when a user clicks the Charge button.
The following figure shows this workflow.
Workflow Description. This workflow performs the following actions:
Generate NRC Charge. This step calls the FS - Generate NRC Charge child workflow that generates nonrecurring charges for an agreement line item. The input date for this workflow is in the local time format. The workflow converts this format to ODBC format (YY-MM-DD). After the nonrecurring charge is generated, the workflow also updates the last-charged date for the nonrecurring charge on the charge plan (the NRC Last Charged Date field on the FS Agreement Item business component).
Generate RC Charge. This step calls the FS - Generate RC Charge child workflow that generates recurring charges for an agreement line item. The workflow retrieves and converts the asset readings to charge amounts. The input date for this workflow is in the local time format. The workflow converts this format to the ODBC format (YY-MM-DD). After the recurring charge is generated, the workflow also updates the last-charged date for the recurring charge on the charge plan (the RC Last Charged Date field on the FS Agreement Item business component).
Generate Usage Charge. This step calls the FS - Generate Usage Charge child workflow that generates charges for an agreement line item according to asset usage. The workflow retrieves and converts the asset readings to charge amounts. The input date for this workflow is in the local time format. The workflow converts this format to ODBC format (YY-MM-DD). After the usage charge is generated, the workflow also updates the usage last-charged date on the charge plan (the Usage Last Charged Date field on the FS Agreement Item business component).
Generate Adjustment Charge. This step calls the FS - Generate Adjustment Charge child workflow that generates adjustment charges for an agreement line item.
Refresh UI and User Interact. These steps redirect the user to the Charges view in the Line Items view in the List view of the Agreements screen.
FS - Generate All Agreement Charges Workflow
The FS - Generate All Agreement Charges workflow automates the process of generating charges from all agreement line items.
You can run this workflow as a batch process.
The following figure shows this workflow.
Workflow Description. This workflow performs the following actions:
GenerateAgreementItemList. This step generates a list of agreement line items.
GetNextAgreementItemID. This step retrieves each agreement line item from the list.
GetNextAgreementID. This step retrieves each agreement from the list. This step calls the FS - Generate Agreement Charge wo Goto Charges View workflow.
In this subprocess, the user interface steps are removed because the workflow is expected to run as a batch process with little or no intervention from the user.
True? This step determines whether more agreement line items exist to process. If no more agreement line items exist, then the workflow terminates. If more agreement line items exist, then the workflow continues to the next step.
ProcessOneAgreementItem. This step actually generates the agreement charge.
Setting the Advance To Date in the Workflow
The workflow retrieves the Advance To date from the object ID of the FS Agreement Item business component that is passed into the workflow. The Advance To field on the business component is a calculated field that defaults to the current date. Typically, this default date is not a problem because most administrators run the job using the job scheduler.
However, if you want to set a different Advance To date, then you can change the calculated field of the business component or edit the input parameters for the workflow so that the Advance To date changes when calling the business services.
FS - Generate Agreement Charge wo Goto Charges View Workflow
The FS - Generate Agreement Charge wo Goto Charges View workflow is the same as the FS - Generate Agreement Charge workflow, except that the final 2 user interface steps are removed so that the workflow can run as a batch process.
You can run this workflow as a batch process.
The following figure shows the FS - Generate Agreement Charge wo Goto Charges View workflow.
Workflow Description. This workflow performs the following actions:
Generate NRC Charge. This step calls the FS - Generate NRC Charge child workflow that generates nonrecurring charges for an agreement line item. The input date for this workflow is in the local time format. The workflow converts this format to ODBC format (YY-MM-DD). After the nonrecurring charge is generated, the workflow also updates the last-charged date for the nonrecurring charge on the charge plan (the NRC Last Charged Date field on the FS Agreement Item business component).
Generate RC Charge. This step calls the FS - Generate RC Charge child workflow that generates recurring charges for an agreement line item. The workflow retrieves and converts the asset readings to charge amounts. The input date for this workflow is in the local time format. The workflow converts this format to the ODBC format (YY-MM-DD). After the recurring charge is generated, the workflow also updates the last-charged date for the recurring charge on the charge plan (the RC Last Charged Date field on the FS Agreement Item business component).
Generate Usage Charge. This step calls the FS - Generate Usage Charge child workflow that generates charges for an agreement line item according to asset usage. The workflow retrieves and converts the asset readings to charge amounts. The input date for this workflow is in the local time format. The workflow converts this format to ODBC format (YY-MM-DD). After the usage charge is generated, the workflow also updates the usage last-charged date on the charge plan (the Usage Last Charged Date field on the FS Agreement Item business component).
Generate Adjustment Charge. This step calls the FS - Generate Adjustment Charge child workflow that generates adjustment charges for an agreement line item.
FS - Generate Conditional Charge Process Workflow
The FS - Generate Conditional Charge Process workflow creates conditional charges by using the defined rules in the conditional charge plan. For more information about the methods that this workflow calls, see FS Generate Conditional Charge Process Business Service.
This workflow is called when the user clicks the Charge button in the Conditional Charges view in the Line Items view in the List view of the Agreements screen.
The following figure shows this workflow.

Workflow Description. This workflow performs the following actions:
Business Service:42-4SAVA. This step calls the GetCondCharge method to get the conditional charge for the agreement.
Business Service:42-4Y6AG. This step calls the GenerateCharge method to use the conditional charge to adjust the charge.
FS - Charge Consolidation Workflow
The FS - Charge Consolidation workflow consolidates the charges in the Charge table by using a defined set of rules in the consolidation plans. For more information about the methods that this workflow calls, see FS Charge Consolidation Business Service.
This workflow is called with the user clicks the Execute Now button in the Charge Consolidation Plans view of the Administration - Contracts screen.
The following figure shows this workflow.
Workflow Description. This workflow performs the following actions:
Next Invoice Date <= Advance To. This step checks to see whether the Next Invoice Date field is earlier than or equal to the Advance To field.
Continue? This step determines how the workflow continues. If the Next Invoice Date field is later than the Advance To field, then the workflow terminates after navigating to the Invoices screen. If the Next Invoice Date field is earlier than or equal to the Advance To field, then the workflow continues to the next step.
Get Consolidation on SeachSpec. This step creates a search specification for the FS Charge business component by using the consolidation rules.
Consolidate Charge. This step consolidates found charges into 1 or more invoices. By default, only a single invoice is created. However, if the Use Bill To Account check box is selected for the consolidation plan, then 1 or more invoices are generated for each bill-to account for the charges. The charges are consolidated by using a schedule.
Set Next Invoice Date. This step enters the value in the Next Invoice Date field at the end of each invoice run by using the schedule and the last invoice date.
Note: By default, the first invoice run on a consolidation sets the last invoice date to the start date of the consolidation plan.Next Date Updated? This step determines how the workflow continues. If the Next Invoice Date field is not updated in the previous step, then the workflow terminates after navigating to the Invoices screen. If the Next Invoice Date field is updated in the previous step, then the workflow continues from the beginning.
FS - Goto FS Invoice View. This step navigates to the Invoices screen. This screen displays only the recently created records.
FS - All Charge Consolidation Workflow
The FS - All Charge Consolidation workflow batches consolidation charges.
You can run this workflow as a batch process.
The following figure shows this workflow.
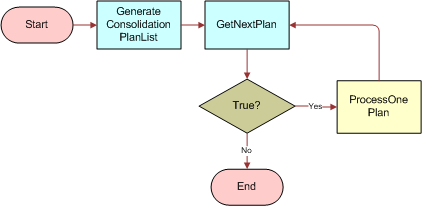
Workflow Description. This workflow performs the following actions:
GenerateConsolidationPlanList. This step generates a list of consolidation plans. The list is generated from the FS Invoice Consolidation Plan business component when the Released field is selected and the Next Invoice Date field is less than or equal to the current date.
GetNextPlan. This step retrieves each consolidation plan from the list. After retrieval, GetNextPlan passes the consolidation plan ID to the Set Next Consolidation Date subprocess. This subprocess calls the FS - Charge Consolidation wo Goto Invoice View workflow.
In this subprocess, the user interface steps are removed because the workflow is expected to run as a batch process with little or no intervention from the user. The first step of this subprocess retrieves the consolidation rule from the consolidation plan with the correct plan ID.
Caution: In the repository, the business object property in the FS - Charge Consolidation wo Goto Invoice View workflow is set to FS Invoice Consolidation. Clear this business object property, redeploy the workflow, and test it. If you do not change this object property, then performance issues might result.True? This step determines whether more consolidation plans exist to process. If no more consolidation plans exist, then the workflow terminates. If more consolidation plans exist, then the workflow continues to the next step.
ProcessOnePlan. This step actually runs the consolidate plan. The process then updates the Next Invoice Date field on the FS Invoice Consolidation Plan business component so that the charge consolidation workflow can determine when to next run the plan.