9Designing Products with Components
Designing Products with Components
This chapter describes how to design the structure of a product with components. It includes the following topics:
About Products with Components
A product with components is one that has components that the user can select. For example, you sell desktop workstations. At the time of purchase, the user can select from several types of disk drive, monitor, keyboard, and mouse to configure the workstation.
A product with components can have other products with components as components. For example, you sell a telephone PBX system that includes 6 rack-mounted PC-based modules. Each module is configurable in a fashion similar to a desktop computer. The components of the PBX system form a product hierarchy. To configure the PBX, the user begins at the start of the hierarchy with the PBX as a whole, and then works down through the hierarchy, configuring its components.
About Products with Components and Product Classes
This chapter and subsequent chapters describe how to define structure, constraints, custom user interface, and other properties of individual products.
Alternatively, you can also define these properties for product classes and then associate individual products with the class. The individual products inherit all the properties from the class.
For more information about product classes, see About Product Classes.
To associate a customizable product with a product class
Navigate to the Administration - Product screen, then the Product Definitions view.
In the Products list, select the desired customizable product.
In the Versions list, in the record for the Work Space version, in the Product Class field, select the product class.
About Relationships
You specify the components of a product with components by defining relationships. A relationship can be defined for a single product, a group of products, or the products in a class.
The relationships you define for a product with components are component type relationships. This means the items in the relationship are components of the product with components. For example, you define a relationship called Hard Drives for the product with components Desktop Computer. You specify that it contains all the products assigned to the Disk Drive class. This makes the disk drives in this class components of the product with components Desktop Computer.
Relationships form the framework of a product with components. They are also the framework underlying the user interface you design for the product. For example, you sell configurable computers. The buyer can choose among several monitors, several keyboards, and several CD-ROMs when configuring a computer. You could create a relationship called Monitors, another called Keyboards, and one called CD-ROMS. You would then specify the products to include in each relationship. You could then design the user interface to present monitors, keyboards, and CD-ROMs each on a separate selection page.
When you design a product with components, begin by defining a framework of relationships. Keep in mind that each relationship represents a distinct, configurable part of the product.
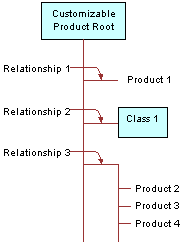
The following figure shows a relationship framework in a product with components.
Relationship 1 contains a single product, Product 1
Relationship 2 contains all the products in product class, Class 1
Relationship 3 contains Product 2, Product 3, and Product 4, each from a different product class
Products with components and the product class system both include hierarchies. However, these hierarchies differ in important ways. In the product class system, inheritance is used to propagate attribute definitions downward through the class system. By contrast, inheritance plays no role in the hierarchy of components in a product with components. Attributes inherited by a product with components because of its membership in a product class do not propagate to the component products in the product with components.
For example, a product with components belongs to a product class that has the attribute Color (red, green, blue). The product with components as a whole inherits this attribute but its components do not. For example, if the product with components is a laptop computer, this means the laptop comes in three colors, red, green, or blue.
However, these colors are not inherited by any of the components of the laptop. For example, if the laptop has a CD-ROM, it does not inherit these colors. The color attribute of the CD-ROM (if it has one) is defined in the product class from which it comes, not in the product with components in which it resides.
If a class relationship is assigned to a class that have subclasses, the products in the subclasses appear in the class relationship. For example, there is a parent class called Hard Drive and subclasses called Laptop Hard Drives and Desktop Hard Drives, both of which have products in them. If the relationship is on the Hard Drive class, the application will pick up products from both Laptop Hard Drive class and Desktop Hard Drives.
About Cardinality
When you define a relationship, you can specify a minimum, maximum, and default cardinality. Cardinality refers to the quantity of the component that the user can select. For example, you define a relationship called Hard Drives. It contains a 20 GB drive and a 30 GB drive. If you set the minimum cardinality to 2, the user must pick 2 items from this relationship. The user can do this in any of the following ways:
Pick one 20 GB drive and one 30 GB drive
Pick two 20 GB drives
Pick two 30 GB drives
The three types of cardinality you can define for a relationship are as follows:
Minimum Cardinality. Governs whether or not selecting items from this relationship is optional or is required. If you set the minimum cardinality to 0, selecting items is optional. If you set the minimum cardinality to greater than 0, the user must select that number of items from the relationship.
Maximum Cardinality. Sets the maximum number of items that the user can select from a relationship. If you set the minimum cardinality to greater than 0, you must set the maximum cardinality to a number at least as large If you do not enter a maximum cardinality, the default is 999. To revise this default, see Revising the Default Cardinalities.
Default Cardinality. Specifies what quantity of the default product is automatically added to the initial solution that the user sees. Default cardinality must be equal to or greater than the minimum cardinality and must be less than or equal to the maximum cardinality.
If you specify a default cardinality and do not specify a default product, the application uses the first product that displays when you expand the relationship folder in the Structure view.
Combinations for Setting Cardinality
The following table describes several combinations for setting cardinality. The table shows what the user will see in the initial solution and what actions that the user can take. In the table, N is the quantity of the default product in the initial solution. In all the cases where the Min Card is greater than 0, the user can substitute other products for the default product.
Table Combinations of Cardinality
| Min Card | Default Card | Max Card | Application Adds Default Product? | User Pick Reqd? | Initial Solution | User Actions Allowed |
|---|---|---|---|---|---|---|
=0 |
= Min Card |
>Default Card |
No |
No |
No items |
Increase item quantities to Max Card. |
=0 |
> Min Card |
=Default Card |
No |
No |
N=Max Card |
Decrease Item quantities to 0 but cannot increase them. |
=0 |
> Min Card |
>Default Card |
No |
No |
N=Default Card |
Increase item quantities to Max Card or decrease them to 0. |
>0 |
= Min Card |
=Default Card |
Yes |
Yes |
N=Min, Default, Max |
Cannot increase or decrease item quantities. |
>0 |
= Min Card |
> Default Card |
Yes |
Yes |
N=Min |
Can increase item quantities to Max Card but cannot decrease them. |
>0 |
> Min Card |
= Default Card |
Yes |
Yes |
N=Default |
Can decrease item quantities to Min Card but cannot increase them. |
>0 |
> Min Card |
>Default Card |
Yes |
Yes |
N=Default |
Can decrease item quantities to Min Card or increase them to Max Card. |
About Generics
Generics are notifications to the user from the engine that one or more items within a relationship needs to be selected for the product with components to be correct. An example of generics is a star displayed next to the relationship name and product title during a configuration session because some minimum cardinality requirements were not satisfied. Siebel Product Configurator gives users a warning when they try to save a configuration that has generics in it, but it allows users to save the configuration and also saves the fact that the configuration is incomplete to the quote or order.
When the user verifies a quote, the application checks for incomplete configurations as well as for other information. If the configuration saved was incomplete because of unsatisfied cardinalities on relationships, the application displays a message when the user verifies saying that the configuration of the item is not complete and the user must reconfigure the item.
Guidelines for Designing Products with Components
You can minimize order problems if you avoid adding the same product to more than one relationship in a customizable product. If you restructure the customizable product and publish a new version, the Auto Match business service in Siebel Product Configurator may not pick the correct relationship for the item if transactional data (for quotes, orders, and assets) based on old versions of the product is reconfigured. For more information see: Auto Match Business Service for Siebel Product Configurator.
Guidelines for Asset-Based Ordering
If you are designing products with components and you use asset-based ordering, the best practice is to avoid creating require rules that add items that are not tracked as assets to a customizable product.
For example, you write a require rule that adds a one-time charge for Installation to a customizable product. You do not set the Track as Asset flag for Installation in its product record. This means Installation does not display as a customer asset.
Then the customer requests an addition to the service. The call center agent selects the service, clicks Modify, and starts a configuration session. The Siebel Product Configurator engine adds Installation, because it is required by configuration rules. Installation is transferred to the quote even though it is not required by the service modification.
Process of Designing a Product with Components
To define a product with components, perform the following tasks:
Creating Product Records for a Product with Components and for Its Components
Add components to products with components, which can be done in the following ways:
Adding Products as Components Using the Dynamic Class Domain
Adding a Group of Products from Different Classes as Components
Note: Instead of defining the structure of an individual product with components, as described in this process, you can define the structure of a product class. Products associated with the class inherit both the structure and constraints from the class. For more information, see About Product Classes.
Creating Product Records for a Product with Components and for Its Components
First, you must create product records that represent the product with components as a whole and that represent all of its components.
This task is a step in Process of Designing a Product with Components.
For example, if the product with components is a computer, first you create a product record that for the entire computer and product records for all of its components, such as disk drives, a monitor, and so on. You must create all the products before you can add the components to the product with components.
Create product records in the same way that you do for a simple product, as described in Process of Creating Simple Products.
All these products must be orderable. To make a product orderable, place a check mark in the Orderable check box in the product record.
Adding a Single Product as a Component
You can create a relationship that adds a single product as a component of a product with components.
This task is a step in Process of Designing a Product with Components.
To add a single-product relationship
Navigate to the Administration - Product screen, then the Product Definitions view.
In the Products list, select and lock the desired product with components.
In the Versions list, click the Work Space version.
In the Structure list, add a new record and complete the necessary fields, described in the following table.
Field Comments Relationship Name
Enter a name for this relationship.
Product
Select the product that is a component of this product with components.
Minimum Cardinality, Maximum Cardinality, and Default Cardinality
Enter the minimum, maximum, and default cardinality for the product. For more information, see About Cardinality.
Adding Products as Components Using the Class Domain
You can add products as components of a product with components by using the class domain.
This task is a step in Process of Designing a Product with Components.
This method of adding products does not maintain a connection to the class system. When you refresh the customizable product work space, relationships are not updated. For example, if you assign a new product to a class, this product is not added to the relationship containing this class when you refresh the work space or release a new version of the customizable product. Use this method when you want to keep the relationship contents static or when you want to add only some of the products in a product class. If you want the relationship to be updated when you update the class system, see Adding Products as Components Using the Dynamic Class Domain.
To add products by using the class domain
Navigate to the Administration - Product screen, then the Product Definitions view.
In the Products list, select and lock the desired product with components.
In the Versions list, click the Work Space version.
In the Structure list, add a new record and complete the necessary fields, described in the following table.
Field Comments Relationship Name
Enter a name for this relationship.
Domain Type
Select Class.
Product Class
Select a class.
The dialog box contains one record for each class and for each subclass in the class system. Selecting a class selects all of its subclasses.
Minimum Cardinality, Maximum Cardinality, and Default Cardinality
Enter the minimum, maximum, and default cardinality for the product. For more information, see About Cardinality.
Click the Define Domain button and then use the following options to select the products you want to add to the relationship:
Add. Select products and click Add to add the products to the relationship. A check mark displays in the Is in domain field.
Add All button. Adds all the products in the class to the relationship.
Set as Default button. Adds the product to the relationship and makes it the default product. The product name displays in the Default Product field of the relationship.
Clear Default button. Removes the product from the relationship Default Product field. Does not remove the product from the relationship.
Delete button. Removes the product from those you have selected to be in the relationship. Removes the check mark from the "Is in domain field. Does not remove the product from the product class.
Delete All button. Removes all the products from the relationship. No products display a check mark in the "Is in domain field. Does not remove the products from the product class.
In the Product Structure Designer panel, the relationship icon displays as a folder. Click this folder to display the products you added, and verify that the relationship is defined properly, that the default product is correct, and that all the products you want to add are present.
In the Relationship Domain list, do the following:
Remove the check mark from the Forecastable field for items as needed.
Removing the check mark means the item will not be included in product forecasts when the opportunity is updated for quotes, orders, and so on contained the product with components.
For each product in the relationship, enter a sequence number in the Sequence Number Field.
The item with sequence number 1 displays first within the relationship in selection pages.
Adding Products as Components Using the Dynamic Class Domain
You can add products as components of a product with components by using the dynamic class domain.
This task is a step in Process of Designing a Product with Components.
This method of adding products maintains a connection to the class system. When the work space is refreshed, Dynamic Class relationships are updated from the class system. For example, if you add a new product to a class in the class system, this product is added to the relationship containing this class when you select Refresh Dynamic Class in the Structure tab menu.
When you refresh the work space to update the contents of the relationship, you must reenter the sequence numbers in the relationship definition.
To add products using the dynamic class domain
Navigate to the Administration - Product screen, then the Product Definitions view.
In the Products list, select and lock the desired product with components.
In the Versions list, click the Work Space version.
In the Structure list, add a new record and complete the necessary fields, described in the following table.
Field Comments Relationship Name
Enter a name for this relationship.
Domain Type
Select Dynamic Class.
Product Class
Select a class.
The dialog box contains one record for each class and for each subclass in the class system. Selecting a class selects all of its subclasses.
Minimum Cardinality, Maximum Cardinality, and Default Cardinality
Enter the minimum, maximum, and default cardinality for the product. For more information, see About Cardinality.
Click the Define Domain button and select the products you want to add to the relationship:
In the Define Relationship Domain dialog box, click Add All.
A check mark appears in the Is in domain field for all the products in the class.
Also, in the Define Relationship domain dialog box, use the following buttons to specify the default product:
Set as Default button. Adds the product to the relationship and makes it the default product. The product name displays in the Default Product field of the relationship.
Clear Default button. Removes the product from the relationship's Default Product field. Does not remove the product from the relationship.
In the Relationship Domain list, do the following:
Remove the check mark from the Forecastable field for items as needed.
Removing the check mark means the item will not be included in product forecasts when the opportunity is updated for quotes, orders, and so on contained the product with components.
For each product in the relationship, enter a sequence number in the Sequence Number Field.
The item with sequence number 1 displays first within the relationship in selection pages.
Adding a Group of Products from Different Classes as Components
The products you add to a relationship do not have to be from the same class. You can group products from several classes or products not assigned to a class into one relationship.
This task is a step in Process of Designing a Product with Components.
You do this by creating a relationship of domain type Class but without specifying a class. This allows you to select products from anywhere in the class system.
You can do anything with this relationship that you can do with other class-type relationships such as creating resources, configuration rules, and links.
To add groups of products from different classes
Navigate to the Administration - Product screen, then the Product Definitions view.
In the Products list, select and lock the desired product with components.
In the Versions list, click the Work Space version.
In the Structure list, add a new record and complete the necessary fields, described in the following table.
Field Comments Relationship Name
Enter a name for this relationship.
Domain Type
Select Class.
Minimum Cardinality, Maximum Cardinality, and Default Cardinality
Enter the minimum, maximum, and default cardinality for the product. For more information, see About Cardinality.
Click the Define Domain button and select the products you want to add to the relationship, using the following buttons in the Define Relationship Domain dialog box:
Add column. Click the word Add in the record to add the product to the relationship. A check mark displays in the Is in domain field.
Add All button. Adds all the products in the class to the relationship.
Set as Default button. Adds the product to the relationship and makes it the default product. The product name displays in the Default Product field of the relationship.
Clear Default button. Removes the product from the relationship Default Product field. Does not remove the product from the relationship.
Delete button. Removes the product from those you have selected to be in the relationship. Removes the check mark from the Is in domain field. Does not remove the product from the product class.
Delete All button. Removes all the products from the relationship. No products display a check mark in the Is in domain field. Does not remove the products from the product class.
Because you did not specify the product class, this dialog box lists all products from all classes and subclasses.
Adding a Product with Components as a Component
You can add products with components as components of other products with components. This means you can create products with components that are sub-assemblies and then include them as components in the final product. For example, you sell a configurable power supply and a configurable gearbox as part of an industrial lathe. You can create one product with components for configuring the power supply and one for configuring the gearbox. You can then add both of these component products with components to the industrial lathe product with components.
This task is a step in Process of Designing a Product with Components.
In the Structure view, when you add a product with components to a relationship, its configurable parts do not display. Instead, the product with components displays as a single product.
When you edit a product with components and release it, the changes propagate to all products with components containing it.
Use the following procedures to add a product with components:
To add a product with components that is not assigned to a class, see Adding a Single Product as a Component.
To add a product with components that is a member of a class, see Adding Products as Components Using the Class Domain or Adding Products as Components Using the Dynamic Class Domain.
Refreshing the Customizable Product Work Space
If a product with components contains relationships of type Dynamic Class, refreshing the work space copies a new instance of these product classes into the relationships. This means a fresh copy of all the products in the class become part of the product with components instance.
For example, the number of products in a class has changed. You have defined a relationship of type Dynamic Class that specifies this product class. When you refresh the work space, the revised product class is copied to the relationship from the product table. When you view the relationship in the User Interface view or in Validate mode, the new products display.
Relationships of domain type Class and Product are not updated from the product table when you refresh the work space.
Refreshing the work space updates the products or attributes in a product with components. The configuration rules, resource definitions, link definitions, and scripts that are part of the product with components are not updated to reflect changes. You must manually make these updates.
For more information about relationships of type Dynamic Class, see Adding Products as Components Using the Dynamic Class Domain.
To refresh the work space
Navigate to the Administration - Product screen, then the Products view.
In the Products list, select and lock the desired product with components.
In the Versions list, click the Work Space version.
From the Structure menu, select Refresh Dynamic Class.
Enabling the Customize Button
The user can select a configurable product and click the Customize button to customize the product. However, the Customize button is only enabled when the user's responsibilities include one of the appropriate views that allows users to customize products. The following views of the Quotes screen are examples of views that enable the customize button:
Complex Product Runtime Instance View
Complex Product Runtime Instance View - Order
Complex Product Runtime Instance View - Shopping Cart
Within these views, the Customize button is enabled only when the type of the product is Customizable.
To find a complete list of the views that enable the Customize button
Open Oracle's Web Tools.
In the Views tab, search for views that match the following:
Complex Product Runtime Instance View*
About the Siebel Product Configurator Save Button
When Asset Based Ordering (ABO) is enabled, the Save button is disabled. If the Save button is not needed, because the application is using ABO, you can remove it by configuring the product using Oracle's Web Tools.
The Save button is similar to the Done button, except that it does not exit from the configuration session. In general, after you click the Save button, clicking Cancel does not remove the items from the configured product.
About Managing the Structure of Products with Components
You can manage the structure of products with components in the following ways:
Editing a Relationship Definition
You can only edit the current work space of a product with components. You cannot edit a version that has already been released. All the fields in a relationship definition can be edited except the relationship name. Changes are not propagated to other parts of the product with components.
To edit a relationship definition
Navigate to the Administration - Product screen, then the Product Definitions view.
In the Products list, select and lock the desired product with components.
In the Versions list, click the Work Space version.
In the Explorer applet, select the desired relationship.
Edit the fields in the Structure record as desired.
Revise configuration rules, resource definitions, link definitions, and scripts as needed to reflect the changes.
Deleting Products from Products with Components
You can only delete products from the current work space of a customizable product. You cannot delete products from a released version. You can delete relationships or products included within a relationship.
Changes are not propagated to other parts of the product with components. For example, if you delete a product from a relationship, configuration rules for that product are not deleted.
If you delete a product from a relationship that has domain type Dynamic Class, the product will be added back to the relationship when you refresh the work space or release the product. This is because the product still exists in the product class. When you refresh the work space or release the product, the relationship is updated so that it contains all the products in the product class and the current attribute definitions.
To avoid this, you can change the relationship domain type to Class. This breaks the connection to the product class system and prevents any further updates of the relationship. You can also leave the domain type unchanged and remove the product from the product class.
To delete products
Navigate to the Administration - Product screen, then the Product Definitions view.
In the Products list, select and lock the desired product with components.
In the Versions list, click the Work Space version.
To delete a relationship, select the desired relationship record. To delete a product within relationship, expand the relationship and select the product record.
From the Structure menu, choose Delete Record.
Revise configuration rules, link definitions, and resource definitions as needed.
Copying Products with Components
When you copy a product with components, all parts of the product are included in the copy. This includes its relationships, links, resources, scripts, rules, and its user interface.
All the parts of the copied product are visible and can be edited.
To copy a product with components
Navigate to the Administration - Product screen, then the Products view.
In the Products list, select the desired product with components.
From the Products menu, choose Copy Record.
Enter a name for the copy in the Product Field.
Revise other fields, such as Part # as desired.
Creating a Report on a Product's Structure
You can request a report that lists all the relationships in a product with components as well as the contents of each relationship. You can request the report once, or schedule the report to run at scheduled times. The report title is Product Relationship Report. This report must be enabled on the report server before performing the following procedure.
To create a report on a product's structure
Remove the product with components from all existing quotes.
Navigate to the Administration - Product screen, then the Product Definitions view.
In the Products list, select and lock the desired product with components.
In the Versions list, click the desired version.
Click the Reports icon to produce or schedule the report.