22Product and Promotion Eligibility and Compatibility
Product and Promotion Eligibility and Compatibility
This chapter describes eligibility and compatibility rules for products and product promotions. It includes the following subjects:
About Product and Promotion Eligibility
Product and promotion eligibility allows you to create rules specifying which customers are eligible to buy a product and which customers are eligible for product promotions.
Some examples of product eligibility are:
A telecommunications company may have different wireless plans available for different geographical areas.
An internet service provider may have certain DSL services only to customers who live within a specified distance of certain cities.
Some examples of promotion eligibility are:
An airline may offer a free upgrades only to customers who live in certain cities.
A cable television company may offer extra channels at no extra cost only to new customers who live in certain states.
Eligibility is based on the PSP engine, so it is fully configurable. For more information about PSPs, see Siebel Order Management Infrastructure Guide. For more information about the PSP used for eligibility, see Eligibility and Compatibility Workflow Reference.
About Eligibility Rules and Configuration Constraints for Siebel CRM Version 7.7 and Earlier
In versions Siebel CRM 7.5 and 7.7, you may have used configuration constraints, linked items, and scripting to create rules controlling which customers could buy a product. In Siebel CRM version 7.8 and later, you can do this much more efficiently using eligibility rules.
For example, you want to limit the availability of a product named 104 USB Keyboard to customers who have a type of Commercial:
In Siebel CRM version 7.5, you may have done this by creating a linked item to bring the customer type into the configuration session. Then you write Siebel Product Configurator exclude constraints to exclude this product if the type is not Commercial. You must write these rules many times, once for every product that can use this keyboard as a component.
In Siebel CRM version 7.5, you may also have done this by assigning all component products are assigned a Siebel Product Configurator UI property named Commercial Only with values of Yes or No. Then, you modify the JavaScript code that displays the available selections to evaluate the condition: Is customer type NOT "Commercial" and does this "Commercial Only" UI property for this product equal "YES." If this condition is true, the JavaScript does not display that product or displays it differently.
In Siebel CRM version 7.8 and later, you can do this by creating an eligibility rule. You write this rule once, and it applies to all configuration models. By setting the Eligibility Display Mode, you can control whether ineligible products are displayed in red, as a warning, or not displayed at all. You do not have to use any scripting.
Without configuration, compatibility rules do not necessarily substitute for Siebel Product Configurator requires and excludes rules. The difference is that the compatibility rules would work against the Projected Asset Cache, which includes all assets for the customer, all open orders for the customers and the current quote for the customer. This broad scope may be unacceptable if you want the scope of the rule to just be the components within one customizable product instance, as it is for configuration constraints. For more information about the Projected Asset Cache, see Siebel Order Management Infrastructure Guide.
By default, the Projected Asset Cache, with its extended scope, is used in workflows, whereas Siebel Product Configurator rules apply only to the loaded product. If you want workflows to have a more limited view, identical to Siebel Product Configurator rules, you must change the default Eligibility and Compatibility Procedure by modifying the Projected Asset Cache query. As an example, see the step Initialize PAC and the following steps in Eligibility and Compatibility Workflow Reference.
However, if you are using linked items and attributes and configuration constraints to control product eligibility, then eligibility rules are a preferred replacement for these configuration constraints.
By using eligibility rules instead of the modeling approaches used in earlier versions, you achieve:
Greater scalability
Faster performance
Simplified administration
Less customization, easier upgrades
More consistent behavior across the application
Defining How Eligibility Output Displays
Eligibility is checked before the product or promotion is displayed in a catalog, Product picklist, or elsewhere in the interface.
Eligibility information is displayed when you select products to add to quotes, orders, or agreements. You can define how this information is displayed by setting the Eligibility Display Mode parameter value. Setting this value controls the Eligibility and Compatibility procedure which dictates the behavior of eligibility and compatibility as follows:
If set to 0, the procedure is not run. This stops price list visibility, contract visibility, and product effectivity filters from running also.
If set to 1, the procedure is run, and ineligible products are displayed with messages. In the Siebel Product Configurator, ineligible products are displayed in red text.
If set to 2, the procedure is run, and ineligible products are not included in selections.
You can set the Eligibility Display Mode parameter value at various levels in your application. For example, you can choose to set the parameter value from the Enterprise, Server or Object Manager level. You can also set the value at the applet, workflow call, or at the data service API level.
The Eligibility and Compatibility procedure looks for the display mode value in the following locations and in the following order:
Display Mode workflow process property
The EligibilityDisplayMode property on the applet
The Eligibility Display Mode server parameter
The Eligibility Display Mode default value (1 - show all products with messages)
Eligibility Display Options for Catalogs
In catalogs, there are three options for how eligibility information is displayed:
Show Products Only. All products are displayed, whether or not the user is eligible to purchase them. Eligibility information is not displayed to the user. This option also turns off product effectivity, price list and contract visibility.
Hide Products. Products are not displayed if the user is not eligible to purchase them.
Show Products with Comments. All products are displayed. A comments displayed with each product says whether the user is eligible to purchase it.
If customers are eligible for only a small percentage of the total products, then choosing the Hide Products option gives slower performance than the Show Products with Comments option. This is because a large number of records must be read before enough records are found to fill a page. This performance trade-off must be considered when selecting the Display Mode during implementation design.
Eligibility Display in Siebel Product Configurator
In Siebel Product Configurator, if the customer is ineligible to buy the product, then the application displays an error message if the user selects the product. The user can click Undo to undo the selection that caused the error, or select Proceed to go ahead with the configuration using the ineligible product. If the user selects Proceed, Siebel Product Configurator adds this error message to its message list.
Siebel Product Configurator also enforces the value set for the Display Mode parameter. If this parameter is set not to show ineligible products, then the ineligible products are not in the configuration session, and the user cannot choose them.
To define how eligibility output displays on the mobile or dedicated client
Use any text editor to edit the CFG file for the application.
In the [PSPEngine] section, set the value of the parameter EligibilityDisplayMode to one of the following values:
EligibilityDisplayMode=0. No eligibility comments are displayed, and all products (eligible or not) appear in all product selection applets
EligibilityDisplayMode=1. Default value. Ineligible products appear in the product selection applets with the eligibility status of N and with comments explaining why they are ineligible.
EligibilityDisplayMode=2. Only eligible products appear in the product selection applets, so the user cannot see and pick ineligible products.
To define how eligibility output displays on a server-based application
Modify the value of the server or component parameter named EligibilityDisplayMode, using the same values as in the previous procedure.
Defining Eligibility Groups
Eligibility groups are used to group eligibility rules that you create, for your own purposes.
For example, you can create one group for product eligibility rules and one group for promotion eligibility rules. Alternatively, you may decide to create one group for each product line. You can use any logical group that makes sense to your business.
Choose how to group eligibility rules based on your business needs.
To define an eligibility group
Navigate to the Administration - Product screen, then the Eligibility and Compatibility Matrices view.
In the Eligibility and Compatibility Matrices list, add a new record and complete the necessary fields. Some fields are described in the following table.
| Field | Comments |
|---|---|
Name |
Enter a name for a group. |
Matrix Type |
To make this an eligibility rule group, select Eligibility Rules. |
Defining Product and Promotion Eligibility Rules
Before you can define product eligibility, you must define the product. Then add eligibility rules to it.
Before you can define promotion eligibility, you must define the product promotion, as described in the topic on product promotions in Siebel Pricing Administration Guide. Then add eligibility rules to it.
You can create two types of rules:
Available Rules. Specify the customers who are eligible to buy the product.
Not Available Rules. Specify the customers who are not eligible to buy the product.
Defining Inclusive or Exclusive Eligibility for Products
A given product can use only inclusive or exclusive eligibility rules. Before you define the rule, you must define which type of eligibility the product uses.
To define inclusive or exclusive eligibility for a product
Navigate to the Administration - Product screen, then the Products view.
In the Products list, in the record for the product, select or deselect the Inclusive Eligibility checkbox, if necessary.
Defining Product Eligibility Rules
You can define eligibility rules for products or product lines.
This procedure describes how to define rules for products. To define rules for product lines, use a similar procedure, but instead of adding a record to the Eligibility Rules list, add a record to the Product Line Eligibility list, which is further down on the screen.
To define product eligibility rules
Navigate to the Administration - Product screen, then the Products view.
In the Products list, select the product you are defining rules for.
Click the Eligibility and Compatibility Rules view tab.
In the link bar of the Eligibility and Compatibility Rules view, click Eligibility.
In the Eligibility Rules list, add a new record and complete the necessary fields, described in the following table.
Field Comments Matrix Name
Select the eligibility group used for grouping this rule. For more information about eligibility groups, see Defining Eligibility Groups.
Rule Type
Select the type of the rule. Options are:
Available. The rule specifies customers who are eligible to buy. For example, if the criteria depends on State, the rule specifies a state where customers are allowed to buy the product.
Unavailable. The rule specifies the customers who are not eligible to buy. For example, if the criteria depends on State, the rule specifies a state where customers are not allowed to buy the product.
Account
If the rule depends on account, select the name of an account that is or is not eligible to buy the product.
Account Type
If the rule depends on account type, select the name of an account that is or is not eligible to buy the product.
City
If the rule depends on city, enter the name of a city where customers are or are not eligible to buy the product.
State
If the rule depends on state, select the name of a state where customers are or are not eligible to buy the product.
Country
If the rule depends on country, select the name of a country where customers are or are not eligible to buy the product.
Postal Code
If the rule depends on postal code, enter the name of a postal code where customers are or are not eligible to buy the product.
Effective Start
Enter the date when this rule goes into effect.
Effective End
Enter the date when this rule is no longer in effect.
Continue to add records until you have specified all eligibility rules that determine whether customers are eligible to buy this product.
Defining Promotion Eligibility Rules
This procedure describes how to define eligibility rules for product promotions.
To define promotion eligibility rules
Navigate to the Administration - Product screen.
In the link bar, select Product Promotions.
In the Product Promotions list, select the promotion you are defining rules for.
Click the Eligibility and Compatibility Rules view tab.
In the link bar of the Eligibility and Compatibility Rules view, click Eligibility.
Add records to the eligibility rules list and enter criteria in the same way that you do when you are defining product eligibility rules.
Defining Eligibility for Products with Components and for Component Products
Eligibility for products with components is checked at the following times:
Product Selection. When a new product with components is selected, the application checks the customer's eligibility to buy the product with default options. For example, eligibility is checked when an eSales user clicks Add to Cart.
Siebel Product Configurator Launch. When the customer launches a new configuration session, the application checks the customer's eligibility to put the product in the saved quote, since eligibility may have changed since the quote was saved.
Component Products. There is an eligibility check on component products that the customer can add to the configurable product.
Eligibility for products with components is defined in the same way as eligibility for other products:
You can define eligibility for individual component products of the product with components, as described in Defining Compatibility Rules for Products and Promotions.
You can define eligibility for the entire product with components, as described in Defining Compatibility Rules for Products and Promotions.
If you define eligibility for component products, the customer may not be eligible to buy all the default components of a product with components but may be eligible to buy the product with components with substitute components. In this case, the product with components can be flagged as ineligible, so customers can select substitutes for the default components that they are not eligible to buy.
Defining Eligibility for Product Attributes
You can define the eligibility for individual attributes of products. For example, only customers living in certain countries are eligible to buy a shirt in a specific color. All customers are able to buy the same shirt in any other color.
When a configuration session is started, all the possible attribute values belonging to the attributes marked as requiring an eligibility check are evaluated:
If the eligibility display is Mode 1, the invalid attribute values are displayed in red within the configuration session.
If the eligibility display is Mode 2, the invalid attribute values are not displayed in the configuration session UI (unless they are already selected).
When an attribute value is changed, only the new selection is evaluated for eligibility (post-pick). The ineligibility reason is used by the Siebel Product Configurator UI in the messaging.
You must create custom PSP procedures to evaluate the attributes. The framework that calls these custom procedures and communicates with the user is delivered as part of the application, including:
Ability to assign an evaluation procedure to an attribute.
Evaluation of attribute eligibility within a configuration session.
Creation of context and row set data used by the custom PSP procedure.
Attribute eligibility related messaging within a configuration session. If the user selects an invalid attribute, Siebel Product Configurator displays a message telling the user to click the Undo button.
Saving the Result of Attribute Eligibility
Attribute eligibility status and reason are not saved to the quote or order objects when a configuration session is completed. It is not possible to save these with the configuration changes alone, because the values are not saved to the CxObject in memory.
However, it is possible to save these results using the BatchValidate API for Siebel Product Configurator, described in BatchValidate Method. This API can run attribute eligibility. The ineligible attributes are sent to a log file. The output property that is set from this API contains information on the ineligible attributes.
It is possible to add a custom step to the Sales Order verify process that calls the batch validate API. This step can update the custom fields on the Order XA business component indicating an attribute value as being ineligible. The Order Validation engine then checks that field to confirm that no ineligible values are selected.
Attribute Eligibility Architecture
Attribute eligibility checking uses the following architecture:
For attributes requiring an eligibility check, the user creates a custom PSP procedure and attaches it to this attribute when it is defined on the class.
When the configuration session is started, for each attribute that will be evaluated for attribute eligibility, a context row set, row set, and additional parameters are generated, and then the custom PSP procedure is called.
The context row set is based on the variable map Cfg Eligibility Variable Map - Context.
The row set is a list of all possible values for the attribute.
Note: When an attribute value is changed, the same events occur except that the only value evaluated is the new value selected.
The custom procedure evaluates each value in the row set to find values that are ineligible, and the custom procedure creates the following variables with the following values:
Eligibility Status = N
Eligibility Reason = user defined message
With the default Eligibility Display Mode of 1, the Siebel Product Configurator UI uses this status to determine which selections are displayed in red.
If Eligibility Display Mode was set to 2, then the ineligible values are not displayed.
The Siebel Product Configurator UI uses the Eligibility Reason in the message displayed when the end user selects an invalid attribute value.
Setting Up Attribute Eligibility Checking
This topic describes the high-level steps for setting up attribute eligibility checking.
Writing a Custom PSP Procedure to Check Eligibility
You can use a given procedure to evaluate one attribute or many attributes:
Use conditional statements to use one procedure to evaluate multiple attributes that have different evaluation criteria.
Or create one procedure for each attribute.
Typically, the custom procedure includes the following steps:
In a step of the PSP procedure, log the Context property set.
In a step of the PSP procedure, log the RowSet property set.
In a step of the PSP procedure, set all rows to Eligible by default before evaluating the row set:
This step uses the Row Set Transformation Toolkit business service, Conditional Action Transform Method.
Input arguments are shown in the following table.
Input Argument Type Value Property Name On Default 1
Literal
{Row.Eligibility Status} = LookupValue('PEC_ELIG_STATUS_CD','Y')
Row Set
Process Property
Row Set
Output arguments are shown in the following table.
| Property Name | Type | Value | Output Argument |
|---|---|---|---|
Row Set |
Output Argument |
Row Set |
In one or more steps of the PSP procedure, check attributes for eligibility:
This step uses the Row Set Transformation Toolkit business service, Conditional Action Transform method.
Input arguments include conditional statements that check whether the value entered is eligible.
Output arguments set rows to ineligible if these conditions are true.
In Administration - Order Management, then the Message Types view, define the error message.
In Administration - Order Management, then the Payload view, create payload variable records.
In a step of the PSP procedure step, assign context and rowset values to the message payload variables.
Creating the Attribute and Assigning It to a Product Class
Create the attribute and assign it to a product class in the usual way, described in Process of Creating Products with Attributes.
In the Administration - Product, Product Classes, Version, and then the Attributes view:
In the Check Eligibility field, select the checkbox for any attribute whose eligibility you want to check.
In the Eligibility Procedure field, select the custom PSP procedure that you created to check the eligibility of this attribute.
Changing the Context and Rowset Variable Maps
You can change the context and rowset variable maps used by the attribute eligibility procedure. The variable map is set as a parameter in the LoadInstance signal and the SetInstance signal. The name of the parameter is Context Variable Map. By default, it has a value of Cfg Eligibility Variable Map - Context.
The rowset for attribute eligibility is generated without a variable map. It contains only one property: value.
Using Different Display Modes for Attribute and Product Eligibility
You can have different display modes for Attribute eligibility and for Product eligibility. Change the display mode for attribute eligibility by adding the EligiblityDisplayMode parameter to the SetInstance and LoadInstance signals and giving it the value of 0, 1, or 2. This overrides the application's EligibilityDisplayMode setting.
Creating Eligibility Matrices
When you create an eligibility matrix, you enter data similar to the data entered in an eligibility rule, but you enter the data under the matrix.
You must use eligibility to create eligibility rules for product classes.
Eligibility and compatibility rules are shown in the Eligibility and Compatibility Matrices view, regardless of how you created them. If you create them in Eligibility and Compatibility Rules view and grouped them under a matrix, the rules are displayed under this matrix. This procedure describes how to create them directly under the matrix.
To create an eligibility matrix
Navigate to the Administration - Product screen, then the Eligibility and Compatibility Matrices view.
In the Eligibility and Compatibility Matrices list, add a new record and complete the necessary fields. Some fields are described in the following table.
Field Comments Name
Enter a name for a group.
Matrix Type
Select Eligibility Rules.
Click the name of the new record.
The Eligibility Matrix form and Eligibility Rules list appear.
Add a new record to the Eligibility Rules list and complete the necessary fields. Some fields are described in the following table.
Field Comments Product
Select the subject product.
Note: You may use only one field of Product, Product Line, and Product Class.Product Line
Select the subject product line.
Product Class
Select the subject product class.
Type
Select the type of the rule. Options are:
Compatibility - Requires. If the subject product is purchased, the object product must be purchased.
Compatibility - Excludes. If the subject product is purchased, the object product must not be purchased.
Account, Account Type, City, State, Postal Code, Country
In one of these fields, enter the account, account type, city, state, postal code, or country that the rule applies to. Depending on the Rule Type that you chose, this is required to buy the product or excludes you from buying the product.
Effective Start
Enter the date when the rule goes into effect.
Effective End
Enter the date when the rule is no longer in effect.
About Product and Promotion Compatibility
Compatibility allows you to define rules specifying which combinations of products, product attributes, or product promotions are required and which combinations are not allowed. These rules are simpler than configuration constraints and can be defined by the marketing administrator.
Compatibility rules are global. Once they are defined for a product or promotion, they apply whenever it is added to quotes, orders, or agreements.
If the end user selects a product that has a compatibility rule associated with it, the application displays a message describing the rule. The message may say that the selected product requires purchase of another product or that the selected product is not compatible with a previously selected product.
The application does not enforce compatibility rules, as it enforces configuration constraints. It just displays these messages.
Eligibility and compatibility checks are performed by the same workflow and the same engine at the same time. Compatibility is one step in the overall determination of eligibility. Compatibility rules are just one of a number of different criteria that the eligibility procedure checks to determine whether a product can be sold to a customer given the customer's profile.
Compatibility is based on the PSP engine, so it is fully configurable. For more information about PSPs, see Siebel Order Management Infrastructure Guide. For more information about the PSP used for compatibility, see Eligibility and Compatibility Workflow Reference.
About Compatibility Rules
Compatibility rules state that products require or exclude other products. You can create rules for products, product lines, and product classes.
As a simple example, assume that customers who buy a computer must buy a monitor, and there are only two monitors available. The Turbo computer supports the Standard monitor but not the Flat-screen monitor. Then you would create two different rules:
Turbo computer requires Standard monitor.
Turbo computer excludes Flat-screen monitor.
The Subject and Object of Compatibility Rules
As you can see in this example, compatibility rules consist of:
Subject. The product that requires or excludes another product. In the examples, the computer is the subject.
Type of Rule. The type is either requires or excludes.
Object. The product that is required or excluded. In the examples, the monitor is the object.
Requires rules apply in only one direction. If the subject requires the object, the object does not necessarily require the subject. For example, the Turbo computer requires a Standard monitor. However, the Standard monitor does not necessarily require the Turbo computer; it can also be used with other computers.
Excludes rules apply in both directions. If the subject excludes the object, the object necessarily excludes the subject. For example, the Turbo computer does not work with the Flat-screen monitor, and that necessarily means that the Flat-screen monitor does not work with the Turbo computer.
Subject Compatibility Rules and Object Compatibility Rules
For product compatibility:
When you create a subject compatibility rule, you choose a product as the subject of the rule, and you can choose either a product, product line, or product class as the object of the rule.
When you create an object compatibility rule, you choose a product as the object of the rule, and you can choose either a product, product line, or product class as the subject of the rule.
For product line compatibility:
When you create a subject compatibility rule, you choose a product line as the subject of the rule, and you can choose either a product, product line, or product class as the object of the rule.
When you create an object compatibility rule, you choose a product line as the object of the rule, and you can choose either a product, product line, or product class as the subject of the rule.
About Pre-Pick Compatibility
By default, compatibility rules are evaluated after the sales agent selects a product. This is called post-pick compatibility.
It is also possible to enable pre-pick compatibility, so the sales agent can see whether products are compatible before selecting them.
If pre-pick compatibility is enabled, products are displayed as follows:
Catalog. If a product displayed in the catalog is incompatible with a product already added to the order, a compatibility message is displayed under the product name.
For example, a customer orders satellite dish programming service. She tells the sales agent that she wants the high-resolution satellite dish. Then, in the same order, she wants to purchase a digital video recorder (DVR). Only three of the five DVRs that the company sells are compatible with the high-resolution satellite dish. When the sales agent displays the catalog page listing DVRs, the two DVRs that are not compatible have messages under them that say their compatibility status is N and that also display the compatibility reason explaining why they are incompatible. The sales agent is able to tell the customer about the DVRs that are compatible with the satellite dish, without wasting the customer's time by talking about DVRs that are incompatible.
Siebel Product Configurator. If a component displayed in Siebel Product Configurator is incompatible with a component already selected, then it is displayed in red to indicate it is excluded. The sales agent can select the excluded components to display the compatibility message explaining why it is excluded.
For example, a cable television customer orders a cable television subscription and selects the standard package of channels. The sales agent who is configuring the service that the customer is purchasing selects these two products in Siebel Product Configurator. Then the customer says that he also wants to subscribe to a special programming service that provides additional channels, which he saw in an advertisement. In Siebel Product Configurator, this special package is displayed in red, indicating that it is excluded. The sales agent selects the excluded product, and Siebel Product Configurator displays an error message. The sales agent clicks the explanation icon, and the explanation says that this special programming service is not available with the standard package of channels, only with the premium package.
When pre-pick compatibility is enabled, the application still does the post-pick compatibility check. For example, pre-pick compatibility is enabled and a product in Configurator is marked in red to show that it is incompatible with the current selections. The user adds this incompatible product. The application displays a post-pick compatibility error message saying that this product is incompatible.
Enabling Pre-Pick Compatibility
By default, post-pick compatibility is used. To enable pre-pick compatibility, perform the following tasks:
Setting the Server Parameter to Enable Pre-Pick Compatibility
Setting the Server Parameter to Enable Pre-Pick Compatibility on the Siebel Developer Web Client
For more information about pre-pick and post-pick compatibility, see About Pre-Pick Compatibility.
Modifying the Web Template to Enable Pre-Pick Compatibility
To enable pre-pick compatibility, you must modify the Web template to include the parameter ForceRefresh=Y.
To do this:
Manually set the Web template for the UI control.
Edit the Web template to set the ForceRefresh flag to Y.
To manually set the Web template for the UI control
Navigate to the Administration - Product screen, then the Product Definitions view.
Modify the product definition:
Select the Locked Flag check box for the product.
Drill down on the Workspace version.
Click the User Interface Tab.
In the User Interface list, add a new record and complete the necessary fields.
Drill down on the Name field of the User Interface record you just created.
In the Group Item List, add a new record and complete the necessary fields.
In the tree structure, right click any item and add select Add Item to add it to the group.
For the item you added, select the desired UI Control Web template.
For example, you might select eCfgControlCheckPriceJS for a check box control.
To edit the Web template to set ForceRefresh to Y
Navigate to the directory \siebel install directory\webtempl/
In that directory, find the Web template file for the UI control and open it using a text editor such as Notepad.
For example, you might use Notepad to edit the file eCfgControlCheckPriceJS.
Note: The Web templates for controls all begin with eCfgControl.Edit the file:
Search for the tag <swe: control>.
Add a line that says: ForceRefresh="Y".
Save the changes.
The edited file has the following code:
 <!-- Template Start: eCfgControlCheckJS -->
<od-include file="eCfgPort_HeaderJS"/>

<tr>
  <td colspan=3>
    <od-iterator id="500" CfgLoopType="DomainAndChildren" startValue="1500" count="Dynamic"
    iteratorName="101Id"
    Usage="CheckBox"
    CfgFieldList="CfgFieldName:Name, CfgUIControl:lblName, HtmlAttrib_width:310, Default:Y*
      	CfgFieldName:RequireMoreChild, Default:Y*
      	CfgFieldName:Explanation, CfgUIControl:lblExplanation*
      	CfgFieldName:Customize, CfgUIControl:lblCustomize"
    >

    <od-type="control" id="swe:111Id + 4000" CfgHtmlType="CfgCheckBox" ForceRefresh= "Y"
   		 CfgJSShow="showCheckBox" CfgJSUpdateExclusion="updateExcludedItemForPort"
        CfgJSUpdateSelection="updatePortItemsForCheckBox"/>
     </od-iterator>
  	 </td>

  </tr>
<od-include file="eCfgPort_FooterJS"/>
<!-- Template End: eCfgControlCheckJS -->
Setting the Server Parameter to Enable Pre-Pick Compatibility
Use the following procedure to set the server parameter to enable pre-pick compatibility.
To enable pre-pick compatibility
Navigate to the Administration - Server Configuration screen, then the Servers and Parameters view.
In the Server Parameters list, query to find the parameter Order Management - PrePick Compatibility.
In the Value field for this parameter, enter True.
The Value on Restart field also changes to True.
Setting the Server Parameter to Enable Pre-Pick Compatibility on the Siebel Developer Web Client
Use the following procedure to set the server parameter to enable pre-pick compatibility on the Siebel Developer Web Client.
To enable pre-pick compatibility
Use any text editor to open the .cfg file of the Siebel Developer Web Client.
If the InfraObjMgr section already exists, add the following line to that section:
PrePickCompatibilityEnabled = TRUE
If the InfraObjMgr section does not already exist, add both the section header and the line to the .cfg file, as follows:
[InfraObjMgr]
PrePickCompatibilityEnabled = TRUE
Verifying the Variable Map for Pre-Pick Compatibility
Verify that the needed variable map definition is present for the following two variable maps:
Product Eligibility Variable Map - Context
Cfg Eligibility Variable Map - Context
To verify the variable map
Navigate to the Administration - Order Management screen, then the Variable Maps view.
Query to find the variable map named Product Eligibility Variable Map - Context.
Drill-down on this variable map.
In the Variable Map Definitions list, query to find Pre Pick Compatibility.
If this definition is not found:
Lock the variable map.
Add a new record to the Variable Map Definitions list and complete the necessary fields, described in the following table.
Field Value Variable Name
Pre Pick Compatibility
In/Out
In
Type
Boolean
On Null
Ignore
Add a new record to the Variable Source list and complete the necessary fields, described in the following table.
Field Value Mode
Any
Path
PARAM_OM_PREPICK_COMPATIBILITY_FLAG
Source Type
Server Parameter
Add another new record to the Variable Map Definitions list and complete the necessary fields, described in the following table.
Field Value Variable Name
Pre Pick Mode
In/Out
In
Type
Text
On Null
Ignore
Add a new record to the Variable Source list and complete the necessary fields, described in the following table.
Field Value Mode
Any
Path
$Current/Header/Pre Pick Mode
Source Type
Instance
Release the variable map.
Repeat Step 1 to Step 5 for the variable map Cfg Eligibility Variable Map - Context.
Clear the Cache.
Defining Compatibility Groups
Compatibility groups are used to group compatibility rules that you create, for your own purposes.
For example, you can create one group for product compatibility rules and one group for promotion compatibility rules. Alternatively, you can create one group for each product line. You can use any logical group that makes sense to your business.
To define an compatibility group
Navigate to the Administration - Product screen, then the Eligibility and Compatibility Matrices view.
In the Eligibility and Compatibility Matrices list, add a new record and complete the necessary fields. Some fields are described in the following table.
| Field | Comments |
|---|---|
Name |
Enter a name for a group. |
Matrix Type |
To make this an compatibility rule group, select Compatibility Rules. |
Defining Compatibility Rules for Products and Promotions
You can define compatibility rules for products, product lines, product classes, or promotions.
All of these types of compatibility rules allow subject compatibility rules and object compatibility rules. For more information about subject and object compatibility rules, see About Compatibility Rules.
Defining Compatibility Rules for Products, Product Lines, or Product Classes
Before you can define a product compatibility rule, you must define the products, and if necessary, the product lines and product classes that it applies to, as described in earlier chapters of this book.
To define compatibility rules for a product
Navigate to the Administration - Product screen.
Click the Eligibility and Compatibility Rules view tab.
In the Eligibility and Compatibility Rules link bar, click Product Compatibility.
If you are creating a rule that has the current product record as the subject, then add a new, add a new record to the Subject Compatibility Rules list and complete the necessary fields. Some fields are described in the following table.
Field Comments Subject Product
Select the subject product. The default is the product that is selected in the Products list, but you can select any product to replace it.
Type
Select the type of the rule. Options are:
Compatibility - Requires. If the subject product is purchased, the object product must be purchased.
Compatibility - Excludes. If the subject product is purchased, the object product must not be purchased.
Scope
You can configure the product so this field can be used to select the scope of the rule, the set of products that the rule applies to. It displays the option:
Projected Asset Cache. If you are using asset-based ordering, select this to apply the rule to the Account Projected Assets. For more information about projected asset cache, see Siebel Order Management Infrastructure Guide.
You can add other options by configuring the product using Oracle's Web Tools. In addition, the application does not evaluate the scope field unless you configure the product using Oracle's Web Tools.
You must select Column Displayed from the menu to display this field.
Object Product
Select the object product.
Note: Make an entry in only one of the fields Object Product, Object Product Line, Object Product Class.Object Product Line
Select the object product line.
Object Product Class
Select the object product class.
Start Date
Enter the date when the rule goes into effect.
End Date
Enter the date when the rule is no longer in effect.
Matrix Name
Select the compatibility group used for grouping this rule. For more information about compatibility groups, see Defining Compatibility Groups.
If you are creating a compatibility rule that has the current product as object, add a new record to the Object Compatibility Rules list and complete the required fields. These are similar to the fields used for defining subject compatibility rules, except that for the fields described in the following table.
Field Comments Subject Product
Select the subject product.
Note: Make an entry in only one of the fields Subject Product, Subject Product Line, Subject Product Class.Subject Product Line
Select the subject product line.
Subject Product Class
Select the subject product class.
Object Product
Select the object product.
Click Clear Cache.
Defining Compatibility Rules for Product Lines
Before you can define a product line compatibility rule, you must define the product lines, and if necessary the products and product classes, it applies to, as described in Siebel Product Administration Guide.
To define compatibility rules for a product lines
Navigate to the Administration - Product screen.
Click the Eligibility and Compatibility Rules view tab.
In the Eligibility and Compatibility Rules link bar, click Product Line Compatibility.
Add a record to the Subject Compatibility Rules list or the Object Compatibility Rules list, and complete the necessary fields.
These fields are similar to the fields used for product compatibility, except that you must choose a product line instead of a product as the subject product of a subject compatibility rule and as the object product of an object compatibility rule.
Defining Compatibility Rules for Promotions
Before you can define promotion compatibility rule, you must define the product promotions it applies to, as described in the topic on product promotions in Siebel Pricing Administration Guide.
To define promotion compatibility rules
Navigate to the Administration - Product screen.
In the link bar, select Product Promotions.
In the Product Promotions list, select the promotion you are defining rules for.
Click the Eligibility and Compatibility Rules view tab.
In the link bar of the Eligibility and Compatibility Rules view, click Product Compatibility.
Add records to the Subject Compatibility Rules list and Object Compatibility Rules list, and define the rules in the same way that you do when you are defining product compatibility rules.
Creating Compatibility Matrices
When you create a compatibility matrices, you enter data similar to the data entered in a compatibility rule, but you enter it directly under the matrix record.
You must use compatibility matrices to create compatibility rules where the subject is a product class.
Eligibility and compatibility rules are shown in the Eligibility and Compatibility Matrices view, regardless of how you created them. If you create them in Eligibility and Compatibility Rules view and grouped them under a matrix, they are displayed under this matrix. This procedure describes how to create them directly under the matrix.
To create a compatibility matrix
Navigate to the Administration - Product screen, then the Eligibility and Compatibility Matrices view.
In the Eligibility and Compatibility Matrices list, add a new record and In the Eligibility and Compatibility Matrices list, add a new record and complete the necessary fields. Some fields are described in the following table.
Field Comments Name
Enter a name for a group.
Matrix Type
Select Compatibility Rules.
Click the name of the new record.
The Compatibility Matrix form and the Compatibility Rules list appear.
Add a new record to the Compatibility Rules list and complete the necessary fields. Some fields are described in the following table.
Field Comments Subject Product
Select the subject product. The default is the product that is selected in the Products list, but you can select any product to replace it.
Note: Make an entry in only one of the fields Subject Product, Subject Product Line, and Subject Product Class.Subject Product Line
Select the subject product. The default is the product that is selected in the Products list, but you can select any product to replace it.
Subject Product Class
Select the subject product. The default is the product that is selected in the Products list, but you can select any product to replace it.
Type
Select the type of the rule. Options are:
Compatibility - Requires. If the subject product is purchased, the object product must be purchased.
Compatibility - Excludes. If the subject product is purchased, the object product must not be purchased.
Object Product
Select the object product.
Note: Make an entry in only one of the fields Object Product, Object Product Line, Object Product Class.Object Product Line
Select the object product line.
Object Product Class
Select the object product class.
Effective Start
Enter the date when the rule goes into effect.
Effective End
Enter the date when the rule is no longer in effect.
Verifying Quotes and Orders for Eligibility and Compatibility
You can verify the eligibility and compatibility for all the products in a quote or order or for individual line items.
It is useful to verify all products before a quote changes status or is taken to a different stage of the order management process. This is especially important for products that have compatibility rules written against them.
When a product is added to a quote or order, eligibility and compatibility is evaluated only for the added line item. Thus, if the added item is incompatible with a product already in a quote, only the added item will show this, not the item already on the quote.
For example, a compatibility-excludes rule says that product A and product B are incompatible. The user adds product A to the quote, and its eligibility status is marked as Y. Then the user adds product B to the quote, and B's eligibility status is marked as N, but A's status is still Y. When you click the Verify button, all items on the quote are evaluated, so product A's eligibility status also becomes N.
To verify eligibility and compatibility for all products in a quote or order
Navigate to the Quotes or Orders screen, then the List view.
In the list, select the desired quote or order.
Drill down on the name of the quote or order.
Click the Line Items view tab.
In the Quote or Order header form, click Verify.
To verify eligibility and compatibility for one product in a quote or order
Navigate to the Quotes or Orders screen, then the List view.
In the list, select the desired quote or order.
Drill down on the name of the quote or order.
Click the Line Items view tab.
In the Line Items list, select the desired line item.
From the Line Items menu, select Verify.
Eligibility and Compatibility Workflow Reference
Eligibility and Compatibility workflows are covered in the following topics:
The PSP Driver Workflow is the default controlling workflow for all these Eligibility and Compatibility Procedures. When the code raises a signal to call the controlling workflow for eligibility and compatibility, it passes the names of these Eligibility and Compatibility Procedures to the PSP Driver Workflow. You can also configure your own controlling workflow to replace this default controlling workflow. For more information about the PSP Driver Workflow, see Siebel Order Management Infrastructure Guide.
Eligibility and Compatibility Procedures are PSP procedures. For more information, see the topic about PSP Procedures in Siebel Order Management Infrastructure Guide.
For more information about workflows, see Siebel Business Process Framework: Workflow Guide.
Product Eligibility & Compatibility - Default Workflow
Product Eligibility & Compatibility - Default workflow is responsible for determining the eligibility and availability of a list of inputted row set of Products. Eligibility and availability are based on eligibility rules setup in the administration views and in the procedure itself. The workflow takes a row set of Products and flags each row with an eligibility status and also a comment detailing the reason for ineligibility, if any.
This workflow is shown in the following.
Workflow Description.
This workflow does the following:
Primary Display Mode?. Verifies whether Primary Display Mode is specified.
Secondary Display Mode?. Verifies whether Secondary Display Mode is specified.
Use Secondary Display Mode. Assigns the Secondary Display Mode to the Display Mode variable.
Use Default Display Mode. Sets Default Display Mode = 1 if both the Primary and Secondary Display Modes are not specified.
Display Mode is Zero?. Verifies whether if Display Mode is zero and branches to the End of procedure if zero.
Set Status of All to Eligible. Sets each Row's eligibility status to Yes. Defaults all products to eligible. Subsequent steps will flag ineligible products.
Current Product. Verifies dates associated with the current line item. If the line item is outside of the effective dates, then sets the eligibility status to No and moves the product into the Output Set. Ensures that each product can be sold today by checking its effective from and effective to dates.
In Price List. Searches the Price Line Item Buscomp for the product and if the product does not exist, sets eligibility status to No. Ensures that each product is in the current price list.
Contracted Product Only. Decides whether it needs to check for contract eligibility. Checks against contracted products if the account Contracted Product Only Flag = Y.
Contracted?. Queries for the Context Account id under Agreement BC, and verifies the start and end dates. Set eligibility status to No if no valid contracts are found. Ensures that each product appears in a pricing contract for the account.
Inclusive Eligibility. Splits the Row Set based on the Inclusive Eligibility Flag. Only checks inclusive eligibility rules for products whose Inclusive Eligibility Flag = Y.
Eligible for Customer. Queries the Product Eligibility BC and verifies that the row set items satisfies the eligibility requirements (Inclusive). Ensures that each product satisfies an inclusive eligibility rule (for example, that it is sold in the customer's state).
Merge Non-Inclusive. Merges the Non-Inclusive Eligibility Row Set into the Row Set.
InEligible for Customer. Queries the Product Eligibility BC and verifies that the row set items satisfies the eligibility requirements (non-inclusive). Ensures that no ineligibility rules are broken for each product (for example, that the product is not sold in customer's postal code).
Is Workflow Mode Pre-Pick?. Verifies whether Workflow Mode is Pre-pick and branches to Compatibility workflow if not Pre-Pick.
Compatibility Workflow. Executes the Product Compatibility - Default Workflow to check for compatibility of Products in Row-Set.
Display Mode 1 or 2?. Verifies the value of the Display Mode property.
Merge Eligible and Skip Rows. Merges Eligible and Skip Rows for Mode = 2.
Merge Elig, Inelig and Skip Rows. Merges Eligible, Ineligible and Skip Rows for Mode = 1.
Product Compatibility - Default Workflow
Product Compatibility - Default workflow is responsible for determining other required and excluded products for a list of inputted row set of products. It determines required and excluded products based on compatibility rules set up in the administration views. The workflow takes a row set of Products and flags each row with compatibility status and with a comment detailing related products that are either required or excluded.
This workflow is shown in the following.
Workflow Description
This workflow does the following:Merge Ineligible Rows. Merges the row sets passed in by parent workflow Product Eligibility & Compatibility - Default, which already determined Eligibility of the products and separated the products into row sets depending on whether or not the products are eligible.
Filter Duplicate Row Set. Filters out any duplicate products in the row set.
Post-Pick?. Determines if the workflow is run in post-pick or pre-pick mode. Skips steps Copy Row Set, Merge Row Set to Scope and Filter Duplicate Projected Assets if in not in Post-Pick mode.
Copy Row Set. Makes a copy of the unique row set created in the step Filter Duplicate Row Set.
Merge Row Set to Scope. Merges row sets to form the scope row sets. Scope row set is all the products that the input row set will be checking Compatibility rules against. It includes the Projected Assets as well as products in the Customizable Product.
Filter Duplicate Projected Assets. Filters any duplicate products in the Projected Assets row set.
Get Incompatible Products. Loads A Excludes B rules for the products from the Compatibility administration view.
Get Incompatible Products (Mutual). Load B Excludes A rules for the products.
Incompatible Products in Projected Assets?. Checks whether there are incompatible products in the Project Asset row set based on rules retrieved in the two previous steps.
Flag Incompatible Rows Flags rows in the Row Set with Status and Comment for incompatibilities found in the previous step.
Get Required Products. Loads A Requires B rules for the products.
Required Products in Projected Assets?. Checks if there are required product rule violated for products in the Project Asset row set based on rules retrieved in the previous steps.
Flag Rows Missing Required Product. Flags rows in the Row Set with Status and Comment for missing products based on violations found in the previous step. Moves all rows with violations to the Incompatible Row Set.
Fix Row Set with Incompatibility Status. Removes from the Row Set all the rows that exist in the Incompatible Row Set.
Merge Incompatible products. Merges the Incompatible Row Set with the Row Set.
Split Eligible Rows. Splits the rows with Compatibility violations from the Row Set to the Ineligible Row Set. Ineligible Row Set now contains a row set of all the products that have Eligibility violations or Compatibility violations.
Compatibility Multiple Popup Workflow
Compatibility Multiple Popup Workflow is responsible for displaying product compatibility violations determined by the Eligibility and Compatibility workflows. This popup gives the user the option of adding the incompatible products or removing them. The popup gets triggered in Quotes and Orders unless the Skip Quote flag is set to N.
This workflow is shown in the following.
Workflow Description
This workflow does the following:Post-Pick Mode?. Skips this workflow completely if in Pre-pick mode.
Skip Quote. Ends this workflow if the Skip Quote flag is Y.
Set Even Type. Stores the full event name after reading the event prefix and the event type. This event name is used later to resume the workflow.
Ineligible Exists?. If there are no Eligibility and Compatibility (E&C) violations, goes to end of workflow
Popup Message. Displays the popup with violating product and comment and waits for the user to decide whether to continue to add this product or to remove this product.
Event Type?. Checks if the event for this workflow comes from Favorites, Search, or Catalog
Wait Favorites/Search/Catalog. Waits for a resume workflow event type from one of the 3 modules.
Loop
Get E&C Responses. Depending on user input from previous steps, deletes or keeps products.
Configurator Eligibility Compatibility Workflow
This Workflow is invoked by Siebel Product Configurator to check if there are any products or attributes that violate Eligibility or Compatibility rules. There are 2 types of checking: Pre-Pick check on the domains of products and attributes in Siebel Product Configurator, and Post-Pick check on the products and attributes that are selected in the Siebel Product Configurator Instance.
This workflow is shown in the following.
Workflow Description
This workflow does the following:PrePick1. Determines whether this is a Pre-Pick or Post-Pick scenario.
Pre Pick Get Row Set. Creates a Row Set of all the Domain Products in Siebel Product Configurator.
Post Pick Get Row Set. Asks the Context Service to generate a Row Set of the current Siebel Product Configurator Instance.
Get Delta RowSet. Generates a subset of the Row Set generated in the previous step. This subset contains only the newly selected or deleted instance after a Siebel Product Configurator Submit Request. The Compatibility Engine will use this Row Set and compare it with the Row Set generated in the previous step to determine if any Compatibility Rules are violated.
Initialize PAC?. Determines whether Projected Asset Cache (PAC) was already initialized.
Construct PAC Params. Constructs the necessary input arguments that PAC business service needs. This will control which buscomps (Quote, Order, or Asset) that will be queried by PAC.
Call PAC?. Based on the inputs set in the previous step, determines whether the application needs to call PAC.
Initialize Projected Asset. Creates the Projected Asset Cache.
Projected Asset Key. Creates a unique key for the Cache created in the previous step.
Query Projected Asset. Creates a Property Set of the items cached in the PAC.
Transform PAC Fields. Transforms the PAC fields to Variable Names that are recognized by the Eligibility/Compatibility engine
E&C Workflow. Passes the control to the Product Eligibility & Compatibility - Default workflow.
PrePick2. Determines whether this is a Pre-Pick or Post-Pick scenario.
ProcessPostPickProduct. Updates Siebel Product Configurator instances that are Ineligible.
ProcessPostPickAttribute. Determines the eligibility of attributes that are already selected (part of the Instance).
ProcessPrePickProduct. Updates Siebel Product Configurator Domain Products that are Ineligible.
CheckPrePickAttribute. Determines the eligibility of the domains of the attributes.
Check Eligibility & Compatibility - Default Workflow
This workflow is responsible for checking the eligibility and compatibility of a quote or order line item.
This workflow is shown in the following.
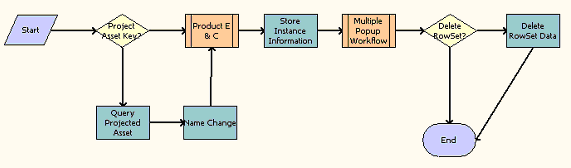
Workflow Description
This workflow does the following:Project Asset Key?. Determines whether the Projected Asset Key is present.
Query Projected Asset. If the Projected Asset Key is present, searches for the asset.
Name Change. Calls the Conditional Action Transform for the Business Service Row Set Transformation Toolkit.
Product E & C. Calls the Product Eligibility & Compatibility - Default workflow.
Store Instance Information. Stores instance information that will be used in the Delete RowSet Data step.
Multiple Popup Workflow. Calls the Compatibility Multiple Popup Workflow.
Delete RowSet?. Determines whether any Line Items in the Row Set have been marked for deletion.
Delete RowSet Data. Deletes any Line Items that are marked for deletion.
Pricing and Eligibility Procedure - Default Workflow
Pricing and Eligibility Procedure - Default workflow will check the Eligibility and Compatibility of a Line Item and then do Pricing.
This workflow is shown in the following.

Workflow Description
This workflow does the following:Product E + C. Calls the Check Eligibility & Compatibility - Default workflow, which checks eligibility and compatibility for the Line Items.
Pricing. Calls the Pricing Procedure - Default workflow, which prices the line items.