1 Feature Summary
![]()
ORACLE HOSPITALITY DIGITAL LEARNING
Oracle Hospitality is committed to supporting your business needs. To enable our customers, we are providing complimentary access to OPERA Hospitality Digital Learning through Oracle University for a limited time. To use these OPERA-related service offerings from Oracle University, you must have a technical support contract for OPERA which is active and in good standing. Please contact operaenablement_ww@oracle.com with the primary property point of contact for access and activation.
![]()
Column Definitions
| SMALL SCALE: These UI or process-based features are typically comprised of minor field, validation, or program changes. Therefore, the potential impact to users is minimal. |
| LARGER SCALE: These UI or process-based features have more complex designs. Therefore, the potential impact to users is higher. |
| CUSTOMER ACTION REQUIRED: You must take action before these features can be used. These features are delivered disabled and you choose if and when to enable them. |
Accounts Receivable
Create Invoice Enhanced for Multiple Charges
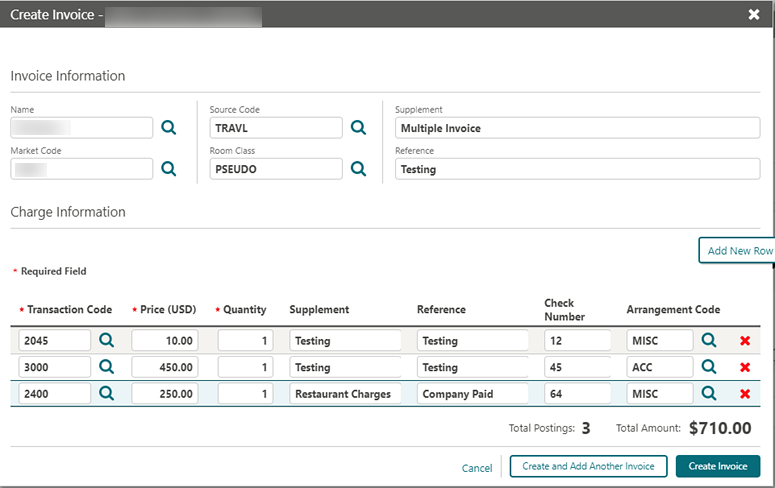
Market Code, Source Code, and Room Class fields are added on the AR Create Invoice screen. While creating an AR Invoice, the newly added fields are populated with default values specified in OPERA Controls.
You can post multiple charges to the new invoice using the Add New Row action link.
When the Folio Arrangements function is active in the Cashiering group of OPERA Controls, you can select the arrangement code for each charge.
After posting charges, you can print or email the new invoice.
Related Topic:
Managing AR Account Invoices and Payments
Notifications Link Added for AR Notes
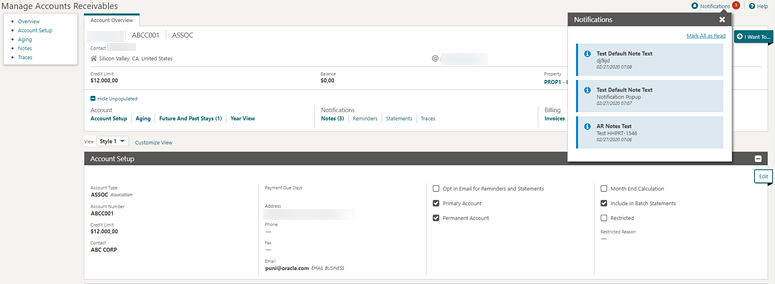
A notification appears in the AR Presentation screen when AR notes exist.
Restricted Icon Added to AR Account Search and Business Card
A restricted icon is added to AR account search and the AR Account business card, replacing the restricted column in AR Account search. The restriction reason appears when you hover your mouse over the icon.
View Changes Log Link Added in I Want To . . . Menu
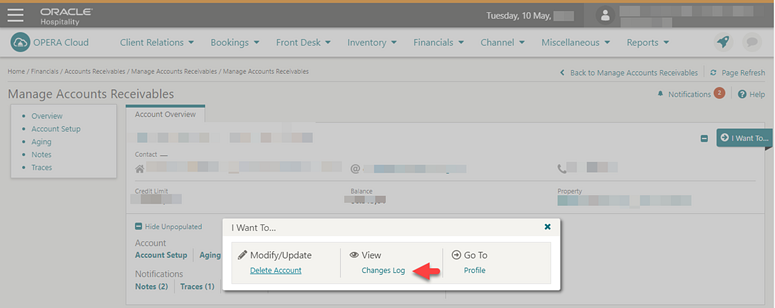
A Changes Log link is added to the Manage Accounts Receivables I Want To . . . menu. Selecting the link displays the Changes Log page, which lists all user activity related to the AR account.
Block Management
Adaptive Layout for Block Business Card
When using OPERA Cloud in full screen mode, the block business card adjusts to display block details over two rows.
Business Block Short List Report Updated
An Attendees column is added to the Business Block Short List (rep_bh_short) report.
Manage Resources Link Added to Block Search and Block Presentation Screens
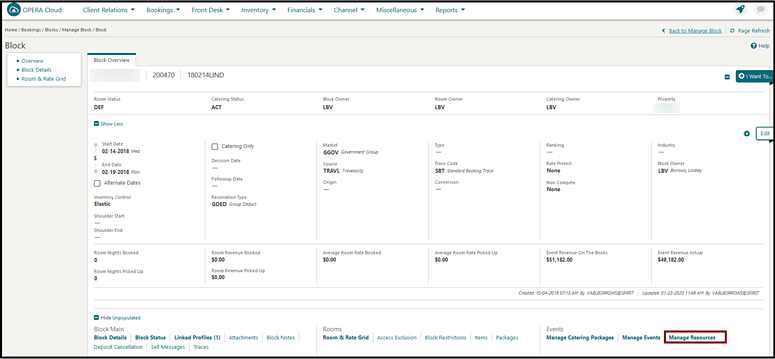
In OPERA Cloud Sales and Events, a Manage Resources action link is added to the Block Presentation and Manage Block Search screens to enhance usability.
The Manage Resources link is available in the Events section of the details links panel. The link appears only when at least one event exists for the block.

Sales Allowance Functionality Added
A Sales Allowance Block function is added to OPERA Controls for OPERA Cloud Sales and Event subscribers. When enabled, the function allows the setting of an artificial availability ceiling for group rooms.
When this availability ceiling is reached, only users with the Overbooking task can continue booking additional group rooms for the required date range.
When the function is enabled, the Block Origin for Sales Allowance setting is enabled, which allows the selection of block origins to affect the Sales Allowance.
The Bookings Overbook Sales Allowance user task governs the ability to over book the Sales Allowance.
STEPS TO ENABLE
-
From the Administration menu, select Enterprise and then select OPERA Controls.
-
Select or confirm the Property where you want to enable the parameter.
-
Click the Blocks group.
-
Locate and enable the Sales Allowance function.
-
Locate and update the Block Origin for Sales Allowance setting.
-
Select the block origin to affect the sales allowance (typically this is the SC value).
-
-
Select Role Manager and search chain or property roles as required.
-
Select the required role and select Edit from the vertical ellipse.
-
Update the following tasks as required for each role:
-
Bookings > Overbook Sales Allowance
-
Booking Admin > Sales Allowance > New/Edit Sales Allowance > Delete Sales Allowance
-
-
From the Administration menu, select Booking, select Block Management, then select Sales Allowance.
Refer to: Configuring Sales Allowances
Cashiering and Financials
Custom Reference Number on Payment Receipts
Custom Numbers is further enhanced to enable you to configure custom numbers for payment receipts.
An update of your customized payment receipt is required to output custom reference numbers generated.
Custom Number Configuration Updated
A Custom Number Type attribute is added to identify Folio or Receipt codes separately.
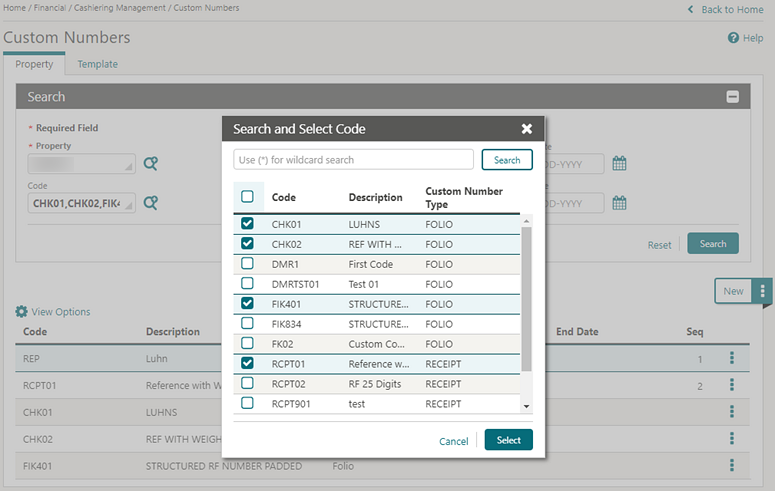
The Custom Number Formula and Filter components provide new functions that allow generation of custom numbers based on Luhn's Algorithm, Reference Number with Weights, and Structured or Creditor Reference Number calculations.
In multi-property operations, you have the option to configure custom numbers in the template and copy the configuration to multiple properties.
Access to the Template tab and New/Edit/Delete options is controlled by the existing Template Configuration and by New/Edit/Delete Template tasks.
The Actions vertical ellipsis provides a Copy option in both the Template and Property tabs. Access to the Copy action is controlled by the New/Edit Custom Numbers task.
Folio and Receipt History Updated
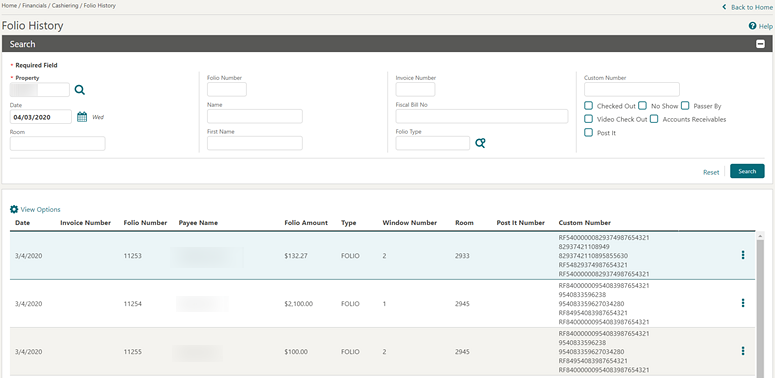
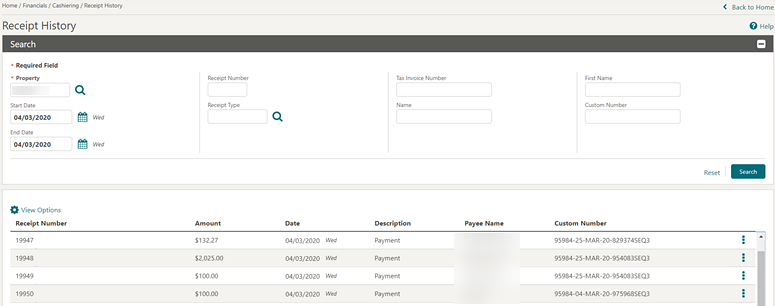
Folio History and Receipt History are updated with a custom number search field.
Search results are updated with a Custom Number column where up to five custom numbers are listed for each folio or receipt.
Sample_payment Template Updated
A custom_number element is added to SAMPLE_PAYMENT XML for outputting custom number(s) in the footer of the payment receipt.
Refer to Steps to Enable below to update your customized payment receipt.
STEPS TO ENABLE
Update the layout of your customized payment receipt by downloading the latest sample_payment.xml. Add the custom_number field to the footer section in your customized receipt template(s).
-
From the Application menu, select Reports, select Configure Reports, and then select Manage Reports.
-
Click Show Internal, select Payment Receipt report group, and click Search.
-
Select the payment receipt in search results and click Edit from vertical ellipsis.
-
Download the latest sample_payment.xml.
-
Download your customized payment receipt template.
-
Load the sample_folio XML for the Word template.
-
Add the Custom_Number field to the footer section in your customized receipt template.
-
Save changes to the RTF template.
-
Upload the modified RTF template.
-
Click Save to save changes.
-
Repeat for all other payment receipts (if multi-language is enabled).
Fiscal Folio Printing Feature Added
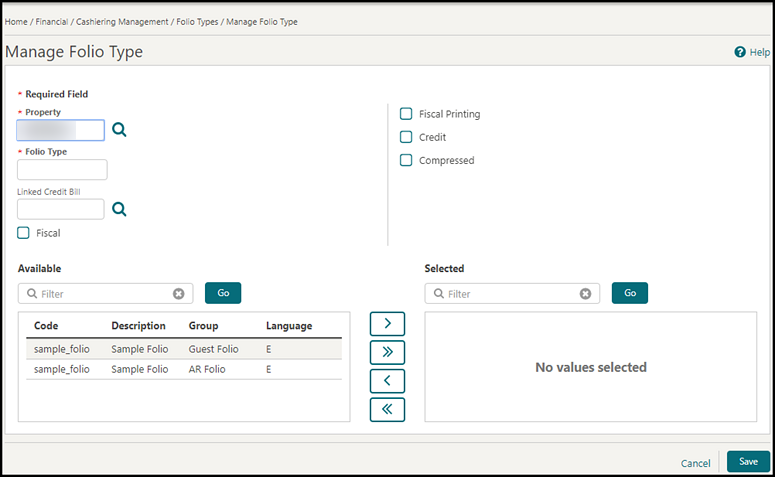
A new check box for Fiscal Printing is visible on the Manage Folio Type screen when the Cashiering parameter for Fiscal Folio Printing is on.
Select the check box for any Folio Type(s) where the folio must be sent to a fiscal printer.
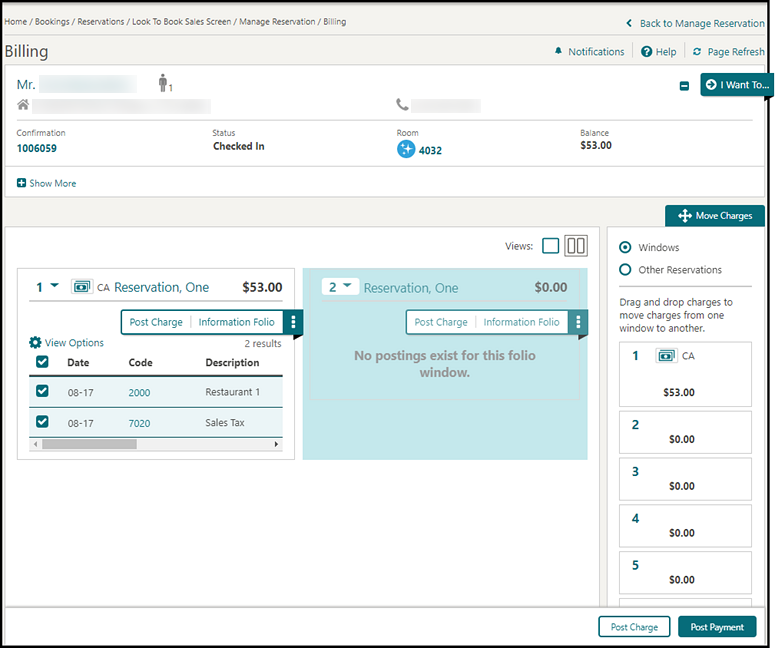
Transaction Transfer Usability Enhanced in Billing
The drag and drop method of transferring transactions is enhanced to make the drop area dynamically larger.
When viewing the Billing screen in split view, the drop area in the folio windows is always the same size as the largest of the two folio windows.
In addition, the acceptable drop area is highlighted as you begin dragging the transaction(s). Refer to: Manage Billing
Client Relations
Profile Search Extended to Additional Fields
An Extended Account Name Search profile parameter is added to OPERA Controls.
After enabling it, you can search for sales accounts (Company/Agent profiles) by the Name2 or Name3 fields in Basic or Advanced search and the Quick Profiles search screens.
STEPS TO ENABLE
-
From the Administration menu, select Enterprise and then select OPERA Controls.
-
Select or confirm the Property where you want to enable the parameter.
-
Click the Profile group and scroll to the parameter section.
-
Activate Extended Account Name Search.
Relationships Panel Updated
The Relationship panel is updated with the following new labels when entering a new relationship.
-
Profile Type is renamed to Target Profile Type.
-
Type of Relationship is renamed to Type of Relationship to Target Profile.
-
Related Profile is renamed to Profile.
After a relationship is created, the listed profile in the panel shows its relationship to the profile from which the panel is viewed.

Country Specific
Country Specific - Italy - Additional Information Feature Added
A link for Additional Information is visible on reservations and displays the Additional Information screen when selected.
You can enter purchase order data, contract data, convention data, and delivery data on the Additional Information screen.
Refer to: Oracle Hospitality Localization Center for Hotel; Italy - under OPERA Cloud Solutions: OPERA Cloud Fiscal Primary Data Document (Doc ID 2563778.1).
Country Specific - Italy - Auto Post Stamp Duty Feature Added
An Auto Post Stamp Duty country specific parameter is added to OPERA Controls.
When the Auto Post Stamp Duty parameter is enabled, OPERA Cloud automatically posts/removes the Stamp Duty transaction to/from the folio windows on the Billing screen. The message, Stamp Duty has been posted, appears on the Billing screen when the Stamp Duty exists on a folio window.
Refer to: Oracle Hospitality Localization Center for Hotel; Italy - under OPERA Cloud Solutions: OPERA Cloud Fiscal Primary Data Document (Doc ID 2563778.1).
Country Specific - Italy - Credit Bill Feature Added
You can generate a Credit Bill for a Ricevuta Deposit Folio until the reservation is checked in.
You can generate a Credit Bill for a Ricevuta folio on the same day it was generated.
Refer to: Oracle Hospitality Localization Center for Hotel; Italy - under OPERA Cloud Solutions: OPERA Cloud Fiscal Primary Data Document (Doc ID 2563778.1).
Country Specific - Italy - Fiscal Printing Feature Added
When you perform a folio settlement, a window for Fiscal Printing appears offering you the choice of selecting the Folio Type for Fattura or for Ricevuta.
Refer to: Oracle Hospitality Localization Center for Hotel; Italy - under OPERA Cloud Solutions: OPERA Cloud Fiscal Primary Data Document (Doc ID 2563778.1).
Country Specific - Italy - Restrict Folios With Deposit For Full Credit Bill Control Added
The Restrict Folios With Deposit For Full Credit Bill cashier parameter is added to OPERA Controls and should be reviewed by properties in Italy. The parameter enables you to credit only individual transactions if the folio for the credit bill includes a deposit folio. After enabling the parameter, access to the All Transactions radio button is disabled for folios with deposit transactions.
If no deposit information exists on the Fattura or Ricevuta for which you create a credit bill, you can create either a full credit bill or a partial credit bill.
Refer to: Oracle Hospitality Localization Center for Hotel; Italy - under OPERA Cloud Solutions: OPERA Cloud Fiscal Primary Data Document (Doc ID 2563778.1).
Country Specific - Italy - VAT (Value Added Tax) Offsets for Deposits
The VAT Offset Transfer at Check In is added to the Cashiering settings in OPERA Controls for properties in Italy. The setting is available when the VAT Offset parameter is enabled.
When a deposit folio is generated for a payee profile designated as VAT offset eligible, a credit is posted for the entire VAT amount using a payment transaction code referenced in the VAT Offset Transfer at Check In setting. You must configure the payment transaction code as "other payment" type. A profile is marked offset eligible from the VAT_Offset_YN field in Profile Details. At check-in, the Deposit Folio VAT Offset payment is transferred to the guest ledger together with the Deposit Transfer at Checkin deposit payment. The VAT Offset Transfer at C/I transaction code is not eligible for manual posting.
Refer to: Oracle Hospitality Localization Center for Hotel; Italy - under OPERA Cloud Solutions: OPERA Cloud Primary Data Document (Doc ID 2563778.1).
Country Specific - Maldives - Guest Registration Number EOD Routine
A Generate Tax Registration Number Cashiering parameter is added to OPERA Controls and should be reviewed by properties in Maldives.
After you enable the parameter, a registration number is sequentially assigned to the current date, checked in reservations (excludes pseudo room type reservations, cancelled reservations, and no-show reservations) during End of the Day (EOD) by the eod_misc.assign_tax_reg_no procedure.
A Registration Number field is available in the Reservation presentation screen. Use Page Composer to display this field in the Stay Details panel.
Refer to: Oracle Hospitality Localization Center for Hotel; Maldives - under OPERA Cloud Solutions: OPERA Cloud Fiscal Primary Data Document (Doc ID 2631152.1).
Events
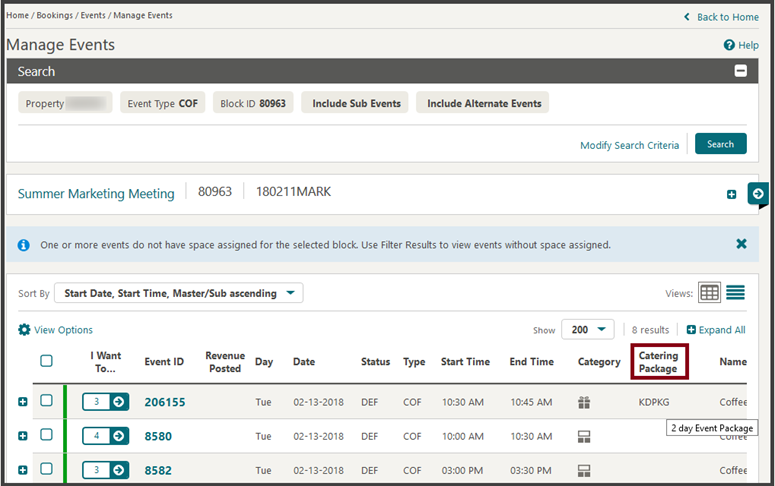
Catering Package Code Added to Manage Event Search
In OPERA Cloud Sales and Events, a Catering Package Code column is added to the Manage Event search screen allowing you to view which package an event belongs to when multiple packages exist on the same date.
Hovering your mouse over the Catering Package code displays the full catering package name.
Copy Menu Items Added
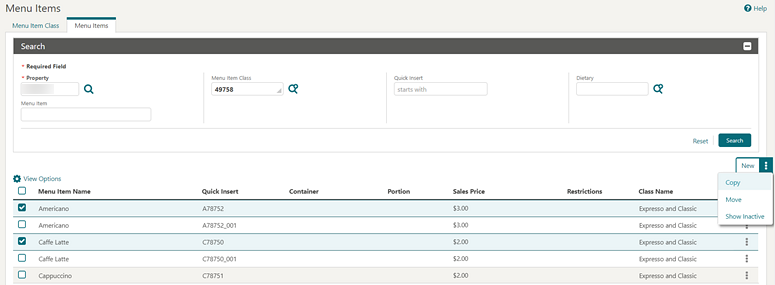
In OPERA Cloud Sales and Events, you can copy configured menu items and reuse them within the same properties.
From the Administration menu, navigate to Resource Management and select Menu Items. Use the Copy action button in the Menu Items Search screen.
-
A multi select check box is available at each row level within the Menu Items search screen.
-
After selecting single/multiple Menu items, click Copy. You are prompted with the Menu Item Class selection screen. This screen has a multi select check box and Menu Item Class name with Select and Cancel links.
Note:
You can select single or multiple Menu Item classes (same or different). If you click Cancel, the Menu Item class selection process is canceled. -
The Menu Item gets copied to the selected Menu Item Classes
-
If the same Menu Item gets copied to the same/other class, a new menu item is created with quick insert (Source Quick Insert value_001/002 and so on). The Quick Insert value is always unique.
-
The Event Types becomes populated based on the Menu Item class selected for the newly created menu Item.
-
The Responsible Department becomes populated based on the Menu Item class selected for the copied menu Item.
-
If the target Menu Item Class is flagged as Beverage, then the copied Menu Item (in this case flagged as Food) becomes flagged as Beverage.
-
If the target Menu Item Class is flagged as Food, then the copied Menu Item (in this case flagged as Beverage) becomes unchecked flagged as Beverage.
-
Other fields such as Beverage, Print flag, Sales Price, Revenue Type and so on are copied as well.
-
Translations are copied as well.
-
-
At the Hub level, you can copy the configured Menu Items so you can reuse them within the same properties.
Copy Menus Added
In OPERA Cloud Sales and Events, you can copy a menu to the same menu class or one or multiple different menu classes from the Menu administration screen.
Use the row level Copy action link in the Composed Menu screen.
-
When you select Copy, you are prompted for the menu class selection. You can select single or multiple menu classes.
-
When a menu is copied to the selected menu classes:
-
Dependent details (Example: Included/Consumption/Multi Choice flag, Menu Items, pricing, notes, and so on) are also copied.
-
The Event Type is populated based on the menu class selected for the newly created menu.
-
Translations are copied.
-
-
At the Hub level, you can copy the configured menus for reuse within same properties.
Create Event Updated with Create Sub-event Action
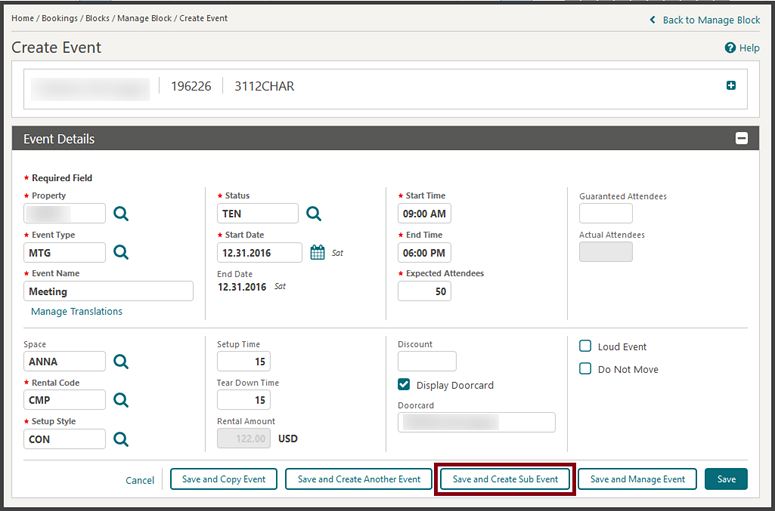
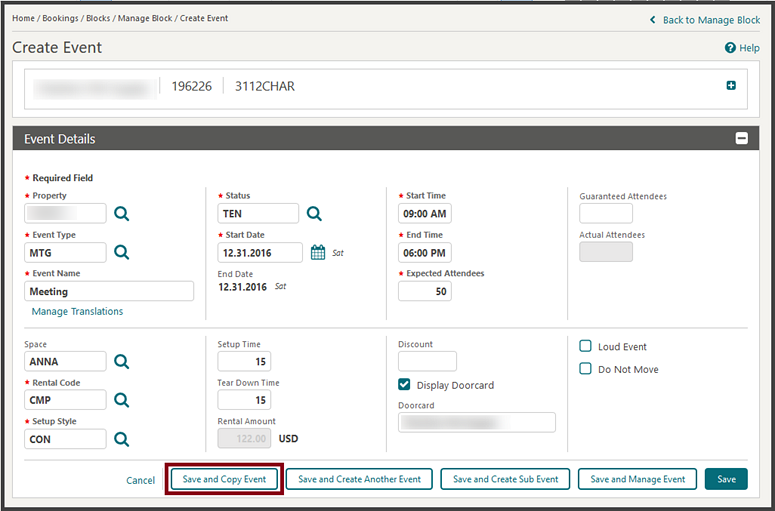
In OPERA Cloud Sales and Events, the Create Event page is updated with a Save and Create Sub Event action button (replacing the sub-event check box) for properties with the Sub Event control enabled.
When selected, the event is saved and you are taken to the Create Sub Event screen where you can save the sub event or continue to create additional sub events using the Save and Create Another Sub Event action button.
Create Event Updated with Save and Copy Action
In OPERA Cloud Sales and Events, the Create Event page is updated with a Save and Copy Event action button. When you select the button, the event is saved and you are directed to the Copy Event to Other Dates screen.
From here, you can copy the saved event to one or multiple dates within the same block or to a different block.
When the button is selected while creating master and sub events, the master event becomes highlighted and appears in the Select Event(s) to Copy section.
Since the check box for Include Sub Events is selected by default, the master event and any sub events that exist are copied.
If you launch the create sub event screen from the I Want To . . . menu link, the button for Save and Copy does not become available.
Customizable BEO Report Templates Available
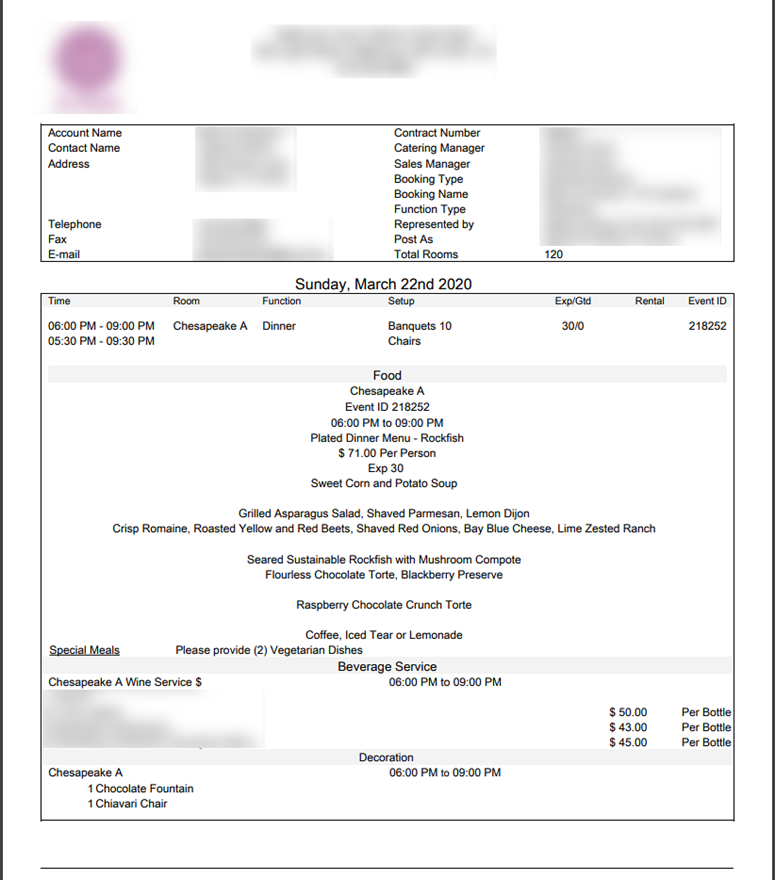
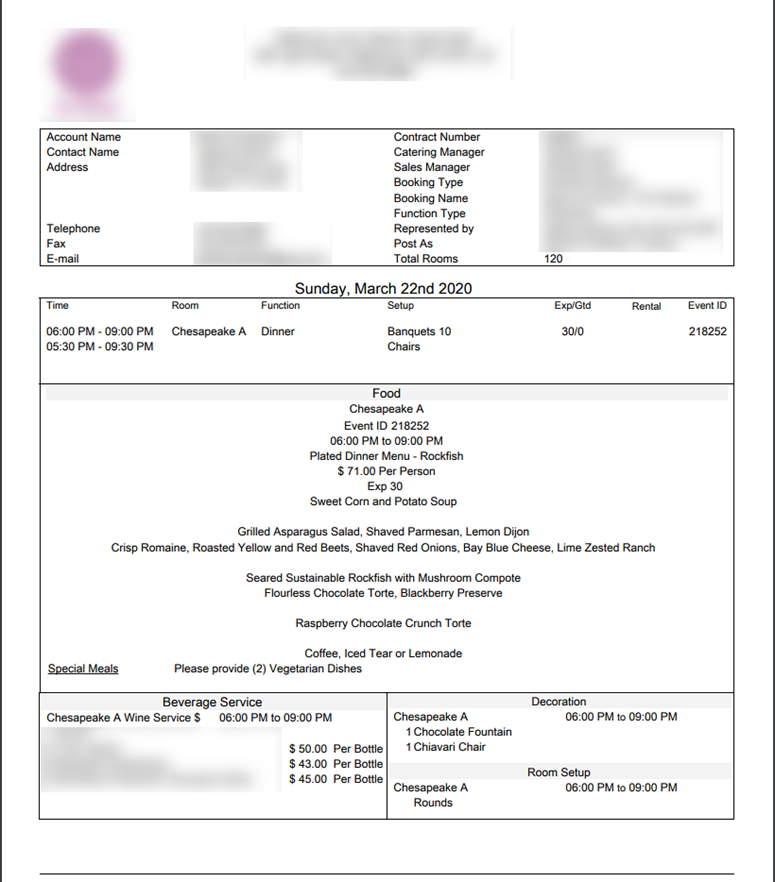
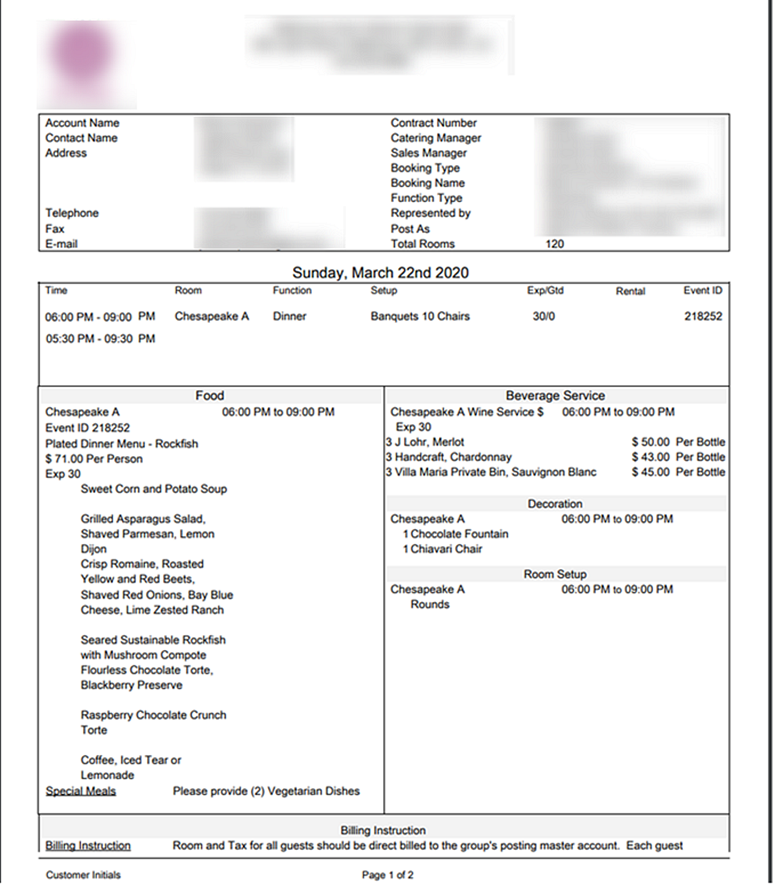
In OPERA Cloud Sales and Events, three Banquet Event Order (BEO) templates are available in RTF format for customization using the Microsoft Word Stationery Editor.
-
sample_beo_1column (parameter form: sample_beo_1column)
-
sample_beo_2column (parameter form: sample_beo_2column)
-
sample_beo_2column_fb (parameter form: sample_beo_2column_fb)
The fields for Function Type, Post As, and Total Rooms are added in the Booking Details sections, and the Event ID field is added in the Agenda section of all three templates.
You can preview layout changes to your templates by downloading and loading the sample XML data into Microsoft Word.
You can generate the BEO in Word format to make further changes as needed for specific events.
STEPS TO ENABLE
-
From the OPERA Cloud menu, select Reports, select Configure Reports, and then select Create Reports.
-
Set the Report Type to Customized Report.
-
In the Sample Report to base your Customized Report field, select a template. Options are: sample_beo_1column, sample_beo_2column, and sample_beo_2column_fb.
-
Select Download Sample Report to download the RTF template; save and rename the file (lower case letters only) to your local file system.
-
Select Download Sample Data to download the XML file containing sample data. Save the file to your local file system.
-
Launch Microsoft Word and open the downloaded RTF template.
-
Load the sample XML Data and select the downloaded XML file.
-
Customize your template as required and save the changes to the RTF file.
-
From Create Report, select Choose File to upload the modified template.
-
Select a Report Group.
-
Update the Display Name.
-
Select Language Code, if needed.
-
Set the Parameter form to Existing; select the parameter form that matches the RTF template selected based on the naming convention, for example, Sample 2 Col = Sample 2 Col, Sample 2 Col FB = Sample 2 Col FB, and so on.
-
Populate the default report parameters, as needed.
-
Click Save.
Related topic: About Stationery Editor (Oracle Business Intelligence (BI) Publisher)
Food and Beverage Plan Report Added
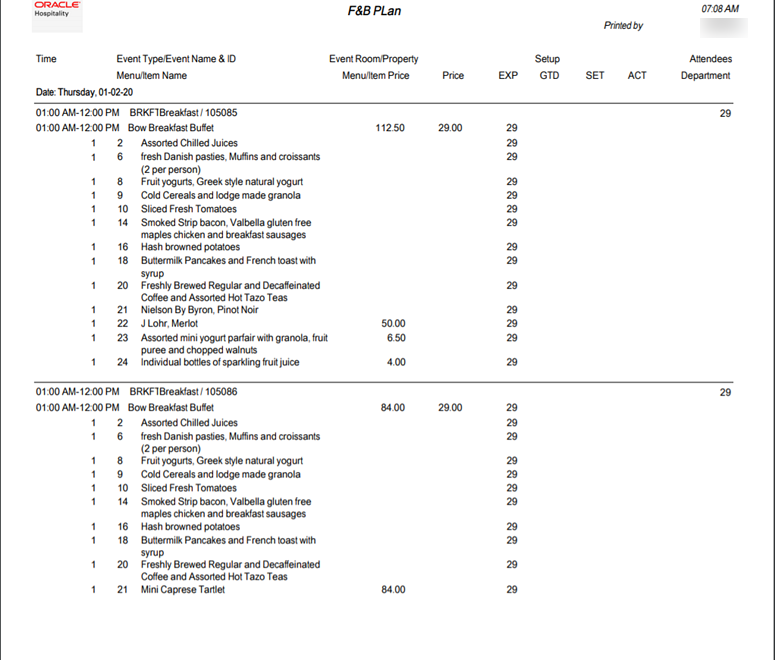
In OPERA Cloud Sales and Events, the F&B Plan report is available in the Events Report Group. This report details the necessary food and beverage preparations and requirements for events. The report includes notes, and you can generate it with account, contact, on-site contact, and communication details when you select Print Details. You can generate the report for specific blocks or a date range. It has additional filters, including Event Status, Event Types, and Responsible Department. You can run the report in Daily or Weekly mode.
The report is a great tool for the Banquet Chef, Kitchen, and other departments responsible for providing food and beverages for catering events. You can use the report as an addition to the Banquet Event Order or as a replacement as it only includes the necessary details for food and beverage.

Manage Resources Link Added to Event Search and Event Presentation Screens
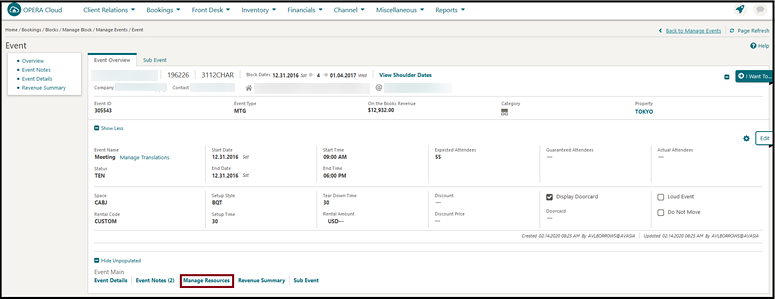
In OPERA Cloud Sales and Events, a Manage Resources details link is added to the Event Presentation and the Manage Event Search screens to enhance usability.
The Manage Resources link appears below the Event Overview panel in the Event main section in addition to within the I Want To . . . menu. The link is always bold and accessible even if no resources are added to the Event.

Menu Configuration Usability Enhanced
In OPERA Cloud Sales and Events, Menu configuration is updated to enhance usability.
Configure Menu :
-
A Menu Item drawer is available within the Menu Items panel.
-
When clicked, the Menu Item selection panel opens for you to select one or more menu items to add to the menu.
-
The Menu Items drawer provides the following:
-
Search (collapsed by default):
-
You can search menu items by Name, Event Type, Quick Insert, or Dietary.
-
Use the Reset action to reset search criteria.
-
-
Three actions on the screen:
-
Add Menu Item: the button adds selected menu items to the menu.
-
Cancel: the button cancels the menu item selection process.
-
Include in Menu: selecting the check box includes the Menu Item. The check box is not available for Consumption Menus.
-
-
You can add multiple Menu Items to the Menu using the check box corresponding to menu Items.
-
Selecting Expand All displays all Menu Items; if you collapse the same, the results get collapsed.
-
-
After you add Menu Items using the Menu Item drawer, you can delete the same using the Delete ellipsis option on each row level.
-
You can add Menu Items to a menu and flag them as Included by selecting the Include in Menu check box in the Menu Item drawer.
Menu Presentation screen:
The Menu Presentation screen, Menu Item panel, provides the following:
-
A row level ellipsis option for Delete is available. You can select it to delete the selected Menu Item.
-
You can click Edit, and the entire table is enabled for Edit. The Menu Item drawer is available in this mode.
-
You can add the Menu Items using the Menu Item drawer in Edit mode.
Note:
The Menu Item drawer is available in the Menu Item indicator as well.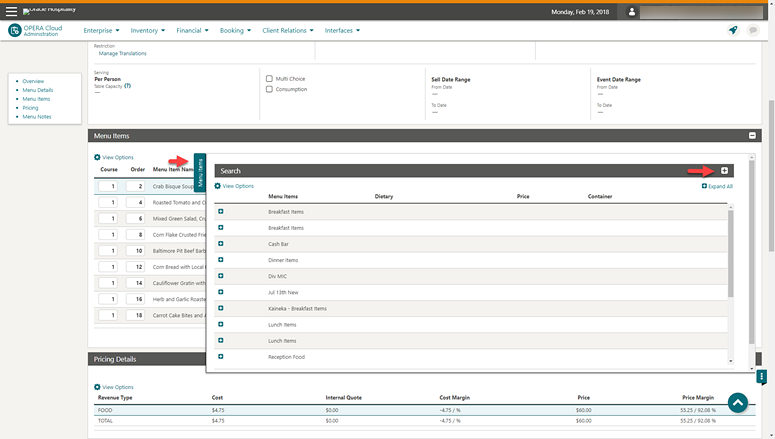
Move Menu Items Added
In OPERA Cloud Sales and Events, you can move one or multiple Menu Items to another Menu Class for the same property from the Menu Item administration screen.
Use the Move action button available below the Copy option within the header ellipsis in the Menu Items Search screen.
-
A multi-select check box is available at each row level within the Menu Items search screen.
-
You can click Move after selecting single or multi-menu items and are prompted with the Menu Item Class selection user interface. This user interface provides a list of Menu Item Class names with Select and Cancel links.
-
You can select a single Menu Item Class (same or different) and click Select. If you click Cancel, the Menu Item Class selection process ends.
-
The selected Menu Item gets moved to the selected Menu Item Class.
-
The Event Types are populated based on the Menu Item Class selected for the moved menu Item. This is a change from the existing OPERA 5 behavior.
-
The Responsible Department is populated based on the Menu Item Class selected for the moved menu Item. This is a change from the existing OPERA 5 behavior.
-
If the target Menu Item Class is flagged as Beverage, then the moved Menu Item (in case it is flagged as Food) is flagged as Beverage. This is a change from the existing OPERA 5 behavior.
-
If the target Menu Item Class is flagged as Food, then the moved Menu Item (in case it is flagged as Beverage) has the unchecked flag for Beverage. This is a change from the existing OPERA 5 behavior.
-
Translations are moved as well.
-
-
At the Hub level, you can move the configured menu items for reuse within the same properties.

Exports
Back Office Export Views Listed in General Exports
The following Back Office Export views are converted to General Export views and are available from OPERA Cloud > Miscellaneous > Exports > General.
BOF_DEP_CHKOUT_TOTALS
BOF_CHEQUE_EXCH_DETAILS
BOF_CITYLED_TRXCODE_DETAILS
BOF_BILLTYPE_TRXCODE_TOTALS
BOF_BILLTYPE_TAXCODE_TOTALS
BOF_BILL_TRX_CODE_TOTALS
BOF_BILL_NO_TAX_CODE_TOTALS
BOF_DEP_CHECKEDIN_TOTALS
BOF_ZERO_FOLIOS
BOF_FATREP_BILL_TAXCODE_TOTALS
BOF_DEP_REFUND_TOTALS
BOF_DEP_RECD_TOTALS
BOF_FATREP_TAX_CODE_TOTALS
BOF_RESV_REVENUE_RECORDS
BOF_CITYLED_TAX_CODE_DETAILS
BOF_AR_OLDBAL_PAYMENTS
BOF_UNALLOCATED_PAYMENTS
BOF_NOBILL_REVENUE_RECORDS
BOF_CREDIT_CARD_RECORDS
BOF_FOLIOTAX_AND_CC_PAYMENTS
BOF_COUNTRYSTATS_RECORD
BOF_REVENUE_TAX_RECORDS
EXP_BOF_ALL_TRANSACTION
Back Office Export Views Updated
Additional columns are added to the following standard export views:
-
PROFILE UDFC21 to UDFC40 (Profile of Payee)
-
Reservation UDFC21 to UDFC40
-
Reservation Guest Country Description
-
MC_BOF_CODE1 to MC_BOF_CODE25
-
GUEST_LAST_NAME
-
GUEST_FIRST_NAME
-
RESERVATION UDFC01- UDFC10
-
BOF_CODE1 - BOF_CODE25
A new export view is available with the following columns:
-
Account Period
-
User Name
-
Transaction Code
-
Market Code
-
Room Type Code
-
Tax Rate String
-
Transaction Description
-
Transaction Date
-
Inter Hotel Ledger Debit
-
Inter Hotel Ledger Credit
-
Inter Hotel Ledger Control
-
Inter Hotel Ledger Control Flag
-
Department Ledger Debit
-
Department Ledger Credit
-
Department Ledger Control
-
Department Ledger Control Flag
-
Guest Ledger Debit
-
Guest Ledger Credit
-
Guest Ledger Control
-
Guest Ledger Control Flag
-
Package Ledger Debit
-
Package Ledger Credit
-
Package Ledger Control
-
Package Ledger Control Flag
-
AR Ledger Credit
-
AR Ledger Debit
-
AR Ledger Control
-
AR Ledger Control Flag
-
Gross Amount
-
Gross- Debit/Credit Flag
-
Net Amount
-
Net -Debit/Credit Flag
-
VAT Amount
-
VAT- Debit/Credit Flag
-
Tax Amount
-
Tax- Debit/Credit Flag
-
Transaction Code Type
-
Transaction Code Group
-
Transaction Code Subgroup
-
AR Indicator
-
Revenue Bucket ID
-
Cash Indicator
-
Manual Posting Flag
-
Revenue Group Indicator
-
Arrangement Code
-
Expense Folio
-
Group Folio
-
BOF Interface Code
-
BOF Code1 - BOF Code 25
-
Market BOF Code 1- Market BOF Code 25
Country Specific - Germany - GoBD Export Modified
GoBD Export Templates are modified to accommodate the requested changes from the auditing authorities.
-
Dataset xmlns info is replaced with <DatasSet>.
-
<RecordDelimiter>&#13;&#10;</RecordDelimiter> is replaced with <RecordDelimiter> </RecordDelimiter>.
-
<ColumnDelimiter>;</ColumnDelimiter> and <TextEncapsulator>""</TextEncapsulator> are added.
-
The column order is now matching in the Index file for both GOBD_FOLIO and GOBD_REV_TRX_DET.
-
For GoBD Stat Export, the column, TOTAL_NON_REVENUE_GROSS, will not exceed 20 positions.
STEPS TO ENABLE
In order for these changes to take effect, you must delete the existing export configuration and re-select the exports from template.
-
From the Application menu, select Miscellaneous, select Exports, and then select Country.
-
Search and then select a GoBD Export in search results.
-
Click the row level Vertical Ellipsis and select Delete.
-
If a pop-up like "Export cannot be deleted as data is already generated" appears, click the Vertical Ellipsis and select View Exports.
-
Select the generated file, click the Vertical Ellipsis, and select Delete. Continue with deleting the export.
-
Repeat the process for deleting each of the five GoBD exports.
-
Click New from Template to create a new export from the template.
-
Click the search glass icon and search for GoBD export, for example, *GoBD.
-
Select the export and click Create and Continue.
-
Repeat the process for adding each of the five GoBD exports.
Country Specific - Portugal - Update to Police Export
The following changes to the Portugal Police Export (PT_POLICE_EXPORT_DAY) are generically available, but should be reviewed by properties in Portugal.
-
The export outputs three-letter ISO codes for Nationalities, Countries, and ID Countries.
-
The export no longer includes pseudo room type reservations.
Note:
Properties are expected to configure 2-letter ISO codes for Countries, ID Countries, and Nationalities. If non-ISO2 codes are configured for a Country/Nationality/ID Country, the export passes a blank value in the respective column.Custom Reference Numbers in Back Office and General Export Views
Custom Number(s) are available in the following with five separate columns for Custom_number1, Custom_number2, Custom_number3, Custom_number4, and Custom_number5.
-
Back Office Export view: EXP_BOF_ALL_TRANSACTIONS
-
General Exports views: EXP_FOLIOTAX and EXP_ALL_TRANSACTION_VIEW
An additional custom_numbers column is available listing all custom numbers in a comma delimited string.
New Exports for Oracle Responsys (Marketing Cloud)
New exports are available for exporting reservation and profile data to the Oracle Responsys (Oracle Marketing Cloud. )
-
RESPONSYS_RESV_DAY export can be generated for an arrival date range and for specific reservation status(es). Additional filter conditions can be defined in Miscellaneous > File Exports > General > Select the export file type > Edit > Filter Condition.
-
RESPONSYS_PROF_DAY export can be generated for date/date range and filtered by profile type(s) and profile privacy option. The Profile export file generated contains profile, revenue (production) data, stay details, and membership details for applicable profile types(s).
There are six export file types available in the list of templates within the General exports. You can select the applicable export(s) from the template list and add to your property.
-
RESPONSYS_RESV_DAY: You can use this template file type to generate the reservation export manually.
-
RESPONSYS_RESV: When this template file type is added to the property, the reservation export is automatically scheduled to run during End of Day. You can review the scheduler job from Miscellaneous > File Exports > Schedules.
-
RESPONSYS_RESV_AUTO: You can use this template file type to schedule the reservation export from Miscellaneous > File Exports > Schedules.
-
RESPONSYS_PROF_DAY: You can use this template file type to generate the profile export manually.
-
RESPONSYS_PROF: When this template file type is added to the property, the profile export is automatically scheduled to run during End of Day. You can review the scheduler job from Miscellaneous > File Exports > Schedules.
-
RESPONSYS_PROF_AUTO: You can use this template file type to schedule the reservation export from Miscellaneous > File Exports > Schedules.
When the profile export is generated during End Of Day or from a scheduler job, the export is generated for current business date.
When the reservation export is generated during End Of Day or from a scheduler job, the export is generated for the next 30 days arrivals (from the current business date).
Note:
Pseudo room type reservations are not included in the reservation export.Both reservation and profile exports are generated in comma separated file format by default; you can change the format to .txt from Miscellaneous > File Exports > General > Select the export file type > Edit > update the file extension formula.
The exports are delivered to an SFTP or file system location.
For information on General Export configuration, refer to Exports.
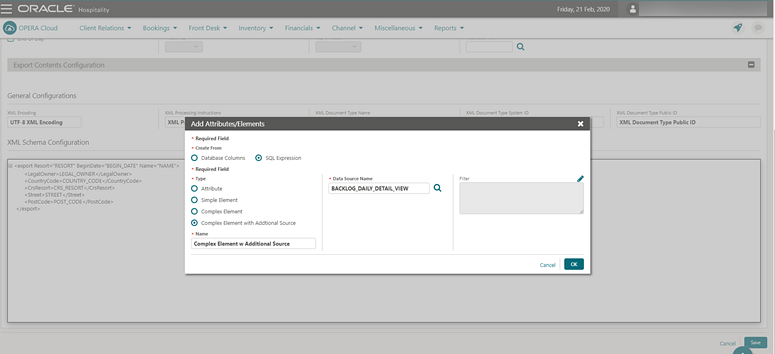
XML Formats Added to Export Definition
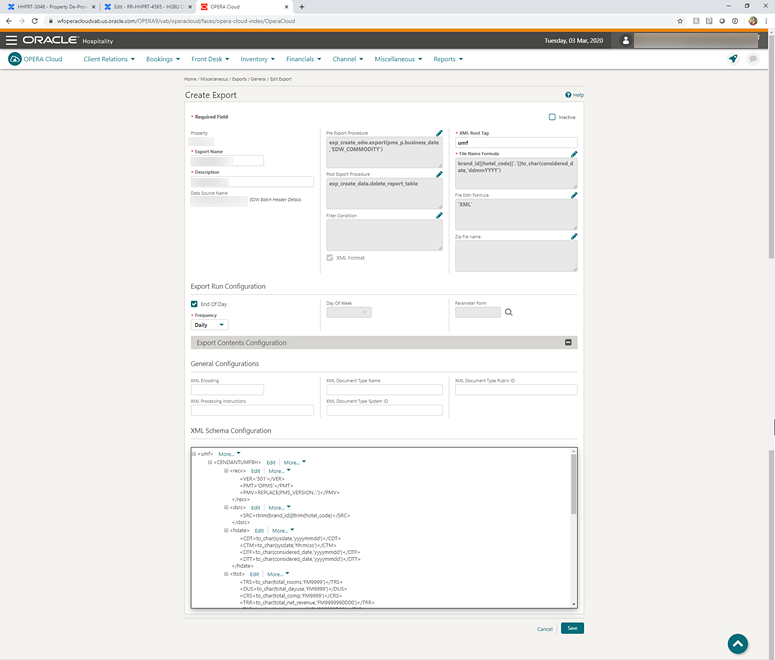
You can configure exports to output in XML format. Upon enabling the XML format button, the Create Export page is transformed into an XML format friendly page.
-
Addition of XML Root Tag.
-
In Export Contents Configuration, the General Configurations section contains the XML Declarations and the Document Type Declaration (DTD) of an XML file. All fields in the General Configurations section are optional.
-
You can configure XML Attributes and Elements to be one of the following:
-
Database Columns - lists columns from Data Source that you can add as attributes and/or elements.
-
SQL expression - You can choose other types of attributes or elements. Choices for SQL Expression are:
-
Attribute - provides an attribute name, column length; use the SQL expression builder to filter values.
-
Simple Element - provides an element name; use the SQL expression builder to filter values.
-
Complex Element - provides an element name. This creates a new level/branch in the XML. You can add new attributes and elements. All will come from the original Data Source.
-
Complex Element with Source - provides an element name; choose another Data Source and filter column as needed using the expression builder. This creates a new level/branch in the XML. You can add new attributes and elements, but all data comes from the new Data Source.
-
-
Note:
-
XML exports do not have component exports.
-
You cannot edit XML Export data in the View Exports screen.
Front Desk
Enhancements to Electronic Registration Card Presentation
-
Labels related to eSign functionality are updated to display eSign Registration Card.
-
eSign Registration Card appears as a full page overlay for presentation to the guest.
-
The Language selection drop-down is located in the upper right corner of the popup and appears when the multi-language function is active.
-
Scrolling inside the eSign Registration Card popup occurs only on the body of the configured eSign registration card document; header, language, and actions are persistent.
-
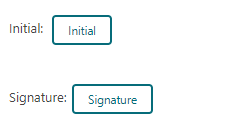
Guests can add their signature or initials to the eSign registration card by clicking the Signature or Initial buttons.
-
After the elements are signed, buttons are replaced with the guest signature, and a pen icon (to edit) appears next to the signature.

Enhancements to Electronic Registration Card Template Configuration
-
With the multi-language control enabled, you can configure a template for each language.
-
With the multi-property add-on subscription enabled, you can configure and then copy templates to other properties.
-
You can use the Copy action to clone a template to a new template for other membership types, properties, or languages.
-
Page design is updated to improve usability.
Note:
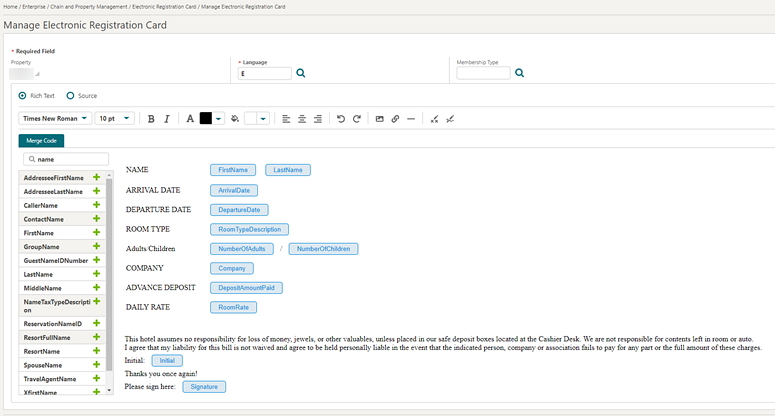
The Administration menu and associated user tasks are renamed Electronic Registration Card (previously Web Registration Card).Electronic Registration Card Template customization is enhanced by a "what you see is what you get" rich text editor.
The merge code list is updated with all profile and reservation flex fields, such as ProfileUDFC01 and ResvUDFC01.
The ArrivalComments merge code is renamed PickupNotes (Transport Pickup Note).
The DepartureComments merge code is renamed, Dropoff Notes(Transport Dropoff Notes).
Note:
Pre-existing templates require updates with new merge codes if previously referenced.You can edit the HTML source code for advanced control of the template layout.
For further details on template configuration, refer to Configuring Electronic Registration Card Templates
Integrations
New Dashboard Tile for OXI Queue Monitoring
The OXI Interface Status Dashboard tile is available for monitoring the OXI message queue for a specific OXI interface.
You can add multiple instances of the tile to your dashboard when multiple OXI interfaces are active at your property.
For both message downloads and uploads, the queue indicates: successful, successful with warning, or failed for all messages currently in the queue (based on the OXI purge setting).
To view the tile on your dashboard, you must have the View OXI Interface Status Tile user task assign to your role(s).
When your user is initialized to a property location, you can add and configure the tiles for all the interfaces configured under Exchange. The property code is internally defaulted.
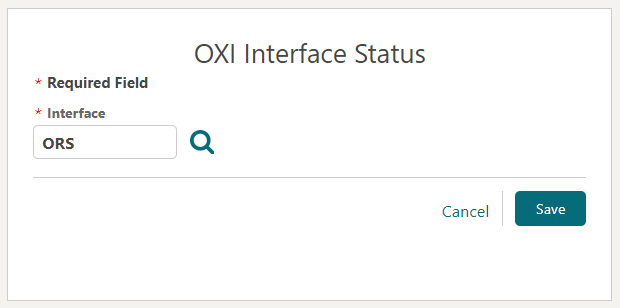
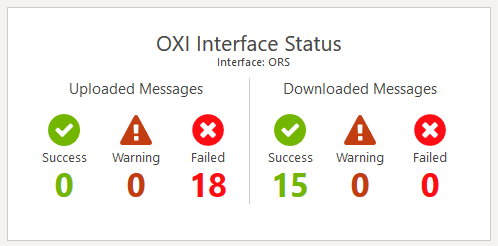
When your user is initialized to a Hub location (multi-property), you can add and configure the tiles for properties and interfaces configured under Exchange.
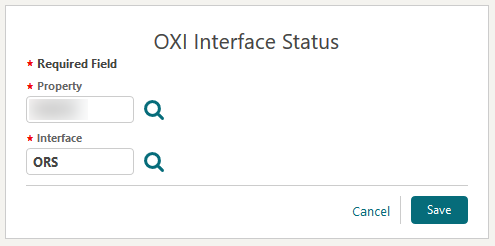

STEPS TO ENABLE
-
From the Role Manager menu, select Role Manager.
-
Select Manage Chain Roles or Manage Property Rolesaccording to your needs.
-
Search and edit the role(s) to grant for access to the View OXI Interface Status tile.
-
Select the General group and grant the task: View OXI Interface Status Tile.
-
Click Save.
Number Masking Added for Property Interfaces
Number Masking is introduced in the Postings panel of interfaces such as PBX, VID, CAS, MBS, WWW, MSC, and VMS. You can now decide whether to hide a dialed number in the supplement or reference fields.
You can configure the interfaces to mask the dialed numbers for single or multiple lines.
Multiple masking options are available for you to select: No Masking, Masking per room, Last 2 Digits, Last 4 Digits, 4 Digits before Last 2, All except first 2, and Mask All.

Scan ID Documents Using Desktop Scanner
With an active ID Document scanning service (OPP_IDS), you can configure and enable scanning of identification documents using a validated partner scanning solution.
ID scanning is available in the Identification panel of a guest profile and also as part of the reservation check-in steps.
After completing an ID scan, you are presented with a profile comparison screen enabling you to retain or overwrite existing values obtained from the OCR scan.
In addition to the optical character recognition capture, ID scanning can capture a secure image of the identification and save it as an attachment on the profile.
Related Link
Scan ID Documents Using Tablet Camera
With an active ID Document scanning service (OPP_IDS) and integration with a validated mobile ID scanning partner, you can use the camera on a tablet device to capture an image of a guest's identification and transmit the image to an identification scanning partner.
The partner solution can then process the image and send the identification data back to OPERA Cloud.
After completing an identification scan, you are presented with a profile comparison screen allowing you to retain or overwrite existing values obtained from the scan of the identification document.
Identification scanning is available in the Identification panel of a guest and contact profile and also as part of the reservation check-in steps.
In addition to optical character recognition capture, ID scanning can also save the encrypted image as an attachment on the profile.
Related Link
Send Queue Room Information By IFC8 Notification
The Enable with Queue Room option is available in the Class of Service panel of the Property Interface Configuration. The check box appears when the Queue Room function is active at your property.
When this feature is enabled, placing a guest reservation with a room number assigned on Queue generates a Guest In message to the Vendor Interface System for the room/reservation.
Checking in the room reservation still generates the expected Guest In message.
The vendor system is expected to handle the logic of the Queue Room functionality from the Check In functionality.

Miscellaneous
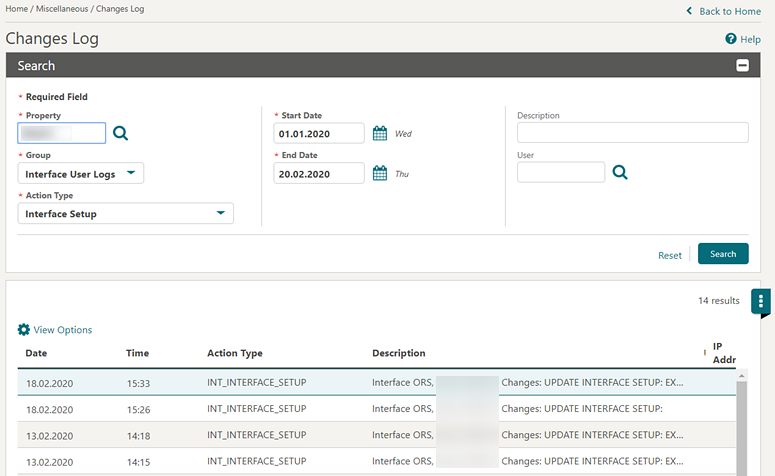
Changes Log Updated for Interface Action Types
The Changes Log is updated with Action Types for the Interface User Logs group, which allows you to view the changes log for interface configuration changes.
The changes logs help you review and understand if any system inconsistencies occur due to interface configuration changes.
-
Interface Setup: shows all user activities such as New, Edit, and Delete actions on the Interface Setup screen.
-
Interface Communication Method: shows all user activities such as New, Edit, and Delete actions on the Communication Method screen.
-
OXI Subscription Activation: shows all user activities such as activation and deactivation OXI subscriptions on the OPERA OXI: Add-on subscription screen at the property level.
-
External System Activation shows all user activities such as Activation and Deactivation External System actions on the External System screen.
Identity Management Link Added to Side Menu
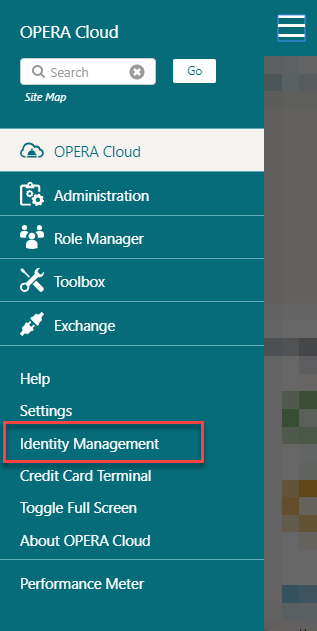
An Identity Management link is added to the side menu. When you click the link, a new browser tab opens to Oracle Identify Management to update your user profile and password. Getting Started Changing Your Password
Multi-tenant Enterprise Admin User Introduced
An Enterprise User Hierarchy is introduced to enable administrators and other users who need to log into multiple chains and/or properties in different chains to use one user login rather than maintaining a login for each tenant (chain). All chains and properties of the larger Enterprise are then linked to the one common parent organization: the Enterprise Level.
While the user is on the Enterprise Level, access to the individual chains/properties is controlled by granting the respective chain/property role. So, one Enterprise user might be granted access to chains belonging to the parent organization, while another is given access to only selected chains in the organization.
The Enterprise organization can be linked to multiple tenants (chains) in different OPERA Cloud and OPERA 5 environments (Dedicated/multi-tenant) as long as they are managed within the same Shared Security Domain.
The Enterprise Admin user can create users at the enterprise level and associate them with a group of chain or property roles. A non-admin Enterprise user needs to request access to chain and property roles as would any other level user. Users can see and request all, but the respective chain and/or property admin need to approve the access.
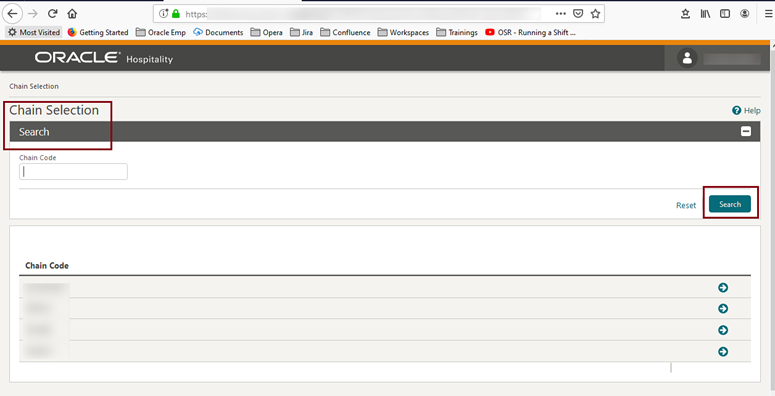
As an Enterprise user with access to multiple tenants (chains), you are presented with a tenant (chain) selection screen when logging in to OPERA Cloud. For logging in to OPERA 5, you will first access the OPERA 5 Portal and then use the familiar OPERA 5 screen to select the respective property you want to access.
You can log out from the chain selection screen. You can find the log out option by clicking the user name that appears above the OPERA Cloud menu bar at the top-right corner.

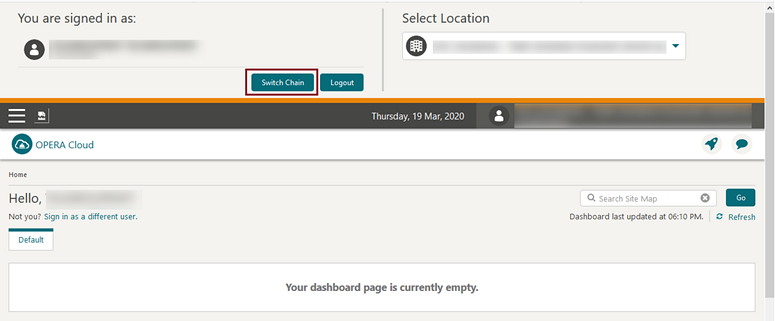
You can switch to a different tenant (chain) by clicking the user name that appears above the OPERA Cloud menu bar. By clicking Switch Chain, you are taken back to the chain selection screen.
Multiple Browser Tab Support Added
You can open OPERA Cloud in multiple tabs in the same browser using the browser’s duplicate or new/add tab functionality.
Session time out is handled gracefully for each new tab without impact on the active tabs:
-
The session is kept alive in all tabs as long as you are active in one of the tabs.
-
If you become idle, then all tabs receive the two minute popup warning that the session is about to expire.
-
If you still remain idle, all tabs will show the Session Expired popup.

New Tasks Control Access to Generic Tiles
-
View Custom Content Tile
-
View Image Gallery Tile
Behavior in OPERA Cloud:
-
With the Edit Dashboard user task assigned to your roles, you can see all dashboard tiles and can add/remove/arrange tiles on your dashboard.
-
Without the Edit Dashboard user task assigned to your roles, you can only view the Event tiles in the OPERA Cloud dashboard with the View Events Tile user task granted to your role.
-
With the Image Management <Specific Image Type> user task assigned to your role, you can access the Manage Images link for the selected image type from the Image Gallery > Setup screen.
-
Without the Image Management <Specific Image Type> user task assigned to your role, you can select the image type from the list in the Image Gallery > Setup screen, but you do not have access to Manage Images.
Side Menu Links Appear Based on Tasks Assigned to Roles
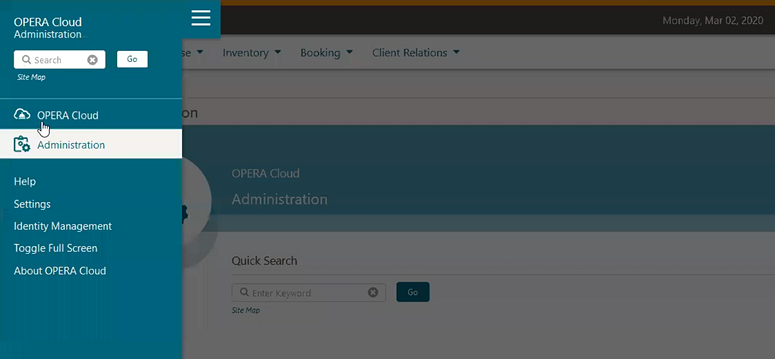
The OPERA Cloud side menu is updated so that links are removed for options that your roles and assigned tasks do not permit access.
For example, if your assigned roles have no administration or toolbox related tasks granted, you cannot see the Administration or Toolbox menu links in the side menu.
Note:
Users with no application tasks granted to their roles still see a link for OPERA Cloud, but no application menu appears after initializing.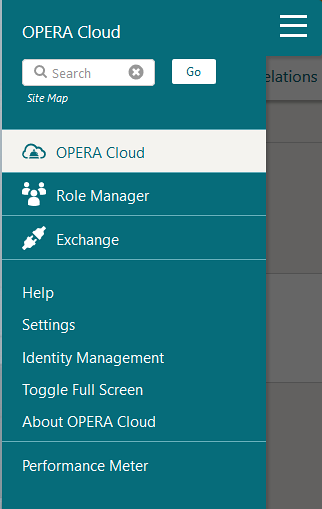
Reports
Ability Added to Email Reports and Stationery to Multiple Recipients
You can email reports and stationery to multiple recipients by separating email addresses with a comma (,) or a semi-colon (;).
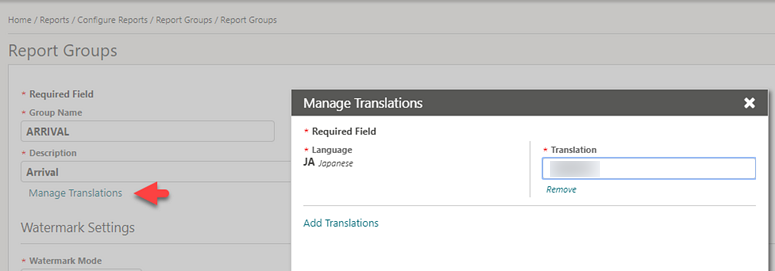
Manage Translation Added to Report Groups
You can translate Report Group descriptions using the Manage Translations link in the Report Groups configuration.
In Run Reports, the report group list displays the translated description based on the language selected in your user profile.
Report Group Configuration Updated
You can only configure Report Groups chain wide (globally); the Global/Property radio button options are removed regardless of whether you set your location to Hub or Property.
If you create a Report Group at the Hub level, it is visible only when you are logged in at the Hub level. If you create the Report Group when logged in at the property level, it is visible for all properties in the chain.
Update Logo Image for Reports and Stationery
You can upload a logo image to output on reports and stationery.
After you upload an image, all reports and stationery display the logo in the location specified in the stationery template.
Refer to Image Management.
Reservations
Advanced (Derived) Daily Rates Added
The Advanced Daily Rates rate management function is available in OPERA Controls and extends the existing Daily Rate functionality.
An Advanced (Derived) Daily Rate behaves like a regular Daily Rate with the exception that the pricing schedule is derived from a source rate — an Advanced Daily Base Rate — rather than by manually entering a pricing schedule.
With the Advanced Daily Rate function enabled, you can create the following two kinds of rate codes:
-
Advanced Daily Base Rates. These are configured like regular daily rates, however, the pricing schedule in the Advanced Daily Base Rate rate code is used as the source of the pricing schedule for one or multiple Advanced Daily Rates.
-
Advanced Daily Rates. This is a daily rate code type configured to derive its pricing schedule from the source, the Advanced Daily Base Rate rate code.
STEPS TO ENABLE
-
From the Administration menu, select Enterprise, and then select OPERA Controls.
-
Select or confirm the Property.
-
Select the Rate Management group.
-
Activate the Advanced Daily Rates function (note: the Daily Rates function must already be active).
Arrival Date Setting Added for Look to Book
The LTB Arrival Date Handling setting in the Look To Book Sales Screen group of OPERA Controls replaces the property level parameter. This setting allows you to specify the default arrival date in the Look To Book (LTB) sales screen reservation creation process.
-
ALWAYS POPULATE (arrival date populates with business date of the property on LTB)
-
DEFAULT TO BLANK (arrival date is always blank on LTB for the property)
For multi-property and central reservation operations, the LTB Arrival Date Handling for Hub setting is added and available in Hub controls.
Note:
This setting is delivered enabled with Same as Property setting value.-
ALWAYS POPULATE (arrival date populates with the business date of the selected property)
-
DEFAULT TO BLANK (arrival date is always blank on LTB for all properties)
-
SAME AS PROPERTY SETTING (arrival date looks at the property setting and appears accordingly on the LTB view after a property is selected)
The available options display the following information when the property selection on the LTB screen is:
-
ALWAYS POPULATE > (PROPERTY DATE)
-
DEFAULT TO BLANK > (BLANK)
-
SAME AS PROPERTY SETTING > depending on the property parameter setting – either (PROPERTY DATE) or (BLANK)
-
ALWAYS POPULATE > (HUB DATE)
-
DEFAULT TO BLANK > (BLANK)
-
SAME AS PROPERTY SETTING > (BLANK)
Dynamic Rate Discounting Feature Added
A global Advanced Discount Reasons Reservations function is added to OPERA controls. When enabled, it can dynamically calculate a rate discount amount for inhouse reservations.
When enabled, you can configure rules to dynamically calculate a rate discount amount for in-house reservations. The discount rules are defined for occupancy ranges you specify and the discount calculated based on % of Average Daily Rate (ADR).
-
Discount Reason configuration is updated with an Advanced check box that enables you to configure the occupancy range calculation rules.
-
Advanced Discount Reasons are then referenced in Auto Attach Elements configuration.
-
Advanced Discount Reasons are not available for selection and are used directly on reservations.
-
New reservations created in OPERA Cloud Look to Book or received from an integrated solution, such as a central reservation system (CRS) or website, are updated by the auto-attach elements functionality; eligible reservations have the advanced discount reason added (attached).
-
The Discount Amount and Discount Percentage fields on the reservation are null (as the discount is calculated dynamically) and disabled.
-
The Advanced Discount Reason Calculations Rule configuration is referenced by the Post Room & Tax, End of Day procedure to calculate and apply the rate discounts to reservations.
Note:
In order to configure and use Advanced Discounting, you must enable the Reservation Discounts and Reservation Auto Attach Elements controls at your property.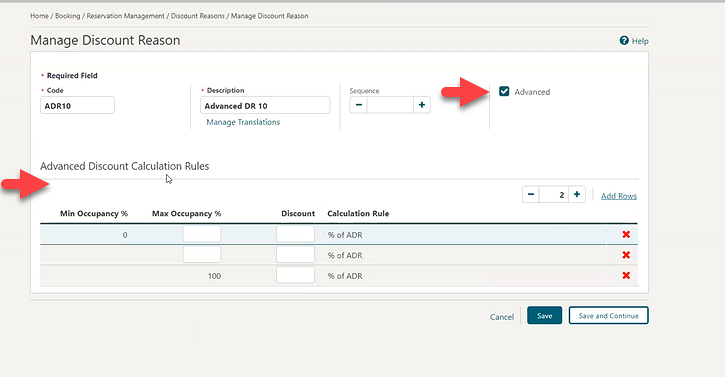
Updated Auto Attach Elements Configuration
Auto Attach Elements is updated with the ability to configure rules to attach Advance Discount Reason codes based on membership, preference, rate code, room type, and specials.

Updated End of Day Procedure
The Post Room & Tax end of day procedure is updated to reference the ADR and the Advanced Discount Reasons calculation rules for calculating the discount amount to be applied to each reservation based on the advanced discount reason set in the reservation Discount Reason field. The amount to be posted considers all Non-Advanced Discount Reason Reservations to calculate the amount of ADR to post to guest reservations.
Room Rate Posting
The Room Rate Posting posts the % of ADR on all guest reservations with an Advance Discount Reason attached. The amount of the posting depends on the configuration of the Advance Discount Reason and the previous night’s occupancy.
IMPACT OR OTHER CONSIDERATIONS
-
Review the rate code configuration and ensure applicable rate codes are configured as eligible for discount; the discount(able) check box is available in the Financials panel.
-
The Reservation with Discounts Report lists reservations with the discount applied using Advanced Discounts.
STEPS TO ENABLE
-
From the Administration menu, select Enterpriseand then select OPERA Controls.
-
Select or confirm the Property.
-
Select View Options and enable Global Controls.
-
Select the Reservations group.
-
Activate the Advanced Discount Reasons (global) function.
-
From the Role Manager menu, select Manage Chain Roles or Manage Property Roles according to your needs.
-
Search and edit the role(s) to be granted access to Advanced Discount configuration.
-
Click the Booking Admin task group and grant the Advanced Discount Reasons Configuration task in the Reservations Management section.
-
Click Save.
Total Cost of Stay Added to Book Now
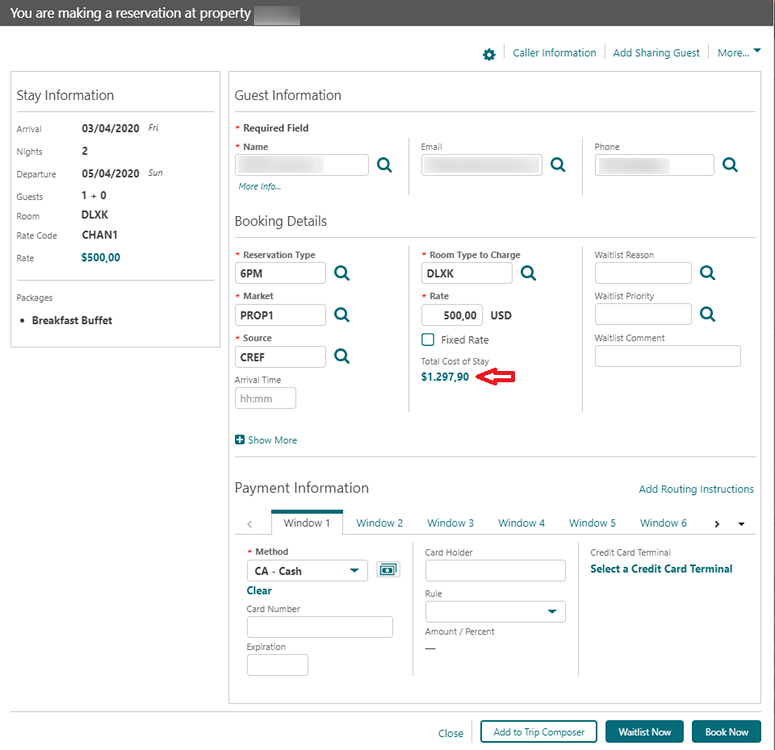
The Book Now screen is updated to display a Total Cost of Stay field to indicate the total cost including any add-to-rate package items.
The field appears by default. You can remove or update the field label using the page composer.
The Total Cost of Stay field appears as a hyperlink you can click to view the detailed rate information.
Role Manager
Changes Streamline Template Roles and Tasks
In an effort to streamline the role and task management, the following changes are implemented:
Removed General Parameter Enable Task Template At Property Level
The Enable Task Template at Property Level parameter serves as a control allowing a user with only a property role and relevant tasks to manage property role templates. Since property role templates can affect all properties in a chain, it is no longer possible to allow a property role administrator to manage the property role templates. It requires a chain role and corresponding tasks or the CHAIN_ORGID-ADMIN to manage those templates.
Manage Property Roles Template Task To Be Available Only for Chain Role
The Role Manager > Manage Property Roles Templates task, formerly available for both Property and Chain Roles, is now limited to Chain Roles only. Since managing property role templates can affect all properties in a chain, only administrators with chain-level access should be permitted to make modifications to the templates. The task is now unavailable for assignment to property roles and remains available only on chain roles.
Create Property Role From Existing Template Must Be Linked to Task
Property Roles are based off of Property Role Templates. When a Property Role for which a template exists is created in the Oracle Identity Manager, the administrator was required to have the Manage Property Roles Templates task to create the Property Role from an existing template. To allow more flexible workflows where a chain administrator would manage the templates and a property administrator would create property roles based off of templates as needed, these two actions are now decoupled: 1.) manage template roles and 2.) create a property roles from template. The administrator wanting to create a property role from a template now needs only the Manage Property Roles and Tasks.
Role Manager Tasks – Updates and Display of Internal Data Access Roles
-
Toolbox > Utilities > Data Management > Reset Data
-
Toolbox > Utilities > Data Management > Full Purge
-
Toolbox > Utilities > Data Management > Convert Production Data
-
Toolbox > Utilities > Data Management > Change Chain Mode
-
Toolbox > Utilities > Data Management > Property Login Control
-
Toolbox > Utilities > Data Management > Credit Card Vault Conversion
-
Toolbox > Utilities > Data Management > Change Property Code
-
Toolbox > Utilities > Data Management > Delete Property
-
Administration > Enterprise > OPERA Scheduler Administration > Enterprise
-
Role Manager > Migrate Users
-
Role Manager > Migrate All Users
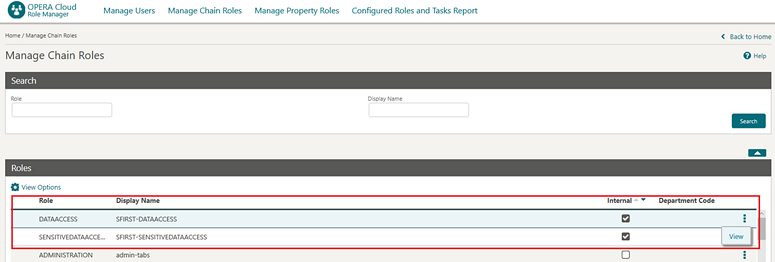
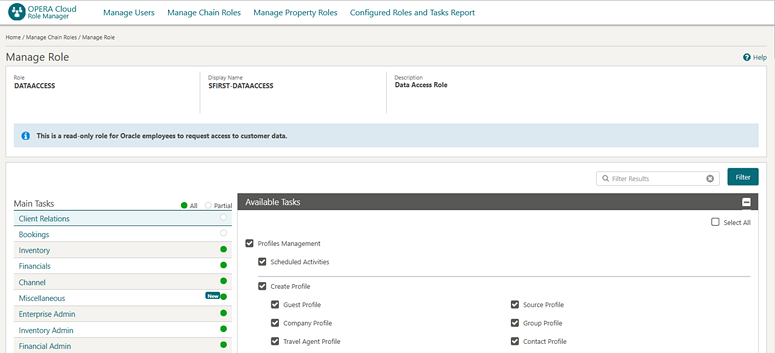
The following internal seeded roles are added to Role Manager > Manage Chain /Property Roles screens. These roles are read-only with a predefined set of tasks that you cannot modify. The roles are visible to all users with access to Manage Chain/Property Roles, however, Oracle employees can request them only to be granted customer data access. Depending on the role organization level, a chain or property administrator must approve requests for these roles. The administrator should review and update the duration for granting the requested role to an Oracle employee.
-
<ORG_ID>-DATAACCESS
-
This role includes all tasks visible in role manager with exception of tasks assigned to the SENSITIVEDATAACCESS role.
-
-
<ORG_ID>-SENSITIVEDATAACCESS
This role has the following tasks assigned:
-
Role Manager > Manage Users
-
Role Manager > Manage Chain Roles
-
Role Manager > Manage Property Roles
-
Role Manager > Manage Property Template Roles
-
Role Manager > Configured Roles and Tasks Report
-
Client Relations > Profile Management >Identification > View Identification Details
-
Bookings > Reservation Management > Payment Instructions > View Credit Card Details
-
-
Toolbox > System Setup > OPERA Licenses
-
Client Relations > Profile Management > Identification > View Identification Details
-
Bookings > Reservation Management > Payment Instructions > View Credit Card Details
-
Administration > Enterprise > OPERA Controls
-
Administration > Enterprise > Chain and Property Management > Hubs
-
Administration > Enterprise > Chain and Property Management > Properties
-
General > Dashboard Tiles > Edit Dashboard
-
Role Manager > Manage Users
-
Role Manager > Manage Chain Roles
-
Role Manager > Manage Property Roles
-
Role Manager > Manage Property Template Roles
-
Role Manager > Configured Roles and Tasks Report
Updates to tasks assigned to Property Administrator <PROPERTY_ORG_ID-ADMIN> role:
-
Toolbox > System Setup > OPERA Licenses
-
Client Relations > Profile Management > Identification > View Identification Details
-
Bookings > Reservation Management > Payment Instructions > View Credit Card Details
-
Administration > Enterprise > OPERA Controls
-
Administration > Enterprise > Chain and Property Management > Hubs
-
Administration > Enterprise > Chain and Property Management > Properties
-
General > Dashboard Tiles > Edit Dashboard
-
Role Manager > Manage Chain Roles
-
Role Manager > Manage Property Template Roles
-
Role Manager > Manage Users
-
Role Manager > Manage Property Roles
-
Role Manager > Configured Roles and Tasks Report
Rooms Management
Component Room Indicator Added to Manage Task Sheets and Task Companion
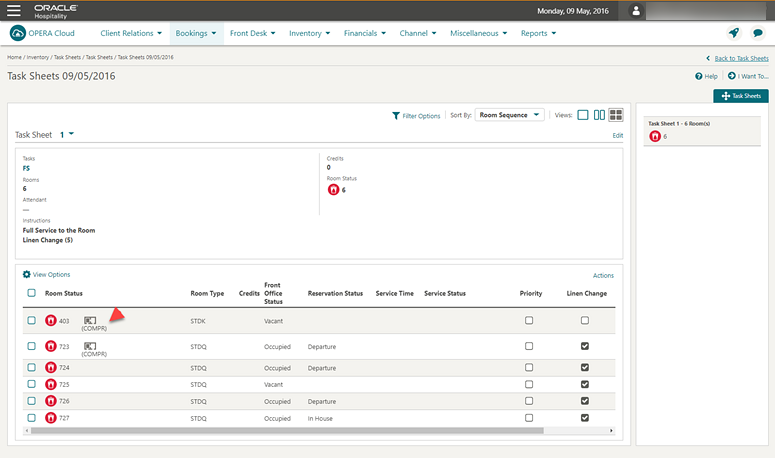
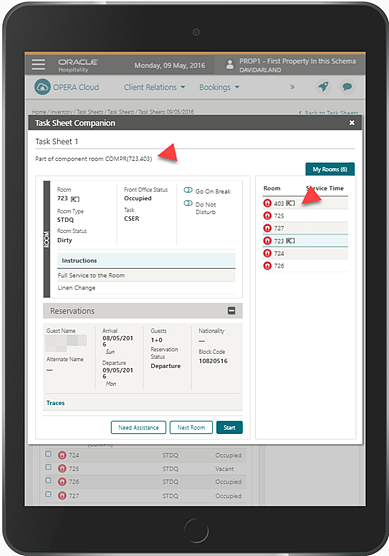
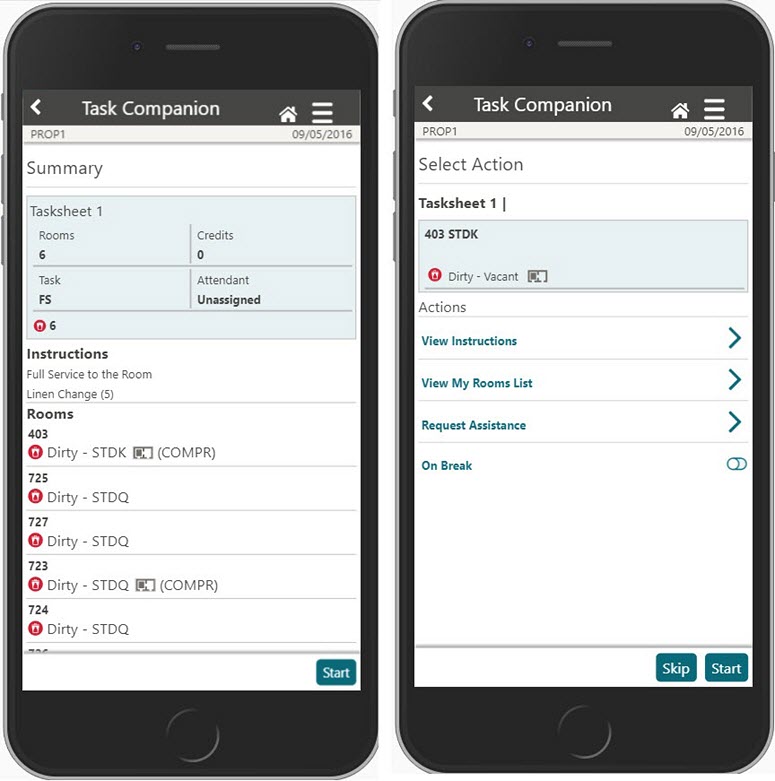
With the Component Suites control enabled, a component room indicator appears in Manage Task Sheets, Task Sheet Companion, and Mobile Task Companion. The component indicator identifies the component suite to which a room is a component.
The following screen shows the component room indicator in Manage Task Sheet:
The following shows the component room indicator in the Task Sheet Companion. When you click the indicator in the Room Section, rooms that are part of the selected component suite appear in the upper part of the screen.
The component room indicator in the Mobile Task Companion:
Sales
Ability to Delete Multiple Activities Added
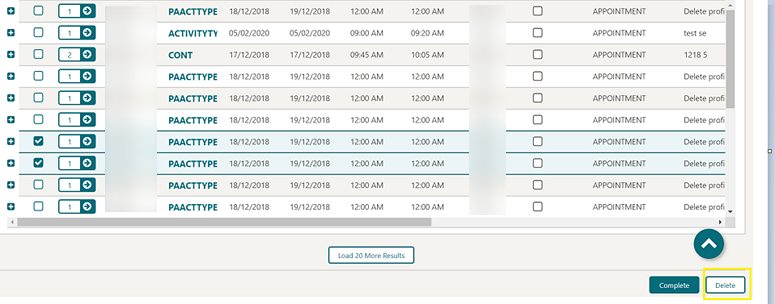
In OPERA Cloud Sales and Events, you can delete multiple Activities.
-
The button is enabled when one or more Activities are marked for selection.
-
The Delete Activity Task controls button visibility.
-
When you click the Delete button, a confirmation prompt appears. Selecting Yes deletes all selected activities.
Activity Trace Configuration Updated
When creating or editing the configuration of an Activity Trace Definition, the Activity Type list of values (LOV) is sorted by the sequence configured for the Activity Types.
After you select the Activity Type on Trace Definition, the Purpose field defaults to the Activity Type description.