1 Feature Summary
Column Definitions
| SMALL SCALE: These UI or process-based features are typically comprised of minor field, validation, or program changes. Therefore, the potential impact to users is minimal. |
| LARGER SCALE: These UI or process-based features have more complex designs. Therefore, the potential impact to users is higher. |
| CUSTOMER ACTION REQUIRED: You must take action before these features can be used. These features are delivered disabled and you choose if and when to enable them. |
Accounts Receivable
Manage Account Invoices Redesign
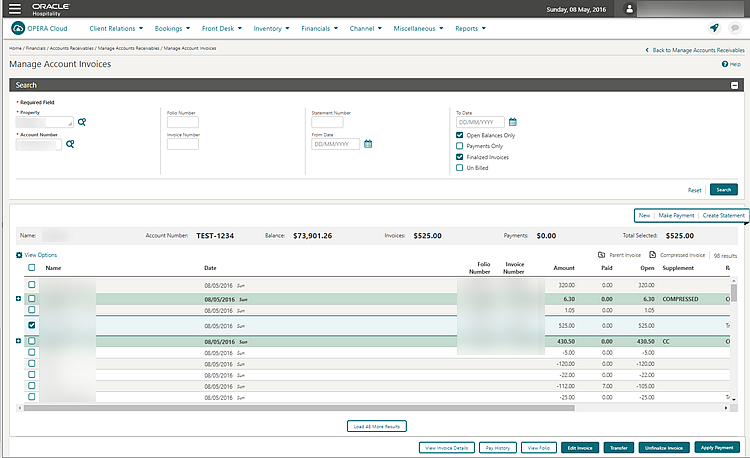
The Manage Account Invoices page is redesigned to improve usability.
-
When multiple AR accounts are selected in search results, you can select AR accounts from a panel that appears on the left side.
-
Actions are relocated to a persistent action bar at the bottom of the page. After selecting invoices or payments, the appropriate action buttons appear.
-
Icons are added to indicate compressed and parent invoices.
-
The Load More pagination feature is added to the Invoice panel.
Mandatory AR Account for Direct Bill Payment Added
The Mandatory AR Account setting for Direct Bill Payment is added to OPERA Controls.
-
If set to None: when creating or updating a reservation with a profile that has auto populate routing set and a payment method of Direct Bill (but no AR Account number exists on the profile), the Direct Bill payment method is correctly copied to the reservation.
-
If set to Reservation or Reservation/Check-In: when creating or updating a reservation with a profile that has auto populate routing set and a payment method of Direct Bill (but no AR Account number exists on the profile), the payment method is not copied to the reservation.
-
If set to Reservation/Check-In or to Check-In: when performing a check-in for a reservation with routing set and a payment method of Direct Bill (but no AR Account number exists for the selected profile), the check-in should not be allowed.
STEPS TO ENABLE
-
From the Administration menu, select Enterprise and then select OPERA Controls.
-
Select or confirm the Property where you want to enable this parameter.
-
Click the Accounts Receivable group and scroll to the Settings section.
-
Update the Mandatory AR Account for Direct Bill setting.
-
Click Save.
Block Management
Block Management Dashboard Tile User Task Added
A general user task View Block Overview Tile is added in Role Manager. The new task is granted by default to all roles.
Behavior in OPERA Cloud:
-
With the Edit Dashboard user task assigned to your roles, you see all dashboard tiles in OPERA Cloud and you can add/remove and arrange tiles on your dashboard.
-
Without the Edit Dashboard user task assigned to your roles, you only view the Block tiles in the OPERA Cloud dashboard with the View Block Overview Tile user task granted to your role.
-
With the Manage Blocks user task assigned to your role, you can interact with the Block tiles if the tile has drill-down capability.
-
Without the Manage Blocks user task assigned to your role, you can only view the Block tiles. Even if the tile has drill-down capability, you cannot interact with the tile.
Block Search Usability
The Block search screen is modified to improve usability.
-
The modification also apply to Reservation and Front Desk search screens. Reservation/Front Desk Search Usability
-
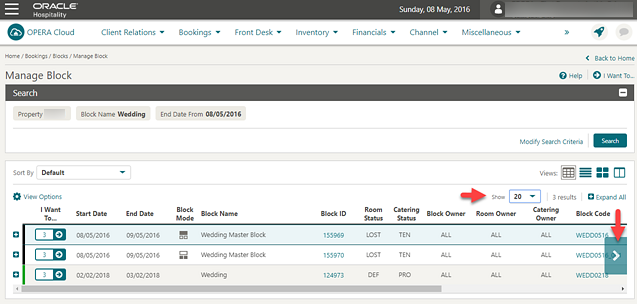
The Load More functionality is replaced by pagination controls with page numbers and previous/next links.
-
A page size selection is added enabling you to select the number records you want displayed per page. The available values for the Show list are 20, 50, 100, 200.
-
Your selection for Show are saved per screen, so when you return to the same screen and perform a search, OPERA Cloud displays the same number of results per page.
Note:
All Reservation and Front Desk search screens are considered variations of the reservation search with different pre-selected criteria. Therefore, any selection in one of these screens will apply to all reservation search screens. -
Removed the capped height on table and list view. The displayed row count automatically adjusts based on the size of the browser.
-
Removed the inner vertical scroll bar on the search results table.
-
Added a floating left and right scroll buttons along the sides of the search results in table view, which allows you to scroll horizontally when focused anywhere in the table.
Control Block Locally Check Box Available in Page Composer Customization
You can add the Control Block Locally check box, Create Block, or Manage Block (Block Details) screens through Page Composer. The check box value is only used in communication with a central reservation system and does not have any impact on the block behavior in OPERA Cloud.
STEPS TO ENABLE
-
Enable Page Composer at the property/hub or chain level, as required.
-
From the OPERA Cloud menu, select Bookings, select Blocks, and then select Manage Block.
-
Search for a block and the launch block presentation page by clicking the block name.
-
Select the gear icon to customize the Block Details panel.
-
Add the Control Block Locally field in the desired locations.
-
Click Save.
-
Click I Want To and select Create Block.
-
Select the gear icon to customize the Block Definition panel.
-
Add the Control Block Locally field in the desired location.
-
Click Save.
-
Disable Page Composer from the settings menu.
Manage Reservations Action Link Added
A Manage Reservations action link is now available in the I Want To menu on all blocks, enabling access to PM reservations as soon as they are created.
Name Validation in Rooming List Parameter Added
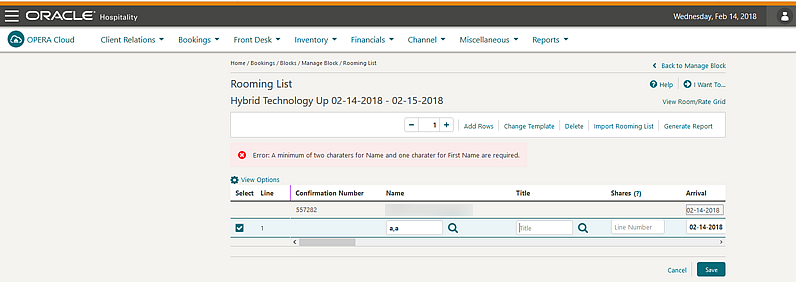
A Block parameter, Name Validation in Rooming List is added to OPERA Controls.
When enabled, the first and last name entries in the group rooming list require a minimum number of alpha-numeric characters. The Lastname requires two characters; the firstname requires one character.
When disabled, name field entries are not validated.
STEPS TO ENABLE
-
From the Administration menu, select Enterprise and then select OPERA Controls.
-
Select or confirm the Property where you want to enable the parameter.
-
Click the Block group and scroll to the parameters section.
-
Enable the Name Validation in Rooming List parameter.
New Defaults When Creating Blocks
-
When creating a block from Account Profile > I Want To > Create Block, the account is defaulted as a linked profile on the Create Block screen.
-
When creating a block from Contact Profile > I Want To > Create Block, the contact and its primary account (if one exists) ares defaulted as a linked profile on the Create Block screen.
Rooming List Additional Import Fields
Rooming list entry and import are enhanced by the addition of the following fields: VIP; Language; Alternate Name; Alternate Name Language; Accompanying Guest based on the OPERA Controls active at your property.
You can include multiple accompanying guest names in an import from an Excel file using a pipe delimiter between names in the worksheet column, for example: Accompanying Guest Lastname1, Accompanying Guest Firstname1 | Accompanying Guest Lastname2, Accompanying Guest Firstname2 | and so on.
Cashiering and Financials
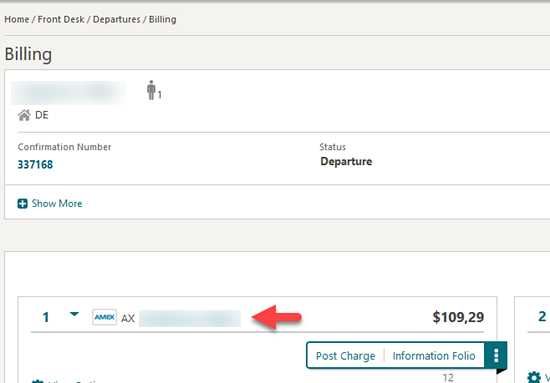
Billing Adds Hyperlinks to Profiles
The Billing page is updated to display the profile name as a hyperlink in each folio window. When you select the link, the Profile Presentation page opens and allows you to update the profile.
After saving your updates, select the Back to Billing link to return to the Billing page.

Cashier Closure Redesigned
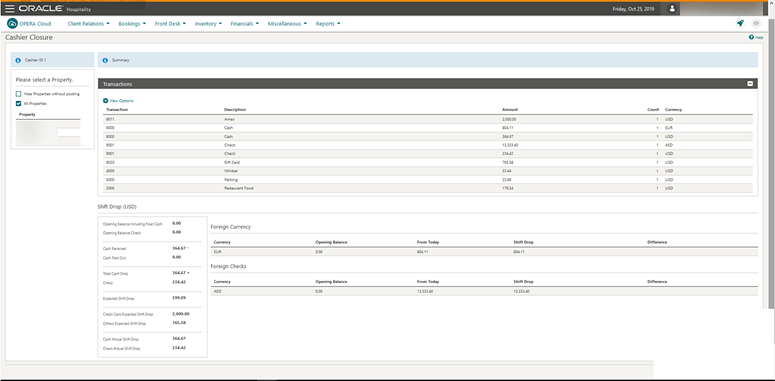
The Cashier Closure screen is redesigned to improve usability and to provide you with additional details related to transaction audit and shift drop.
The layout is modified into various sections related to local and foreign currency, as well as a summary section and individual property selection enabling you to clearly view and audit transaction details per property.
When you select the All Properties check box, the summary section displays the transaction code with a hyperlink that enables you to display a detailed list of postings made to the selected transaction code.
The Close Cashier button is enabled only when you select the All Properties check box.
With the All Properties check box deselected, you can enter shift drop amounts for each property.
Select the Hide Properties check box to hide properties where your cashier did not make any postings.
When closing the cashier ID from a hub location, a property selection screen appears and acts as the logged-in property for that cashier closure session.
When the actual shift drop is over or short for any property, a caution symbol appears next to that property in the list.
Cashier Closure reports are available for printing or emailing when you click the Close Cashier button.
Change Payments and Charges User Task Renamed
Note:
Cashiers with task assigned based on their roles are able to edit price and quantity for same-day charges posted in reservation billing.Custom Reference Numbers on Folios
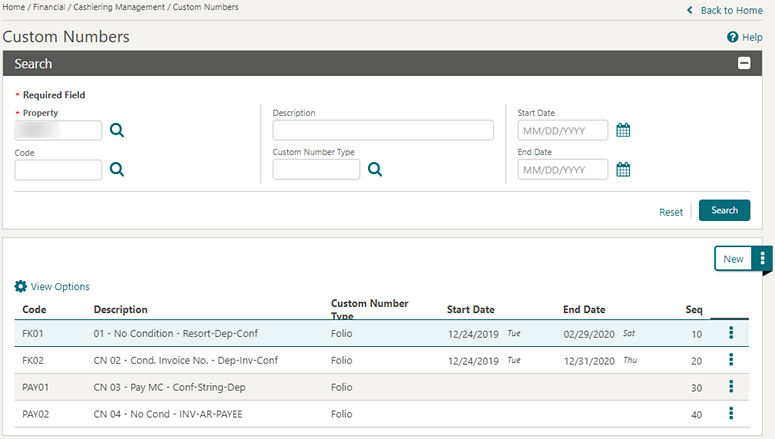
A Custom Number, Cashier parameter is added to OPERA Cloud controls. The parameter enables you to configure a calculation formula and condition to generate, store, and output custom reference number(s) on Billing, Post-It, Passer By, and Accounts Receivables folios.
-
You can use Custom Numbers for tracking purposes to comply with national, regional, or local requirements.
-
Custom Numbers can contain attributes from profiles, reservations, property, and folios.
-
Custom Number configuration is available under the Administration > Financial > Cashiering Management menu option.
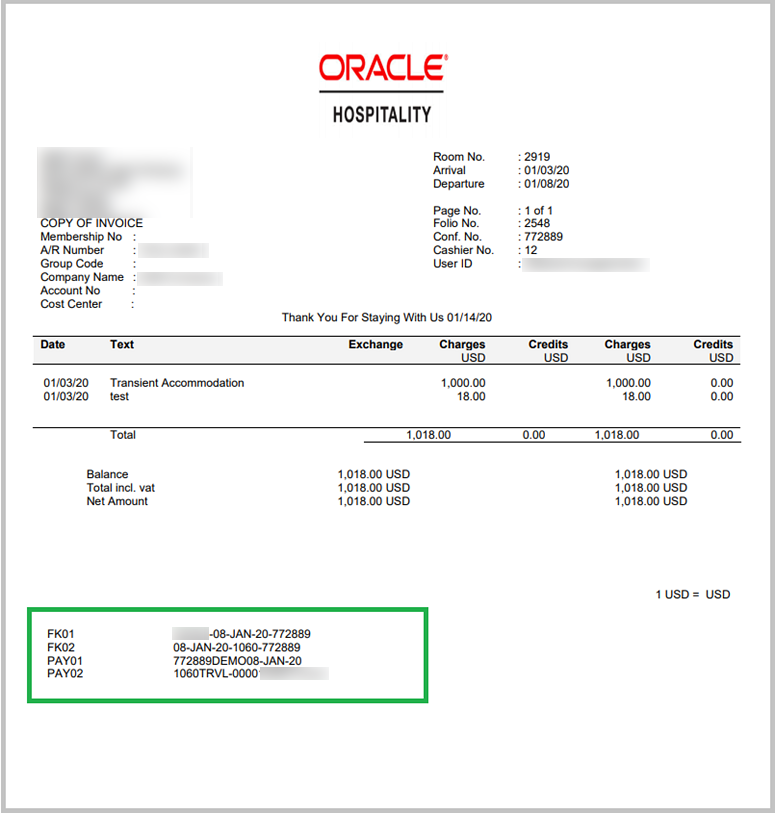
Stored Custom Number(s) are available in the Back Office Export view, EXP_BOF_CITYLED_RECORDS, with five separate columns for Custom_number1, Custom_number2, Custom_number3, Custom_number4, and Custom_number5. An additional Custom_Numbers column with all stored custom numbers is available in a comma delimited string.
STEPS TO ENABLE
-
From the Administration menu, select Enterprise and then select OPERA Controls.
-
Select or confirm the Property where you want to enable the parameter.
-
Click the Cashiering group and scroll to the parameters section.
-
Enable the Custom Numbers parameter.
-
From the Administration menu, select Role Manager.
-
Search and edit the Chain and/or Property Role(s) to be granted access to Custom Numbers configuration.
-
Click the Financial Admin group, scroll to the Custom Numbers section, and grant these tasks: Custom Numbers, New/Edit Custom Numbers, Delete Custom Numbers as required.
-
Click Save.
-
Update the layout of your customized folio (Guest/AR/POST-IT/Passerby) by downloading the latest sample_folio.xml and adding the Custom_Number field to the footer section in your customized folio template(s).
-
Download the latest sample_folio.xml.
-
Download your customized folio template.
-
Load the sample_folio XML for the Word template.
-
Add the Custom_Number field to the footer section in your customized folio template.
-
Save changes to the Word template.
-
Upload the modified stationery template.
-
Refer to Stationery Editor.
-
Fiscal Folio Printing Areas Extended
For properties with the Fiscal Folio Printing parameter active, the fiscal folio printing workflow is available in additional areas when settlement is posted using a payment type selected in the Fiscal Folio Payment Types setting of OPERA Controls.
-
Post It / Passer-By
-
AR Invoice
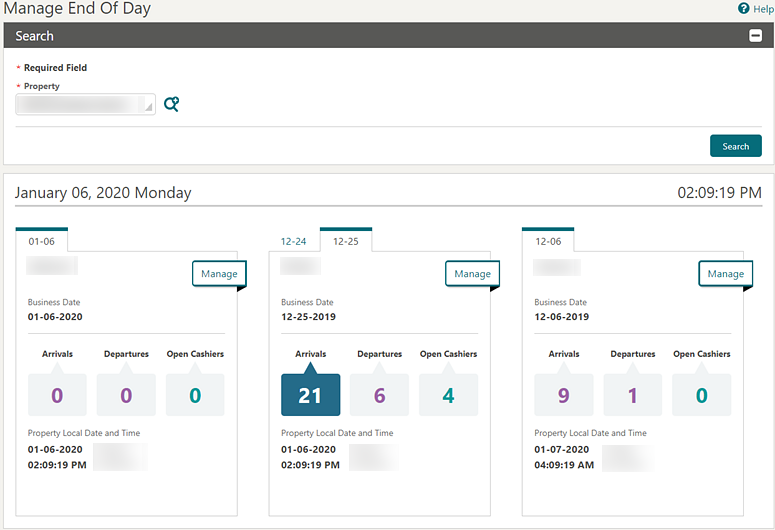
Manage End Of Day Redesigned
The Manage End Of Day screens is redesigned to improve usability.
The search results area displays a tile design, providing you with links for direct access to Arrivals and Departures.
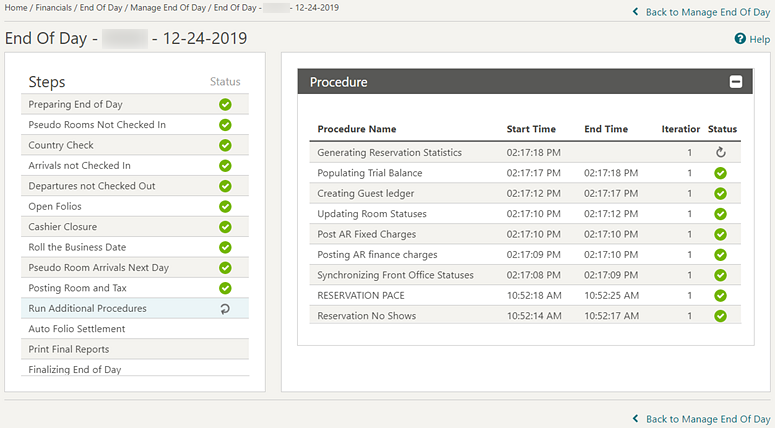
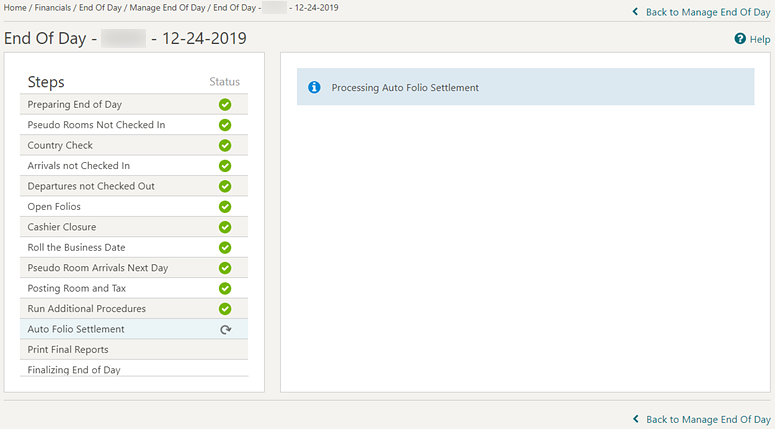
The End Of Day procedure processing screen displays as a table to show you the progress and status of each step; any information messages appear in the processing area.
Post-It / Charge-It Redesigned
-
Post-It / Charge-It is redesigned to improve usability on desktops and tablets.
-
The page adapts to the device resolution and adjusts the layout as required.
-
The payment page appears as a pop-up with easier reservation search for room charge settlement.

Reservation Check Out Enhancements
Reservation check out processing is modified to provide the following usability enhancements:
-
Early check out displays a simplified confirmation message in a pop-up page.
-
Advance Bill is renamed to Advanced Folio and displays a pop-up to select the duration. If an Advance Bill for all nights was previously posted, and you select the Advance Bill option, only a Continue button is available.
-
For Interim Folio, the Folio Settlement pop-up appears for continuing with settlement.
-
The payment posting screens from Credit Bill, Deposit, and Billing are redesigned to improve usability.
-
For Quick Check Out, the Folio Settlement pop-up screen appears for each reservation selected. Reservation alerts are presented, and then settlement is processed for each billing window on the reservation before continuing with the next reservation. The top area of the Folio Settlement page displays the guest name and room number of the reservation currently being processed.
-
The Folio settlement pop-up screen is implemented when performing Check Out, Early Check Out, and Close Folio from the list of reservations -> I Want To . . . option, reservation presentation from -> I Want To . . . option, Billing -> I Want To . . . option.
-
If Generate Zero Bill is active, only the Settle and Send Folio button is available for a billing window having a zero balance and no transactions without a bill number. Selecting the button prompts you for a Zero Bill printing. After printing the folio, the Settle and Send Folio button become disabled for that session. You can continue to select other zero balance windows, and the Settle and Send Folio or Settle Folio buttons appear based on the transactions in that window.
Client Relations
Anonymize Feature Available for Contact Profiles
The Profile Anonymize feature is now available for Contact profiles.This is available for users that have the PROFILES > ANONYMIZE PROFILE user task for their roles. The feature uses data anonymization to encrypt or remove a guest’s personal information from the database so the guest can remain anonymous.
The scheduled procedure, Anonymize Profile Information, is available from the menu Utilities > Utilities > OPERA Scheduler in the Profile group. The routine anonymizes sensitive data on the requested profiles. When scheduled, the procedure attempts to anonymize all profiles with the status of Anonymization Requested.
When the Profile Mailing Privacy function is active, the Privacy screen prompts you when a new guest or contact profile is created. The prompt gives you an option to select privacy options for the specific profile being created.
Privacy options are now available in Registration card and Confirmation letter, which capture the privacy options selected on profile level.

Application Parameters Control Profile Level Restriction
Two new Application parameters are available in OPERA Cloud to control profile level restriction:
-
Membership Profile Update restriction: ability to control profiles with a membership.
-
Bypass Corp Id Validation: ability to bypass Corp Id validation for a Company profile.
Note:
Corp ID validation is tied to the IATA Validation parameter when turned on. OPERA Cloud validates Corp ID to exactly 9 digits.STEPS TO ENABLE
-
From the Administration menu, select Enterprise and then select OPERA Controls.
-
Select or confirm the Property where you want to enable the parameter.
-
Click the Membership group and scroll to the Parameter section.
-
Select Member Profile Update restriction.
-
Click the Profile group and scroll to the Parameter section.
-
Select Bypass Corp Id Validation.
Business ID / Business Registration Code Fields Available with Page Composer Customization
Business ID and Business Registration Code fields are available generically for display in the Profile Details panel. These fields are available for all profile types.
Property Business ID and Business Registration Code fields are also exposed generically in the Localization panel of Properties configuration.
STEPS TO ENABLE
-
Enable Page Composer at the property/hub or chain level, as required.
-
From the OPERA Cloud menu, select Client Relations, select Profiles, and then select Manage Profiles.
-
Search for a profile (per type) and launch the Profile presentation page by clicking the profile name.
-
Select the gear icon to customize the Profile Details panel.
-
Add the Business ID and Business Registration Code fields in the desired locations.
-
Click Save.
-
Disable Page Composer from the settings menu.
BI-Publisher Profile Data Porting Report Available
-
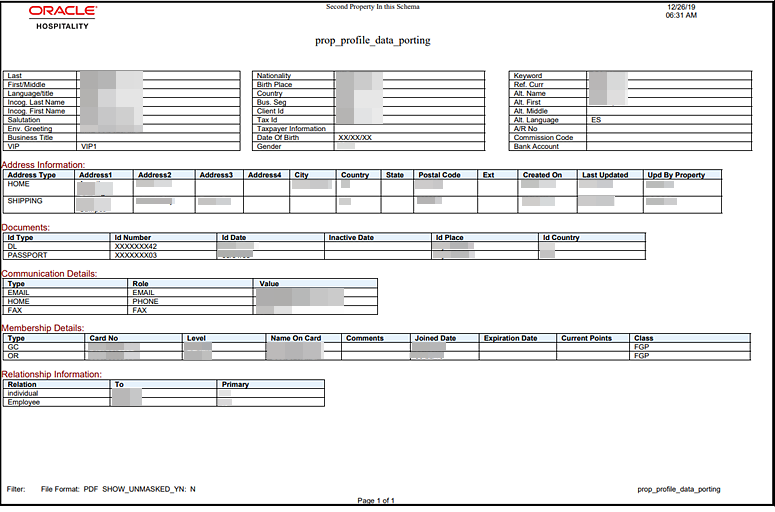
A new BI-Publisher Profile Data Porting report is added to OPERA Cloud for capturing all profile details and providing guests with their data by email when requested.
-
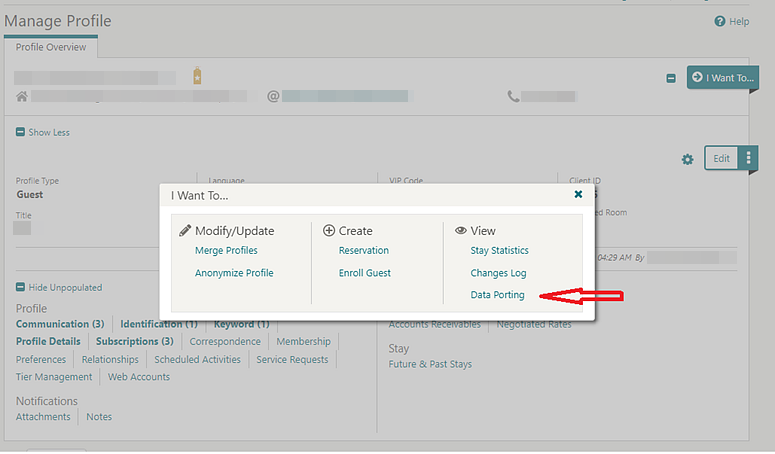
The Data Porting report is available at the Profile level, and you can generate the Data Porting report from Profile -> I Want To -> Data Porting.
Commissions
Ability to Restrict Profile Updates Linked with Commission Payment Type
Two commission settings are added to OPERA Controls to restrict updates to Travel Agent or Source profile names when the profile is associated with the selected commission payment types.
In the Manage Commission screen of a commission bank account (Financials > Commissions> Bank Account > Go to Commissions), you cannot attach or detach reservations if that bank account uses the commission payment type selected in the settings.
When a Travel Agent/Source Profile is restricted for name updates, you cannot merge the profile with another profile.
STEPS TO ENABLE
-
From the Administration menu, select Enterprise and then select OPERA Controls.
-
Select or confirm the Property where you want to enable the parameter.
-
Click the Commissions group and scroll to the settings section.
-
Select Profile Update Restricted Commission Payment Types setting; select the commission payment type(s) to be considered for the Profile Update Restriction. You can select the commission payment types CENT/CHECK/EFT.
-
Select Profile Update Restricted Reservation Status setting; select the Reservation Status(es) to be considered for the Profile Update Restriction. You can select the Reservation Status(es) DUE OUT/IN HOUSE/CHECKED IN.
Country Specific
Country Specific - FIJI - Device Value Field Added to Fiscal Terminal Configuration
The following functionality is generically available, but should be reviewed by properties in Fiji.
A Device Value field is added on the Fiscal Terminal screen. Data entered into this field is included in the Universal Payload. Prerequisite: OPERA Controls > Cashiering > 'FISCAL_FOLIO_PRINTING' = ON; Child Parameter: Fiscal_Service_Terminal = ON.
Refer to: Oracle Hospitality Localization Center for Hotel; Fiji - under OPERA Cloud Solutions: OPERA Cloud Solution: OPERA Cloud Fiscal Master Data Document (Doc ID 2632394.1).
Country Specific - India - Currency Limits Functionality
Currency Limits functionality is generically available, but should be reviewed by properties in India. This functionality allows you to set a limit for all cash payment transactions. The option to set limits for each foreign or local guest is available per transaction amount, daily amount (cumulative), and monthly amount (cumulative).
Refer to: Oracle Hospitality Localization Center for Hotel; India - under OPERA Cloud Solutions: OPERA Cloud Fiscal Master Data Document (Doc ID 2623459.1).
Country Specific - Japan - Beppu Onsen Consumption Tax (OCT) Function Updated
The following functionality is generically available, but should be reviewed by properties in Japan.
To meet legal requirements of charging Beppu Onsen Tax and to be compliant with municipal tax laws, a new package function, JAPAN_GENERIC_TAX_UDF, is introduced to handle the tax amounts.
Refer to: Oracle Hospitality Localization Center for Hotel; Japan - under OPERA Cloud Solutions: OPERA Cloud Fiscal Master Data Document (Doc ID 2560520.1).
Country Specific - Japan - Fukuoka Accommodation Tax Package Function
Functionality for Fukuoka Accommodation Tax is generically available, but should be reviewed by properties in Japan. The Fukuoka Accommodation Tax is available as a package formula. The JAPAN_GENERIC_TAX function calculates the tax for rates exclusive and rates inclusive of tax.
Refer to: Oracle Hospitality Localization Center for Hotel; Japan - under OPERA Cloud Solutions: OPERA Cloud Fiscal Master Data Document (Doc ID 2560520.1).
Country Specific - Japan - Include/Exclude Child in Osaka Accommodation Tax Calculation
A parameter to include or exclude children from the Osaka Accommodation Tax functions (OSAKA_TAX_EXCL_Q_UDF & OSAKA_TAX_INC_Q_UDF) is now available. The Include Child is introduced.
Refer to: Oracle Hospitality Localization Center for Hotel; Japan - under OPERA Cloud Solutions: OPERA Cloud Fiscal Master Data Document (Doc ID 2560520.1).
Country Specific - Japan - Kutchan/Niseko Accommodation Tax Formulas
The Kutchan Accommodation Tax and Niseko Accommodation Tax are available generically as package functions and should be reviewed by properties in Japan.
The functions calculate the tax for rates exclusive and rates inclusive of tax. The Accommodation tax amount is based on the room rate (room revenue + service charge) where 2 percent is charged on the room rate per person or per room.
NOTE: Room Rate includes Service Charge, but does not include consumption tax.
Refer to: Oracle Hospitality Localization Center for Hotel; Japan - under OPERA Cloud Solutions: OPERA Cloud Fiscal Master Data Document (Doc ID 2560520.1).
Country Specific - Japan - Package Fixed / Manual Charges for Japan Accommodation Tax
The Consider Fixed Charges field and Consider Manual Charges field are introduced generically in the Posting Attributes panel for package configuration and should be reviewed by properties in Japan.
For a transaction type such as lodging and when the fields are set to Y, fixed / manual charges posted are considered for calculation of the accommodation tax for the following cities: Tokyo, Kanazawa, Kutchan, Niseko, Osaka, Kyoto, Beppu and Fukuoka.
Refer to: Oracle Hospitality Localization Center for Hotel; Japan - under OPERA Cloud Solutions: OPERA Cloud Fiscal Master Data Document (Doc ID 2560520.1).
Country Specific - Maldives - Tax Generates Function
The following is generically available, but should be reviewed by properties in the Maldives.
The UDF function, Generate_On_PAX, is available under Administration > Financials >Transaction Management > Transaction Code > Generates > UDF Function LOV. The function uses the total persons (adults + children) in the reservation and multiplies this value by the Tax Amount entered in the function parameter to determine the amount of tax to be posted.
Refer to: Oracle Hospitality Localization Center for Hotel; Maldives - under OPERA Cloud Solutions: OPERA Cloud Fiscal Master Data Document (Doc ID 2631152.1).
Country Specific - Poland - New Rachunek Folio Print Type
OPERA Cloud considers the configuration of Folio Types to determine which Folio Type to print under a given set of circumstances. To be compliant with Polish law, a new Folio Type (RACHUNEK) is introduced.
The Rachunek folio must be sent to a fiscal printer when the Payee Profile is not configured with a NIP (Numer Identyfikacji Podatkowej), which translates to Tax Identification Number in English. Ultimately, when a folio is generated, OPERA Cloud must determine if the Tax ID exists on the Payee Profile.
-
If the Tax ID exists, then the existing Faktura folio generates.
-
If the Tax ID does not exist, then the new Rachunek folio generates.
Refer to: Oracle Hospitality Localization Center for Hotel; Poland - under OPERA Cloud Solutions: OPERA Cloud Fiscal Master Data Document (Doc ID 2620050.1).
Country Specific - Switzerland - HESTA Report
To fulfill Swiss legal requirements, a HESTA report is introduced generically, but should be reviewed by properties in Switzerland.
Refer to: Oracle Hospitality Localization Center for Hotel; Switzerland - under OPERA Cloud Solutions: OPERA Cloud Fiscal Master Data Document (Doc ID 2630219.1).
Events
Configure Default Note on Resources (Items)
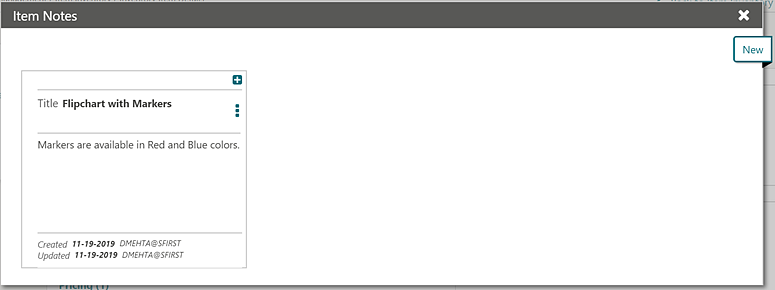
In OPERA Cloud Sales and Event Management, you can configure default notes for Inventory Items that auto-populate when selecting the item for an event or when adding the item to a Catering Package/Template.

Configure Default Note on Resources (Menus)
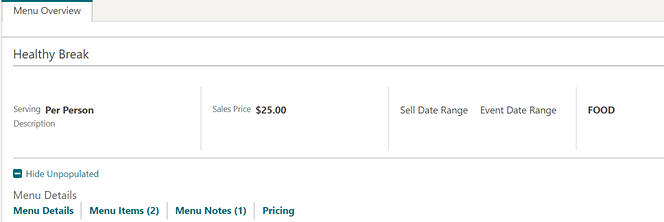
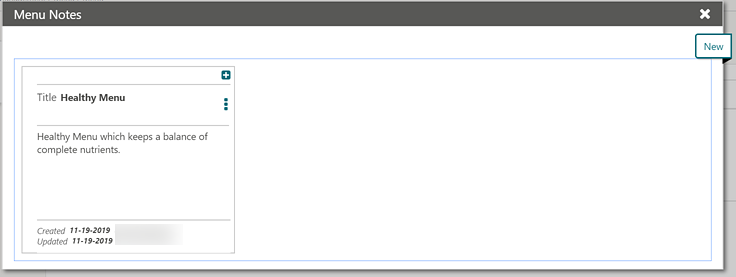
In OPERA Cloud Sales and Event Management you can configure default notes for catering menus, which then auto-populate when selecting the menu for an event or adding the menu to a Catering Package/Template.
Menu Notes:
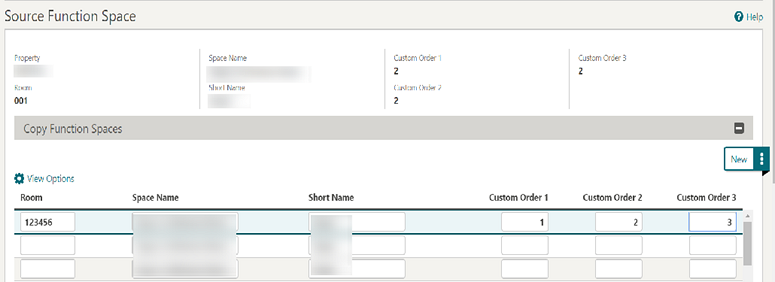
Copy Function Space
-
Room
-
Space Name
-
Short Name
-
Custom Order 1
-
Custom Order 2
-
Custom Order 3
-
Combo Element (available only if the source function space is marked as a combo room)

Events Dashboard Tile User Task Added
A general user task, View Events Tile, is added in Role Manager. The new task is granted by default to all roles.
Behavior in OPERA Cloud:
-
With the Edit Dashboard user task assigned to your roles, you see all dashboard tiles in OPERA Cloud and you can add/remove and arrange tiles on your dashboard.
-
Without the Edit Dashboard user task assigned to your roles, you only view the Event tiles in the OPERA Cloud dashboard with the View Events Tile user task granted to your role.
-
With the Manage Events user task assigned to your role, you can interact with the Events tile if the tile has drill-down capability.
-
Without the Manage Events user task assigned to your role, you can only view the Events tiles. Even if the tile has drill-down capability, you cannot interact with the tile.
Events Search Usability Improvements
The following usability improvements are implemented in the Events search screen:
-
Load More functionality is replaced by pagination controls with page numbers and previous/next links.
-
Added a page size selection allowing you to select the number of records to appear per page. Values available for the Show list are 20, 50, 100, and 200.
-
Your selection for Show is saved per screen, so when you return to the same screen and perform a search, OPERA Cloud displays the same number of results per page.
-
Removed the capped height on table and list view. The displayed row count automatically adjusts based on the size of the browser.
-
Removed the inner vertical scroll bar on the search results table.
-
Added floating left and right scroll buttons along the sides of the results in table view allowing you to scroll horizontally when focused anywhere in the table.
Manage Resources Usability Improvements
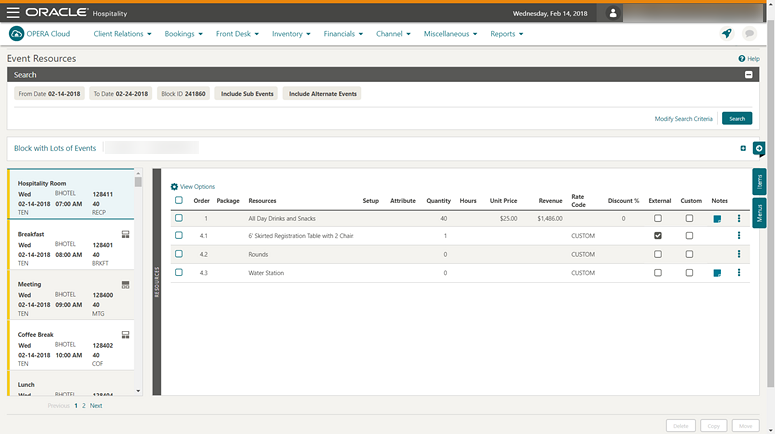
The following usability improvements are implemented in the Manage Resources screen:
-
Load More functionality is replaced by pagination controls with page numbers and previous/next links.
-
The page size default shows 100 records.
New Event Posting Feature
-
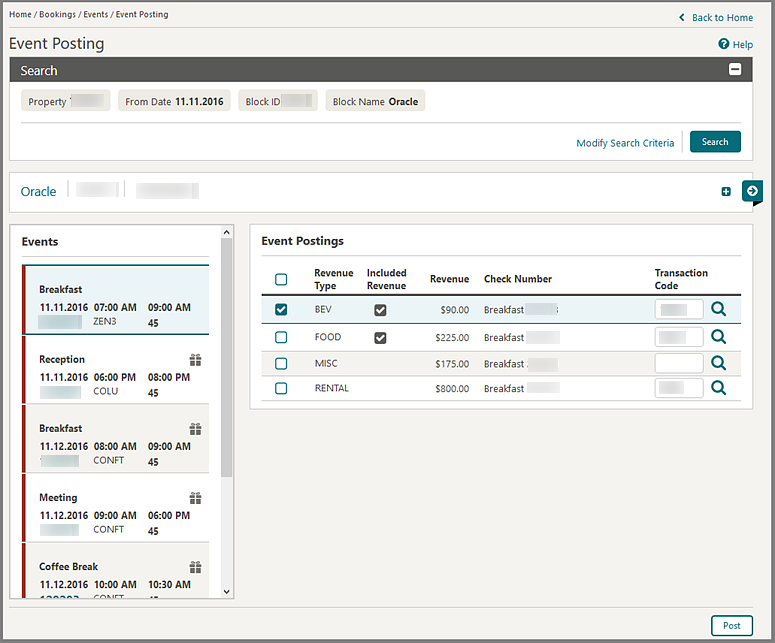
An Event Posting function is added to OPERA Controls for OPERA Cloud Sales and Event Management. It allows you to post charges directly to the posting master account of the business block associated with the event.
-
The Event Posting screen is accessible from the Bookings or Event menus or from the I Want To action link on the Manage Event search and Event Presentation pages.
-
A new Posted Revenue column is provided in the Manage Events search screen, It indicates either No Revenue or Revenue Partially posted for the event when you place your cursor over the triangle shaped icon.
-
You can use the I Want To menu and select Go to Event Posting to view the revenue details or post additional charges.
-
The Event Posting screen also includes a column for Resource Name. When revenue is posted at the Resource Level, the resource name appears in the Resource Name column. When revenue is posted at the Event Level, the Resource Name column displays the event name since the revenue is posted by Revenue Type instead of by individual resources.
-
The transaction code for each posting record automatically defaults based on the Revenue Type Mapping configuration. To post charges, you must have a Cashier ID, and if the control for Force Cashier Login is active, you must log in when posting event charges. When the control for Transaction Code by User Role is active, you only have the ability to post transaction codes associated with your user role. From within the Event Posting screen, you have access to the Billing Screen and the ability to generate the Banquet Check.
-
A Posted Event Revenue report is also available.
STEPS TO ENABLE
-
From the Administration menu, select Enterprise and then select OPERA Controls.
-
Select the Events group.
-
Activate the Event Posting function.
-
Update the Default Catering Folio Style Setting and select a Default Catering Folio Style to use when the Banquet Check is run from the Event Postings screen.
-
Select Application and then select Role Manager.
-
Search chain or property roles.
-
Select the required role and select Edit from the vertical ellipse.
-
Select the Manage Event Posting task and click Save.
Impact or Other Considerations
Review the OPERA Controls for Transaction Code by User Role and Force Cashier Login.

Ensure that users who are required to post event charges have the Manage Event Posting Task within the Bookings Main Task Group and a Cashier ID assigned to their user account.
To avoid human error when posting, default the transaction codes by ensuring the Revenue Type Mapping configuration is completed (under Administration, Financial menu, Transaction Management, Revenue Type Mapping). Revenue Type Mapping enables properties to indicate the transaction code where revenue for the selected revenue type is posted. Additional attributes such as event space, event type, catering only flag, service change percentage, service charge transaction code, and calculation method are also available. This configuration is used when running the proforma invoice and in the Banquet Posting functionality. When the proforma invoice is generated, the mappings provide the ability to calculate the postings, including the generates configured in the mapping record and on the actual transaction code. This provides a more accurate estimate of charges. In Banquet Posting, the mappings dictate which transaction codes are used based on the event type, space, catering only value, and revenue type for a more streamlined posting mechanism.

Room Availability in Function Diary
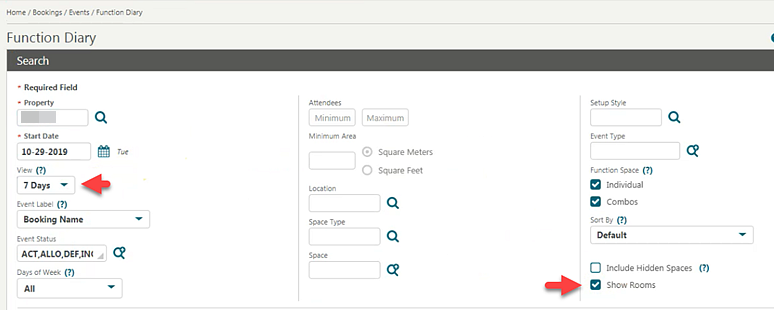
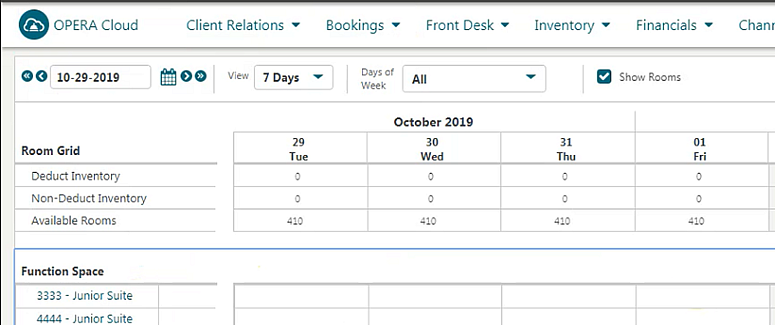
In OPERA Cloud Sales and Event Management you can now view Inventory room availability in the Function Diary by selecting the Show Rooms check box in the Search and Quick Filter sections when in a multi-day view.
The Room Grid displays:
-
Available rooms for the day
-
Deduct block rooms
-
Non-deduct block rooms
Exports
Ability to Download OPERA 5 Back Office Exports
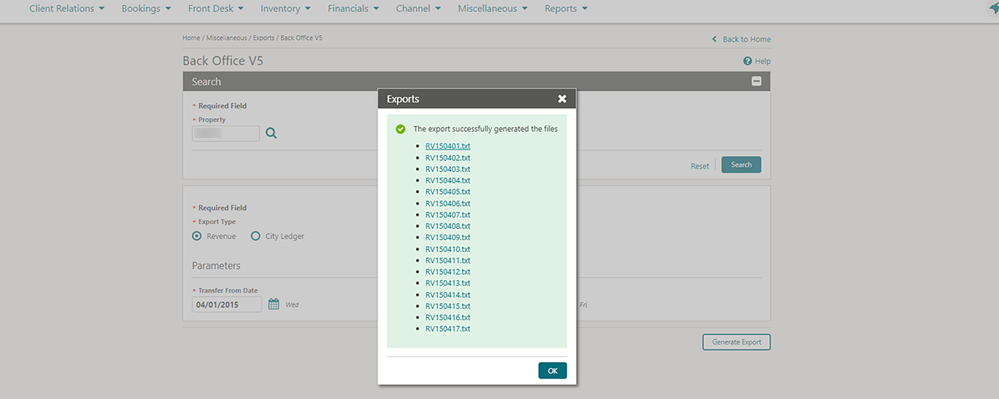
You can now download export files manually generated through the Back Office V5 exports menu option. After running the export, depending on the date range selected, you can download associated export file(s) using the hyperlink provided.
Note: The Back Office V5 exports menu option has no association with End of Day export files.


Ability to Schedule Exports
You can schedule exports to generate at a defined frequency and interval:
-
Hourly
-
Daily
-
Weekly
-
Monthly
-
End Of Day
Restrictions on scheduled exports:
-
Cannot have more than five scheduled exports in the same hourly frequency
-
Cannot schedule the same export with the same frequency more than once
-
Cannot have more than 20 scheduled exports at any point outside of end of day exports
-
Cannot schedule exports with parameter forms
-
Cannot schedule a component export (child export) independently
With the New/Edit Export Schedules user task and the Delete Export Schedules user task assigned to your role, you can access scheduled exports configuration.
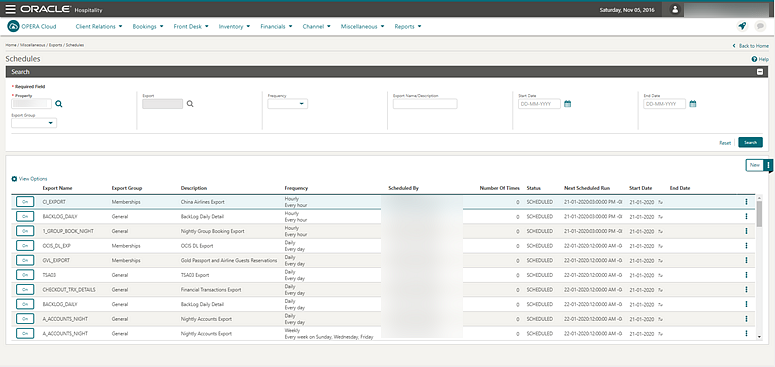
The Export schedules page displays all scheduled exports for the different export types (that is, General/Country/Membership/Backoffice), including those configured to run at end of day.

STEPS TO ENABLE
-
From the Administration menu, select Role Manager.
-
Search and edit the Manage Chain Roles or Manage Property Roles to be granted access to scheduled export configuration.
-
Select Miscellaneous, then select Export Schedules from the user task page.
-
Select the user task(s) to assign to the role:
-
New/Edit Export Schedules
-
Delete Export Schedules
-
-
Click Save and repeat to update other roles.
Additional APIs Available for Export Definition
All standard APIs are exposed in Back Office, General, and Membership export configuration providing greater flexibility when adding formula columns to export definition.
City Ledger Export Generically Available
The City Ledger export is now generically available. New columns are available under standard view for EXP_BOF_CITYLED_RECORDS from Miscellaneous -> Exports -> BackOffice.
All reservation records checked out with City Ledger settlement mode and present in the holding area of accounts receivable feature in the export. You can create the export for Business Date-1.
-
Account Language Code (Profile of the payee)
-
Account Language Description (Profile of the payee)
-
Account UDFC01 to UDFC20 (Profile of the payee)
-
Reservation Guest Name ID
-
Reservation Guest First Name
-
Reservation Guest Last Name
-
Reservation Guest Country
-
Reservation Guest Language Code
-
Reservation Guest Language Description
-
Reservation Guest Phone Number (primary phone)
-
Reservation Guest Profile Email (primary email)
-
Reservation Guest Room Number
-
Reservation Custom Reference
-
Reservation External Reference
-
Reservation UDFC01 to UDFC20
-
Billing Contact Profile Name_ID
-
Billing Contact Profile Last Name
-
Billing Contact Profile First Name
-
Billing Contact Profile Phone Number (primary phone)
-
Billing Contact Profile Email (primary email)
-
Reservation Contact Profile Name_ID
-
Reservation Contact Profile Last Name
-
Reservation Contact Profile First Name
-
Reservation Contact Profile Phone Number (primary phone)
-
Reservation Contact Profile Email (primary email)
-
Invoice Amount Net (NET_TRX_AMOUNT)
Country Specific – Bahrain – New Country Exports
The following exports are generically available, but should be reviewed by Properties in Bahrain.
Three new country export are introduced in OPERA Cloud.
-
BH_HOURLY_EXPORT
-
BH_DAILY_EXPORT_DAY
-
BH_DAILY_EXPORT
With the help of OPERA Cloud Scheduler and the SFTP Delivery Method, you can schedule and send exports to a desired location.
Refer to: Oracle Hospitality Localization Center for Hotel; Bahrain – under OPERA Cloud Solutions: OPERA Cloud Fiscal Master Data Document (Doc ID 2597068.1).
Country Specific – Germany – GoBd Export Changes
A number of changes to the GOBD export are now generically available, but should be reviewed by properties in Germany. The changes affect export templates, export file names, voided folios, zero bills, and other details.
Refer to: Oracle Hospitality Localization Center for Hotel; Germany - under OPERA Cloud Solutions: OPERA Cloud Fiscal Master Data Document (Doc ID 2622122.1).
Country Specific - Poland – SAF-T Export
The PL_JPK_FA Export is updated to comply with the latest Polish country regulations. Changes to the export include updating the name to the existing hard-coded date template and to an existing hard-coded data element, changing an element from required to optional, reclassifing standard invoices, and other changes.
Refer to: Oracle Hospitality Localization Center for Hotel; Poland - under OPERA Cloud Solutions: OPERA Cloud Fiscal Master Data Document (Doc ID 2620050.1).
Country Specific - Portugal - SAF-T Export Updated
The following export is generically available, but should be reviewed by Properties in Portugal.
The Standard Audit File for Tax Purposes, Portuguese version 104 (PT_SAFT_104), is a standardized XML file used for exporting the accounting information to the tax authorities. The export complies with the Portuguese law of a directive from the Organization for Economic Co-operation and Development (OECD) and is applicable for all information registered after January 1, 2008. It complies with SAFT-PT.xsd validation schema available on http://www.portaldasfinancas.gov.pt.
Refer to: Oracle Hospitality Localization Center for Hotel; Portugal - under OPERA Cloud Solutions: OPERA Cloud Fiscal Master Data Document (Doc ID 2629862.1).
Country Specific - Switzerland Exports
To fulfill Swiss legal requirements, new country exports HOKO, TSTAT, and HESTA report are introduced generically, but should be reviewed by properties in Switzerland.
Refer to: Oracle Hospitality Localization Center for Hotel; Switzerland - under OPERA Cloud Solutions:s OPERA Cloud Fiscal Master Data Document (Doc ID 2630219.1).
Country Specific - Switzerland - New Statistics Export
A new country statistics export, CH_HESTA_STAT, is introduced for Switzerland. This XML export is generically available, but should be reviewed by properties in Switzerland.
You can generate the export manually for a month. You can also configure the export to run during End of Day daily or at month's end or schedule the export called CH_HESTA_STAT_AUTO from the OPERA Scheduler. The export frequency is set to End of Month by default. If you need to schedule the export to generate daily, you should update the export frequency accordingly.
Refer to: Oracle Hospitality Localization Center for Hotel; Switzerland - under OPERA Cloud Solutions: OPERA Cloud Fiscal Master Data Document (Doc ID 2630219.1).
Custom Reference Numbers in Back Office Export
Custom Number(s) are available in the Back Office Export view, EXP_BOF_CITYLED_RECORDS, with five separate columns for Custom_number1, Custom_number2, Custom_number3, Custom_number4, and Custom_number5.
An additional Custom_numbers column is available, listing all custom numbers in a comma delimited string.
Export Configuration Enhanced
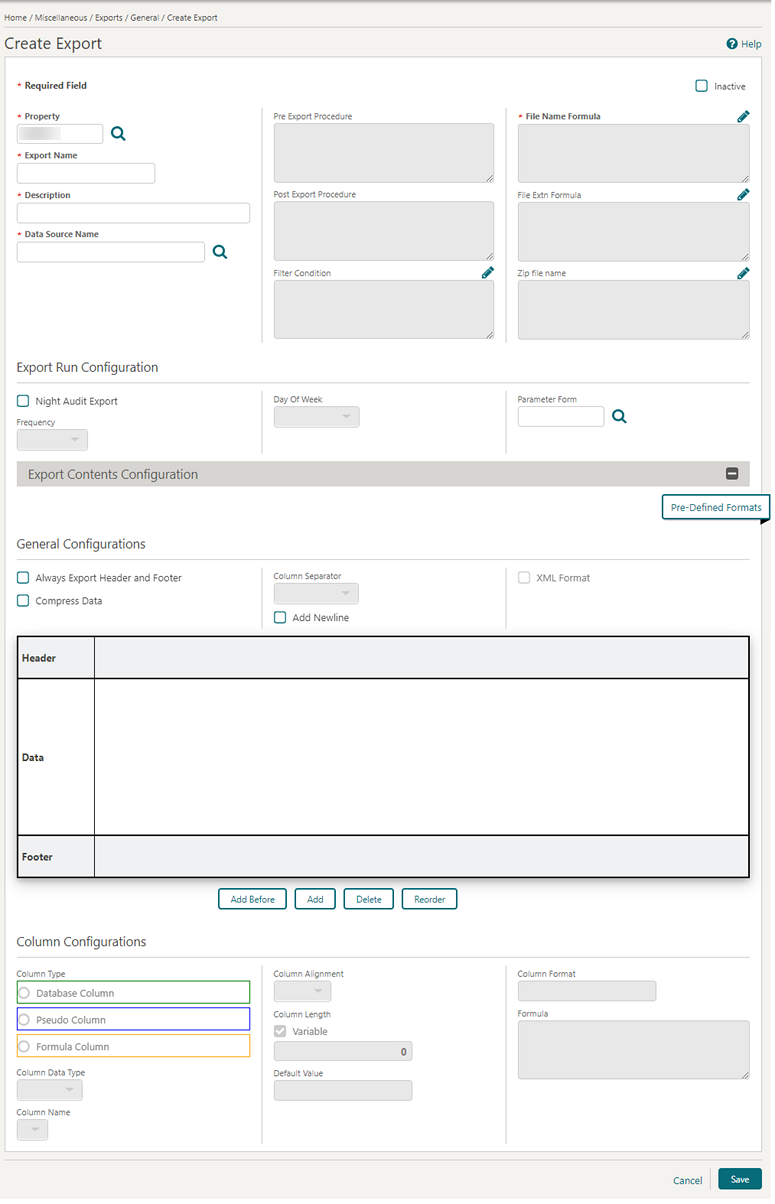
OPERA Cloud exports configuration is enhanced for a more streamlined user experience.
In the main export screen, a new column easily identifies XML exports from regular exports.
-
Export configuration framework is set up enabling data source filtering, selecting existing export templates, and renaming export names and descriptions on the fly.
-
In the Export Configuration screen, parameter forms appear as a list of values for any export not configured to run as a night audit export.
-
The Pre-Defined Formats screen is added for selecting popular formats such as CSV, JSON, or TSV, reordering columns, specifying separators, and so on.
-
You can configure export content using pre-defined formats or available column configurations.
-
When editing an export, a new section (Header/Data/Footer) provides an interactive visual representation of the export layout. You can further modify, remove, or rearrange columns.
You can create component exports from scratch or from an existing export template.
Exports
Front Desk
Action Links Added for Handling Reservation Check In
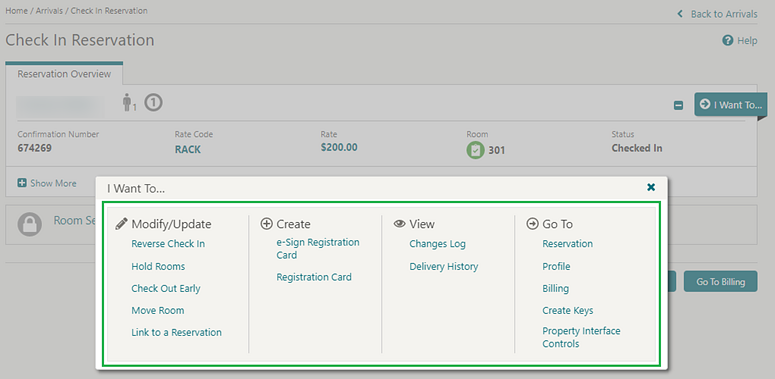
Action links are added to the I Want To menu on the Check In Reservation screen after a check in is completed. You now have the same links available that you have from the Reservation presentation screen for a checked in reservation. The additional links include Reverse Check In and Reverse Advance Check In. The Cancel Reservation link is removed because a checked in reservation cannot be cancelled.
Advance Check In Allows Pseudo Room Mass / Advance Check In
Advance Check In functionality allows the processing of pseudo room type reservations from Check In, Mass Advance Check In, Auto Assign and Advance Check In, and the Auto Check In of Advance Checked In Reservations processor. This change complements the existing Advance Check In functionality of inventory room type reservations.
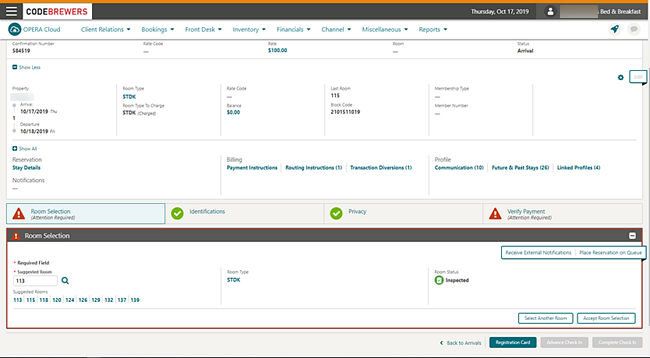
Check In Room Selection Enhanced with Suggested Room List
The Room Selection step within Check In is enhanced with Suggested Rooms functionality.
-
A list of suggested rooms displays up to 10 available rooms of the highest cleaning status at your property.
-
The list of suggested rooms contain hyperlinks enabling you to click to select the room of your choice.
-
After completing a reservation upgrade, the suggested room list displays any available rooms for the upgraded room type.
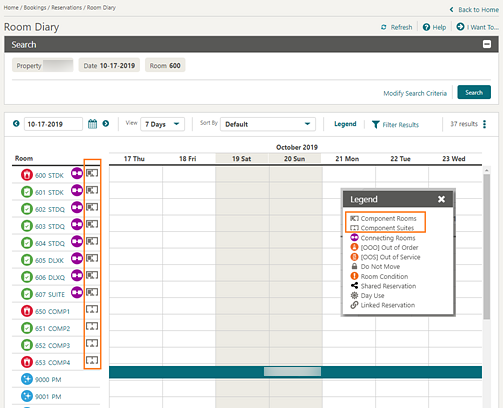
Component Room Indicators Added to Room Assignment Screens
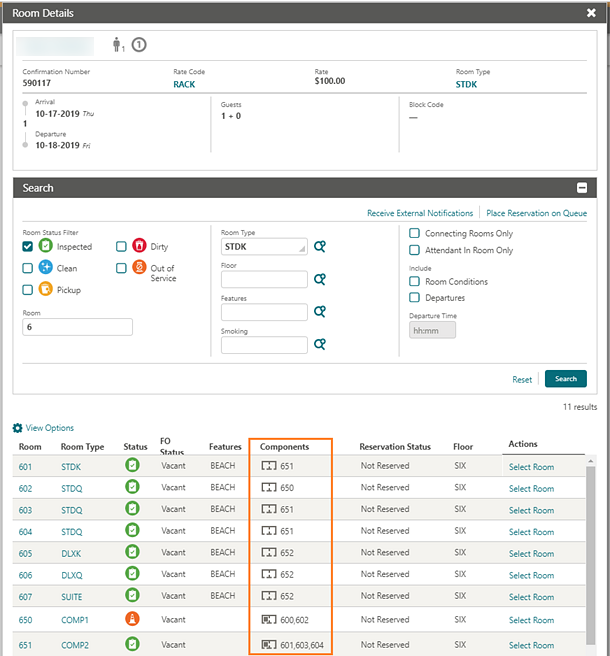
The Room Assignment screens are updated to display a Components column in Search Results.
-
For component suites, the column shows the component room icon along with the rooms that make up the component suite.
-
For component rooms, the column shows the component suite icon along with the component suite to which the room belongs.
The component suite and component room icons are updated on the Room Diary screen in order to show the same icons.
Custom Check In Steps Setting
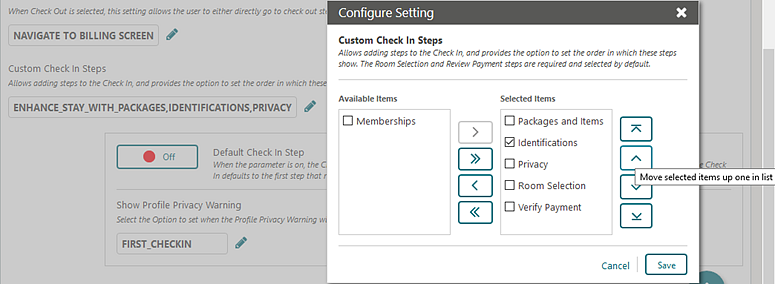
The following OPERA Controls are available to provide you with greater flexibility in displaying check in steps:
-
The Show Additional Steps During Check In setting is replaced with the Custom Check In Steps setting to allow you to multi-select panels and set the display sequence for the additional steps.
-
Panels previously selected for the Show Additional Steps during check in prepopulate to the new Custom Check In Steps setting.
-
A new Default Check In Step parameter determines whether to always commence with the first step in the sequence or progress to the first step that requires attention.
STEPS TO ENABLE
-
From the Administration menu, select Enterprise, select OPERA Controls, and then select Front Desk.
-
Update the Custom Check In Steps setting. Set the sequence of selected panels using the up or down controls to the right.
-
Set the Default Check in Step parameter according to the required behavior:
-
When this parameter is On, the Check In defaults to the first step set in the Custom Check In Steps setting.
-
When this parameter is Off, the Check In defaults to the first step that requires attention or to the Verify Payment step when no step requires attention.
-
Day Use Reservation Warning
If a Day Use reservation is assigned to the room you are checking in, a new warning appears when you select the Complete Check In button. You can select another room or continue with the check in.
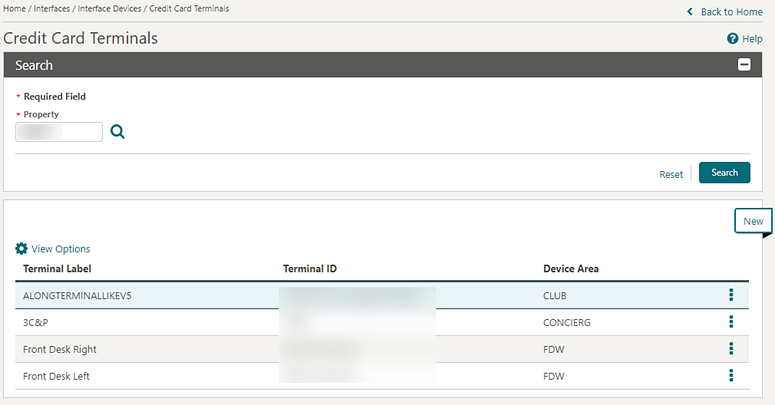
Device Area Added to Credit Card Terminal Configuration
Device Area is added to the Credit Card Terminal configuration to provide you with an option to group terminals based on the physical location of the devices at your property. The feature enables you to select and define a default credit card terminal from a list of terminals for use when initiating a credit card transaction, such as an authorization, a payment, or a settlement, and getting a token for the credit card.
A new column for Device Area appears in Credit Card Terminals search results.


eSign Registration Card Front Desk Function Added
An eSign Registration Card Front Desk function is added to OPERA Controls to enable the eSign registration card functionality and associated web registration card template configuration.
This function counts towards the OPERA Cloud Standard subscription, increasing the number of active functions.
The dependent setting, "Days to purge e-Signed Registration Cards" (PURGE_ESIGNREGCARD_DAYS) is nested under the new function and is visible when the eSign Registration Card function is active.
The following obsolete controls are removed:
-
Registration Card Script (REGISTRATION_CARD_SCRIPT_RSV) parameter
-
Mobile Signature Capture (MOBILE_SIGNATURE_CAPTURE) parameter
-
Default Mobile Registration Card (DEFAULT_MOBILE_REGISTRATION_CARD) setting
STEPS TO ENABLE
-
From the Administration menu, select Enterprise and then select OPERA Controls.
-
Select or confirm the Property where you want to enable the function.
-
Select the Front Desk controls group.
-
Locate the eSign Registration Card control under the Functions section.
-
New function is disabled by default. To activate, click the Inactive button next to the control and then click Activate.
-
To immediately reflect any function changes, click the Reload Application link inside the information message at the top of the screen.
Options for Advance Check In, Arrivals, Departures, In House (Occupied) Dashboard Tiles
The following general user tasks are added in Role Manager. The new tasks are granted to all roles by default:
-
View Advanced Check In Tile
-
View Arrivals Tile
-
View Departures Tile
-
View In House (Occupied) Tile
-
View VIP Guests Tile
Behavior in OPERA Cloud:
-
With the Edit Dashboard user task assigned to your roles, you can see all dashboard tiles in OPERA Cloud and can add/remove and arrange tiles on your dashboard.
-
Without the Edit Dashboard user task assigned to your roles, you can only view the tiles in the OPERA Cloud dashboard with the View Advance Check In, View Arrivals, View Departures, and View In House (Occupied) user tasks granted to your role.
-
With the Reservation Management user task assigned to your role, you can interact with the View Advance Check In Tile, View Arrivals Tile, View Departures Tile, and View In House (Occupied) Tile if the tile has drill-down capability.
-
Without the Reservation Management user task assigned to your role, you can only view the tiles. Even if the tile has drill-down capability, you cannot interact with the reservation tiles.
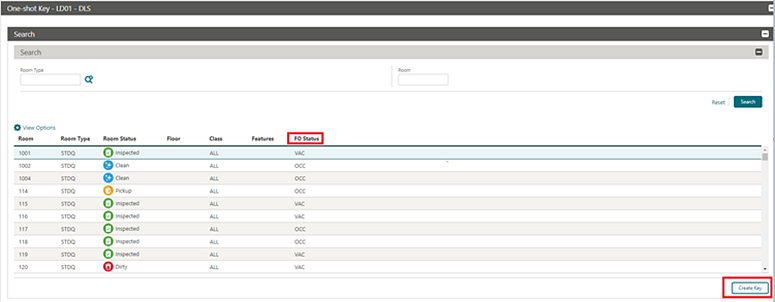
Front Office Status Added to One-shot Key
The One-shot Key screen is modified to display a column for Front Office status.
A Create Key button is provided for creating keys for the selected room (by default, the number of keys is based on per reservation).
Mass Check In Includes Pseudo Rooms
Mass Check In is updated to ensure that pseudo room type reservations selected in Search Results are included in the mass check in, auto room assign, and check in processes.
New Credit Card Terminal Link Available
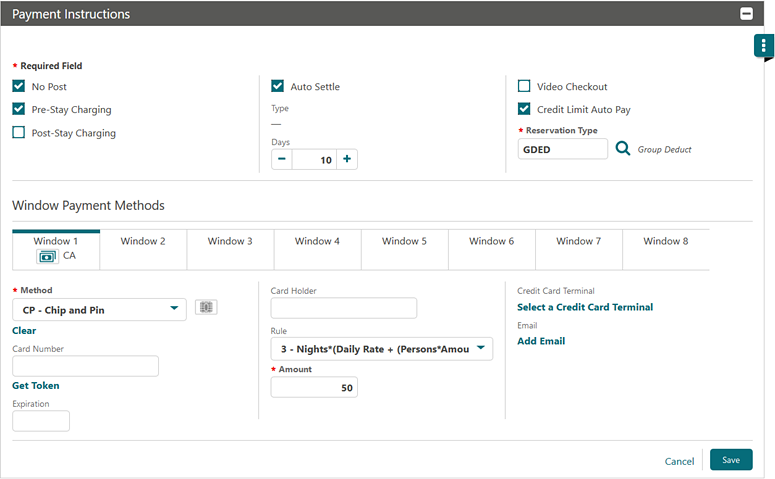
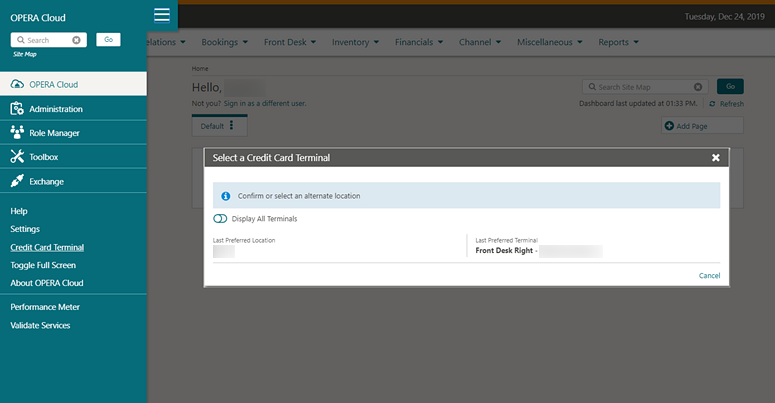
In properties where the Chip and Pin functionality is active, a new Credit Card Terminal link is available in the payment component throughout OPERA Cloud. After selecting this link, the Credit Card Terminal selection opens a list of all configured terminals. You can select and set a default terminal for your browser to use for any credit card transaction such as authorizations, payments, settlement, and getting a token for the credit card. The Credit Card Terminal selection screen is also available from the side bar menu.
The payment component provides a new Credit Card Terminal link allowing you to select a default credit card terminal.
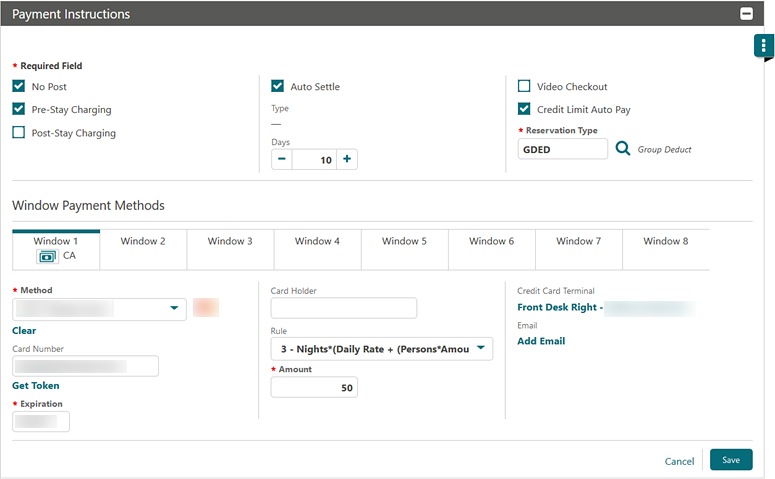
After you select a credit card terminal, the name and ID become listed in the payment component. You can change the default credit card terminal by clicking the terminal name link.
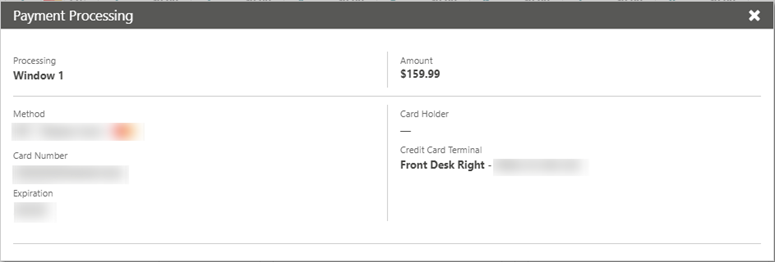
The default credit card terminal is used for all credit card related transactions.
A Credit Card Terminal is available in the side bar menu if you are granted the Credit Card Terminal task (where a default terminal can be selected).
Option to Select Another Room During Check In
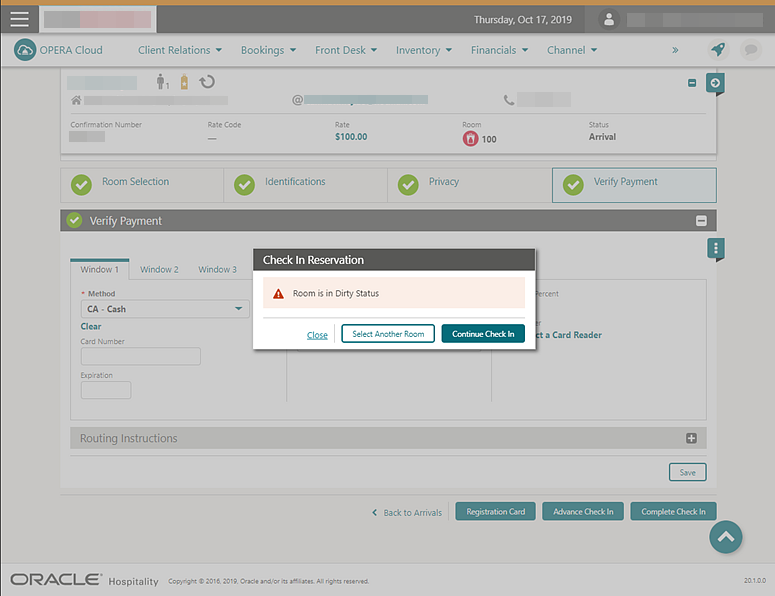
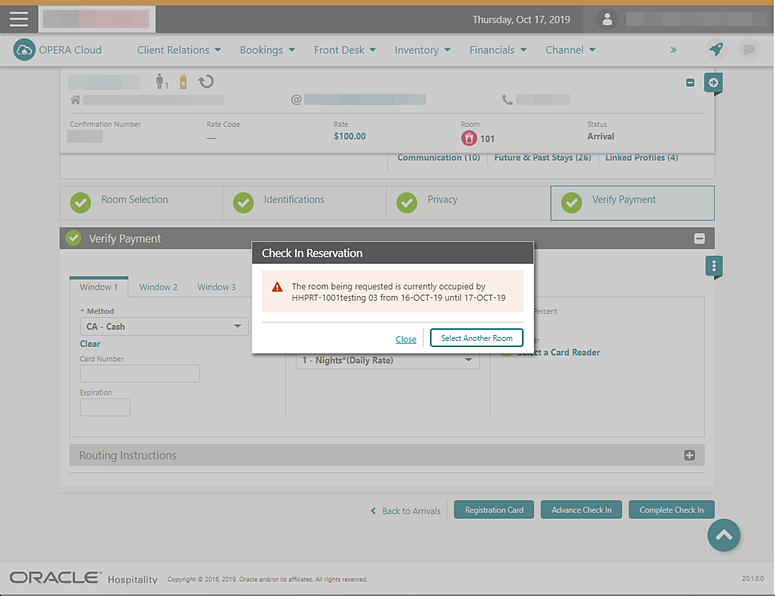
During reservation check in, the Complete Check In button now prompts a warning message and a new Select Another Room button if the selected room is either not on the highest cleaning status at the property (that is, Clean or Inspected when the functionality is active) or the assigned room is still not checked out. The Select Another Room button takes you to the Room Selection step where suggested rooms might be listed. Or, you can click the Select Another button to assign a different room.
Wake Up Call Companion Redesigned
The Wake Up Call Companion page is redesigned to display Search Results columns for VIP Code, Block Code, Member Type, Member Level, Reservation Status, Notes, and Follow-up Call indicator.
Confirmation numbers and profile names appear as hyperlinks to provide quick access to respective presentation pages. You can filter Wake Up Call status from the Wake Up Call Companion search panel.

Integrations
Configurable Interface Unit Charges
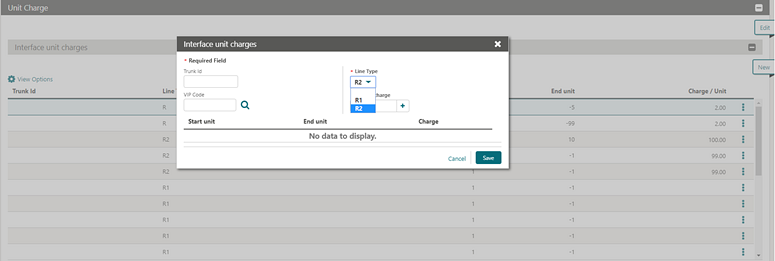
A single default charge and multiple unit charge rows are configurable for multiple line types in the Unit Charge panel for PBX and CAS (Call Accounting) interfaces.
Door Locking System (DLS) Property Interface Supports Online Key Systems
The Door Locking System (DLS) Property Interface configuration can support online key systems. When the DLS partner system supports an online interface, OPERA Cloud automatically triggers a Key Data Change message to the partner with a room move, change of the stay date, or change of the check out time of the arriving and In-House reservations.
STEPS TO ENABLE
Contact Oracle Hospitality consulting or an Oracle partner to assist with the setup required for an online DLS system.
Exchange Message Status, Reprocess All
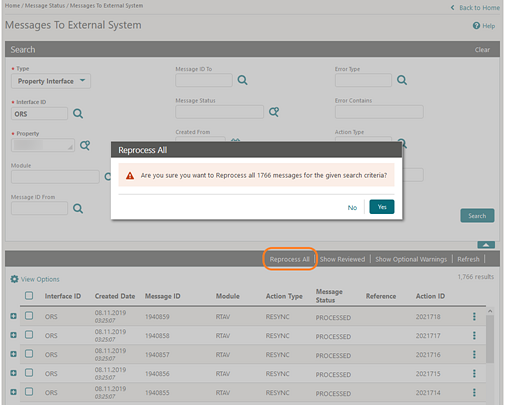
The Exchange Message Status screen is enhanced with a Reprocess All action button to reprocess all inbound or outbound messages from the respective message status screen.
The Reprocess All action button is enabled based on the assignment of a new eXchange Reprocess All user task.
The confirmation number appears as a link to navigate to the reservation presentation page.
STEPS TO ENABLE
-
From the OPERA Cloud menu, select Role Manager.
-
Select Manage Chain Roles or select Manage Property Roles.
-
Search and select the role to update.
-
Select Edit from the roll level vertical ellipse.
-
From the Main Tasks, select the eXchange Interfaces group.
-
From the Available Tasks, select Reprocess All from the Message Status Workspace section.
-
Click Save.

Exchange Parameters Added
The following parameters are added to OPERA Cloud OXI Controls:
OXI_Generic: Delete Enrollment Codes Not Received
-
Direction: Data from external system to OPERA Cloud.
-
Determines whether to keep or delete existing OPERA Cloud membership enrollment codes when they are not received in the message payload.
OXI_Profiles: Process Inbound Documents
-
Direction: Data from External System to OPERA Cloud only.
-
Global. Determines whether the ID documents (ID Number and ID type) are processed.
OXI_Profile: Phone Extension Sys Over
-
Direction: Data from External system to OPERA Cloud.
-
Determines whether to send the phone extension.
OXI_Reservations: Update Alerts
-
Direction: Data from external system to OPERA Cloud.
-
Determines how the Reservation Alerts received from the external system are processed.
Fiscal Folio Attributes Added
The following attributes for the Fiscal Layer Integration Platform (FLIP) are available with default values that you can modify.
| Code | Description | Value |
|---|---|---|
|
FLIP_Cconfigmode |
FLIP configuration mode |
Default |
|
FLIP_DeliveryLayOut |
FLIP delivery layout |
V5XML |
|
FLIP_Delivery_DirectCall |
FLIP delivery direct call |
Yes |
|
FLIP_LogLevel |
FLIP log level |
Trace |
|
FLIP_TemplateFile |
FLIP template |
FLIPTemplate.xml |
|
DeliveryDirectCall_Exeparam |
Vendor Executable used by DirectCall Delivery |
Null |
|
FLIP_Fiscal_Printer |
Fiscal Printer |
No |
|
FLIP_Fiscal_Device_Name |
Fiscal Device Name |
FP90III |
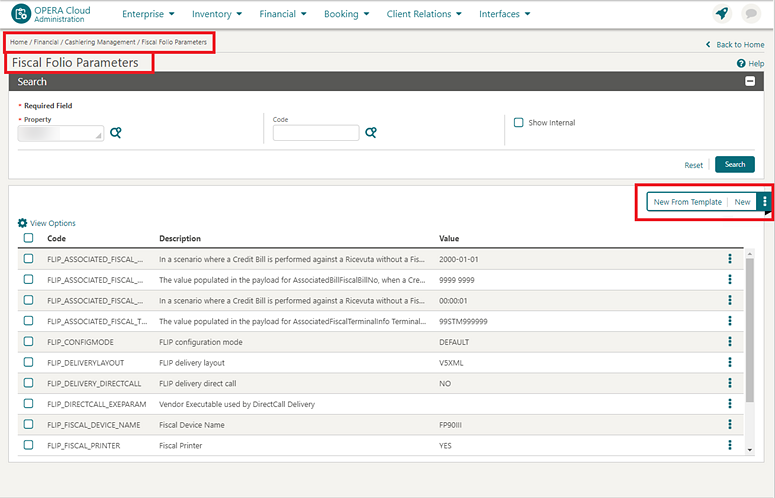
Fiscal Folio Parameters Template
To allow ease of setup for Fiscal Folio parameters, the ability to select a template for the required parameters for Fiscal Partners is now available in the Fiscal Folio Parameters screen in Cashiering Management. Selecting the required template inserts the set of parameters used by the Fiscal Layer Integration Platform for the required Fiscal Partner. The parameter values should then be updated with the values required by the Fiscal Partner as listed in the Fiscal Layer Integration Platform installation guide.
Fiscal Layer Integration Platform Updated
The Fiscal Layer Integration Platform (FLIP) payload is updated to include the Business ID, the Business Registration Code, and other details such as Fiscal Year, Begin Month, and Fiscal Year Begin Date defined in the Localization panel of Property configuration.
Licenses / External Systems Added
The following validated OXI, HTNG, and OXIHUB licenses / external systems are added:
| Interface Type | Interface Code | Interface Description |
|---|---|---|
|
OXI |
PROSOXI |
OPERA eXchange 2-way interface for PROS |
|
OXI |
DASHBOARD |
OPERA Xchange One-way Interface for DASHBOARD BY HOIST |
|
OXI |
DINGUS |
OPERA Xchange One-way Interface for DINGUS BY HITT |
|
OXI |
KORIDOR2 |
OPERA Xchange Two-way Interface for KORIDOR |
|
OXI |
SLIM |
OPERA Xchange Two-way Interface for SLIM by SHANGRILA |
|
OXI |
HOTELIERSGURU |
OPERA Xchange 2-way for HoteliersGuru |
|
OXI |
GLOBALHS |
OPERA Xchange 2-way for Global Hospitality Solutions |
|
OXI |
IVVY |
OPERA Xchange 2-way for iVvy |
|
OXI |
EZEETECH |
OPERA Xchange 2-way for eZee Technosys |
|
OXI |
PACE |
OPERA Xchange Interface for PACE by Prix Ltd |
|
OXI |
ILUNION |
OPERA Exchange Two-Way for ILUNION DATAMART |
|
OXI |
HEIASMARTBOOKING |
OPERA Xchange Two-way Interface for SMARTBOOKING by HEIA |
|
OXI |
ZOOX |
OPERA XChange 2-way for ZOOX |
|
OXI |
PMWEB |
OPERA Xchange 2-WAY for PMWEB CRM |
|
OXI |
INGAUGE |
OPERA Exchange Two-Way for FPG In-Gauge |
|
OXI |
INNTOPIACRS |
OPERA Xchange 2-WAY for Inntopia CRS |
|
OXI |
HOTELIQ |
OPERA Exchange Two-Way for HOTELIQ |
|
OXI |
EMAAR |
OPERA Xchange 2-way for EMAAR |
|
OXI |
SMARTCHANNEL |
OPERA Xchange Two-way Interface for SMARTCHANNEL by SMARTHOTEL |
|
OXI |
HOTELSPIDER |
OPERA Xchange Two-way Interface for HOTELSPIDER by TOURISOFT |
|
OXI |
AXISROOMS |
OPERA Xchange Interface for AXISROOMS RMS |
|
OXI |
AMENITY |
OPERA Xchange One-way Interface for AMENITY BY ACQUAINT |
|
OXI |
IPOOLSIDE |
OPERA Xchange 2-WAY for IPOOLSIDE |
|
OXI |
REPUP |
OPERA Xchange Two-way Interface for RepUp |
|
HTNG |
OPX_FLEXNG |
OPERA HTNG Interface for Flexkeeping by CREATRIKS d.o.o |
|
HTNG |
NETGENBIZ |
OPERA HTNG Interface for OSS by NetGenBiz |
|
HTNG |
ASPEN |
OPERA HTNG Interface for Aspen Club System by Aspen |
|
HTNG |
JURUDATA |
OPERA HTNG Interface for WINPAC by Jurudata |
|
HTNG |
DODOTDO |
OPERA HTNG Interface for HIMS by Dodotodo |
|
HTNG |
1CHECK |
OPERA HTNG Interface for 1CHECK by 1 Check SAS |
|
OXIHUB |
OXI-PROTELGHA |
OPERA Xchange 2-way for GHA by PROTEL |
New Elements in Interfaces Configuration Translation Panel
New elements - Guest Number Length, Guest ID Message Length, and Group Number Length - are available in the Interfaces Configuration Translation panel.
The elements are used when the integrated system does not support the actual field length of the data from OPERA Cloud and truncates the value to the selected number of characters or digits.

An option to enter a Default Charge amount is available in the Postings panel when articles are not in use for a minibar type posting. The default charge amount is used when the incoming minibar posting has none or invalid articles in the PostSimple message.

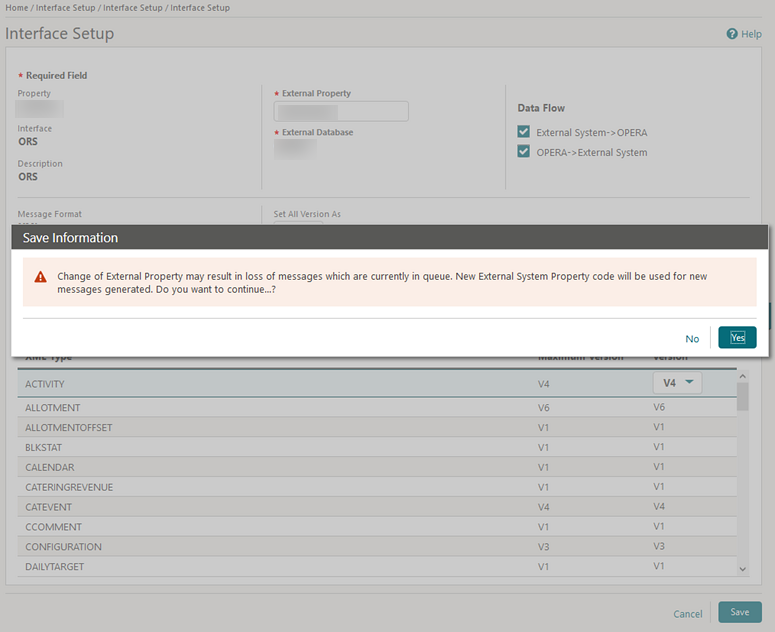
OXI Interface Setup Confirmation Message
OXI Interface Setup is updated to display a confirmation message when you select to change the external resort code.
When you make a change in the External Resort Code for an existing interface setup, the system prompts you with the following warning message: Change of external property may result in lost messages which are currently in queue. New external property code will be used for new messages generated. Do you want to continue... [No | Yes]. If you confirm the message by selecting Yes, the new external resort code is accepted and saved. If you select No, the old value is retained.
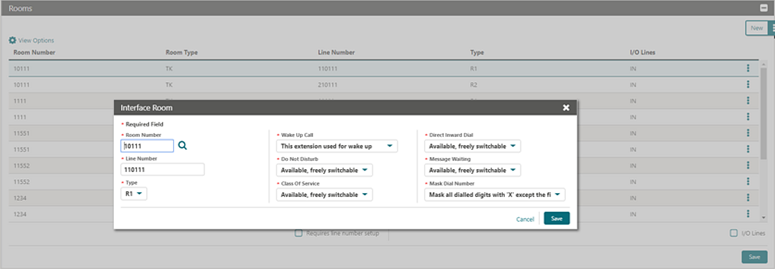
PBX Interface Additional Line Configuration
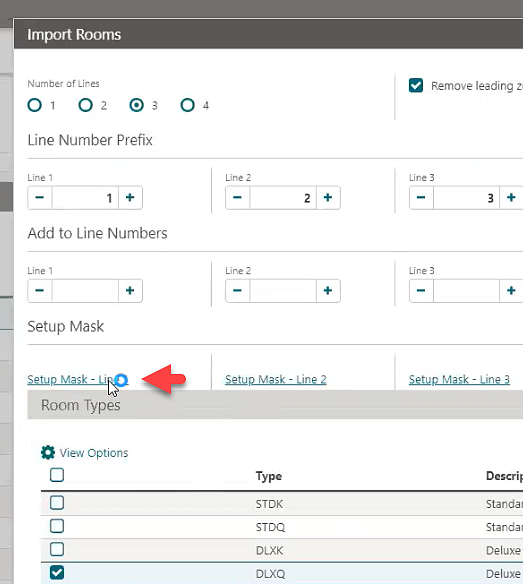
PBX interface - Rooms configuration is updated in Property Interfaces.
-
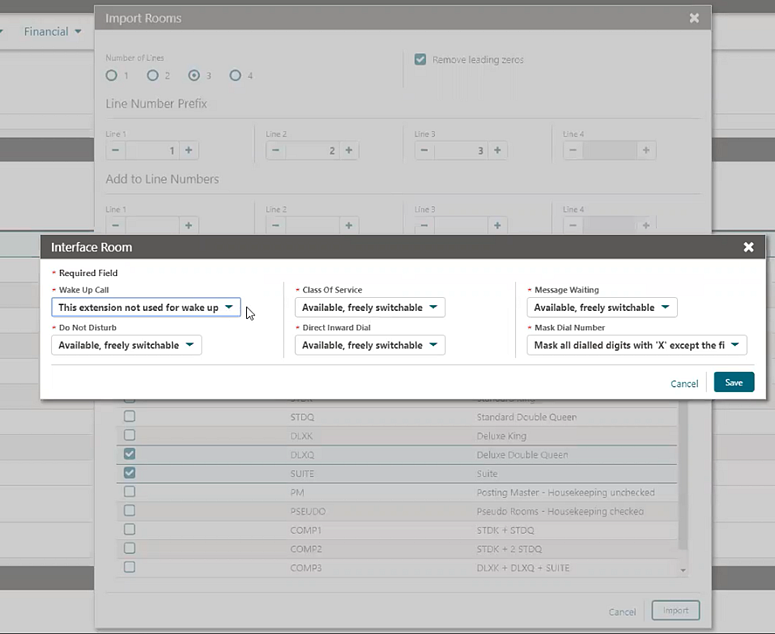
When importing rooms by room type, the following options are available for setting the line with Wake up Call ability: Do Not Disturb; Class of Service; Direct Inward Dial; Message Waiting; and Mask Dial Number as defaults from the Setup Mask - Line x action link.
-
When adding or editing an existing line, the following options are available for setting the line with Wake up Call ability: Do Not Disturb; Class of Service; Direct Inward Dial; Message Waiting; and Mask Dial Number.
PBX Interface Configuration Enhanced
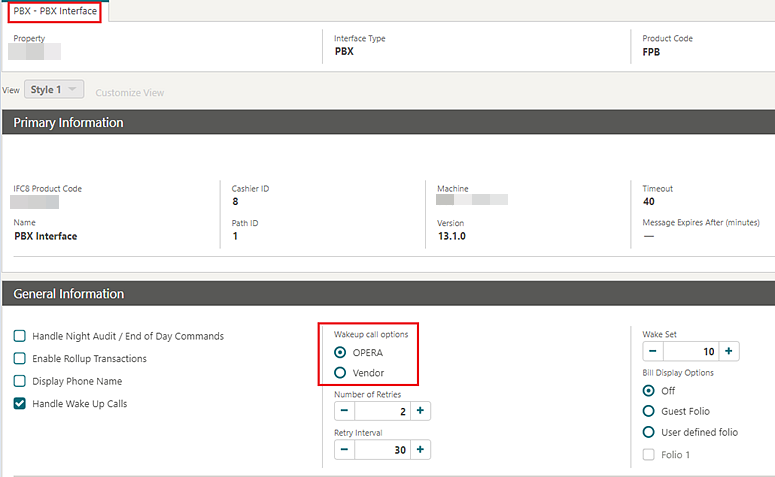
The PBX Interface configuration is enhanced enabling you to enable guest room lines to receive wake up calls.
In setup, you can select whether the vendor PBX system or OPERA Cloud controls the wake up call.
Transaction Codes Mapping Updated for POS Interface Configuration
The Transaction Codes mapping panel is updated for POS Interface configuration in Property Interfaces.
You can select a transaction code for a difference amount when the Difference Posting setting is set to POST (this is required when the Subtotal Postings option is set to Full Split).
A difference is identified when TotalAmount does not equal the sales items total.
-
Set to POST. The interface posts the sales items amounts plus the Difference amount to the guest folio using the selected transaction code.
-
Set to IGNORE. The interface ignores and not post the difference amount; only the sales itemizer amounts are posted.
-
Set to REJECT. The interface rejects the posting of a check when there is a difference in total amount and the sales itemizer amount.
UserID Element Added to Oracle Payment Interface (OPI)
The ability to populate the UserID tag in outgoing credit card transactions with the logged in user name that initiated the transaction is added.
-
The UserID is included when the payment partner supports the tag in the outgoing messages.
-
The UserID is already saved with the specific transactions and appears in the credit card history area of the reservation. The UserID always appears in OPERA Cloud even if the tag is not included in the messages.
Inventory
Inventory Dashboard Tiles User Tasks Added
The following general user tasks are added in Role Manager. These tasks are granted to all roles by default
-
View Max Available Rooms
-
View Room Availability Summary
Behavior in OPERA Cloud
-
With the Edit Dashboard user task assigned to your roles, you see all dashboard tiles in OPERA Cloud and you can add/remove and arrange tiles on your dashboard.
-
Without the Edit Dashboard user task assigned to your roles, you only view the tiles in the OPERA Cloud dashboard with the View Max Available Rooms user task and the View Room Availability Summary user task granted to your role.
-
With the Property Availability task assigned to your role, you can interact with the reservation tiles if the tile has drill-down capability.
-
Without the Property Availability task assigned to your role, you can only view the reservation tiles. Even if the tile has drill-down capability, you cannot interact with the tile.
Miscellaneous
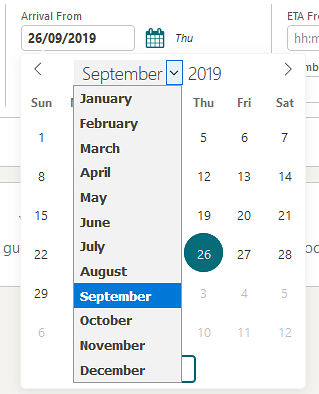
Calendar Component Updated
The calendar component that enables you to select a date or range of dates from a calendar popup is updated for desktop users. The new component supports all previous functionality with an updated design and more intuitive keyboard navigation:
-
Ctrl + Home: opens the associated calendar popup when focus is in the input field
-
Esc: closes the calendar popup
-
Right Arrow: move to next day
-
Left Arrow: move to previous day
-
Down Arrow: move to the next week
-
Up Arrow: move to the previous week
-
Ctrl + Right Arrow: move to next month
-
Ctrl + Left Arrow: move to previous month
-
Ctrl + Down Arrow: move to next year
-
Ctrl + Up Arrow: move to previous year
-
Enter: selects the chosen date
Changes Logs and User Activity Report Updated
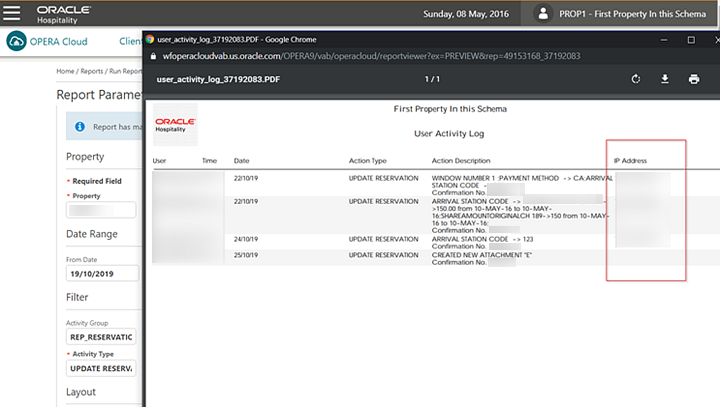
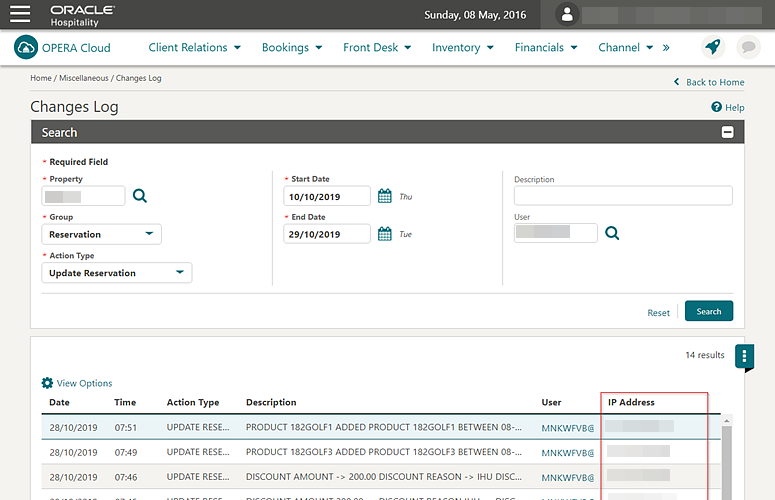
The changes logs and user activity report are updated with the removal of the Station ID column.
It is possible to display the workstation IP address. Refer to: Store IP Address in Changes Log Parameter Added
Previous Keys Column Added to Door Locking System Search Results
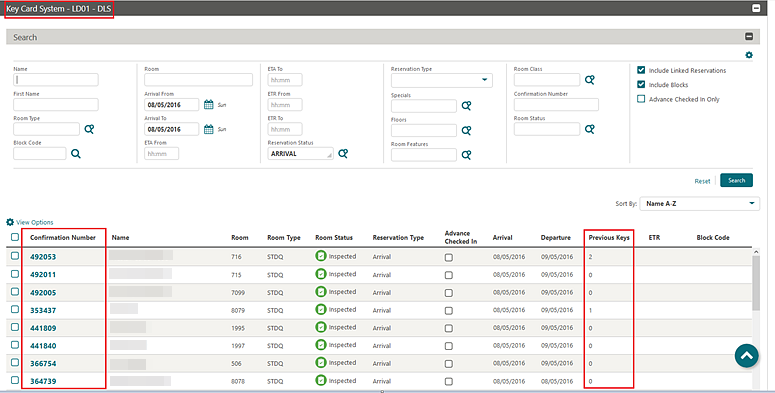
A Previous Keys column is added to the Property Interface Control DLS Key Interface management page (Miscellaneous>Property Interface Control > active Door Locking System) search results.
The confirmation number appears as a link to navigate to the reservation presentation page.
Rich Text Editor Updated
The Rich Text Editor component used in many OPERA Cloud screens is updated with standard iconography similar to many common text editing tools and applications. The enhancement is designed to help you easily recognize icons and understand available functionality.
The following example is from: Administration > Enterprise > Chain and Property Management > Closing Scripts > New/Edit.
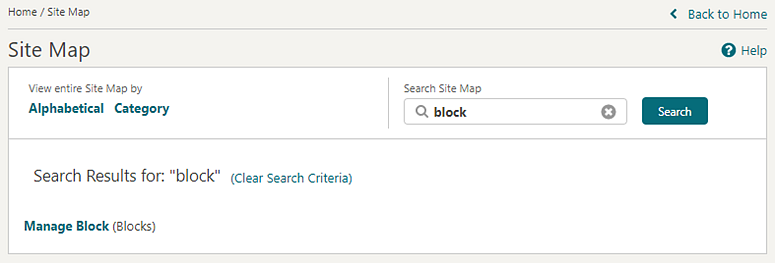
Site Map Search Updated
The Site Map search is updated to display the parent menu in parentheses following items returned from your search.
Store IP Address in Changes Log Parameter Added
A new General parameter, Store IP Address in Changes Log, is added to OPERA Controls.
When the parameter is enabled, the IP address of the workstation appears in a column on the Changes Log page and the User Activity Log report.
The parameter is not enabled by default. It retains previous functionality and does not display the IP address in the Changes Log.

STEPS TO ENABLE
-
From the Administration menu, select Enterprise and then select OPERA Controls.
-
Select or confirm the Property.
-
Select the General group and scroll to the Parameters section.
-
Enable the Store IP Address in Changes Log parameter.
Mobile
Mobile Access Available with Primary Standard or Premium Subscription
The O9M_900 OPERA Mobile addon subscription is deprecated and no longer required to access the /mobile web application on smartphone devices.
The /mobile web application is available with the primary Standard or Premium subscription.
Reports
Customizable Report Added to Profile Report Group
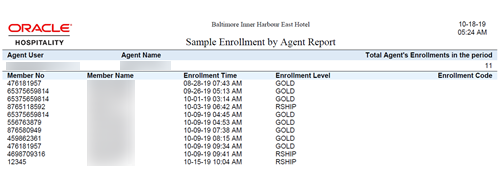
A Rich Text Format (RTF) customizable report (Sample Enrollment by Agent) is added to the Profile report group. The report provides a count and detailed list of members that were enrolled by a selected user. You can filter for Member Type, Date Range, and User.
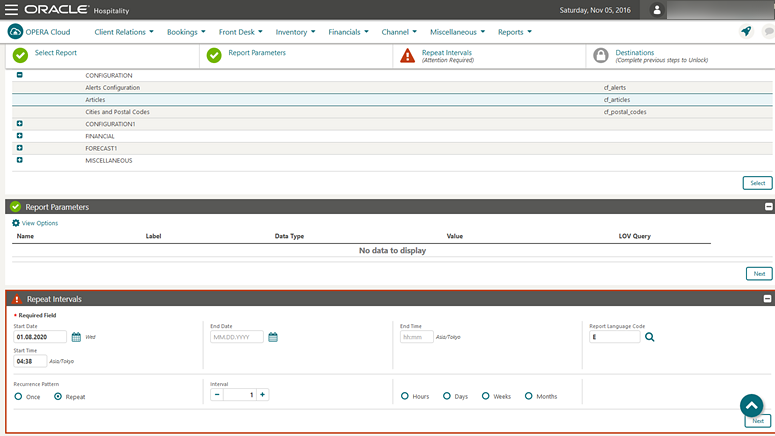
Intervals for Scheduled Reports
New Posted Event Revenue Report
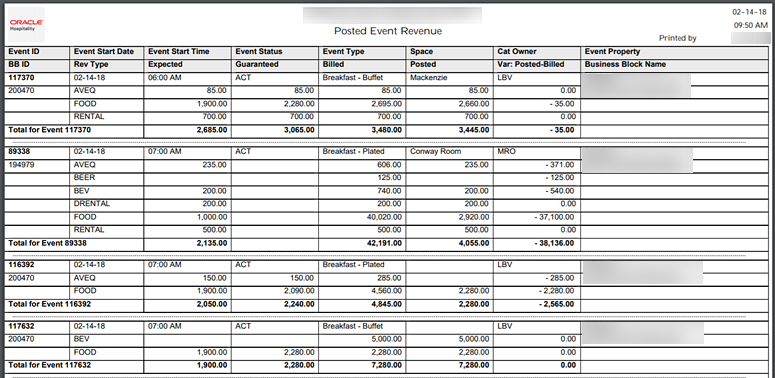
A Posted Event Revenue report is available in the Events report group when the Event Posting function is active. You can generate the report for specific blocks or a date range, and the report has additional filters including Catering Owner, Revenue Types, and Event Types. Expected, Guaranteed, Billed, and Posted revenue appear by Revenue Type for each event included in the report. You can use the report to verify all revenue is posted or to identify and research any discrepancies between the billed and posted revenue amounts.

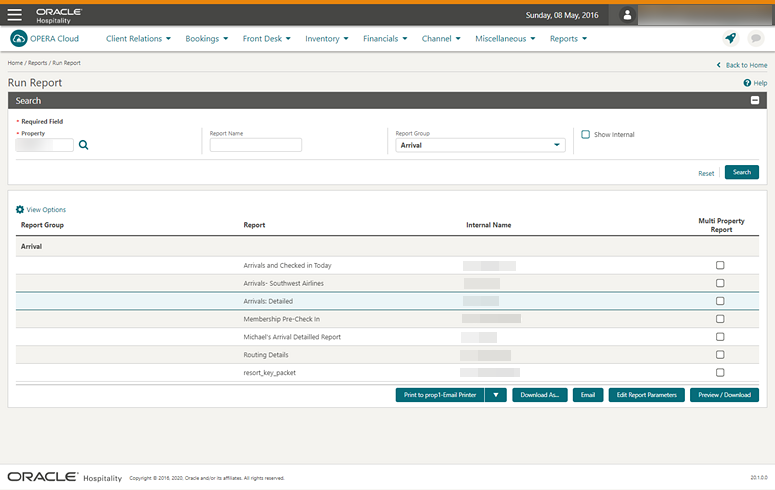
Run Report Screen Redesigned
-
The multi-step pattern is replaced with a table listing the reports for easy selection.
-
Actions to generate the report or modify report parameters appear at the bottom of the page in a persistent action bar.
-
You can generate reports with their default parameters by selecting an output action button after selecting the report name.
-
The Select Printer list button, on first interaction, allows you to select an email addressable printer. The printer is retained during your user session.
-
The Download As... action button allows you to download reports in HTML, RTF, XML, Delimited Data formats.
-
The Email action button allows you to email reports as a PDF attachment.
-
The Preview/Download action allows you to generate reports in PDF format in a new browser window for printing or saving on local file system.
-
After the report is generated, a fade-out confirmation message appears.
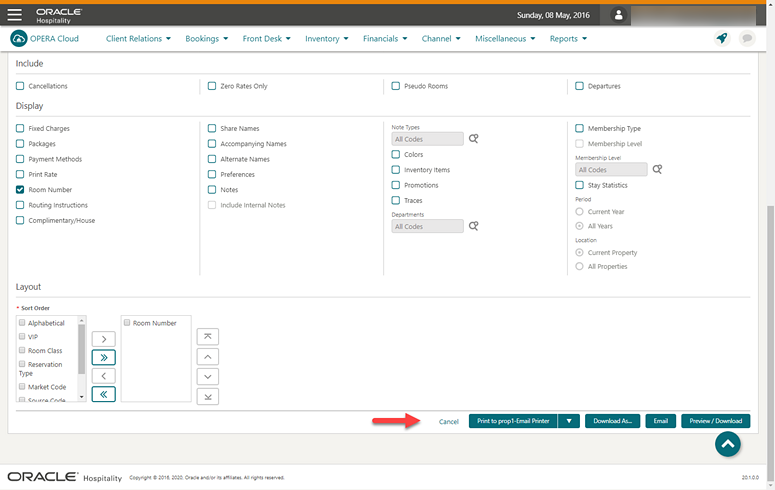
Edit Parameter screen:
UserID Added to Sample Stationery Templates
The following sample stationery templates are updated with UserID, which is populated with the OPERA Cloud user for a specific credit card transaction.
-
User_name merge code is available in the Sample Payment Receipt and Sample Folio XMLs to output the UserID.
STEPS TO ENABLE
-
From the OPERA Cloud application menu, select Reports, select Configure Reports, and then select Manage Reports.
-
Click Show Internal to list the stationery report groups.
-
Select the Folios report group and click Search.
-
From search results:
-
Select Download Sample_Data from the vertical ellipsis.
-
Open your customized folio RTF template by selecting Download Customized Report from the vertical ellipsis.
-
-
In Microsoft Word, do the following:
-
Load the sample XML for the RTF template.
-
Add the User Name field to the layout of your template.
-
Save your changes to the RTF template.
-
Upload the modified RTF template to OPERA Cloud.
Refer to Stationery Editor.
-
UserID Column Added to Credit Card Reports
The following reports are updated with UserID, which is populated with the OPERA Cloud user name for the specific credit card transaction.
-
On the Credit Card Authorization History report, the column titled User is added for the output of the UserID (cc_auth_history, from Authorization History panel > Report).
-
On the Credit Card History report, the column titled User is added for the output of the UserID (creditcard_history).
Wake Up Call Reports Added
Two wake up call reports are introduced:
-
The Wake Up Calls report provides a list of all wake up calls associated with reservations for the date range selected. You can run the report from either the Wake Up Call Companion screen or from the Guest In House report group.
-
The Wake Up Calls User Log Activity report details user activity related to wake up calls. The report is available in the Miscellaneous reports group.
Reservations
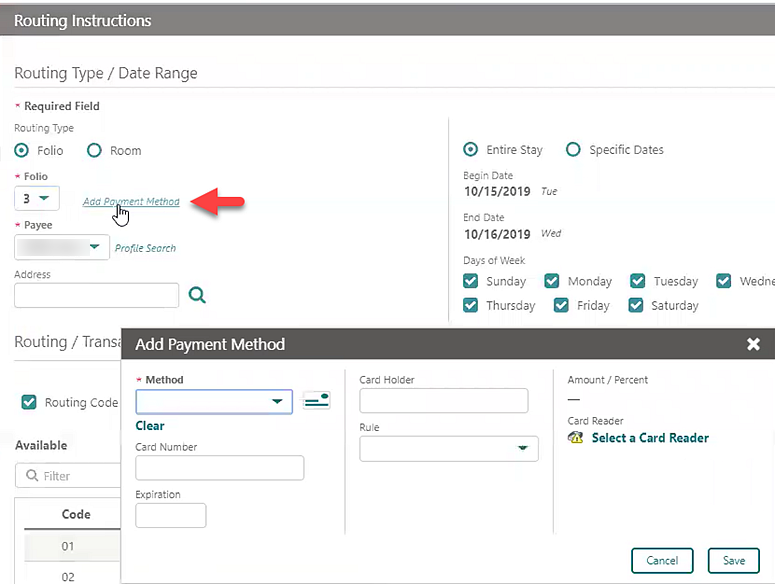
Add Payment Method Added to Routing Instructions
An Add Payment Method action link is added to Routing Instructions and appears when you select window routing and a window number.
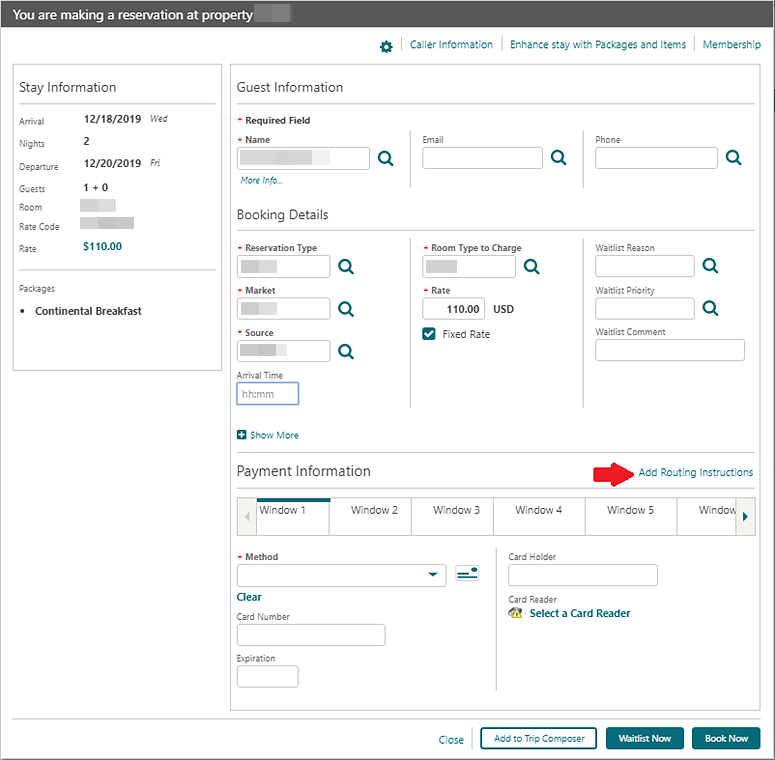
Add Routing Instructions at Time of Reservation Creation
The Book Now screen is modified to display an action link for Add Routing Instructions in the Payment Information panel. You can use this link to add routing instructions during the creation of the reservation.
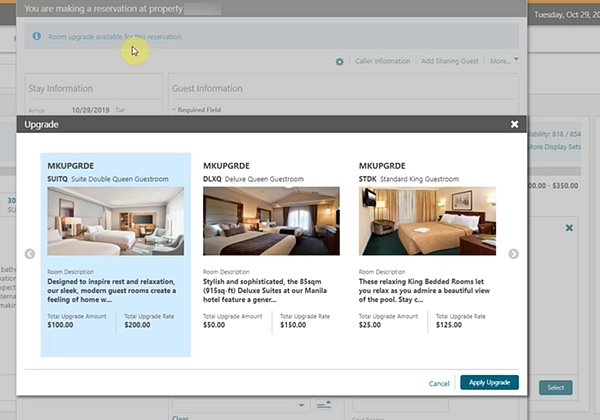
Book Now Adds Reservation Upgrade Information
With the Reservation Upgrade function active, an information link to view upgrade offers is available for new reservations eligible for an upgrade (based on the selected room type and rate code). The link appears at the top of the Book Now page.
The presentation of upgrade offers is redesigned so that multiple offers appear side-by-side in a carousel view.
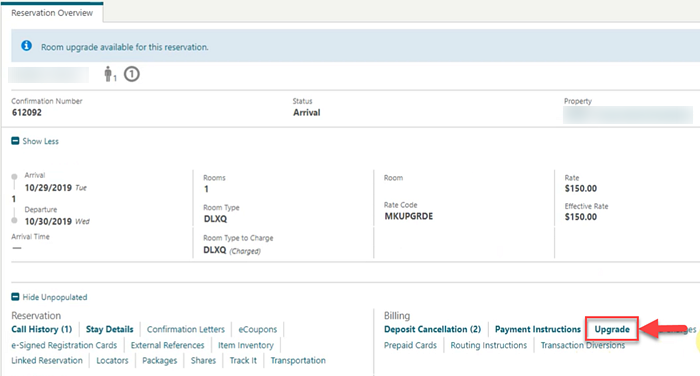
In the reservation presentation screen, the Business Card and the Stay Details panel displays a link to upgrade offers if the reservation is eligible. This includes previously upgraded reservations with further upgrade offers available.
An upgrade indicator link from the Reservation Overview > Billing section displays the upgrade page with the currently selected offer plus additional available offers. From this page, the Remove Upgrade action is available for reverting the reservation to the original room type.
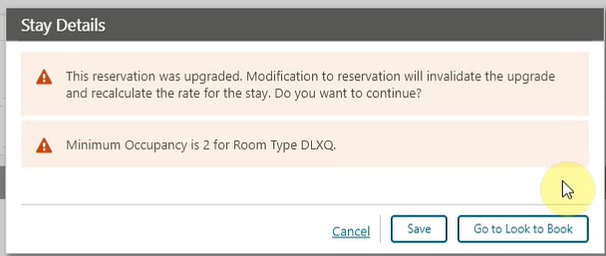
When changes are made to the reservation length of stay, you are presented with options regarding the adjustment to the upgrade offer.
When changes are made to the rate code or room type, you are prompted to continue and remove the upgrade.

Book Now Updated for Adding Payment Information
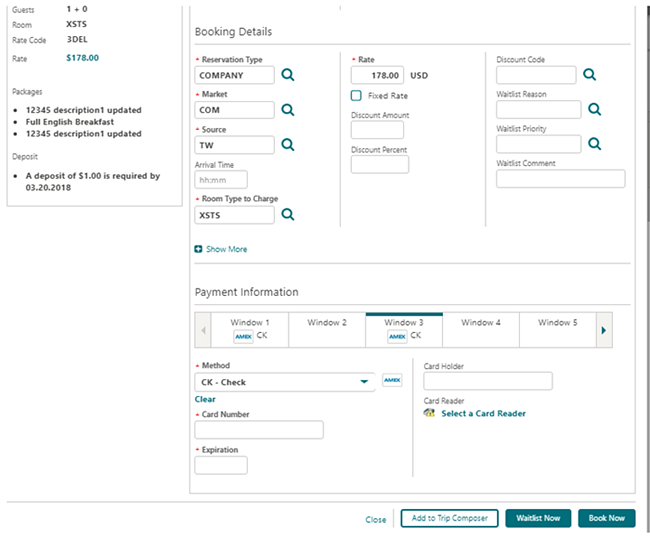
The Book Now screen is updated, enabling you to add payment information for the eight billing windows.
Change Routing Type on Routing Instructions
You can now change the routing type (Room or Window) on existing reservation routing instructions. When changing the routing type, the selected transaction codes or routing codes remain unchanged.
Confirmation Letter Template Modified
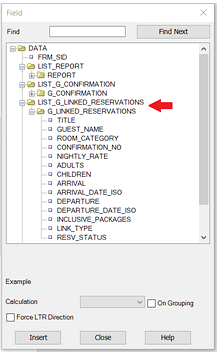
The Sample Confirmation Letter (sample_guest_confirmation) template is modified to include linked reservation details. A repeating group, G_LINKED_RESERVATIONS, contains the following elements:
-
TITLE (Title), GUEST_NAME (Guest Name)
-
ROOM_CATEGORY (Room Type)
-
CONFIRMATION_NO (Confirmation No)
-
NIGHTLY_RATE (Nightly Rate)
-
ADULT (No. of Adults)
-
CHILDREN (No. of Children)
-
ARRIVAL (Arrival Date)
-
ARRIVAL_DATE_ISO (Arrival Date in ISO Format)
-
DEPARTURE (Departure Date)
-
DEPARTURE_DATE_ISO (Departure Date in ISO Format)
-
INCLUSIVE_PACKAGES (Package Inclusions)
-
LINK_TYPE (Type of Linked Reservation LINKED / SHARED)
-
RESV_STATUS (Reservation Status)
-
RESORT (Property Code)
STEPS TO ENABLE
The following information also appears as a MOS article under Doc ID 2631555.1.
-
Download the new sample XML file and existing Customized RTF.
-
Access the existing Customized Guest Confirmation report from Reports > Configure Reports > Manage Reports.
-
Download the new sample XML file by clicking the Download Sample Data link.
-
Download the existing customized RTF by clicking the Download Customized Report link.
-
-
Load the latest XML file.
-
Open your customized RTF and load the new sample_guest_confirmation.xml file downloaded in Step 1 above. After the XML file is loaded, a message, "Data loaded successfully" informs you that the sample XML data is now loaded for use in customization. Now you can add a section on the template for linked reservations per your requirement.
Note:
It is recommended that you create a table with IF and End IF statements. You can refer to how the IF statement is used in Activities/ Inventory Items / Upsell sections of the existing customized confirmation RTF. IF and ENDIF represent the IF and END IF statements provided with the sample reports. All data contained within the IF to ENDIF statements only appears based on the conditions of the IF statement being met. If a reservation does not have any linked/shared reservations, the IF statement suppresses the Linked Reservation section from appearing on the confirmation. -
-
Insert Linked Reservation Merge Codes.
-
After the XML data is loaded into the Template document, use the BI Publisher > Field menu item to insert new fields in the document and edit accordingly.
-
New Merge Codes applicable for Linked Reservations are listed under the new Group, G_LINKED_RESERVATIONS. You can add fields by highlighting and dragging them to the document or double clicking on a selected field from this list.
Ensure the following:
-
The IF condition should carry the help text as
<?if:GUEST_NAME!=”?>to ensure the linked reservation section appears in the confirmation letter only when the reservation has at least one linked / shared reservation record. -
The "for-each" condition should be given as
<?for-each:G_LINKED_RESERVATIONS?>. -
The "end" condition should be given as end G_LINKED_RESERVATIONS and should carry the help text as
<?end for-each?>. -
After inserting a merge code in the template, check the help text and ensure that the same merge code is reflected as help text. For example, for Guest_Name merge code, the help text should be
<?GUEST_NAME?>. -
After the RTF is customized with merge codes applicable for Linked Reservations, save the file to your computer.
-
-
Use the updated customized RTF File.
-
Go to Reports > Configure Reports > Manage Reports> Select the existing Customized Guest Confirmation Report > Edit.
-
Click Choose File.
-
Select the latest modified RTF file from your computer and click Select.
-
-
Click Save to upload the template.
Cross Brand Recognition Parameter Added
A Cross Brand Recognition parameter is added to the Reservations group in OPERA Controls. When enabled, members of a central loyalty membership program are identified by a pop-up message when accessing their reservation. This helps identify where the guest originally enrolled. The message appears only if the chain for the source of the membership enrollment is not equal to the chain you are working in.
Along with the Cross Brand Recognition parameter, a new Default Membership Source application setting is added enabling you to define the enrollment source code to be added to membership for the chain.
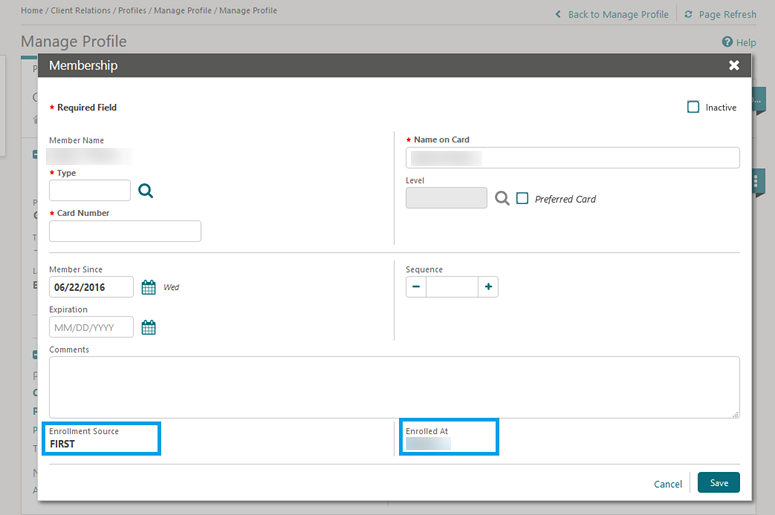
After the Cross Brand Recognition parameter is made active, Enrolled Source and Enrolled At fields appear in the Profile Membership screen.
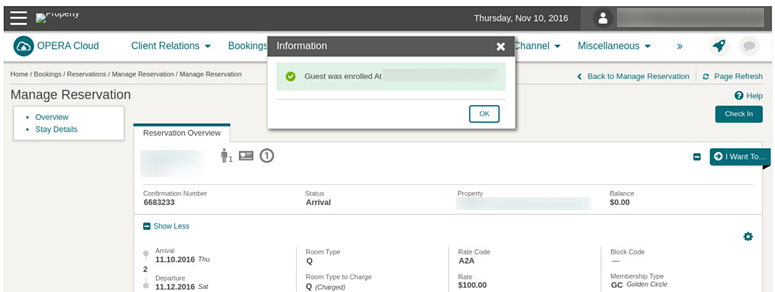
A Manage Reservation screen Information message indicates the chain or property where the guest membership originally enrolled.
STEPS TO ENABLE
-
From the Administration menu, select Enterprise, select OPERA Controls, and then select Reservations.
-
Enable the Cross Brand Recognition parameter.
-
Select Enterprise, select OPERA Controls, select Membership.
-
Update the Default Membership Source setting.
Keyboard Access Keys Added to Reservation Screens
Keyboard access keys are added to the most used input fields and control buttons in the following screens.
-
Caller Information entry
-
Look To Book search
-
Look To Book search results
-
Room Rate Availability Analysis
-
Book Now
-
Closing Script
-
General
To access keyboard shortcuts, press Ctrl on your keyboard and all fields that have a keyboard shortcut show the respective key(s) you can press to access the field.
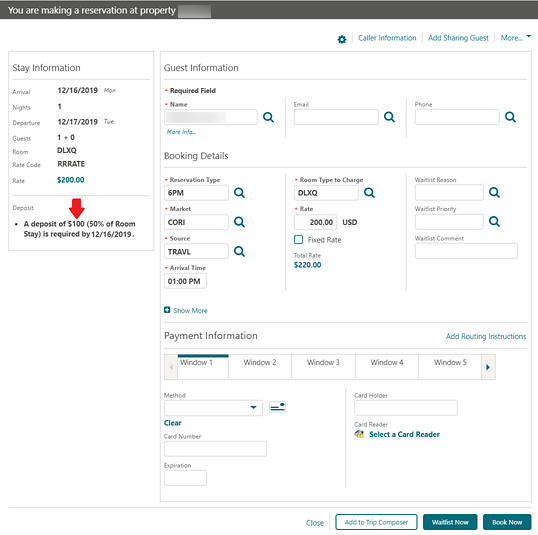
Look To Book Deposit Policy Updated to Show Amount
Look To Book Search Adds E Certificate Field
Properties with an interface to OPERA 5 OCIS with E-Certificate functionality enabled can now redeem a promotion e-certificates for a reservation..
The Look to Book search panel is updated with an E Certificate field that displays a list of e-certificates available for the selected member.
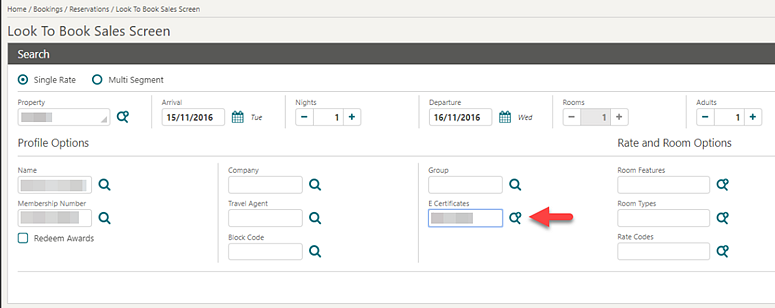
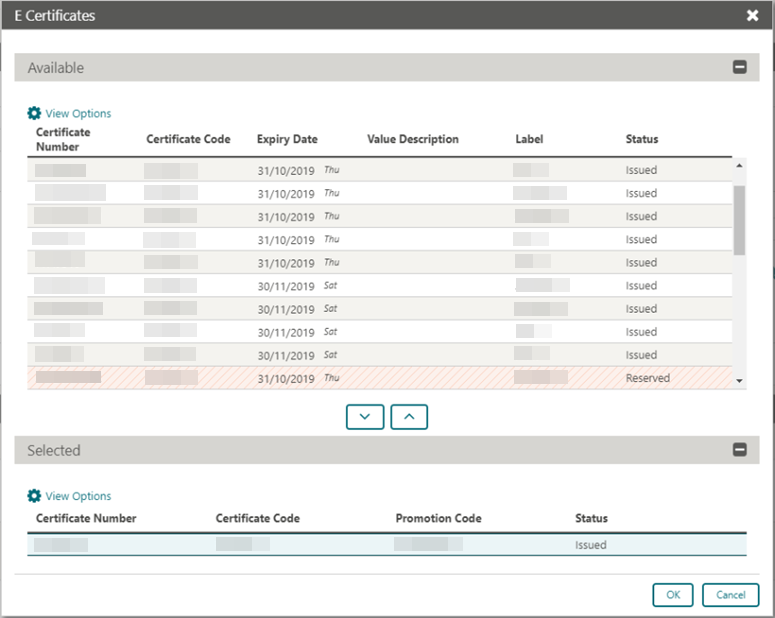
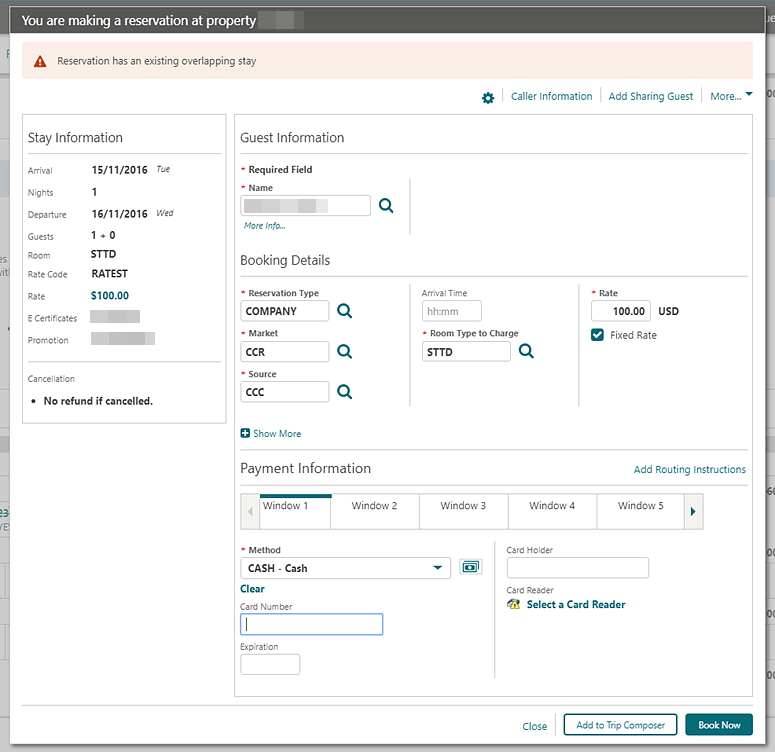
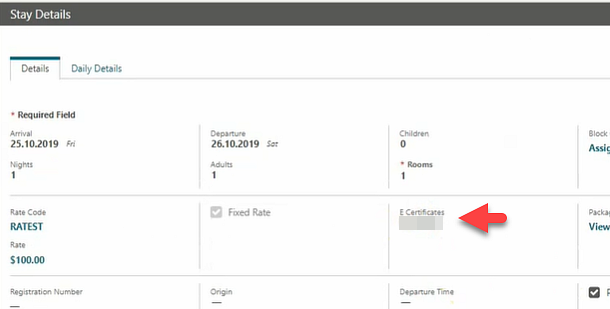
The Stay Details panel in the Reservation Presentation displays the e-certificate and promotion code.
You can update a member's reservation with an e-certificate by editing Stay Details. The E Certificate field provides a list of issued certificates.
Look To Book Search Refined
-
When a search is executed in the Look To Book Sales screen, the search panel remains expanded, but the focus moves down to the availability results. You can scroll up to review and refine the search criteria, which remains in the search fields.
-
For the multi-select list fields, the selected codes appear under the respective fields. In the event of overflow, hovering the mouse over the text reveals a tool tip displaying the full list of codes.
-
You can select the existing Show All option (triangle icon in field level) to view both codes and descriptions.
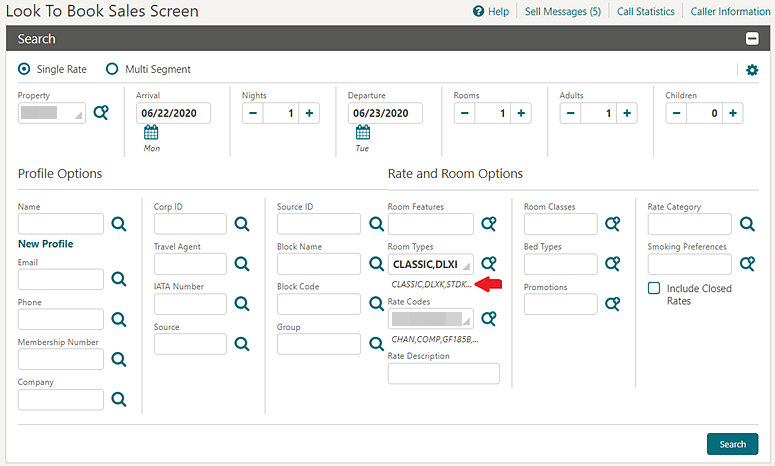
Look To Book Shows Display Set Descriptions
Look to Book availability is updated to show Display Set descriptions.
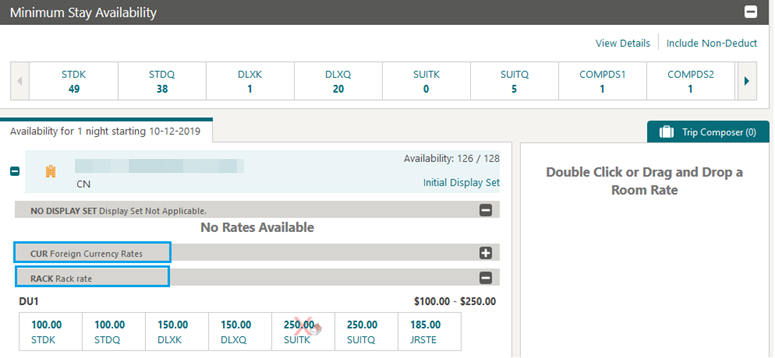
Parameter Enforces Credit Card Entry When Breaking Share
A parameter for Enforce Credit Card Entry for Credit Card Guaranteed Guests During the Break Share is added to the Reservations group in OPERA Cloud controls.
When breaking a share reservation, if one or more of the reservations are marked with a reservation type flagged as Credit Card GTD and if not all the sharers have a credit card number, OPERA Cloud prompts a payment screen with the list of share reservations requiring credit card details. After entering credit card details and clicking the Separate Share button, the share is broken and credit card details are copied to the listed reservations.
OPERA Cloud also validates the credit card details for credit card guaranteed shared reservations when reducing the length of stay, changing the room type, or performing a room move.
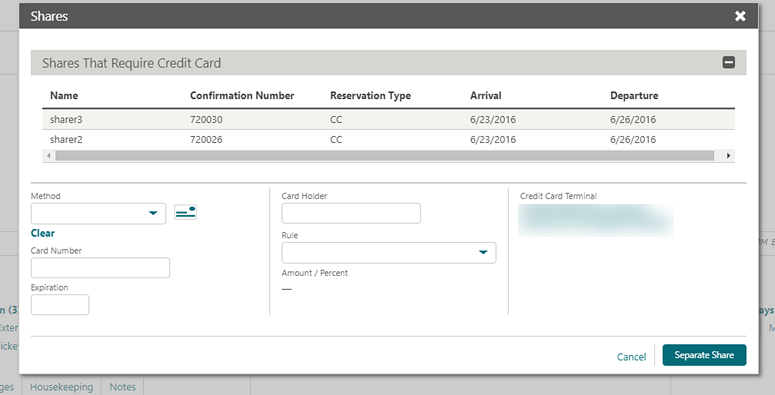
STEPS TO ENABLE
-
From the Administration menu, select Enterprise and then select OPERA Controls.
-
Select or confirm the Property name.
-
Select the Reservations group.
-
Select Enforce Credit Card Entry for Credit Card Guaranteed Guests During the Break Share parameter.
-
Activate the parameter.
Reservation / Front Desk Search Usability Improvements
The Reservation and Front Desk search screens are modified to improve usability.
-
The modification also apply to the Block Search screen. Block Search Usability
-
The Load More functionality is replaced by pagination controls with page numbers and previous/next links.
-
A page size selection is added enabling you to select the number of records you want displayed per page. The available values for the Show list are 20, 50, 100, 200.
-
Your selection for Show are saved per screen, so when you return to the same screen and perform a search, OPERA Cloud displays the same number of results per page.
Note:
All Reservation and Front Desk search screens are considered variations of the reservation search with different pre-selected criteria. Therefore, any selection in one of these screens will apply to all reservation search screens. -
The capped height on table and list view is removed. The displayed row count automatically adjusts based on the size of the browser.
-
The inner vertical scroll bar on the search results table is removed.
-
Added floating left and right scroll buttons along the sides of the search results in table view enabling you to scroll horizontally when focused anywhere in the table.
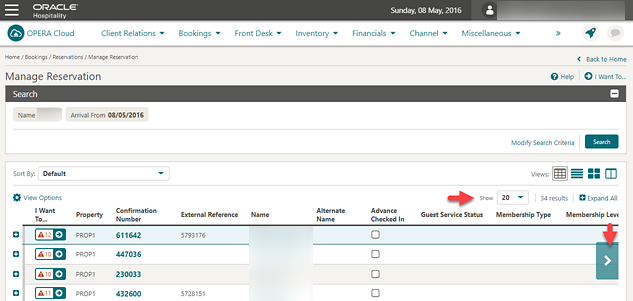
Reservation Dashboard Tiles User Tasks Added
The following general user tasks are added in Role Manager. These tasks are granted to all roles by default:
-
View Daily Projections Tile
-
View Reservation Activity Tile
-
View Reservation Revenue Summary Tile
-
View Reservation Statistics Tile
-
View Reservations and Cancellations Today Tile
-
View Rooms Sold Summary Tile
Behavior in OPERA Cloud:
-
With the Edit Dashboard user task assigned to your roles, you can see all dashboard tiles in OPERA Cloud and can add/remove and arrange tiles on your dashboard.
-
Without the Edit Dashboard user task assigned to your roles, you can only view the tiles in the OPERA Cloud dashboard with the View Daily Projections, View Reservation Activity, View Reservation Revenue Summary, View Reservation Statistics, View Reservations and Cancellations Today, and View Rooms Sold Summary user tasks granted to your role.
-
With the Reservation Management user task assigned to your role, you can interact with the View Daily Projections Tile, View Reservation Activity Tile, View Reservation Revenue Summary Tile, View Reservation Statistics Tile, View Reservations and Cancellations Today Tile, and View Rooms Sold Summary Tile if the tile has drill-down capability.
-
Without the Reservation Management user task assigned to your role, you can only view these tiles. Even if the tile has drill-down capability, you cannot interact with the reservation tiles.
Reservation Search Views Updated for Multiple Rates Codes and Rate Amounts
Reservation search result views are updated to display an indicator for multiple rate codes and rate amounts.
If either the rate codes or rate amounts on a multi-night reservation changes, an indicator next to the Rate Code and Rate Amount fields appears.
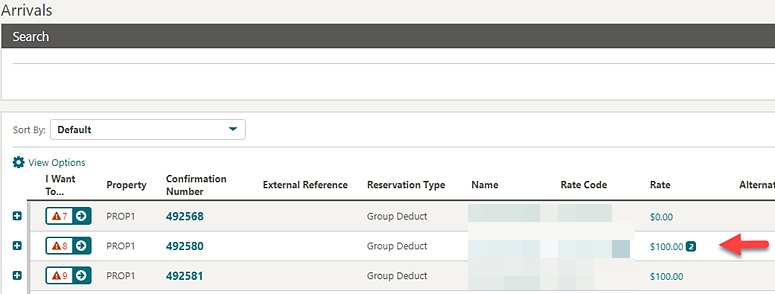
Room Diary Updated
The Room Diary is updated with the ability to create a new reservation, an Out of Order schedule for a room, or an Out of Service schedule for a room.

Routing Instructions Redesigned
The View mode on the Routing Instructions screen is redesigned so that the details for each routing instruction appear in a table with the window and room routing details appearing in separate sections.
You can edit routing by selecting the row level vertical ellipse and selecting Edit.
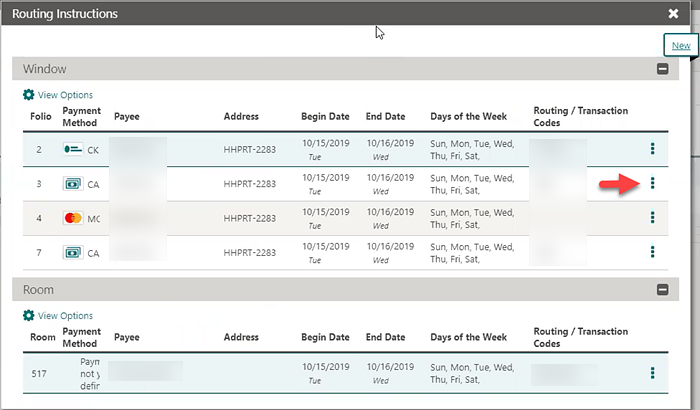
Source Code / Market Code Added to Manage Reservation
The console view for reservation search is updated to display the Source Code and Market Code for the reservation.
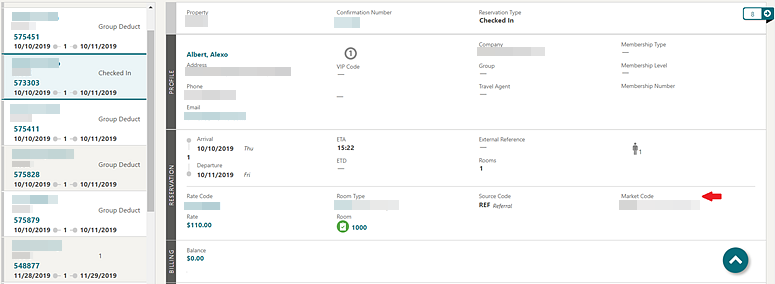
Total Cost of Stay Field Available on Reservations
The Reservation Overview and Stay Details panels in Reservation Presentation screen are updated to display a Total Cost of Stay field.
The field indicates the Total Cost including any add-on package items.
In the Stay Details Panel, the Total Cost of Stay field appears as a hyperlink to view the detailed Rate Information.
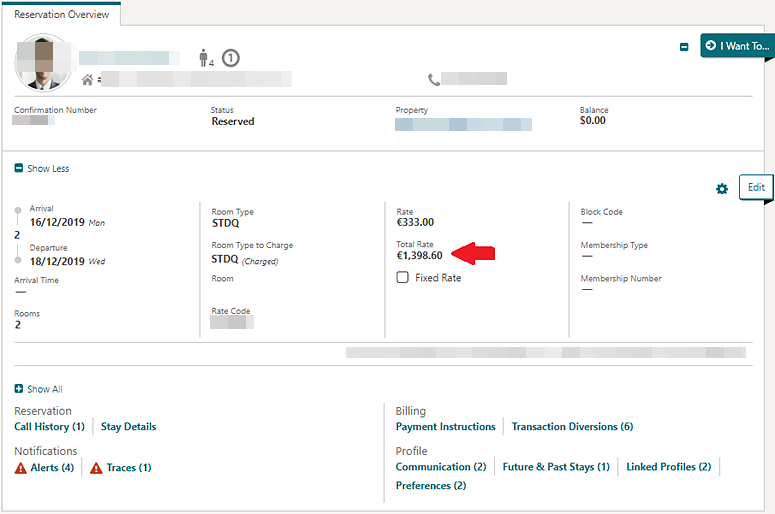
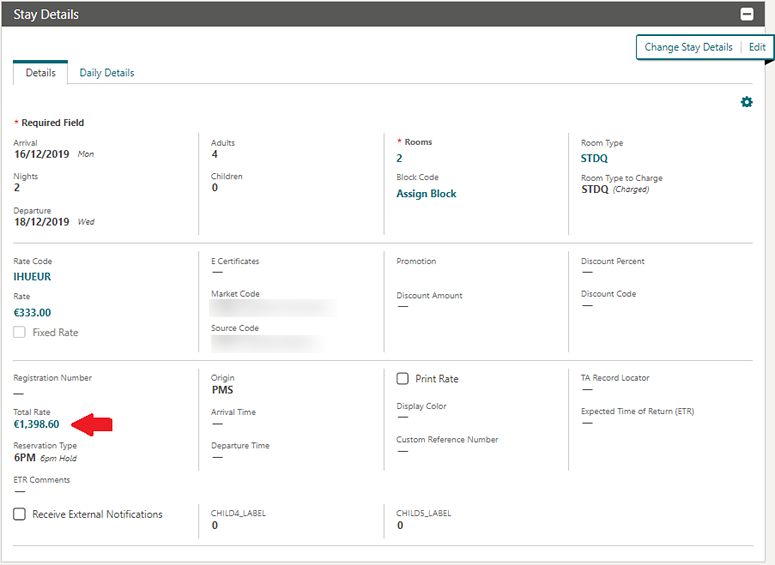
STEPS TO ENABLE
-
Enable Page Composer at property/hub or chain level, as required.
-
From the OPERA Cloud menu, select Bookings, select Reservations, and then select Manage Reservation.
-
Search for a reservation and launch the reservation presentation page by clicking the confirmation number.
-
Select the gear icon to customize the Stay Details panel.
-
Add Total Rate field in the desired locations.
-
Click Save.
-
Repeat steps 4-6 to add the Total Rate field to the Overview panel.
-
Click Save.
-
Disable Page Composer from the settings menu.
Rooms Management
Generate Task Sheet Updated
The Generate Task Sheet page is updated. When the Turndown function is active, the Resource panel displays a Turndown check box that disables all other fields and check boxes that are not applicable for generating Turndown task sheets. When the Task Sheet Template parameter is enabled, you can also create a template and select the template in the future from the template LOV on the Resources panel.
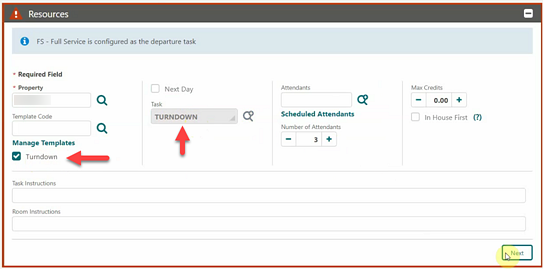

Room Management Dashboard Tiles User Tasks Added
The following general user tasks are added in Role Manager. The new tasks are granted by default to all roles.
-
View Queue Reservations Tile
-
View Room Maintenance Tile
-
View Room Status Tile
-
View Room Summary Tile
-
View Task Sheet Tile
-
View 60 Minutes Tile
Dashboard Tiles Behavior
-
With the Edit Dashboard user task assigned to your roles, you can see all dashboard tiles in OPERA Cloud and can add, remove, and arrange tiles on your dashboard.
-
Without the Edit Dashboard user task assigned to your roles, you can view only the View Queue Reservations, View Room Maintenance, View Room Status, View Room Summary, View Task Sheet, and View 60 Minutes user tasks granted to your role.
Some of the above tiles have multiple clickable areas controlled by separate user tasks.
Queue Reservations Tile
-
With the Reservation Management task, you can interact with the Queue Reservations tile.
-
Without the Reservation Management task, you can only view the Queue Reservations tile.
Room Maintenance Tile
-
With the Room Maintenance task, you can interact with the Room Maintenance tile.
-
Without the Room Maintenance task, you can only view the Room Maintenance tile.
Room Status Tile
-
With the Reservation Management task, Housekeeping Board task, and/or Room Discrepancies task, you can interact with some or all of the Room Status tiles' interactive areas.
-
Without the Reservation Management task, Housekeeping Board task, and Room Discrepancies task, you can only view the Room Status tile.
Room Summary Tile
-
With the Property Availability task, Out of Order task, and/or Out of Service task, you can interact with some or all of the Room Summary tiles' interactive areas.
-
Without the Property Availability task, Out of Order task, and/or Out of Service task, you can only view the Room Summary tile.
Task Sheet Tile
-
With the Task Sheets task, you can interact with the Task Sheet tile.
-
Without the Task Sheets task, you can only view the Task Sheet tile.
Example of the Room Status tile:
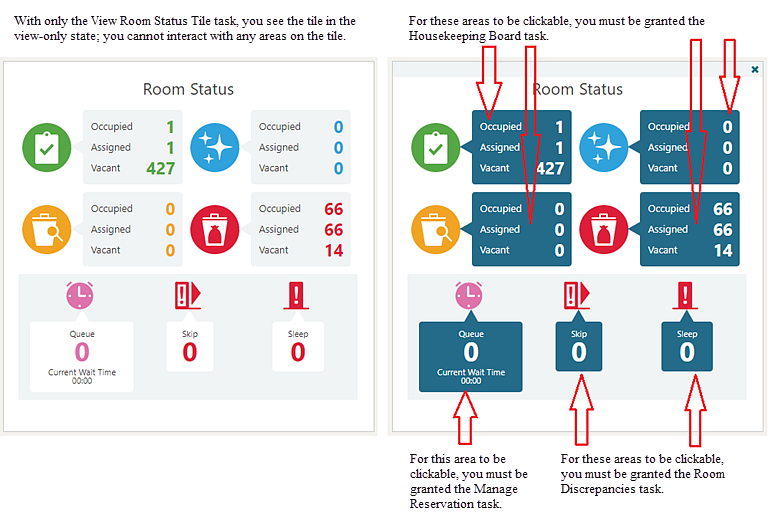
Show All Scheduled Tasks on Task Sheets
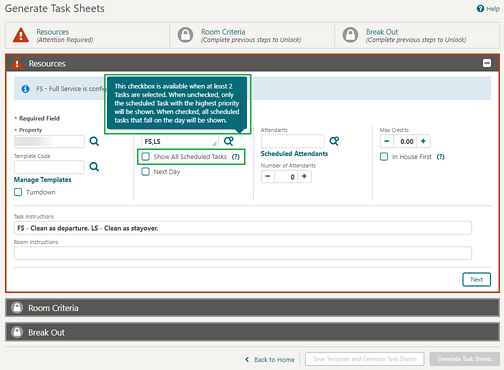
Task Sheet Presentation Screen
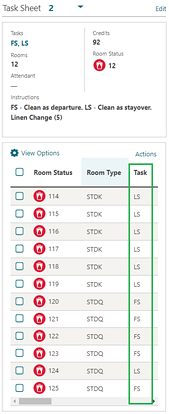
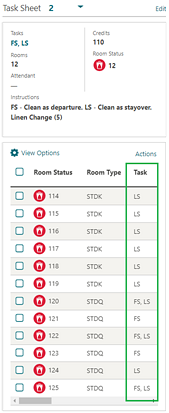
Task Sheet Companion
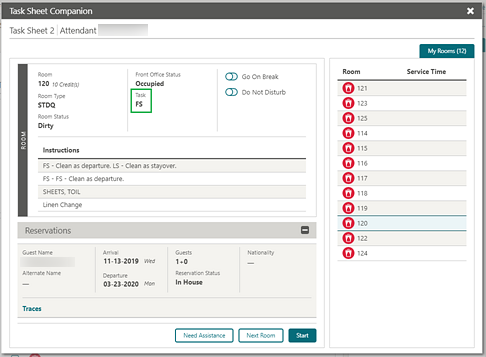
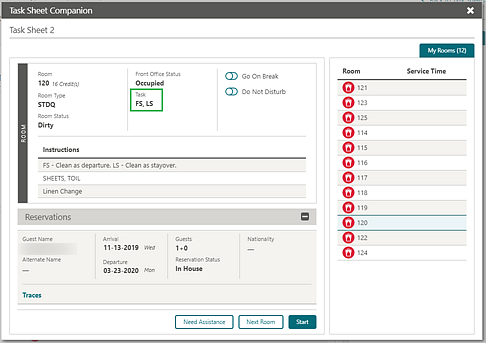
Task Companion (/smallformfactor)
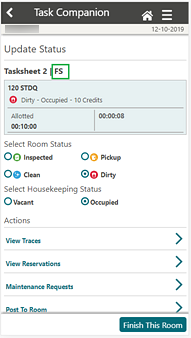
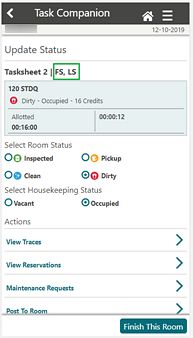
Sales
Sales Dashboard Tiles User Tasks Added
The following General user tasks are added in Role Manager. The new tasks are granted by default to all roles.
-
View To Do List Tile
-
View Activities Tile
-
View Appointments Tile
Behavior in OPERA Cloud:
-
With the Edit Dashboard user task assigned to your roles, you see all dashboard tiles in OPERA Cloud and you can add/remove and arrange tiles on your dashboard.
-
Without the Edit Dashboard task assigned to your roles, you only view the tiles in the OPERA Cloud dashboard with the View To Do List Tile, View Activities Tile, and View Appointments Tile user tasks granted to your role.
-
With the Activities user task assigned to your role, you can interact with the To Do List Tile, Activities Tile, and the Appointments Tile if the tile has drill-down capability.
-
Without the Activities user task assigned to your role, you can only view the To Do List Tile, Activities Tile, and Appointments Tile. Even if the tiles have drill-down capability, you cannot interact with the tiles.
