Search Screens
-
Application menu
-
Dashboard tiles
-
Quick Links
-
Site map search
You can search for a particular entity by entering or selecting criteria in the search screens. Searches can be done using basic criteria, or can be done in advanced mode, which allows additional criteria to be added.
Depending on your setup OPERA Cloud defaults to either a basic search or an advanced search panel.
Advanced search panels are customizable via Page Composer and can be further personalized to suit your specific needs.
You can toggle between the two search methods using the Goto, Search action link in the top right.
- Search Using Basic Criteria
- Search Using Advanced Criteria
- Predefined Searches
- Modify Search
- Search Result Panel
Parent topic: Common Actions, Icons, and Navigation
Search Using Basic Criteria
Figure 1-3 Basic Reservation Search

-
From a Advanced Search page, click Go To Basic Search in the upper right corner of the panel.
-
Enter search value as prompted.
-
Click Search. The entities that match the search criteria are displayed in the Results panel.
Parent topic: Search Screens
Search Using Advanced Criteria
Figure 1-4 Advanced Reservation Search

-
From a Basic search page, click Go To Advanced Search in the upper right corner of the panel.
-
Enter or select one or all of the search criteria displayed.
-
Click Search. The entities that match the search criteria are displayed in the Results panel
Note:
Depending on the services active the options available within Advanced Search will vary. For example with an active OPERA Cloud Sales and Event subscription the option to search by Sales Account is added to the View-by list. For more information, see Filtering Profile Search by Accounts.
Parent topic: Search Screens
Predefined Searches
Within the Front Desk Workspace menu Front Desk Workspace there are options for predefined reservation searches; click a menu option and click Search to launch the search.
Quick Launch also has Quick Links to go to a pre-defined search.
Parent topic: Search Screens
Modify Search
The current search criteria is displayed in the search panel. Click Modify Search Criteria to open advanced search to change your search criteria.
Figure 1-5 Modify Search Panel

Parent topic: Search Screens
Search Result Panel
Figure 1-6 Search Result Panel

-
Table: Displays results in rows and columns. Click
 to expand the row to view and access the active Detail Links for the entity.
 -
List: Displays results ir rows. Click
 to expand the row to view the details and access all Detail Links for the entity.
 -
Card: Displays each entity in a card. Click
 to expand the card to view more details.
 Note:
This is the default view when OPERA Cloud is accessed on a tablet; tap the card to select the entity. -
Console: Displays result as a split view with the search result in the left panel and details for selected entity in the right panel.
-
Sort By: Select to change the sort-by order.
-
Show: Select a value from list to determine how many results are displayed per page.
- View and Goto Navigation
- Vertical Ellipse Menu
- I Want to Menu
- Modifying Column Selection and Sequence
- Exporting Search Results
Parent topic: Search Screens
View and Goto Navigation
Values displayed in Cyan in a search result provide a link to view more information or go to the related entity - tap or click the link text to open the related entity or view more details.
-
Click the Guestname to go to the Profile Presentation page.
-
Click the Confirmation to go to the Reservation Presentation page.
-
Click the Block Code to go the Block Presentation page.
-
Click the Balance to go to the Billing page.
-
Click the Room type to open the room type information page.
-
Click the Rate code to open the rate code information page.
-
Click the Rate amount to open the rate information page.
Parent topic: Search Result Panel
Vertical Ellipse Menu
Figure 1-7 Vertical Ellipses Menu

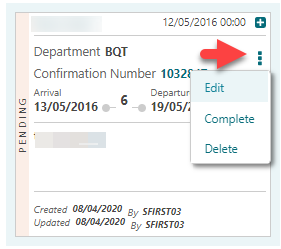
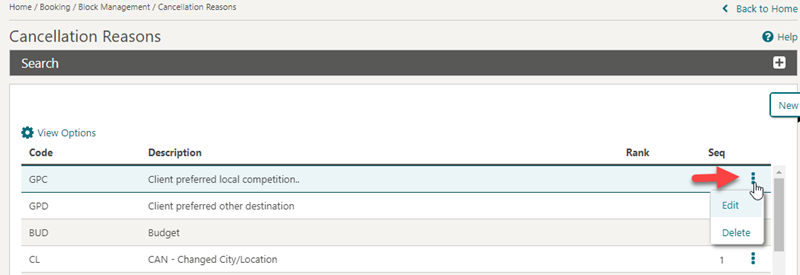
Throughout Administration search results are listed in a table view with a vertical ellipse menu displayed for each entity in the result.
Figure 1-8 Vertical Ellipse Menu in Administration Search Results

Parent topic: Search Result Panel
I Want to Menu
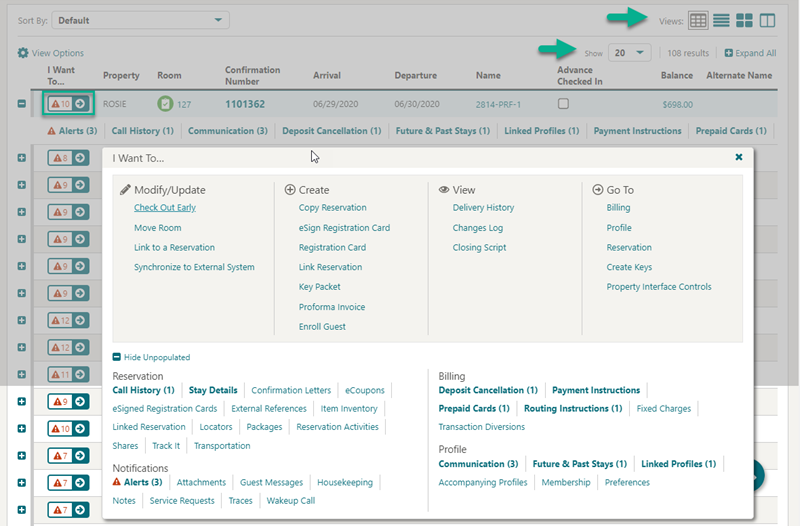
Tap or click ![]() to overlay a page with various actions and detail links for the entity.
to overlay a page with various actions and detail links for the entity.
Actions are separated into Modify/Update, Create, View and Goto categories. A maximum of 10 action links are listed in each category before a Show More is displayed. Tap or click each link to perform the required action.
By default OPERA Cloud displays all Detail Links. Detail Links displayed in BOLD contain data (populated) and are listed first'; regular text Detail Links do not yet contain data (unpopulated) .
Click Hide Unpopulated to only display Detail Links with active data.
Figure 1-9 I Want to Menu

Parent topic: Search Result Panel
Modifying Column Selection and Sequence
With the Column Options task assigned to your role you can select the columns and their sequence displayed in a table or list view.
Click View Options and select Columns > to view a list of columns. Check items in the list to select the columns to display in the result
Click Reorder Columns to set the column display sequence - select a column then use the navigation button to move the column up (left) or down (right) through the table.
Figure 1-10 Modifying Column Selection and Sequence

Parent topic: Search Result Panel
Exporting Search Results
-
Select Table view from Display Options
-
Click the View Options at the top of the search result and then click Export.
-
Select an option to export search result displayed in table view as ExcelHTML or CSV file.
-
When ExcelHTML is selected, the downloaded file is in HTML format with an XLS filename extension.(Excel is the default application).
-
When CSV is selected, the downloaded file is a delimited text file that uses a comma to separate the values in each column.
-
-
Filename: Enter a File Name.
-
Document Title: Enter a title.
-
Click Export.
The file is generated and downloaded on your workstation via the web browser.
Parent topic: Search Result Panel