1 Feature Summary
![]()
ORACLE HOSPITALITY DIGITAL LEARNING
Oracle Hospitality is committed to supporting your business needs. To enable our customers, we are providing complimentary access to OPERA Hospitality Digital Learning through Oracle University for a limited time. To use these OPERA-related service offerings from Oracle University, you must have a technical support contract for OPERA which is active and in good standing. Please contact operaenablement_ww@oracle.com with the primary property point of contact for access and activation.
![]()
Column Definitions
| SMALL SCALE: These UI or process-based features are typically comprised of minor field, validation, or program changes. Therefore, the potential impact to users is minimal. |
| LARGER SCALE: These UI or process-based features have more complex designs. Therefore, the potential impact to users is higher. |
| CUSTOMER ACTION REQUIRED: You must take action before these features can be used. These features are delivered disabled and you choose if and when to enable them. |
Features that are specific to the Sales and Event Management Premium Edition are marked with the Premium badge. ![]()
Features that are specific to the Comp Accounting Cloud Service are marked with the Gaming badge. ![]()
Accounts Receivable
AR Account Type for Authorizers Added
![]()
An Authorizer AR Type Comp Account is added in OPERA Controls for associating authorizer AR accounts with an AR Account type. Refer to: AR Account Type.
STEPS TO ENABLE
-
From the side menu, select Administration, select Enterprise, and then select OPERA Controls.
-
Select or confirm the Property where you want to enable the parameter.
-
Click the Comp Accounting group.
-
Locate and update the Authorizer AR Type setting.
-
Select an AR Account Type.
Block Management
Alternate Date OPERA Control Removed
The Alternate Dates OPERA Control and related functionality is removed.
Create Block Link Added to Block Search
A Create Block action link is added to Block search.
You can launch the screen by pressing [CTRL][N] on your keyboard.

Group Rooms Control Updated
![]()
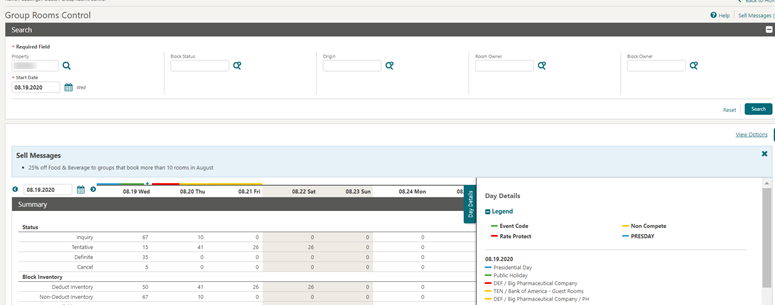
Group Rooms Control is updated with color indicators for Non Compete, Rate Protect, Day Type, and Calendar Events.
A Day Details drawer is added to view details for the indicators. Multiple indicators appear per date column, and the details are available in the Day Details drawer.
Date-driven sell messages are also added so you can easily and effectively communicate offers and announcements to your team.
Reports Navigation Updated
I Want To . . . Reports is updated to launch Manage Report with the Blocks and Groups report group selected and the reports listed.
I Want To . . . Group Stationery is updated to launch Manage Reports with the Group Stationery report group and reports listed.

IMPACTS OR OTHER CONSIDERATIONS
See Multiple Updates to Generate Reports.Simple Diary Updated
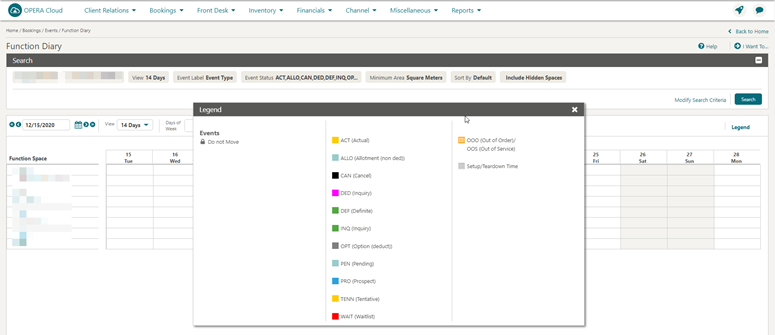
For properties with the Simple Events OPERA Control active, the (Simple) Function Diary is updated. See Simple Events
Cashiering and Financials
Auto-settlement of Comp Folio Windows Added
![]()
Auto Settle Comp Folio and Default Comp Payment Method OPERA Controls are added enabling you to initiate the auto-settlement of comp folios during the check-out process (or while processing Advance and Interim Folios).
Comp folios with a balance are settled in the following manner:
-
If the Authorizer of the routing instruction for the comp folio has a valid AR Account, the comp folio auto settles to that AR account.
-
If the Authorizer does not have a valid AR account, but the Default Comp Payment Method application setting is defined, the comp folio auto settles to that payment method.
-
If there is no AR account and no Default Comp Payment Method, the folio is presented for manual settlement.

After the Auto Settle process is completed, the Batch Report Destination screen appears with a list of the settled folios and their print destinations.

STEPS TO ENABLE
-
From the side menu, select Administration, select Enterprise, and then select OPERA Controls.
-
Select or confirm the Property where you want to enable the parameter.
-
Click the Comp Accounting group and scroll to the parameter section.
-
Locate and activate the Auto Settle Comp Folio parameter.
-
Locate and select a value for the Default Comp Payment Method setting.
Note:
A list displays transaction codes configured with Comp Payments checked.Billing Updated for Comp Folio Printing
![]()
A Print Comp Folio OPERA Control is added for defining the print options when a comp folio (101-108) is settled.
- AUTO_PRINT: displays the Settle and Send Folio button when settling folios 101-108. Clicking the button settles the folio and opens the Report Destination screen for printing the folio.
- SELECT_DESTINATION: displays the Settle and Send Folio and the Settle Folio buttons when settling folios 101-108. The Settle and Send Folios button settles the folio and then displays the Report Destination screen for printing the folio. The Settle Folio button settles the folio without presenting the Report Destination screen.
Note:
The setting is set to Select_Destination by default in order to show both buttons during the settlement process.Billing Updated for eFolio Export
For properties with the eFolio Export OPERA Control active, Billing is updated to display the Before Settlement Actions prompt when posting settlement from the following:
-
Advance Bill
-
Early Departure
-
Interim Bill
-
Check Out
-
Credit Bill (through Billing)
-
Quick Checkout
You can select an eFolio delivery method from the delivery types defined on the profile. Refer to: Delivery Types Added for eFolio Export
Folio details are queued for inclusion in the eFolio export.

IMPACT OR OTHER CONSIDERATIONS
For details on enabling the eFolio export see eFolio Export AddedBilling Updated for Player Redemption
![]()
Comp Redemption is added to OPERA Cloud controls. It enables you to configure comp redemption codes used to redeem comps earned by guests with a casino player membership to pay for billing charges.
Refer to: Configuring Comp Redemption Codes
After configuring comp redemption codes and meeting the following conditions, you can post redemptions to reservations. Note the following conditions:
-
The Folio No Reprint in OPERA Controls is active.
-
The reservation has a membership equal to the Default Membership Type for the Patron Tracking System (PTS) OPERA Control.
-
The redemption amount is greater than 1.00 (not zero or a negative amount), but not higher than the balance of the folio window where the redemption is being posted.
-
The Post Redemption button at the bottom of the screen.
-
An I Want To . . . Post Redemption action.
-
A Post Redemption action link in the vertical ellipsis for each folio window.
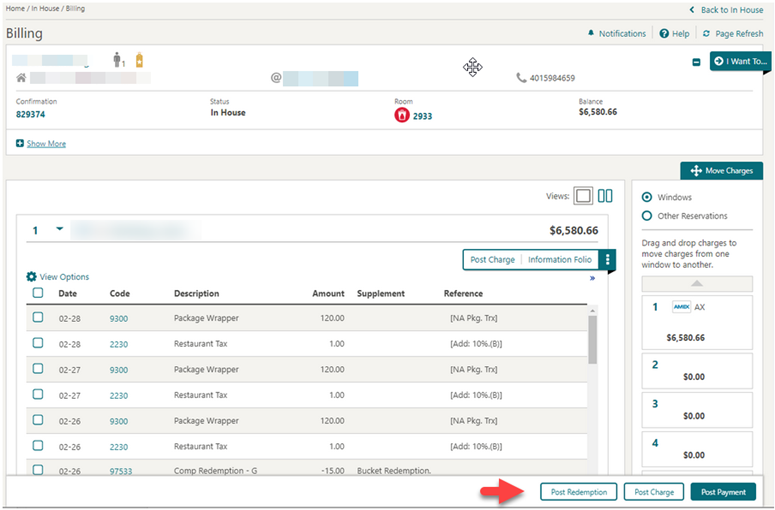
After selecting the Post Redemption action, the redemption panel appears with a list of Comp Redemption codes configured at your property.
You can redeem a total amount equal to or less than the balance of the selected folio window.
The redemption amount or the sum of redemption amounts cannot be negative or higher than the balance of the selected folio window.

After posting redemptions to a folio window, you cannot edit the redemption amount, split, move, transfer, or adjust the transaction.
To correct or reverse a redemption posting, users granted the Reverse Redemption task can select the Reverse Redemption button and select an adjustment reason for deleting the selected redemption.
The Reverse Redemption button is only available for redemptions made on the same business date of the property.

STEPS TO ENABLE
-
From the side menu, select Administration, select Enterprise, and then select OPERA Controls.
-
Select or confirm the Property where you want to enable the parameter.
-
Click the Comp Accounting group and scroll to the parameters section.
-
Enable the Comp Redemption parameter.
-
From the side menu, select Role Manager.
-
Search and edit the Chain and/or Property Role(s) to be granted access to Comp Redemption Codes configuration.
-
Click the Financial Admin group, scroll to the Comp Accounting section, and grant these tasks as required:
-
Comp Redemption Codes
-
New/Edit Comp Redemption Codes
-
Delete Comp Redemption Codes
-
-
Click Save.
Billing Updated for Reverse Direct Bill
The following is introduced generically, but should be reviewed by properties in Germany:
A Reverse Direct Bill user task is added in the Financials task group.
When you activate the Folio No Reprint OPERA Control, the Reverse Direct Bill action is hidden in Billing.
When you deactivate the Folio No Reprint OPERA Control, the Reverse Direct Bill action is enabled in Billing for users with the Reverse Direct Bill user task assigned to their role(s).

STEPS TO ENABLE
-
From the side menu, select Role Manager and then select either Manage Chain Roles or Manage Property Roles according to your needs.
-
Enter search criteria and click Search.
-
Select the role to update, click the vertical ellipsis, and select Edit.
-
Select the Financials group and grant the Reverse Direct Bill task.
-
Click Save.
Billing Updated to Remove Inclusive Taxes
![]()
A Deduct Inclusive Tax from Comp Window OPERA Control is added. When active, if a sales charge transaction is moved to a comp window, the inclusive taxes are not comped, resulting in only the net amount transferring to the comp window. If this charge is moved back to a cash window, then the inclusive taxes are re-posted.
This OPERA Control is not available when Deferred Tax is active, and when Deduct Inclusive Tax from Comp Window is active, the Deferred Tax OPERA Control is not available .
Note:
This parameter cannot be deactivated if there are any Open Folio, In House, or Future reservations with a net amount charges in a comp window, that is, without the inclusive tax.STEPS TO ENABLE
-
From the side menu, select Administration, select Enterprise, and then select OPERA Controls.
-
Select or confirm the Property where you want to enable the setting.
-
Click the Comp Accounting group.
-
Locate and update the Deduct Inclusive Tax from Comp Window parameter.
Card Present Check Box Added to Payment
When the Payment Services Directive OPERA Control is active:
A Card Present check box is enabled in the areas listed below. The Card Present check box is deselected by default and remains deselected when the credit card PAN and EXPY are entered manually. The check box is selected when the credit card details are returned in the interface response to the authorization or sale transaction. A "Credit Card Was Entered Manually" prompt also appears for your information when you enter the credit card PAN and EXPY manually.
-
Look to Book Sales, Payment Information
-
Deposit payment
-
Check In, Verify Payment step
-
Payment Instructions panel
-
Authorization and History
-
Billing payment
-
House Posting Account payment
-
Post It payment
-
Passer By payment
-
Accounts Receivable Invoice payment


IMPACT OR OTHER CONSIDERATIONS
See Payment Service Directory (PSD2) OPERA Control Added and MOTO Attribute added to Payment Integration
Comp Accounting OPERA Controls Added
![]()
The following OPERA Controls are added to the Comp Accounting group:
| Control Name | Type | Description |
|---|---|---|
|
Authorizer PIN Required |
Parasmeter |
When moving a transaction to a comp window, users are prompted for the authorizer pin belonging to the authorizer for the target window when this parameter is active. |
|
Auto Settle Comp Folios |
Setting |
Transactions on comp windows are automatically settled to the authorizer's AR account. You may, however, define an alternate default method of payment for auto- settling comp charges at check out. |
|
Comp Requests |
Setting |
Enables Authorizers to approve a comp routing request (that is, set up comp routing instructions for a comp routing request), or decline the comp routing request. |
STEPS TO ENABLE
-
From the side menu, select Administration, select Enterprise and then select OPERA Controls.
-
Select or confirm the Property where you want to enable the parameter.
-
Click the Comp Accounting group.
-
Locate and enable the Authorizer PIN Required parameter.
-
Locate and update the Auto Settle Comp Folios setting.
-
Locate and update the Comp Requests setting.
Comp Accounting: Incorporating Comp Windows 101-108
![]()
The following is implemented in Billing, Comp windows 101-108.
-
Selecting the Post Charge link on any Comp window opens the Post Charges screen with window 1 selected as a default window.
-
The Post Adjustment action link is removed from Comp windows as the comp transactions cannot be adjusted. If adjustment is necessary, the charge should be moved back to the regular window and the adjusted transaction can be moved again to Comp windows.

Comp windows 101-108 are now available on the Billing screen for the I Want To . . . Generate Information Folio option.

The following four new tasks are available in the Comp Accounting workspace of the Financial Administration task group:
-
Access Comp Windows. When granted this task, you can access windows 101-108 and can:
-
Set up Comp routing instructions.
-
Select a Comp window for transfer posting.
-
Select Comp windows in the payment screen or drawer.
-
-
Edit Price Quantity Comp No Approval. When granted this task, you can edit price/quantity for a posting on window 101-108 even if the comp posting is not approved.
-
Edit Price Quantity Comp With Approval. When granted this task, you can edit price/quantity for a posting on windows 101-108 if the comp posting has already been approved.
-
Transfer Posting Comp No Approval. When granted this task, you can transfer a Comp posting if it has not been approved.
STEPS TO ENABLE
-
From the side menu, select Role Manager and select either Manage Chain Roles or Manage Property Roles.
-
Enter search criteria and click Search.
-
Select the role to update, click the vertical ellipsis and select Edit.
-
Select the Financials group and grant the following tasks:
-
Access Comp Windows.
-
Edit Price Quantity Comp No Approval.
-
Edit Price Quantity Comp With Approval.
-
Transfer Posting Comp No Approval.
-
-
Click Save.
Comp Authorizer Group Limits Added
![]()
You can now define Daily Credit Limit and Transfer Limit in the Authorizer Group and Authorizer ID for Transaction/Routing Codes. Any Authorizer associated with a group will inherit the same Transaction/Routing Codes, Daily Credit Limit, and Transfer Limit values, as well as rate code. This takes precedence over the Transaction/Routing Codes, Credit limit, and limit values as well as the rate code defined on the specific authorizer itself.
When you route a posting or move to a Comp window, the Daily Credit Limit/Transfer Limit values will validate, and if the limit is exceeded, the transaction will not be comped. When creating a comp routing instruction, if the authorizer has any Transfer Limit values defined for the Transaction/Routing Codes, the lowest limit value among the selected codes is pre-populated in the Routing limits; this takes precedence over the limits defined in the Comp Routing Codes.
Comp Posting Journal Updated
![]()
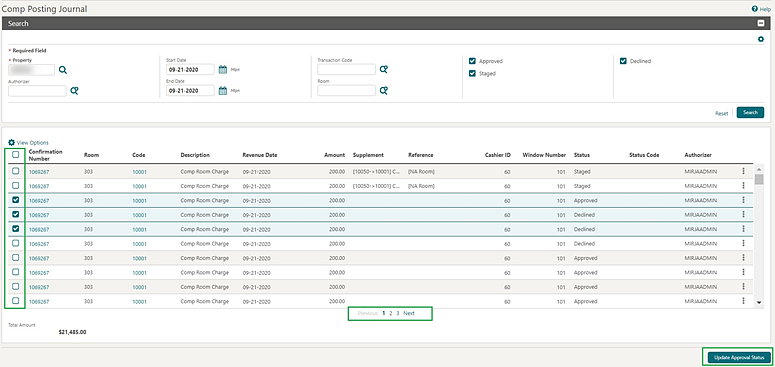
A Comp Posting Journal is added and provides summary and detail information on all transactions routed or transferred to comp windows (101-108).
When the Comp Transaction Status OPERA Control is enabled, additional search filters are available for approval code, approved, declined, and staged.
The search results table displays the following: confirmation number (link), room, code (link), description, revenue date, amount, supplement, reference, cashier ID, window number, and authorizer.
Actions are provided for the transactions listed in the search results, enabling you to access options related to the transaction and the associated reservation.
-
Confirmation Number (link) - when clicked, opens the reservation overview (controlled by the Reservation Management task).
-
Code (link) - when clicked, allows editing the transaction (controlled by the Manage Financial Postings task).
-
Go to Billing - opens the billing screen (controlled by the Manage Financial Postings task).
-
Go to Profile - opens the profile overview (controlled by the Profiles Management task).
-
View Routing Instructions - opens routing instructions (controlled by the Routing Instructions task).
-
Transfer Posting - opens the transfer postings page (controlled by the Manual Transfer of Transactions Between Reservations task).
-
Update Approval Status - available to users granted the Update Approval Status task; enables update of the transaction status to approved, declined, or staged.
You can select multiple records at the same time using the Select column. After you select more than one row, the Change Approval Status button appears at the bottom of the screen for processing the selected records.
Pagination is available to make it easier to navigate between postings. Up to 200 records are shown in one screen.
STEPS TO ENABLE
-
From the side menu, select Administration, select Enterprise, and then select OPERA Controls.
-
Select or confirm the Property where you want to enable the parameter.
-
Click the Comp Accounting group and scroll to the parameters section.
-
Enable the Comp Transaction Status parameter.
-
From the side menu, select Role Manager and then select either Manage Chain Roles or Manage Property Roles according to your needs.
-
Enter search criteria and click Search.
-
Select the role to update, click the vertical ellipsis, and select Edit.
-
Select the Financials group and grant the tasks: Comp Posting Journal and/or Update Approval Status.
-
Click Save.
Comp Revenue Bucket Configuration Added
![]()
The existing Revenue Bucket configuration is updated with the option for configuring Comp Revenue Buckets.
The Comp Bucket Type allows the selection of Comp Transaction Codes.
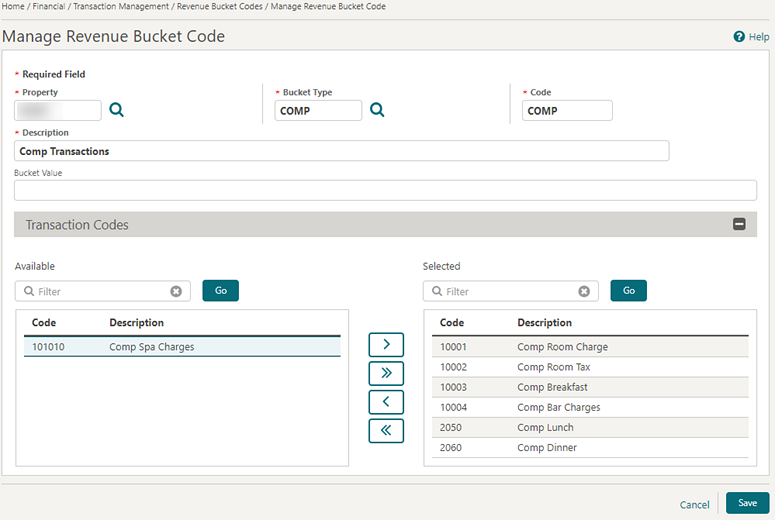
Within Billing, the Billing Summary is updated to show the Comp Revenue totals. Select I Want To . . . View Billing Summary.

Comp Routing Codes Added
![]()
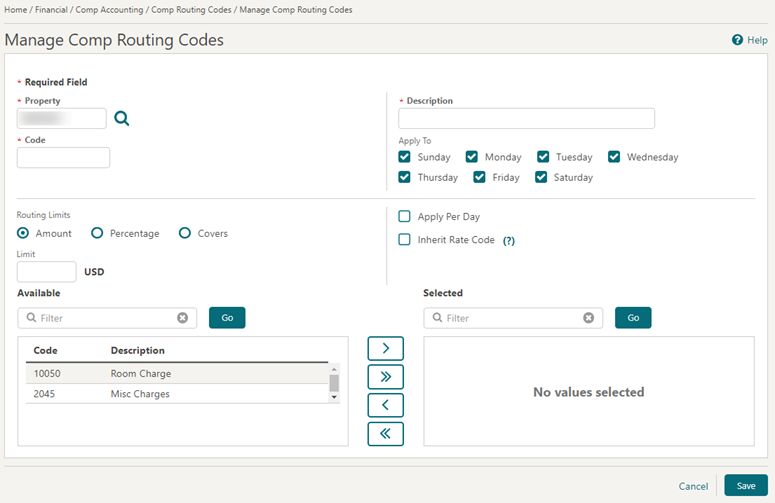
Comp Routing Codes is added enabling you to group comp transaction codes and select the Comp Routing Code for reservation routing instructions.
The codes appearing in the Available panel are transaction codes that have a comp transaction code associated.
Refer to: Configuring Comp Routing Codes
STEPS TO ENABLE
-
From the side menu, select Role Manager and then select either Manage Chain Roles or Manage Property Roles according to your needs.
-
Enter search criteria and click Search.
-
Select the role to update, click the vertical ellipsis, and select Edit.
-
Select the Financial Admin group and grant the following tasks:
-
Comp Routing Codes
-
New/Edit Comp Routing Codes
-
Delete Comp Routing Codes
-
-
Click Save.
Comp Routing Dashboard Tile Added
![]()
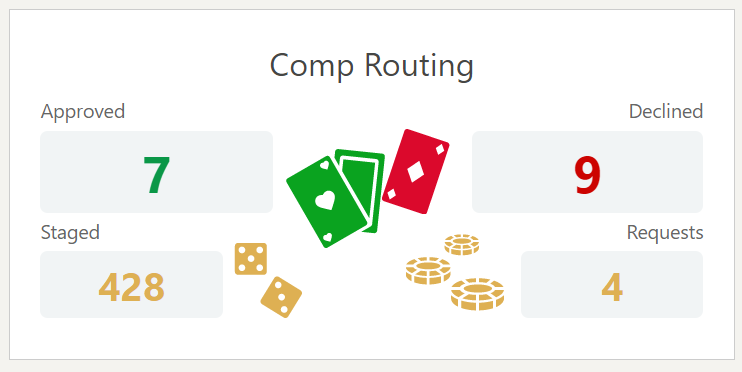
A Comp Routing tile is added to the list of tiles available on the OPERA Cloud Dashboard. The tile gives you a quick overview of the Comp Routing statistics in your property. It specifically shows the statuses of the postings on the Comp Posting Journal and a count of the current Comp Routing Requests. The different areas on the tile give you the ability to drill down to the Comp Posting Journal and Comp Routing Instructions screens.
With the appropriate task granted to your role and either the Comp Accounting Integration Service or the Comp Transaction Status controls on in your property, you can now add the Comp Routing tile to your OPERA Cloud Dashboard.
The tile shows the following information:
Comp Postings
Number of Approved postings for the current date.
Number of Declined postings for the current date.
Number of Staged postings for the current date.
Comp Routing Requests
Number of current pending Comp Routing Requests.
-
When selecting the Approved area, you are taken to the Comp Posting Journal screen with the Approved check box selected and the search results visible.
-
When selecting the Declined area, you are taken to the Comp Posting Journal screen with the Declined check box selected and the search results visible.
-
When selecting the Staged area, you are taken to the Comp Posting Journal screen with the Staged check box selected and the search results visible.
-
When selecting the Requests area, you are taken to the Comp Routing Instructions screen with the Request check box selected and the search results visible.
STEPS TO ENABLE
OPERA Controls
-
From the side menu, select Administration, select Enterprise, and then select OPERA Controls.
-
Select or confirm the Property.
-
Select the Comp Accounting group.
-
Locate and activate the Comp Accounting Integration Service or the Comp Transaction Status parameters.
-
Comp Accounting Integration Service if you are connected to an external Patron Tracking System (PTS).
-
Comp Transaction Status if you are manually approving/declining comp postings.
-
-
Also activate the Comp Requests OPERA Control to configure Requests and see them on the tile.
OPERA Cloud Tasks
-
From the side menu, select Role Manager and select either Manage Chain Roles or Manage Property Roles according to your needs.
-
Enter search criteria and click Search.
-
Select the role to update, click the vertical ellipsis, and select Edit.
-
Select the General group and grant the tasks: View Comp Routing Tile to be able to add and view the tile.
-
Select the Financials group and grant the tasks: Comp Posting Journal to be able to drill down to the Comp Posting Journal screen.
-
Select the Financials group and grant the tasks: Comp Routing Instructions to be able to drill down to the Comp Routing Instructions screen.
-
Click Save.
Credit Card Processing Message Added
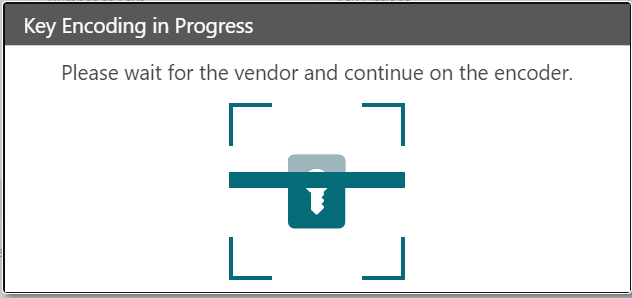
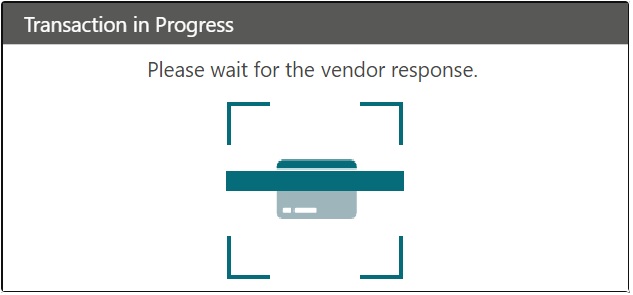
The Transaction in Progress message is presented when processing credit card authorizations, payments, and rebates.
Depending on the action being processed, the message indicates:
-
Please wait for the terminal or vendor response: This is presented when adding a card or making a payment/settlement with the expectation that a terminal is used to input a card by selecting the Get Token link or making a payment/settlement using a chip and pin payment method throughout OPERA Cloud.

Gaming Reports Added
![]()
The following reports are added:
Table 1-1
| Report | Report Description | Report Group |
|---|---|---|
|
Authorizer Groups (CF_Authorizer_Groups) |
The report displays all authorizer groups, along with the group rate code, transaction codes, and credit limits. The report also lists the authorizers who are members of each group by authorizer ID and name |
Configuration |
|
Authorizer Limits (GA_Auth_Limits) |
The report displays all authorizers for the selected date and the corresponding Credit Limits that are granted for Groups of Transaction Codes. Additionally, the report displays the Actual Comp Charges that were posted by that Authorizer for each Group of Transaction Codes. |
Comp Accounting |
|
Comp Charges (GA_Comp_Charges) |
The report output includes the comp transaction code, amount, and the authorizer that made the comp request. When the Comp Transaction Code field on the parameter form is set to ALL, all comp transaction codes, including any payment types configured for windows 101-108, appear on the report. |
Comp Accounting |
|
Comp Routing (Ga_Comp_Routing) |
The report output displays all reservations that have Comp Routing attached. This includes declines and requests for Comp routing. |
Comp Accounting |
|
Comp Open Balances (Comp_Open_Balance) |
The report sums and accounts for the total open balance of all charges posted to comp windows or comp transaction codes that are not yet settled for the purpose of reporting revenue accurately. When this report is included with the End of Day reports, it displays reservations from the previous business date with open comp balances. Checked out reservations with open comp balances also appear. |
Financial |
|
Comp Analysis Statistics (Stat_Comp_Analysis) |
The report displays a breakdown of Cash Rooms, Cash Room Revenue, Comp Rooms, Comp Room Revenue, and the Average Daily Rate (ADR). When the report is run, the report output is divided into the three sections of Day, Month to Date, and Year to Date. |
Statistical |
Generic Comp Member Number Feature Added
![]()
A Generic Comp Membership Number OPERA Controls is added enabling you to enter a generic membership number for comp postings.
Generic membership numbers are membership numbers that are not equal to the membership numbers linked to the reservation. When the parameter is active, the membership number field is enabled on the Routing Instructions and Authorizer Login screens.
This parameter is closely related to the Default PTS Membership Type OPERA Control; the setting must be defined for the Generic Membership Number functionality to work.
Routing Instructions Screen
Select a reservation, scroll to the Routing Instructions panel, and click New.

Authorizer Login Screen
Open the Billing screen for a reservation and move a charge to a Comp Folio.

Profile Search Screen

After you select a new profile search results, the attached Membership Number appears on the Routing Instructions/Authorizer Login screens and is saved along with the Routing Instructions record. Any kind of communication with the external PTS now has that newly selected membership number attached.
STEPS TO ENABLE
-
From the side menu, select Administration, select Enterprise, and then select OPERA Controls.
-
Select or confirm the Property where you want to enable the parameter.
-
Click the Comp Accounting group and scroll to the parameters section.
-
Locate and enable the Generic Comp Membership Number parameter.
-
Locate and confirm/update the Default PTS Membership Type setting as needed.
Package Arrangement Folio Groupings Added
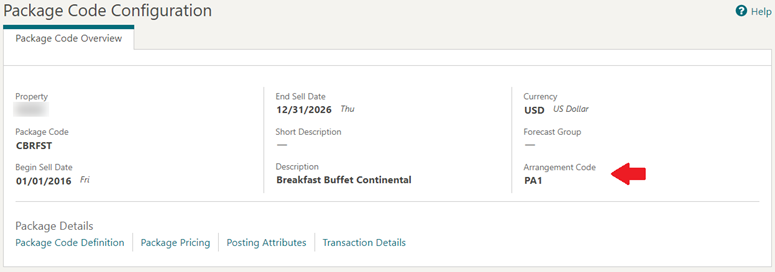
A Package Arrangement Codes OPERA Control is added. When the control is active, you can configure Package Arrangement Codes for grouping package postings on the folio when generated in one of the following folio styles:
-
1 - Detailed Folio (Date)
-
9 - Detailed Folio (Room)
-
14 - Summary by Check No (Date)
-
15 - Group Folio Subtotal (Date)
-
16 - Group Folio Subtotal per Guest (Date)
-
18 - Group Folio Subtotal per Room (Date)
Once configured, Package Arrangement Codes must be selected in Package Code Configuration.
STEPS TO ENABLE
-
From the side menu, select Administration, select Enterprise, and then select OPERA Controls.
-
Select or confirm the Property where you want to enable the parameter.
-
Select the Cashiering group.
-
Enable the Package Arrangement Codes application parameter.
Payment Types for Comp Billing Added
![]()
The ability to specify payment types applicable to Comp Billing windows (101-108 ) is added.
Payment transaction code configuration is updated with a Comp Payment check box to indicate payment types available for settlement of Comp windows 101-108.
Payment Type, where the Comp Payment check box is not checked, cannot be used to settle Comp windows 101-108.


PIN Added for Authorizers
![]()
In order to authorize transferring charges and setting up Comp Routing, you must enter your PIN when prompted.
You can set up your PIN in Settings. Refer to: Managing Application Settings

Player Snapshot Feature Added
![]()
A Player Snapshot screen is added to OPERA Cloud enabling you to view a summary of comp and reservation information related to current, future, and past reservations for guests with a Player ID. It is based on the Patron Tracking System (PTS) Membership Type OPERA Controls.
Refer to: Player Snapshot

STEPS TO ENABLE
-
From the side menu, select Role Manager and select either Manage Chain Roles or Manage Property Roles according to your needs.
-
Enter search criteria and click Search.
-
Select the role to update, click the vertical ellipsis, and select Edit.
-
Select the Booking group and grant the Player Snapshot task.
-
Click Save.
Player Statistics Added
![]()
A Player Statistics screen is added to provide up-to-the-minute gaming information for a guest with a player ID.
-
Player Snapshot > I Want To > Player Statistics.
-
Profile search > I Want To > Player Statistics.
-
Reservation search > I Want To > Player Statistics or the Player Statistics button in the action bar.
-
Billing > I Want To > Player Statistics.
Refer to: Player Statistics

STEPS To ENABLE
-
From the side menu, select Administration, select Enterprise, and then select OPERA Controls.
-
Select or confirm the Property.
-
Select the Comp Accounting group.
-
Locate and activate the Player Statistics parameter.
-
From the side menu select Role Manager, select either Manage Chain Roles or Manage Property Roles according to your needs.
-
Enter search criteria and click Search.
-
Select the role to update, click the vertical ellipsis, and select Edit.
-
Select the Financial group, open the Comp Accounting Workspace, and grant the task: Player Statistics.
-
Click Save.
PTS Membership Comp Routing OPERA Control Added
![]()
A Patron Tracking System (PTS) Membership Type Based Comp Routing parameter is added to OPERA Controls.
When active, Comp routing instructions are only allowed for reservations with a membership linked where the membership type is equal to the Default PTS Membership Type in OPERA Controls.
For reservations without a membership linked where the membership type is equal to the Default PTS Membership Type in OPERA Controls, the option to set up comp routing is hidden when creating or updating routing instructions.
If the Default PTS Membership Type setting is blank, the option to set up comp routing is hidden when creating or updating routing instructions for all reservations.
STEPS TO ENABLE
-
From the side menu, select Administration, select Enterprise, and then select OPERA Controls.
-
Select or confirm the Property where you want to enable the parameter.
-
Click the Comp Accounting group and scroll to the parameters section.
-
Enable the PTS Membership Type Based Comp Routing parameter.
-
Locate and confirm/update the Default PTS Membership Type setting as required.
Sample_Folio Stationery Template Updated
The following merge codes are added to sample_folio.rtf/sample_folio.xml.
-
Payee_Name2 and Payee)Name33
-
Name2 and Name3
-
Addressee_Name2 and Addressee_Name3
-
Hotel Phone Header
-
Hotel Fax Header
-
Hotel Webaddress
-
Hotel Email Header
-
Addressee tax1 no
-
Addressee tax2 no
-
Hotel Street
-
Hotel cap city state
-
Payee name id
-
Guest tax1 no
-
Guest Tax2 no
-
Associated bill no header
STEPS TO ENABLE
Staged Transactions OPERA Control Added
![]()
A Staged Transactions During Folio Generation OPERA Control is added to determine the handling of staged transactions on comp windows during checkout and the interim bill process.
Available values are:
-
ALLOW(default): The settlement continues, and the transaction that was staged remains on the comp windows.
-
STOP: Stop check out.
-
MOVE: Staged transactions are moved to window 1 of the guest's billing screen. The transactions are handled in the same way as other transactions in that window.
Transaction Search Updated for Comp Windows
![]()
Transaction search is updated to support Cash (1-8) and Comp (101-108) billing windows.
You can transfer sale charge transactions from cash windows to comp windows or from comp windows to cash windows using the Transfer Posting action.
When you attempt to transfer charges to any of the comp windows, OPERA Cloud prompts for the Authorizer PIN.


Client Relations
Ability to Convert Account Profiles Added
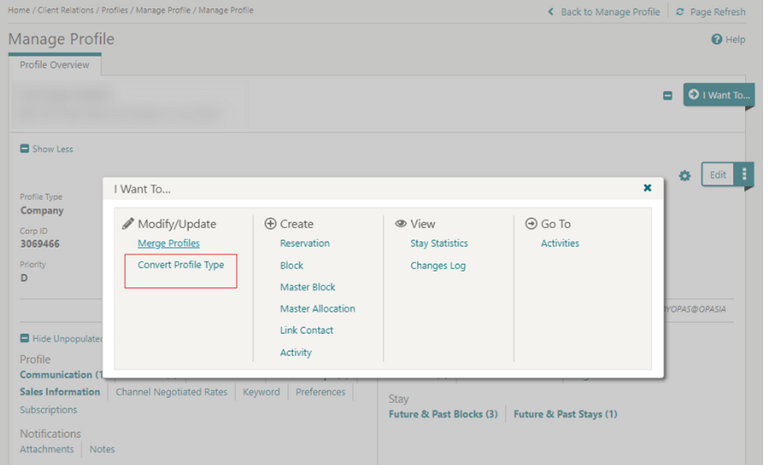
You can convert Account Profile types between Company, Travel Agent, and Source profile types if there is no history, future reservations/blocks, AR accounts, commissions, and so on associated to the profile.
The Convert Profile Type action is enabled based on the Edit Profile Details task granted to roles.
Refer to: Converting Sales Account Profile Type.
Ability to Externally Validate Membership Numbers Added
You can validate membership card numbers for a membership type configured with validation rule set as External.
When creating a profile or reservation membership record, OPERA Cloud communicates with the external system to validate the membership card number.

The Membership Handling panel is updated with an External Database list, enabling you to select the external system to validate the card number.

Delivery Types Added for eFolio Export
For properties with the eFolio Export OPERA Control active, a Delivery Types panel is added to all profile types for setting up eFolio exports.
A profile can have one or more delivery types for eFolio export, with one selected as primary.
-
Electronic: transmits data to the recipient’s bank.
-
Email: generates an email to the recipient.
-
Printing: allows you to send a printed version to the recipient by regular postal mail.
When a guest settles a bill for a billing window with a payment type selected for eFolio Export, you are prompted to select the delivery type and proceed with the settlement. Refer to: Billing Updated for eFolio Export
The eFolio exports are generated either during the End of Day or on-demand. Refer to: eFolio Export Added


External Loyalty Enrollment Added
The ability to perform membership enrollment in an external, integrated loyalty system is added.
You can customize the Enrollment screen using Page Composer.
You can enroll a guest from multiple areas using the I Want To . . . menu:
-
Enroll an existing profile. Field values will default based on values in the profile.
-
Create a new profile and enroll the guest at the same time.
-
Enroll a guest from the guest's existing reservation. The membership will attach to both the profile and the reservation.
Refer to: Enrolling Guests in External Loyalty Programs
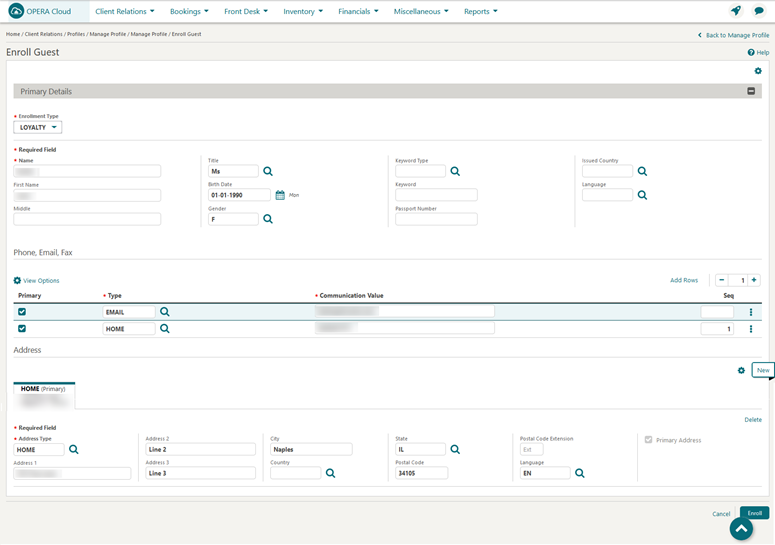
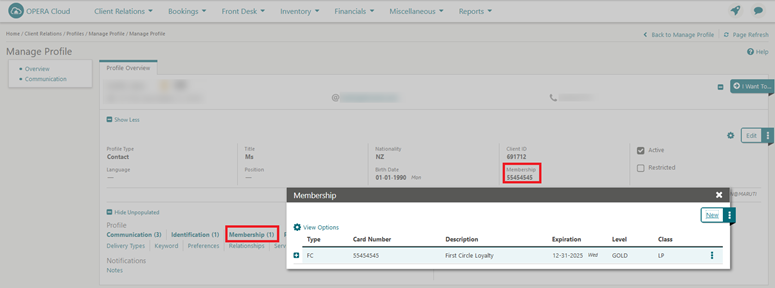
-
Name on Card
-
Membership ID
-
Membership Type
-
Membership Level
-
Expiration Date
External Profile Lookup and Download Added
The ability to look up profiles and download them from an external, integrated solution using OPERA Cloud REST APIs is added to Profile search.
A Lookup Profile list field in Advanced Search defines the external system where you can look up profiles. When the External Lookup Behavior OPERA Control is set to Force, this field cannot be null.
Lookup results appear in a separate, named tab where a Download Profile action allows you to download the profile to OPERA Cloud.
Note:
This is a one-time, one-way download. If the profile is downloaded twice, two records will be created.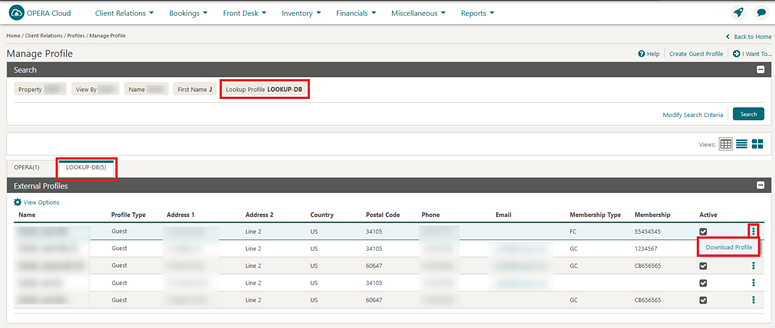
IMPACT OR OTHER CONSIDERATIONS
Ensure the External Lookup Behavior OPERA Control is set to Manual or Force.

STEPS TO ENABLE
Contact Oracle consulting or your Oracle partner for assistance with activation and configuration of a validated integration.
ID Document Scan Field Mapping Updated
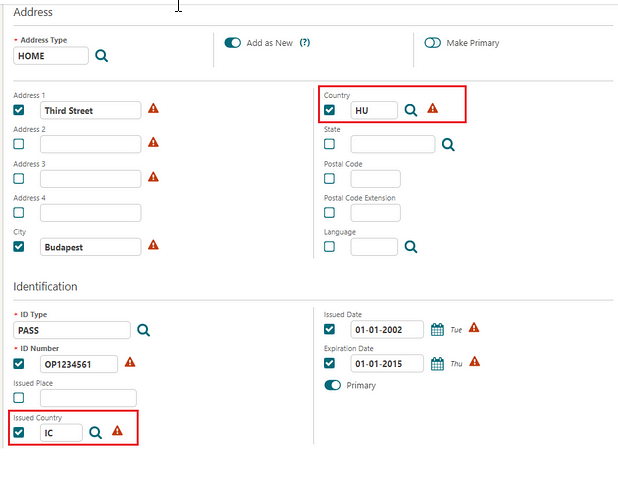
The following desktop and mobile ID scanner field mappings are updated:
-
The Issued Country from the ID document scan is populated to the Issued Country field in the profile Identification section.
-
The Country Code from the ID address detail is populated to the Country field in the profile address section.
Loyalty Award List Added
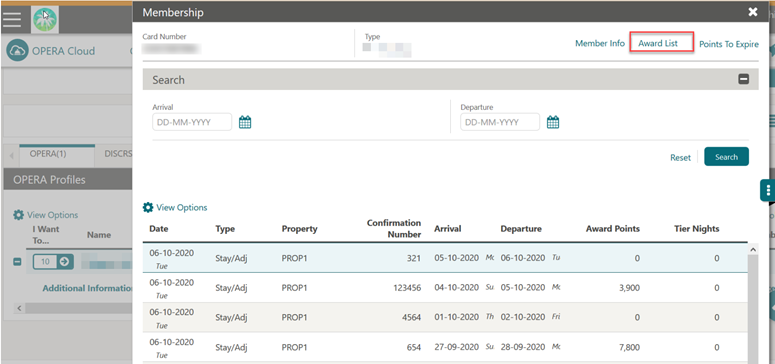

IMPACT OR OTHER CONSIDERATIONS
Also see Rate and Upgrade Loyalty Award Redemption Added.Master/Sub Column Added to Profile Search Results
The Master/Sub indicators are added to Table and Card views for profile search results when searching by View All.

Membership Panel Updated
The Membership panel is updated to improve usability.
-
The primary actions for Manage and Back to Transactions are removed from the vertical ellipsis.
-
The titles of several sub panels are updated to be more detailed and easily identified.
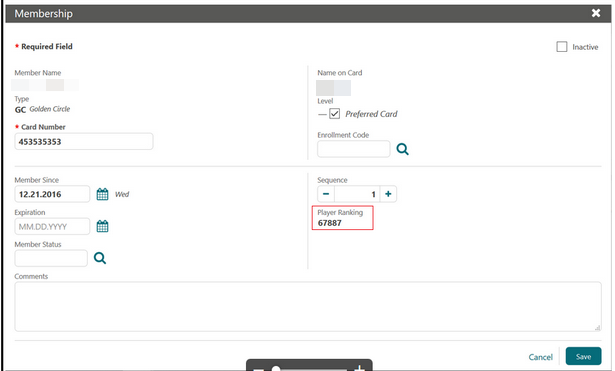
Player Ranking Added to Profile
![]()
A read-only Player Ranking field is added to the Membership panel based on the Default Patron Tracking System (PTS) Membership Type setting.
You can also add the field to the Reservation Presentation and Billing screens using the Page Composer.
Commissions
Configurable File Name for EFT Exports Added
A File Name Format OPERA Control is added to define the export file name format for commission Electronic Funds Transfer (EFT) exports. This settings defaults with the filename format expected by each EFT subscription. If required, you can select a different file name format.
The values of this application settings vary based on the EFT subscription active for your property.
-
If the OPP_NPC subscription is active, The following values are available for this settings:
XF_PROPERTY (Default value)
XF_PROPERTY_DDMMYYYY
XF_PROPERTY_MMDDYYYY
XF_PROPERTY_DDMMYYYYHH24MI
XF_PROPERTY_MMDDYYYYHH24MI
-
If the OPP_WTP or OPP_EGS or OPP_HCC subscription is active, the following values are available for this settings:
PROPERTYID_SEQUENCE ( Default Value)
PROPERTYID_SEQUENCE_DDMMYYYY
PROPERTYID_SEQUENCE_MMDDYYYY
PROPERTYID_SEQUENCE_DDMMYYYYHH24MI
PROPERTYID_SEQUENCE_MMDDYYYYHH24MI
-
If the OPP_INF subscription is active, the following values are available for this settings:
RESORTNAME_MMDDYY_SEQUENCE( Default Value)
RESORTNAME_DDMMYYYY_SEQUENCE
RESORTNAME_MMDDYYYY_SEQUENCE
RESORTNAME_DDMMYYYYHH24MI
RESORTNAME_MMDDYYYYHH24MI
Country Specific
Country Specific - Austria - Incorporate legal requirements for Receipt Added
-
A Zero_Invoice_With_Receipt value is added for the Fiscal Command OPERA Control.
Once set, a new row level option is available in Configure Fiscal Commands.

-
A sample_fiscal_command_receipt.rtf customizable template is added to the Cash Register Receipts report group. When you select "Zero Invoice With Receipt" from the Financials -> Cashiering -> Fiscal Commands screen upon selecting a Fiscal Terminal, the call is made through the Fiscal Layer Integration Platform (FLIP) to EFSTA. After the success response, the receipt is printed (fiscal_command_receipt.rtf).
Refer to: Oracle Hospitality Localization Center for Hotel; Austria - under OPERA Cloud, Solutions: OPERA Cloud Solution. Doc ID 2221741.2
STEPS TO ENABLE
-
From the side menu, select Administration, select Enterprise, and then select OPERA Controls.
-
Select Cashiering.
-
Scroll to the Fiscal Folio Printing parameter.
-
Edit Fiscal Commands and select ZERO_INVOICE_WITH_RECEIPT.
Country Specific - Brazil - Export Mapping Types Added
Export Mapping functionality is updated to include the following new mapping types:
-
COUNTRY_CITIES_CODES. Export mapping codes are configured in User Defined Field values for the COUNTRY_CITIES LOV group. See UDF Groups and Values.
-
PURPOSE_OF_VISIT. Export mapping codes are configured in the Purpose Of Stay.
-
TRANSPORTATION_CODES. Export mapping codes are configured in Transportation.
Refer to: Oracle Hospitality Localization Center for Hotel:; Brazil - under OPERA Cloud, Solutions: OPERA Cloud Solution: OPERA Cloud Fiscal Master Data Document (Doc ID: 2221741.2)
Country Specific - Brazil - Service Type OPERA Control Added
A Service Type OPERA Control is added generically and is available when the Credit Bill OPERA Controls is active and should be reviewed by properties in Brazil.
Service Type enables the creation of separate folios for transaction defined as either Goods or Services.
When the Service Types OPERA Controls is active, the Transaction Code configuration displays a Service Type list field with the following values: G - Goods; S - Services for sales charge transaction codes.
The Folio Type Method OPERA Control is updated with a Service Type value when the Service Type OPERA Control is active.
When the Service Types OPERA Control is active and the Folio Type Method OPERA Control is set to Service Type, the Folio Type configuration provides an additional list field for selecting either Goods or Services.
When selecting the Post It option, a new single select list of values (LOV) for Service and Goods type selection is available. The Articles and Transaction codes available for posting will be of that selected service type.
When at least one article or transaction code is posted, this LOV field is disabled as you can only post article or transaction codes of one service type on a Post It / Passer By folio. During folio settlement, appropriate Service or Goods type folios are created.
For Latin American country modes, the Restrict Negative Sale in Post It OPERA Control must be active to restrict posting negative transactions in Post It and Passer By.
Refer to: Oracle Hospitality Localization Center for Hotel; Brazil - under OPERA Cloud, Solutions: OPERA Cloud OPERA Cloud Fiscal Master Data Document (Doc ID 2221741.2).
STEPS TO ENABLE
-
From the side menu, select Administration, select Enterprise, and then select OPERA Controls.
-
Select or confirm the Property where you want to enable the parameter.
-
Click the Cashiering group.
-
Enable the Service Type function.
-
Update the Folio Type Method setting to Service Type.
Country Specific - Brazil - SPED Report Updated
The following is generically available, but should be reviewed by properties in Brazil.
The SPED Report (BR_SPED and BR_SPED_DAY) is updated to consider only the transaction codes that are configured with the Service Type.
The report no longer considers the fiscal transaction code.

Refer to: Oracle Hospitality Localization Center for Hotel: Brazil - under OPERA Cloud, Solutions: OPERA Cloud Solution: OPERA Cloud Fiscal Primary Data Document (Doc ID: 2620770.1)
Country Specific - Colombia - Purchase Order Details Added
The Information Collection Methods OPERA Control is updated with the Purchase Order Details option generically and should be reviewed by properties in Colombia.
When selected for the Information Collection Methods OPERA Control, the Additional Information panel in the Reservation presentation screen is updated with PO Number and PO Date fields.
Values entered into the fields are available in the universal payload when the Fiscal Folio Printing functionality is active.
Refer to: Oracle Hospitality Localization Center for Hotel: Colombia- under OPERA Cloud, Solutions: Colombia - Fiscal Information Document for Hospitality (Doc ID: ID 2657496.1)

STEPS TO ENABLE
-
From the side menu, select Administration, select Enterprise, and then select OPERA Controls.
-
Select or confirm the Property.
-
Select the General group.
-
Locate and activate the Information Collection parameter.
-
Update the Information Collection Methods setting.
-
Select Purchase_Order_Details.
Country Specific - France - Article 88 Requirements, Folio Customization
Changes are made to the custom_france_folio_rtf.
Refer to: Oracle Hospitality Localization Center for Hotel; France - under OPERA Cloud, Solutions: OPERA Cloud Solution: OPERA Cloud Fiscal Primary Data Document (Doc ID: 2621636.1)
Country Specific - Italy - Custom Charges Feature Updated
Custom Charge configuration is updated as follows:
-
The Rule Type list field is added with MAX NO NIGHTS.
-
When the Rule Type is MAX NO NIGHTS, the value field is displayed along with the price. The Value field is mandatory.
-
When the Rule Type LOV is blank, only the Price field is available.
-
-
The Property Exemptions Type is added to the Custom Charge Exemptions Screen.
Refer to: Oracle Hospitality Localization Center for Hotel; Italy - under OPERA Cloud Solutions: OPERA Cloud Fiscal Primary Data Document (Doc ID 2563778.1).
Country Specific - Italy - Custom Charge Report Added
A Custom Charge and Redemption Summary report (custom_charge_summary) is added to the Financials group.
-
Paying Guests
-
Exempt Guests
-
Special condition Guests
Refer to: Oracle Hospitality Localization Center for Hotel; Italy - under OPERA Cloud Solutions: OPERA Cloud Fiscal Primary Data Document (Doc ID 2563778.1).
Country Specific - Italy - OPERA Controls Added for ISTAT Reports and Exports
The following OPERA Controls are added generically to the Exports Group, but should be reviewed by properties in Italy.
Istat Hotel ID
Hotel ID for Istat Reports/Exports.
Istat Hotel Key
Hotel Key for Istat Export, Lazio Region only.
Istat Number of Beds
Number of Beds for Istat Reports/Exports.
Istat Number of Restrooms
Number of Restrooms for Istat Reports/Exports.
Istat Number of Rooms
Number of Rooms for Istat Reports/Exports.
Refer to: Oracle Hospitality Localization Center for Hotel; Italy - under Oracle Hospitality – OPERA Cloud, Documentation: OPERA Cloud Solution: OPERA Cloud Fiscal Primary Data Document (Doc ID: 2563778.1)
STEPS TO ENABLE
-
From the side menu, select Administration, select Enterprise, and then select OPERA Controls.
-
Select or confirm the Property.
-
Select the Exports group. Refer to: OPERA Controls - Exports.
-
Locate and update the settings listed in the section above.
Country Specific - Philippines - Message Texts Added
The following should be reviewed by properties in the Philippines:
The following Customizable Message Texts are added for the following reports and stationery templates.
| MSGE Codes | CAS_DETAILS | SAMPLE_FOLIO_PHILIPPINES_TEXT1 | SAMPLE_FOLIO_PHILIPPINES_TEXT2 | SAMPLE_PAYMENT_PHILIPPINES_TEXT1 | SAMPLE_PAYMENT_PHILIPPINES_TEXT2 | SAMPLE_STATEMENT_PHILIPPINES_TEXT1 | SAMPLE_STATEMENT_PHILIPPINES_TEXT2 |
|---|---|---|---|---|---|---|---|
|
Report |
|||||||
|
ack_receipt |
X |
||||||
|
official_receipt_summary |
X |
||||||
|
pwd_report |
X |
||||||
|
bir_senior_citizen |
X |
||||||
|
official_receipt_register |
X |
||||||
|
zero rated report |
X |
||||||
|
official folio register report |
X |
||||||
|
sample_folio_philippines |
X |
X |
X |
||||
|
sample_payment_philippines |
X |
X |
X |
||||
|
sample_statement_philippines |
X |
X |
X |
||||
-
sample_folio_philippines, sample_payment_philippines, and sample_statement_philippines are customisable templates. See About Stationery Editor (Oracle Business Intelligence (BI) Publisher).
-
ack_receipt, official_receipt_summary, pwd_report, bir_senior_citizen, official_receipt_register, zero rated report, and official folio register report cannot be customized.
-
The report group BIR Reports is enabled for properties in the Philippines . See Generating Reports.
Country Specific - Portugal - Foliotax_07 Report Added
The following is generically available, but should be reviewed by properties in Portugal.
A FOLIOTAX_07 report is added to the Financial report group.
Refer to: Oracle Hospitality Localization Center for Hotel; Portugal - under OPERA Cloud, Solutions: OPERA Cloud Solution.
Country Specific - Portugal - PT_SAFT_104 Export Updated
Two XML tags are added to the PT_SAFT_104 export that provide the following details:
-
<Reference> will contain the associated bill number details against which the credit bill is generated from the folio history screen.
-
<Reason> (credit bill reason) will contain the supplement details updated during the transaction posting from the Folio History screen.
The Credit Bill generated from the Folio History screen is included in the export at the transaction code level.
Information folios and Pro-forma folios generated for POS Account reservations are handled as "internal" and not recorded as a working document in the PT_SAFT_104 export.
Refer to: Oracle Hospitality Localization Center for Hotel; Portugal - under OPERA Cloud, Solutions: OPERA Cloud Solution: OPERA Cloud Fiscal Primary Data Document (Doc ID:2221741.2 )
STEPS TO ENABLE
-
From the side menu, select OPERA Cloud, select Miscellaneous, select Exports, and then select Country Exports.
-
Select the pt_saft_104. export.
-
Click the vertical ellipsis and select Delete.
-
Click New from Template.
-
Search and select pt_saft_104.
Refer to: Creating Exports From Templates
Country Specific - Portugal - Sample Folio Portugal and Sample Credit Portugal Templates Updated
The following changes are implemented for the SAMPLE_CREDIT_PORTUGAL template:
-
Associated Document - Associated Bill Number.
-
Associated Date - Associated Bill Date.
-
Calculate the Gross amount and display for VAT line.
-
Amounts should be absolute values.
-
Show the Credit and Debit amounts at respective columns (credit amounts should be in the Debit column; debit amounts should be in the Credit column).

The following changes are implemented for the SAMPLE_FOLIO_PORTUGAL template:
-
VAT lines visible even for 0% VAT.
-
VAT Gross amount rounding for two decimals.

Refer to: Oracle Hospitality Localization Center for Hotel; Portugal - under OPERA Cloud, Solutions: OPERA Cloud Solution.
Country Specific - Portugal - Simple Folio Functionality Updated
The Deposit Folio workflow and Billing screen workflow are updated for the generation of Simple Folios. When the posted charges are equal to or less than 100.00, the check box for Simple Folio is visible during settlement.
-
If the Simple Folio box is selected, then the Simple Folio generates.
-
If the Simple Folio box is deselected, then the normal Portuguese Folio generates.
Refer to: Oracle Hospitality Localization Center for Hotel; Portugal
Country Specific - Taiwan - e-Invoice Details Report Updated
When you generate the e-Invoice Details report (einv_details), the report only displays records with an e-Invoice Number (also known as the GUI Number).
Refer to: Oracle Hospitality Localization Center for Hotel; Taiwan- under OPERA Cloud, Solutions: Taiwan - Oracle Hospitality Fiscal Layer Integration Platform Documentation (Doc ID: 2559710.1)
Country Specific - Taiwan - e-Invoicing Details Screen Updated
The following is implemented generically, but should be reviewed by properties in Taiwan.
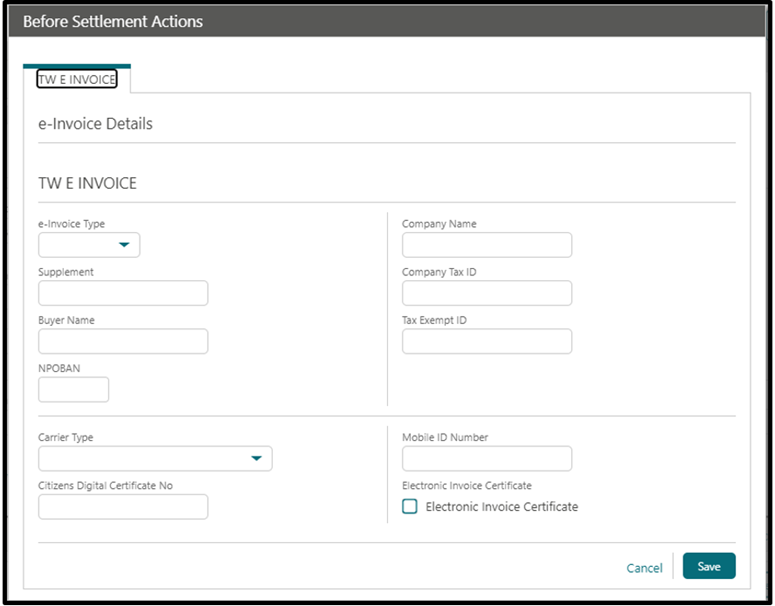
Before performing settlements (Check out, Interim Folio, Advance Folio), the following e-Invoice screen appears enabling you to select e-Invoice type and Carrier Type.
Based on the e-Invoice type/Carrier type selection, the screen refreshes and shows the respective fields to enter the details.


e-Invoice Type = Donate / Carrier Type = Citizen Digital Certificate Number:

e-Invoice Type = Tax Exempt / Carrier Type = Citizen Digital Certificate Number:

Refer to: Oracle Hospitality Localization Center for Hotel; Taiwan- under OPERA Cloud, Documentation: Taiwan Electronic Uniform Invoice Statement of Direction (SOD) (Doc ID: 2221741.2).
Country Specific - Taiwan - e-Invoicing Solution
The following is implemented generically, but should be of specific interest for properties in Taiwan: An Allow Credit Bill Only From Folio History OPERA Control is added that enables you to restrict the generation of the Credit Bill from all settlement screens except for the Folio History screen. The Parameter is disabled by default.
The e-Invoice functionality is added. The Information Collection Methods OPERA Control has the following value for Taiwan e-Invoice:
Code: TW_E_INVOICE
Description: Taiwan e-Invoice
Once selected, the Before Settlement Actions screen appears when you perform a Settlement or Check-Out action to generate a folio.
You must select one of four e-Invoice Type values: Individual, Company, Donate, or Tax Exempt.
Other fields appear based on the e-Invoice Type you select.
Refer to: Oracle Hospitality Localization Center for Hotel; Taiwan - under OPERA Cloud, Solutions: Taiwan - Oracle Hospitality Fiscal Layer Integration Platform Documentation (Doc ID: 2559710.1)
STEPS TO ENABLE
-
From the side menu, select Administration, select Enterprise. and then select OPERA Controls.
-
Select or confirm the Property.
-
Select the General group.
-
Locate and activate the Information Collection parameter.
-
Locate and update the Information Collection Methods setting to TW_E_INVOICE.
-
Select the Cashiering group.
-
Locate and activate the Allow Credit Bill only from the Folio History parameter (if you need to restrict the generation of credit bills from all areas except for the Folio History screen).
-
From the side menu, select Role Manager and select either Manage Chain Roles or Manage Property Roles according to your needs.
-
Enter search criteria and click Search.
-
Select the role to update, click vertical ellipsis, and select Edit.
-
Select the Financials Group.
-
Locate and activate the Resend Fiscal Folio task (for users to resend the fiscal folios from the Folio History screen).
Events
-
Oracle Hospitality OPERA Cloud Service, Sales and Event Management Standard Edition
-
Oracle Hospitality OPERA Cloud Service, Sales and Event Management Premium Edition
Features that are specific to the Sales and Event Management Premium Edition are marked with the Premium badge. ![]()
Consumption Menu Configuration Updated
You can enter a Forecast price on a Consumption menu when the Consumption Menu Forecasting OPERA Control is active.

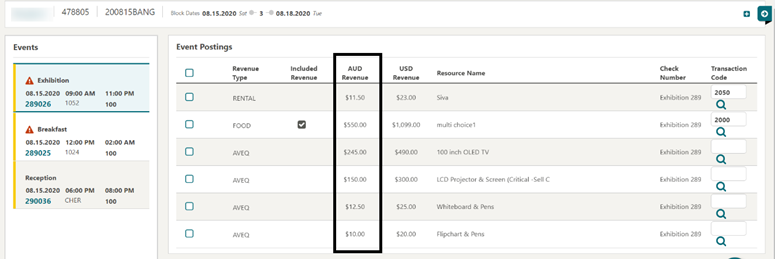
Event Postings Updated with Catering Currency
Event Postings is updated to display revenue in property and catering currencies.
Function Diary I Want To Menu Updated
The Function Diary I Want To . . . menu is updated with the Create Block and the Go To Group Rooms Control action links.

Function Diary Search Updated
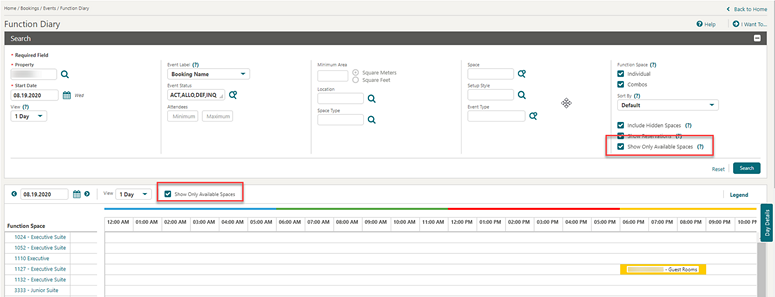
![]()
The Function Diary Search and Quick Filter is updated with the Show Only Available Spaces filter to quickly identify all spaces that are not yet booked for events in a deducted status.
Function Space Configuration Updated
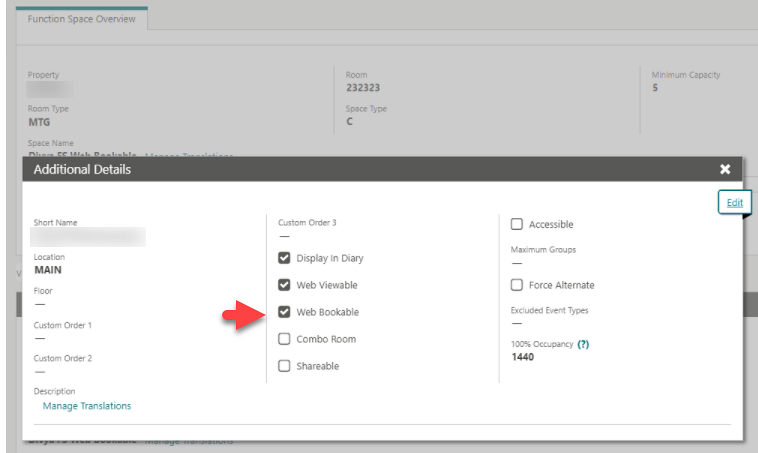
With an active Sales and Catering Web Self Service Cloud Service, a Web Bookable check box is enabled in Function Space configuration.
When selected, the function space is bookable from an integrated event booking website.
Posting Master Selection for Event Posting Added
A Posting Account (PM room number) read-only field is added in Event Posting. When the selected event has a single eligible posting master reservation, the room number appears. When the selected event has more than one posting master reservation, no value appears.
When posting charges for a block that has more than one eligible checked-in posting master account, you are prompted to select the reservation to post the charges to. The prompt displays the Room Number, Reservation Name, Arrival and Departure Date, and the Confirmation number.
When generating the Banquet Check for a block with multiple posting master reservations, a Posting Account field becomes enabled, and you can select an account to use. This field is visible only when the folio is generated from the Event Posting screen.
The Posting Account and Default Posting Account Room fields are available for adding in the booking information section for all three sample banquet event order templates. See Stationery Editor. This update results in the BEOs generating with the label and room number for the default posting master reservation associated to the group block. Once the label for Posting Account is added to the template, edit the field and update the code to <?/DOCUMENT/LABELS/POSTING_ACCOUNT?> in the Advanced tab.


STEPS TO ENABLE
To update existing stationery templates refer to Updating Customized Stationery with Current Data Model.
Reports Navigation Updated
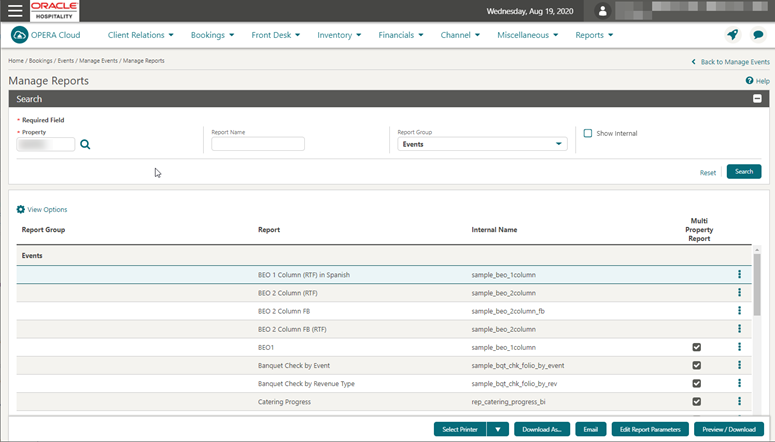
I Want To . . . Reports is updated to launch Manage Report with the Events report group selected and the reports listed.
I Want To . . . Group Stationery is updated to launch Manage Reports with the Group Stationery report group and reports listed.
IMPACTS OR OTHER CONSIDERATIONS
See Multiple Updates to Generate Reports.Sell Messages Added to Function Diary
![]()
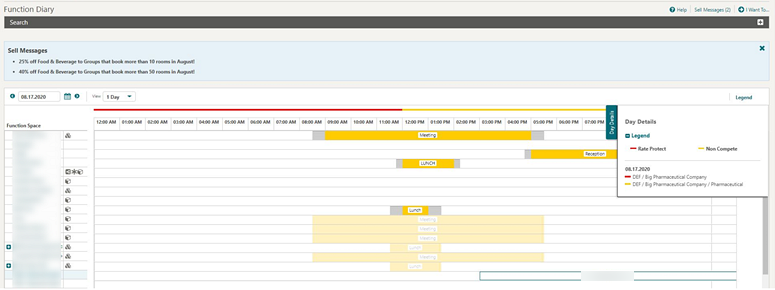
Sell messages are available for the Function Diary so you can easily and effectively communicate offers and announcements to your Sales and Events team.
Exports
Back Office Views Added as General Exports
-
exp_bof_daily_stats_record
-
exp_bof_market_stats_record
-
exp_bof_statistic_export
-
exp_bof_dep_ledger_amts
-
exp_bof_chkin_dep_amts
eFolio Export Added
An eFolio Export OPERA Control is added, enabling the ability to export folio data to an XML file during End of Day or on-demand.
Two export templates are available for creating an export.
-
EFOLIO_EXPORT is available to be generated during End of Day.
-
EFOLIO_EXPORT_DAY is available to be manually generated on-demand.
Note:
eFolio export is not supported with scheduled exports.The export file generated contains data for Billing folio settlements made with a nominated payment method.
Refer to:
STEPS TO ENABLE
-
From the side menu, select Administration, select Enterprise, and then select OPERA Controls.
-
Select or confirm the Property.
-
Select the Cashiering group.
-
Locate and activate the eFolio Export parameter.
-
Update the Payment Methods setting: specify the payment type(s) for which eFolio export should be initiated.
-
Update the Delivery Methodssetting: select the method(s) for which eFolio export should be initiated.
-
Electronic: Sent automatically to the recipients bank.
-
Email: Sent as an email to the recipient.
-
Printing: Printed and sent by regular postal mail to the recipient.
-
-
Locate and activate the General parameter, Information Collection.
-
Update the Information Collection Methods setting and select the method(s) to use for Information Collection functionality. EFOLIO_EXPORT is one of the options.
Set up the following tasks in Role Manager:
-
From the side menu, select Role Manager and select either Manage Chain Roles or Manage Property Roles according to your needs.
-
Enter search criteria and click Search.
-
Select the role to update, click the vertical ellipsis, and select Edit.
-
Select the Client Relations group and grant the tasks: Delivery Types, New/Edit Delivery Types, and/or Delete Delivery Types tasks.
-
Select the Financials group and grant the Efolio Export tasks.
-
Click Save.
France - Article 88 Exports Updated
-
Total Net Amount
-
Total Tax Amount
-
Total Tax Summary
-
Property RCS Number
-
OPERA Cloud Version Number
-
Cashier Number
-
User Id
-
Document Type
-
Number of Charges
Note:
You must copy the exports from a template for the new elements to be included.STEPS TO ENABLE
-
From the side menu, select OPERA Cloud, select Miscellaneous, select Exports, select Country, and then select New From Template.
-
Select the Template Daily_Archive or Daily_Archive_Day.
-
Create the Export Name and select Create and Continue.
-
Select the End of Day check box and Frequency per your requirement for Daily_Archive Export.
-
Click Save.
Refer to: Oracle Hospitality Localization Center for Hotel; France - under OPERA Cloud, Solutions: OPERA Cloud Solution: OPERA Cloud Fiscal Primary Data Document (Doc ID: 2621636.1)
Portugal - PT Police Export Day Updated
The following changes to the Portugal Police Export (PT_POLICE_EXPORT_DAY) are generically available, but should be reviewed by properties in Portugal.
The Portugal Police export (PT_POLICE_EXPORT_DAY) is modified to include ICAO Codes for Residence Countries, ID Issued Countries and Nationalities.
In order to use the Mapped Codes for Country Codes and Nationality Codes for PT_POLICE_EXPORT_DAY, you must create the following Mapping Types with their respective Mapped To Groups in Administration>Interfaces > Export Mapping > Mapping Types/Codes.
-
Mapping Type: PT_POLICE_EXPORT. Description: Export mapping Type for Portuguese Police Export Country Codes, Mapped To: Country Codes.
- Mapping Type: PT_POLICE_EXPORT. Description: Export mapping Type for Portuguese Police Export Nationality Codes, Mapped To: Nationality Codes.
When the reservation has accompanying guest(s) attached, the information pertaining to accompanying guests are included in the export. Additionally, the footer section of the export file is modified to include the character '|' (pipe) at the end.
Note that you must re-select the export from the template for the changes to take effect.
Refer to: Oracle Hospitality Localization Center for Hotel; Portugal - under OPERA Cloud Solutions: Statement of Direction – Unique Document Code (ATCUD) and Bidimensional Barcode (QR code) (Doc ID 2713238.1).
STEPS TO ENABLE
-
From the side menu, select OPERA Cloud, select Miscellaneous, select Exports, and then select Country.
-
Delete the existing export PT_POLICE_EXPORT_DAY (if any).
-
Select New from Template.
-
Search for and select the PT_POLICE_EXPORT_DAY from the Template list.
-
Click Create and Continue.
Portugal - PT SAFT 104 Export Updated
The PT_SAFT_104 export contains the detailed transactions and tax information instead of the wrapper for the information and proforma folios. In the case of individual transactions, the taxes are also recorded in the export for the working documents (information and proforma folios). Taxes appear on the sample_folio_portugal template and sample_credit_portugal template for working documents (information and proforma folios).
Note:
There is no need to re-customize the folio or re-select the export from template.Refer to: Oracle Hospitality Localization Center for Hotel;Portugal - under OPERA Cloud Solutions: Statement of Direction – Unique Document Code (ATCUD) and Bidimensional Barcode (QR code) (Doc ID 2713238.1).
Property Export for Oracle Responsys (Marketing Cloud) Added
The RESPONSYS_PROP_DAY export is available for exporting Property Details within a specific chain to Oracle Responsys (Oracle Marketing Cloud).
Note:
Regardless of HUB configuration, when one property runs this export ALL properties in the chain (tenancy) are exported.You can generate this export for a date range in OPERA Cloud > Miscellaneous > Exports > General > Select the export file type > Edit > Filter Condition.
There are three export file types available in the list of templates within the General exports. You can select the applicable export(s) from the template list and add them to your property.
-
RESPONSYS_PROP_DAY: Use this template file type to generate the Property export manually.
-
RESPONSYS_PROP: When this template file type is added to the property, the Property export is automatically scheduled to run during End of Day. You can review the scheduler job from Miscellaneous > Exports > Schedules.
-
RESPONSYS_PROP_AUTO: Use this template file type to schedule the Property export from Miscellaneous > File Exports > Schedules.
When the Property export is generated during End Of Day or from a scheduler job, the export is generated for the previous month (Business day -30 days).
The Property export is generated in a comma separated CSV file format by default. You can change the format to .txt from Miscellaneous > Exports > General > Select the export file type > Edit > update the file extension formula.
The export is delivered to an SFTP or file system location.
UPE Exports Added
The following pre-defined export templates are generically available, but should be reviewed by specific properties.
The added export templates are:
-
UPE_EXPORT: Universal PMS Export - automatically runs during the End of Day process.
-
UPE_EXPORT_DAY: Universal PMS Export can be manually generated for any past date range.
Uruguay - RIHP Police Export Available
The following is available generically, but is of specific interest to properties in Uruguay.
Using the ES_POLICE_EXPORT view, an export can be created that fulfills the requirements for the Computerized Registry of Guests and Passengers (RIHP).
It is mandatory to run the RIHP Export on a daily basis during night audit with output in delimited format.
Refer to: Oracle Hospitality Localization Center for Hotel; Uruguay - under OPERA Cloud Solutions: OPERA Cloud Fiscal Primary Data Document (Doc ID 2657495.1).
Front Desk
Automated Intelligence (AI) Room Assignment Added
An AI Room Assignment OPERA Controls is added. AI Room Assignment is an artificial intelligence and data science based feature for the batch assignment of rooms to reservations and aims for better guest satisfaction and reduced operational costs and manual efforts. The procedure primarily considers accessibility and smoking preferences along with other guest preferences. Guest preferences are intelligently removed when rooms matching all of the guest’s preferences are not available. AI Room Assignment incorporates reservation importance by considering a ranking value for VIP membership type/level and market group. The feature also ensures balanced room rotation to reduce wear and tear on rooms and ensures maximize contiguous future availability of rooms by minimizing gaps with reservations assigned to each room.
With the Do Not Move Room OPERA Controls active, pre-assigned reservations marked Do Not Move are excluded from the AI Room Assignment procedure.
With the Reservation Upgrade OPERA Controls active, reservations that should be upgraded due to room type overbooking are identified based on reservation importance, length of stay, and cost of upgrade, among other criteria. You must select the reservation market groups that are eligible for AI complimentary room type upgrade based on the upgrade room type hierarchy configured.
Note:
Block reservations are excluded from upgrade.AI assigned rooms are indicated by 'AI' after the room or 'AI Upgrade' in the event of a room type upgrade.
See Running AI Room Assignment.

Available room search is updated with an AI Display Order option. When selected, the results are sequenced according to the recommendation from AI Room Assignment.
See Assigning Rooms to a Reservation.

An Automated Intelligence Room Assignment Dashboard tile is available, which indicates statistics related to the assignment of rooms each day.

STEPS TO ENABLE
Controls
-
From the side menu, select Administration, select Enterprise, and then select OPERA Controls.
-
Select or confirm the Property.
-
Select the Reservations Group.
-
Locate and activate the AI Room Assignment function.
Note:
AI Room Assignment cannot be used in conjunction with the Enhanced Room Assignment function or Room Type Auto Room Assign parameters. -
Update the Lock-In Days setting.
-
Update the Accessibility Preference Codes setting.
-
Update the Optimization Objective setting.
-
Update the Allow Automatic Room Upgrades parameter, if desired.
User Tasks
-
From the side menu, select Role Manager, select either Manage Chain Roles or Manage Property Roles according to your needs.
-
Enter search criteria and click Search.
-
Select the role to update, click the vertical ellipsis, and select Edit.
-
Select the Bookings group and grant the AI Room Assignment task.
-
Select the General group and grant the View AI Room Assignment Tile task.
-
Click Save.
Check In Updated for Player Statistics
Check In is updated to provide access to Player Statistics from the I Want To . . . action for reservations with a Patron Tracking System (PTS) membership number attached to the profile irrespective of whether this member number is selected for the reservation.

Gaming Keycard Added
![]()
The Gaming ID General setting is added to OPERA Controls.
-
If Gaming ID is set as UNICARD, the Gaming ID is saved on the Reservation.
-
If Gaming ID is set as MEMBERSHIP, the Gaming ID is saved on the Membership.
The create (room) Key is updated with a Key Card Use list field, which defaults to the Gaming ID OPERA Control value.
All other value are available for selection.
-
If the Gaming ID setting is set to OFF, then the default key type is Room Key Only and other options should be available.
-
If the Gaming ID setting is set to MEMBERSHIP, then the default key type is Gaming Card Only and all of the other choices should be available.
-
If the Gaming ID setting is set to UNICARD, then the default key type is Universal Card and all other choices are available.

STEPS TO ENABLE
-
From the side menu, select Administration, select Enterprise, and then select OPERA Controls.
-
Select or confirm the Property where you want to enable the parameter.
-
Click the General group and scroll to the setting section.
-
Select and update the Gaming ID setting:
-
OFF - Gaming ID is not fetched/stored.
-
UNICARD - Gaming ID is stored with guest reservation.
-
MEMBERSHIP- Gaming ID is stored with the guest membership.
-
Integrations
Enhanced Fiscal Business Events
When you perform an action that generates a Fiscal Business Events payload and an export value is mapped from the Export Mapping configuration for the country of the guest profile, the mapped value is included in the Fiscal Business Events payload.
Fiscal Communication Improved
When you perform a settlement for a fiscal folio and an error is returned during fiscal communication, OPERA Cloud displays the error text from the response in the error message.
Fiscal Export Mapping Improved
The Export Mapping functionality is enhanced to include new fiscal mapping codes for Mapping Types.
The mapping codes are split so that you can configure them for each fiscal partner.
-
Mapping Type: COUNTRY_CODES
Mapping Codes: MC_IRP, MC_SOVOS, MC_SISCOSERV, MC_HGRS, MC_NTMP, MC_EDICOM, MC_BASWARE, MC_VOXEL, MC_BITSOFT, MC_HRS, MC_GENERIC, MC_EFSTA, MC_FISKALTRUST
-
Mapping Type: STATE_CODES
Mapping Codes: MC_IRP, MC_SOVOS, MC_SISCOSERV, MC_HGRS, MC_NTMP, MC_EDICOM, MC_BASWARE, MC_VOXEL, MC_BITSOFT, MC_HRS, MC_GENERIC, MC_EFSTA, MC_FISKALTRUST
Fiscal Folio Parameter Added and Posting Type Codes Updated
The Fiscal Folio parameter Flip_Server_Address is included in the following Fiscal Folio parameter templates:
-
BASWARE
-
EDICOM
-
ESDC
-
ITALY_RT_PRINTER
-
VNPT
-
GENERIC
Fiscal Folio Bucket Types Flip, Posting_Type_1 until Posting_Type_9, are available as prepopulated/default configurations without a preceding 0.
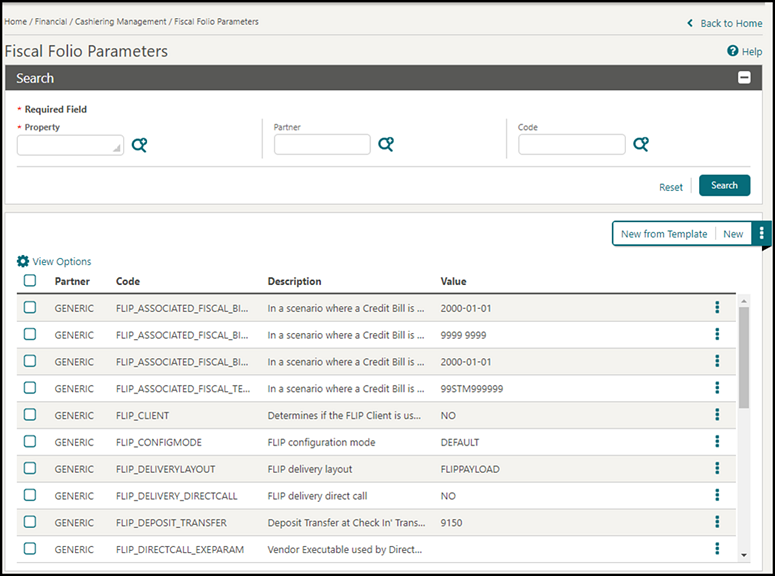
Fiscal Folio Parameters Configuration Improved
The configuration screen for Fiscal Folio Parameters is enhanced to allow you to configure Fiscal Folio Parameters for multiple partners/vendors.
All existing Fiscal Folio Parameters configured in a property are associated with the GENERIC partner by default.
When the fiscal universal payload is generated by properties with Fiscal Folio Parameters configured for multiple partners/vendors, the Fiscal Folio Parameters are organized by Partner within the fiscal universal payload.
Fiscal Folio Parameters Feature Improved
Fiscal Folio parameters functionality is enhanced to include additional Fiscal Folio parameters for the GENERIC template and the EDICOM template.
Template: GENERIC
Additional Fiscal Folio Parameters:
FLIP_PARTNER_MODE
FLIP_PARTNER_NETGROSS
FLIP_PROPERTY_ECONOMIC_ID
Template: EDICOM
Additional Fiscal Folio Parameters:
FLIP_PARTNER_MODE
FLIP_PARTNER_NETGROSS
FLIP_PARTNER_TAX_QUALIFICATION
FLIP_PERSON_IN_CHARGE
FLIP_PROPERTY_ADDRESS1
FLIP_PROPERTY_ECONOMIC_ID
FLIP_PROPERTY_ID
Fiscal Folio Parameters Removed
The following Fiscal Folio Parameters are removed from all Fiscal Folio parameter templates (if they are part of the template) including the Generic template.
DELIVERY_OPERA
FLIP_DELIVERYLAYOUT
FLIP_DELIVERY_DIRECTCALL
FLIP_DIRECTCALL_EXEPARAM
FLIP_PROXY
FLIP_DELIVERY_FILESYSTEM
FLIP_LOGIN
FLIP_DELIVERY_URL
DELIVERYFILE_FILENAME
DELIVERYFILE_PATHPARAM
FLIP_CLIENT
FLIP_DELIVERY_PARTNER
FLIP_LOGLEVEL
FLIP_FISCAL_PRINTER
FLIP_FISCAL_DEVICE_NAME
FLIP_TEMPLATEFILE
Fiscal Folio Payload Updated
Fiscal Folio Printing is updated to include a NetAmount attribute in the universal payload.
When you generate a fiscal folio that includes tax generates, the new attribute for NetAmount is included in the <Taxes> section of the universal payload.
The value is the total net amount for which the tax is calculated in the corresponding tax bucket (1-20) of the tax transaction code.
Germany - Fiscal Folio Parameters for EFSTA Added
The following is generically available, but should be reviewed by properties in Germany.
The Fiscal Folio parameter template for EFSTA is available in Fiscal Folio parameters.
Code: EFSTA
Description: EFSTA Fiscal Folio Parameters
Fiscal Folio Parameters:
| Parameter Name | Description | Default Value |
|---|---|---|
|
FLIP_CONFIGMODE |
FLIP configuration mode |
DEFAULT |
|
FLIP_DELIVERYLAYOUT |
FLIP delivery layout |
V5XML |
|
FLIP_LOGLEVEL |
FLIP log level |
INFO |
|
FLIP_TEMPLATEFILE |
FLIP template |
FLIPTemplate.xml |
|
FLIP_FISCAL_PRINTER |
Fiscal Printer device |
YES |
|
FLIP_SERVER_ADDRESS |
FLIP Server IP address |
null |
|
FLIP_CLIENT |
**Determines if the FLIP Client is used for fiscal communication |
YES |
|
FLIP_DELIVERY_PARTNER |
FLIP Partner delivery code |
null |
|
FLIP_DEPOSIT_TRANSFER |
Deposit transfer at check in |
null |
Note:
Values should be updated as specified in the Fiscal Layer Integration Platform (FLIP) Installation Guide.Outbound System Configuration for Synchronous Integrations Added
Outbound System Configuration is added to Toolbox and provides a way to enable integrations initiated from within OPERA Cloud.
For example, for an integrated CRM solution that follows the OPERA Cloud REST specification, you can define the Outbound Code with Outbound Type = CRM and configure the CRM system end point URL and authentication credentials.
Then, from the respective area(s) of OPERA Cloud, you can make synchronous calls (GET/POST) from OPERA Cloud to/from the CRM system using REST Web services.
Refer to: Configuring Outbound System Configuration

OXI Control for OPX_CVENT Added
A Referral As Booking OPERA Xchange Interface (OXI) Control is added for the OPX_CVENT interface.
When active, the OPX_CVENT interface converts incoming CVENT RFPs to blocks for all destination properties listed in the OXI message that are configured for the OXI endpoint.
Note:
This is a global parameter in multi-property operationsIMPACT OR OTHER CONSIDERATIONS
The parameter must be activated for OPERA Cloud if using the OPX_CVENT interface.STEPS TO ENABLE
-
From the side menu, select Exchange, select interface CVENT, and then select Interface Controls.
-
Select or confirm the Property.
-
Select or confirm Interface.
-
Select the Blocks group.
-
Locate and activate the Referral As Block parameter.
OXI External Systems Added
The following validated OXI external systems are added:
|
HCONNECT |
OPERA Xchange Two-way Interface for HCONNECT |
|
PROFITROOM |
OPERA Xchange Two-way Interface for PROFITROOM |
|
SMARTRMS |
OPERA Xchange Two-way Interface for SMARTRMS by SMARTHOTEL |
|
VICAS |
OPERA Xchange Two-way Interface for VICAS by SAMSOTECH |
|
DOTCY |
OPERA Xchange Two-way Interface for dotHospitality on Dynamics 365 by Dot.Cy |
|
RCDHYBRIS |
OPERA XChange 2-way for RCDHYBRIS |
|
GRAVTY |
OPERA Xchange 2-way for GRAVTY by LJI |
|
N2PRICING |
OPERA Xchange 2-way for N2Pricing |
|
OAKY |
OPERA Xchange 2-way for OAKY BV |
Payment Service Directory (PSD2) OPERA Control Added and MOTO Attribute added to Payment Integration
A Payment Service Directive OPERA Control is added for properties with payment integration to meet the requirements of the P2D2 European directive for card not present transactions.
When the OPERA Control is active :
OPERA Cloud transmits the Mail Order Telephone Order (MOTO) flag with the PaymentMethod tag indicating:
-
'Mail Order Telephone Order'=0 then credit card is not entered manually
-
'Mail Order Telephone Order'=1 then credit card is manually entered
Note:
This flag is only supported by the Oracle Payment Interface.OPERA Cloud includes the following flags when sending payments to the payment service provider for approval:
-
PSD2-PRE-PAYMENT when processing credit card payments for deposits.
-
PSD2-NOSHOW when processing credit card payment for no show fees.
-
PSD2-DELAYED_CHARGE when processing credit card payments for post-stay charges
IMPACT OR OTHER CONSIDERATIONS
STEPS TO ENABLE
-
From the side menu, select Administration, select Enterprise, and then select OPERA Controls.
-
Select or confirm the Property.
-
Select the IFC group.
-
Locate and activate the Payment Service Directive parameter.
PosNet XL2 Fiscal Folio Parameter Template Added
The following is generically available, but should be reviewed by properties in Poland.
The Fiscal Folio parameter template for POSNET XL2 Online Fiscal Printer is available in Fiscal Folio Parameters.
Code: POSNET
Description: POSNET Fiscal Folio Parameters
| Code | Description | Default Value |
|---|---|---|
|
FLIP_CONFIGMODE |
FLIP configuration mode |
DEFAULT |
|
FLIP_SERVER_ADDRESS |
FLIP Server Address |
null |
|
FLIP_DEPOSIT_TRANSFER |
Deposit Transfer at Check In |
null |
Taiwan Fiscal Folio Parameters Added
The following is generically available, but should be reviewed by properties in Taiwan. The template for Taiwan e-Invoicing is available under Fiscal Folio parameter templates.
Code: TAIWAN_EINVOICE.
Description: Taiwan e-Invoice Fiscal Folio Parameters.
Fiscal Folio Parameters:
| Code | Description | SID Default Value |
|---|---|---|
|
FLIP_CONFIGMODE |
FLIP configuration mode |
DEFAULT |
|
FLIP_DELIVERYLAYOUT |
FLIP delivery layout |
V5XML |
|
FLIP_LOGLEVEL |
FLIP log level |
INFO |
|
FLIP_TEMPLATEFILE |
FLIP template |
FLIPTemplate.xml |
|
FLIP_FISCAL_PRINTER |
Fiscal Printer |
YES |
|
FLIP_FISCAL_DEVICE_NAME |
Fiscal Device Name |
FP90III |
|
FLIP_CLIENT |
Determines if the FLIP Client is used for fiscal communication. YES = FLIP Client communicates to the FLIP Server to deliver the payload. NO = FLIP Server retrieves/delivers payload without FLIP Client. |
YES |
|
FLIP_SERVER_ADDRESS |
FLIP Server IP Address |
null |
|
FLIP_PARTNER_FOLIO_TEXT |
Used to add Folio Text required by the partner |
null |
|
FLIP_TAX_FREE_PROPERTY |
Used to specify if the Property is located in a Tax Free region |
null |
|
FLIP_PERSON_IN_CHARGE |
Used to specify the person in charge for use by the partner |
null |
|
FLIP_PROPERTY_ID |
Property ID for use by the Partner |
null |
|
FLIP_PROPERTY_ADDRESS1 |
Property Address Line 1 for use by Partner |
null |
|
FLIP_PROPERTY_ADDRESS2 |
Property Address Line 2 for use by Partner |
null |
|
FLIP_PROPERTY_ADDRESS3 |
Property Address Line 3 for use by Partner |
null |
Note:
Values should be updated as specified in the Fiscal Layer Integration Platform (FLIP) Installation Guide.The following codes are available in pre-populated/default configuration for Fiscal Folio Parameters (GENERIC and TAIWAN_EINVOICE templates):
| Code | Description | SID Default Value |
|---|---|---|
|
FLIP_PARTNER_FOLIO_TEXT |
Used to add Folio Text required by the partner |
null |
|
FLIP_TAX_FREE_PROPERTY |
Used to specify if the Property is located in a Tax Free region |
null |
|
FLIP_PERSON_IN_CHARGE |
Used to specify the person in charge for use by the partner |
null |
Miscellaneous
Quick Launch Improved
When you add menu items to the My Quick Links section of Quick Launch for which no quick key is assigned, the Go to Screen and the Launch as New Session columns display an icon you can click to launch the selected link.
For menu items where quick keys are available, the quick key combinations appear in the respective Go to Screen and Launch as New Session columns.
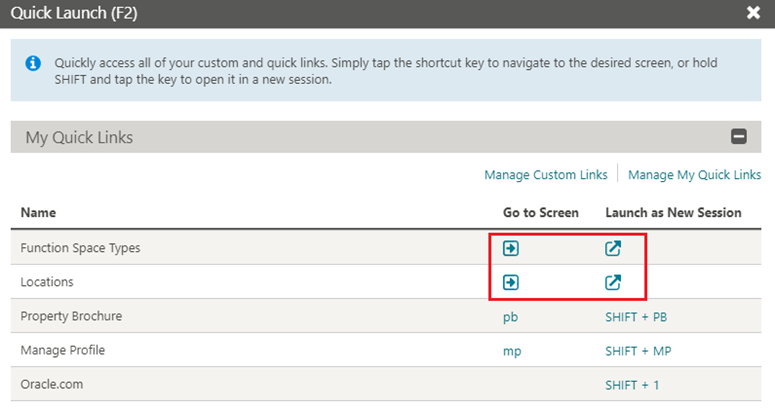
On mobile devices, tap-enabled icon links are available for all Quick Links.
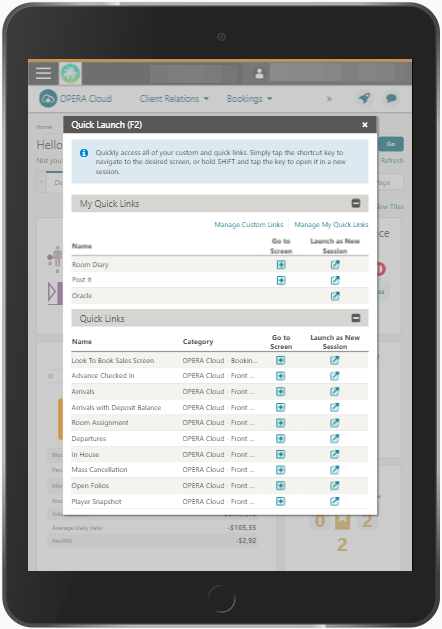
Reservation Pace OPERA Control Removed
The Reservation Pace OPERA Control is removed; the functionality is activated in all properties.
The Reservation Pace forecast report is available, and the forecast data is also available in Reporting and Analytics (R&A).
Rich Text Editor Updated
The Rich Text Editor is updated with additional operators for conditional text.
| Operator | Description | Condition Value | Sample Condition |
|---|---|---|---|
|
!= |
Not equal to |
Enter single value |
If <Country> != US then "Please be aware that ID is required at check-in." |
|
is null |
Is null |
Value field is blank and disabled |
If <Language Code> is null then "Please select your language." |
|
is not null |
Is not null |
Value field is blank and disabled |
If <VIP> is not null then "Free self parking is available for VIP guests." |
|
not in |
Not in |
Enter single value or multiple values divided by comma |
If <Country> not in (AU, US, UK) then "Please be aware that ID is required on check-in." |
|
not like |
Not like |
Enter single value. The percent sign (%) represents zero, one, or multiple characters. |
If <RateCodeDesc> not like %breakfast% then "Would you like to add breakfast package to your rate?" |
Refer to:
Reports
Fixed Date Parameters for Scheduled Reports Added
For properties with the Report Scheduler OPERA Control active, you have the option to set either a fixed date or dynamically calculate a date (with the Date Options selection) for each date parameter:
-
Selecting a Fixed Date clears the Date Option selection.
-
Setting a Date Option clears the corresponding Fixed Date field.
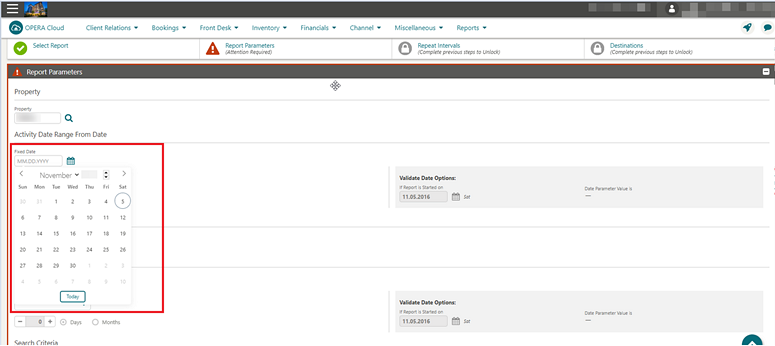
Multiple Updates to Generate Reports
The Run Reports menu is renamed Manage Reports.
-
You can download and email reports in various file formats.
-
BI Publisher based reports can be downloaded or emailed in PDF, HTML, RTF, and XML formats.
-
You can download the following BI Publisher-based reports in Excel format. Download the others in Delimited and Delimited Data formats.
| Internal Report Name | Report Title |
|---|---|
|
rep_catering_progress_bi |
Catering Progress |
|
rep_group_rooms_pace_bi |
Group Room Pace |
|
rep_meal_type_forecast_bi |
Meal Type Forecast by Day |
|
rep_mgr_progress_bi |
Sales Manager Month End Progress |
|
rep_month_end_details_bi |
Month End Details BI |
|
rep_room_cat_rev_pace_bi |
Room and Catering Revenue Pace |


You are presented with an error if any of the report parameters values do not exist in the property; this might occur when the Copy Reports process was used to create the report in multi-property operations.

Report Scheduler Relocated to Manage Reports
For properties with the Report Scheduler OPERA Controls active:
-
The Schedule Reports functionality is incorporated into Manage Reports.
-
A Schedule Report action is added to the ellipsis menu of each report.
-
A Manage Scheduled Reports action link is added for viewing executed (scheduled) reports and managing the schedule of the reports. See Managing Scheduled Reports.

Stationery Templates Increased to 10MB
The file size limit for RTF Stationery Templates is increased to 10MB.
Reservations
Authorizer Password Validation Added
![]()
The screen for Authorizer ID and Password appears only when the Authorizer Password Required OPERA Control is On.
The screen for Authorizer ID is visible only when the Authorizer Password Required OPERA Control is Off.
-
Drag and drop between billing windows
-
Transfer transaction
-
Routing
IMPACTS OR OTHER CONSIDERATIONS
-
Drag and drop between billing windows
-
Transfer transaction
-
Routing

The following validation popup appears when doing routing, drag and drop between billing windows, and transfer transactions.

When the OPERA Control is Off, OPERA Cloud does not ask for password validation; it asks only for identification while you are doing drag and drop between billing windows and transfer transactions.

STEPS TO ENABLE
-
From the side menu, select Administration, select Enterprise, and then select OPERA Controls.
-
Select or confirm the Property.
-
Select the Comp Accounting group.
-
Locate and activate the Authorizer Password Required OPERA Control.
Booking Rules and Schedules Updated
You can schedule a Deposit or Cancellation rule or a Reservation Type rule with multiple criteria.
Additionally, a Block Code field is added for Deposit and Cancellation Rule schedules to schedule rules for one or more Blocks.
-
When scheduling a deposit/cancellation rule, Rate Code, Reservation Type, Credit Rating, and Block Code accept multiple values.
-
When scheduling a reservation type, Rate Code and Credit Rating accept multiple values.
-
When multiple criteria are selected, separate schedules are created for each combination.
See Bookings Rules and Schedules
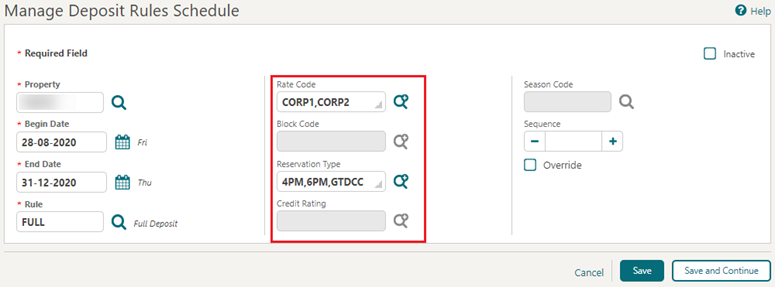
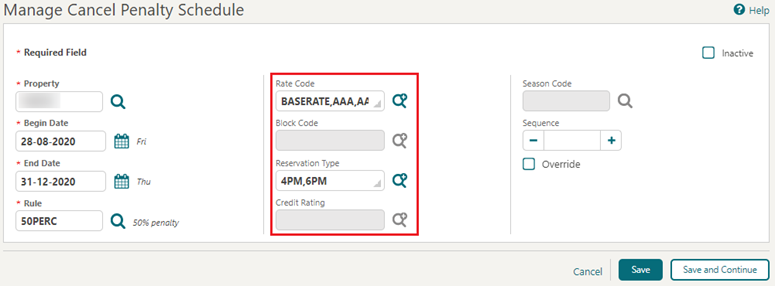

Comp Accounting Inherit Rate Code Feature Added
![]()
Overview
A feature to inherit the rate code from the Comp Authorizers configuration is added in OPERA Cloud. When you add a comp accounting routing code to a reservation, you are prompted to inherit the Comp Authorizer rate code.
-
The process is automated and processes the rate update on the reservation with the least amount of user input requirements.
-
In general, the full reservation time frame is considered for the inherit rate code process.
-
For checked-in reservations, only the current business date and future dates are considered for the inherit rate code process.
Note:
This feature excludes block reservations.Workflow
After adding a comp routing code to a reservation, you decide to inherit the Authorizer rate code, and the validations of required updates to the reservation are processed and applied.
-
Before starting the inherit rate process, you can decide whether the market and source code of the reservation should be updated during the process, if applicable.
-
For dates with availability restrictions on the authorizer rate code, you are prompted to override the availability or skip these dates.
-
Dates associated with inherited authorizer rate codes will clear any existing discount and fixed rate flags.
-
After the workflow is completed, the Details show the updated values in the Stay Details or the Daily Details section of the reservation (depending if the reservation is a single-day or a multi-day reservation).
Comp Authorizer Field Added
A Comp Authorizer field is added to the Reservation Overview and Stay Details panels of the Reservation presentation.
When a Comp Authorizer is selected for a reservation, this authorizer populates while creating comp routing instructions for that reservation. You can choose a different comp authorizer if required.
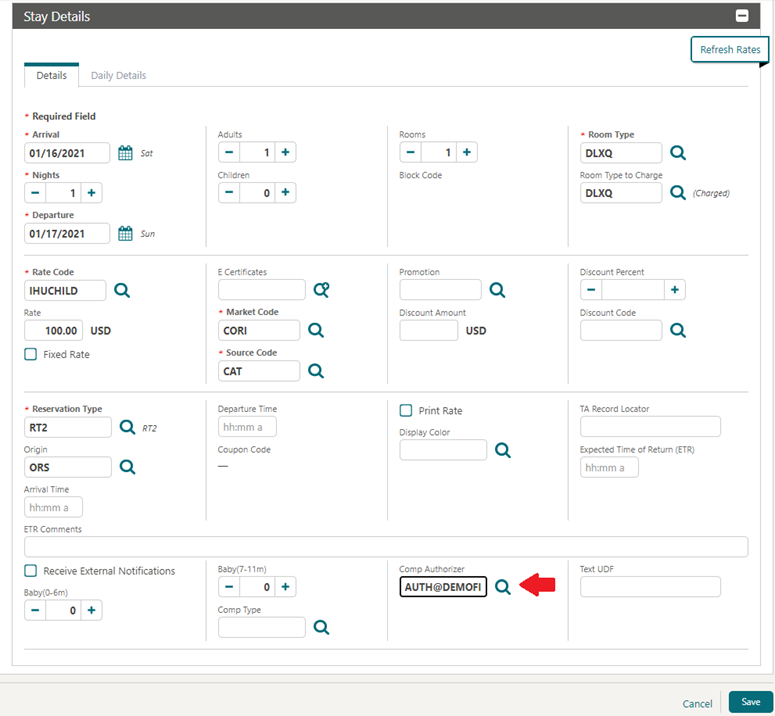
STEPS TO ENABLE
Enable Page Composer at the property, hub, or chain level, as required.
-
From the side menu, select OPERA Cloud, select Bookings, select Reservations, and then select Manage Reservations.
-
Search for a reservation and click the confirmation number to launch the Reservation presentation.
-
Select the gear icon to customize the Overview or Stay panel.
-
Click Add Field.
-
Add the Comp Authorizer field in the desired locations.
-
Click Save.
-
Click Save.
-
Disable Page Composer from the Settings Menu.
Comp Request OPERA Control Added
![]()
A Comp Request OPERA Control is added, enabling the ability to add Comp Routing and Comp Routing Requests on a reservation.
Comp Routing Instructions are used to automatically route transactions to the Comp Folios of the reservation (101-108).
The Comp Routing Request is available to set up a request for Comp Routing that a Comp Authorizer can approve.
Comp Routing
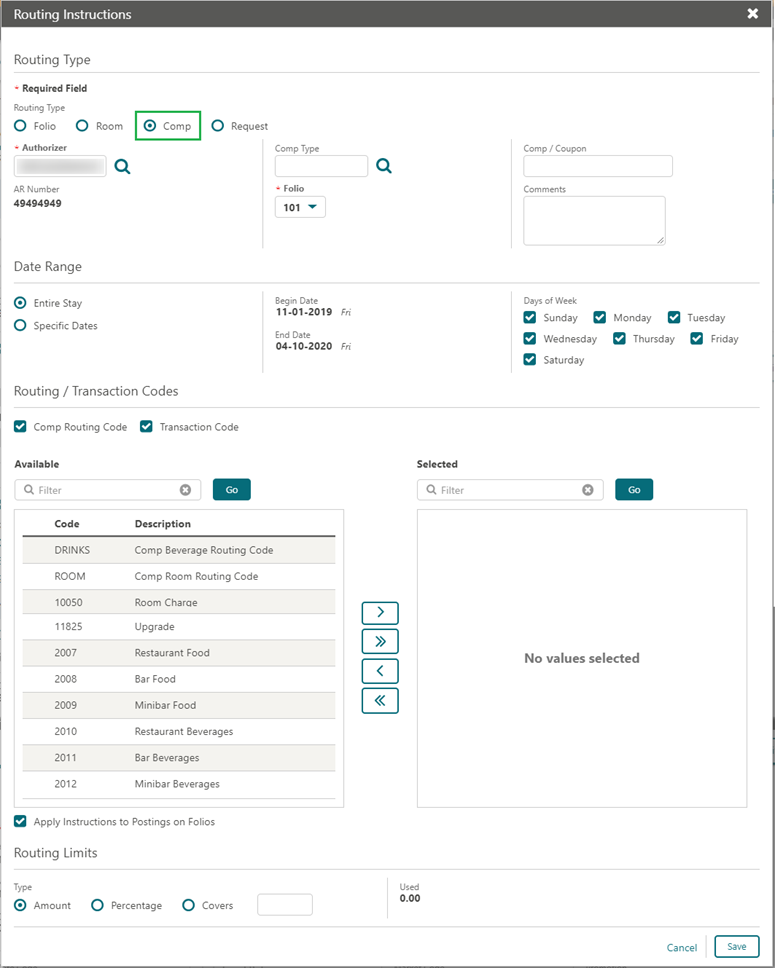
Routing Instructions

STEPS TO ENABLE
Note:
This feature requires the Routing OPERA Control to be active-
From the side menu, select Administration, select Enterprise, and then select OPERA Controls.
- Select or confirm the Property where you want to enable the parameter.
-
Select the Comp Accounting group.
-
Locate and activate the Comp Request function.
-
From the side menu, select Role Manager and select either Manage Chain Roles or Manage Property Roles according to your needs.
-
Enter search criteria and click Search.
-
Select the role to update, click the vertical ellipsis, and select Edit.
-
Select the Bookings group and grant the following tasks as applicable:
-
Decline Comp Requests
-
Delete Comp Requests
-
Delete Comp Routing from other Authorizers
-
Approve Comp Requests
-
Add Comp Routing Instructions
-
Comp Routing Instructions
-
-
Click Save.
Comp Routing Defaulted from Promotions Feature Added
![]()
Promotion Codes with Comp Accounting Routing
-
OPERA Cloud allows the setup of routing information on a promotion code.
-
When the promotion code is attached to a rate code, and the rate code is used on a reservation, the attached routing details are applicable for the reservation.
Auto-Populate Routing - On/Off
-
You can configure a promotion code with Comp Accounting routing set to either auto-populate or non auto-populate. Depending on this configuration, the setup routing details from the promotion code can be edited before applying these to the reservation (if non auto-populate), or not (if auto-populate).
Authorizer Password Required
-
If the Authorizer Password Required OPERA Control is enabled, you must enter Authorizer credentials to enable applying Comp Accounting routing details to a reservation. A pop-up window prompts the entry of Authorizer credentials when you apply the routing details to the reservation.
-
If the Authorizer Password Required OPERA Control is not enabled, Comp Account routing instructions do not require authorization when the routing details are applied to the reservation.

Creating a Reservation with Comp Accounting Routing
-
To create a reservation with Comp Accounting routing, you can enter or select a promotion code (with setup Comp Accounting routing) on the Look To Book Sales screen.
-
When you search, only rates that are attached to the selected promotion code appear. You can select the desired room/rate combination and proceed to the BookNow screen. The promotion code is applied to the reservation.
-
BookNow - Add Routing Instructions:
When you select Add Routing Instructions on BookNow, and a Comp Accounting promotion code with routing instructions has been added to the reservation, a pop-up window shows you a list of all suggested routing options for the reservation (routing options from attached profiles and promotion codes are considered) and you can select the promotion code routing and select Confirm [the] Selection.-
If the selected routing instructions were flagged as auto-populate, the routing instruction is applied to the reservation (an authorization process is prompted when Authorizer Password Required is set to Yes).
-
If the selected routing instructions were not flagged as auto populate, the routing instructions detail window appears in an editable state with the details from the promotion code routing details pre-populated. You can make adjustments to the values before applying the routing details to the reservation (an authorization process is prompted when Authorizer Password Required is set to Yes).
-
-
BookNow - Creating a Reservation:
When you complete the mandatory information on BookNow, and the reservation has a Comp Accounting promotion code attached, the routing details are considered:-
If the selected routing instructions were flagged as auto-populate, the routing instruction are applied to the reservation (an authorization process is prompted when Authorizer Password Required is set to Yes) if no other routing details were added to the reservation on BookNow.
-
If the selected routing instructions were not flagged as auto-populate, a pop-up window shows you a list of all suggested routing options for the reservation (routing options from attached profiles and promotion codes are considered), and you can select the promotion code routing and select Confirm Selection. The routing instructions detail window appears in an editable state with the details from the promotion code routing details pre-populated. You can make adjustments to the values before applying the routing details to the reservation (an authorization process is prompted when Authorizer Password Required is set to Yes).
-
-
Reservation presentation - reservation with attached Comp Accounting promotion code:
When a reservation does not have routing instructions applied (but a Comp Accounting promotion code attached), you can click on the Routing Instructions indicator in the reservation links and a pop-up window will show you a list of all suggested routing options for the reservation (routing options from attached profiles and promotion codes are considered). You can select the promotion code routing and select Confirm Selection:-
If the selected routing instructions were flagged as auto-populate, the routing instruction is applied to the reservation (an authorization process is prompted when Authorizer Password Required is set to Yes).
-
If the selected routing instructions were not flagged as auto populate, the routing instructions detail window appears in an editable state with the details from the promotion code routing details pre-populated. You can make adjustments to the values before applying the routing details to the reservation (an authorization process is prompted when Authorizer Password Required is set to Yes).
-
IMPACTS OR OTHER CONSIDERATIONS
-
Functionality requires the Promotions and Routing OPERA Controls to be active at your property.
-
Refer to: Configuring Promotions
Comp Types Added
![]()
A Comp Type is added to OPERA Controls enabling you to configure the Comp Types used to rank guests according to your needs. For example, you might use this feature to identify guests according to their gaming expertise.
When Comp Type is active, you can customize the Reservation presentation screen by adding the Comp Type list field in the Stay Details panel.
The Comp Type value of guest is also indicated in Comp Routing.
STEPS TO ENABLE
-
From the side menu, select Administration, select Enterprise and then select OPERA Controls.
-
Select or confirm the Property.
-
Select the Comp Accounting group.
-
Locate and activate the Comp Types function.
-
From the side menu, select Role Manager and then select either Manage Chain Roles or Manage Property Roles according to your needs.
-
Enter search criteria and click Search.
-
Select the role to update, click the vertical ellipsis, and select Edit.
-
Select the Financial Admin group and grant these tasks:
-
New/Edit Comp Types
-
Delete Comp Types
-
-
Click Save.
-
Enable Page Composer at the property, hub, or chain level, as required.
-
From the OPERA Cloud menu, select Bookings, select Reservations and then select Manage Reservation.
-
Search for a reservation and then launch the Reservation presentation page by clicking a confirmation number in search results.
-
Select the gear icon to customize the Stay Details panel.
-
Add the Comp Type field in the desired locations.
-
Click Save.
-
Disable Page Composer from the settings menu. Refer to: Application Settings
Membership Panel Updated
The Membership panel is updated to improve usability.
-
The primary actions for Manage and Back to Transactions are removed from the vertical ellipsis.
-
The titles of several sub panels are updated to be more detailed and easily identified.
Packages and Items Usability Improved
Multiple usability improvements are made to the Packages and Item Inventory panels.
Profile Discounts of Negotiated Rates Added
A Show Profile Discounted Rates OPERA Control is added to determine the display of discounted negotiated rates in the Look To Book Sales Screen
When the Show Profile Discounted Rates control is active and you select a profile with a discount in the Look to Book Sales Screen search, the negotiated rates that appear in search results are adjusted by the profile discount amount. When you select a room rate combo, the screen displays the following information text: “This is a discounted rate.”
When the control is inactive, Look To Book returns the profile negotiated rate without the profile discount applied.
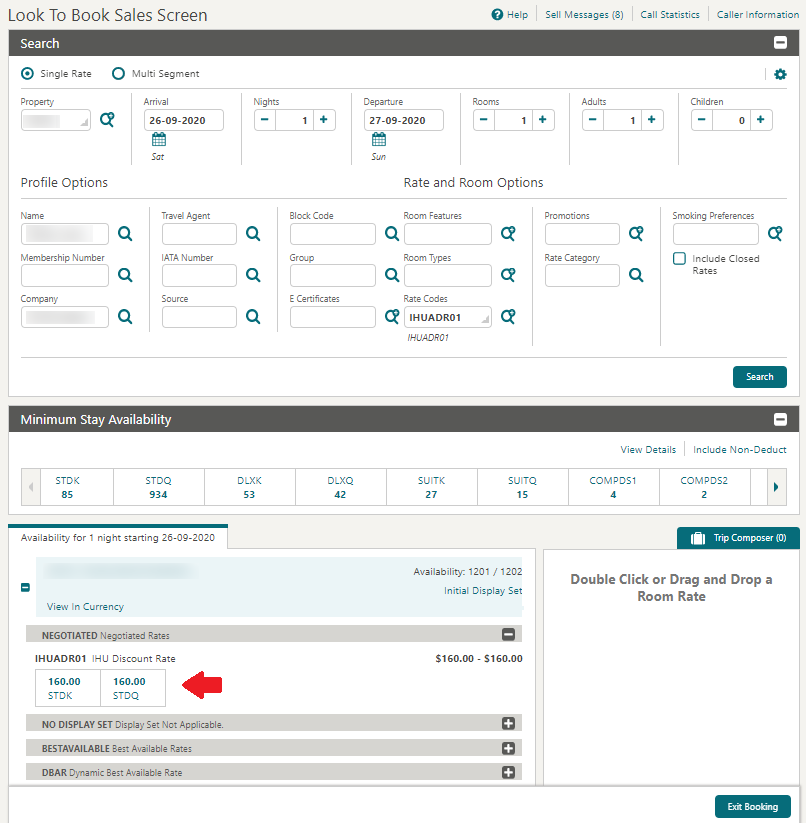
STEPS TO ENABLE
-
From the side menu, select Administration, select Enterprise, and then select OPERA Controls.
-
Select or confirm the Property where you want to enable the parameter.
-
Select the Profile group.
-
Locate and activate the Profile Discounts parameter.
-
Select the Look To Book Sales Screen group.
-
Locate and activate Show Profile Discounted Rates.
Quick Book Feature Added
A Quick Book OPERA Control is added. Quick Book is a rapid reservation entry screen offered as an alternative to the Look to Book Sales Screen for when you have the reservation details (such as room type, rate code, reservation type, and so on).
Quick Book commences with the reservation entry and offers optional access to an Available Rates screen (for room type availability and rate pricing details) and an Analyze Rate screen (for review and override of closed rates).
Users with Reservation Management tasks granted to their roles can also access Quick Book. Refer to Creating Reservations Using Quick Book.
| Quick Book | Look To Book Sales screen |
|---|---|
|
Availability Search |
|
|
Display Sets Closed Rates Analyze Restrictions Multi-currency rates Rate Info (Dep/Cxl) |
Display Sets Closed Rates Analyze Restrictions Multi-currency rates Rate Info (Dep/Cxl) Multi-property Rate Category Promotions Room Class Room Features Negotiated Rates / Profile Discounts Block allocation |
|
Reservation |
|
|
Discount Fixed Rate Payment Preferences
|
Discount Fixed Rate Payment Preferences
Page Composer Customization / flex fields ETA / ETD Daily Details (multi-rate) Multi-segment (Itinerary) Assign Room |
|
Profile |
|
|
Guest
|
Guest/Company/Agent/Source/Contact
|
|
Detail Links |
|
|
Resv Notes Packages |
Resv Notes Packages Sharers Routing Item Inventory Membership (Auto-populate / prompt / Manual Add) Linked Profiles (Company /Agent/Source/Contact) |
|
Other |
|
|
Override Rate Availability (user) |
Override Rate Availability (PIN) Closing Script Sell Messages Upgrade Offers Caller Information Awards Turnaway Waitlist Property Brochure |
STEPS TO ENABLE
-
From the side menu, select Administration, select Enterprise, and then select OPERA Controls.
-
Select or confirm the Property.
-
Select the Reservations group.
-
Locate and turn on the Quick Book parameter.
Rate and Upgrade Loyalty Award Redemption Added
The ability to redeem Loyalty Awards for rates and upgrades is added in an OPERA Cloud Professional integrated environment when the Customer Loyalty Tracking Cloud Service license (OPI_500) and Award Redemption OPERA Control are both active in the environment for the property/chain.
Loyalty Member Award points can be redeemed for Awards configured for a membership type. Awards can take the form of room rates or room type upgrades and be offered based on specific valid dates, the member's tier or level, and other factors.
Once redeemed, the Points Available value on the Member Info screen updates to show the deduction in points (or increase based on updates/cancellations).
An award record is also created for each night on the Member Award List screen. Refer to: Loyalty Award List Added.
Rate Awards
Rate Awards are redeemable from the Look To Book screen by selecting a profile with a Membership for which Awards are configured. After you select the Redeem Awards check box, the Award Rate codes are returned.
Once selected, the Total Cost of Stay shows $0, and the points required are populated.


Upgrade Awards
Upgrade Awards can be redeemed from the Look To Book screen or the Reservation Presentation screen when the Profile/Reservation has a Membership attached for which Awards are configured.
A blue banner message, "Member Award Upgrade available for this Reservation,” appears on the Book Now screen from the Look To Book (LTB) screen or the Reservation presentation.
Once selected, the Room Type to Charge remains, and the Room Type updates to the Upgraded Room Type.

-
The Points Available value on the Member Info screen are updated to show the deduction/increase in points.
-
An award record is created for each night in the Member Award List.

IMPACT OR OTHER CONSIDERATIONS
You must consider the following in Customer Loyalty Tracking Cloud Service:
-
The Customer Loyalty Tracking Cloud Service license (OPI_500) must be active in the same Cloud environment of the property/chain.
-
Configure Membership and Awards in the OPERA Customer Loyalty Tracking Cloud Service.
-
In OPERA Cloud, the Award Redemption OPERA Control must be active.
If the Customer Loyalty Tracking Cloud Service license (OPI_500) is not active and Award Redemption OPERA Control is active in the environment for the property/chain, Award Redemption will continue to request data from the interfaced OPERA Customer Information System (OCIS).
Awards will continue to be configured in OPERA V5 OCIS, but can now be redeemed in OPERA Cloud.
Related Topic: Redeeming Loyalty Awards for Stays and Room Type Upgrades
Reservation Item Inventory Redesigned
The reservation Item Inventory panel is updated to improve usability with the following:
Inventory Items Tab
-
The multi screen workflow is updated to a single screen workflow.
-
Available Items List:
-
Item Pools appear in bold for easy identification; you can expand the Item Pool to view the items. An indicator is added for Item Pool included elements.
-
An availability override is added for items that are not available.
-
-
Selected Items List:
-
An image icon appears for items with configured images; click the icon to launch the image viewer.
-
A pencil icon to edit items.
-
An X icon to delete items.
-
Availability Override and PIN Override
-
Override: If you have the Item override sell control user task, you can override items when the item is not available.
-
PIN Override: If you do not have the Item override sell control user task, you can request a PIN override. Other users that have the Item override sell control user task can authorize on your behalf from their override PIN.

Reservation Search Updated
Reservation search is updated to remove the + Expand All (rows) action when displaying 20 or more search results.
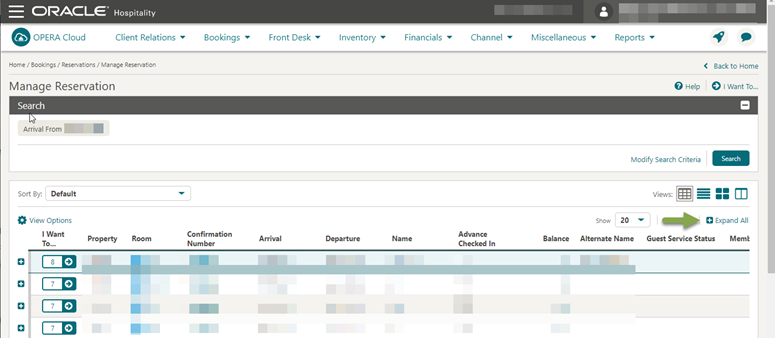
Restrict New Profile OPERA Control Added
![]()
A Restrict New Profile OPERA Control is added. When enabled, the Select Another Profile action link in the Linked Profile panel is disabled when charges are transferred or manually posted to a comp window (101-108).
STEPS TO ENABLE
-
From the side menu, select Administration, select Enterprise and then select OPERA Controls.
-
Select or confirm the Property where you want to enable the parameter.
-
Select the Comp Accounting group.
-
Locate and activate the Restrict New Profile parameter.
Routing Report Updated
![]()
The Routing Details report is updated with additional details for Comp Routing displaying the dates of the reservation, the authorizer, dates of the comps, and any notes attached to the comp.
Routing Updated with Player Membership Details
![]()
Comp Routing Instructions display the Player membership details based on the Default PTS Membership Type OPERA Control.

The Authorizer Login screens also display the Player membership information.

STEPS TO ENABLE
-
From the side menu, select Administration, select Enterprise, and then select OPERA Controls.
-
Select or confirm the Property where you want to enable the parameter.
-
Click the Comp Accounting group and scroll to the parameter section.
-
Locate and activate the Generic Comp Membership Number parameter.
-
Locate and define the Default PTS Membership Type setting.
Shares Panel Updated
You can access profile and reservation details from the reservation Shares panel.
The Shares panel displays the guest name and reservation confirmation number as links. Clicking the guest name or the reservation confirmation number opens the respective Profile or Reservation screen in a new browser tab session.

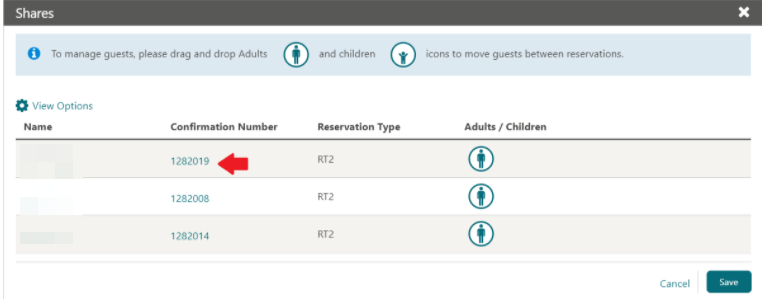
Stay Details User Task Added
A Stay Details user task is added to control the display of the Stay Details panel in the Reservation presentation screen.
The existing Edit Stay Details user task controls access to modifying the details in Stay Details.
Roles currently assigned to the Edit Stay Details task are granted the Stay Details task automatically.
STEPS TO ENABLE
-
From the side menu, select Role Manager and then select either Manage Chain Roles or Manage Property Roles according to your needs.
-
Enter search criteria and click Search.
-
Select the role to update, click the vertical ellipsis, and select Edit.
-
Select the Bookings group and grant the Stay Details task.
-
Click Save.
Sales
-
Oracle Hospitality OPERA Cloud Service, Sales and Event Management Standard Edition
-
Oracle Hospitality OPERA Cloud Service, Sales and Event Management Premium Edition
Features that are specific to the Sales and Event Management Premium Edition are marked with the Premium badge. ![]()
Activity Search Improved
Manage Activities is updated with the following:
-
A Show list selection to specify the number of records to display (20|50|100|200).
-
Pagination with page number links and next/previous navigation.
-
In table view, floating left and right scroll buttons along the sides of the table.
-
You can export the Activities listed from View Options.
Reports Navigation Updated
The I Want To . . . Reports action is updated to launch Manage Reports with the Activities report group selected and the reports listed.
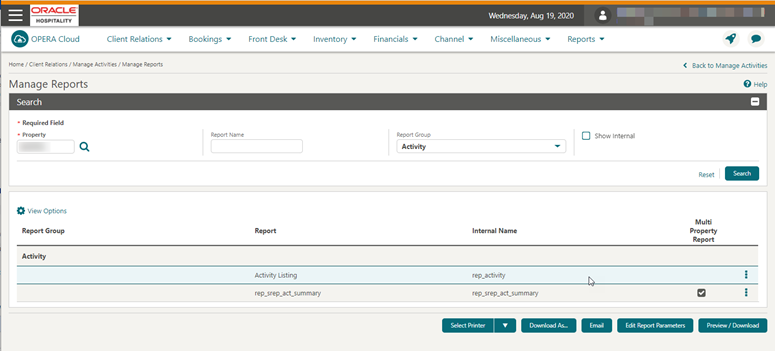
IMPACTS OR OTHER CONSIDERATIONS
See Multiple Updates to Generate Reports.To Do and Activity Summary Tiles Updated
You can view To Do activities on the Activity Statistics and To Do Tiles for more than one day. If an activity is not completed, it remains visible on your dashboard on subsequent days.
A Default Number of Days to keep To Do Activities on Activity Dashboard Tile setting is updated in the Activities group of OPERA Controls.
This setting is also used for defaulting the From/End Date dates on the Activity Search screen.
STEPS TO ENABLE
-
From the side menu, select Administration, select Enterprise, and then select OPERA Controls.
-
Select or confirm the Property.
-
Click the Activities group.
-
Locate and update the Default Number of Days to keep To Do Activities on Activity Dashboard Tile setting.
Toolbox
Column Width Validation Added to Data Import
The maximum length of data specified for each column in each data type import file is validated during the Validate Data process in the import cycle.
If the data length exceeds the maximum value specified for each column in a data type, the Validate Data procedure generates an error file with length validation failures.
See Importing Data for details on column widths for each Data Type.
Additional improvements made to Data Import:
-
The Data Type "Individual/Contact Profiles" is renamed "Guest/Contact Profiles."
-
The sample template file "Individual_Contact_Profiles.csv" in the download templates is renamed "Guest_Contact_Profiles.csv."
-
A Time header is added to the Import Overview screen to specify the time the import is completed.
-
A Steps header is added to the Import Data screen to explain the order of steps to follow for Initiate Import Data.
Data Types Added to Data Import
The data import utility is updated to support importing the following data types:
-
Blocks & Room and Rate Grid
-
Activities
Data is uploaded in the comma separated (.csv) file format based on a template file provided per data type.
You can download sample template files from the Import Data screen.
Utilities Updated
The requirement for a one-time use support key is removed when accessing the following Data Management Utilities:
-
(Block/Catering) Status Code Update
-
Change Revenue Type
-
Update Contact
IMPACT OR OTHER CONSIDERATIONS
User role(s) must be granted the applicable task for each utility. Refer to: OPERA Tasks