Adding Custom Dialog Boxes
This topic describes how to add a custom dialog box. It is recommended that you define custom dialog boxes in the dialogs tag in the dialogs.xml file. This tag includes a unique dialog identifier, id, that Siebel CRM Desktop uses as the starting point for creating a dialog box. This tag includes the following sections:
Script section where you can write the scripts that define the dialog box logic. It is recommended that you use this script section to define the dialog box logic so that the predefined forms.js file can reference the script.
Page section where you define the dialog box layout.
The example in this topic describes how to create a dialog box that allows the user to specify child competitor information for a parent opportunity. It assumes a top-level or parent asset object type exists, and that the basic_mapping.xml file defines the parent and child Opportunity.Competitor object.
The following table describes the fields of the Opportunity.Competitor object that the custom dialog box you create must display. This dialog box must include a list for each field, and it must allow the user to choose a value from each of these lists.
| Fields | Type Of Control | Source |
|---|---|---|
CompetitorName |
autocomplete |
Account object type. |
RelationshipRole |
combobox |
CompetitorRelationshipRolePicklist of the opportunity object type. |
ReverseRelationshipRole |
combobox |
CompetitorReverseRelationshipRolePicklist of the opportunity object type. |
This example links the child competitor object with an account object, so it uses an autocomplete list for the CompetitorName field to make sure the user chooses a valid link.
The combobox controls in the RelationshipRole and ReverseRelationshipRole fields make sure the user does not create a relationship between the child competitor object and a picklist value.
You configure Siebel CRM Desktop to use the account object type to populate values for the autocomplete list, and picklists to populate values for the combobox controls. You define these picklists in the basic_mapping.xml file.
For information about how to add a picklist, see Customizing Picklists
To add custom dialog boxes
Use a JavaScript editor to open the business_logic.js file.
Add a direct link:
add_direct_link("Opportunity.Competitor", "Account", "CompetitorId", true,
null, false, "ObjectStatus");
This code adds a direct link between the Opportunity.Competitor child object and the account top-level object. It supports the list of accounts that Siebel CRM Desktop displays in the autocomplete list. For more information, see Preventing Users From Removing Links Between Object Types.
Specify the dialog box layout.
For more information, see Specifying the Layout of the Dialog Box.
- Register the controls that you added in step 3. For more information, see Registering Form Controls:
Locate the following function in the business_logic.js file:
function od_competitor_dlg(ctx)
{
...
}
This function handles the custom dialog events.
Add the following code to the function that you located in step a:
register_autocomplete_control(ctx, link_to, autocomplete_ctrl,
show_salesbook_btn)
where:
ctxindicates to use these parameter without modification.link_toidentifies the object type that Siebel CRM Desktop uses for the autocomplete list.autocomplete_ctrlspecifies the Id of the autcomplete control that you defined in step 3.show_salesbook_btnspecifies the Id of the button control that you defined in step 3. If the user clicks this button, then Siebel CRM Desktop displays the dialog box.
Add the trigger that displays the dialog box:
- Locate the following code:
with (scheme.triggers) { ... //add trigger here } - Add the following code to the code that you located in step a:
add_simple_trigger(form_helpers.create_dialog_show("Competitor Dlg", {
"form_handler": include.forms.od_competitor_dlg }), null,
"Opportunity.Competitor", null, "show");
For more information, see Customizing Triggers.
- Locate the following code:
Save, and then close the business_logic.js file.
Create the function that handles the dialog box:
Use a JavaScript editor to open the forms.js file.
Add the following code:
function od_competitor_dlg(ctx)
{
  var form = ctx.form;
  var events = ctx.events;
// enable autocomplete for this item;
ctx.form_links_manager.init_new();
if (ctx.item_ex.get_id() == null)
  ctx.form.item = ctx.form.item;
}
You can add this code anywhere in the forms.js file. It is recommended that you add it immediately after the form handler function of the object where Siebel CRM Desktop displays this dialog box.
- Save, and then close the forms.js file.
For more information about creating a function that handles a form, see Customizing Form Handlers.
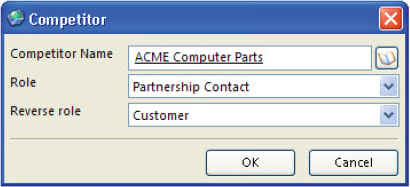
Verify your work:
Log into the client.
Navigate to the Opportunity screen, and then click in the Competitor field.
Verify that the client displays a dialog box that is similar to the following:
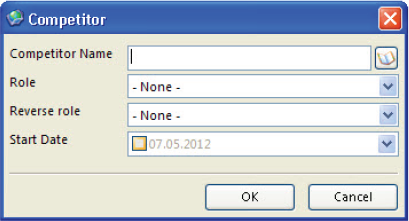
(Optional) Add another field to the dialog box:
Use a JavaScript editor to open the forms_xx.xml file.
- Add the following code immediately under the code you added in
step 3
<cell size="22">
  <static id="lbl_start_date" tab_order="101">
    <text>#lbl_start_date</text>
    </static>
</cell>
...
<cell size="22">
  <datetime id="startdate" tab_order="100" type="date" store_time="false">
    <field>StartDate</field>
  </datetime>
</cell>
where:
type="date"configures Siebel CRM Desktop to display only the date without the time in the datetime contol.
- Locate the following code that you added in step 3:
<appearance height="130" width="350"position="parent_center"> Replace the code you located in step c with the following code:
<appearance height="160" width="350" position="parent_center"></appearance>This code increases the height of the dialog box to accommodate the new control.
Save the forms_xx.xml file, and then republish the customization package.
For more information, see Republishing Customization Packages
Log in to the client, and then navigate to the Opportunity screen.
Click the Competitor field.
Verify that the client displays a dialog box that is similar to the following that includes the Start Date field: