Working with Integration Layer Processes (IJCT)
Purpose: Use this menu option to work with the processes that transmit data between Order Management System and an external system, such as batch and on-line credit card authorizations, deposits, and merged customers.
Note: The integration layer processes are not restricted by company; when you work with or change a process, it affects all companies.
Configuration: See the Advanced Queuing chapter of the Implementation Guide for information on setting up queues.
In this chapter:
• Work with Integration Layer Process Screen
• Integration Layer Process Screen (Create Mode)
• Integration Layer Process Screen (Change Mode)
• Hiding an Integration Layer Process
• Work with Integration Layer Process Queues Screen
• Starting or Stopping Process Queues
• Integration Layer Process Queue Screen
• Work with Integration Process Control Screen
• Display Integration Process Control Screen
• Defining Outbound Interface Trigger Rules
- Defining Trigger Rule Values
- Select Trigger Rules File Window
- Outbound Interface Trigger Rules Screen
• Outbound Interface XML Inclusion Screen
• Select XML Message Version Screen
• Translating Special Characters
• Integration Layer Processes and Web Services
- Web Services without Integration Layer Processes
- Troubleshooting XML Messages and Integration Layer Processes
As data is processed in Order Management System, the JMS provider sends messages to the integration layer processes for processing. Processes can be one-directional or bi-directional if a response is received (for an outbound process) or generated (for an inbound process).
All messages are processed in the sequence in which they arrive at the queue.
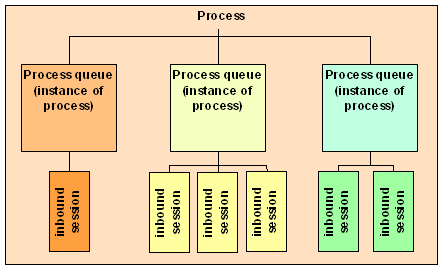
Inbound process structure: Underneath each inbound process at the Work with Integration Layer Process Screen are one or more process queues. Multiple process queues are useful for inbound messages, so that you can receive and process messages from more than one remote system. For example, you might receive inventory transactions from both a warehouse management system and a POS system.
When there are multiple process queues, each queue is an instance of the Inbound program for the process; however, each queue should have a unique Inbound job name so that you can identify and troubleshoot each process separately.
The # inbound sessions for each process queue can be one or more. For example, you might set the number of inbound sessions higher for the process queue that processes orders from your web storefront, to prevent delays; however, you might require only one inbound session for orders you receive from a remote order entry service, because you receive these orders at a scheduled time, and an immediate response is not required.
Inbound process example:
1. |
A remote system sends a message to the Inbound queue specified for an integration layer process queue in Order Management System. |
2. |
The process: • receives and identifies the message • parses (interprets) the XML • performs any required actions, such as building Order Management System records or submitting records to a background job for additional processing |
3. |
Optionally, the process sends a response using the Outbound queue specified. |
Generic web service: As an alternative to sending messages directly to the inbound queue specified for each integration layer process queue, you can use the generic web service. In this situation, you send messages to the endpoint for the generic web service, which routes each message to the correct process queue and then routes the generated response. See the Generic Web Services for more information.
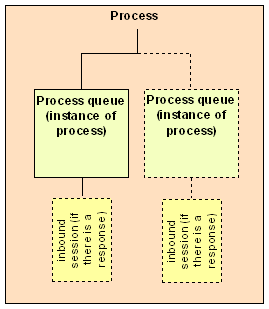
Outbound process structure: Underneath each outbound process at the Work with Integration Layer Process Screen are one or more outbound queues. Multiple outbound queues allow you to send outbound messages to more than one remote system. For example, you might send item information to your POS system and warehouse management system. If you define more than one outbound queue, the system creates a copy of the outbound message for each additional queue whose Enabled field is selected.
An outbound process requires an inbound session only when a response from the remote system is expected.
Outbound process example:
1. |
Activity in Order Management System: • generates an outbound message and sends the message to the outbound queue for the outbound process, Or • creates outbound triggers in the IL Outbound Trigger table, based on the trigger rules defined for the outbound process. See Defining Outbound Interface Trigger Rules. |
|
• When active, the outbound process looks for outbound triggers to process at defined intervals, based on the Outbound delay time field. • For each outbound trigger, the outbound process determines which elements to include in the outbound message, based on XML inclusion rules; see Outbound Interface XML Inclusion Screen. • The system then sends the generated message to the outbound queue for the outbound process. If more than one outbound queue is defined, the system creates a copy of the message to send to the additional queues that are active (the Enabled field is selected). |
2. |
The remote system receives the message. |
3. |
Optionally, the remote system sends a response using the inbound queue specified. |
Message logging: See Order Management System Application Logs for information on the logs you can use to track XML messages.
Overview: As new elements and attributes are added to existing system-delivered XML messages processed through Integration Layer Job Control, each new version of a message is tagged with a version number. The first version of an XML message is always tagged as version 1.0, but if the next release of Order Management System adds any new attributes or elements to this XML message, this next version of the message is tagged as version 2.0.
Version compatibility: Each new attribute or element is always optional, or implied, so that the integration layer process can always process previous versions of the message.
XML version numbers vs. Order Management System release numbers: The XML version number is independent of the Order Management System release number. For example, version 2.0 of a message might be introduced in Order Management System release 4.0, while version 1.0 of another message might be introduced in Order Management System release 5.5.
About inbound XML messages: Since the integration layer processes can process any previous versions of the related inbound message, the highest version of an inbound XML message supported by an integration layer process is indicated by the Version in field at the Work with Integration Layer Process Screen. For example, if this field is set to 2.0, the integration layer process can process the message in version 1.0 and 2.0.
Not all integration layer processes receive inbound messages. The Version in field is blank for any integration layer processes that are outbound-only.
About outbound XML messages: You use the Select XML Message Version Screen to indicate which version of the outbound message the integration layer process should generate. For example, if version 1.0 and 2.0 are available for an outbound message, you could have the process generate either version. By default, the integration layer process generates version 1.0. Whichever version of the message you select will be sent to all process queues running under the integration layer process.
Outbound XML version for SVC Reversal process: The SVC Reversal process (SVC_REVRSL) uses the outbound XML version defined for the SVC Activation process (SVC_OUT) to generate a stored value card authorization reversal request message. If you define an outbound XML version for the SVC Reversal process, the system ignores this version and continues to use the outbound XML version for the SVC Activation process. Typically, you would want to generate the same outbound message version for both stored value card activations and stored value card authorization reversals.
Outbound XML version for CC_TOKEN process: Because the CC_TOKEN integration layer process is an interactive job, you must define its outbound XML version in the CCAUTH_BTH (Batch Authorization) and CCAUTH_ONL (Online Authorization) integration layer processes. To include the tokenized tag in the Authorization Request XML Message (CWAuthorizationRequest), set the outbound XML version for the CCAUTH_BTH and CCAUTH_ONL processes to version 2.0 or later.
How does the system identify the current version of a message? The XML Message Version table lists the latest available version of each inbound and outbound XML message. This table is updated each time you apply a new upgrade to Order Management System.
Identifying when new attributes or elements were added to a message: Unless otherwise indicated in the XML layout, each element and attribute was included in version 1.0 of the message. See XML Messages for a listing of inbound and outbound messages processed through Working with Integration Layer Processes (IJCT), including links to the XML layouts.
Versions assigned to system-delivered messages only: Only system-delivered XML messages processed through integration layer processes support this version functionality. For example, e-commerce XML messages and unique XML messages do not support versions. See the Integration Layer Processes for a listing of system-delivered messages processed by the integration layer processes under Working with Integration Layer Processes (IJCT).
Important: You must select the latest available Outbound version for the EMAIL_OUT process in order for the email generation to work for any notification formats that use information added in versions greater than 1.0 (for example, backorder, soldout, and stored value card notifications). See Outbound Email API for more information.
Work with Integration Layer Process Screen
Purpose: Use this screen to review and work with integration layer processes.
When you first enter this screen, the system automatically creates the Batch credit card authorization integration layer process, on-line credit card authorization integration layer process, and batch deposit integration layer processes. The communication type defaults to MQ and the inbound and outbound XML messages and job names are populated.
Hidden processes? If a process is not listed at this screen, it might have had its Type changed to Hide Service. See Hiding an Integration Layer Process for more information.
How to display this screen: Enter IJCT in the Fast path field at the top of a menu or select Integration Layer Job Control from a menu.
Field |
Description |
Process |
A code for an integration layer process. Alphanumeric, 10 positions; optional. |
Description |
A description of the process. Alphanumeric, 45 positions; optional. |
Version in |
The latest version of the inbound XML message that the process is capable of processing. For example, if the Version in is 2.0, this indicates that the process works with version 1.0 or 2.0 of the inbound XML message. See XML Versions for an overview. This field is blank if the process does not process inbound XML messages. Numeric, 3 positions with a 1-place decimal; display-only. |
Version out |
The version of the outbound XML message that the process generates. You can select the outbound XML version at the Select XML Message Version Screen. See XML Versions for an overview. This field is blank if the process does not generate outbound XML messages. Numeric, 3 positions with a 1-place decimal; display-only. |
Type |
Indicates whether the process uses a JMS provider (advanced queuing) or a web service. Possible types are: MQ = the process uses a JMS provider, advanced queuing, to transmit and receive messages, or uses an Order Management System web service. See Advanced Queuing and Generic Web Services. WS = the process uses an external web service. If you have hidden a process, it is not listed on this screen. See Hiding an Integration Layer Process for more information. |
Status |
The status of the queue. Possible statuses are: • Active • Inactive • Starting • Ending • Interact: The MERCH_LOC, EMAIL_OUT, and TAX_INT process always have this status because they do not use a batch job, but processes requests and responses interactively. The SVC_BALANC process also has this status if no companies have the Perform Balance Inquiry during Batch Authorizations (J19) system control value selected. It is not possible to change the status of these processes. Note: • The status is Active if any of the process queues is currently active. See the Work with Integration Layer Process Queues Screen for more information. • It is not necessary to start or stop the ORDER_IN job unless you want it to read from or write to queues. Alphanumeric, 9 positions; display-only. |
Active session |
The number of separate sessions that are active for all process queues. You might set up multiple sessions for each process queue of an inbound process to prevent delays in communication. Numeric, 5 positions; display-only. |
The date and time the process, or any of the process queues, was most recently started. The user ID of the person who started the process or any of its queues is also displayed. Date: numeric, 6 positions (in user date format); display-only. Time: numeric, 6 positions (HH:MM:SS format); display-only. User: alphanumeric, 10 positions; display-only. |
|
The date and time the process, or any of the process queues, was most recently ended. The user ID of the person who ended the process or any of its queues is also displayed. Date: numeric, 6 positions (in user date format); display-only. Time: numeric, 6 positions (HH:MM:SS format); display-only. User: alphanumeric, 10 positions; display-only. |
Screen Option |
Procedure |
Create an integration layer queue |
Select Create to advance to the Integration Layer Process Screen (Create Mode). |
Change the settings for an integration layer process |
Select Change for a process to advance to the Integration Layer Process Screen (Change Mode). |
Delete an integration layer process |
Select Delete for a process to delete it. |
Review the details of an integration layer process |
Select Display for a process to advance to the Display Integration Layer Process Screen. You cannot change any information at this screen. See the Integration Layer Process Screen (Create Mode) for field descriptions. |
Start a process |
Select Start for a process that is in an Inactive status to start all process queues for the process. See Changing Process Status. Note: This option is not available for the CC_TOKEN, MERCH_LOC, EMAIL_OUT, and TAX_INT jobs because they are interactive rather than batch processes. (The SVC_BALANC process also has this status if no companies have the Perform Balance Inquiry during Batch Authorizations (J19) system control value selected.) Also, this option is not necessary for some jobs, such as the ORDER_IN. See Integration Layer Processes for a listing of jobs that indicates whether it is necessary to start or stop the job. To schedule: You can use the STRIJCT Start IJCT Process Passed periodic function to schedule the start of the integration layer process whose Process ID is defined in the Parameter field for the periodic function. |
End a process |
Select End for a process to end all process queues. See Changing Process Status. Note: This option is not available for the CC_TOKEN, MERCH_LOC, EMAIL_OUT, and TAX_INT jobs because they are interactive rather than batch processes. (The SVC_BALANC process also has this status if no companies have the Perform Balance Inquiry during Batch Authorizations (J19) system control value selected.) Also, this option is not necessary for some jobs, such as the ORDER_IN. See Integration Layer Processes for a listing of jobs that indicates whether it is necessary to start or stop the job. To schedule: You can use the ENDIJCT End IJCT Process Passed periodic function to schedule the end of the integration layer process whose Process ID is defined in the Parameter field for the periodic function. |
Work with the queues for a process |
Select Work with Queues for a process to advance to the Work with Integration Layer Process Queues Screen, where you can start, end, or work with individual process queues. Only processes whose Type is MQ use queues. |
Change the status of a process |
Select Change Status for a process to advance to the Change Status Window if you are not able to start or end it normally. Note: This option is not available for the CC_TOKEN, MERCH_LOC, EMAIL_OUT, and TAX_INT jobs because they are interactive rather than batch processes. (The SVC_BALANC process also has this status if no companies have the Perform Balance Inquiry during Batch Authorizations (J19) system control value selected.) Also, this option is not necessary for some jobs, such as the ORDER_IN. See Integration Layer Processes for a listing of jobs that indicates whether it is necessary to start or stop the job. |
Define trigger rules for an outbound process |
Select Trigger Rules for a process to advance to the Outbound Interface Trigger Rules Screen or the Select Trigger Rules File Window. This option is not available for processes that do not use trigger rules. |
Define XML inclusion rules for an outbound process |
Select XML Inclusion for a process to advance to the Outbound Interface XML Inclusion Screen. This option is available only for processes that use XML inclusion. |
Select the XML version to use for outbound messages |
Select Outbound XML Ver for a process to advance to the Select XML Message Version Screen. This option is not available for processes that do not generate outbound messages. Also, inclusion rules are not implemented for the MERCH_LOC process, which uses Order Broker’s Locate Items messages. See Merchandise Locator API for an overview. |
Work with background jobs |
Select Background Jobs to advance to the Work with Background Jobs Screen. |
Work with Drop Ship background jobs |
Select Drop Ship Jobs to advance to the Work with Drop Ship Background Jobs Screen. |
Integration Layer Process Screen (Create Mode)
Purpose: Use this screen to create an integration layer process. For example, you might create a new process similar to a system-delivered process in order to communicate with multiple authorization services.
How to display this screen: Select Create at the Work with Integration Layer Process Screen.
Field |
Description |
A code for the job that performs integration layer updates between Order Management System and an external system. See Work with Integration Layer Process Screen for a description of each. Alphanumeric, 10 positions; required. |
|
Description (unlabeled field next to Process ID) |
A description of the subsystem job that is used when the integration layer process is active. Alphanumeric, 45 positions; required. |
Status |
The current status of the integration layer job. Possible statuses are: • Active • Inactive • Starting • Ending • Interact: The CC_TOKEN, MERCH_LOC, EMAIL_OUT, and TAX_INT process always have this status because they do not use a batch job, but processes requests and responses interactively. The SVC_BALANC process also has this status if no companies have the Perform Balance Inquiry during Batch Authorizations (J19) system control value selected. It is not possible to change the status of these processes. Note: • The status is Active if any of the process queues are currently active. See the Work with Integration Layer Process Queues Screen for more information. • The status field is not implemented on the Create screen. Alphanumeric, 9 positions; display-only. |
Communication type |
Indicates whether the process uses a JMS provider (advanced queuing) or a web service. Possible types are: Message Queue (default) = the process uses a JMS provider, advanced queuing, to transmit and receive messages, or the job uses an Order Management System web service. See Advanced Queuing and Generic Web Services. Web Service = the process uses a web service that is external to Order Management System. Hide Service = this process is not used and will be hidden from the Work with Integration Layer Process Screen once you accept your entries on this screen. See Hiding an Integration Layer Process for more information. Required. |
Inbound Processing: |
|
For an inbound process, the name of the job that receives and interprets the XML message from an external system to Order Management System, and performs any additional processing in Order Management System. Alphanumeric, 10 positions; optional. |
|
Active session(s) |
The total number of active sessions from the Work with Integration Layer Process Queues Screen. Set to zero on the Create screen. Numeric, 3 positions; display-only. |
Inbound XML Msg/WSDL Doc Name |
• If the Communication type field is set to Message Queue, this is the inbound message for the integration layer process to read and process. • If the Communication type field is set to Web Service, this is the name of the WSDL file for the integration layer process to read and process. Note: The only integration layer process that requires you to specify the name of a WSDL file in this field is the TAX_INT process. Other processes that use web services do not require you to specify a WSDL. Alphanumeric, 50 positions; optional. |
Outbound Processing: |
|
Outbound job name |
For an outbound process, the name of the job that generates the outbound XML message. Alphanumeric, 10 positions; optional. |
Outbound program |
For an outbound process, the name of the program that the job uses to build the XML message and send it to an external system. Alphanumeric, 10 positions; optional. |
For an outbound process the number of seconds to wait before checking the IL Outbound Trigger table for triggers in a ready (R) status. For outbound processes requiring additional configuration options, the system also uses the outbound delay time to determine the length of time to wait before performing a delete transaction, giving the system time to generate a delete download message. Note: For outbound processes that require additional configuration options, you must enter an outbound delay time. Numeric, 5 positions; optional. |
|
Outbound XML message |
The outbound message for the integration layer process to generate. Alphanumeric, 50 positions; optional. |
Integration Layer Process Screen (Change Mode)
To change: Select Change for an integration layer process at the Work with Integration Layer Process Screen to advance to the Integration Layer Process screen in Change mode. See the Integration Layer Process Screen (Create Mode) for field descriptions.
Overview: You can start or stop the Integration Layer processes at the Work with Integration Layer Process Screen by selecting Start or End.
When you start a process, its status changes from Inactive to Starting to Active.
When you end a process, its status changes from Active to Ending to Inactive.
Ending an individual process queue: If you end an individual process queue for a process and another process queue is still active, the system updates the status of the integration layer process to Ending. The process will remain in an Ending status until you end the other active process queue(s) for the integration layer process.
For information on how to start or end individual process queues for a process, see the Work with Integration Layer Process Queues Screen.
If someone reboots the server: If someone restarts Order Management System while an integration layer process is active, the system might update the integration layer process job on the Job Management Screen (under My Jobs) to MSG or INACTIVE status. In this situation, you will need to:
• verify that the job is not listed on the Display Active Batch Jobs Screen,
• end the job at the Job Management Screen,
• use Purge Active Procedures Across Users (MACX) to delete any active procedures for the job,
• use the Change Status Window to update the status of the integration layer process to Inactive,
• start the integration layer process again,
• verify that the job now displays on the Display Active Batch Jobs Screen.
Note: If you have more than one enabled integration layer process queue, the system may update the Active session field for the integration layer process to 1, even though more than one session actually went active on the Job Management Screen and Work with Integration Layer Process Queues Screen. In this situation, stop the integration layer process again and restart it so that the number of Active sessions matches the number of sessions that have actually started.
Interactive processes: This option is not available for the CC_TOKEN, MERCH_LOC, EMAIL_OUT, and TAX_INT jobs because they are interactive rather than batch processes. The SVC_BALANC process also has this status if no companies have the Perform Balance Inquiry during Batch Authorizations (J19) system control value selected. Also, this option is not necessary for some jobs, such as the ORDER_IN. See Integration Layer Processes for a listing of jobs that indicates whether it is necessary to start or stop the job.
Scheduling when an integration layer process starts and stops: You can schedule a periodic function to start or stop an integration layer process at a particular time. See Scheduling Jobs and Additional Interface (INT) Periodic Functions for more information on how to schedule a periodic function and for a list of the periodic functions used to start and stop the integration layer jobs.
Change status: You can also change the status of a process if it does not start or stop normally in a reasonable amount of time. Select Change Status for a process to display the Change Status window.
At this window, select the desired status, Inactive or Active.
Note: This option is not available for the CC_TOKEN, MERCH_LOC, EMAIL_OUT, and TAX_INT jobs because they are interactive rather than batch processes. The SVC_BALANC process also has this status if no companies have the Perform Balance Inquiry during Batch Authorizations (J19) system control value selected. Also, changing the status is not necessary for some jobs, such as the ORDER_IN. See Integration Layer Processes for a listing of jobs that indicates whether it is necessary to start or stop the job.
Hiding an Integration Layer Process
Purpose: You can hide an unused integration layer process in order to simplify the information displayed at the Work with Integration Layer Process Screen.
Which processes are eligible to be hidden? You can hide a process only if:
• its current status is Inactive or Interactive
• it does not have any process queues set up through the Work with Integration Layer Process Queues Screen, or all existing process queues have the Enabled flag unselected
Before you hide a process: You should confirm that it is not a process that you are currently using or will need to use in the near future. For example, if you hide:
• TAX_INT: You will not be able to use the integration with Vertex or AvaTax.
• Outbound processes (such as ITEM_OUT, PO_OUT): Messages will not generated.
• Inbound processes (such as INVTRAN_IN): Messages will not be received and processed. In the case of an interactive process, no response message will be generated.
• EMAIL_OUT: You will not be able to send the CWEmailOut message for any template whose XML only? flag is selected; however, the system will continue to generate email notifications for email templates whose XML only? flag is not selected. See Working with E-Mail Notification Templates (WEMT) for more information.
Note: If you have already configured the merchandise locator integration with Order Broker, this integration will continue to work after you hide the MERCH_LOC process.
Also, you should confirm that you do not have an Interface (INT) Periodic Functions to Start and Stop IJCT Jobs set up for a process that you are going to hide. If you do, the periodic function might start the process, even though it is hidden.
How to hide a process: At the Integration Layer Process Screen (Change Mode), change the Communication type to Hide Service.
How to show a hidden process: Once a process is hidden, you cannot show it again through an option at a screen in Order Management System. Instead, you need to query the Integration Layer Process table (MSILPR) and reset the ILP Communication type field from H to MQ (if the type was previously Message Queue) or WS (if the type was previously Web Service).
The BROKER, MERCH_LOC, and TAX_INT processes use the Web Service type; the other processes use the Message Queue type.
Work with Integration Layer Process Queues Screen
Purpose: Use this screen to work with the process queues that run for each process displayed at the Work with Integration Layer Process Screen. Inbound processes might have multiple process queues if you receive messages from multiple remote systems; similarly, outbound processes might have multiple process queues if you broadcast messages to multiple remote systems. See Process Overview for more information on how processes relate to process queues.
It is not necessary to set up queues for a process that uses an external web service (Type at the Work with Integration Layer Process Queues Screen = WS) or for the BILL_UPD process.
Note: You cannot create multiple process queues for the CC_TOKEN, CCAUTH_BTH, CCAUTH_ONL, DEPOSITS, SVC_OUT, SVC_BALANC, SVC_REVRSL, MERCH_LOC, EMAIL_OUT, or EC_ITEMAVL processes. If you create multiple process queues for any of these processes, the system will only process messages for the queue with a sequence number of 1.
How to display this screen: Select Work with Queues for a process at the Work with Integration Layer Process Screen.
Field |
Description |
Process ID |
The process you selected at the Work with Integration Layer Process Screen. The description is to the right. Alphanumeric, 10 positions; display-only. |
Sequence |
A unique sequence number to identify a queue for a process. You cannot create multiple process queues for the CC_TOKEN, CCAUTH_BTH, CCAUTH_ONL, DEPOSITS, SVC_OUT, SVC_BALANC, SVC_REVRSL, MERCH_LOC, EMAIL_OUT, or EC_ITEMAVL processes. If you create multiple process queues for any of these processes, the system only processes messages for the queue with a sequence number of 1. Numeric, 3 positions; optional. |
Description |
The description of the process queue. Alphanumeric, 30 positions; optional. |
Active sessions |
The number of inbound sessions that are currently active for each process queue. You might have more than one active session for a process queue to prevent delays in responses; for example, you might have multiple active sessions for the process queue that receives new orders from your web storefront. Note: Active sessions do not apply to outbound processing. Numeric, 5 positions; display-only. |
Start |
The date and time the process queue was most recently started. The user ID of the person who started the process queue is also displayed. Note: This field is not displayed for outbound queues. Date: numeric, 6 positions (in user date format); display-only. Time: numeric, 6 positions (HH:MM:SS format); display-only. User: alphanumeric, 10 positions; display-only. |
End |
The date and time the process queue was most recently ended. The user ID of the person who ended the process queue is also displayed. Note: This field is not displayed for outbound queues. Date: numeric, 6 positions (in user date format); display-only. Time: numeric, 6 positions (HH:MM:SS format); display-only. User: alphanumeric, 10 positions; display-only. |
Option |
Procedure |
Create a new process queue |
Select Create to create a new queue for the selected process. You advance to the Integration Layer Process Queue Screen in Create mode. Note: You cannot create multiple process queues for the CC Token Process, Batch CC Auth Process, Online CC Auth Process, Batch Deposit Process, SVC Activation, SVC Balance Inquiry, SVC Reversal, MERCH_LOC, EMAIL_OUT, or EC_ITEMAVL processes. |
Change a process queue |
Select Change for a process queue to work with it. You advance to the Integration Layer Process Queue Screen in Change mode. |
Delete a process queue |
Select Delete for a process queue to delete it. |
Display a process queue |
Select Display for a process queue to advance to the Integration Layer Process Queue Screen in Display mode; all fields will be display-only. |
Start a process queue |
Select Start for a process queue to start it. If none of the other process queues were currently active, the status of the process at the Work with Integration Layer Process Screen changes to Active. The Start date, time, and user indicated for the process are also updated. Note: • The Enabled flag for the process queue must be selected for you to be able to start it. • Starting and stopping a process queue is not available for the CC_TOKEN, MERCH_LOC, EMAIL_OUT, and TAX_INT jobs because they are interactive rather than batch processes. The SVC_BALANC process also has this status if no companies have the Perform Balance Inquiry during Batch Authorizations (J19) system control value selected. Also, this option is not necessary for some jobs, such as the ORDER_IN. See Integration Layer Processes for a listing of jobs that indicates whether it is necessary to start or stop the job. |
End a process queue |
Select End for a process queue to end it. If none of the other process queues were currently active, the status of the process at the Work with Integration Layer Process Screen changes to Inactive. The End date, time, and user indicated for the process are also updated. |
View status of a batch of messages in a queue |
Select View batch status for a process queue to advance to the Work with Integration Process Control Screen. |
Start all process queues for the process |
Select Start all to start all process queues for the selected process. The status of the process at the Work with Integration Layer Process Screen changes to Active. The Start date, time, and user indicated for the process are also updated. Note: • Only process queues whose Enabled flag is selected will start. • Starting and stopping a process queue is not available for the CC_TOKEN, MERCH_LOC, EMAIL_OUT, and TAX_INT jobs because they are interactive rather than batch processes. The SVC_BALANC process also has this status if no companies have the Perform Balance Inquiry during Batch Authorizations (J19) system control value selected. Also, this option is not necessary for some jobs, such as the ORDER_IN. See Integration Layer Processes for a listing of jobs that indicates whether it is necessary to start or stop the job. |
End all process queues for the process |
Select End all to end all process queues for the selected process. The status of the process at the Work with Integration Layer Process Screen changes to Inactive. The End date, time, and user indicated for the process are also updated. |
Starting or Stopping Process Queues
You can start or stop processes in two ways:
• All existing process queues for a process:
- At the Work with Integration Layer Process Screen: see Changing Process Status.
- At the Work with Integration Layer Process Queues Screen: see below.
• Individual process queues for a process: At the Work with Integration Layer Process Queues Screen:
- Starting a process queue: Select Start for a process queue to start it. If none of the other process queues were currently active, the status of the process at the Work with Integration Layer Process Screen changes to Active. The Start date, time, and user indicated for the process are also updated. Note: The Enabled flag for the process queue must be selected for you to be able to start it.
- Ending a process queue: Select End for a process queue to end it. If none of the other process queues were currently active, the status of the process at the Work with Integration Layer Process Screen changes to Inactive. If one of the other process queues is currently active, the status of the process at the Work with Integration Layer Process Screen changes to Ending; the process will remain in an Ending status until you end the other active process queue(s) for the integration layer process.The End date, time, and user indicated for the process are also updated.
Interactive processes: Starting and stopping a process queue is not available for the CC_TOKEN, MERCH_LOC, EMAIL_OUT, and TAX_INT jobs because they are interactive rather than batch processes. The SVC_BALANC process also has this status if no companies have the Perform Balance Inquiry during Batch Authorizations (J19) system control value selected. Also, this option is not necessary for some jobs, such as the ORDER_IN. See Integration Layer Processes for a listing of jobs that indicates whether it is necessary to start or stop the job.
System started: The system automatically starts a process queue for the Batch CC Auth, Online CC Auth, Batch Deposit, SVC Activation, and SVC Reversal processes if a message is requested or received and the process is not currently running.
Starting or stopping all process queues for a process at the Work with Integration Layer Process Queues Screen:
• Starting all process queues for a process: Select Start all to start all process queues for the selected process. The status of the process at the Work with Integration Layer Process Screen changes to Active. The Start date, time, and user indicated for the process are also updated. Note: Only process queues whose Enabled flag is selected will start.
• Ending all process queues for a process: Select End all to end all process queues for the selected process. The status of the process at the Work with Integration Layer Process Screen changes to Inactive. The End date, time, and user indicated for the process are also updated.
Interactive processes: Starting and stopping a process queue is not available for the CC_TOKEN, MERCH_LOC, EMAIL_OUT, and TAX_INT jobs because they are interactive rather than batch processes. The SVC_BALANC process also has this status if no companies have the Perform Balance Inquiry during Batch Authorizations (J19) system control value selected. Also, this option is not necessary for some jobs, such as the ORDER_IN. See Integration Layer Processes for a listing of jobs that indicates whether it is necessary to start or stop the job.
Which job queue? The integration layer jobs run automatically in the QSYSNOMAX job queue in order to avoid slowing down any other jobs that might be running in other job queues on the system.
If someone reboots the server: If someone restarts Order Management System while an integration layer process is active, the system updates the integration layer process job on the Job Management Screen (under My Jobs) to MSG status. In this situation, you will need to:
• end the job at the Job Management screen,
• use the Change Status Window to update the status of the integration layer process to Inactive,
• start the integration layer process again at the Work with Integration Layer Process Screen.
Note: If you have more than one enabled integration layer process queue, the system may update the Active session field for the integration layer process to 1, even though more than one session actually went active on the Job Management Screen and Work with Integration Layer Process Queues Screen. In this situation, stop the integration layer process again and restart it so that the number of Active sessions matches the number of sessions that have actually started.
Integration Layer Process Queue Screen
Purpose: Use this screen to create, change, or display a process queue for an integration layer process.
How to display this screen: At the Work with Integration Layer Process Queues Screen:
• Select Create to advance to this screen in Create mode.
Note: You cannot create multiple process queues for the CC_TOKEN, CCAUTH_BTH, CCAUTH_ONL, DEPOSITS, SVC_OUT, SVC_BALANC, SVC_REVRSL, MERCH_LOC, EMAIL_OUT, or EC_ITEMAVL processes.
• Select Change for a process queue to advance to this screen in Change mode.
• Select Display for a process queue to advance to this screen in Display mode. All fields will be display-only.
Field |
Description |
Process ID |
The Process ID for the selected process. The description of the process is to the right. Process ID: alphanumeric, 10 positions; display-only. Process description: alphanumeric, 45 positions; display-only. |
Description |
The description of the process queue to run for the integration layer process. For example, for an inbound process, you might use this field to indicate the source of the messages. Alphanumeric, 30 positions; required. |
Indicates whether the process queue can process messages. Valid values are: • Selected = You can start the process queue. • Unselected = You cannot start the process queue. Note: If this field is unselected for all process queues, you will not be able to start the process. For outbound processing, the system sends the outbound message to queues only if their Enabled field is selected. |
|
The number of sessions to run under this process queue. You might run multiple sessions for process queues that require an immediate response, such as the process queue that receives new order messages from the web storefront. Multiple sessions are used only for inbound process queues; outbound processes should have this field set to 1 for their process queues. Note: If you leave this field blank, you will not be able to start the process queue. If this field is blank for all process queues for a process, you will not be able to start the process. Numeric, 5 positions; required. |
|
Wait time |
The number of seconds Order Management System waits for a response from an external system. Used only for two-way interfaces (outbound/inbound). If the message waits on the target queue longer than this number of seconds the message is automatically deleted. Numeric, 6 positions; optional. |
Inbound Processing: |
|
Active session (s) |
Indicates the number of sessions that are currently active for this process queue. Included in Change or Display mode only. Numeric, 5 positions; display-only. |
Inbound queue manager |
This field is currently implemented. Alphanumeric, 48 positions; optional. |
The queue in the queuing database where this process queue reads messages originating from the remote server or system. Required for inbound process queues. Alphanumeric, 48 positions; optional. |
|
Inbound XML message |
The name of the inbound XML message; informational only. Alphanumeric, 50 positions; optional. |
The name of the job that interprets the XML message from the external system to Order Management System. This is the Job Name listed on the Job Management screen, available through the My Jobs option. If there are multiple process queues for a process, each instance of the job should have a unique name. Required for inbound process queues. Alphanumeric, 10 positions; optional. |
|
Outbound Processing: |
|
Outbound queue manager |
This field is not currently implemented. Alphanumeric, 48 positions; optional. |
The queue to which this process queue sends messages for transmission to the remote server. Required for outbound process queues. Alphanumeric, 48 positions; optional. |
|
Outbound XML message |
The name of the outbound XML message; informational only. Alphanumeric, 50 positions; optional. |
Note: You cannot create multiple process queues for the CC_TOKEN, CCAUTH_BTH, CCAUTH_ONL, DEPOSITS, SVC_OUT, SVC_BALANC, SVC_REVRSL, MERCH_LOC, EMAIL_OUT, or EC_ITEMAVL processes.
1. At the Work with Integration Layer Process Queues Screen, select Create to advance to this screen in Create mode.
2. Complete the Desc and set the Enabled flag, and then any additional fields required for the process queue. Select OK to accept your entries.
Work with Integration Process Control Screen
Purpose: Use this screen to review the status of a batch of messages. This screen is useful if you need to troubleshoot the location of a batch message.
Each batch status represents a record in the Integration Process Control table. The system creates a record in the Integration Process Control table when the system sends or receives a batch of messages via an integration layer process.
Purging integration process control records: When one of the integration layer jobs listed above becomes active (from a user manually starting the job, through a periodic function, or through the job starting automatically), the system submits the ILPURGE job to determine if any of the records in the Integration Process Control table should be purged. If the integration process control record has an ILC date stamp that is over 7 days old, the system removes the record from the Integration Process Control table.
Purpose: Select View batch status for a process queue at the Work with Integration Layer Process Queues Screen.
Batch status records on this screen sort in descending date and time sequence.
Field |
Description |
Process |
The name and description of the batch integration layer process whose integration process control records you are reviewing. Code: alphanumeric, 10 positions; display-only. Description: alphanumeric, 45 positions; display-only. |
Queue Name |
A unique sequence number to identify a queue for a process, and the description of the process queue. Queue: numeric, 3 positions; display-only. Description: alphanumeric, 30 positions; display-only. |
Job |
The job name for the process associated with the integration process control record. For example, PICK_GEN indicates a integration process control record created for the Batch CC Authorization integration layer process; these records represent a batch of credit card authorizations sent to the authorization service. Alphanumeric, 10 positions; optional. |
Status |
The status of the integration process control record. Normal transmissions process through the following statuses: TRF, SNT, RCV, RIN, CMP. TRF Unknown status indicates the batch message is unknown and has not been transmitted. SNT Sent indicates the batch message transmission has been sent to the external system. RCV Received (IDC Server) indicates the batch message transmission has been received from the external system and all background processing for the batch is complete. A batch may remain in a received status if the associated job, such as pick slip generation, has timed out or moved on before the batch could be updated to Complete. No further action is required for a batch that remains in a Received status; however, if the associated process was pick slip generation or deposits, you should verify that no records remain in a Sent status in the CC Authorization Transaction or CC Deposit Transaction table. RIN Receiving indicates the batch message transmission is in the process of being received. CMP Complete indicates the batch message has been completed. FLD Error (Sending) indicates the batch message transmission has failed. Note: • If the Immediate response field for the service bureau is selected, completed records remain in a RCV status and never update to CMP. • If the integration process control record is in a sent or error status, the system will continue to wait for a response for that record. You must resolve any errors before receiving the next transaction. Status code: Alphanumeric, 3 positions; optional. Status description: Alphanumeric, 24 positions; display-only. |
Date |
The date the batch message transmission was sent to or received from an external system. Numeric, 6 positions (in user date format); display-only. |
Time |
The time the batch message transmission was sent to or received from an external system. Numeric, 6 positions (HH/MM/SS format); display-only. |
Reference ID |
The next available number from the Batch Auth File Trace Number number assignment value. Numeric, 16 positions; display-only. |
Screen Option |
Procedure |
Delete an integration process control record |
Select Delete for an integration process control record to delete it. |
Review an integration process control record |
Select Display for an integration process control record to advance to the Display Integration Process Control Screen. |
Change the status of an integration process control record that is not yet complete |
Select Change status for an integration process control record to advance to the Change Status window. You cannot change the status of an integration process control record that is in CMP complete status. |
Display Integration Process Control Screen
Purpose: Use this screen to review the details of an integration process control record. This screen is useful if you need to troubleshoot the location of a batch message.
How to display this screen: Select Display for an integration process control record at the Work with Integration Process Control Screen.
Field |
Description |
Process |
The name and description of the batch integration layer process whose integration process control records you are reviewing. Code: alphanumeric, 10 positions; display-only. Description: alphanumeric, 45 positions; display-only. |
Queue |
A unique sequence number to identify a queue for a process, and the description of the process queue. Queue: numeric, 3 positions; display-only. Description: alphanumeric, 30 positions; display-only. |
Job # |
The job number for the process associated with the integration process control record; this is the process that sent the batch message. Alphanumeric, 6 positions; display-only. |
Job name |
The job name for the process associated with the integration process control record. For example, PICK_GEN indicates an integration process control record created for the Batch CC Authorization integration layer process; these records represent a batch of credit card authorizations sent to the authorization service. Alphanumeric, 10 positions; display-only. |
User |
The user ID of the person who submitted the process associated with the batch messages. Alphanumeric, 10 positions; display-only. |
Status |
The status of the integration process control record. Normal transmissions process through the following statuses: TRF, SNT, RCV, RIN, CMP. TRF Unknown status indicates the batch message is unknown and has not been transmitted. SNT Sent indicates the batch message transmission has been sent to the external system. RCV Received (IDC Server) indicates the batch message transmission has been received from the external system and all background processing for the batch is complete. A batch may remain in a received status if the associated job, such as pick slip generation, has timed out or moved on before the batch could be updated to Complete. No further action is required for a batch that remains in a Received status; however, if the associated process was pick slip generation or deposits, you should verify that no records remain in a Sent status in the CC Authorization Transaction or CC Deposit Transaction table. RIN Receiving indicates the batch message transmission is in the process of being received. CMP Complete indicates the batch message has been completed. FLD Error (Sending) indicates the batch message transmission has failed. Note: If the integration process control record is in a sent or error status, the system will continue to wait for a response for that record. You must resolve any errors before receiving the next transaction. Status code: Alphanumeric, 3 positions; optional. Status description: Alphanumeric, 24 positions; display-only. |
Date |
The date the batch message transmission was sent to or received from the external system. Numeric, 6 positions (in user date format); display-only. |
Time |
The time the batch message transmission was sent to or received from the external system. Numeric, 6 positions (HH/MM/SS format); display-only. |
Reference ID |
The next available number from the Batch Auth File Trace Number number assignment value. Numeric, 16 positions; display-only. |
Comment |
Informational error message regarding the batch message transmission, indicating a transmission error has occurred. Alphanumeric, 60 positions; display-only. |
Change Status Window (Integration Process Control)
Purpose: Use this window to change the status of an integration process control record. You might change the status of a record if you experienced communication problems and need to re-send or receive transactions.
You cannot change an integration process control record that is already in a CMP Complete status: Status Already Complete.
How to display this window: Select Change status for an integration layer process control record at the Work with Integration Layer Process Queues Screen.
To change: Select a status and click OK to update the integration process control record to that status.
• Complete indicates the batch message has been completed.
• Confirm (Deposits) indicates the batch message has been confirmed.
• Failed indicates the batch message transmission has failed.
• Ready indicates the batch message is ready for transmission.
• Received indicates the batch message transmission has been received from the external system.
• Sent indicates the batch message transmission has been sent to the external system.
• Transferred indicates the batch message has been transmitted.
Defining Outbound Interface Trigger Rules
Outbound interface trigger rules are the criteria a transaction must meet in order for the system to create an IL outbound trigger. For each outbound process, you can create trigger rules for certain tables. For example, you can create trigger rules for the Item table and SKU table to control the Item Outbound job. If you enter more than one criterion, the record must meet all of the criteria in order to generate a trigger.
Example: For the ITEM_OUT process, you can specify to create item download triggers for SKUed items in company 555 that are located in warehouse 20. To do this, for the Item table trigger rules, select a Test of Equal and enter 555 as the Value for the Company trigger field, and select a Test of Equal and enter ’Y’ as the Value for the Allow SKU’s trigger field. For the SKU table trigger rules, select a Test of Equal and enter 20 as the Value for the Warehouse trigger field.
Item table criteria |
SKU table criteria |
Results |
The Company field must equal 27 or 555. The Allow SKUs field must equal ’Y’. |
The Warehouse field must equal 20. |
The system generates a SKU trigger only if the item/SKU being created, updated, or deleted is in company 27 or company 555 and the item is SKU’d and the SKU is located in warehouse 20. If the item/SKU does not meet all of the criteria, no trigger is created. |
You can create trigger rules for the following outbound processes.
For IL Process job: |
you can create trigger rules for: |
Example: |
BROKER |
Item (INITEM) SKU (INSKU |
You can specify to create Order Broker requests only for company 5 and that are assigned a certain Item status of QR. To do this: • in the Item table trigger rules, select a Test of Equal and enter 5 as the Value for the Company trigger field. • In the SKU table trigger rules, select a Test of Equal and enter QR as the Value for the Item status trigger field. |
CUST_OUT |
Company, Customer class, Inactive?, and Country fields |
You can specify to create Customer Download messages only for active customers in the US and Canada. To do this: • Select a Test of Not Equal for the Inactive? flag and enter Y as the Value • Select a Test of Equal for the Country field and enter ’USA CAN’ as the Value (assuming those are the country codes you are using) |
ITEM_OUT |
Item (INITEM) SKU (INSKU) |
You can specify to only create item download triggers for company 555, items that are SKU’ed and whose SKUs are located in warehouse 20. To do this: • in the Item table trigger rules, select a Test of Equal and enter 555 as the Value for the Company trigger field, and select a Test of Equal and enter Y as the Value for the Allow SKU’s trigger field. • In the SKU table trigger rules, select a Test of Equal and enter 20 as the Value for the Warehouse trigger field. |
INVOIC_ OUT |
Invoice Header (OEINHD) Order Header (OEORDR) |
You can specify to only create invoice download triggers for debit invoices and not credit invoices. To do this, select a Test of Equal and enter I as the Value for the Invoice type trigger field. |
INV_ DOWNLD |
Item (INITEM) Item Warehouse (INIWRE) SKU (INSKU) Warehouse (INWRHS Item UPC (ITMUPC) |
You can specify to exclude drop ship items, non-inventory items, and membership items. To do this, select a Test of Equal and enter Y as the Value for the Drop ship item, Non-inventory, and Membership trigger fields. |
PICK_OUT |
Pick Control Header (FLPCTH) |
You can specify by company only. |
PO_OUT |
Purchase Order Header (POH) |
You can specify to only create purchase order download triggers for purchase orders that are created, closed, cancelled in company 12 and vendor 10001. To do this, select a Test of In and enter 12 as the Value for the Company trigger field and select a Test of Equal and enter 10001 as the Value for the Vendor trigger field. |
RETURN_OUT |
Order Header (OEORDR) |
You can specify to only create return authorization download triggers for return authorizations that are created, changed or deleted in company 7 or 555 and are associated with orders whose order type is W. To do this, select a Test of In and enter 7 555 as the Value for the Company trigger field, and select a Test of Equal and enter W as the Value for the Order Type trigger field. |
VENDOR_ OUT |
Vendor (POVEND) |
You can specify to create vendor download triggers only for companies 27 and 555 and vendor 202. To do this, select a Test of In and enter 27 555 as the Value for the Company trigger field, and select a Test of Equal and enter 202 as the Value for the Vendor # trigger field. |
To create a trigger rule, select the fields in the table that should control trigger creation. For each trigger field, define:
• a Test value: indicates how the system compares the record against the trigger rule criteria.
• a Value: defines the trigger rule criterion.
Example: For the Company trigger field, select a Test of Equal and enter 555 as the Value field. This indicates the system creates IL outbound triggers only for company 555.
Field type: The T (type) field indicates if the value you enter must be numeric or alphanumeric.
• N = the Value must be numeric.
• A = The Value is alphanumeric.
Note:
• Enter alphanumeric values between single quotes: for example, ’Y’.
• When entering a list or range of alphanumeric values, separate each value with a space: for example, ’S F V’.
• When entering a list or range of numeric values, separate each value with a comma: for example, 2,5,7.
• If you select a Test value for a field you must also enter a Value, and vice versa.
• The system does not validate that the value you enter for a trigger field is valid (if the field requires valid values) or is within the maximum field positions (for example, the Company field is 3 positions). Refer to your Database Listing to review field attributes for a table.
• Fields that are in the table but are not included in the XML message are not included as a trigger field.
Test value |
Description |
blank |
A trigger rule is not specified for the field. |
Between (falls within a defined range) |
The field must fall within the trigger rule value range. For example, the Ship via must fall within 1 and 5. |
Equal |
The field must equal the trigger rule value. For example, the Company field must equal 555. |
Greater than |
The field must be greater than the trigger rule value. For example, the Cost field must be greater than 5.00. |
Greater than or equal |
The field must be greater than or equal to the trigger rule value. For example, the Cost field must be greater than or equal to 5.00. |
In (equal to a listed value) |
The field must match a trigger rule value. For example, the Company field must match 27, 409, or 555. |
Less than |
The field must be less than the trigger rule value. For example, the Cost field must be less than 500.00. |
Less than or equal |
The field must be less than or equal to the trigger rule value. For example, the Cost field must be less than or equal to 500.00. |
Not Between |
The field must not fall within the trigger rule value range. For example, the Postal code must not be between 96700 and 96899. |
Not Equal |
The field must not be equal to the trigger rule value. For example, the Company field must not be 25. |
Not In (not equal to a listed value) |
The field must not match a trigger rule value. For example, the Company field must not be 25 or 444. |
Select Trigger Rules File Window
Purpose: This window opens if you can define trigger rules for more than one table. If a process has only one table available for trigger rules, you advance directly to the Outbound Interface Trigger Rules Screen for this process.
How to display this window: Select Trigger Rules for an outbound process for which you can create trigger rules for more than one table.
Field |
Description |
Process |
The code and name of the process for which you are creating trigger rules. Alphanumeric, 10 positions; display-only. |
File name |
The table for which you are creating trigger rules. Select a table to advance to the Outbound Interface Trigger Rules Screen. Alphanumeric, 10 positions; optional. |
Outbound Interface Trigger Rules Screen
Purpose: Use this screen to define trigger rules for an outbound job.
The appearance of this screen varies based on the outbound process for which you are defining outbound trigger rules.
Using this screen: See Defining Outbound Interface Trigger Rules for a discussion.
How to display this screen:
• Select Trigger Rules for an outbound process at the Work with Integration Layer Process Screen.
• Select a table at the Select Trigger Rules File Window.
Field |
Description |
Process ID |
The code and name of the outbound process for which you are creating trigger rules. Alphanumeric, 10 positions; display-only. |
File name |
The table for which you are creating trigger rules. Alphanumeric, 10 positions; display-only. |
Field |
The field in the table for which you can create a trigger rule. When evaluating a record to determine whether to create an IL outbound trigger, the system compares the record’s field value against the trigger rule for the field. Alphanumeric, 15 positions; display-only. |
Test |
Indicates how the system compares the record against the trigger rule criteria. blank = A trigger rule is not specified for the field. Between (falls within a defined range) = The field must fall within the trigger rule value range. For example, the Ship via must fall within 1 and 5. Equal = The field must equal the trigger rule value. For example, the Company field must equal 555. Greater than = The field must be greater than the trigger rule value. For example, the Cost field must be greater than 5.00. Greater than or equal = The field must be greater than or equal to the trigger rule value. For example, the Cost field must be greater than or equal to 5.00. In (equal to a listed value) = The field must match a trigger rule value. For example, the Company field must match 27, 409, or 555. Less than = The field must be less than the trigger rule value. For example, the Cost field must be less than 500.00. Less than or equal = The field must be less than or equal to the trigger rule value. For example, the Cost field must be less than or equal to 500.00. Not Between = The field must not fall within the trigger rule value range. For example, the Postal code must not be between 96700 and 96899. Not Equal = The field must not be equal to the trigger rule value. For example, the Company field must not be 25. Not In (not equal to a listed value) = The field must not match a trigger rule value. For example, the Company field must not be 25 or 444. Alphanumeric, 5 positions; optional. |
Value |
Defines the trigger rule criterion. The system compares the trigger field value against the value of this field in each record. • If the record meets the trigger rule criteria, the system creates an IL outbound trigger. • If the record does not meet the trigger rule criteria, the system does not create an IL outbound trigger. When entering alphanumeric values, you must enter the value between single quotes; for example ’Y’. When entering a list or range of values, separate each value with a space; for example, 27 555 or ’S F V’. If you define a Value here, you must also select a Test value. Alphanumeric, 50 positions; optional. |
Type |
Indicates if the value you enter is numeric or alphanumeric. N = numeric A = alphanumeric Note: Enter alphanumeric values between single quotes; for example ’Y’. Alphanumeric, 1 position; display-only. |
Outbound Interface XML Inclusion Screen
XML inclusion defines which elements to include in a download message.
• If the element is included, that element and its parents are included in the generated download XML message.
• If the element is excluded, that element and its children are excluded from the generated download message.
Remember: Parent elements are those elements that nest other elements; any elements nested underneath the parent element are its children.
Example: Some of the elements in the generic item download message are displayed below. In this example: Item is the parent of ItemInformation and ItemInformationDetail. ItemInformation is the parent of ItemInformationDetail and the child of Item. ItemInformationDetail is the child of ItemInformation and Item.
IItem
SKU
UPC
Warehouse
ItemWarehouse
• If you include the Item element, you can still exclude the SKU element. If you exclude the Item element, the SKU element and its children (UPC, Warehouse, and ItemWarehouse) are also excluded.
• If you include the UPC element, the system automatically includes the SKU element. You can still exclude the Warehouse element.
• If you exclude the Item element, the process still generates an “empty” message with just the top element information. For example, if you exclude the entire message for the INV_DOWNLD process, the resulting “empty” message would resemble:
<Message source="OROMS" target="cwi" type="CWInventoryDownload" date="02112006" time="10:38:10">
</Message>
This screen appears different based on the outbound process for which you are defining XML inclusion rules.
You can define XML inclusion rules for the following outbound processes:
For IL Process job: |
You can create XML inclusion rules for: |
CUST_OUT |
parent and child elements included in the Customer Download XML Message (CWCustomerDownload). See Customer Outbound XML Inclusion. |
ITEM_OUT |
parent and child elements included in the Item Download XML Message (CWItemOut). See Item Outbound XML Inclusion. |
VENDOR_OUT |
parent and child elements included in the Vendor Download XML Message (CWVendorOut). See Vendor Outbound XML Inclusion. |
INVOIC_OUT |
parent and child elements included in the Invoice Download XML Message (CWInvoiceOut). See Invoice Outbound XML Inclusion. |
INV_DOWNLD |
parent and child elements included in the Inventory Download XML Message (CWInventoryDownload). See Inventory Download XML Inclusion. |
PICK_OUT |
parent and child elements included in the Pick Message from Order Management System (CWPickOut). See Pick Out Processing. |
Note: Although you can display XML inclusion options for the MERCH_LOC process, these options are not currently implemented.
When you first advance to the screen in your environment, all elements are included.
How to display this screen: Select XML inclusion for an outbound process at the Work with Integration Layer Process Screen.
Field |
Description |
Process ID |
The code and name of the outbound process for which you are creating XML inclusion rules. Alphanumeric, 10 positions; display-only. |
Include |
Indicates whether the element is included in the download XML message. selected = the element and its parent(s) are included in the XML message. unselected = the element and its children are not included in the XML message. Select Include for an element to include it and its parents in the generated XML messages. The system updates this field for the element and its parents to selected. Select Exclude for an element to exclude it and its children in the generated XML messages. The system updates this field for the element and its children to unselected. |
Element |
The name of an element tag to include or exclude in the download XML message. Alphanumeric, 30 positions; optional. |
Screen Option |
Procedure |
Include the element tag and its parents |
Select Include for an element. The Include field for the element and its parents updates to Y. |
Exclude the element tag and its children |
Select Exclude for an element. The Include field for the element and its children updates to N. |
Select XML Message Version Screen
Purpose: Use this screen to select the version of an outbound XML message to be generated by a system-delivered integration layer job. By default, each process generates version 1.0, but you can select a higher version if it is available. See XML Versions for an overview.
How to display this screen: Select Outbound XML Ver for a process at the Work with Integration Process Control Screen. This option is not available for processes that do not generate outbound XML messages.
Completing this screen: Select the XML version you would like to generate. Afterward, stop and restart the process at the Work with Integration Process Control Screen to have your change take effect.
