5 Installation of Fleet Management Component or Add-On
The following topic describes the installation steps of Fleet Management Component or Add–On
Note:
You can download the Database Schema Password Manager and the Encryption Manager tools from My Oracle Support (MOS). Both are not provided in the FMS Suite 9.1.0.0 package.-
Download the Installation file from OSDC (Oracle Software Deliver Cloud)/ MOS.
-
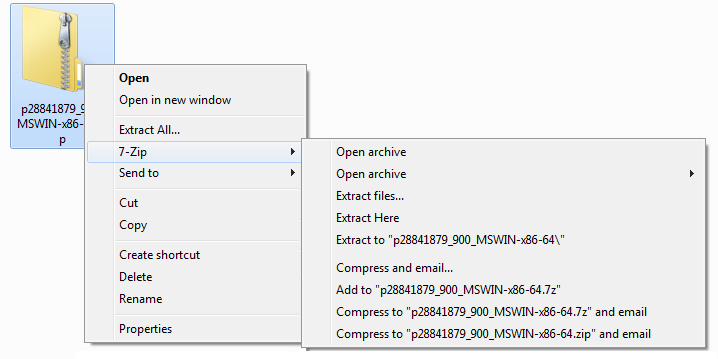
Extract the zip file using the Extract Here.
Figure 5-1 Downloaded Installation File (Zip format)

-
Open the Setup folder from the above extracted zip file.
-
Right-click the OHCFM.exe and select Run as administrator to install the application.
-
On the Oracle Installation Welcome screen, click Next to continue.
-
Select I accept the terms of the license agreement option, and then click Next to install Fleet Management or click Cancel to cancel the installation process.
Installation Notes
-
Select the Microsoft .NET Framework option if the system does not have a previous installation of the .NET Framework.
-
To view a list of all installed software, open the Control Panel, and then select Program and Features. If the Microsoft.NET Framework appears in the list of installed software, do not select the Microsoft .NET Framework installation option.
-
-
Select the required Components or Add-Ons, and then click Install.
-
Click Finish to exit the installation process.
Post Installation Notes
-
See Secure Clients section in the FMS 9.1 User Guide for the Security Server Configuration on FMS IIS Web Server.
-
Requirement to add the IIS server machine name in config.json file
(C:\inetpub\wwwroot\OHCGangwayActivityWebApp)of Gangway web application. -
To modify the value of ServiceUrl, replace localhost with the IIS machine name in ERSService.js file
(C:\inetpub\wwwroot\OHCEmergencyMobileApp)of ERS web application. -
To ensure Database Schema passwords are compatible with FMS 9.1, see Database Schema Password Manager chapter in the FMS 9.1 User Guide.
- To upgrade Database to FMS version 9.1, ignore the database scripts available in installation package. Download and run the scripts provided in patch number 30615259 instead. See FMS 9.1 User Guide, Database Updater chapter.
-
When the installation is completed. Go to the specific FMS component directory, for example,
C:\Program Files (x86)\Oracle Hospitality Cruise.-
Add the ServiceURL information to each Component or Add-On .exe configuration file. See below for the example.
<appSettings>
   <add key="FidelioBkPwd" value=""/>
   <add key="KEKKey" value=""/>
   <add key="ServiceUrl" value="https://Host-Machine-Name/OHCFMSSecurityService/FCTransactionsService.asmx"/>
   <add key="launcher1" value="layout_fms"/>
   <add key="launcher2" value="layout_occ"/>
   <add key="LogExceptionToFile" value="True"/>
   <add key="ClientSettingsProvider.ServiceUri" value=""/>
   <add key="IsActiveDirEnabled" value="N"/>
   <add key="isFileUpdaterEnabled" value="Y"/>
   <add key="isShipSide" value="N"/>
          <add key="Languages" value=""/>
</appSettings>


<add key="IsActiveDirEnabled" value="N"/> ïƒ  Set Y for active directory login authentication

<add key="isFileUpdaterEnabled" value="Y"/> ïƒ  Set N for running desktop applications e.g. Data Viewer, Corporate access Management on Windows 10.

<add key="isShipSide" value="N"/> ïƒ  Set Y to run ship side interfaces (Sender, Receiver, Watchdog)
-
- Launch your application by using the application icon(s) available on desktop.