6 Performing FMS Upgrade
What You Should Know
Make sure you have an operational understanding as follows:
-
Personal Computers (PCs) and a working knowledge of Microsoft Windows interface
-
Understanding of basic network concepts
-
Experience with Microsoft Windows Server 2012 R2
-
Experience with Oracle 11g, Oracle 12c
-
Microsoft Windows administrative privileges
In addition, you must know
-
You cannot repair or modify installation features due to changes in the setup process. If a problem occurs, you must uninstall any installed applications and reinstall FMS.
Before You Begin
You must have the FMS version 9.0 before upgrading the FMS software, take note of the followings:
-
When performing an upgrade to version 9.1, you must perform a database verification and backup task for the databases.
-
Have a dedicated Client PC ready for an upgrade.
-
Follow the prompts in the FMS software installation. If you cancel the installation after it starts, using any method other than through the provided prompts; the results can be unpredictable.
-
You must be logged in as an administrator before running the FMS setup on a Microsoft Windows system.
-
Ensure that all other programs and applications are closed on the PC. If the system detects an active program or process during the installation routine, a notification to close them may appear.
Pre-Installation Task
You must complete the tasks mentioned in chapter Pre-Installation Task before continuing
Acquiring the patches
The installation requires you to have Administrator privileges. You must acquire the patches from the My Oracle Support (MOS) site.
Table 6-1 Patch from MOS
| Software | Patch Number | Patch Name |
|---|---|---|
|
Database Scripts |
29754121 |
Script for Shore Sender/Receiver required FCU/FCX Entries |
|
Database Scripts |
30615259 |
Script Upload for FMS 9.1.0.0 |
Installing the patches
From FMS 9.1.2 onwards, a patch release will not contain a full setup files for FMS applications. Patch release will only contain the setup file for the FMS application to be patched. This is to ensure conformance to the Release standards to distinguish a Patch release from a Major/Minor release.
For example, in FMS 9.1.2, there will be a patch for FMS Sender and Receiver. As a pre-requisite to apply this patch, the full FMS applications must be installed using FMS 9.1.0 setup file. When that is met, the FMS 9.1.2 Sender and Receiver setup file can be run to install the patch.
Installing a New Application for Sender and Receiver Services
Note:
The Activity Log tab functionality to check the transfer of data will not be available when the FMS Sender and Receiver are installed as Windows Services. This is due to the inherent design of Windows Services which are not capable of refreshing UI updates.
The Sender Receiver Interfaces is a Windows Desktop application and it behaves as a configurator. User is able to select a single type of Sender to install. Once It is installed, you will obtain an executable file in the C:\Program Files (x86)\Oracle Hospitality Cruise\OHC FMS Sender folder.
Installing a Sender Service
-
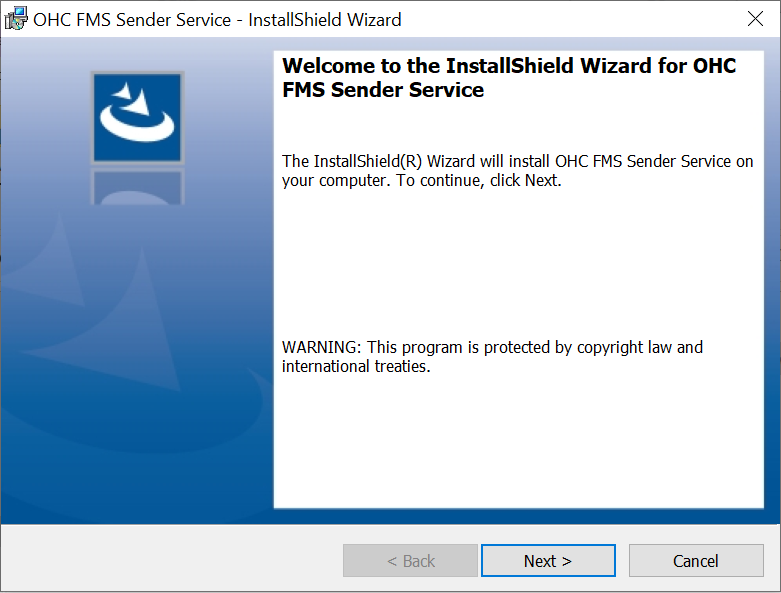
Open the InstallShield Installer, click Next to install a new service.
-
Click Finish. This closes the InstallShield Installer window.
-
Go to
C:\Program Files (x86)\Oracle Hospitality Cruise\OHC FMS Senderfolder. -
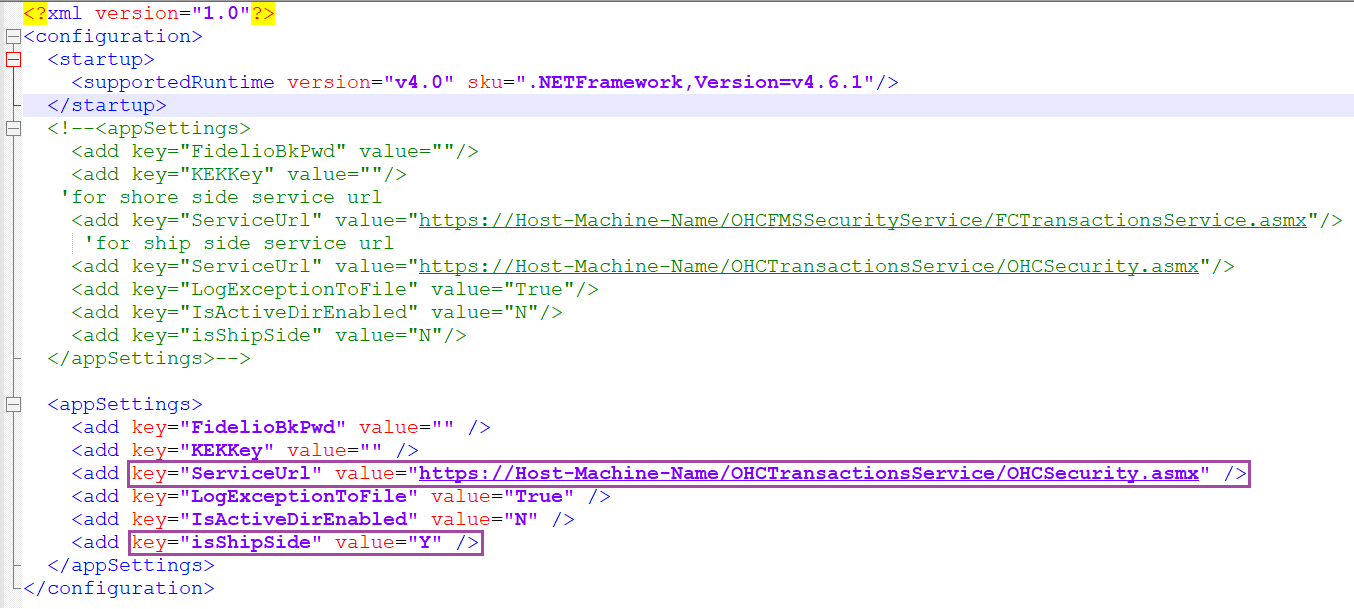
Open OHC FMS Sender.exe.Config and change ServiceUrl with Security Services. Then set the isShipSide value to ‘Y’ (for ships’ side configuration).
Figure 6-1 Security Services Setting for Shore Side Sender
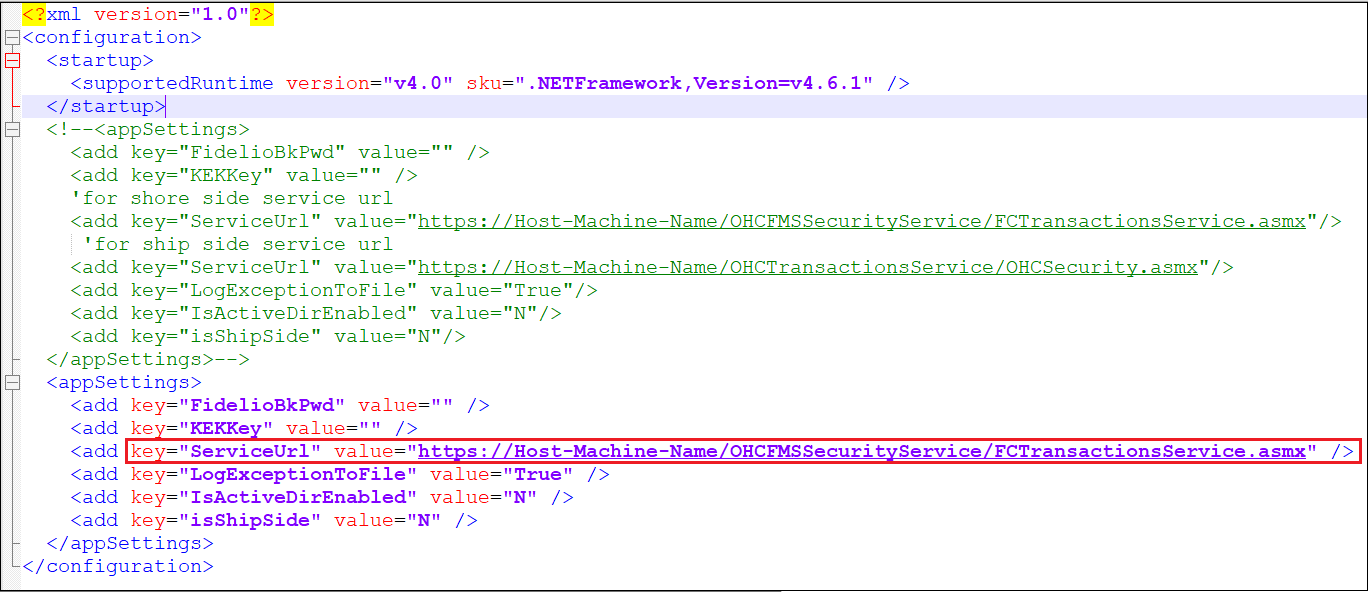
Figure 6-2 Security Services Setting for Ship Side Sender
-
Open the sender configuration from the desktop’s shortcut (OHC FMS Sender.exe).
-
Enter the application login credential. Key in the required information for Login and Password. From the drop-down list, select TNS Names file and Data Source.
-
Click OK to log in.
-
Select the default schema and click Apply.
-
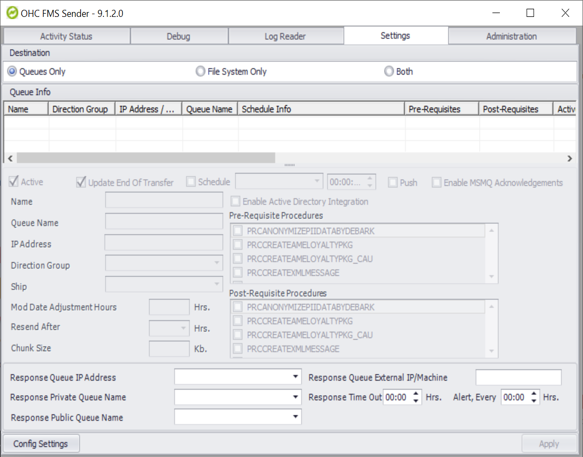
Create a new schedule task for the Sender. Any changes of the scheduled tasks requires a restart of the service.
Figure 6-3 New Schedule Task for Sender
-
Open the Services application
-
Click Start.
-
Type Services.
-
Click or tap the matching result.
-
-
Select OHC FMS Sender, and click Start Service.
-
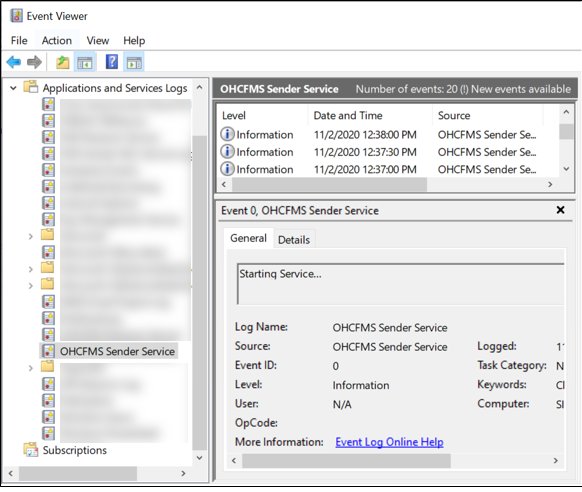
In the Event Viewer, you are able to check the status of the service
Figure 6-4 Event Viewer — Sender Services
Installing a Receiver Service
-
Open the InstallShield Installer, click Next to install a new service.
-
Click Finish, this will close the InstallShield Installer window.
-
Go to
C:\Program Files (x86)\Oracle Hospitality Cruise\OHC FMS Receiverfolder. -
Open OHC FMS Receiver.exe.Config and change ServiceUrl with Security Services. Then set the isShipSide value to ‘Y’ (for ships’ side configuration).
-
Open the receiver configuration from the desktop’s shortcut (OHC FMS Receiver.exe).
-
Enter the application login credential. Key in the required information for Login and Password. From the drop-down list, select TNS Names file and Data Source.
-
Click OK to log in.
Installing Sender/Receiver Application
If you do not want to install FMS Sender or FMS Receiver as a Windows Service, you can install it as a Windows Application.
-
Locate and run OHCFMSSenderUpdate.exe or OHCFMSReceiverUpdate.exe
-
Click Update to install.
-
Upon completion, click Finish to close the Patch Installer window.
Uninstalling Sender/Receiver Services
-
Go to Windows Control Panel, Add & Remove Program.
-
Search for “OHC FMS Sender/Receiver Service”.
-
Click on the Uninstall button to remove the Sender/Receiver Services.
Updating Sender/Receiver
When you are ready to update the sender/receiver, make sure you perform the followings:
-
Take a backup for “Settings.xml” and “Configsettings.xml”.
-
Uninstall the Sender/Receiver.
-
Update Sender/Receiver as follows
-
Upgrade shore-side FMS Sender/Receiver to 8.2.2.1006 if current version is older. (Older versions can’t be upgraded directly to 8.2.2.1008).
-
Upgrade shipboard FMS Sender/Receiver to 8.2.2.1006 if current version is older. (Older versions can’t be upgraded directly to 8.2.2.1008).
-
Upgrade ODAC v11.2.2 to ODAC 11.2.3.20 32 bit on FMS Sender/Receiver machine(s) shore side
-
Run the Database scripts for version 8.2.2.1008 provided in patch number 29754121 - Script for Shore Sender/Receiver required FCU/FCX Entries.
Important:
Prior to the running the DB Scripts, ensure all DB schemas are identified by a standard password.
- Post execution, ensure entries in FIDELIOBK.FCU table is as follow:
Table 6-2 FIDELIOBK.FCU
FCU_USER FCU_DBP FCU_ENCRYPT FCU_EXPIRY DATE FCU_TYPE FCU_GRACE_ PERIOD Schema Name
4D52EBC35DC44F8EEA91B319925E2630
F903D9FC63D06D9D07D0C8384DDE9E1C6124372E941F901617
53C555FD0EFA80
31-Dec-99
1
14
- Also, ensure the FIDELIOBK.FCX table is as follow:
FCX_SECONDKEY 567330B8F5CADC10CB13A2ACA4C9487714BBADEA0B551224FB14660B41C09B87
-
Upgrade shore-side Receiver/Sender to 8.2.2.1008.
-
Upgrade ODAC v11.2.2 to ODAC 11.2.3.20 32 bit on FMS Sender/Receiver machine(s) shipside
-
For Receiver/Sender to 8.2.2.1008, you need to upgrade each ship individually.
-
Upgrading to FMS 9.1
To upgrade your current FMS version to FMS version 9.1, you need to do as follows:
-
Upgrade FMS 8.x Server DB from 11g to 12.2c
-
Download the required patches from MOS locations using the URLs mentioned in Acquiring the patches.
-
Upgrade the database with the scripts provided in patch number 30615259. See the Database Updater chapter in the FMS 9.1 User Guide.
Note:
Ignore the Database scripts available in package downloaded from OSDC (Oracle Software Delivery Cloud).
-
Setup the shore side FMS IIS Security Server.
-
It is recommended that you source one SSL certificate for the Security Server.
-
Follow the steps mentioned in Updating Sender/Receiver. See FMS Upgrade Plan for details to upgrade.
-
When you have completed Step 5 in FMS Upgrade Plan, you need to change the schema password of all the schemas using Database Schema Password Manager. See Database Schema Password Manager chapter in the FMS 9.1 User Guide.
Note:
To make sure the password is new and rotates regularly, you must set the System User (SYSTEM) login credentials to use the Database Schema Password Manager.
-
Continue with Step 6 in FMS Upgrade Plan.
-
Upgrade FMS applications from 8.x to 9.x
-
Data Viewer/Corporate Access Module (CAM)
-
Emerg, ResOnline (ROL)
-
Corporate Data Transfer Interface (CDTI)
-
Web-Services
-
Universal Check In (FCUCI))
-
-
For upgradation process refer below sections
-
Run the Encryption Manager (EM) and you can run it in the background. See topic Encryption Manager in FMS 9.1 User Guide
FMS Upgrade Plan
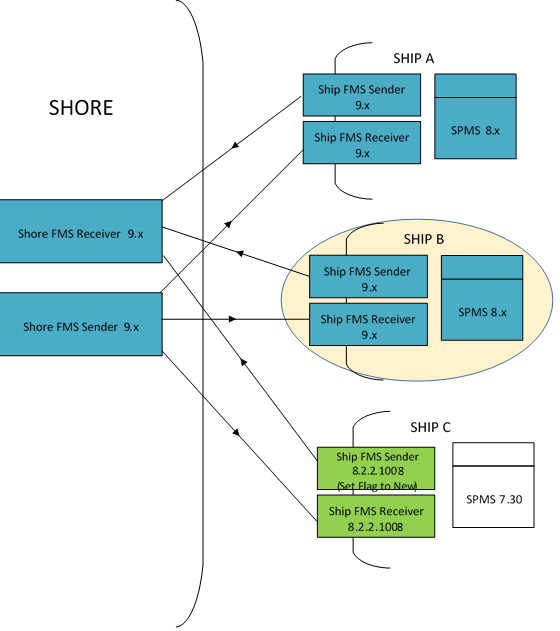
Figure 6-5 Diagram of FMS before an upgrade
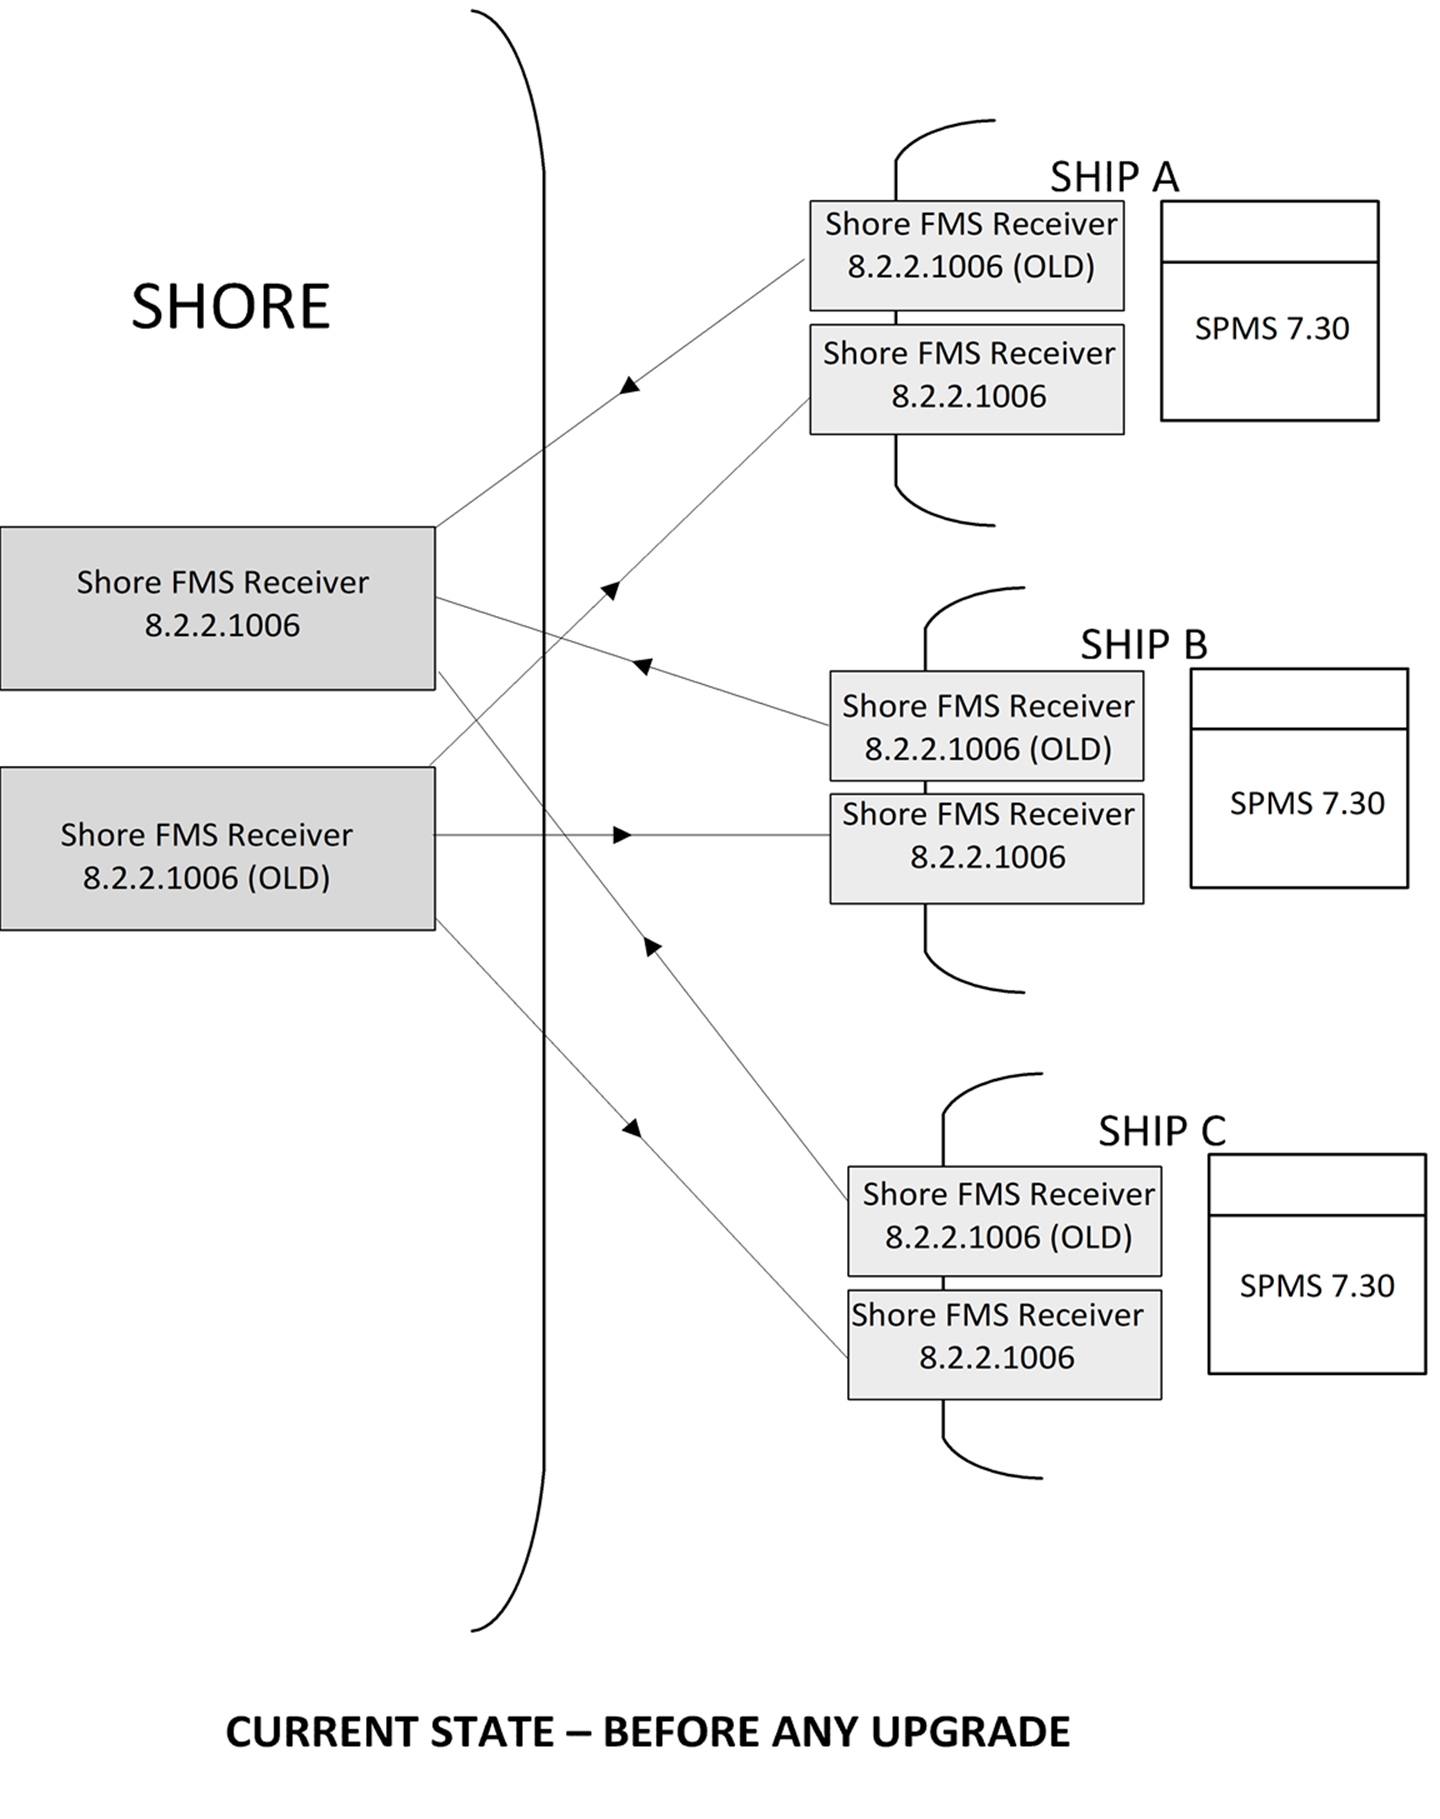
The following upgrade plan assumes there are three (3) ships in the fleet
-
You must complete step 1 before continue to Step 2, 3, or 4.
-
You can perform Step 2, 3 and 4 in any order and for various ships. It does not need to be at the same time.
-
Continue with step 4 until step 6 in order until complete.
-
You can perform Step7, 8 and 9 in any order and for various ships. It does not need to be at the same time.
-
The sender configuration file is named as FMSSender.exe.Config in the application folder.
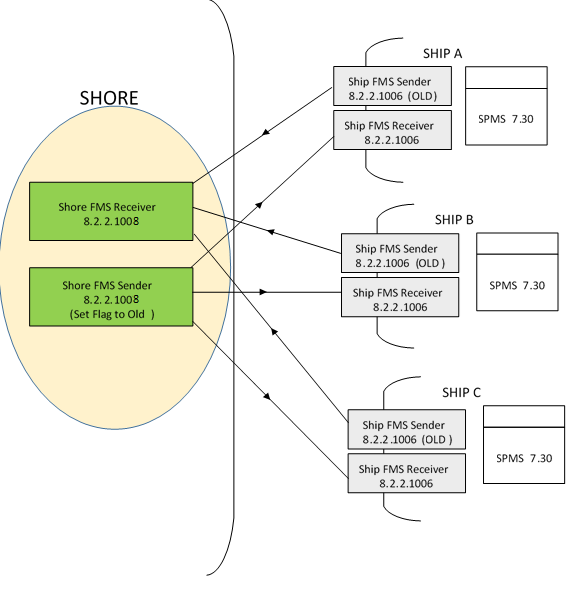
Step 1
Figure 6-6 FMS Upgrade Step 1
-
Install version 8.2.2.1008 Sender & Receiver shore-side to replace the old Sender & Receivers.
-
In the shore-side Sender s APP.CONFIG file, set the Compression Flag to Old (Case Insensitive).
Figure 6-7 Upgrade Plan Step 1 Configuration

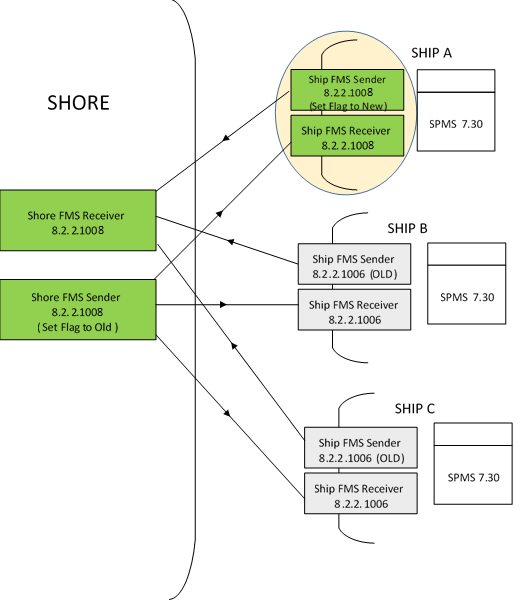
Step 2
Figure 6-8 Upgrade Plan Step 2
-
Install version 8.2.2.1008 Sender & Receiver on Ship A to replace the old Sender & Receivers.
-
In Ship A Sender FMSSender.exe.Config file, set the Compression Flag to New (Case Insensitive).
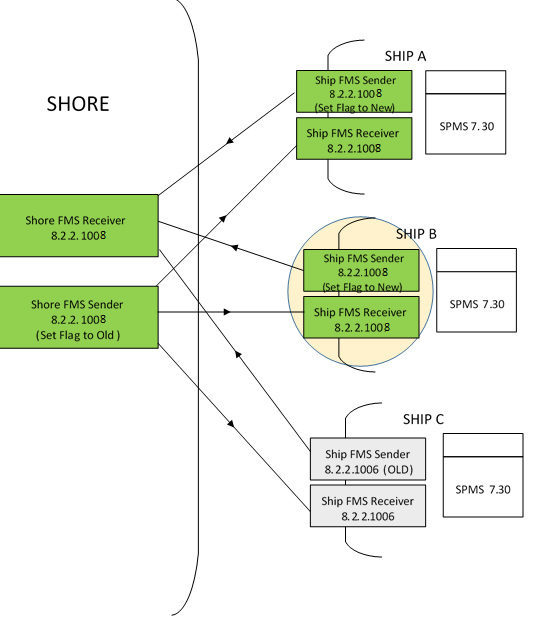
Step 3
Figure 6-9 FMS Upgrade Step 3
-
Install version 8.2.2.1008 Sender & Receiver on Ship B to replace the old Sender & Receivers.
-
In Ship B Sender FMSSender.exe.Config file, set the Compression Flag to New (Case Insensitive).
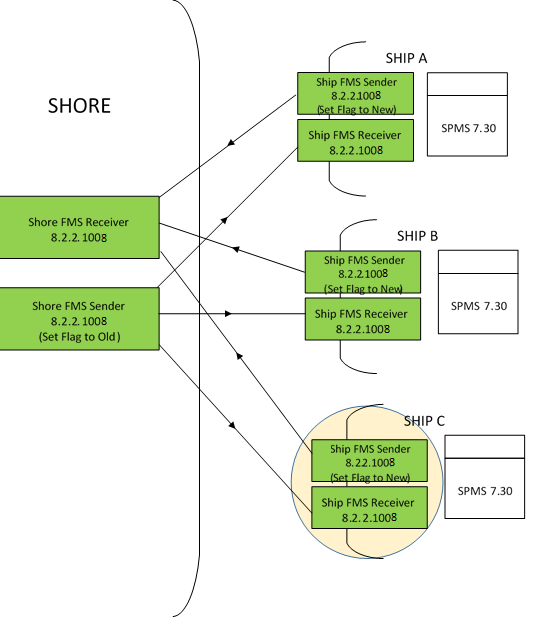
Step 4
Figure 6-10 FMS Upgrade Step 4
-
Install version 8.2.2.1008 Sender & Receiver on Ship C to replace the old Sender & Receivers.
-
In Ship B Sender FMSSender.exe.Config file, set the Compression Flag to New (Case Insensitive).
Step 5
Figure 6-11 FMS Upgrade Step 5
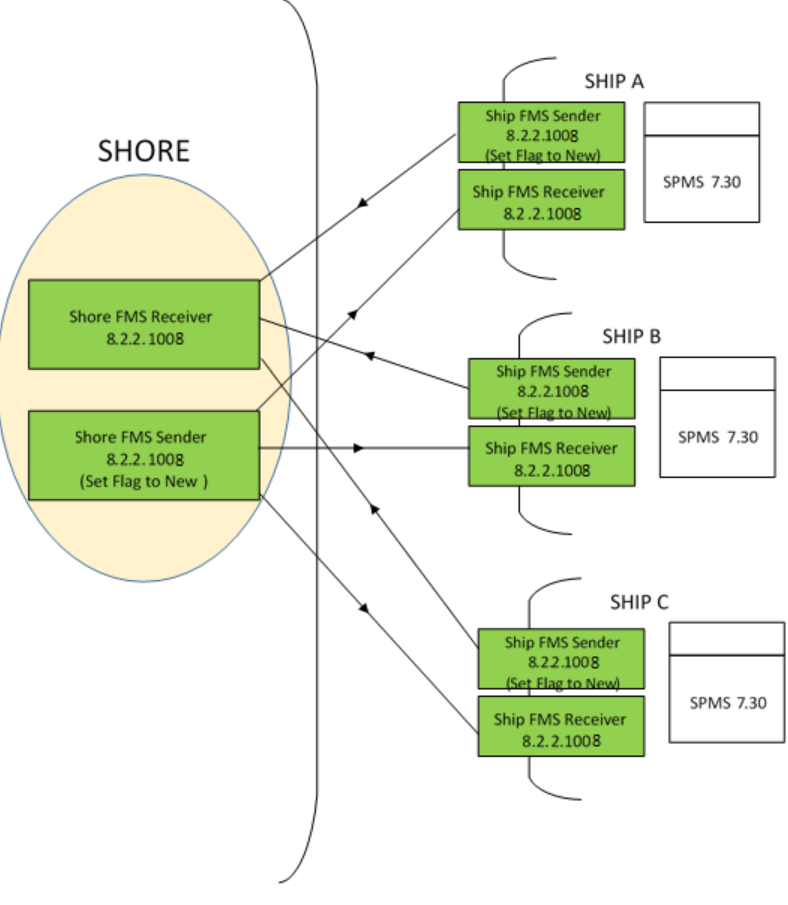
-
In the shore-side Sender FMSSender.exe.Config file, set the Compression Flag to New (Case Insensitive) and re-start the Sender.
-
This step completes the upgrade process to 8.2.2.1008 across the fleet.
Step 6
Figure 6-12 FMS Upgrade Step 6
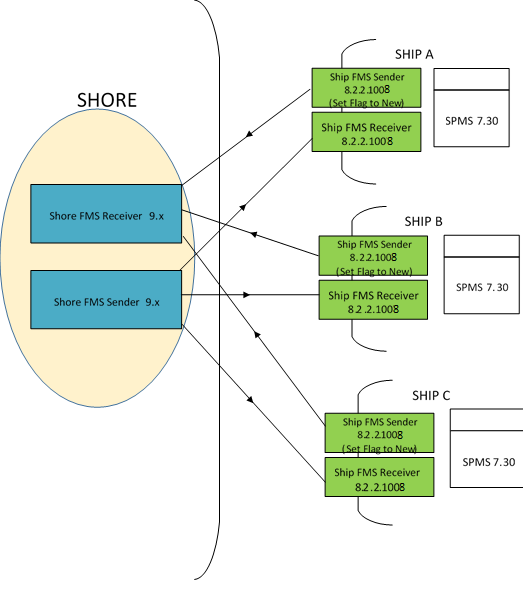
-
Before replacing shore-side Sender and Receiver to 9.x, execute the FMS Encryption Manager scripts - (FCONSOL_FMSEncryptionManager.sql) released with 9.1 version.
-
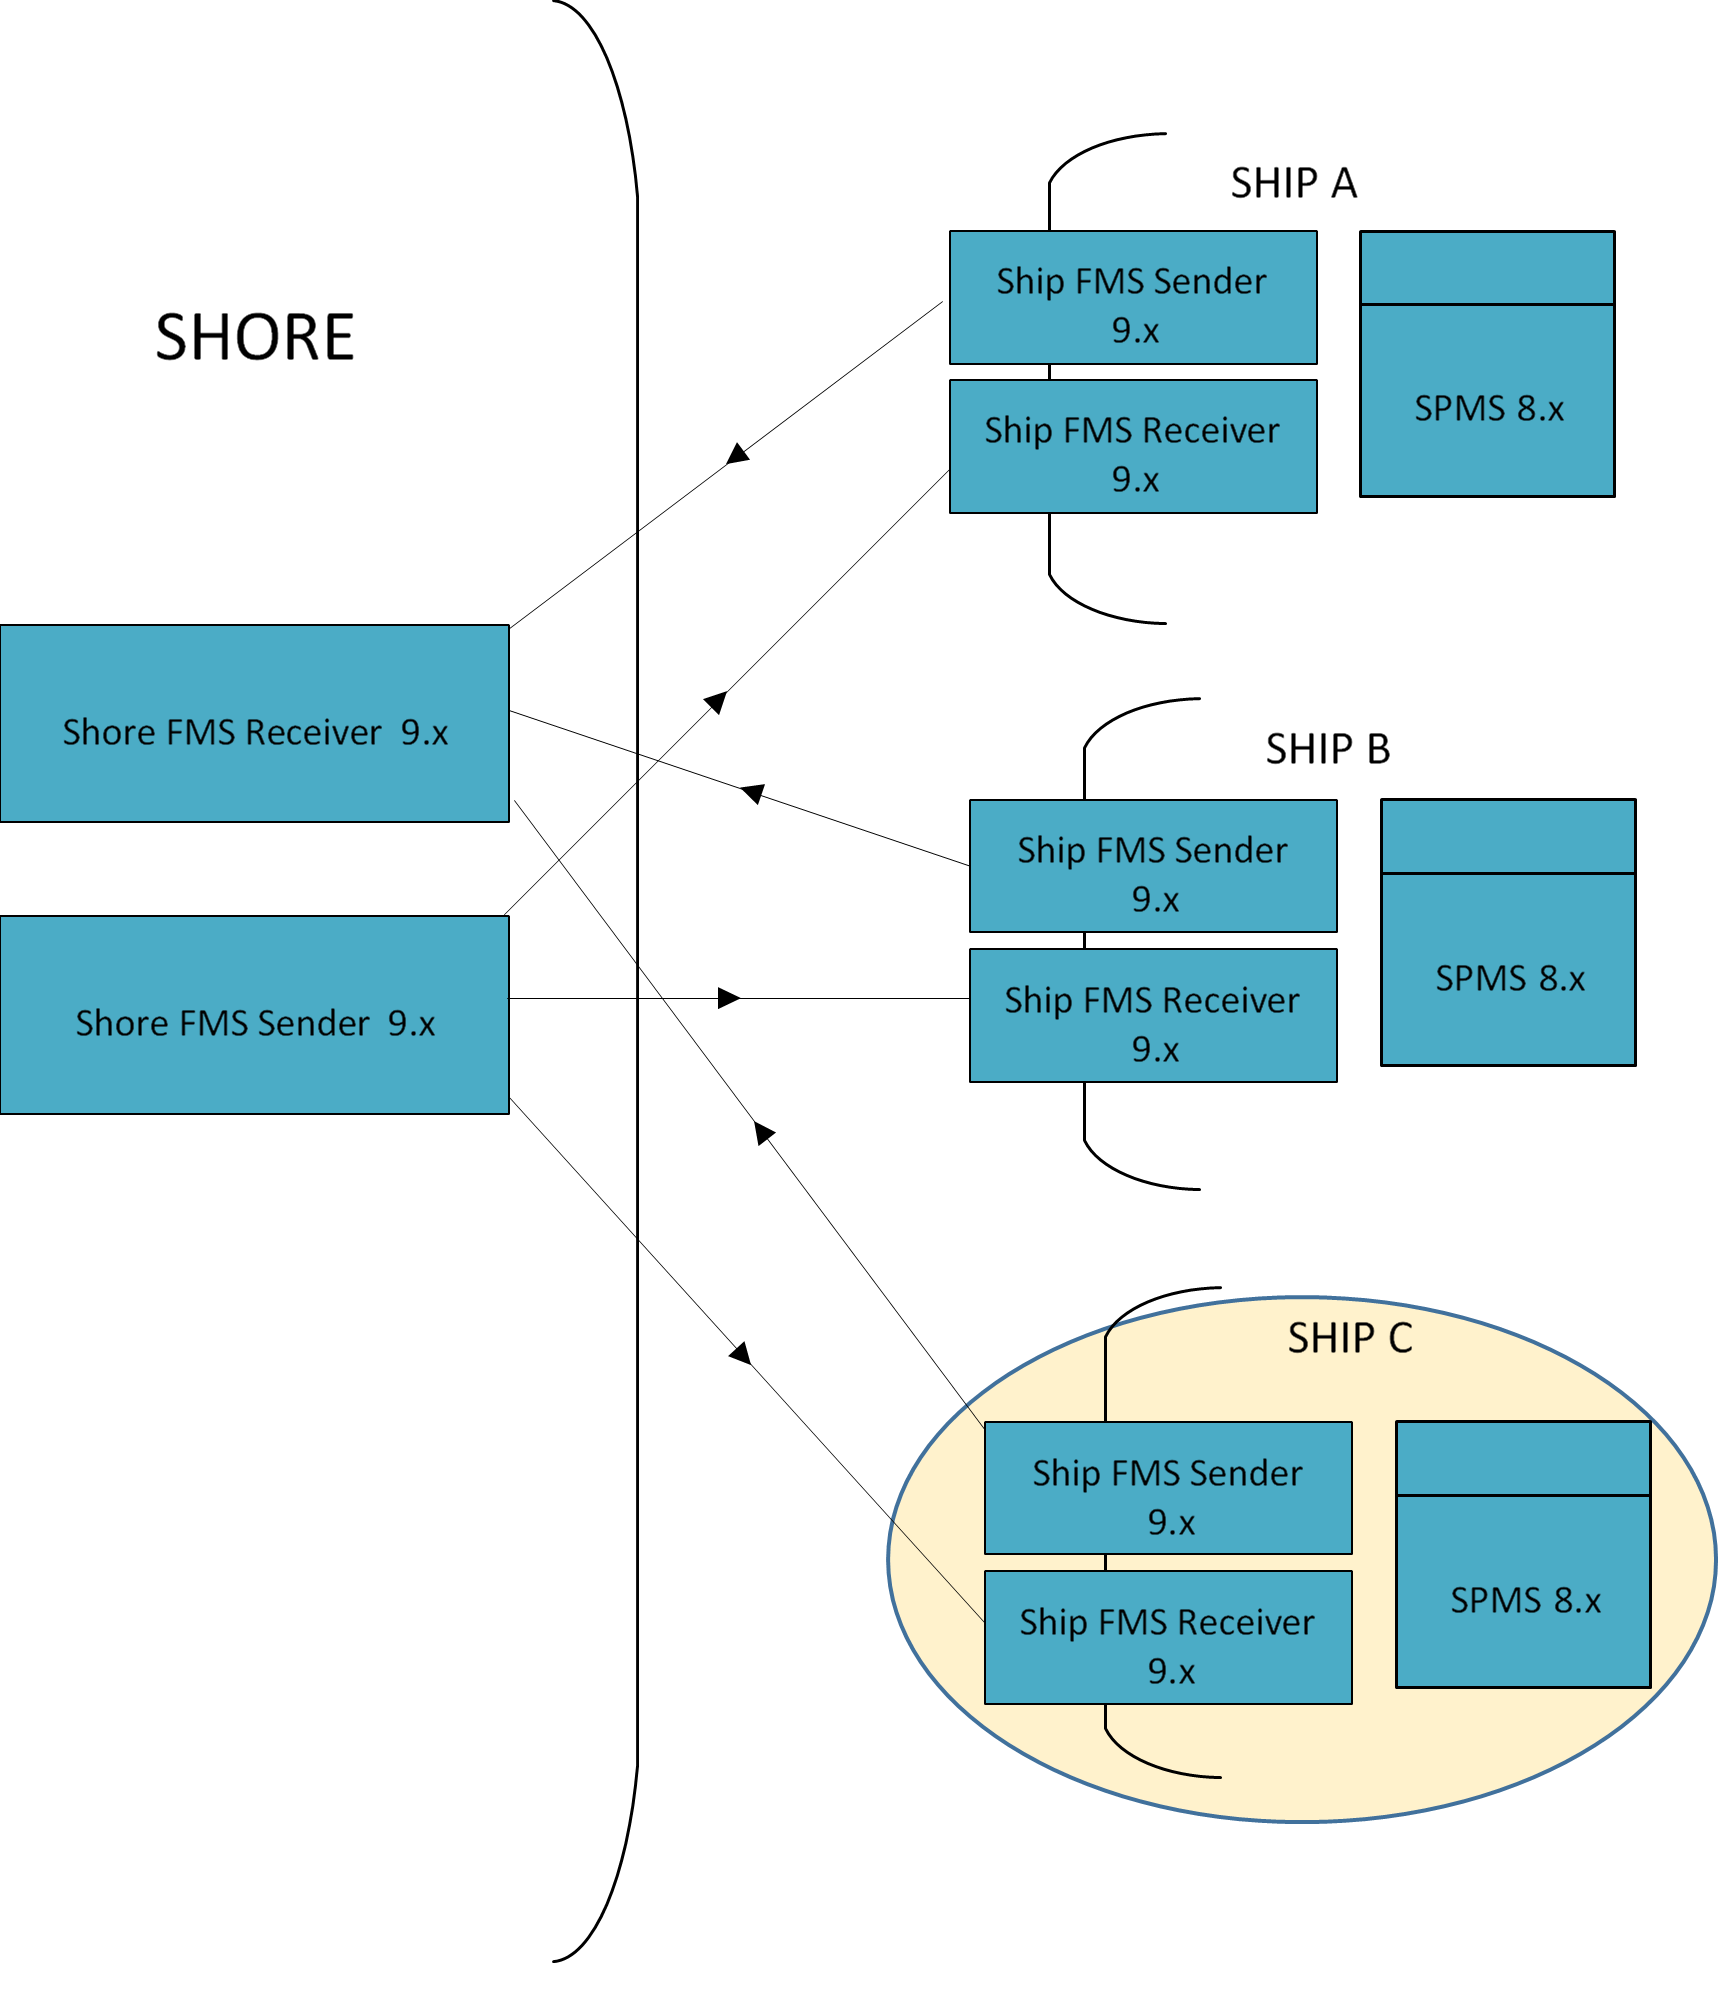
Upgrade FMS to version 9.x and replace shore-side Sender and Receiver to version 9.x.
Step 7
Figure 6-13 FMS Upgrade Step 7
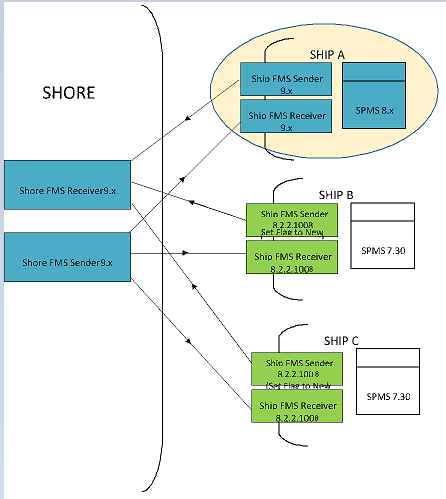
-
Upgrade SPMS to version 8.x on Ship A.
-
Replace Sender and Receiver to version 9.x on Ship A.
