Use the Report Details page to view, analyze, or update the report information depending on the report status. For more information on various statuses in which you can use the Report Details page, see Table 2 .
The Report Details page includes the following sections:
· Accessing Report Details : Use this section to access the specific Report Details page. Click the required Report Number on the Regulatory Reports List page.
· Reporting Entity : Use this section to know more about Report Details, Report Entity, and Reporting Person Details.
· Transactions Info : Use this section to know the list of transactions associated with the selected report.
· Involved Accounts Details : Use this section to know the list of accounts involved in the transaction and analyze the details pertaining to them.
· Involved Entity Details : Use this section to know the list of entities (Individual or Institution) involved in the transaction and analyze the details pertaining to them.
· Involved Person Details : Use this section to know the list of persons involved in the transaction and analyze the details pertaining to them.
To access the Report Details page, follow these steps:
1. On the Summary Report page, click the Report Number link. The Reports Details page is displayed. By default, Transaction and Transaction Information sections are displayed.
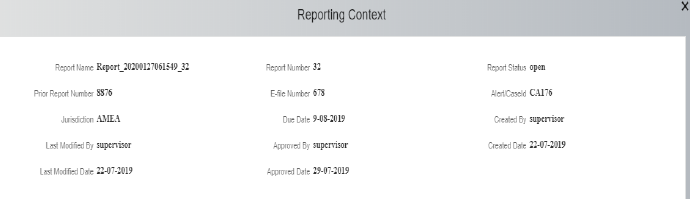
To view the gist of the selected report, click More Details on top of the page. The Report Context window displays the details of the report such as Report Name, Report Status, Created By, and so on.
2. To collapse the Report Context window, click Less Details.
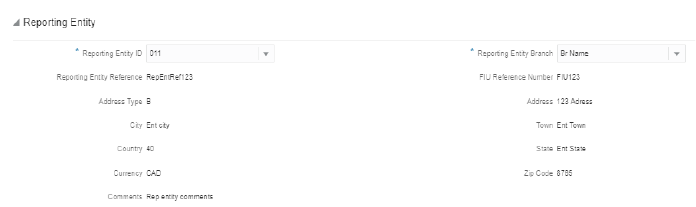
Use the Reporting Entity Information page to know and update the information pertaining to the entity who has reported this specific report, reporting person details, and report details. The Reporting Entity Information is the default section of the Reports Details page and it provides the following information:
· Report Details : This section provides information related to the selected report.
· Report Entity : This section provides information about the entity that has reported this report to the regulator.
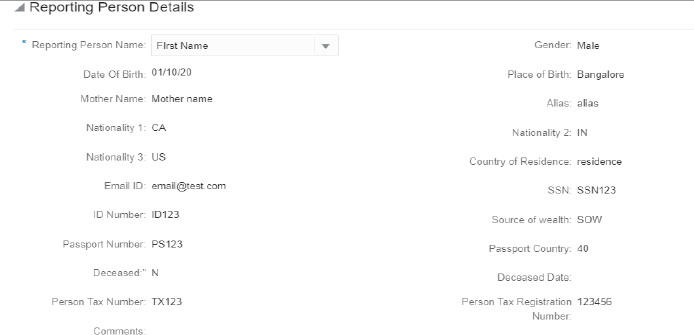
· Reporting Person Details : This section provides information about the person who reported it.
Use this section to analyze and update the details pertaining to the selected report.

1. Enter the fields described in Table 9. Fields marked with * asterisk are mandatory.
Use this section to analyze and update the information about the reporting entity. For example, reporting branch, reporting entity unique identification, and so on.
2. Enter the fields described in Table 10. Fields marked with * asterisk are mandatory.
NOTE |
All fields except Reporting Entity ID and Reporting Entity Branch are auto-populated as per the reporting entity selected. |
Use this section to analyze and update the information about the person who has reported it. For example, name, gender, place of birth, and so on.
3. Enter the fields described in Table 11. Fields marked with * asterisk are mandatory.
NOTE |
All fields except Reporting Person’s Name are auto-populated as per the reporting entity selected. |
For more information on Address, Phone, Identification, and Employer Details, see the Person Details section.
4. Click Save. A confirmation message is displayed and the reporting entity information is updated.
Use the Transactions Info section to know the list of the transactions associated with the selected report. All transactions linked to the report are listed here. You can view, add, edit, or remove transactions. For more information, see Managing Transaction .
To use the Transactions for your analysis, click Transactions Info on the Reports Details page.
Use this section to view the transaction list.

Table 12 explains the column details.
Fields |
Description |
|---|---|
View |
Click on the |
Record Number |
The record number associated with the transaction. |
Transaction Number |
A unique number that defines the specific transaction. |
Transaction Category |
The type of category to which the selected transaction belongs to. |
Transaction Date |
The date on which the transaction has taken place. |
Transaction Method |
The transaction method. For example, cash, ATM, wire, and so on. |
Amount |
The amount involved in the transaction. |
Value Date |
The transaction value date. |
Select |
Use the check box to select the transaction to remove from the list. |
You can add a new transaction to the selected report and also modify or delete the existing transactions from the list.
To add a transaction to a report, follow these steps:
1. On
the Transaction section, click  . The Add Transaction window
is displayed.
. The Add Transaction window
is displayed.
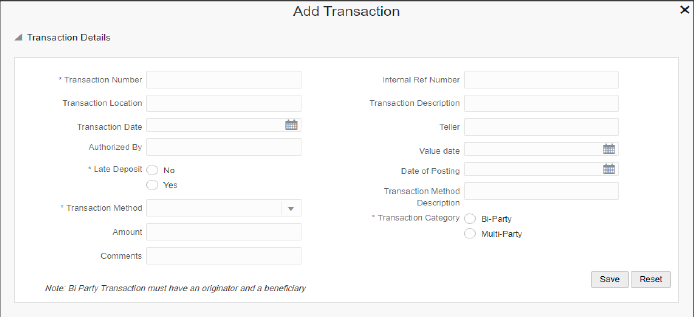
2. Enter the information as described in Table 13 . Fields marked with * asterisk are mandatory.
3. Click Save. A confirmation message is displayed and the newly added transaction appears in the Transaction list.
4. To
edit the existing transaction, click  against the transaction
you want to modify. The Transaction Details window is displayed. Modify
the necessary information and click Save.
The transaction details are updated. For more information on the fields,
see Table 13 .
against the transaction
you want to modify. The Transaction Details window is displayed. Modify
the necessary information and click Save.
The transaction details are updated. For more information on the fields,
see Table 13 .
5. To
delete the existing transaction, select the transaction and click ![]() .
The selected transaction is removed from the list.
.
The selected transaction is removed from the list.
The Transaction Information section provides more insight into the transaction and its details such as the parties involved in the transaction and goods and services associated with the transaction.
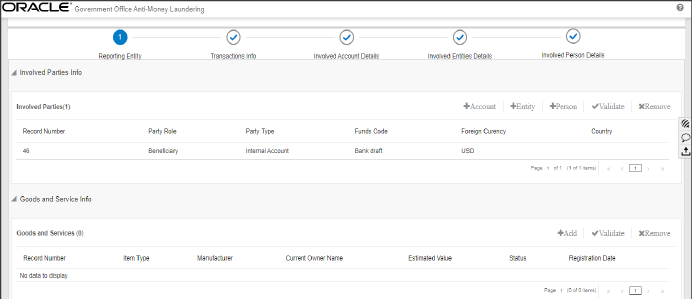
This section provides information about the type of parties involved in the transaction. For example, account, entity, or person. For more information, see Involved Party List .
Use the Involved Parties Information section to add a new involved party to the transaction and edit or delete the involved parties associated with the transaction. For more information, see Involved Parties Details .
Use this section to view and update the list of parties involved in the transaction. This section provides you information such as record number, party role, funds code, foreign currency, and country of the parties involved.

To view and update the involved party details, follow these steps:
1. Select the required Record Number in the Transaction list. The Involved Party details are displayed. The involved party can be an account, entity, or person.
2. Enter the involved party details as described in Table 14. Fields marked with * asterisk are mandatory. For more information, see Involved Parties Details.
3. Click Save. A confirmation message is displayed and the involved party information is updated.
Use this section to add a new involved party (account, entity, or person) to the selected transaction. You can also edit or delete an involved party associated with the selected transaction.
· An Account as an involved party: You can add an account as an involved party to the selected transaction. The account that you add in this section is listed in the Involved Accounts Details section.
· An Entity as an involved party: You can add an entity (organization or institution) as an involved party to the selected transaction. The entity that you add in this section is listed in the Involved Entity Details section.
· A Person as an involved party: You can add a person as an involved party to the selected transaction. The person that you add in this section is listed in the Involved Person Details section.
To add an involved party to the selected transaction, follow these steps:
1. On
the Involved Parties Information section,
click  for Account,
Entity, or Person. The Add Involved Party section is expanded based on
your selection (Account, Entity, or Person).
for Account,
Entity, or Person. The Add Involved Party section is expanded based on
your selection (Account, Entity, or Person).

2. Enter the involved party details as described in Table 14. Fields marked with * asterisk are mandatory.
3. Click Save. A confirmation message is displayed and the newly added involved party appears in the Involved Party list. The newly added entities are also listed in their respective pages. For example, if you add the account as an entity, it is also displayed on the Involved Accounts Details page. Similarly, for Involved Entity Details and Involved Person Details .
4. To
edit an existing involved party, click  . The Involved Party details
are displayed. Modify the necessary information and click Save.
The involved party details are updated.
. The Involved Party details
are displayed. Modify the necessary information and click Save.
The involved party details are updated.
5. To delete an existing involved party, select the involved party from the list and click Remove. The selected involved party is removed from the list.
This section provides information about the goods and services associated with the selected transaction, such as item type, manufacturer, current owner, estimated value, and so on.
Use this section to add new goods and services to the selected transaction, edit or delete the existing goods and services from the list. For more information, see Goods and Services Details .
Use this section to view and update the list of goods and services associated with the selected transaction.

To view and update the goods and services, follow these steps:
1. Select the required Record Number in the list. The goods and services details are displayed.
2. Enter the goods and service details as described in Table 15 . Fields marked with * asterisk are mandatory.
3. Click Save. A confirmation message is displayed and the goods and services information is updated.
To add new goods and services to the selected transaction, follow these steps:
1. On
the Goods and Services section,
click  . The Add
Goods and Services section is displayed based on your selection.
. The Add
Goods and Services section is displayed based on your selection.
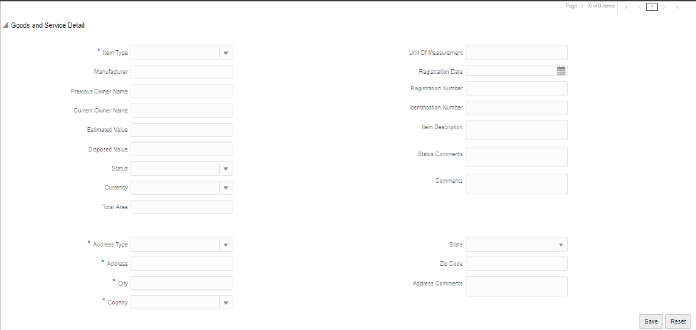
2. Enter the goods and service details as described in Table 15 . Fields marked with * asterisk are mandatory.
3. Click Save. A confirmation message is displayed and the newly added goods and services information appears in the Goods and Service Details list.
4. To edit the existing goods and services, click Report Number. The Goods and Service Details page is expanded. Modify the necessary information and click Save. The goods and services details are updated.
5. To delete existing goods and service details, select the goods and services from the list and click Remove. The selected goods and service are removed from the list.
The Involved Account Details section displays the list of accounts involved in the transaction. This list provides information such as involved party role, involved party type, type of foreign currency used for the transaction, and so on.
Use this section to view and update: Accounts Details, Signatory, Account Entity Owner, Director.
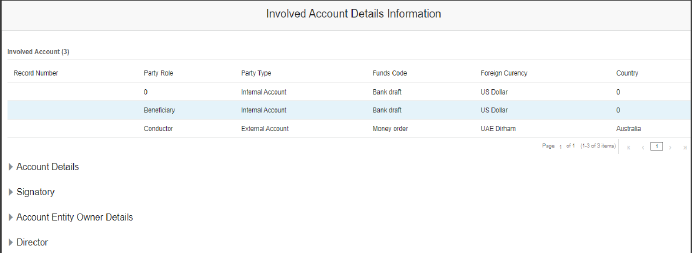
Use the Accounts Details section to view and update information pertaining to the selected involved account details.
To update account details, follow these steps:
1. On
the Involved Account Details Information section,
select the Involved Account Report Number.
The Account Details section is displayed. If it is folded, click  to
expand the section.
to
expand the section.
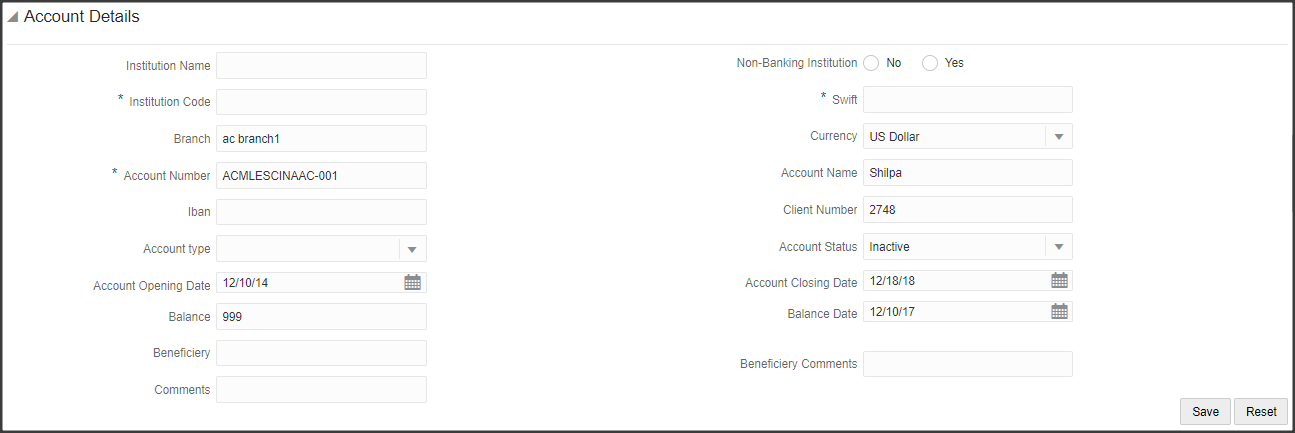
2. Enter the account details as described in Table 16 . Fields marked with * asterisk are mandatory.
3. Click Save. A confirmation message is displayed and the newly added account appears in the Involved Account list.
Use the Signatory section to view, add, and update information pertaining to the selected involved signatory details.
To add signatory details, follow these steps:
1. On the Involved Signatory section, click Add. The Signatory Details page is displayed.
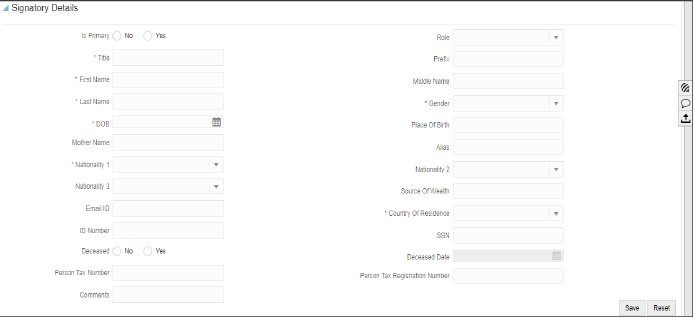
2. Enter the signatory details as described in Table 17 . Fields marked with * asterisk are mandatory.
For more information on Address, Phone, Identification, and Employer Details, see the Person Details section.
3. Click Save. A confirmation message is displayed and the newly added signatory details appear in the Signatory list.
4. To update an existing signatory, select the Involved Signatory Name and update the necessary information.
Use the Account Entity Owner section to view and update information pertaining to the entity owner of the account.
To update the entity owner of the account, follow these steps:
1. On the Account Entity Owner section, enter the details of the account entity owner as described in Table 18 . Fields marked with * asterisk are mandatory.
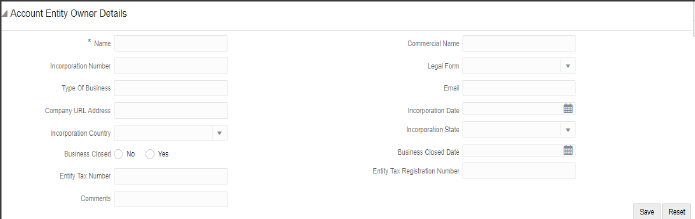
2. Click Save. A confirmation message is displayed and the newly added account entity owner details appear in the list.
Use the Director section to view, add, and update information pertaining to the director’s details.
To add a new director’s details, follow these steps:
1. On the Director section, click Add. The Director Details page is displayed.
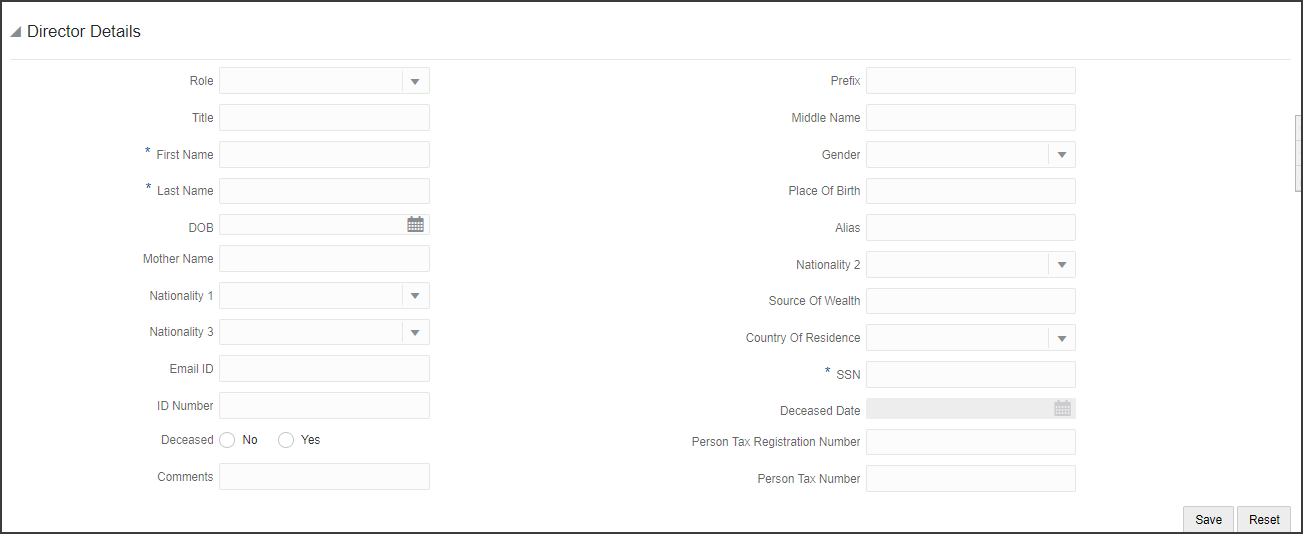
2. Enter the director details as described in Table 19 . Fields marked with * asterisk are mandatory.
3. Click Save. A confirmation message is displayed and the newly added director details appear in the list.
4. To modify the existing director’s details, select the required director name and update the necessary information.
5. To delete an existing director from the list, select the required director name and click Remove.
The Involved Entity Details section provides the list of entities (Institutions) involved in the transaction. It provides details such as involved party roles, fund code, and so on.
Use this section to view and update: Entity Details and Director details.

Use the Entity Details section to view and update information pertaining to the selected involved entity details.
To update the entity details, follow these steps:
1. In
the Involved Entity Details Information
section, select the Involved Entity Report
Number. The Entity Details section is displayed. If it is in folded,
click  to expand the section.
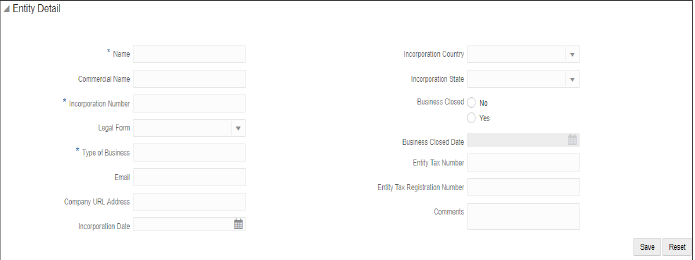
2. Enter the involved party details as described in Table 20 . Fields marked with * are mandatory.
For more information on Address, Phone, Identification, and Employer Details, see the Person Details section.
This section provides details about the entity director. For more information, see the Director section.
The Involved Person Details section provides a list of the persons involved in the transaction. This section also provides complete information about the person’s details such as an address, phone details, identification details, and employer details that led to the creation of the report.
Use this section to view and update: Person Details, Address, Phone, Identification, and Employer Details .
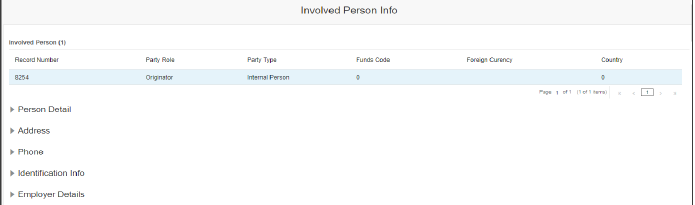
Use the Person Details section to view and update information pertaining to the selected involved person.
To update the involved person’s details, follow these steps:
1. On
the Involved Person section,
select the Involved Person Report Number.
The Person Details section is displayed. If it is folded, click  to
expand the section.
to
expand the section.

2. Enter the person’s details as described in Table 21 . Fields marked with * asterisk are mandatory.
3. Click Save. A confirmation message is displayed and details are updated in the selected involved person details.
Use the Address section to know the communication address of the person involved in the transaction that led to the creation of the report.
You can use this section to view, add, or delete the address of the person.
To update the address details, follow these steps:
1. On the Involved Person section, go to the Address section. The list of addresses pertaining to the selected person is displayed.

This section provides you the complete details of the involved person’s address. For example, local address, state, zip code, and so on. You can also add a new address to this list.
2. To
add a new address, click Add.
The Address Details section is displayed. If it is in folded mode, click
 to expand the section.

3. Enter the address details as described in Table 22 . Fields marked with * asterisk are mandatory.
4. Click Save. A confirmation message is displayed and a newly added address is displayed in the Address list.
5. To delete an existing address from the list, select the required address and click Remove. The Address list is updated.
Use the Phone section to know the phone details of the person involved in the transaction that led to the creation of the report.
You can use this section to view, add, or delete a person’s telephone.
To update phone details, follow these steps:
1. In the Involved Person section, go to the Phone section. The phone details pertaining to the selected person are displayed.

This section provides you the details of the phone that belongs to the involved person. For example, phone number, contact type, extension, and so on. You can also add a new phone to this list.
2. To
add a new phone, click Add. The
Phone Details section is displayed.
If it is folded, click  to expand the section.

3. Enter the phone details as described in Table 23 . Fields marked with * asterisk are mandatory.
4. Click Save. A confirmation message is displayed and a newly added phone is displayed on the Phone list.
5. To delete an existing phone from the list, select the required phone number and click Remove. The Phone list is updated.
Use the Identification section to know the identification type of the person involved in the transaction that led to the creation of the report. Identification can be address identification, photo identification, and so on.
You can use this section to view, add, or delete the identification of the person.
To update the identification details, follow these steps:
1. On the Involved Person section, go to the Identification section. The identification details pertaining to the selected person are displayed.

This section provides you the details of the identification of the person. For example, Identification Type, Identification Number, Issue Date, Expiry Date, Issuing Country, and so on.
You can also add new identification details to this list
2. To
add a new identification, click Add.
The Identification Details section
is expanded. If it is folded, click  to expand the section.
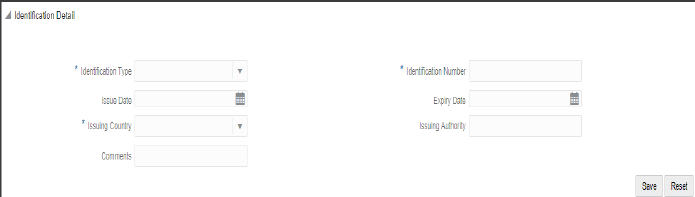
3. Enter the identification details as described in Table 24 . Fields marked with * asterisk are mandatory.
4. Click Save. A confirmation message is displayed and newly added identity is displayed in the Identification list.
5. To delete an existing identity from the list, select the required identity and click Remove. The Identification list is updated.
Use the Employer section to know the employer’s details with whom the involved person is employed.
You can use this section to view, add, or delete the employer of the person.
To update the employer’s details, follow these steps:
1. On the Involved Person section, go to the Employer section. The list of employers pertaining to the selected person is displayed.
This section provides you the details of the employer of the person. For example, employer name, occupation, address type, and so on. You can also add new employer details to this list.
2. To
add a new employer, click Add.
The Employer Details section
is expanded. If it is folded, click  to expand the section.
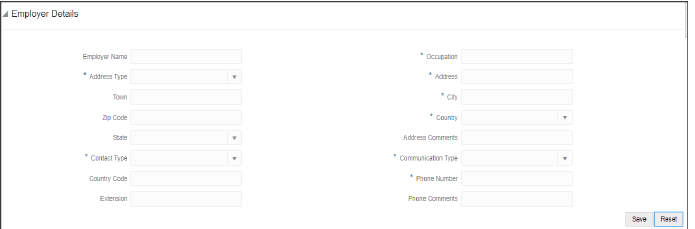
3. Enter the employer details as described in Table 25 . Fields marked with * asterisk are mandatory.
4. Click Save. A confirmation message is displayed and a newly added employer is displayed in the Employer list.
5. To delete an existing employer from the list, select the required employer and then click Remove. The Employer list is updated.