2 Policy Templates
Oracle Retail Allocation requires the selection of a policy for the calculation of an allocation. The policy defines the source of the data used in the calculation of the allocation and other parameters that are used in the calculation.
Create a Template
To create a policy template:
-
From the Tasks menu, select Allocation Foundation > Manage Policy Templates. The Manage Policy Template window appears.
-
From the Actions menu, select Create. The Policy Template window appears.
-
Enter a name in the Policy Name field.
-
Update as necessary and click Save. The policy template is saved.
Select a Demand Source
To select a demand source:
-
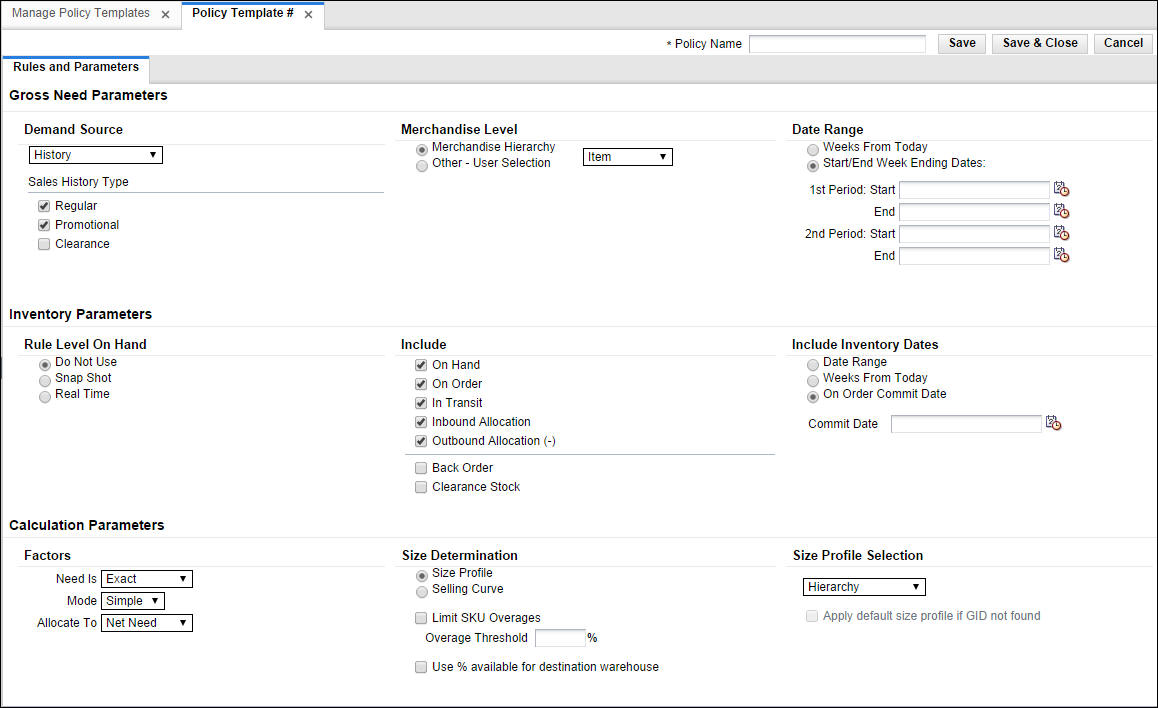
In the Demand Source field, select the source of demand from the list of values:
Table 2-1 Select Demand Source Options
Source Description History
Use the item's historical sales for the date range selected to determine the gross need of item on the allocation.
Corporate Rules
Use custom pre-defined rules to determine the need of the item on the allocation.
History and Plan
Use both the item's sales history and plan for the date range selected to determine the gross need of the item on the allocation.
Forecast
Use the item's forecast for the date range selected to determine the gross need of item on the allocation.
Plan
Use the item's plan for the date range selected to determine the gross need of the item on the allocation.
Receipt Plan
Use the item's receipt plan to determine the gross need of the item in the Allocation system in order to create pre-allocations.
Plan Re-project
Use to compare the item's actual sales to the plan, re-forecast the plan based on performance for the date range selected, and use the re-projected plan to determine the gross need of the item on the allocation.
-
In the Sales History Type section, select the check boxes for the type of history to include.
Select a Level
The demand is derived from the level of product hierarchy selected. On the Policies window, you can select to allocate items using hierarchy or user selection.
Allocate by Hierarchy
To allocate items using hierarchy:
-
In the Level section, select Merchandise Hierarchy.
Note:
-
Pack Distribution mode is not applicable for Item hierarchy.
-
If the component items have more than one distinct department/class/subclass then User Selection must be used.
-
-
Select the hierarchy level to allocate by from the list.
Note:
Item need for an allocation is determined by calculating the need for each item on the allocation from the selected policy for the organizational hierarchy level selected.
Allocate by User Selection
To allocate items using user selection:
-
In the Level section, select Other - User Selection.
-
Click Edit. The User Selection window appears.
-
In the Date Range Editing section select an option:
-
Weight Percentage
-
Weight Percentage and Start and End Date
-
Weight Percentage and Weeks from Today
-
-
In the User Selection section enter an ID in the appropriate field to select a merchandise hierarchy level.
-
Click Add. The merchandise hierarchy is added to the Select Merchandise Hierarchy Items section.
-
Enter the weight or percentage to adjust the need calculated for the user selection in the Weight column.
-
Enter the start and end date in the Start Date and End Date column.
Note:
-
The Start Date and End Date fields appear only if you have selected Weight Percentage and Start and End Date option.
-
You need to select two start and end dates when the demand source is History, Forecast, or Plan.
-
-
Enter a number in the Weeks From Today column. This value specifies the number of weeks all approved allocations, direct to store orders, and transfers as stock on hand and future fulfillment, are included at the store in the need calculation. The value can range between 1 and 52 only.
Note:
-
The Weeks From Today columns appear only if you have selected Weight Percentage and Weeks from Today option.
-
If no number is entered, the system includes all stock on hand at the store and future inventory regardless of the date on the purchase orders or transfers.
-

Weeks From Today
Enter the number of weeks to search back or forward, depending on the rule type selected. The system starts searching with the last completed week.
-
Click Change Weights. The Change Weights window appears.
Note:
The date displayed is based on the end of week day selected as defined in the allocation system options. -
Enter the new weights as appropriate.
-
Click OK to save changes.
Set Inventory Parameters
The inventory parameters comprise of Rule Level On Hand, Include In Inventory, and Remove Future Fulfilment.
Select Rule Level On Hand
To set Rule Level On Hand:
-
Select one of the following options available in the Rule Level On Hand section:
-
Do Not Use
-
Snap Shot
-
Real Time
Note:
-
When Rule Level On Hand is used with User Selection, the on-hands is based on the rule level of the like merchandise hierarchy selected.
-
For performance purposes, the Rule Level On Hand Snap Shot is stored in a database table which can be refreshed through a batch program to be run at your discretion.
-
Select Include in Inventory
Currently, when allocating the net need using either Stock on Hand (SOH) or Rule Level On Hand (RLOH), the values for on-hand is derived from using the summation of five RMS Inventory buckets. You can select to include or exclude one or more of these buckets.
To include inventory details:
Include Inventory Dates
In the Include Inventory Dates section, when you enter a date in the On Order Commit Date field, all approved allocations, direct to store orders, and transfers dated on or before the date are included in the calculation of on-hand quantity.
When you enter the number of weeks, it is used to determine how many weeks into the future should be used to pull approved allocations, direct to store orders, and transfers into the calculation for on-hand quantity.
Select Factors
To select factors:
-
In the Factors section Need Is field, select how the Allocation should determine the quantity of items sent to a location.
-
In the Mode field, select the type of algorithm calculation. The modes available are Simple, Spread Demand, and Pack Distribution.
Note:
-
Simple mode is applicable for both staple and fashion items. Pack Distribution mode is not applicable for fashion items.
-
Spread Demand is applicable for Subclass or higher level.
-
-
In the Allocate To field, select the need type for calculation, values available are Net and Gross.
Set Size Profile Logic
To set the method used to determine what to allocate:
-
Select one of the following options in the Size Determination section:
-
Size Profile to use the store size profile ratio as a guide to determine what to allocate. This option is the default selection.
-
Selling Curve to use the selling curve derived from the policies (the demand source and hierarchy level) selected within the allocation as a guide to determine what to allocate.
Note:
Selling Curve option can be used only when the level is Parent, Parent/diff, or Item. -
-
Select Limit SKU Overages to limit the SKU overages.
-
Enter the acceptable overage percentage in the Overage Threshold field.