3 Create an Allocation from a Worksheet
To create an allocation from the Worksheet window:
-
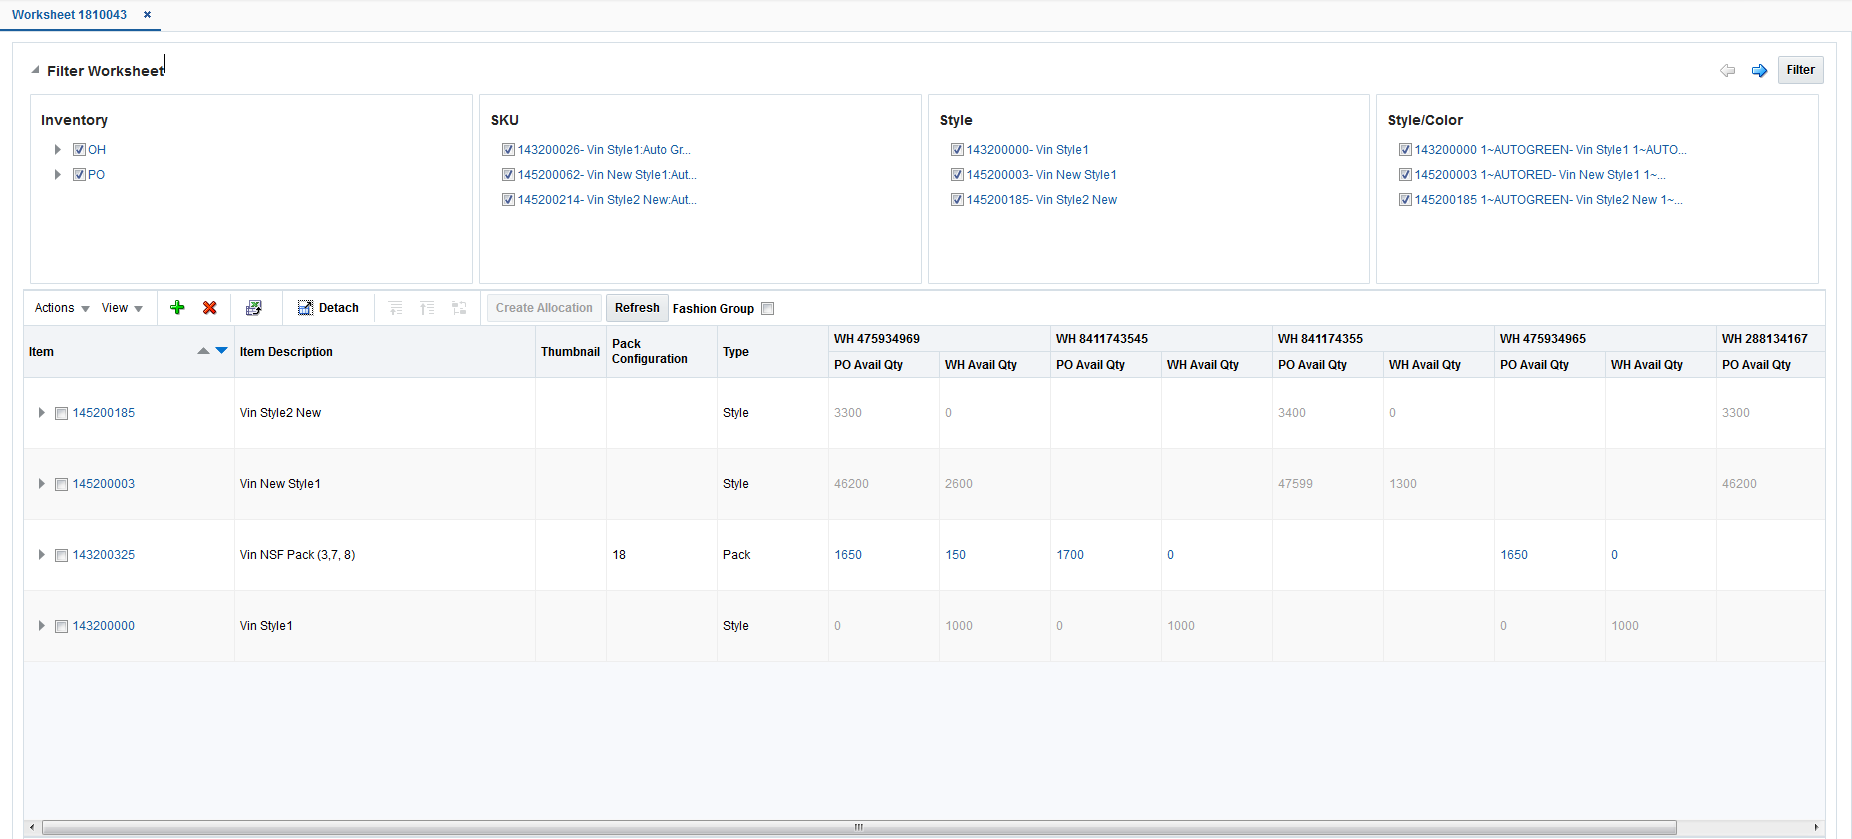
On the Worksheet window, select the items that you want to allocate. The Create Allocation button is enabled.
Note:
-
If you want to expand a parent to see the parent/diffs under it, select '>' to the left of the parent ID in the parent row. You can select individual items from the expanded list.
-
You can expand a pack to see its individual components by selecting '>' to the left of the pack ID. You cannot select individual components of a pack.
-
If you select a parent/diff you cannot select staple items for the same allocation.
-
You can select all items of a particular type using either one of the following options: Select All Style/Color, Select All SKU, Select All Fashion Group, or Select All Fashion Packs.
-
-
Select Fashion Group if you want to group multi-diff packs, single diff packs, SKUs for the same parent and allocate using a single demand. (A Fashion Group allocation can be for multiple stores, it generates a two tier table in the item review section of the Allocation Maintenance screen. The top tier of the table has only one entry, it shows the Style ID in the Item Number section and the Style description in the Item Description columns.
-
Click Create Allocation. The Allocation Maintenance window appears. You can proceed to select locations and policies for the allocation.
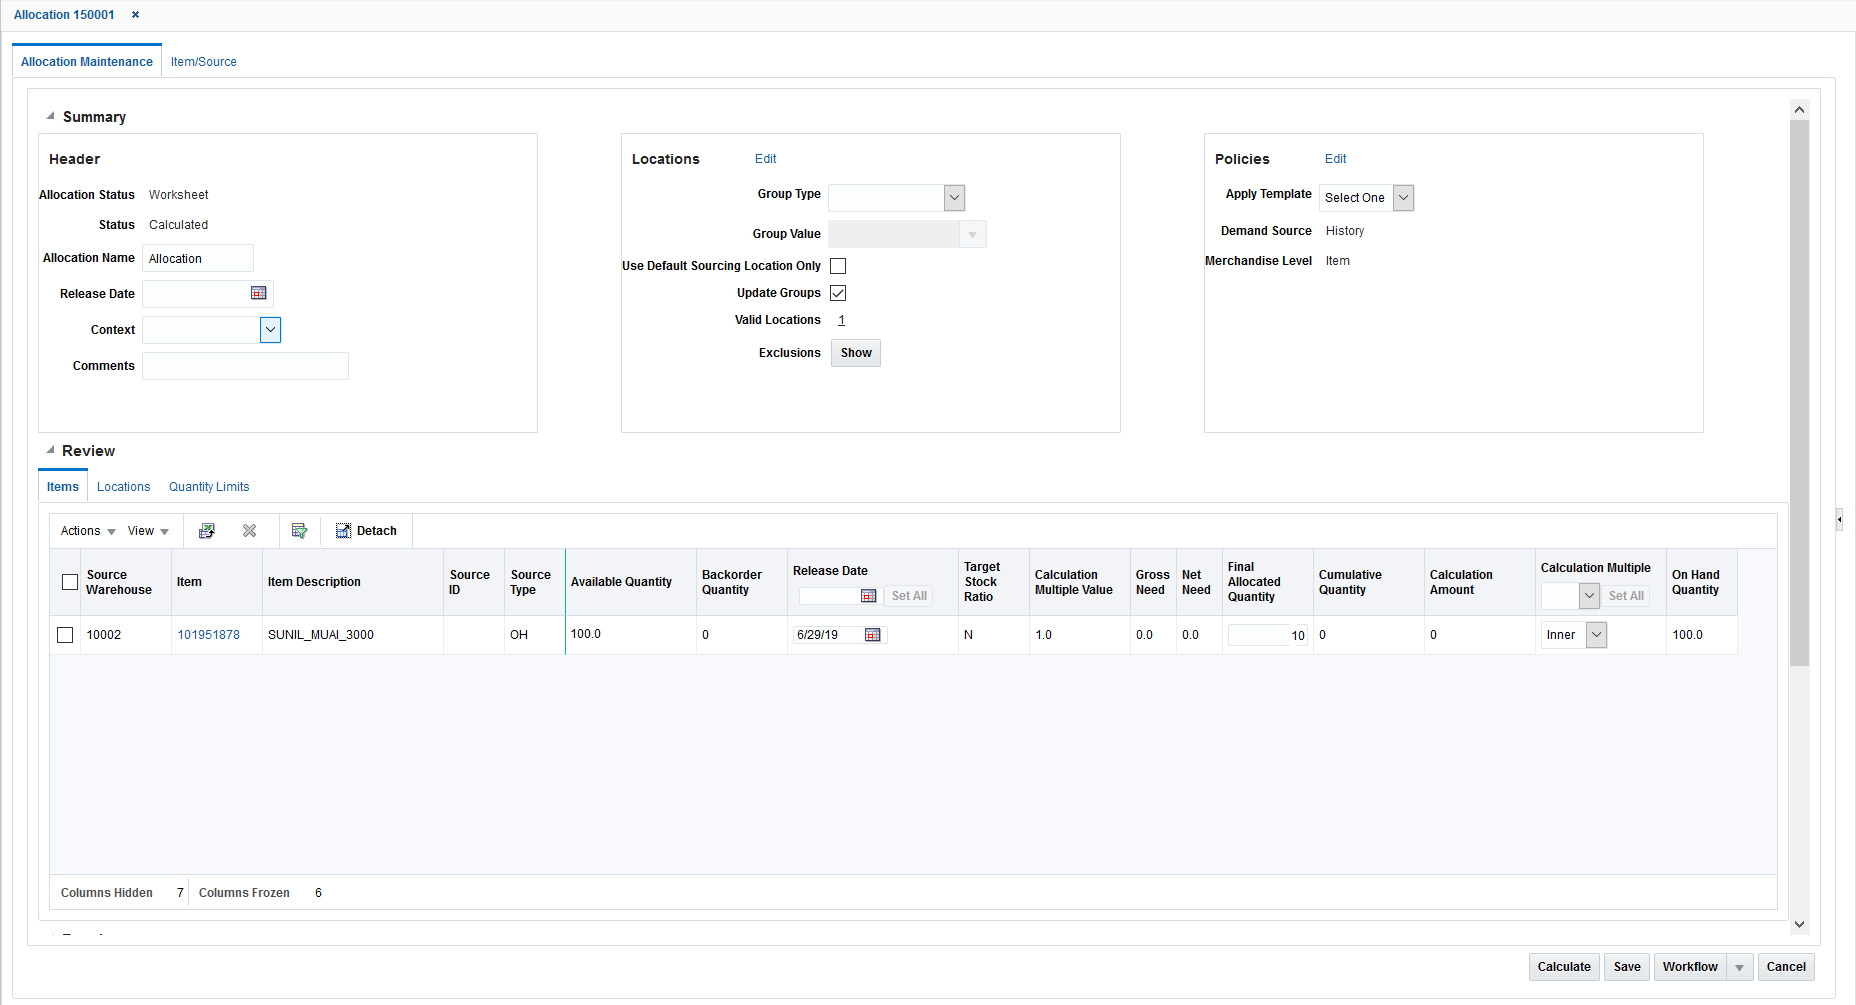
Review Item Information
The Review section of the Allocation Maintenance window allows you to view items that were selected for allocation, the quantity available, the calculation multiple, and source information. Here you can specify the holdback quantity/percent.
To review item information:
-
On the Worksheet window, select the items required for the allocation and click Create Allocation. The Allocation Maintenance window appears.
-
In the Context field, select a reason why the allocation is being created (optional).
-
If you select Promotion in the Context field, select a promotion in the Promotion field.
-
In the Comments field, enter comments or notes as necessary.
Understanding the Item Window
You can view the item details by clicking the Item ID link in the Worksheet or the Allocation Maintenance window. It has the following tabs:
-
Header – This provides the complete item description along with the Merchandise Hierarchy, Differentiators and Supplier details
-
Pricing – The Current Retail and Future Retail (based on the Release Date) values are displayed here at the unit level as well as the total number of allocated units
-
UDAs – This displays any user defined attributes linked with the item in Merchandising
-
Config – Packaging details linked with the item such as the inner, case and pallet values are displayed here.
This pop up also displays an image of the item retrieved from the ITEM_IMAGE table in Merchandising.
Specify the Hold Back Quantity or Percent
In the HoldBack Quantity column enter the quantity that you want to keep unallocated in the warehouse. This quantity is not considered as available for the current allocation.
Specify the Calculation Multiple
Select the calculation multiple from the Calculation Multiple column for the destination location. Click Set All to apply the multiple to all items in the allocation. The options available are:
-
Each
-
Inner
-
Case
-
Pallet
To specify the calculation multiple of individual items, select the multiple from the Calculation Multiple field next to the item.
Select Locations
The Add Locations window allows you to search and select stores and warehouses for the allocation. You can add locations or groups of locations to an allocation. Various types of groups such as Store Grades, Merchandising Location Lists & Traits and Location Groups can be used as a mechanism to select multiple locations.You can create the following complex groups:
-
A union, which includes all locations in the groups selected.
-
An intersection, which includes all locations that are duplicated in the groups selected.
-
An exclude, which excludes the locations in the group selected.
-
An exclude intersection, which includes all locations that are not duplicated in the groups selected.
Templates are created to apply the same location combination for multiple allocations.
Range Item/Location
The following logic is applied during the determination of valid item/location combinations:
-
A location gets staple items allocated if and only if the SKU has a valid item/location status.
-
A location gets fashion items (style/color or parent/diff) allocated if and only if the parent as well as all its child items being allocated have a valid item/location status.
-
A location gets sellable packs (fashion/staple/simple/complex) allocated if and only if the pack has a valid item/location status.
Note:
This would depend on the Pack ranging option defined by the user in System Options. This feature is not available for sellable packs. -
A location gets non-sellable packs (fashion/staple/simple/complex) allocated if and only if the pack as well as all its components have a valid item/location status.
Note:
This would depend on the Pack ranging option defined by the user in System Options.
Add Locations
You can add locations using the Group Type field on the Allocation Maintenance window which is used for quick Add location, or if you want to select multiple groups or create a complex group then you can click the Edit Location button to access the Add Locations window.
Note:
You can select franchise locations to create an allocation for franchise stores. Allocations can be for only franchise stores or for a combination of franchise and company stores. When an allocation created for one or more franchise stores is approved, a franchise order is created in Merchandising.To use quick add locations:
-
On the Allocation Maintenance window, from the Locations section, select the type of group in the Group Type field. Locations brought in from the selected group are listed in the Group Value list.
-
Select the group in the Group Value field.
-
Select the Use Default Sourcing Location Only check box to ensure the item is ranged to the set of locations used in the allocation.
-
Select the Update Group option to specify that location groups in this allocation should be updated when Oracle Retail Merchandising location groups change.
-
Click the Show button in the Exclusion field to view the item location exceptions. The Item Location Exceptions window appears listing the invalid item-location combinations.
To add locations using the Add Location window:
-
On the Allocation Maintenance window, click Edit on the Locations section. The Add Locations window appears.
-
Select the location group using the following lists:
-
Location List
-
Location Trait
-
Location Group
-
Store Grade List
-
Single Store
-
Single Warehouse
You can also select the All Stores and All Warehouses option.
-
-
Click the
 icon. The location groups matching the search criteria are displayed in the Group View tab.
Note:
-
The Updatable Group column in the Group View tab indicates if that Group can be updated.
-
For every location or Merchandising location group added, this field is defaulted to Yes.
-
After adding a Merchandising location group, if you perform any operations on the group such as Union, Intersection, Exclude, and Exclude Intersection, this field is changed from Yes to No.
-
-
If you want to delete any locations before creating the location group, do the following:
-
Select the Location View tab. The locations available in the selected groups are displayed.
-
Select the locations you want to delete.
-
Click the delete icon.
-
-
Select the groups you want to combine to form a new location group.
-
Click the Union, Intersection, Exclude, or Exclude Intersection button to form the desired combination.
-
Optionally, enter a name in the Group Name field and click Save As to save the new location group.
-
Click Apply. The new location group is applied to the Allocation. You can review the selected locations in the Review section of the Allocation Maintenance window.
Define your Supply Chain Network
The Use Default Sourcing Location Only check box allows you to define the way in which an item gets allocated to the destination location.
Set the Use Default Sourcing Location Only Flag
By checking the Use Default Sourcing Location Only check box on an allocation, only the primary source location is used to allocate items to the destination location.
In an allocation with the Use Default Sourcing Location Only set to unchecked in the Allocation Maintenance UI, in case the default source warehouse is unable to meet the total demand, any other source warehouse (selected by the user during the creation of an allocation) meeting certain conditions mentioned below with respect to the destination store or warehouse will be able to allocate to these locations.
For standard and scheduled workflows, the following rules are used to determine the sequence in which the warehouses are picked based on their parameters in order to meet the destination location demand. The logic considers the next warehouse only after the total available quantity in the current warehouse is exhausted.
Transfer Entity Determining Intercompany Movement
In Merchandising, if the Intercompany Transfer Basis is set to 'T', then the transfer entity determines intercompany movement in Merchandising and thus is not considered a valid sourcing warehouse parameter for a store in Allocation. In this case, the rules are as follows:
-
Rule #1a – The warehouse mentioned as the source warehouse in the ITEM_LOC table for the item/destination location combination is considered.
-
Rule #1b – The default warehouse for the destination location (for example, the STORE.DEFAULT_WH or WH.DEFAULT_WH) is considered.
-
Rule #2a – Any other virtual warehouse belonging to the same Org Unit, Transfer Entity, and Channel and is the primary virtual warehouse of the linked physical warehouse and has the Protected Indicator set to 'N' is considered.
-
Rule #2b – Any other virtual warehouse belonging to the same Org Unit, Transfer Entity, and Channel but is not the primary virtual warehouse of the linked physical warehouse and has the Protected Indicator set to 'N' is considered.
-
Rule #2c – Any other virtual warehouse belonging to the same Org Unit, Transfer Entity, and Channel and is the primary virtual warehouse of the linked physical warehouse and has the Protected Indicator set to 'Y' is considered.
-
Rule #2d – Any other virtual warehouse belonging to the same Org Unit, Transfer Entity, and Channel but is not the primary virtual warehouse of the linked physical warehouse and has the Protected Indicator set to 'Y' is considered.
-
Rule #3b – Any other virtual warehouse belonging to the same Org Unit and Transfer Entity, but a different Channel but is not the primary virtual warehouse of the linked physical warehouse and has the Protected Indicator set to 'N' is considered.
-
Rule #3c – Any other virtual warehouse belonging to the same Org Unit and Transfer Entity, but a different Channel and is the primary virtual warehouse of the linked physical warehouse and has the Protected Indicator set to 'Y' is considered.
-
Rule #3d – Any other virtual warehouse belonging to the same Org Unit and Transfer Entity, but a different Channel but is not the primary virtual warehouse of the linked physical warehouse and has the Protected Indicator set to 'Y' is considered.
-
Rule #4a – Any other virtual warehouse under a different Org Unit but having the same Transfer Entity, and Channel and is the primary virtual warehouse of the linked physical warehouse and has the Protected Indicator set to 'N' is considered.
-
Rule #4b – Any other virtual warehouse under a different Org Unit but having the same Transfer Entity, and Channel but is not the primary virtual warehouse of the linked physical warehouse and has the Protected Indicator set to 'N' is considered.
-
Rule #4c – Any other virtual warehouse under a different Org Unit but having the same Transfer Entity, and Channel and is the primary virtual warehouse of the linked physical warehouse and has the Protected Indicator set to 'Y' is considered.
-
Rule #4d – Any other virtual warehouse under a different Org Unit but having the same Transfer Entity, and Channel but is not the primary virtual warehouse of the linked physical warehouse and has the Protected Indicator set to 'Y' is considered.
-
Rule #5a – Any other virtual warehouse belonging to the same Transfer Entity, but a different Org Unit and Channel and is the primary virtual warehouse of the linked physical warehouse and has the Protected Indicator set to 'N' is considered.
-
Rule #5b – Any other virtual warehouse belonging to the same Transfer Entity, but a different Org Unit and Channel and is not the primary virtual warehouse of the linked physical warehouse and has the Protected Indicator set to 'N' is considered.
-
Rule #5c – Any other virtual warehouse belonging to the same Transfer Entity, but a different Org Unit and Channel and is the primary virtual warehouse of the linked physical warehouse and has the Protected Indicator set to 'Y' is considered.
-
Rule #5d – Any other virtual warehouse belonging to the same Transfer Entity, but a different Org Unit and Channel and is not the primary virtual warehouse of the linked physical warehouse and has the Protected Indicator set to 'Y' is considered.
Set of Books Determining Intercompany Movement
If the Intercompany Transfer Basis is set to 'B', then the set of books determines intercompany movement in Merchandising and thus transfer entity is not part of the rules and will not be considered as a valid sourcing WH parameter for a store in Allocation. In this case, the rules should be as follows:
-
Rule #1a – The warehouse mentioned as the source warehouse in the ITEM_LOC table for the item/destination location combination is considered.
-
Rule #1b – The default warehouse for the destination location (for example, STORE.DEFAULT_WH or WH.DEFAULT_WH) is considered.
-
Rule #2a – Any other virtual warehouse belonging to the same Org Unit, Transfer Entity, and Channel and is the primary virtual warehouse of the linked physical warehouse and has the Protected Indicator set to 'N' is considered.
-
Rule #2b – Any other virtual warehouse belonging to the same Org Unit, Transfer Entity, and Channel but is not the primary virtual warehouse of the linked physical warehouse and has the Protected Indicator set to 'N' is considered.
-
Rule #2c – Any other virtual warehouse belonging to the same Org Unit, Transfer Entity, and Channel and is the primary virtual warehouse of the linked physical warehouse and has the Protected Indicator set to 'Y' is considered.
-
Rule #2d – Any other virtual warehouse belonging to the same Org Unit, Transfer Entity, and Channel but is not the primary virtual warehouse of the linked physical warehouse and has the Protected Indicator set to 'Y' is considered.
-
Rule #3a – Any other virtual warehouse belonging to the same Org Unit and Transfer Entity, but a different Channel and is the primary virtual warehouse of the linked physical warehouse and has the Protected Indicator set to 'N' is considered.
-
Rule #3b – Any other virtual warehouse belonging to the same Org Unit and Transfer Entity, but a different Channel but is not the primary virtual warehouse of the linked physical warehouse and has the Protected Indicator set to 'N' is considered.
-
Rule #3c – Any other virtual warehouse belonging to the same Org Unit and Transfer Entity, but a different Channel and is the primary virtual warehouse of the linked physical warehouse and has the Protected Indicator set to 'Y' is considered.
-
Rule #3d – Any other virtual warehouse belonging to the same Org Unit and Transfer Entity, but a different Channel but is not the primary virtual warehouse of the linked physical warehouse and has the Protected Indicator set to 'Y' is considered.
-
Rule #4a – Any other virtual warehouse belonging to the same Org Unit, and Channel but a different Transfer Entity and is the primary virtual warehouse of the linked physical warehouse and has the Protected Indicator set to 'N' is considered.
-
Rule #4b – Any other virtual warehouse belonging to the same Org Unit, and Channel but a different Transfer Entity and is not the primary virtual warehouse of the linked physical warehouse and has the Protected Indicator set to 'N' is considered.
-
Rule #4c – Any other virtual warehouse belonging to the same Org Unit, and Channel but a different Transfer Entity and is the primary virtual warehouse of the linked physical warehouse and has the Protected Indicator set to 'Y' is considered.
-
Rule #4d – Any other virtual warehouse belonging to the same Org Unit, and Channel but a different Transfer Entity and is not the primary virtual warehouse of the linked physical warehouse and has the Protected Indicator set to 'Y' is considered.
-
Rule #5a – Any other virtual warehouse belonging to the same Org Unit, but a different Transfer Entity and Channel and is the primary virtual warehouse of the linked physical warehouse and has the Protected Indicator set to 'N' is considered.
-
Rule #5b – Any other virtual warehouse belonging to the same Org Unit, but a different Transfer Entity and Channel and is not the primary virtual warehouse of the linked physical warehouse and has the Protected Indicator set to 'N' is considered.
-
Rule #5c – Any other virtual warehouse belonging to the same Org Unit, but a different Transfer Entity and Channel but is the primary virtual warehouse of the linked physical warehouse and has the Protected Indicator set to 'Y' is considered.
-
Rule #5d – Any other virtual warehouse belonging to the same Org Unit, but a different Transfer Entity and Channel and is not the primary virtual warehouse of the linked physical warehouse and has the Protected Indicator set to 'Y' is considered.
For the Scheduled workflow, the user needs to specify all warehouses that can be used as a source. The calculation logic then considers the sum total of the stock of all warehouses (out of the ones added by the user) matching the table criteria for determining the Min. Avail Qty. or Threshold % parameters.
Note:
As long as the default warehouse cannot meet the need, there would not be any user control over the sequence in which the item gets picked from the non-default warehouses in case there are multiple ones meeting the same table criterion. For example, if there are three virtual warehouses that have been added as sources to an allocation, and all match Rule #3b, these can be picked up in any sequence while allocating goods.Select Policies
An allocation determines need by using a policy. You determine how the policy gathers information by selecting Source Demand, Level, Calculation Type, Date Ranges and Constraints.You can customize the level a policy is applied to by using the User Selection window. Use the User Selection window to select multiple merchandise hierarchies simultaneously as well as select hierarchies other than the default ones of the items being allocated. Also, to set the percentage of policies to apply to hierarchies and the time periods to constrain the policies.
To select a policy:
-
From the Worksheet, select the items to allocate.
-
Click Create Allocation. The Allocation Maintenance window appears.
-
In the Review section, enter the Release Date.
-
In the Rules section, you can select a predefined policy from the Apply Policy list.
-
Click Edit in the Rules section. The Policies window appears.
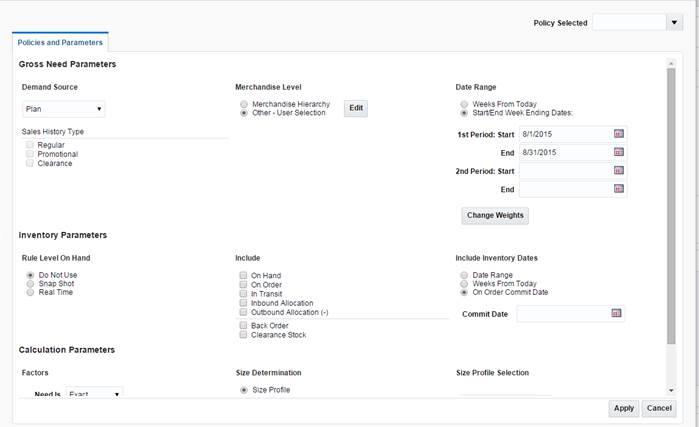
Select Gross Need Parameters
Before selecting gross need parameters, understand the following:
-
For an allocation containing warehouses and stores as destination locations, priority logic built to determine the order of allocating between stores and warehouses.
-
History for a warehouse is only applicable at the item level.
-
Plan re-project is not applicable for warehouses.
-
For the policy types which are based on database values/entries such as History, Forecast, Plan, Corporate and Receipt Plan, in case of no records existing at the warehouse level, their need is treated as zero in the same way as it works for store locations.
To select the gross need parameters:
-
In the Demand Source field, select the source of demand from the list of values:
Table 3-1 Select Demand Source Options
Source Description History
Use the item's historical sales for the date range selected to determine the gross need of item on the allocation.
Corporate Rules
Use custom pre-defined rules to determine the need of the item on the allocation.
Manual
Use to allocate fixed quantities of the item on an allocation. You must know the quantity to be allocated to each store which must be manually entered.
History and Plan
Use both the item's sales history and plan for the date range selected to determine the gross need of the item on the allocation.
Forecast
Use the item's forecast to determine what the store is forecasted to sell at the item/week level, the demand is obtained from the Oracle Retail Demand Forecasting product.
Plan
Use an item/store/weekly sales plan for the date range selected to determine what the store is expected to sell.
Receipt Plan
Use the item's receipt plan to determine what the store is expected to receive at the item/week level, demand for this rule type is obtained from Oracle Retail Assortment Planning product.
Plan Re-project
Use to compare the item's actual sales to the plan, re-forecast the plan based on performance for the date range selected, and use the re-projected plan to determine the gross need of the item on the allocation. This logic uses a Bayesian forecasting method.
-
In the Sales History Type section, select the check boxes for the type of history to include.
-
In the Corporate Rules section, select the rule to be applied.
Select a Merchandise Level
The store demand is derived from the level of product hierarchy selected. On the Policies window, you can select to allocate items using hierarchy or user selection.
Allocate by Hierarchy
To allocate items using hierarchy:
-
In the Level section, select Merchandise Hierarchy.
Note:
Based on the merchandise level selected, additional constraints may apply:-
Pack Distribution mode is not applicable for Item level hierarchy
-
For staple allocations, merchandise level can only be: Department, Class, Subclass, or Item
-
Pack Merchandise Level is only available if the Demand Source is Receipt Plan
-
Merchandise Level must be Department, Class, or Subclass in order to use the Spread Demand mode
-
Level must be Style, Style/diff, or Item if Store Sales Selling curve is selected
-
-
Select the hierarchy level to allocate by from the list.
Note:
Item need for an allocation is determined by calculating the need for each item on the allocation from the selected policy for the organizational hierarchy level selected.
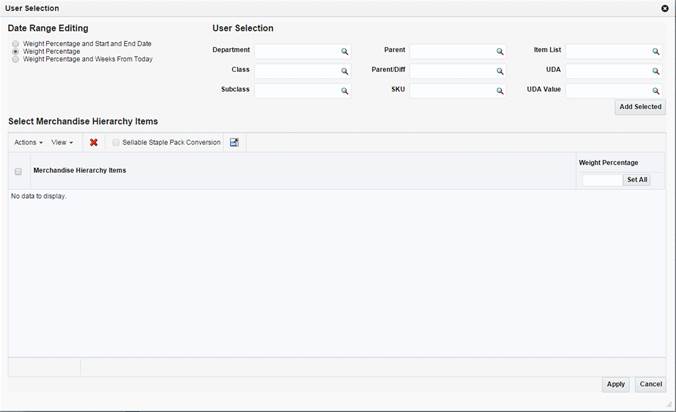
Allocate by User Selection
To allocate items using user selection:
-
In the Merchandise Level section, select Other - User Selection.
-
Click Edit. The User Selection window appears.
-
In the Date Range Editing section select an option:
-
Weight Percentage
-
Weight Percentage and Start and End Date
-
Weight Percentage and Weeks from Today
-
-
In the User Selection section enter an ID in the appropriate field to select a merchandise hierarchy level.
-
Click Add. The merchandise hierarchy is added to the Select Merchandise Hierarchy Items section.
-
Enter the weight or percentage to adjust the need calculated for the user selection in the Weight column.
-
Enter the start and end date in the Start Date and End Date column.
Note:
-
The Start Date and End Date fields appear only if you have selected Weight Percentage and Start and End Date option.
-
You need to select two start and end dates when the demand source is History, Forecast, or Plan.
-
-
Enter a number in the Weeks From Today column. This value specifies the number of weeks all approved allocations, direct to store orders, and transfers as stock on hand and future fulfillment, are included in the need calculation for the destination location. The value can range between 1 and 52 only.
Note:
-
The Weeks From Today columns appear only if you have selected Weight Percentage and Weeks from Today option.
-
If no number is entered, the system includes all stock on hand at the store or warehouse and future inventory regardless of the date on the purchase orders or transfers.
-
Select a Date Range
On the Policies window, you can select the date range.
-
Enter the start date in the 1st Period :Start field.
-
Enter the end date in the 1st Period :End field.
Note:
-
If you want to include a week, make sure that the fiscal week ending day falls within your search. For example, if you select the start and end dates as May 1, 2013 and May 25, 2013. Then the following weekend dates are picked: May 6, May 13, and May 20.
-
You may select a second time period by entering dates in the 2nd period Start and End fields.
-
Enter the number of weeks to search back or forward, depending on the rule type selected. The system starts searching with the last completed week.
-
Click Change Weights. The Change Weights window appears.
Note:
The date displayed is based on the end of week day selected as defined in the Allocation system options. -
Enter the new weights as appropriate.
-
Click OK to save changes.
Set Inventory Parameters
The inventory parameters comprise of Rule Level On Hand, Include In Inventory, and Remove Future Fulfilment.
Select Rule Level On Hand
To set Rule Level On Hand:
-
Select one of the following options available in the Rule Level On Hand section:
-
Do Not Use
-
Snap Shot
-
Real Time
Note:
-
When Rule Level On Hand is used with User Selection, the on-hands is based on the rule level of the like merchandise hierarchy selected.
-
For performance purposes, the Rule Level On Hand Snap Shot is stored in a database table which can be refreshed through a batch program to be run at your discretion.
-
Select Include in Inventory
Currently, when allocating the net need using either Stock on Hand (SOH) or Rule Level On Hand (RLOH), the values for on-hand is derived from using the summation of four Merchandising Inventory buckets. You can select to include or exclude one or more of these buckets.
To include inventory details:
-
Select from the following options in the Include section:
-
On Hand
-
On Order
-
In Transit
-
Inbound Allocation
-
Outbound Allocation (Applicable only for Warehouses)
-
-
Select the Backorder option to include backorder quantity in the calculation of 'Stock On Hand'.
-
Select the Clearance Stock option to include clearance stock in the need calculation.
Include Inventory Dates
In the Include Inventory Dates section, when you enter a date in the On Order Commit Date field, all approved allocations, direct to store orders, and transfers dated on or before the date are included in the calculation of on-hand quantity.
When you enter the number of weeks, it is used to determine how many weeks into the future should be used to pull approved allocations, direct to store orders, and transfers into the calculation for on-hand quantity.
Select Calculation Parameters
To select factors:
-
In the Type section Need Is field, select how the Allocation should determine the quantity of items sent to a location. The options available are Exact and Proportional.
-
In the Mode field, select the type of algorithm calculation. The modes available are Simple, Pack Distribution, and Spread Demand.
Note:
-
Simple mode is applicable for both staple and fashion items.
-
Spread Demand is applicable for Subclass or higher level.
-
-
In the Allocate To field, select the need type for calculation, values available are Net Need and Gross Need.
Spread Demand
The Spread Demand mode allows you to allocate multiple items for a single store demand. This mode can be applied on the Policy window at the subclass level or higher while creating an allocation. The need value at the merchandise hierarchy level is spread among the set of items belonging to that hierarchy based on their availability ratio.
The Spread Demand logic first calculates the percentage availability of each style of the total available quantity and then the demand at the Merchandise Hierarchy level is multiplied by each style's percentage availability value to determine the unique Gross Need value of each style.
System Rules & Best Business Practice
-
This mode requires at least two items in the allocation under the merchandise hierarchy for which spread demand is applied.
-
All items types except Fashion Packs are supported under this mode. The application provides better ways of handling fashion pack allocations; hence the spread demand mode is disabled for these type of allocations. For other pack types, the spread demand ratio is applied on the pack quantities and not the SKU inventory values.
-
You must ensure the store demand is rich enough to produce optimal results; the demand value must be greater than total available quantity. This total available quantity might be out of a single warehouse source or multiple ones.
-
After the spread demand is executed, each item/location record can be treated as any other allocation. The regular rules around Quantity Limits, Rounding, and Manual override continue to apply on these records.
-
If allocating multiple items from different merchandise hierarchies, User Selection capability is required in order to spread one demand among multiple items.
-
If the you select the Rule Level on Hand (RLOH) option, the spread demand ratio is applied to the RLOH quantity for the selected merchandise hierarchy.
-
When Gross Need Quantity Limits are applied, the spread demand value is compared with the quantity limit value and the QL value is used only if it exceeds the spread demand value.
-
Target Stock Ratio (TSR) will apply in allocations involving the spread demand mode where the available quantity is less compared to the need value.
Set Size Profile Logic
To set the method used to determine what to allocate:
-
Select one of the following options in the Size Determination section:
-
Size Profile to use the store size profile ratio as a guide to determine what to allocate. This option is the default selection.
-
Selling Curve to use the selling curve derived from the policies (the demand source and hierarchy level) selected within the allocation as a guide to determine what to allocate.
Note:
Selling Curve option can be used only when the level is Parent, Parent/diff, or Item. -
-
Select Limit SKU Overages to limit the SKU overages.
-
Enter the acceptable overage percentage in the Overage Threshold field.
Size Profile Selling Curve
This is an alternative option where you can use historical sales to determine the size curve instead of using size profile ratios. This method is applicable for the rule type History at the Parent, Parent/Diff, and Item levels and uses the ITEM_LOC_HIST table to calculate the Selling Curve for the items on the allocation.
Consider the following example containing Men's Shirts in three different colors and sizes - Red, Blue, Green, and Small, Medium, Large respectively. A simplified ITEM_LOC_HIST table for these items is as follows:
| ITEM | SALES |
|---|---|
| Blue Shirt: Small | 10 units |
| Blue Shirt: Medium | 20 units |
| Blue Shirt: Large | 5 units |
| Red Shirt: Small | 30 units |
| Red Shirt: Medium | 40 units |
| Red Shirt: Large | 5 units |
| Green Shirt: Small | 50 units |
| Green Shirt: Medium | 60 units |
| Green Shirt: Large | 5 units |
In a fashion allocation containing the 'Blue Shirt: Small' and 'Blue Shirt: Medium' with sufficient available inventory, the size determination will occur in the following way:
-
Blue Shirt: Small = 10/30 = 1/3
-
Blue Shirt: Medium = 20/30 = 2/3
While allocating these items, calculation will occur as follows:
-
Total Need = 20 + 10 = 30 units
-
Need for Blue Shirt: Small = 1/3 * 30 = 10 units
-
Need for Blue Shirt: Medium = 2/3 * 30 = 20 units
-
Total Need = 20 + 10 + 5 = 35 units
-
Need for Blue Shirt: Small = 1/3 * 35 = 11.6666 units (rounded up to 12 units)
-
Need for Blue Shirt: Medium = 2/3 * 35 = 23.3333 units (rounded down to 23 units)
-
Total Need = 10 + 20 + 5 + 30 + 40 + 5 + 50 + 60 + 5 = 225 units
-
Need for Blue Shirt: Small = 1/3 * 225 = 75 units
-
Need for Blue Shirt: Medium = 2/3 * 225 = 150 units
Limit SKU overages
This can be used to limit the number of SKU's that the calculation engine can allocate on a per SKU basis. Consider the following example:
A fashion allocation contains White Shirts of three different sizes - Small, Medium and Large. These items have a size profile ratio of 1:2:3 and the total need is equal to 60 units. Then the quantity allocated will be as follows:
-
Shirt White: Small = 10 units
-
Shirt White: Medium = 20 units
-
Shirt White: Large = 30 units
In case the Limit SKU overages is defined as 0.5 or 50%, then the maximum allocation that can be done for these items is:
-
Shirt White: Small = 10 + (10 * 0.5) = 15 units
-
Shirt White: Small = 20 + (20 * 0.5) = 30 units
-
Shirt White: Small = 30 + (30 * 0.5) = 45 units
In case a complex, non-sellable pack containing one unit of each of the these items is allocated, then only 15 packs (that is, 45 units) can be allocated for a need value of 60 units with the Limit SKU overages defined as 0.5. This is because the upper limit for the Shirt White: Small is reached and no more packs get allocated in spite of not meeting the store need and inventory being available.
Without any value of the Limit SKU overages defined, there will be 20 packs allocated for the same need value of 60 units.
Note:
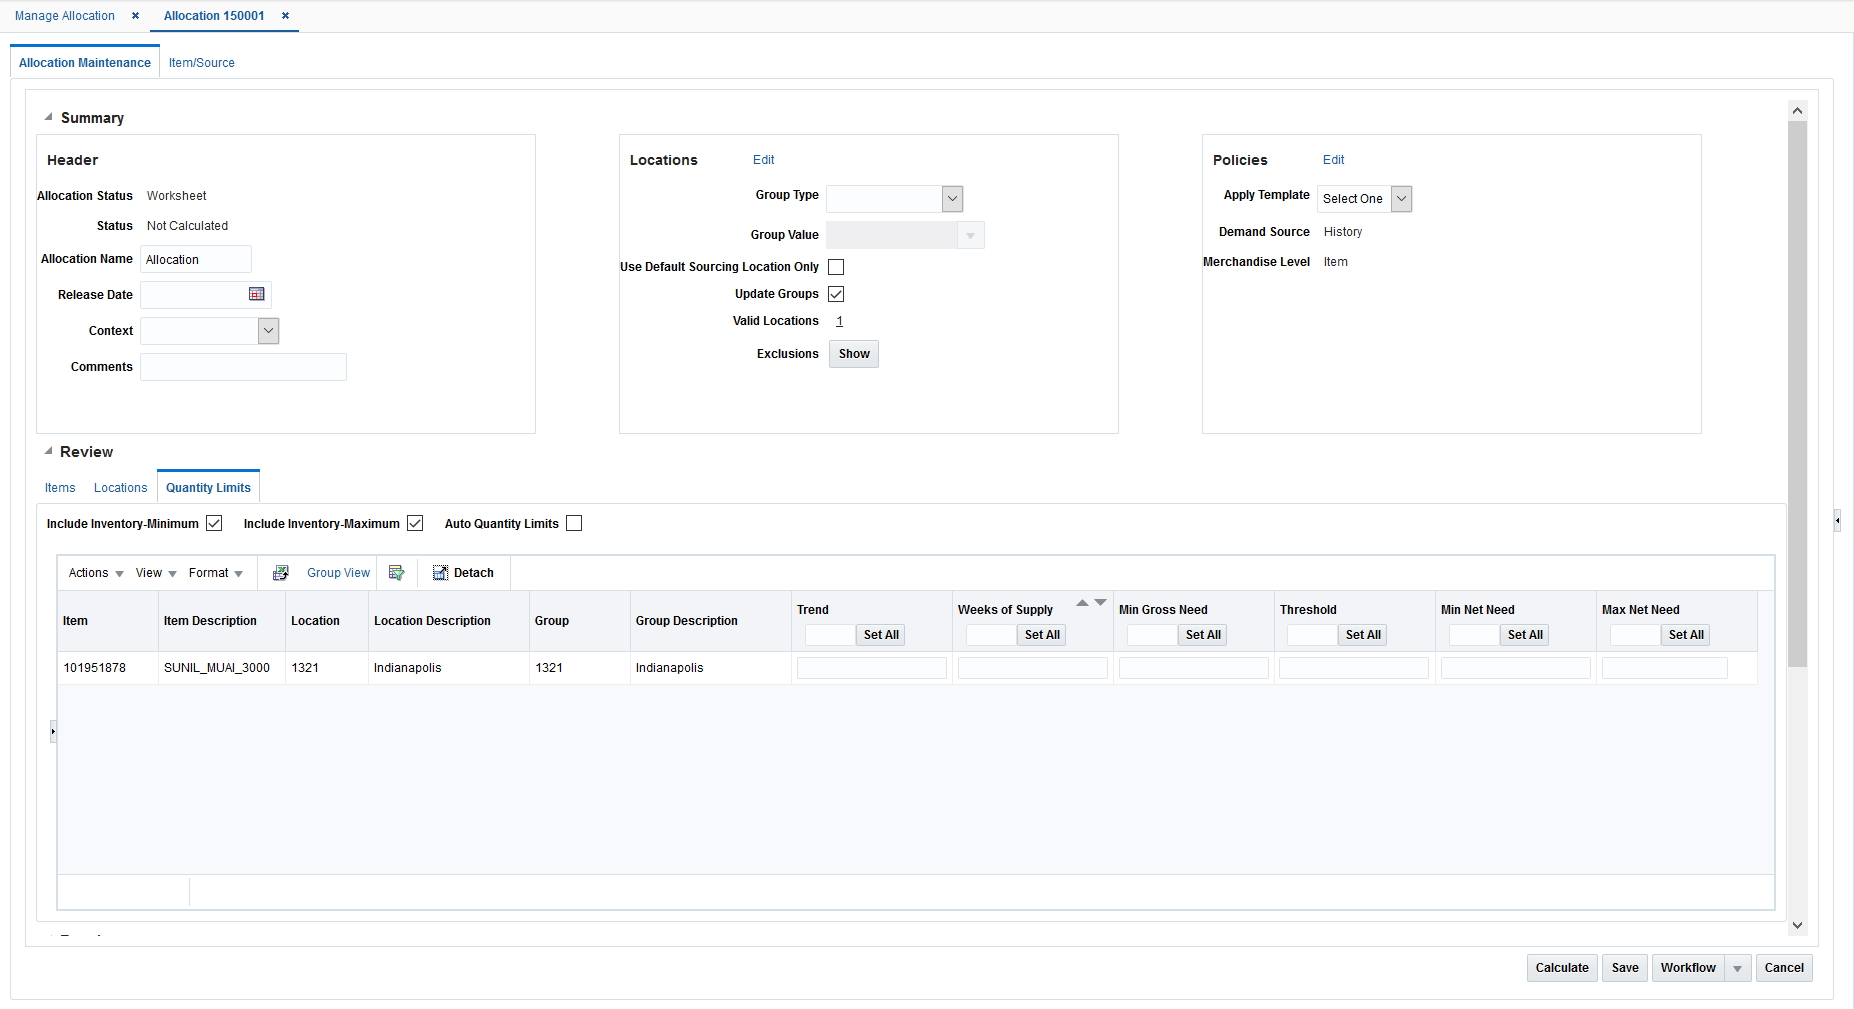
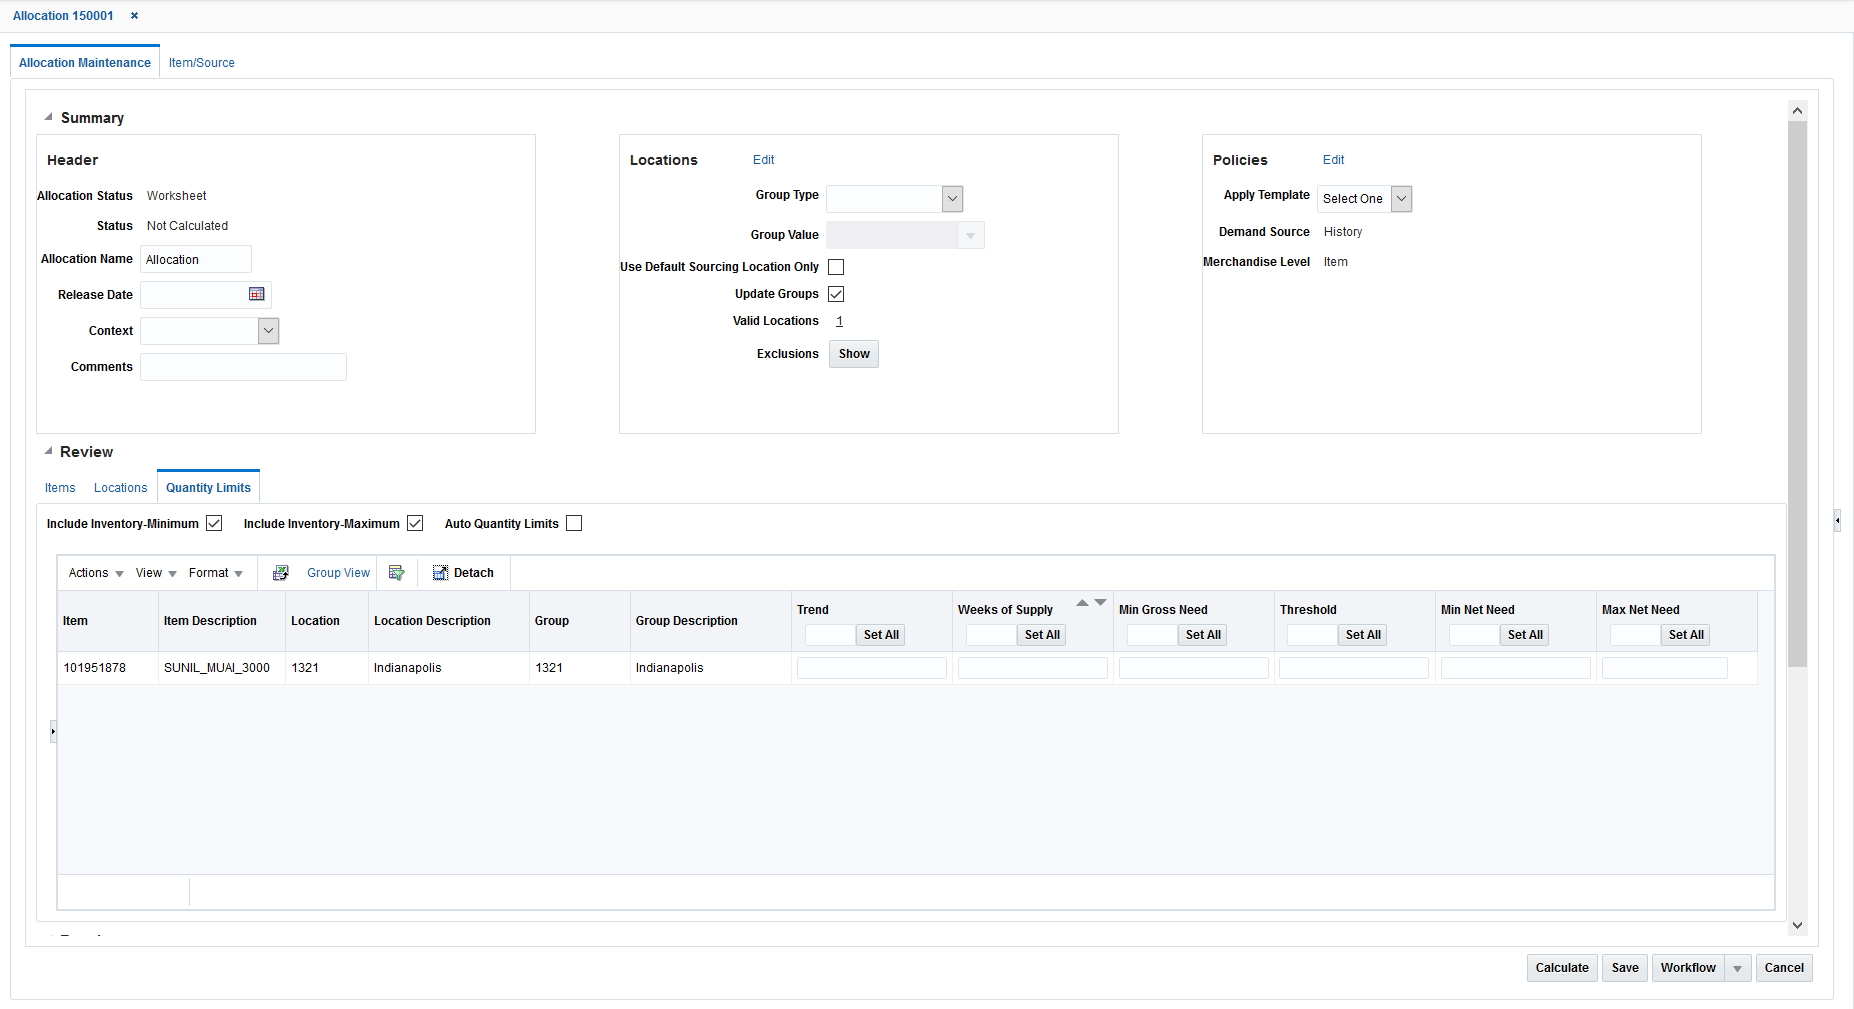
The 'Valid Locations' count in the Allocation Maintenance UI would not be in sync for the 'Selling curve' option in a case where all the locations are excluded. In this case, the details in the Exclusions table in the application UI need to be followed to fix the item/location ranging issues.Set Quantity Limits
The quantity limits section allows you to set parameters for the allocation at the item/store level demand constraints. The section allows you to set the parameters for different stages of the allocation. Quantity Limits are not used to control assortments or serve as shipping constraints.
To set quantity limits:
-
On the Allocation Maintenance window, select the Quantity Limits tab from the Review section. The Quantity Limits window appears.
Note:
If you have selected Pack Distribution mode, you can use only Minimum Pack and Maximum Pack quantity limits.-
In the By Location Aggregate field, the location level is set to Store for Simple mode.
-
-
Select Include Inventory - Minimum or Include Inventory - Maximum to include stock on hand of the item at the location to calculate the net need.
Note:
The Include Inventory - Minimum and Include Inventory - Maximum check boxes are selected by default. -
Enter the quantity limits at the appropriate intersection for item/location and limiter.
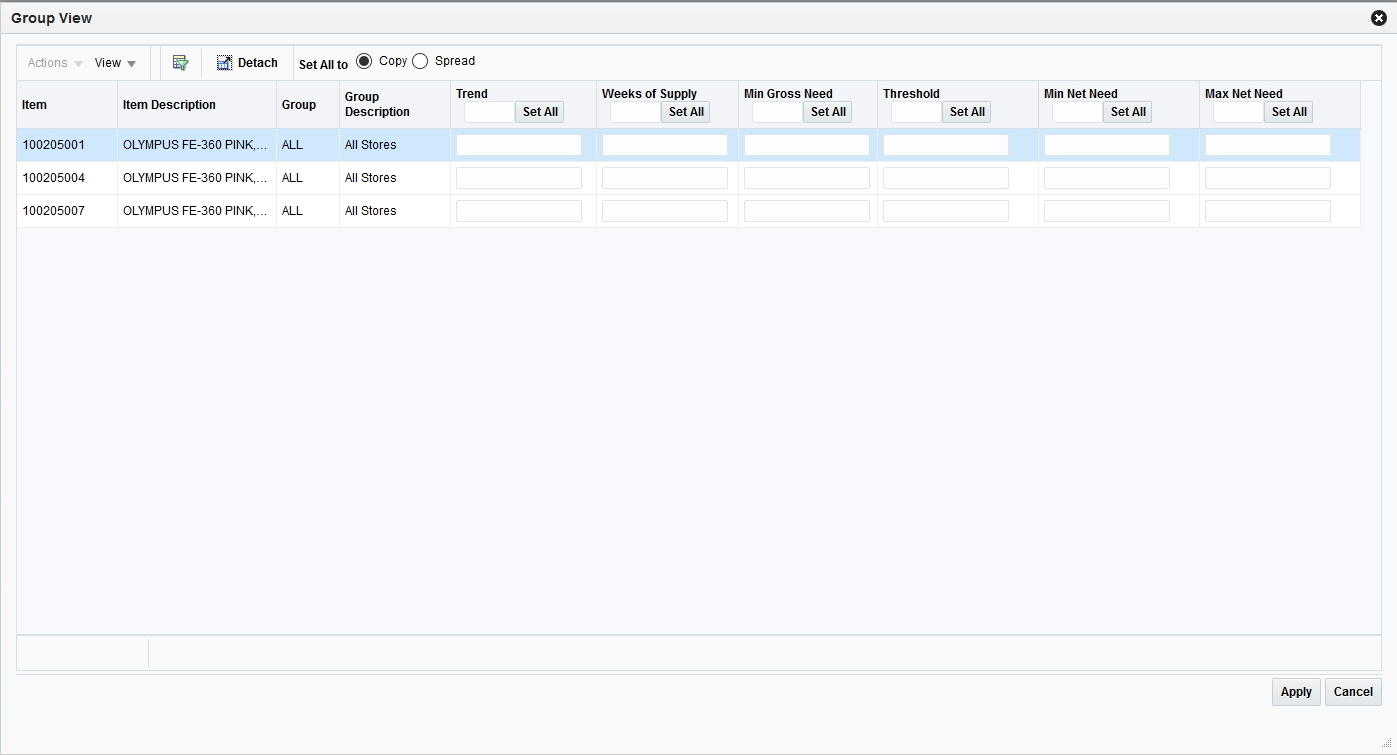
Work with Group View
You can work at the group level using the Group view.
To use the group view:
-
On the Quantity Limits window, click the Group View link. The Group view window appears.
-
Select an option in the Set All to field. The options available are:
-
Copy: Use this option to copy the entered quantity to all the stores in the group.
-
Spread: Use this option to spread the entered quantity equally to all the stores in the group.
-
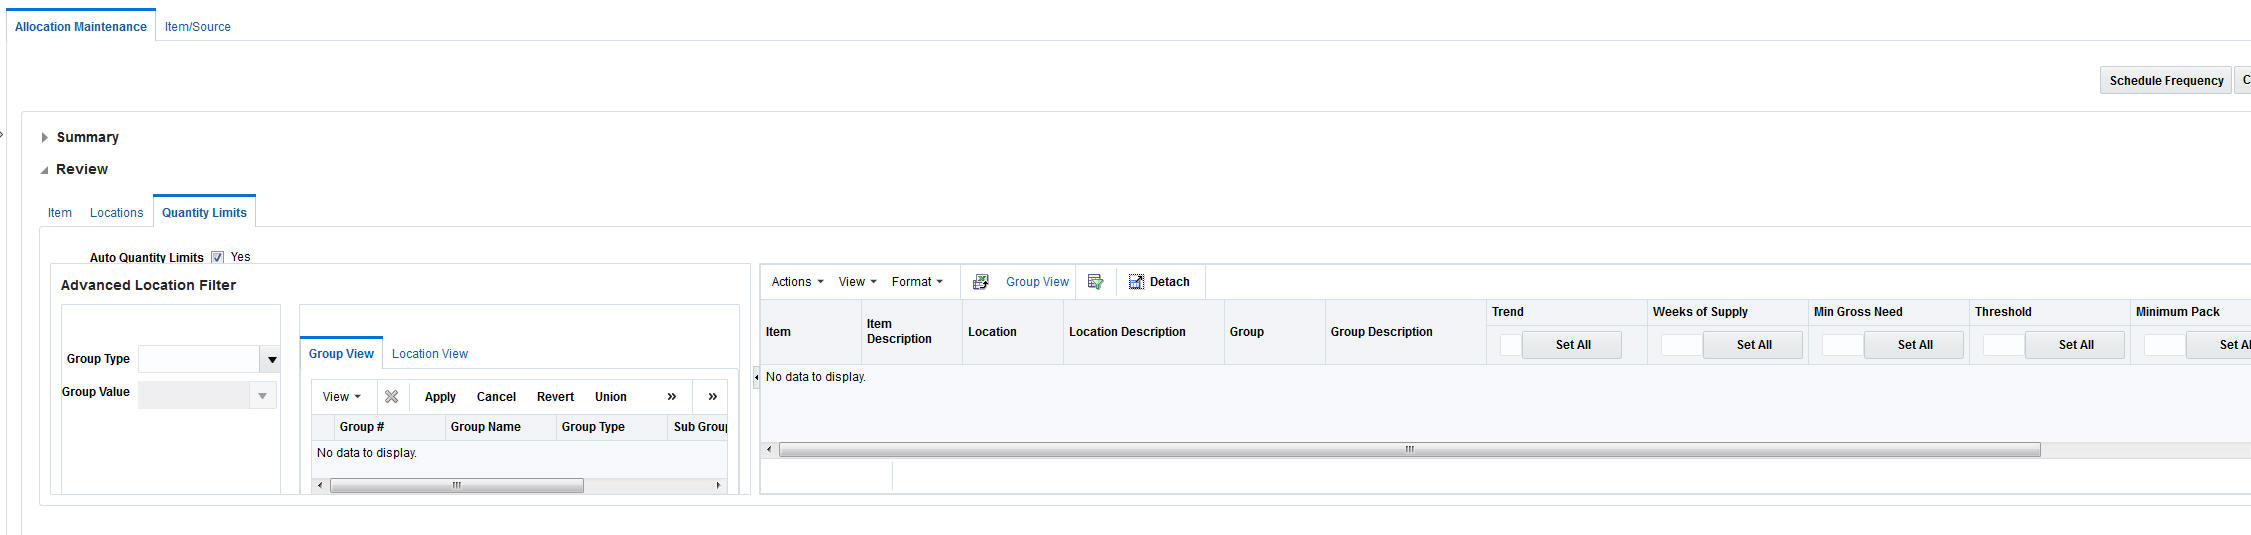
Filter by Location
You can use the Advanced Location Filter to edit allocated quantities for a set of locations.
To filter the items based on locations:
-
On the Quantity Limits window, click the arrow
 on the left panel. The Advanced Location Filter section appears.
 -
Select the type of location group from the Group Type list.
-
Select the name of the group from the Group Value list. A list of location groups matching the selected criteria is displayed in the Group View section.
-
Click Apply. The items in the Quantity Limits section are filtered based on the location groups selected.
-
Make the necessary edits.
-
To return back to the previous filter applied, click Revert. If you click Cancel, the location filter is removed.
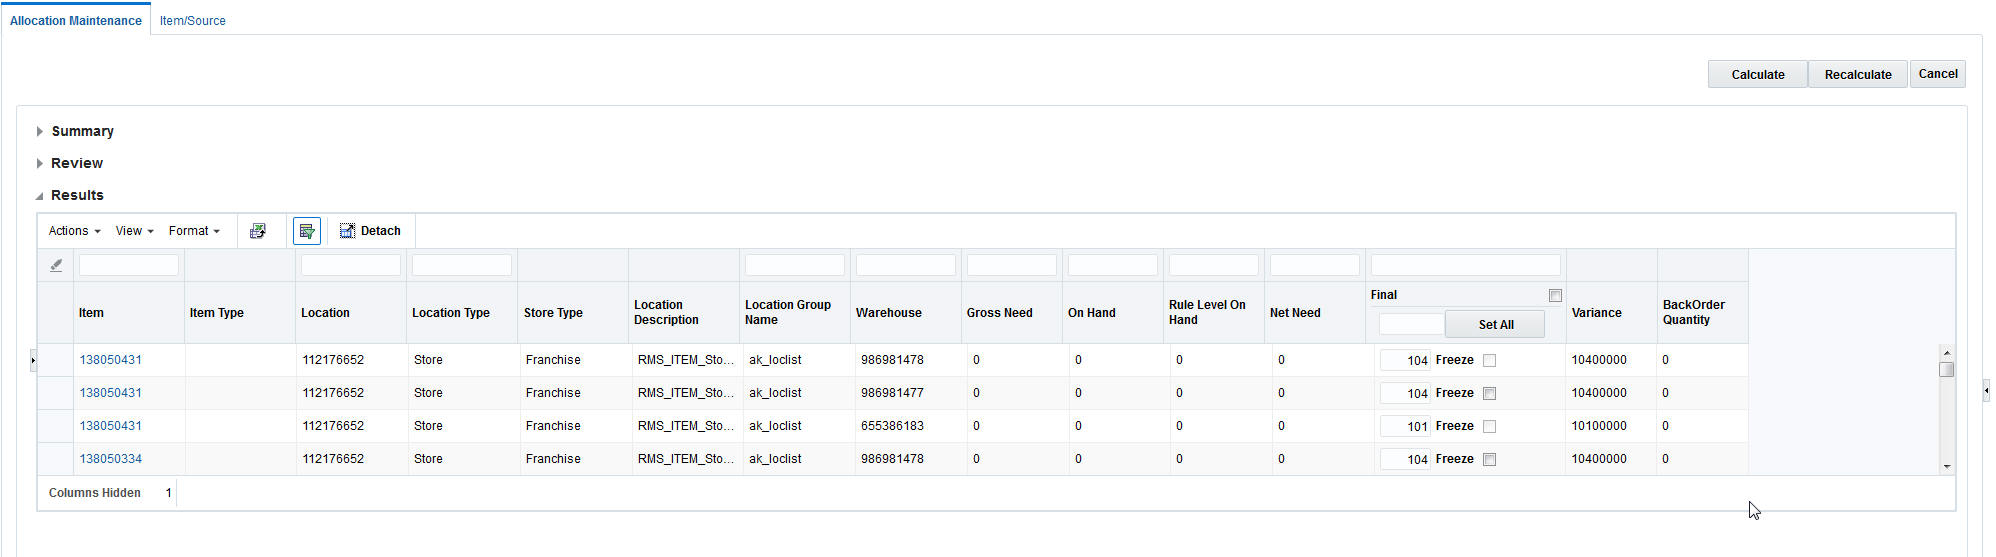
Calculate Allocations
After you allocate items, add locations, and assign policies, you can calculate the allocation. To calculate an allocation:
-
On the Allocation Maintenance window, click Calculate. The calculation of the Allocation starts. The Allocation Maintenance window is closed.
-
The calculation will process in the calculation queue. Once complete you are notified through the notifications icon. When the calculation is complete, the notification icon
 on the Allocation task bar increments in number.
Note:
Notifications is an optional for the application. See Notifications in the Oracle Retail Allocation Do the Basics User Guide for more information. -
Click the notification icon
to display the recent notifications list. -
Click the link for the allocation you want to view. The calculation results are displayed.
Note:
-
After an allocation is calculated, you can Submit, Reserve, or Approve the allocation from the Workflow menu. If there is an item/source with a zero allocated quantity in the Review section of the Allocation Maintenance window, that item/source must be deleted before the Submit, Reserve, and Approve options appear on the workflow drop down.
-
You can change a Submitted, Reserved, or Approved allocation to Worksheet status by selecting the Withdraw option from the Workflow menu.
Note:
If the allocation includes franchise locations, when you change the status of an allocation to Reserved or Approved, a credit check is run for the franchise stores. If the franchise store fails the credit check, the allocation remains in its original status. If the franchise store passes the credit check, the status of the allocation is changed to Reserved or Approved.