4 Preventive Maintenance

This chapter describes preventive maintenance of the LSMS. Included are topics on backing up databases and file systems, monitoring hardware and network performance, and routine cleaning.

Introduction

This chapter describes preventive maintenance of the LSMS. Included are topics on backing up databases and file systems, monitoring hardware and network performance, and routine cleaning.

Use the system monitoring features regularly, especially during times of peak load, to verify that the system has adequate resources. This practice provides an insight into system resource utilization and provides early warning if the system capacity limits are being approached.

The procedures in this chapter assume that you are familiar with the LSMS hardware. For more information about the hardware, refer to Application B Card Hardware and Installation Guide.

Recommended Daily Monitoring

To properly maintain your LSMS system, it is recommended that you perform the activities described in this section on a daily basis.

Continuous Monitoring Activities

Perform the following activities continually:

  • Always keep at least one graphical user interface (GUI) open. Monitor the GUI especially for any red or yellow conditions, either on the NPAC and EMS status icons or in the notifications display area. For more information about the display areas of the GUI, refer to the Database Administrator's Guide. For information about notifications displayed in the notifications display area, see Automatic Monitoring of Events.

  • Monitor the latest Surveillance notifications in either or both of the following ways:

    • Connect a customer-provided administration console to Serial Port 3 of each server so that Surveillance notifications can be displayed there.

    • View the Surveillance log file, /var/TKLC/lsms/logs/survlog.log. To display the latest contents of this file, log in as any user and enter the following command:

      $ tail -f /var/TKLC/lsms/logs/survlog.log

      For more information about the Surveillance feature, see “Understanding the Surveillance Feature”.

Once a Day Monitoring Activities

It is recommended that once each day you perform the following:

Note:

Logs are maintained up to 20 MB for rejected logs and 500 MB for transaction logs. The old rotated logs get deleted automatically in a day and new logs start getting pegged in the newly created files.

Daily Examination of Logs for Abnormalities

Examine the following logs for any abnormalities once a day, preferably near the end of the day. In each of these logs, <MMDD> indicates the month and day. Each log is kept for seven days. For more information about these logs, refer to the Database Administrator's Guide. You can view the logs using the GUI or you can use any text editor.

  • Examine the following exception log files:

    • Run the chkfilter command and then examine /var/TKLC/lsms/logs/trace/LsmsSubNotFwd.log.<MMDD>. This log contains subscription versions (SVs) or number pool blocks (NPBs) that have been received from an NPAC but could not be forwarded to a network element because the LSMS has no EMS routing defined for the SVs or NPBs.

    • /var/TKLC/lsms/logs/<clli>/LsmsRejected.log.<MMDD>. This log contains transactions that the LSMS attempted to forward to a network element, but which were rejected by the network element.

  • Examine the following alarm logs to verify that you are aware of all alarms (these events will also have been reported in the GUI notifications display).

    • /var/TKLC/lsms/logs/alarm/LsmsAlarm.log.<MMDD>. This log contains events associated with the Local Data Manager, the Local Services Manager and regional NPAC agent processes.

  • Examine the following transaction logs for any abnormalities:

    • /var/TKLC/lsms/logs/<clli>/LsmsTrans.log.<MMDD> for each network element identified by <clli>. These logs contain all transactions forwarded to EMS agents, including information associated with M-Create, M-Set, and M-Delete operations initiated from the NPAC.

  • Examine the Surveillance log /var/TKLC/lsms/logs/survlog.log for any abnormalities. This log contains all surveillance notifications that have been posted.

Daily Determination of Success or Failure of Backup

Each day, check the backup log from the previous day on each server (as you can see from the timestamps in Figure 4-1 and Figure 4-2, backups generally begin a few minutes before midnight). Ensure that the backup logs contain text similar to that shown in the referenced figures. If you need help interpreting the logs, contact the unresolvable-reference.html#GUID-646F2C79-C167-4B5A-A8DF-7ED0EAA9AD66.

If you determine that the automatic backup(s) did not complete successfully, perform a manual backup right away.

LSMS Database Defragmentation

In releases of LSMS prior to 13.0, a database sort was sometimes required to keep the LSMS operating at maximum efficiency in terms of transactions per second (TPS). This was a manually-intensive operation that could be performed only by the Technical Assistance Center (TAC). LSMS 13.0 and later releases use the E5-APP-B platform, which has solid state drives (the old platform used disk drives) that by design do not require defragmentation. Oracle performed testing to validate that fragmentation will not be an issue on the E5-APP-B platform. However, if for some reason there is any indication of a need for database sorting, contact the unresolvable-reference.html#GUID-646F2C79-C167-4B5A-A8DF-7ED0EAA9AD66 so your system can be fully evaluated. If it is determined there is a need for database sorting, the Customer Care Center has access to MO006201 which defines this database sort procedure.

Using Backup Procedures

The most basic form of backup happens continuously and automatically, as the redundant LSMS servers contain duplicate hardware, and the standby server replicates the active server’s database.

However, if data becomes corrupted on the active server’s database, because data on the active server’s database is automatically replicated to the standby server, you must also follow more conventional backup procedures so that you can recover from a corrupted database. A database saved to file on the Network Attached Storage (NAS) device or copied from the disk to tape on the NAS and then stored off-site is a precaution against database corruption.

Understanding How the LSMS Backs Up File Systems and Databases

Each night at midnight, the LSMS automatically backs up the following to disk:

  • Platform configuration (for each server), stored as plat.xml
  • The entire LSMS database, stored as lsmsdb.xml
  • The entire LSMS logs filesystem, stored as lsmslogs.xml

When both servers are functioning, the automatic backup function backs up the database (lsmsdb.xml) and logs (lsmslogs.xml) from the standby server, and backs up only the platform configuration (plat.xml) from the active server.

If only one server is active, the automatic backup function backs up all the files shown in the bulleted list above from the active server.

In addition, you can perform the same backups manually at any time (see Backing Up the LSMS Manually).

Understanding the Backup Results

The result of each backup is posted to the log file on the server on which the backup was scheduled to take place.

  1. Log into the server as lsmsview.
  2. At the command line prompt, enter the following command to view the log:
    # more /var/TKLC/log/backup/backup.log
  3. Output:
    1. The example backup log for the standby server indicates that on Wednesday, December 7, an automatic backup was performed on the standby server.
      After completing the backup task for each respective backup type (platform, database, and logs), an entry was generated and stored in the backup log. If the backup was successful, output similar to the following displays:

      Figure 4-1 Example of Successful Backup Log for STANDBY Server


      img/t_understanding_the_backup_results_mm-fig1.jpg
      The example backup log for the active server indicates that on Wednesday, December 7, an automatic backup was also performed on the active server. After completing the backup task for the platform files, an entry was generated and stored in the backup log. If the backup was successful, output similar to the following displays:

      Figure 4-2 Example of Successful Backup Log for ACTIVE Server


      img/t_understanding_the_backup_results_mm-fig2.jpg
    2. If the backup was unsuccessful, output similar to the following displays:

      Figure 4-3 Example of Unsuccessful Backup Log for ACTIVE Server


      img/t_understanding_the_backup_results_mm-fig3.jpg

Backing Up the LSMS Manually

Before beginning a manual backup:

  • Read Understanding How the LSMS Backs Up File Systems and Databases.
  • Check the GUI notification information and surveillance logs for database errors before beginning the manual backup procedure to ensure that the LSMS is functioning correctly.
  • Check whether servdi is running before starting the manual backup. If servdi is running, wait for it to complete before running the manual backup.

Note:

Backups can also be performed via the platcfg menu. For more information, see Using Restore Procedures.

The following procedure explains how to start a backup manually. If a backup procedure fails, contact the unresolvable-reference.html#GUID-646F2C79-C167-4B5A-A8DF-7ED0EAA9AD66.

  1. Perform the procedure described in “Checking for Running Backups” to ensure that no other backup (automatic or manual) is already running.
  2. Ensure that none of the following processes are running.
    All of these processes use temporary file space on the LSMS. If you attempt to start a backup, you may run out of file space.
    • Starting a standby node (to change its state from UNINITIALIZED "INHIBITED" to STANDBY)
    • An import command
    • An lsmsdb quickaudit command
    • A query server snapshot (lsmsdb snapshot)
  3. Log into the active server as lsmsmgr.
    (For more information, see “Logging In to LSMS Server Command Line”.)
  4. View the backup log and ensure that the backup completed successfully.

    Note:

    The backup log shows only the active server’s backup results.
    For more information, see Daily Determination of Success or Failure of Backup.
  5. From the Main Menu on the active server, select Maintenance, and then Backup and Restore, and then Network Backup.
    The Select Backup Configuration Menu is displayed.

    Figure 4-4 Select Backup Configuration Menu

    img/t_backing_up_the_lsms_manually_mm-fig1-r13.jpg
    • plat.xml is provided by TPD and is used to back up all platform files (such as log, pkg, and rcs files) from LSMS to NAS.
    • plat-app.xml is provided by LSMS and is used to back up all platform files (such as log, pkg, and rcs files) from LSMS to NAS.
    • lsmsdb.xml is used to back up the LSMS database on NAS.
    • lsmslogs.xml is used to back up the LSMS logs on NAS.
    • Exit returns control to the Backup and Restore menu.

    Select plat.xml as shown.

  6. Press Enter and the Select Action Menu is displayed.

    Figure 4-5 Select Backup on Active Server

    img/t_backing_up_the_lsms_manually_mm-fig2.jpg
    • Advanced Options enables specification of backup host details, the archive directory, the repository, and other options. For example:
      Backup Host: backupserver
      Backup Host user: root
      Archive directory: /Volumes/LVstorage
      Repository: logs (automatically selected based on the type of backup selected previously)
      Depth: 5 (numerical value, use of 1-5 is suggested)
      Prune: (*)Yes or ()No
    • View Index Table of Contents lists the data to be backed up.
    • Test Backup performs a test backup.
    • Backup performs backup of LSMS data on NAS.
    • Exit returns control to the Backup and Restore menu.

    Select Backup as shown.

  7. When the backup is complete, press any key to continue.

    Figure 4-6 Backup Complete on Active Server

    img/t_backing_up_the_lsms_manually_mm-fig7.jpg
  8. Log into the standby server as lsmsmgr.
    (For information, see “Logging in from One Server to the Mate’s Command Line”.)

    Note:

    If the standby server is not functional, perform the rest of the procedures on the active server.
  9. Select plat.xml on the standby server, and press Enter.

    Figure 4-7 Select plat.xml on Standby Server

    img/t_backing_up_the_lsms_manually_mm-fig1-r13.jpg
  10. Select Backup.

    Figure 4-8 Select Backup on Standby Server

    img/t_backing_up_the_lsms_manually_mm-fig5.jpg

    Figure 4-9 Performing Backup Screen

    img/t_backing_up_the_lsms_manually_mm-fig6.jpg
  11. When the backup is complete, press any key to continue.

    Figure 4-10 Backup Complete on Standby Server

    img/t_backing_up_the_lsms_manually_mm-fig7.jpg
  12. Select lsmslogs.xml on the standby server, and press Enter.

    Figure 4-11 Select lsmslogs.xml on Standby Server

    img/t_backing_up_the_lsms_manually_mm-fig8.jpg
  13. Select Backup.

    Figure 4-12 Select Backup on Standby Server

    img/t_backing_up_the_lsms_manually_mm-fig9.jpg
  14. When the backup is complete, press any key to continue.

    Figure 4-13 Backup Complete on Standby Server

    img/t_backing_up_the_lsms_manually_mm-fig7.jpg
  15. Select lsmsdb.xml, and press Enter.

    Figure 4-14 Select lsmsdb.xml on Standby Server

    img/t_backing_up_the_lsms_manually_mm-fig12.jpg
  16. When the server has completed loading the Select Action Menu displays.

    Figure 4-15 Select Action Menu

    img/t_backing_up_the_lsms_manually_mm-fig14.jpg
  17. Select Backup, and press Enter.

    Figure 4-16 Backup

    img/t_backing_up_the_lsms_manually_mm-fig15.jpg
  18. When the backup completes, press any key to continue.

    Figure 4-17 Backup Complete

    img/t_backing_up_the_lsms_manually_mm-fig7.jpg
    You can now exit to the Main Menu, or choose another menu item.

Stopping an Automatic or Manual Backup

Under normal conditions, backups complete relatively quickly (in less than 45 minutes). However, if no backup has been previously performed or if the previous backup was stopped before it completed, the next backup can take up to 4 hours.

It is advisable to allow a backup to complete. However, if you accidentally start a backup or need to stop the backup process, use the following procedure. You must log into both the active and standby servers to stop a backup.

Note that a backup cannot restart at the point where it was aborted because various lock files are created to prevent conflicting backups. To restart a manual backup, start the procedure from the beginning. See “Backing Up the LSMS Manually” if you need help.

If you need to restore data from a previously recorded backup, contact the unresolvable-reference.html#GUID-646F2C79-C167-4B5A-A8DF-7ED0EAA9AD66.

  1. Log in as root on active server.
  2. To find the process ID of the processes involved in backing up the databases, enter the following command:
    # ps -ef | egrep "rsync|netbackup|lsmsbkp" | grep -v grep

    The output from the above command includes the process ID (PID), also referred to as the job number, for each process that has the characters rsync, netbackup, or lsmsbkp in its name. Note the first PID (shown inbold text in the following example) displayed on the line for each process.

    
    root      5673 32428  0 13:43 pts/0    00:00:00 /bin/sh 
    /usr/TKLC/lsms/tools/lsmsbkp
    root      5759  5673  4 13:43 pts/0    00:00:00 /usr/bin/perl -T 
    /usr/TKLC/plat/bin/netbackup 
    --config=/usr/TKLC/plat/etc/BackupTK/plat.xml
    root      5942  5759 25 13:43 pts/0    00:00:00 /usr/bin/rsync --archive 
    --delete --delete-excluded --relative --sparse --files-from=- 
    --rsh=/usr/bin/ssh / 
    root@backupserver-lsmssec:/Volumes/LVstorage/lsmssec/00-Oct21_13:43
    root      5943  5942 12 13:43 pts/0    00:00:00 /usr/bin/ssh -l root 
    backupserver-lsmssec rsync --server -logDtpRS --delete-excluded . 
    /Volumes/LVstorage/lsmssec/00-Oct21_13:43
    
  3. To stop the backup, enter the following command:
    # kill <jobnumber1> <jobnumber2> ...

    where <jobnumber1> is the PID of the first process to stop and <jobnumber2> is the PID of the second process to stop. Enter a job number for each line that displays in step 2. For the example output in step 2, enter the following command:

    kill 5673 5759 5942 5943

  4. Verify that all relevant processes have been stopped by entering the following command and ensuring that no output appears:
    # ps -ef | egrep "rsync|netbackup|lsmsbkp" | grep -v grep

    If no output appears, the backup has been stopped.

  5. Clean up any remaining lock files by entering the following command:
    # rm -f /TOC
  6. Repeat steps 1 through 5 on the standby server to stop that server’s backup.
  7. To clear up any lingering lock files on the NAS, enter the following command on either server:
    # ssh backupserver /etc/rc3.d/S99TKLCclearlocks start

    When the OK in the following output displays, all lock files on the NAS have been cleared.

    
    Clearing backup locks:[  OK  ]
    

Checking for Running Backups

Both database backups and query server snapshots use the same file space on the LSMS. If a backup is in process and a query server snapshot or another backup is started, the first backup process will terminate prematurely, and the next backup will take significantly longer to complete. Therefore, it is very important that you perform the following procedure to check for a running backup before starting a manual backup or creating a query server snapshot.

In addition, the following tasks all use temporary file space on the LSMS. If you attempt to run these processes simultaneously, you may run out of disk space. Since backups can be run automatically, it is recommended that you perform the following procedure before attempting any of these tasks to ensure that no database backups are running:

  • Starting a standby node (changing its state from UNINITIALIZED "INHIBITED" to STANDBY)
  • Running the import command
  • Running the lsmsdb quickaudit command.
  1. Log in as the lsmsadm or lsmsall user to the active server (for information about logging in, see “Logging In to LSMS Server Command Line”).
  2. Enter the following command to determine whether any database backups are running:
    $ ps -ef | grep netbackup
    • If output similar to the following displays (only grep netbackup displays after 00:00:00), no backup is running, and you may continue with the procedure you were performing:
      
      lsmsadm   6826  6312  0 16:58 pts/12   00:00:00 grep netbackup
      
    • If output similar to the following displays (with one or more processes after 00:00:00), a backup is running. DO NOT proceed with the procedure that you are performing. (This output displays all on one line although it does not fit on one line in this manual.)
      
      lsmsadm 25742 25596  0 11:20 ?        00:00:00 /usr/bin/perl -T /usr/TKLC/plat/bin/netbackup --config=/usr/TKLC/plat/etc/BackupTK/lsmsdb.xml
      

      Caution:

      While a backup is in progress, do not attempt to start a standby node (change its state from UNINITIALIZED "INHIBITED" to STANDBY), run the import command, run the lsmsdb quickaudit command, create a query server snapshot, or start another backup. All of these tasks use temporary file space. If you attempt to start one of these processes, you may run out of disk space.
    Before restarting or attempting to proceed with the procedure you were performing, run the command in this step again.

Using Restore Procedures

The platcfg utility provides for network backup and restore operations. From the Main Menu, selecting Backup and Restore displays the Backup and Restore menu as shown.

Figure 4-18 Backup and Restore Menu

img/c_using_restore_procedures_mm_fig1.jpg
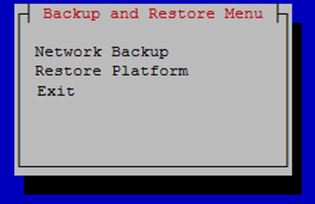
  • Network Backup works in the same way as it does for lsmsmgr. For more information, see Backing Up the LSMS Manually.
  • Restore Platform enables restoration of data from NAS to LSMS.

Selecting Restore Platform transfers control to the Restore Backup Menu as shown.

Figure 4-19 Restore Backup Menu

img/c_using_restore_procedures_mm_fig2.jpg
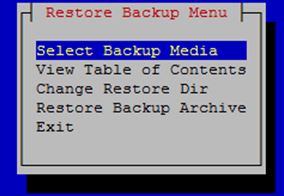
  • Select Backup Media enables selection of the backup archive to be restored from NAS to LSMS.
  • View Table of Contents displays the contents of the selected backup archive. If no backup archive is selected, a message is displayed indicating that you must select the media first.
  • Change Restore Dir is used to indicate the restore directory to which the archive will be restored.
  • Restore Backup Archive restores the selected archive from NAS to LSMS. If no backup archive is selected, a message is displayed indicating that you must select the media first.

To restore the data from NAS when the servers are in active/standby state, follow these steps:

  1. On the standby server, open the lsmsmgr menu using the following command:
    su - lsmsmgr
  2. Select Maintenance, and then Stop Node.
  3. Repeat steps 1 and 2 on the active server.
  4. Start restore from NAS on the active server from the platcfg menu (Backup and Restore, and then Restore Platform).
  5. After restore, issue the following command on both the A and B servers:
    rm -rf /var/TKLC/lsms/db/auto.cnf
  6. On the active server, open the lsmsmgr menu using the following command:
    su - lsmsmgr
  7. Select Maintenance, and then Start Node.
  8. Repeat steps 6 and 7 on the standby server.

Additional Tools for Monitoring the LSMS Hardware and the Network

LSMS provides various tools that you can use to monitor the LSMS hardware and the network. Monitoring can help you prevent and diagnose errors.

Use the system monitoring features regularly, especially during times of peak load, to verify that the system has adequate resources. This practice provides an insight into system resource utilization and provides early warning if the system capacity limits are being approached.

Verifying Active Server Network Interfaces and NPAC Connections

Use one or more of the following methods to verify network connectivity:

  • The ifconfig command
  • The traceroute utility to verify network connectivity and routing between hosts
  • The LSMS graphical user interface (GUI) to determine connectivity to NPACs
Using the ifconfig Command

Use the ifconfig -a command on the target host to verify that ports are in the UP state.

  1. Log in as root on the active server.
  2. Enter the following command to test the interfaces:
    # ifconfig -a

    Verify the output. The successful completion is indicated by the word UP in the output, which is highlighted in bold in Figure 4-20 and Figure 4-21. A failure is indicated by the absence of the word UP in the output.

    Figure 4-20 Single Subnet Configuration

    
    bond0     Link encap:Ethernet  HWaddr 00:00:17:0F:2D:06
              inet addr:192.168.1.1  Bcast:192.168.1.255  Mask:255.255.255.0
              inet6 addr: fe80::200:17ff:fe0f:2d06/64 Scope:Link
              UP BROADCAST RUNNING MASTER MULTICAST  MTU:1500  Metric:1
              RX packets:13234317 errors:0 dropped:0 overruns:0 frame:0
              TX packets:49892404 errors:0 dropped:0 overruns:0 carrier:0
              collisions:0 txqueuelen:0
              RX bytes:930274679 (887.1 MiB)  TX bytes:2323295112 (2.1 GiB)
    
    bond0.2   Link encap:Ethernet  HWaddr 00:00:17:0F:2D:06
              inet addr:192.168.2.1  Bcast:192.168.2.255  Mask:255.255.255.0
              inet6 addr: fe80::200:17ff:fe0f:2d06/64 Scope:Link
              UP BROADCAST RUNNING MASTER MULTICAST  MTU:1500  Metric:1
              RX packets:42010 errors:0 dropped:0 overruns:0 frame:0
              TX packets:43401 errors:0 dropped:0 overruns:0 carrier:0
              collisions:0 txqueuelen:0
              RX bytes:8261939 (7.8 MiB)  TX bytes:9152913 (8.7 MiB)
    
    eth0      Link encap:Ethernet  HWaddr 00:00:17:0F:2D:04
              inet addr:192.168.60.11  Bcast:192.168.60.255  Mask:255.255.255.0
              inet6 addr: fd0d:deba:d97c:a0:200:17ff:fe0f:2d04/64 Scope:Global
              inet6 addr: fe80::200:17ff:fe0f:2d04/64 Scope:Link
              UP BROADCAST RUNNING MULTICAST  MTU:1500  Metric:1
              RX packets:85601 errors:0 dropped:0 overruns:0 frame:0
              TX packets:145415 errors:0 dropped:0 overruns:0 carrier:0
              collisions:0 txqueuelen:1000
              RX bytes:18515983 (17.6 MiB)  TX bytes:27768794 (26.4 MiB)
    
    eth1      Link encap:Ethernet  HWaddr 00:00:17:0F:2D:05
              inet addr:192.168.3.1  Bcast:192.168.3.255  Mask:255.255.255.0
              inet6 addr: fe80::200:17ff:fe0f:2d05/64 Scope:Link
              UP BROADCAST RUNNING MULTICAST  MTU:1500  Metric:1
              RX packets:1851 errors:0 dropped:0 overruns:0 frame:0
              TX packets:1867 errors:0 dropped:0 overruns:0 carrier:0
              collisions:0 txqueuelen:1000
              RX bytes:144660 (141.2 KiB)  TX bytes:124694 (121.7 KiB)
    
    eth2      Link encap:Ethernet  HWaddr 00:00:17:0F:2D:06
              UP BROADCAST RUNNING SLAVE MULTICAST  MTU:1500  Metric:1
              RX packets:13234314 errors:0 dropped:0 overruns:0 frame:0
              TX packets:49892392 errors:0 dropped:0 overruns:0 carrier:0
              collisions:0 txqueuelen:1000
              RX bytes:930274503 (887.1 MiB)  TX bytes:2323294344 (2.1 GiB)
    
    eth3      Link encap:Ethernet  HWaddr 00:00:17:0F:2D:06
              UP BROADCAST RUNNING SLAVE MULTICAST  MTU:1500  Metric:1
              RX packets:3 errors:0 dropped:0 overruns:0 frame:0
              TX packets:12 errors:0 dropped:0 overruns:0 carrier:0
              collisions:0 txqueuelen:1000
              RX bytes:176 (176.0 b)  TX bytes:768 (768.0 b)
    
    lo        Link encap:Local Loopback
              inet addr:127.0.0.1  Mask:255.0.0.0
              inet6 addr: ::1/128 Scope:Host
              UP LOOPBACK RUNNING  MTU:16436  Metric:1
              RX packets:1658459 errors:0 dropped:0 overruns:0 frame:0
              TX packets:1658459 errors:0 dropped:0 overruns:0 carrier:0
              collisions:0 txqueuelen:0
              RX bytes:126522800 (120.6 MiB)  TX bytes:126522800 (120.6 MiB)


    Figure 4-21 Segmented Network Configuration

    bond0     Link encap:Ethernet  HWaddr 00:00:17:0F:2F:12
              inet addr:192.168.1.1  Bcast:192.168.1.255  Mask:255.255.255.0
              inet6 addr: fe80::200:17ff:fe0f:2f12/64 Scope:Link
              UP BROADCAST RUNNING MASTER MULTICAST  MTU:1500  Metric:1
              RX packets:13242602 errors:0 dropped:0 overruns:0 frame:0
              TX packets:50173237 errors:0 dropped:0 overruns:0 carrier:0
              collisions:0 txqueuelen:0
              RX bytes:972152478 (927.1 MiB)  TX bytes:2368284409 (2.2 GiB)
    
    bond0.2   Link encap:Ethernet  HWaddr 00:00:17:0F:2F:12
              inet addr:192.168.2.1  Bcast:192.168.2.255  Mask:255.255.255.0
              inet6 addr: fe80::200:17ff:fe0f:2f12/64 Scope:Link
              UP BROADCAST RUNNING MASTER MULTICAST  MTU:1500  Metric:1
              RX packets:90623 errors:0 dropped:0 overruns:0 frame:0
              TX packets:97130 errors:0 dropped:0 overruns:0 carrier:0
              collisions:0 txqueuelen:0
              RX bytes:17963083 (17.1 MiB)  TX bytes:20655848 (19.6 MiB)
    
    bond1     Link encap:Ethernet  HWaddr 00:00:00:00:00:00
              BROADCAST MASTER MULTICAST  MTU:1500  Metric:1
              RX packets:0 errors:0 dropped:0 overruns:0 frame:0
              TX packets:0 errors:0 dropped:0 overruns:0 carrier:0
              collisions:0 txqueuelen:0
              RX bytes:0 (0.0 b)  TX bytes:0 (0.0 b)
    
    bond2     Link encap:Ethernet  HWaddr 00:00:00:00:00:00
              BROADCAST MASTER MULTICAST  MTU:1500  Metric:1
              RX packets:0 errors:0 dropped:0 overruns:0 frame:0
              TX packets:0 errors:0 dropped:0 overruns:0 carrier:0
              collisions:0 txqueuelen:0
              RX bytes:0 (0.0 b)  TX bytes:0 (0.0 b)
    
    bond3     Link encap:Ethernet  HWaddr 00:00:00:00:00:00
              BROADCAST MASTER MULTICAST  MTU:1500  Metric:1
              RX packets:0 errors:0 dropped:0 overruns:0 frame:0
              TX packets:0 errors:0 dropped:0 overruns:0 carrier:0
              collisions:0 txqueuelen:0
              RX bytes:0 (0.0 b)  TX bytes:0 (0.0 b)
    
    eth0      Link encap:Ethernet  HWaddr 00:00:17:0F:2F:10
              inet addr:192.168.60.14  Bcast:192.168.60.255  Mask:255.255.255.0
              inet6 addr: fd0d:deba:d97c:a0:200:17ff:fe0f:2f10/64 Scope:Global
              inet6 addr: 2606:b400:605:b80c:200:17ff:fe0f:2f10/64 Scope:Global
              inet6 addr: fe80::200:17ff:fe0f:2f10/64 Scope:Link
              UP BROADCAST RUNNING MULTICAST  MTU:1500  Metric:1
              RX packets:13981300 errors:0 dropped:0 overruns:0 frame:0
              TX packets:78201 errors:0 dropped:0 overruns:0 carrier:0
              collisions:0 txqueuelen:1000
              RX bytes:3815515378 (3.5 GiB)  TX bytes:7623582 (7.2 MiB)
    
    eth1      Link encap:Ethernet  HWaddr 00:00:17:0F:2F:11
              inet addr:192.168.3.1  Bcast:192.168.3.255  Mask:255.255.255.0
              inet6 addr: fe80::200:17ff:fe0f:2f11/64 Scope:Link
              UP BROADCAST RUNNING MULTICAST  MTU:1500  Metric:1
              RX packets:559584 errors:0 dropped:0 overruns:0 frame:0
              TX packets:1805629 errors:0 dropped:0 overruns:0 carrier:0
              collisions:0 txqueuelen:1000
              RX bytes:42998514 (41.0 MiB)  TX bytes:860763886 (820.8 MiB)
    
    eth1.<vlan ID 1>  Link encap:Ethernet  HWaddr 00:00:17:0F:2F:11
              inet addr:192.168.59.18  Bcast:192.168.59.255  Mask:255.255.255.0
              inet6 addr: 2606:b400:605:b80a:200:17ff:fe0f:2f11/64 Scope:Global
              inet6 addr: fe80::200:17ff:fe0f:2f11/64 Scope:Link
              UP BROADCAST RUNNING MULTICAST  MTU:1500  Metric:1
              RX packets:47462 errors:0 dropped:0 overruns:0 frame:0
              TX packets:3341 errors:0 dropped:0 overruns:0 carrier:0
              collisions:0 txqueuelen:0
              RX bytes:2481722 (2.3 MiB)  TX bytes:272370 (265.9 KiB)
    
    eth1.<vlan ID 2>  Link encap:Ethernet  HWaddr 00:00:17:0F:2F:11
              inet addr:192.168.61.53  Bcast:192.168.61.255  Mask:255.255.255.0
              inet6 addr: 2606:b400:605:b80b:200:17ff:fe0f:2f11/64 Scope:Global
              inet6 addr: fe80::200:17ff:fe0f:2f11/64 Scope:Link
              UP BROADCAST RUNNING MULTICAST  MTU:1500  Metric:1
              RX packets:502309 errors:0 dropped:0 overruns:0 frame:0
              TX packets:1328746 errors:0 dropped:0 overruns:0 carrier:0
              collisions:0 txqueuelen:0
              RX bytes:31914086 (30.4 MiB)  TX bytes:813991760 (776.2 MiB)
    
    eth2      Link encap:Ethernet  HWaddr 00:00:17:0F:2F:12
              UP BROADCAST RUNNING SLAVE MULTICAST  MTU:1500  Metric:1
              RX packets:13242602 errors:0 dropped:0 overruns:0 frame:0
              TX packets:50173237 errors:0 dropped:0 overruns:0 carrier:0
              collisions:0 txqueuelen:1000
              RX bytes:972152478 (927.1 MiB)  TX bytes:2368284409 (2.2 GiB)
    
    eth3      Link encap:Ethernet  HWaddr 00:00:17:0F:2F:12
              UP BROADCAST RUNNING SLAVE MULTICAST  MTU:1500  Metric:1
              RX packets:0 errors:0 dropped:0 overruns:0 frame:0
              TX packets:0 errors:0 dropped:0 overruns:0 carrier:0
              collisions:0 txqueuelen:1000
              RX bytes:0 (0.0 b)  TX bytes:0 (0.0 b)
    
    lo        Link encap:Local Loopback
              inet addr:127.0.0.1  Mask:255.0.0.0
              inet6 addr: ::1/128 Scope:Host
              UP LOOPBACK RUNNING  MTU:16436  Metric:1
              RX packets:1223316 errors:0 dropped:0 overruns:0 frame:0
              TX packets:1223316 errors:0 dropped:0 overruns:0 carrier:0
              collisions:0 txqueuelen:0
              RX bytes:92431234 (88.1 MiB)  TX bytes:92431234 (88.1 MiB)
    
    sit0      Link encap:IPv6-in-IPv4
              NOARP  MTU:1480  Metric:1
              RX packets:0 errors:0 dropped:0 overruns:0 frame:0
              TX packets:0 errors:0 dropped:0 overruns:0 carrier:0
              collisions:0 txqueuelen:0
              RX bytes:0 (0.0 b)  TX bytes:0 (0.0 b)
Using the traceroute Utility

The traceroute utility determines the path between the host where the utility is run and the remote host named by the utility’s input parameter. The utility also reports the latency of each hop along the route.

Note:

If the network between the hosts contains firewalls, this utility may fail unless the firewalls are properly set up. Setting up firewalls is the responsibility of the customer.

Use the following procedure to run the traceroute utility:

  1. Log in as the lsmsmgr user on the server from which you want to test the route.
  2. From the lsmsmgr interface, select Diagnostics, and then Network Diagnostics, and then Traceroute.

    Figure 4-22 TraceRoute


    img/t_using_the_traceroute_utility_mm-fig1-r13.jpg
  3. Ensure the cursor is placed in the Hostname/IP Address field, and type the IP address of the system to which you wish to trace the route, then use the down arrow key to highlight the OK button, and press Enter.
    The results display in a window similar to the following.

    Figure 4-23 TraceRoute Results


    img/t_using_the_traceroute_utility_mm-fig2-r13.jpg
  4. The output depends on how many hops exist between the server you logged into and the IP address you entered.
    To interpret output similar to the following example, see Table 4-1.
    
    traceroute to 198.89.34.19 (198.89.34.19), 30 hops max, 40 byte packets
     1  192.168.51.250 (192.168.51.250)  2 ms  2 ms  2 ms
     2  198.89.39.250 (198.89.39.250)  3 ms  4 ms  1 ms
     3  198.89.34.19 (198.89.34.19)  5 ms *  4 ms
    

    Table 4-1 Interpreting traceroute Output

    Line Number Meaning

    1

    Indicates the IP address of the interface from which the traceroute packets left the originating host

    2

    Indicates the IP address of the router that routed the traceroute packets

    3

    Indicates the IP address of the remote host. The * shown in this line indicates that there was packet loss connecting to this computer.

Managing Automatic File Transfers

The LSMS generates many logs, measurements, and data files on a regular basis. These files are maintained on the LSMS for seven days. Customers can use the data in these files for traffic pattern analysis, identification of various network events, and investigation of problems.

The optional Automatic File Transfer feature enables customers to set up an automatic method of transferring selected files to specified remote sites at a specified frequency. Using this feature can reduce costs and also the chance of user error that could result in missed transfers of required data.

Whenever an error occurs during an automatic file transfer, an entry is made in the file aft.log.<MMDD> in the directory /var/TKLC/lsms/logs/aft (where <MMDD> is the month and day when the error occurred).

Use the autoxfercfg command, as described in the following subsections, to set up and manage automatic file transfers. To initially set up an automatic transfer of files, perform in the order shown below, the procedures in the following sections:

  1. “Adding a New Remote Location for Automatic File Transfers”

  2. “Scheduling an Automatic File Transfer”

In addition, you can use the autoxfercfg command to perform the following functions:

Displaying Remote Locations Used for Automatic File Transfers

To display all remote locations that have been previously added using this feature, perform the following procedure.

  1. Log in to the active server as lsmsadm.
  2. Enter the following command (for more information about the format of this command, see “autoxfercfg”):
    $ $LSMS_DIR/autoxfercfg
  3. The following menu is displayed:
    
    Select one of the following menu options:
    1) Display valid remote locations
    2) Add new remote location
    3) Remove remote location
    4) Display all scheduled transfers
    5) Add new scheduled transfer
    6) Remove scheduled transfer
    7) Exit
    
  4. Enter 1.
    Output similar to the following displays:
    
    Valid remote machine names:
    1. lnp3
    2. ftp.lnp25
    <hit any key to continue>
    
  5. After you have pressed any key, the output displayed in step 3 is displayed again.
    If you desire to perform other functions, enter a number and follow the procedure described in one of the other sections that describe this feature. For a list of the sections, Managing Automatic File Transfers.
  6. If you do not need to perform any other function, type 7.

Adding a New Remote Location for Automatic File Transfers

To add a new remote location for files to be automatically transferred to, perform the following procedure.

  1. Log in to the active server as lsmsadm.
  2. Enter the following command (for more information about the format of this command, see “autoxfercfg”):
    $ $LSMS_DIR/autoxfercfg
  3. The following menu is displayed:
    
    Select one of the following menu options:
    1) Display valid remote locations
    2) Add new remote location
    3) Remove remote location
    4) Display all scheduled transfers
    5) Add new scheduled transfer
    6) Remove scheduled transfer
    7) Exit
    
  4. Enter 2.
    Output similar to the following displays:
    
    Enter remote machine name: 
    Enter user name: 
    Enter password: ............
    Verify password: ............
    
  5. Type the desired values in all four fields, and then press Return.
    For example, type the following values shown in bold and press Return. (The passwords do not display as you type them; they are shown here to demonstrate that you must enter the same value twice.)
    
    Enter remote machine name:  ftp.oracle.com
    Enter user name:  anonymous
    Enter password:  xy1524wp
    Verify password:  xy1524wp
    
    The following output displays:
    
    Site configured. ** Make sure the host is reachable from this system **
    <hit any key to continue>
    
  6. After you have pressed any key, the output displayed in step 3 is displayed again.
    If you desire to perform other functions, enter a number and follow the procedure described in one of the other sections that describe this feature. For a list of the sections, Managing Automatic File Transfers.
  7. If you do not need to perform any other function, type 7.

Deleting a Remote Location for Automatic File Transfers

To delete a remote locations that has been previously added using this feature, perform the following procedure.

  1. Log in to the active server as lsmsadm.
  2. Enter the following command (for more information about the format of this command, see autoxfercfg):
    $ $LSMS_DIR/autoxfercfg

    The following menu is displayed:

    
    Select one of the following menu options:
    1) Display valid remote locations
    2) Add new remote location
    3) Remove remote location
    4) Display all scheduled transfers
    5) Add new scheduled transfer
    6) Remove scheduled transfer
    7) Exit
    
  3. Enter 3.
    Output similar to the following displays:
    
    Enter remote machine name:
    
  4. Type the name of the location you wish to delete and press Return.
    For example:
    
    Enter remote machine name:  ftp.oracle.com
    
    The following output displays:
    
    Verify: remove ftp.oracle.com (y/n)?
    
  5. Enter y to verify that the site shown is the remote site you wish to delete.
    The following output displays:
    
    Site removed.
    <hit any key to continue>
    
  6. After you have pressed any key, the output displayed in step 3 is displayed again.
    If you desire to perform other functions, enter a number and follow the procedure described in one of the other sections that describe this feature. For a list of the sections, Managing Automatic File Transfers.
  7. If you do not need to perform any other function, type 7.

Displaying Previously Scheduled Automatic File Transfers

To display all automatic transfers that have been previously set up using this feature, perform the following procedure.

Note:

Any file transfers that have been set up to be performed one time only are not displayed.
  1. Log in to the active server as lsmsadm.
  2. Enter the following command (for more information about the format of this command, see “autoxfercfg”):
    $ $LSMS_DIR/autoxfercfg

    The following menu is displayed:

    
    Select one of the following menu options:
    1) Display valid remote locations
    2) Add new remote location
    3) Remove remote location
    4) Display all scheduled transfers
    5) Add new scheduled transfer
    6) Remove scheduled transfer
    7) Exit
    
  3. Enter 4.
    Output similar to the following displays:
    
    Scheduled transfers:
      # SMTWHFS HHMM Filespec                                    Remote
    001  *      0200 /var/TKLC/lsms/logs/Midwest/Lsms
    *        ftp.lnp25:/tmp
    002 ******* 0230 /var/TKLC/lsms/logs/survlog.log            lnp3:/common/logs
    <hit any key to continue>
    
    This display shows that all files with filenames that start with Lsms in the directory /var/TKLC/lsms/logs/Midwest are transferred to ftp.lnp25:/tmp at 2 a.m. every Monday, and that the file survlog.log in the /var/TKLC/lsms/logs directory is transferred to lnp3:/common/logs every night at 2:30 a.m.
  4. After you have pressed any key, the output displayed in step 3 is displayed again.
    If you desire to perform other functions, enter a number and follow the procedure described in one of the other sections that describe this feature. For a list of the sections, Managing Automatic File Transfers.
  5. If you do not need to perform any other function, type 7.

Scheduling an Automatic File Transfer

To set up files to be transferred automatically, perform the following procedure. It is recommended that you schedule transfers according to the following guidelines:

  • Choose an off-peak time, such as very early in the morning.
  • Avoid planning transfers that would result in the same file being transferred more than once. For example, because LSMS application logs are maintained on the LSMS for seven days, they only need to be scheduled for a weekly transfer. If you schedule a daily transfer for logs of that type, the same file will be transferred each day for seven days. For this reason the display described in “Displaying Previously Scheduled Automatic File Transfers” shows that the files with filenames that start with Lsms in the /var/TKLC/lsms/logs/Midwest directory are transferred only on Mondays.

Transferring large numbers of files does not impact the processing performance of the LSMS, but it can impact network performance, especially networks that use the single-subnet design. (For more information about network design, refer to the LSMS Configuration Manual.). This feature is designed for insignificant network degradation for up to 10 configured remote locations with up to 600 transferred files.

  1. Log in to the active server as lsmsadm.
  2. Enter the following command (for more information about the format of this command, see “autoxfercfg”):
    $LSMS_DIR/autoxfercfg

    The following menu is displayed:

    
    Select one of the following menu options:
    1) Display valid remote locations
    2) Add new remote location
    3) Remove remote location
    4) Display all scheduled transfers
    5) Add new scheduled transfer
    6) Remove scheduled transfer
    7) Exit
    
  3. Enter 5.
    Output similar to the following displays:
    
    Enter filespec:
    Enter remote machine name: 
    Enter remote directory: 
    Enter FTP port [21]: 
    Enter transfer time (HHMM): 
    Run (O)nce, (D)aily, (W)eekly: 
    Enter day of the week: (SU,MO,TU,WE,TH,FR,SA):
    
  4. Type the desired values in all four fields, and then press Return.
    For the time, use the twenty-four hour notation, where 11 p.m is represented as 2300. To specify multiple files, you can use a wildcard character (*) in file names. For example, to set up a weekly transfer of the file haEvents.err in the /var/TKLC/lsms/logs directory every Tuesday morning at 1:30 a.m, type the following values, as shown in bold, and press Return:
    
    Enter filespec:  /var/TKLC/lsms/logs/haEvents.err
    Enter remote machine name:  lnp3
    Enter remote directory:  /common/logs
    Enter FTP port [21]:  80
    Enter transfer time (HHMM):  0130
    Run (O)nce, (D)aily, (W)eekly:  W
    Enter day of the week: (SU,MO,TU,WE,TH,FR,SA):  TU
    
    Output similar to the following displays to verify your input. If the display agrees with your input, type y, as shown in bold, and press Return:
    
    SMTWHFS HHMM Filespec                                       Remote
      *     0230 /var/TKLC/lsms/logs/haEvents.err        lnp3:/common/logs
    Is this correct (y/n)?  y
    
    The following output displays:
    
    Automatic transfer successfully scheduled.
    <hit any key to continue>
    
  5. After you have pressed any key, the output displayed in step 3 is displayed again.
    If you desire to perform other functions, enter a number and follow the procedure described in one of the other sections that describe this feature. For a list of the sections, Managing Automatic File Transfers.
  6. If you do not need to perform any other function, type 7.

Removing a Scheduled Automatic File Transfer

To remove an automatic transfer that has been previously set up using this feature, perform the following procedure.

Note:

Any file transfers that have been set up to be performed one time only cannot be removed.
  1. Log in to the active server as lsmsadm.
  2. Enter the following command (for more information about the format of this command, see “autoxfercfg”):
    $LSMS_DIR/autoxfercfg

    The following menu is displayed:

    
    Select one of the following menu options:
    1) Display valid remote locations
    2) Add new remote location
    3) Remove remote location
    4) Display all scheduled transfers
    5) Add new scheduled transfer
    6) Remove scheduled transfer
    7) Exit
    
  3. Enter 6.
    Output similar to the following displays to show all currently scheduled transfers. Enter the number of the transfer that you want to remove (in this example, the first transfer is to be removed. as shown by 1, in bold), or enter 0 to quit:
    
    Scheduled transfers:
      # SMTWHFS HHMM Filespec                                Remote
    001  *      0200 /var/TKLC/lsms
    /
    logs/Midwest/Lsms*     ftp.lnp25:/tmp
    002 ******* 0230 /var/TKLC/lsms/logs/survlog.log        lnp3:/common/logs
    Remove transfer # (0-3, 0=quit):  1
    
  4. The following output displays.
    
    Scheduled transfer successfully removed.
    <hit any key to continue>
    
  5. After you have pressed any key, the output displayed in step 3 is displayed again.
    If you desire to perform other functions, enter a number and follow the procedure described in one of the other sections that describe this feature. For a list of the sections, Managing Automatic File Transfers.
  6. If you do not need to perform any other function, type 7.