4Defining an Event
Defining an Event
Siebel Events Management helps you create and enter information that defines the scope, activities, and budget of an event. Defining an event is the first of four phases in the event management process. Because requirements and task sequences can differ from event to event, the organization of Events Management screens may not exactly match the sequence or organization of tasks for your particular event.
This chapter includes the following topics:
Event Management Process Phases
The event management process has four primary phases:
Definition
Preparation
Implementation
Evaluation
Siebel Events Management can help you define, prepare, implement, and evaluate events.
Depending on the size and complexity of your event, you may be tracking large amounts of information, including the status of many tasks. To simplify the process of learning to use Events Management, this guide discusses the four phases and provides instructions for business tasks that are typical of each phase. However, if your event is large and complex, you may find that the phases actually overlap, or you may find that changing circumstances occasionally require you to redo a previously completed task.
Event Plan Definition
The definition phase typically includes the following business tasks:
Defining the purpose of the event. Decide what do you want the event to accomplish.
Defining the type of event. Decide if the event will be a seminar, a conference, a roadshow, or another type of event.
Defining the scope of the event. Estimate approximately how many people will attend and for how long. Identify what types of people will attend.
Determining the nature and the logistics of the event. Determine if the event will require specific timing, a specific location, or a venue.
Creating an action plan. Identify what activities are required to conduct a successful event.
Creating a budget for the event. Identify the budget categories and the anticipated costs associated are with each category.
Event Preparation
When you know the approximate nature and purpose of your event, your intended audience, and any constraints on timing and location, you are ready to begin preparing for the event. This phase typically includes the following business tasks:
Activity management tasks. These tasks include:
Assigning event preparation and implementation tasks to employees, vendors, or other event staff
Tracking progress of event preparation activities
Designating the event staff and speakers
Information preparation tasks. These tasks include:
Refining and organizing the information that will be presented at the event
Researching and choosing one or more speakers for the event
Tracking and managing speaker availability for the event
Preparing information for Web site publication
Preparing collateral to be distributed at the event
Site preparation tasks. These tasks include:
Researching and choosing a venue for the event
Arranging for any needed facilities and equipment within the venue
Doing the required physical setup of the event site prior to beginning the event
Financial tasks. These tasks include:
Forming partner relationships to improve event quality or defray expenses
Tracking expenditures and revenues in relation to the event budget
Other tasks. These tasks include:
Researching and choosing vendors for the event
Inviting prospective event attendees
Registering attendees in advance
Preparing status reports concerning preparations for the event
Event Implementation
When you open the event to the first registrant, you have moved from the preparation phase into the implementation phase of the event. This phase typically includes the following business tasks:
Registering walk-in attendees at the event site. Register walk-in attendees using administration screens, or let attendees self-register using the Web site (recommended).
Completing last-minute preparation tasks. Complete last-minute tasks, such as recording the billing parameters the vendor will use, recording any discounts or special rates you negotiate, and storing file attachments for the event.
Coordinating with venue personnel. Coordinate with venue personnel to address any facilities issues that arise during the event.
Coordinating with vendor personnel. Coordinate with vendor personnel to make sure that they deliver contracted goods and services on time, in good condition, and at the correct locations within the venue.
Coordinating with partner organizations. Coordinate with partner organizations to make sure that they meet their obligations for the event.
Event Evaluation
After the event has taken place, you will want to evaluate the event. This phase typically includes the following business tasks:
Preparing reports. Create reports on attendance, opportunities generated, and so on for senior management.
Preparing reviews of the venues and vendors. Review the venues and vendors used for the event to determine if they should be considered for future events and the reasons why or why not.
Following up on new business opportunities. Follow up with the contacts that were generated during the event.
Note: You can analyze a contact’s attendance frequency to target future events and determine areas of interest by navigating to the Contacts screen and choosing the Consumer list link, then review the Consumers Activities. For more information, see Siebel Applications Administration Guide.
Business Scenarios for Defining an Event
These scenarios provide examples of process flows performed by Siebel application administrators and event planners. Your company may follow different process flows according to its business requirements.
Administrator Event Definition Scenario
This scenario provides an example of a process flow performed by application administrators. In this scenario, an administrator works for a company holding a user week conference for a software product used by astronomers. In order for event planners and team members to efficiently manage the event, the administrator needs to set up Siebel Events Management for the particular informational needs of the event. Also, because Siebel Pricer has been purchased along with Siebel Events Management, the administrator needs to set up Events Management and Siebel Pricer to work together.
Using lists of values (LOVs), the administrator determines the available fields and selections that allow the event planner and team members to enter and manage the specific information required for this event. For example, the event planner may need to add a planetarium—which is not typically an available selection—as a room type for a session on a college campus. To make this possible, the administrator reviews and modifies the LOVs that populates the static picklist for the room type.
Finally, the administrator performs other procedures that speed data entry by event planners and team members. These procedures include adding and updating account data, entering contact data, and adding venues.
End-User Event Definition Scenario
This scenario provides an example of a process flow performed by end users. In this scenario, the end user is an event planner who, like the administrator described in Administrator Event Definition Scenario, works for a company holding a user week conference for a software product used by astronomers.
The event planner uses Siebel Events Management to define the event by entering information about the event, such as its name, whether it is a conference or seminar, timing, location, and so on. Typically, the event planner waits until the administrator has defined all of the fields and selections necessary before entering this information. In such cases, the event planner provides the administrator with enough information to define the event fields. However, due to the unusual topic of this event, the event planner decides to work in tandem with the administrator to define the fields and enter the event information.
Events often involve featured topics or themes, such as climate change, water pollution, and the ozone layer. In Siebel Events Management, these are called tracks. Therefore, as part of event definition, the event planner can add any such event tracks as necessary. To add additional continuity to the event plan, the event planner can also associate related events.
Next, the event planner creates a budget for the event by entering estimated revenues and expenses, such as advertising revenues and catering expenses.
Lastly, the event planner creates several activity templates, each of which can be used to associate a set activities, or action items, with the event.
Example Process Flow for Defining an Event
The following image shows the recommended event definition tasks to be performed by administrators and end users in Siebel Events Management.
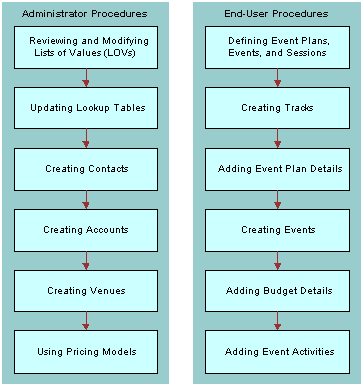
Administrator procedures for defining an event include the following:
Reviewing and Modifying LOVs
Updating Lookup Tables
Creating Contacts
Creating Accounts
Creating Venues
Using Price Models
End-User procedures for defining an event include the following:
Defining Events Plans, Events, and Sessions
Creating Tracks
Adding Event Plan Details
Creating Events
Adding Budget Details
Adding Event Activities
Administrator Setup Procedures for Defining an Event
This section discusses the following topics and procedures:
Siebel Events Management contains fields that depend upon LOVs, existing Accounts, existing Tables or Contacts data. As an administrator, you can use procedures described in this section to set up and autopopulate many LOVs and tables before the first event is added to the database. By first defining and autopopulating LOVs and tables, entering event information proceeds more efficiently. Also, you may want to verify that businesses and people with whom you interact when planning and hosting events are added as Accounts and Contacts before you set up events. The sections that follow contain information about reviewing and modifying these items.
Reviewing and Modifying Lists of Values (LOVs)
Before you enter information about an event, you may want to review the existing LOVs to determine whether the values meet the needs of your company and then add or modify LOVs to adapt them to your business processes.
To review and modify LOVs for event management
Navigate to the Site Map > Administration - Data > Lists of Values view.
Refer to the tables in this topic, and review the LOVs for event management.
Update the values as required.
For specific instructions on modifying LOVs, see Siebel Applications Administration Guide.
If you add values to the EVENT_FORMAT list of values, also add those values in the List of Values Explorer view:
Navigate to the Site Map > Administration - Data > Lists of Values Explorer view.
Select the type of SOURCE TYPE (internal).
In explorer, navigate to SOURCE TYPE (internal) > Values > EVENT > Child List of Values.
In the Child List of Values list, add the values.
Siebel Events Management screens contain fields that display available values from LOVs such as those listed in the following tables.
The following table shows LOVs for Event Management.
| List of Values | Comments |
|---|---|
EVENT_BILLING_BASIS |
Indicates whether a venue or vendor rate is calculated hourly, daily, weekly, monthly, or on a per-item or per-person basis. |
EVENT_COMMITMENT_TYPE |
Displays a selection of contribution types a partner organization can make for an event, such as monetary, promotional, material, and so on. |
EVT_FREQUENCY |
Frequency with which the events occur within an event plan. For example, daily, monthly, or quarterly. |
EVENT_FEE_TYPE |
Indicates if a fee is required for the event. Values available by default include Registration, Voluntary, Donation, and None. |
EVENT_FORMAT |
Displays the format of the session featured, such as Keynote, Roundtable, Workshop, and so on. |
EVENT_COMMITMENT_TYPE |
Displays a selection of sponsorship commitment types, such as promotion or resources. |
EVENT_ORG_TYPE |
Displays a selection of vendor or partner for an organization type. |
EVENT_PARTNER_ROLE |
Identifies the role of a partner organization in an event, such as Exhibitor, Sponsor, Contributor, and so on. |
EVENT_PARTNER_STATUS |
Indicates the status of arrangements with a partner organization, such as Requested, Shipped, Fulfilled, and so on. |
EVENT_REG_STATUS |
Displays the registration status of a potential attendee, speaker, or staff member for an event or an individual session. |
EVENT_REVENUE_TYPE |
Displays a selection of revenue sources related to an event, such as Partners, Sponsors, Advertisers, and so on. |
EVENT_ROOM_TYPE |
Displays a selection of room types available at event venues, such as conference rooms, classrooms, auditoriums, and so on. |
EVENT_STAFF_ROLE |
Displays a selection of staff member roles or areas of responsibility, such as Set-Up, Moderator, Clean-Up, and so on. |
EVENT_STATUS |
Displays the registration status, such as in Planning, Launched, Scheduled, and so on. |
EVENT_STATUS_CODE |
Displays the status of an event or session, such as Planned, In Progress, Completed, and so on. |
EVENT_TYPE |
Displays the type of parent event plan or event featured, such as Seminar, Deal Roadshow, Non-Deal Roadshow, and so on. |
EVENT_VENDOR_ROLE |
Displays a selection of vendor roles or areas of responsibility, such as Caterer, Audio/Video, Security, and so on. |
EVENT_VENUE_ROLE |
Displays a selection of venues, such as Convention Center, Hotel, Office, and so on. |
MKTG_PLAN_APPR_TYPE |
Displays a list of approval status values, such as Rejected, Approved, and Submitted. |
OFFER_MATERIAL_TYPE |
Displays a selection of collateral and literature types, such as Brochure, Map, Hand-out, and so on. This LOV is used in other areas of your Siebel application. |
PARTICIPANT_STATUS |
Displays a selection of participant status types such as VIP and Guest. |
SALES_TOOLS_STATUS |
Indicates whether a collateral or literature item has reached Draft, Final, Approved, and so on. This LOV is used in other areas of your Siebel application. |
SRC_ITEM_CATEGORY |
Displays a list of expense categories, such as Creative, Furnishing, Vendors, Materials, and Venues. |
SESSION_LOCATION_TYPE |
Displays a list of session location types, such as Station or Table. |
TRAVEL_TYPE_CODE |
Displays a selection of travel types such as Air, Ground, and Hotel. |
The following table shows LOVs that are specific to Financial Services customers.
| List of Values | Comments |
|---|---|
EVENT_COM_REG_STATUS |
Displays the registration status of an account for an event or an individual session. Values include Pending, Confirmed, Waitlisted, Restricted Invite, Invited, Cancelled, and so on. |
EVENT_RECUR_FREQ_TYPE |
Indicates the frequency of the auto-generated event of an event plan, such as Daily, Weekly, Quarterly, and so on. |
EVENT_VENDOR_FUNCTION |
Defines the service the vendor is providing. Values include Ads, Music, Lunch, Breakfast, Booths, Limo, Lodging, Publications, Sound, Table Set-up, Video, and so on. |
EVT_PARTICIPANT_TYPE |
Displays values for participant type, such as Analyst, Internal Participant, Competitor, and so on. |
EVT_SIGNUP_STATUS |
Displays the event registration status values, such as Open or Closed. |
FINS_EVENTS_PROD_CAP_SIZE |
Displays values for the market capitalization size to describe the featured financial product, such as Large Cap, Mid Cap, Small Cap, or Micro Cap. |
Updating Lookup Tables
You can enter and maintain some values through LOVs, but you must create other values through tables. The advantage of using tables to enter values is that each company can establish a unique hierarchy and define appropriate values for its business processes.
Populating tables in your Siebel application is a consistent process when setting up Regions, Product Lines, and Session templates, which are described in this section. You can update event-related tables from the Administration - Application screen.
Region Administration
Because Siebel Events Management is only one of many parts of your Siebel application that uses the concept of region, you need to define a regional hierarchy appropriate for your overall business.
There are two region-related fields in Siebel Events Management:
The Region field indicates the region in which the Event takes place.
The Region Origin field indicates the Region from which the Event's featured investment comes.
Other parts of the Siebel application use region to indicate the investment focus of your salesmen and their coverage regarding your client companies. Therefore, it is important that you select a region hierarchy that is generic enough to describe event regions, coverage regions, and investment product regions in a single table.
For global or multinational companies, you need to define regional hierarchies that relate to the geographical areas your business serves and in which you conduct events. Application Administrators can manage region hierarchies by performing the following procedure.
To define regional hierarchies
Navigate to the Administration - Locations > Regions view.
In the Parent Region list, define the region, for example, North America, Asia, and so on.
In the Child Region list, you can then define subsets of the Parent Regions. For example, your Child Regions could be the individual countries that are associated with the highlighted record in the Parent Region list.
Alternatively, you many choose to use individual cities that are associated with the highlighted Parent Region. If two levels of region hierarchies are not sufficient for your company's business requirements, the Siebel data model allows a database administrator to create additional levels. You will however, have to configure the user interface to allow users to define this hierarchy.
The following list illustrates how multiple regions and areas within regions can be set up in the Region table. For example, your financial institution may define geographies in the following major regions and then areas within a region:
Asia-Pacific
Japan
China
Singapore
Malaysia
Indonesia
Australia
Europe
United Kingdom
France
Spain
Italy
Middle East
North America
South America
For more information on working with regions, see Siebel Finance Guide.
Period Administration
While some organizations use standard calendar reporting periods, other organizations use fiscal reporting periods. Siebel Business Applications provide flexibility in this area, so organizations can set up periods that make sense for them. For information about period administration, see Siebel Forecasting Guide.
Product Lines for Financial Services Customers
If you are a financial services customer, Siebel Events Management uses the Product Line table to store Asset Classes. You will want to add a row to the table for each relevant asset class associated with a product line from the Product Line Fee view of the Administration - Application screen.
For example, your financial institution may define the following four types of Asset Classes within a Product Line:
Derivative
Equity
Fixed Income
Mutual Fund
For information on Product Administration, see Siebel Product Administration Guide.
Adding Session Templates
Siebel Events Management uses Session Templates to store templates for groups of sessions that are similar. For example, all events that take place in London may follow the same sequence of sessions, including the same start times and end times. In this case, you may want to save a London template that contains the same sequence of sessions, which you can reuse each time you host a London event.
Session templates may be used in more than one region, area, or location. You can manage session templates by navigating to the Marketing Templates screen and choosing Session Templates. For more information, see Event Management Process Phases.
The following steps describe a recommended workflow for setting up session templates and the events and sessions that define them.
Create the template. An Administrator creates a Session Template and adds session details including City, Country, and Start Time.
Add sessions to the template. The administrator then adds sessions to the template, specifying name, start date, end date, and format.
Save the template. Siebel Events Management saves the session template, which allows you to add, change, or delete sessions associated with it.
The following table displays sample line items in a session template. For example, your company may define the following one-day event in London as part of a session template.
| Session Line Items | Details |
|---|---|
City |
London |
Country |
United Kingdom |
Start Time |
9:00 A.M. |
After you have created an outline for a London session template, you can add typical sessions that occur during your London-based events. The following table displays sample sessions within the London session template.
| Sample Sessions | Details |
|---|---|
Registration/Breakfast |
8:00 A.M.-8:30 A.M. |
Introductions |
8:30 A.M.-9:00 A.M. |
Opening Presentation |
9:00 A.M.-10:00 A.M. |
Featured Presentation |
10:00 A.M.-11:30 A.M. |
Breakout Session |
11:30 A.M.-12:30 P.M. |
Lunch |
12:30 P.M.-2:00 P.M. |
One-on-One Analysis |
2:00 P.M.-3:30 P.M. |
Roundtable 2 |
3:30 P.M.-5:00 P.M. |
Group Report Out |
5:00 P.M.-5:45 P.M. |
Concluding Remarks |
5:45 P.M.-6:00 P.M. |
Creating Contacts
A few Events Management forms and lists contain fields that depend upon existing contact data entered in the Contacts screen. A contact is an individual with whom your company conducts business or expects to conduct business with in the future. A contact can be an employee of another company, a vendor, or professional consultant and may have relationships with a number of companies. Data entry in Events Management can proceed more smoothly if you have already entered contact data for:
Your organization’s employees
Potential staff (other than vendors)
Potential venue personnel
Potential individual invitees
For more information about entering Contacts, see Siebel Applications Administration Guide.
Creating Accounts
Administrators create the supporting data for the events (that is, account information, venues, setting up rooms, and so on) before creating the event itself. Therefore, many Events Management forms and lists contain fields that depend on existing account data entered in the Accounts screen. An account represents the relationship between your company and the companies or individuals with whom you conduct business. To make data entry in Events Management less time consuming, you can enter account data for event vendors, partners, supporting organizations, and employing organizations of potential event invitees earlier.
Before adding account data, identify the relationships for which you need to create accounts. Then, use the following procedure to enter account data for each relationship.
To enter account data
Navigate to the Site Map > Accounts view.
Before adding a new account, search the accounts list to make sure the account does not already exist.
If the account does not exist, in the Add Section complete the fields for the new account, and click Add.
In the Recent Records section, drill down on the account name.
Click the More Info view tab, click the show more button and complete additional fields as needed.
As you gain additional information, or as account details evolve or change, you can update the account information. For more information, including details about adding an account, specifying account details including addresses, and handling company name changes, see Siebel Applications Administration Guide.
Creating Venues
A venue is a physical facility where an event may be held, such as a conference center or hotel. In Siebel Events Management, you can store information about possible venues ahead of time, including their rental rates, and later choose which venue or venues to associate with an event. These and other end-user tasks are described further in Preparing for an Event.
In preparation for working with venue data, you should add possible venues using the Administration - Location screen as described in the following procedure.
To add a venue
Navigate to the Site Map > Administration - Location view.
In the Locations list, create a new record, and complete the necessary fields.
The following procedure describes how to enter information about rooms that you may want to use for event venues, such as conference rooms, meeting rooms, or classrooms.
To enter room information for a potential event venue
Navigate to the Site Map > Administration - Location view.
In the Locations list, select the location that you are considering as a possible event venue.
Click the Rooms view tab.
In the Rooms list, create a new record.
The following table describes some fields in the Room list.
Field Comments Drops
Information describing the network access ports.
Name
Name of the room you are considering as a possible event or session venue.
Room Rate
Expense of renting the room, per time unit or other unit identified in the Basis field.
Type
Type of the room.
The following procedure lets you record information about the equipment that is available in a potential room for an event.
To add the equipment available in a potential event venue room
Navigate to the Site Map > Administration - Location view.
In the Locations list, select the location that you are considering as a possible event venue.
Click the Rooms view tab.
In the Rooms list, select the room for which you want to add equipment.
In the Equipment list, create a new record.
Using Pricing Models
If you have purchased Siebel Pricer along with Siebel Events Management and will be using the Siebel Shopping Cart view to charge customers event or session registration fees, you can use pricing models to adjust the registration fee a customer must pay to attend an event or session. The adjusted fee may be based on customer location, customer account agreements, or other factors.
For more detailed information about setting up and using Siebel Pricer, see Siebel Pricing Administration Guide.
End-User Setup Procedures for Defining an Event
This section discusses the following topics and procedures:
Defining Event Plans, Events, and Sessions
Siebel Events Management allows you to define event plans, events, and sessions. For the purposes of defining and organizing information for an event, you should note that Siebel Events Management uses a three-level hierarchy of events:
Event Plans. Event plans are used to define the high-level information about an event, including overall date span, approvals, and summarized financial metrics. Information from child events, such as expenses and attendees roll up to the event plan.
Events. The propagated events, or children of the parent event, which comprise the individual days within the parent event timeline. An event is usually one day long.
Sessions. The components of an event. Usually, many sessions make up an event. Sessions are typically measured in hours.
Event plans include defining the purpose, nature, and scope of the event, and making at least tentative decisions about when and where the event will be held. In Siebel Events Management, you can record these decisions in an event.
Later in the definition process, you can update the event plan, events, and sessions with detailed information. Also, prospective event attendees will be able to view information from the listing on your Siebel Events Web site.
Creating Tracks
A track in Siebel Events Management is a featured topic or theme at an event. For example, a biotech investment conference may establish three tracks: Genomics, Computers, and Pharmaceutical.
After tracks are created, they can be associated to events and sessions. For example, using the biotech example, you could relate several sessions on using computers in biotech with the computers track. As a result, attendees who are interested in this subject can select from a subset of sessions that are related to the subject.
The following procedure describes how to add an event track. For information on relating a track to events and sessions, see Preparing for an Event.
To add an event track
Navigate to the Site Map > Events > Tracks view.
In the Tracks list, create a new record, and enter a status for the track.
Some status values are In Planning, Scheduled, Launched, Completed, and Cancelled.
Note: These status values are for descriptive purposes only and do not limit registration to associated sessions.
Adding Event Plan Details
This section describes how to create an event plan, which generates events. Creating an event plan also generates an activity in the Activities screen.
The lists and forms for event plans and events use much of the same information. Many of the fields you enter for the event plan are inherited by its events. Each event inherits the values in the parent event fields when it is initially saved. After the initial save, the Status field and the Display on Website field inherit changes made to the parent event.
An event plan’s Status field can be used to hide the event, and its events and sessions, from all users who are not using an Events Administrator Log In ID. This is accomplished by choosing the value Restricted in the Status field of an event. The Restricted status is then copied to that event’s events and sessions. This also works in reverse—if a session’s status is changed to Restricted, the change affects, or gets copied to, the status of the event or event plan.
When creating an event plan, you can specify a value in the Event Frequency field. This field, along with the event plan start and end date, determines how many event records will automatically be generated under the event plan. For example, if the event plan spans 10 days, and the event plan frequency is daily, then 10 events will be generated. When creating a new event plan, events are automatically generated upon saving the event plan record. To generate events for existing event plans, use the Create Events button on the event plan form applet. You can use only the Create Events button to generate events if no events exist for the event plan.
The following procedure describes how to create an event plan.
To create an event plan
Navigate to the Site Map > Events > Event Plans view.
From the visibility filter, select All Event Plans.
In the Event Plans list, create a new record, and complete the necessary fields.
Note: As the event plan creator, you will automatically be selected as the primary team member.Siebel Events Management automatically generates events for each day, including the start and end dates for the parent event. To change the event frequency, in the More Info form, select an event Frequency.
Setting Goals and Assumptions for an Event Plan
Each event plan can be associated with a set of goals and assumptions. Each goal is a metric against which the performance of the plan will be measured, given certain quantitative assumptions.
To create a goal for an event plan
Navigate to the Site Map > Events > Event Plans view.
In the Event Plans list, select and drill down on the event plan.
Click the Plan view tab and then click Goals.
In the Goals list, create a new record.
In the Metric field, select the appropriate value and complete the following steps based on that choice.
If the goal is a financial metric, in the Target Amount field, complete the target value for the goal.
If the goal is s non-financial metric, in the Target Quality field, complete the target value for the goal.
If known, in the Forecast Amount column, type the forecast value.
If you do not know the expected forecast value, leave the field empty and complete the field after you have developed a forecast.
To create an assumption for an event plan
Navigate to the Site Map > Events > Event Plans view.
In the Event Plans list, select and drill down on the event plan.
Click the Plan view tab and then click Goals.
In the Assumptions list, create a new record.
In the Metric field, select the appropriate value and complete the following steps based on that choice.
If the goal is a financial metric, in the Target Amount field, complete the target value for the goal.
If the goal is s nonfinancial metric, in the Target Quality field, complete the target value for the goal.
If known, in the Forecast Amount column, type the forecast value.
Note: If you do not know the expected forecast value, leave the field empty and complete the field after you have developed a forecast.
Deal Roadshow Event Type (Financial Services Customers Only)
If you are a financial services customer, you can create an event with a Type = Deal Roadshow, you can also select the specific deal with which the event is associated and make sure that the deal and the event are not visible to others outside of your deal team. When you associate the event with the deal, the security for the deal is inherited by that event. Users added to the employee list as members of the event team will not be able to view the event unless they are first added to the deal team.
Deal visibility is associated with an individual’s position and not with the individual user. Because Siebel applications typically associate only one position with an employee, this association may affect an employee who leaves a position as a member of the deal team to work in another department within the company. A new employee would be assigned to that position, which may result in the possibility that users could lose track of the old employee's knowledge of the deal. This functionality is required to comply with the securities laws in most countries.
Associating a Deal Roadshow with a Specific Deal (Finance Services Customers Only)
The following procedure describes how to associate a specific deal with an event.
To associate a deal roadshow with a specific deal
Navigate to the Site Map > Events view.
In the Events list, select and drill down on the event for which you want to associate the deal.
In the Event Details form, in the Deal Name field, click the select button.
In the Opportunity dialog box, select Add, and then click OK.
Updating Event Plans
The following procedure describes how to make changes to an event plan.
To modify an event plan
Navigate to the Site Map > Events > Event Plans view.
In the All Event Plans list, modify the event by changing the necessary fields.
Changes made to the parent event will not automatically update in the events’ fields. You can manually change event data from the Events view.
To delete an event plan
Navigate to the Site Map > Event Plans view.
In the All Event Plans list, select the event and click Delete.
Caution: If you delete an event plan, all events, sessions, and activities associated with it are also deleted. Therefore, it is recommended that the only time events should be deleted is when they are erroneously created. Otherwise, the status of the event should be set to Canceled to indicate that it did not take place, and no more work needs to be done.
Creating Events
Events can be manually created or updated with an event plan. Events Management allows you to manage and track the entire event process.
To create an event
Navigate to the Site Map > Events > Event Plans view.
From the visibility filter, select All Event Plans.
In the All Event Plans list, select and drill down on the Event Plan Name.
Click the Schedule view tab, and then click Events.
In the Events list, create a new record, and complete the necessary fields.
Note: You can automatically generate events on the Event Plans form, using the Create Events button.
The following two tables describe some fields in the Events form.
| Field | Comments |
|---|---|
# of Attendees |
Allows you to maintain approximate attendance information. |
Additional Product Interest |
A free-form text field to describe additional sectors, regions, additional capitalization sizes, and other items of interest about the featured investment security. |
Asset Class |
The asset class of the investment security featured by the event. For example, if the event is called Global Bond Investing, then the featured asset class would be Fixed Income (or Bonds). |
Capitalization Size |
Describes the relative size of the market capitalization of the featured investment. |
Deal Name |
Name of the deal (IPO or other investment banking-related opportunity) featured by the event. |
External |
A check box to indicate whether you an event to be visible to external contacts through the Siebel Events Web site. If External is not checked (value = FALSE), then no external contacts are able to see information about the event through the Web site. |
Fee Type |
The fee is required for the event. Default values include Registration, Voluntary, Donation, and None. |
Industry |
Describes the sector or industry group of the featured investment. For example, if the event features an automobile company, then the Industry value is Automobiles. |
Preferences |
Free-form field that allows you track any attendee preferences on an aggregated basis. For example, in this field you might enter “Order 20 vegetarian meals. |
Project Code |
Your company’s internal Project Code for the event. |
Region Origin |
Describes the region in which the featured investment originates. For example, if the event features an automobile company based in Japan, then the Region Origin value is Asia. |
Symbol |
The stock ticker or CUSIP of the featured investment. |
Team |
The employees responsible for accomplishing event-related tasks, including planning, hosting, and evaluating the event. By default, the user who creates the event is automatically listed as the primary team member. The primary team member or the system administrator can designate a different employee as the primary team member. For more information, see the procedure titled To create an event plan in the Updating Event Plans section. |
| Field | Comments |
|---|---|
Capacity |
Approximate audience range projected for the event. This value is used during registration to help determine whether or not maximum enrollment for the event has been reached. |
Display on Website |
Specifies whether the event should be displayed on the Events Web site. |
Description |
A free-form text field to describe the event. Information entered here is visible to prospective attendees as part of the Upcoming Events information on the Home Page. |
Current Registration Fee |
Fee to register for the event at the current date and time. |
End |
(Required) Date and time that the event ends. The end value cannot be set to a date and time earlier than the Start value. Also, the end value cannot conflict with parent (events, in the case of sessions or event plans, in the case of events) start and end values. |
Event Name |
(Required) Name for the event that will be visible to internal and external users. |
Event Type |
(Required) Nature of the event. Typical values include Meeting, Conference, Trade Show, Seminar, and so on. The list of values that determines the available choices is EVENT_TYPE. |
Fee Type |
The fee is required for the event. Default values include Registration, Voluntary, Donation, and None. |
Frequency |
The number of times the event takes place. |
Host Employee |
The employee responsible for the event. |
Invitation Deadline |
Date by which invitations for the event should be sent to prospective attendees. Defaults to 60 days before the event Start. |
Lead Partner |
The partner company affiliated with the event. |
Organization |
Specifies which organizations have access to view the event. By default, the event creator’s organization is added to this list as the primary organization. For more information about organizations, the Siebel Applications Administration Guide. |
Promotional Fee |
Discounted fee for registering before the promotion and date. |
Promotion End |
The date until which the promotional registration fee applies. |
Standard Fee |
Regular fee for registering into the event. |
Session Template |
Specifies the session template used to generate sessions. |
Start |
(Required) Date and time that the event starts. The start value cannot be set to a date and time later than the end value. For a new event, both fields default to current date and time. The event automatically appears on the Events Calendar for each date from the start through and the end. Also, the start value cannot conflict with parent (events in the case of sessions, event plans in the case of events) start and end values. |
Status |
Status of the event. Values available by default are as follows:
|
Team |
The employees responsible for accomplishing event-related tasks, including planning, hosting, and evaluating the event. By default, the user who creates the event is automatically listed as the primary team member. The primary team member or the system administrator can designate a different employee as the primary team member. For more information, see the procedure titled To create an event plan in the Updating Event Plans section. |
URL |
Location of a Web site providing more information about the event. |
Venues |
Main location where the event is held, such as a hotel, conference center, or office building. You associate venues with Companies. |
After you create an event, you can associate one or more tracks with an event.
Updating an Event
Sometimes in the event planning process it is necessary to add or update information previously recorded based on changes to the events.
To update an event
Navigate to the Site Map > Events > Event view.
In the Events list, select the event, and make the necessary changes.
Adding Budget Details
As part of defining an event, you can create a budget for the event. The budget includes estimated revenues and expenses. Then, as part of preparing for and hosting the event, you can enter actual revenues and expenses. With this information, Siebel Events Management calculates budget variances (estimated versus actual amounts) so you can analyze an event’s financial performance at each level of the event—event plan, event, and session. This capability allows your company to maintain a history of line item variances and budget accuracy over time.
To enter estimated expenses or revenues for an event
Navigate to the Site Map > Events > Event view.
From the visibility filter, select All Events.
In the All Events list, select and drill down on the event for which you want to enter expenses.
Click the Plan view tab, and select the appropriate subview.
For estimated expenses, click the Expenses subview tab.
For estimated revenues, click the Revenue subview tab.
In the Expenses list, create a new record, and complete the necessary fields.
When you save the record, the Variance amount and running totals for Forecast Expenses and Actual Expenses are updated at the end of the Expense List.
(Optional) To add invoice details to an expense record, create a new invoice record in the Invoices screen, and make note of the invoice number for use in the remaining steps.
Some invoice record fields are described in the following table.
Field Comments Type
Select Payable. Invoices of type Receivable cannot be selected for cost line items.
Invoice #
This automatically generated number appears in the Invoice # field of the Invoice Items list when you return to the event’s Cost view in the next step in this procedure.
Navigate back to the Invoice Line Items list for the event.
Click Add in the Invoice # field to copy in the invoice information from the Invoices screen.
The following table describes some fields in the Invoice Line Items list.
Field Comments Quantity
The number of items associated with the cost line item.
Invoice Expected?
A Yes or No value, based on whether or not a vendor will generate an invoice.
Invoice Date
The date the Invoice # is entered.
Invoice Status
The status of the invoice. Typical values are Open, On Hold, Cancelled, Consolidated, and Closed.
Vendor Invoice #
The invoice number entered.
Vendor Name
The account name of the vendor.
Cost Code
An internal cost code associated with the line item.
Estimating Revenues
You can use Siebel Events Management to track revenue sources for an event. Revenue may come from sources such as sponsorships, registration fees, advertising, and exhibitors.
To enter estimated revenues for an event
Navigate to the Site Map > Events > Event view.
In the Events list, select and drill down on the Event Name.
Click the Plan view tab, and then click Revenue.
In the Revenue list, create a new record, and complete the necessary fields.
(Optional) Associate the revenue with a session.
You can track expenses at the venue and vendor levels. Expenses created at the venue level, roll up to the event and have a Cost Type = Venue. Expenses created at the vendor level, roll up to the event and have a Cost Type = Vendor. For more information on creating expenses for a venue, see Researching and Choosing a Venue. For more information on creating expenses for a vendor, see Researching and Hiring Vendors.
Financial Information for Events
Siebel Events Management provides summarized financial information at all three levels in the hierarchy: Event Plans, Events, and Sessions. This information includes planning period, budget, expenses, and revenues. Several of these fields are automatically calculated based on detailed records that are created. See the following three tables for more information about these fields.
| Field | Comment |
|---|---|
Planning Period |
User entered |
Execution Period |
User entered |
Requested Budget |
User entered |
Assigned Budget |
User entered |
Forecast Expenses |
An autopopulated field that provides the sum of expense records and forecast expense field |
Actual Expenses |
An autopopulated field that provides the sum of expense records and actual expense field |
Forecast Revenue |
An autopopulated field and provides the sum of revenue records and forecast revenue field |
Actual Revenue |
An autopopulated field that provides actual revenue. For more information see Siebel Marketing User Guide. |
Planning Period |
User entered |
| Field | Comment |
|---|---|
MDF Requested |
An autopopulated field that provides the sum of MDF request |
Net Expense (forecast) |
An autopopulated field that provides the Forecast Expenses-MDF Requested |
| Field | Comment |
|---|---|
Budget Request |
Assigned from the Budget Request in a marketing plan; for more information, see Siebel Marketing User Guide |
Approving Event Plans
During the event planning phase, marketing administrators may be required to submit high-level event plans for approvals, as a part of the overall planning and budgeting process. Siebel Events Management contains functionality for getting approvals, whereby users can collaborate on an event plan by submitting the record to different individuals using the approval field. You can define further control over the approval process through state models, see Siebel Assignment Manager Administration Guide for further information.
To use the event plan approval field
Navigate to the Site Map > Events > Event Plans view.
In the Event Plans list, select the event.
In the Event Plan form, from the Approval Status field, click the drop-down list and select Submitted.
In the Pick Employee dialog box, select the individual to whom you want to submit the plan.
Enter any additional comments, and then click Send.
The person to whom you have submitted the plan must log in to the Siebel application to approve or reject the plan.
Note: You have the ability to track the history of approvals in the Event Plan > Plan > Approvals view.
Adding Event Activities
An activity in Events Management is an action item, such as creating collaterals, that needs to be assigned and completed prior to the start of an event. You enter these action items using the Activities view tab in Siebel Events Management.
During this phase of event management, you enter activities for the event. Then, during the next phase of event management, event preparation, you assign the activities to specific staff members, and track activity progress.
When entering activities, you can enter records individually for each event, or you can create a reusable activity template, which automatically associates a set of activities with any event you choose.
You can also combine individual activities with activities from an activity template. If some activities in an activity template do not apply to an individual event, you can remove them from the event without affecting the template.
The following procedure describes how to create a reusable activity template for an event.
To create an Activity Template for an event
Navigate to the Site Map > Administration - Data > Activity Templates view.
In the Activity Templates list, create a new record.
In the Name field, provide a name for the activity.
In the Type field, select Event Management.
Leave the Sales Stage and Sale Method fields blank, because they do not apply to Siebel Events Management activities.
Note: Finance customers, be sure to select the Automatic Trigger check box to automatically generate an activity list when the template is associated with an event.Click the Activity Templates Details view tab.
In the Activity Template Details list, create a new record.
Note: Create a new activity for each activity associated with the activity template.For information on creating activity templates, see Siebel Applications Administration Guide.
To associate an Activity Template with an event
Navigate to the Site Map > Events > Event view.
From the visibility filter, select All Events.
In the Events list, select and drill down on the Event Plan Name.
Click the Schedule view tab, and then click Events.
Click the Plan view tab, and then click Activity Plans.
In the Activity Plans list, create a new record.
In the Template field, choose a predefined template from the drop-down list.
Complete other fields as needed.
Click the Activities link.
In the Activities list, drill down on the Type field to edit details of that activity.
The display changes from the Events screen to the Activities screen, and an Activity form and an Attachments list are displayed.
The following procedure describes how to add an individual activity to an event.
To add an activity to an event
Navigate to the Site Map > Events >Event view.
In the Events list, select and drill down on the Event Name.
Click the Plan view tab and then click Activities.
In the Activities list, create a new record, and complete the necessary fields.
A modified list of activities appears.
For more information on working with activities, see Siebel Applications Administration Guide.