18Importing Data into Life Sciences
Importing Data into Life Sciences
This chapter covers the following topics:
In this chapter, you will learn how to import data into your Siebel Life Sciencesdatabase.
There are two general categories of data: proprietary data and syndicated data. These two types of data possess different characteristics and should generally be loaded into Siebel base tables using different processes.
Proprietary data. This is data that resides in an existing database and must be imported into the Siebel Life Sciences database during initial implementation or on an ongoing basis.
For proprietary data, Siebel Enterprise Application Integration (EAI) is used. Siebel Enterprise Integration Manager, one method of EAI, is a subsystem in the Siebel Life Sciencessoftware that manages the exchange of data betweenSiebel Life Sciences database tables and other corporate databases. It includes a number of data integrity features, such as generation of foreign-key references and case adjustment.
Syndicated data. This is read-only data about sales, Rx, and profitability that is provided periodically by third-party vendors. Once delivered, this data must be loaded into the Siebel Life Sciencesdatabase and made available to users in a timely fashion. Although you can use Siebel EIM (with transaction logging turned off) to import syndicated data, direct loading with a database utility (such as SQL* Loader) is faster for importing the large volumes of syndicated data typically loaded by pharmaceutical companies.
The Siebel Life Sciences views and business components that require data import, and the data values for those views, are shown in the table in Views Requiring Syndicated Data Import.
Scenario for Importing Data
This scenario is an example of the tasks performed by the database administrator, the application administrator, and the sales representatives. Your company might follow a different sequence according to its business requirements.
The database administrator (DBA) transfers company data into theSiebel Life Sciences interface data tables. The Siebel EIM transfers the data to theSiebel Life Sciences base tables.
Later, the DBA receives syndicated data from a data provider (for example, IMS Health) and transfers this data to a staging table.
The application administrator uses administrative views to map EIM_SYND_DATA fields to S_SYND_DATA, to load the data from the staging table into the application base tables.
After loading a syndicated data update, the application administrator extracts portions of the data according to territory assignment and sends a compressed version of the data extracts to mobile users in the field.
The sales representatives download the data extracts and import them into their local databases. Using the imported data in the Analysis views, they can evaluate their performance and determine where to focus their sales activities.
Process of Importing Data
This topic details sample tasks performed by database and application administrators and end users when importing data.
Administrator Procedures
The following list shows tasks administrators typically perform to import data:
Importing Data with Siebel EIM
This task is a step in Process of Importing Data.
Siebel EIM manages the exchange of data between Siebel database tables and other corporate databases. This topic provides information specific toSiebel Life Sciences and supersedes information in Siebel Enterprise Integration Manager Administration Guide. For general information on Siebel EIM, read Siebel Enterprise Integration Manager Administration Guide.
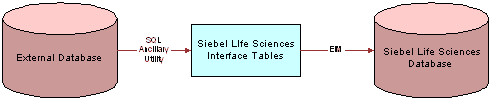
Stages of the Data Import Process
The data import process with Siebel EIM uses two stages, as shown in the following figure.
The data is first copied from external data tapes (or other provided media) into the interface tables for the Siebel Industry Application (SIA), using a native database data-loading utility (such as SQL* Loader).
For information about the interface tables and their relationships to base tables in the Siebel Business Application database, read Data and Related Interface Tables. For further details on Siebel Industry Application interface tables, such as the contents of each table, read Siebel Enterprise Integration Manager Administration Guide.
Using EIM, you transfer the data from the interface tables to predefined destination columns in the base tables of the Siebel Life Sciencesdatabase. The EIM process uses a configuration file (
default.ifb).For general information about
default.ifband instructions on using Siebel EIM, read Siebel Enterprise Integration Manager Administration Guide.
Recommended Import Order
To correctly establish the relationships between dependent data elements, the data should be imported in the following recommended order. In general, reference data such as therapeutic classes, competitive metrics, and competitive issues should be imported first, followed by employee and product data (internal products, external products, and medical specialties), followed by contacts data. Syndicated data should be loaded last.
The following list shows the recommended import order for all data types specific to Siebel Life Sciences:
Reference data (therapeutic classes, competitive metrics, and so on)
Employees
Notifications
Products (both internal and external)
Leads
Medical specialties
Insurance plans
Accounts
Opportunities
Formularies
Contacts
Contact ratings and rankings
Quotes
Documents
Proposal templates
Forecasts
Fulfillment data
Call lists
Objectives
Marketing campaigns
Product consumption
Service requests
Product defects
Activities and appointments
Notes
File attachments
Syndicated data
Data and Related Interface Tables
The process for importing syndicated data takes advantage of the fact that syndicated data is read-only. Because the row ID on the S_SYND_DATA table is never referred to anywhere else in the Siebel data model, it can be populated with dummy values that differ from usual row IDs. The application administrator uses SQL*Loader to populate the ID field with a unique sequential value, a process which provides either full or partial table-level extraction. Using views in the Administration - Syndicated Data screen, you can define complex routing rules for syndicated data.
The following table shows the relationships between the data, interface tables, and base tables.
Table Data and Related Interface Tables
| Data | Interface Table | Base Table | Table Description |
|---|---|---|---|
Accounts Contacts |
EIM_TGT |
S_TGT |
Accounts Contacts Targeting List |
Accounts Contacts |
EIM_TGT_ADMIN |
S_TGT_ADMN |
Targeting Period |
Accounts Contacts |
EIM_TGT_ADMIN |
S_TGT_ITM_ADMN |
Accounts Contacts - Targeting Products |
Accounts Contacts |
EIM_TGT_ADMIN |
S_GT_COL_MAP |
Targeting Product Column Mappings |
Account Details |
EIM_ACCNT_DTL |
S_ORG_EXT |
Organization |
| Account Details | EIM_ACCNT_DTL | S_ORG_EXT_LSX |
1:1 Extension table for Account Types |
| Account Details | EIM_ACCNT_DTL | S_ORG_EXT_X |
1:1 Account Best Times to Visit |
Activities |
EIM_ACTIVITY |
S_EVT_ACT |
Activities |
| Activities | EIM_ACTIVITY1 |
S_EVT_ACT |
Activities Only User Key |
| Activities | EIM_ACTIVITY1 | S_ACT_SIGN |
Signatures |
| Activities | EIM_ACTIVITY2 |
S_EVT_ACT |
Activities Only User Key |
| Activities | EIM_ACTIVITY2 | S_ACT_PRDINT |
Activity Products |
| Activities | EIM_ACTIVITY2 | S_ACT_ISS |
Activity Issues |
| Activities | EIM_ACTIVITY2 | S_ACT_PROD_ISS |
Issues for Activity Products |
Addresses |
EIM_ADDR_ORG |
S_ADDR_ORG |
Account Addresses including Bricks |
Agreements and Contracts |
EIM_AGREEMENT |
S_DOC_AGREE |
Agreements and Contracts |
| Agreements and Contracts | EIM_AGREE_LS |
S_DOC_AGREE |
Contracts |
| Agreements and Contracts | EIM_AGREE_LS |
S_AGREE_PAY |
Contract Payments |
| Agreements and Contracts | EIM__ENTLMNT |
S_ENTLMNT |
Entitlements and Contract Price Group |
| Agreements and Contracts | EIM__ENTLMNT | S_ENTLMNT_ITEM |
Price Group Products |
| Agreements and Contracts | EIM__ENTLMNT | S_ENTLMNT_FEE |
Nonproduct Fees |
| Agreements and Contracts | EIM__ENTLMNT | S_ENTLMNT_ITEM_FEE |
Product Fee Price Group |
Brick |
EIM_AREA_LS |
S_AREA_LS |
Bricks |
Chat and Discussions |
EIM_DISCN_LS |
S_TOPIC_LS |
Chat/Discussion Topics |
| Chat and Discussions | EIM_DISCN_LS | S_TOPIC_CON_LS |
Chat User Registration |
| Chat and Discussions | EIM_DISCN_LS | S_MESG_BRD_LS |
Message Board |
Clinical |
EIM_CL_ACT_LS |
S_EVT_ACT |
Clinical Activity Columns |
| Clinical | EIM_CL_DSGN_LS |
S_CL_DSGN_LS |
Clinical Designs |
| Clinical | EIM_CL_PGM_LS |
S_CL_PGM_LS |
Clinical Programs |
| Clinical | EIM_CL_PGM_LS | S_CL_PGM_ATT_LS |
Clinical Program Attachments |
| Clinical | EIM_CL_PGM_LS | S_CL_PGM_APP_LS |
Clinical Program Applications |
| Clinical | EIM_CL_PTCL_LS |
S_CL_PTCL_LS |
Clinical Protocols |
| Clinical | EIM_CL_PTCL_LS | S_CL_PTCL_LSXM |
1:M Protocol Extension Table |
| Clinical | EIM_CL_PTCL_LS | S_CL_PTL_ATT_LS |
Clinical Protocol Attachments |
| Clinical | EIM_CL_PTCL_LS | S_CL_PTL_POS_LS |
Clinical Protocol Positions |
| Clinical | EIM_CL_PTCL_LS | S_CPTCL_DSGN_LS |
Clinical Protocol Designs |
| Clinical | EIM_CL_SUBJ_LS |
S_CL_SUBJ_LS |
Clinical Subjects |
| Clinical | EIM_CL_SUBJ_LS | S_CL_SUBJ_ST_LS |
Clinical Subject Status |
| Clinical | EIM_CL_SUBJ_LS | S_CL_SJ_CSNT_LS |
Clinical Subject Consent |
| Clinical | EIM_CL_SUBJ_LS | S_CL_SBJ_ATT_LS |
Clinical Subject Attachments |
| Clinical | EIM_PTL_SITE_LS |
S_PTCL_SITE_LS |
Clinical Protocol Sites |
| Clinical | EIM_PTL_SITE_LS | S_PTL_ST_POS_LS |
Clinical Protocol Site Positions |
| Clinical | EIM_PTL_SITE_LS | S_PTL_ST_ATT_LS |
Clinical Protocol Site Attachments |
| Clinical | EIM_PTL_SITE_LS | S_PTL_ST_CON_LS |
Clinical Protocol Site Contacts |
| Clinical | EIM_PTL_SITE_LS | S_PS_STMPVER_LS |
Clinical Protocol Site Template Versions |
| Clinical | EIM_PTL_SITE_LS | S_CL_ACT_EXC_LS |
Clinical Protocol Site Activity Exceptions |
| Clinical | EIM_PTL_SITE_LS | S_CL_PYMNT_LS |
Clinical Payments |
| Clinical | EIM_SBJ_TMPL_LS |
S_SUBJ_TMPL_LS |
Subject Templates |
| Clinical | EIM_SBJ_TMPL_LS | S_SBJTMP_VER_LS |
Subject Template Versions |
| Clinical | EIM_TMPL_PLNITM |
S_TMPL_PLAN_ITEM |
Subject Template Visits |
Companies |
EIM_ACCOUNT |
S_ORG_EXT |
Organization |
| Companies | EIM_ACCOUNT | S_ACCNT_POSTN |
Position for Account |
| Companies | EIM_ACCOUNT | S_ADDR_ORG |
Account Addresses |
| Companies | EIM_ACCOUNT | S_ORG_REL |
Account Affiliations |
| Companies | EIM_ACCOUNT1 |
S_ORG_EXT |
Organization Only User Key |
| Companies | EIM_ACCOUNT1 | S_ACCNT_CLS_RNK |
Account Ratings and Rankings |
| Companies | EIM_ACCOUNT1 | S_ACCNT_MED_PROC |
Account Medical Procedures |
| Companies | EIM_ACCOUNT1 | S_ACCNT_MED_SPEC |
Account Medical Specialties |
Contacts |
EIM_CONTACT |
S_CONTACT |
Contacts |
| Contacts | EIM_CONTACT | S_ADDR_PER |
Contact Addresses |
| Contacts | EIM_CONTACT | S_CONTACT_REL |
Contact Affiliations |
| Contacts | EIM_CONTACT | S_PER_ORG_UNIT |
Contact to Account Affiliations and Roles |
| Contacts | EIM_CONTACT | S_STATE_LIC_LS |
Contact State Licenses |
| Contacts | EIM_CONTACT1 |
S_CONTACT |
Contacts Only User Key |
| Contacts | EIM_CONTACT1 | S_POSTN_CON |
Contact Positions |
| Contacts | EIM_CONTACT1 | S_CON_ADDR |
Contact Address Usage |
| Contacts | EIM_CON_DTL |
S_CONTACT |
Contacts Only User Key |
| Contacts | EIM_CON_DTL | S_CONTACT_LSX |
1:1 Contacts Extension Table |
| Contacts | EIM_CON_DTL | S_CONTACT_LSXM |
1:M Contacts Extension Table |
| Contacts | EIM_CON_DTL | S_ACCNT_CON_ATT |
Accounts Contacts File Attachments |
| Contacts | EIM_CON_DTL | S_NOTE_ACCT_CON |
Accounts Contacts Notes |
Formularies |
EIM_FRMULRY_LS |
S_FORMULARY |
Formulary Opportunities |
| Formularies | EIM_FRMULRY_LS |
S_FRMULRY_PROD |
Formulary Products |
Industry |
EIM_INDUSTRY |
S_INDUST |
Account and Contact Types |
Insurance Plans |
EIM_INS_PLAN_LS |
S_INS_PLAN |
Insurance Plans |
Medical Education |
EIM_ME_EVT_LS |
S_ME_EVT_LS |
MedEd Events |
| Medical Education | EIM_ME_EVT_LS | S_ME_EVT_POS_LS |
MedEd Event Positions |
| Medical Education | EIM_ME_EVT_LS | S_ME_EVT_PRD_LS |
MedEd Event Products |
| Medical Education | EIM_ME_EVT_LS | S_ME_EVT_INV_LS |
MedEd Event Invitees |
| Medical Education | EIM_ME_PLN_LS |
S_ME_PLN_LS |
MedEd Plans |
| Medical Education | EIM_ME_PLN_LS | S_ME_PLN_MDF_LS |
MedEd Plan Funds |
| Medical Education | EIM_ME_PLN_LS | S_ME_PLN_PRD_LS |
MedEd Plan Products |
| Medical Education | EIM_ME_SES_LS |
S_ME_SES_LS |
MedEd Sessions |
| Medical Education | EIM_ME_SES_LS | S_ME_SES_PRD_LS |
MedEd Session Products |
| Medical Education | EIM_ME_SES_LS | S_ME_SES_INV_LS |
MedEd Session Invitees |
| Medical Education | EIM_ME_SES_LS | S_ME_SES_LIT_LS |
MedEd Session Literature |
| Medical Education | EIM_ME_SES_LS | S_ME_SES_MAT_LS |
MedEd Session Materials |
Medical Procedures |
EIM_PROC_LS |
S_MED_PROC |
Medical Procedures |
Medical Specialties |
EIM_SPEC_LS |
S_MED_SPEC |
Medical Specialties |
Objectives |
EIM_ACCT_SRC |
S_ACCNT_SRC |
Target Accounts for Objectives |
| Objectives | EIM_CONTACT2 |
S_CONTACT |
Contacts Only User Key |
| Objectives | EIM_CONTACT2 | S_CAMP_CON |
Target Contacts for Objective |
| Objectives | EIM_SRC |
S_SRC |
Objectives |
| Objectives | EIM_SRC | S_SRC_POSTN |
Objective Positions |
Products |
EIM_PROD_INT |
S_PROD_INT |
Products-Details, Samples, Markets, Lots, and Promotional Items |
| Products | EIM_PROD_INT1 |
S_PROD_INT |
Products |
| Products | EIM_PROD_INT1 | S_PROD_POSTN |
Personal Product List |
| Products | EIM_PROD_INT1 | S_PROD_REL |
Product Relations |
Samples |
EIM_SAMPLE_LS |
S_SAMPLE_TXN |
Sample Transactions |
| Samples | EIM_SAMPLE_LS | S_MPL_TXN_ITEM |
Sample Transaction Item |
| Samples | EIM_POSITION |
S_POSTN |
Positions |
| Samples | EIM_POSITION | S_STOCK_POSTN |
Stock Inventory by Position |
| Samples | EIM_POSITION | S_STOCK_PERIOD |
Stock Period |
Signature Disclaimers |
EIM_SIGNDIC_LS |
S_SIGN_DISC_LS |
Signature Disclaimers |
Syndicated Data |
EIM_SYN_DATA_LS |
S_SYND_DATA |
Syndicated Data |
For further information, see Siebel Enterprise Integration Manager Administration Guide, which lists the contents of each table referred to in the previous table:
Specific data and file attachments that Siebel EIM can process.
Names of the interface tables.
Target base tables mapped to the interface tables.
Any secondary tables associated with the target tables (where data from the interface tables might ultimately reside).
Importing, Extracting, and Routing Syndicated Data
This task is a step in Process of Importing Data.
The process described here for importing syndicated data takes advantage of the fact that syndicated data is read-only. Because the row ID on the S_SYND_DATA table is never referred to anywhere else in the Siebel data model, it can be populated with dummy values that differ from usual row IDs. The application administrator uses SQL*Loader to populate the ID field with a unique sequential value, a process that allows either full or partial table-level extraction. Using views in the Administration - Syndicated Data screen, you can define complex routing rules for syndicated data.
The views that require syndicated data import are shown in the table in the topic Views Requiring Syndicated Data Import.
The general steps for loading syndicated data and distributing it to mobile users are:
Load the data into the base tables of the Siebel Life Sciencesdatabase.
If you choose to use EIM to load the data, turn off transaction logging.
Extract the data required by mobile users.
Transfer the extracted data files to mobile users.
Loading Data into the Siebel Life Sciences Database
This task is a step in Process of Analysis.
Before you can view syndicated data in Siebel Business Applications, you must first populate the foreign keys fields in the S_SYND_DATA table. These keys are populated from the sales representative (POSITION_ID), territory (TERR_ID), product group (MARKET_ID), product (PROD_ID), contact (CON_ID), area (AREA_ID), and period (PERIOD_ID) fields. Each of these is a key to a record in another Siebel Business Application table. Therefore, these fields need to be populated with valid row IDs for the corresponding position, territory, product group, product, and period business components.
To load syndicated data, the application must have the row IDs for the foreign key data that is stored in the S_SYND_DATA table. The data files used to load syndicated data are supplied in a format in which any key information is supplied as a textual description. This means that unless EIM is used to load the data, the textual descriptions need to be converted into their Siebel Business Application table row ID equivalents.
Different data types need to be supplied to make a record visible in S_SYND_DATA. The only compulsory foreign key field is the PERIOD_ID. However, there is a unique index on the table that comprises all of the foreign key fields: S_SYND_DATA_U1. The following table lists all of the foreign key fields, their foreign key table, and a description of what the field contains for Siebel Life Sciences.
Table Foreign Key Fields in Syndicated Data Loading
| Field | Table | Description |
|---|---|---|
AREA_ID |
S_AREA_LS |
Brick/Mini Brick Id |
CON_ID |
S_CONTACT |
Contact for this sales data |
MARKET_ID |
S_PROD_INT |
Product Group |
OU_EXT_ID |
S_ORG_EXT |
Account |
PERIOD_ID |
S_PERIOD |
Period |
PLAN_ID |
S_INS_PLAN |
Plan |
POSITION_ID |
S_POSTN |
Person who owns the data (for example, a sales representative) |
PRDINT_ID |
S_PROD_INT |
Product |
TERR_ID |
S_ASSN_GRP |
Territory |
Use a native data loader (recommended method) such as SQL*Loader in Oracle or BCP in SQL Server. For the purposes of example, Oracle is used as the target database, although the technique applies equally to SQL Server. Alternatively, you can use Visual Basic and Com.
Using SQL*Loader to Load the Data
Data records in Siebel Business Applications do not refer to the row ID field in the S_SYND_DATA table. You can insert any value in this field if it is unique in the record. Therefore, you can use a native database utility to populate this table. This method discusses the use of the Oracle SQL*Loader utility. As with the Visual Basic and COM method, using SQL*Loader requires that you resolve the foreign key references either before or after the data has been loaded into the table.
To use SQL*Loader to load the data
Resolve the foreign keys before loading.
Process the input file one line at a time and convert each foreign key value into a row ID. To save time, first load the data directly into the table as it is stored in the flat file, then update the foreign key fields using SQL statements.
Load the data file using a
.ctlformat file.The following is an example of loading a data file:
options (rows=100)
load data
infile 'c:\myfile.txt'
badfile 'c:\myfile.bad'
append
into table S_SYND_DATA
fields terminated by ","
trailing nullcols
(ROW_ID SEQUENCE (MAX,1),
CREATED SYSDATE, CREATED_BY CONSTANT "1-0",
LAST_UPD SYSDATE, LAST_UPD_BY CONSTANT "1-0",
MODIFICATION_NUM CONSTANT 0,
CONFLICT_ID CONSTANT "0",
POSITION_ID, TERR_ID,
PERIOD_ID, DATA_SRC_CD CONSTANT "RXTer",
MARKET_ID, PRDINT_ID, ATTRIB_01)
Run the SQL*Loader utility from the command line using the following syntax:
SQLLDR73.EXE database/userid@pw control=c:\my.ctl log=c:\my.logNote: The exact file name and syntax of the Loader utility is determined by the version of Oracle being used.When the data has been loaded, resolve the foreign key references for each field. This step makes the data visible to the users, as in the following example.
UPDATE s_synd_data
FROM s_period p
SET s_synd_data.period_id=p.id
WHERE p.name=s_synd_data.period_id ;
This code updates the Period field in the Syndicated Data Table to the ID of the Period rather than to the textual description of the period. You must modify and run this code for each foreign key field referred to in the table in the topic Loading Data into the Siebel Life Sciences Database. The code only needs to be run for each field that you load, not for all of the fields.
Alternative Method: Using Visual Basic and COM to Load the Data
Use Visual Basic and the Siebel COM interface to retrieve the Siebel table row ID information by searching for the field that contains the text and return the ID field.
About Summary Records
Sales forces are frequently hierarchically organized, with a sales representative being the lowest level of the hierarchy, rising through various managerial levels. It is possible that someone at the start of the hierarchy needs to see all of the syndicated data in the system. This might be practical if the particular user is connected to the database. However, if the managerial levels are remote users, they will have visibility on a very large number of records; their synchronization times will be extremely long.
A solution to this problem is to store summary records in the S_SYND_DATA table. Summary records are totals of the sales data for territory, region, division, and other groupings, stored with a type flag in an extension column that indicates the level of summarization is being stored. The summary records can be created by SQL scripts or with a database package such as Microsoft Access. They can be loaded using the two methods described in the previous topics.
In addition to loading summary records, you also must configure the table in the Siebel runtime repository, to make sure that a manager-level user sees only summary records, rather than detail records, on the sales data views. Using this technique, you can also implement drill-down functionality for connected managers so that they can start at high level data and work down.
Extracting Data for Mobile Users
This task is a step in Process of Importing Data.
Once the data is in the database, it needs to be made visible to the users. The data is visible by position and can be viewed on many chart and analysis views in Siebel Life Sciences. This is fine for connected users, but the typical user of such data will be the sales rep or sales manager of a particular territory, who are likely to be remote users, synchronizing with the database using Siebel Remote. Therefore, the data needs to be extracted from the database.
The application administrator extracts syndicated data according to data-routing (visibility) rules that the administrator defines. When you do this, a full export-process audit trail is generated through log files.
You can run multiple instances of the extraction process on each Siebel Server to maximize hardware capacity. The resulting output files are written in a compressed form and then zipped again to minimize file transfer time.
The general steps for data extraction are:
Create a data extraction rule.
Associate the necessary nodes of mobile users with the rule.
Define the portion of the data you want to extract and specify whether any deletions should be performed on the extracted data.
Set the environment by running the siebenv.bat file at the command prompt under the Siebel Server bin directory.
Run the Syndexp.exe executable file to perform the extraction.
These general steps are detailed in the following procedures.
Creating a Data Extraction Rule
Use the following procedure to create a data extraction rule.
This task is a step in Process of Analysis.
To create a data extraction rule
Navigate to the Administration - Syndicated Data screen, then the Export Rules view.
In the Rules list, create a new record and complete the necessary fields.
Some fields are described in the following table.
Field Comments Name
A descriptive name for the rule.
Outfile Id
Enter a unique, three-character ID. This ID will be used as the name of a temporary data file created by the extraction process.
Active
If the rule is not active, it will not be processed by the extraction process.
You can create multiple rules for different types of extractions. For example, you could create one rule for Rx data and another rule for Outlet Level data. You can also extract data by multiple criteria (for example, sales force or position).
The WHERE part of a SQL SELECT statement specifies the rows of the S_SYND_DATA table that should be exported. In most cases, this WHERE clause is
WHERE T.POSITION_ID = [Position Id]
When you specify the users to extract, it will match their position ID to the position ID on the syndicated data table and extract only the data that is visible to them.
Associating Nodes with an Extract Rule
Use the following procedure to associate nodes with an extract rule.
To associate nodes with an extract rule
Navigate to the Administration - Syndicated Data screen, then the Export Rules view.
In the Rules list, select the correct rule.
Click the Nodes tab.
In the Nodes list, create a new record and complete the necessary fields.
Some fields are described in the following table.
Field Comments Name
You can select multiple nodes in the Add Nodes dialog box.
Group Code
A code used for the grouping of nodes within the same extraction rule. You can specify the Group Cd value as an argument for the extraction process that is run with the Syndexp.exe executable file. With this group code, multiple Syndexp.exe processes can be run for the same extraction rule on the same Siebel Server.
Node Type Code
An attribute column for the nodes, used to identify the remote nodes. (The Syndexp.exe process services only remote nodes.)
Active
Only nodes specified as active will be processed.
Specifying the Data to Route to Mobile Users
Use the following procedure to specify the data that is routed to mobile users.
This task is a step in Process of Analysis.
To specify the data that is routed to mobile users
Navigate to the Administration - Syndicated Data screen, then the Export Rules view.
In the Rules list, select the correct rule.
Click the Tables tab.
In the Tables list, create a new record and complete the necessary fields.
Some fields are described in the following table.
Field Comments Table Name
Generally, this value should be S_SYND_DATA. The exception to this general rule is if you have created an extension table or if you are using another table to store syndicated data.
Where String
Enter a string that defines the data to be extracted. Generally, these strings use standard SQL WHERE statements to build the extraction scripts. In addition to using static column values and column names to specify the data to be extracted, you can use two case-sensitive variables, [Position Id] and [Employee Id].
An example WHERE string definition that uses the Position Id variable follows. This example extracts data where the position ID in the syndicated data is equal to the position ID of the user. For example:
WHERE T.POSITION_ID = [Position Id]The following example extracts data for all positions assigned to an employee. Note that <TableOwner> in the example should be replaced with the appropriate Siebel database TableOwner value. For example:
WHERE EXISTS (SELECT 1 FROM <TableOwner>.S_PARTY_PER R WHERE
R.PARTY_ID = T.POSITION_ID  AND R.PERSON_ID = [Employee Id])
Sequence
Enter a numeric value that defines the order in which tables will be extracted.
Active
Only tables specified as active will be processed.
Click the SQL Statements tab, then click the Pre SQL Statements tab.
In the Pre SQL Statements list, create a new record and compete the necessary fields.
Some fields are described in the following table.
Field Comments SQL Text
This SQL statement cleans up the data in the remote database in preparation for importing newer data, by deleting the existing data that will be replaced by newer data.
If the entire syndicated data table is to be extracted, use the DELETE FROM table function. If only a subset of the data is to be extracted (for example, the latest month's data), use a where clause to specify the data subset.
Note: Each SQL statement must be prefixed with the table owner SIEBEL. If you do not include the table owner, the syndicated data import process fails.Comments
Optional description of statement’s purpose; for example, describe the portion of the data you want to extract.
Sequence
Enter a numeric value that defines the order in which SQL statements will be executed.
Active
Only statements specified as active will be processed.
You can refresh the entire syndicated data table, or you can refresh only certain specified data periods.
Setting the Environment
Use the following procedure to set the environment.
To set the environment
In a DOS window, navigate to the siebel_server
\BINdirectory.Run the siebenv.bat file.
Caution: If you do not run siebenv.bat, you might encounter the following error message: “Unable to start common api. Error in DATAExpStartApis function."Set the environment variables.
Note: Syndexp.exe will not detect nodes in a clustered environment successfully unless you manually set CLUSTER_NETWORK_NAME in either siebenv.bat or syndexp.bat.Refer to the command line arguments listed in the following table for multiple variables that are specific to the user environment. For more information on administering data extracts, see Siebel Remote and Replication Manager Administration Guide.
Note: Syndexp command line arguments are case sensitive. Also, arguments that contain path names or spaces should be enclosed in double quotes (“").Table Command Line Arguments for Environment Variables
Argument and Meaning Comments /A
Create Attachment
Default: Y
/C
ODBC Data Source
Default Environment Variable: SIEBEL_DATA_SOURCE
/D
Siebel Table Owner
Required
/E
Extract Rule Name
Required
/F
File Server Directory
Default Environment Variable: SIEBEL_FSRV_ROOT.
This File System parameter can use the absolute path to the
\attdirectory or the Universal Naming Convention (UNC).Examples:
syndexp /f "d:\Siebel\FS\att"syndexp /f \\MACHINENAME\FS\att
/G
Group Code
Required
/L
Log File
Default: syndexp.log
/N
Repository Name
Default Environment Variable: SIEBEL_REPOSITORY
/P
Password
Required
/Q
Log Frequency
Default: -1
/R
Read Consistency
Default: N
/S
Use Sequence Number
Default: N
/T
Data File Type
Default: compressed
/U
Username
Required
/V
AppServer name
Required. This is the logical name of the Siebel Server (not the host name).
/X
Appserver Home Directory
Default Environment Variable: SIEBEL_HOME
Performing a Data Extraction
Use the following procedure to preform a data extraction.
To perform the data extraction
In the siebel_server
\BINdirectory, run the Syndexp.exe executable file.Use the command line arguments listed in the table in the topic Setting the Environment to define multiple variables that are specific to the user environment. For example:
syndexp /U sadmin /P <password> /D phdemo /E “Rule One" /C siebsrvr_siebelNote: Interruption of the extraction process at any point causes the system to fail and necessitates restarting the data extraction from the beginning.If an interruption occurs, you must go into the Pharma Node Attachment Administration view (navigate to the Syndicated Data Files view) and delete the previously generated data files. You also must go into each node and delete the latest file that was created in the previous run.
After the program executes the Syndicated Data Loading (SDL) process, it displays the name of the user whose data is being extracted. This process continues until it has completed the extraction process for each user defined in the Syndicated Data Export Rules.
After you successfully complete the extraction process, you can create a batch file for use with subsequent extractions.
The extracted files are output in a compressed form to minimize file transfer time. Files are transferred using Siebel Remote, which is described in Siebel Remote and Replication Manager Administration Guide. After mobile users receive their extracted files, they must import the data into their local databases.
Full and Partial Data Extracts
Because syndicated data loading does not use EIM to maintain synchronization between the server and the remote databases, you must force a resynchronization step at the end of each direct load. Force resynchronization either by re-extracting an entirely new remote database for each mobile user or by performing a partial extract that includes only the refreshed syndicated data. A new, full database extract creates a database snapshot file for a given mobile user. A partial extract contains only S_SYND_DATA table data.
Some users receive syndicated data updates once a week, while some might receive syndicated data updates monthly or quarterly. Therefore, partial extract is preferred.
Possible Data Loss
Sometimes remote users connect to Siebel Server using unstable dial-up connections that prevent the data file from being transferred correctly, so that the data file does not reach the remote server. Siebel Server does not verify that the data file reached its destination successfully. At the end of the transfer step, Siebel Server removes the data file from the server.
In the case in which a data file is lost and removed from the server, you must extract a new data file for users.
Troubleshooting Syndicated Data Loading
If the Siebel Business Application client session locks or terminates during a syndicated data file import, do the following procedure.
To fix a session lock or termination
In a DOS window, navigate to the
siebel_server\FS folder.Copy
S_NODE_ATTxxx.SAF(containing S_NODE_ATTxxxx.dat) toCLIENT\LOCAL\FILES.Navigate to the
CLIENT\LOCAL\FILESfolder.Delete
S_NODE_ATTxxxx.dat.Restart the Life Sciences client.
Click Import.
Views Requiring Syndicated Data Import
This topic lists theSiebel Life Sciences views and business components that require data import and indicates which data values must be loaded into the syndicated data table.
The following information lists the views that require data import.
Table Views and Business Components Requiring Data Import
| Screen | View | Business Component |
|---|---|---|
Accounts |
Charts, then Sales |
Pharma Sales Consumption |
| Accounts | Charts, then Profitability |
Pharma Consumption |
Analysis |
Direct Sales Trend by Territory - Volume |
Pharma GA Sales Consumption |
| Analysis | Direct Sales Trend by Account - Volume |
Pharma GA Sales Consumption |
| Analysis | Indirect Sales Trend by Territory - Volume |
Pharma GA Sales Consumption |
| Analysis | Indirect Sales Trend by Territory - Share |
Pharma GA Sales Consumption |
| Analysis | Indirect Sales Trend by Zip - Volume |
Pharma GA Sales Consumption |
| Analysis | Indirect Sales Trend by Zip - Share |
Pharma GA Sales Consumption |
| Analysis | Indirect Sales Trend by Brick - Volume |
Pharma GA Sales Consumption |
| Analysis | Indirect Sales Trend by Brick - Share |
Pharma GA Sales Consumption |
| Analysis | Indirect Sales Trend by Account - Volume |
Pharma GA Sales Consumption |
| Analysis | Indirect Sales Trend by Account - Share |
Pharma GA Sales Consumption |
| Analysis | Rx Trend by Territory - Volume |
Pharma GA Rx Consumption |
| Analysis | Rx Trend by Territory - Share |
Pharma GA Rx Consumption |
| Analysis | Rx Trend by Prescriber - Volume |
Pharma GA Rx Consumption |
| Analysis | Rx Trend by Prescriber - Share |
Pharma GA Rx Consumption |
| Analysis | Rx Trend by Plan and Territory - Volume |
Pharma GA Rx Consumption |
| Analysis | Rx Trend by Plan and Territory - Share |
Pharma GA Rx Consumption |
| Analysis | Rx Trend by Plan and Prescriber - Volume |
Pharma GA Rx Consumption |
| Analysis | Rx Trend by Plan and Prescriber - Share |
Pharma GA Rx Consumption |
| Analysis | Rx Trend by Payment Type and Prescriber |
Pharma GA Rx Consumption |
| Analysis | Rx Trend by Payment Type and Territory |
Pharma GA Rx Consumption |
Analysis |
Rx Trend by Brick |
Pharma GA Rx Consumption |
Analysis |
Indirect Sales by Brick-Share Indirect Sales by Brick-Volume |
Pharma GA Markets Pharma GA Sales Consumption |
Contacts |
Rx Trend, then Rx Trend by Product |
Pharma GA Rx Consumption |
Contacts |
Rx Trend, then Rx Trend by Product |
Pharma Consumption |
Contacts |
PreCall, then Rx Trend PreCall, then Rx Trend and Formulary PreCall, then Rx Trend by Plan |
Contact BC Pharma GA Rx Consumption |
Objectives |
My Objectives My Team’s Objectives |
Pharma Campaign The Actual and Last Actual Update fields are the only fields in the business component that require data import. |
| Objectives | Targets (The Actual Amount fields in the Target Accounts and Target Contacts lists) |
Pharma Campaign Target Account Pharma Campaign Target Contact The Actual Amount field is the only field in each business component that requires data import. |
Data Loading Matrix for Syndicated Data
The Data Loading Matrix, shown in the first table in this topic and the Attribute by Data Source Matrix, shown in the second table in this topic, are provided to facilitate loading sales, Rx, profitability, and influence data. The first table indicates, by view, the combination of data source, mandatory ID, and plan type values a record must have to be displayed in the view. The following list explains the table headings:
View. Name of the Analysis, Contacts, Accounts, or Products view.
Data Source. Value that determines which view will display the data stored in the record. The valid values are SlsDirAct, SlsDirBrk, SlsDirTer, SlsDirZip, SlsIndAct, SlsIndBrk, SlsIndTer, SlsIndZip, RSPT, RXBrk, RXEVM, RXSMI, RSXMM, RXPrf, RXTer, RXXPT, RXZip, Anlsys ROI, and Anlsys EvsR.
Mandatory Id. Value that indicates the ID field that must be non-NULL for a database record to be displayed in the corresponding view. There are four key ID fields: Account Id, Contact Id, Territory Id, and Zip Id. For each view listed in the table, one of these ID fields is required and the other three must be NULL.
Plan Type. Value that indicates the type of plan ID a database record must have to be displayed in the view.
Table Data Loading Matrix
| View | Data Source | Mandatory ID | Plan Type |
|---|---|---|---|
Accounts screen, Charts, and then the Sales view |
SlsIndAct |
Account Id |
Total |
Accounts, screen, Charts, then the Profitability view |
Anlsys ROI |
Account Id |
Total |
Analysis screen, Direct Sales Trend, and then the by Territory - Volume view |
SlsDirTer |
Territory Id |
Total |
Analysis screen, Direct Sales Trend, then by Account - Volume view |
SlsDirAct |
Account Id |
Total |
Analysis screen, Indirect Sales Trend, then by Territory - Volume view |
SlsIndTer |
Territory Id |
Total |
Analysis screen, Indirect Sales Trend, then by Territory - Share view |
SlsIndTer |
Territory Id |
Total |
Analysis screen, Indirect Sales Trend, then by Zip - Volume view |
SlsIndZip |
Zip Id |
Total |
Analysis screen, Indirect Sales Trend, then by Zip - Share view |
SlsIndZip |
Zip Id |
Total |
Analysis screen, Indirect Sales Trend, then by Brick - Volume view |
S1sIndBrk |
Area Id |
Total |
Analysis screen, Indirect Sales Trend, then by Brick - Share view |
S1sIndBrk |
Area Id |
Total |
Analysis screen, Indirect Sales Trend, then by Account - Volume view |
SlsIndAct |
Account Id |
Total |
Analysis screen, Indirect Sales Trend, then by Account - Share view |
SlsIndAct |
Account Id |
Total |
Analysis screen, Rx Trend, then by Territory - Volume view |
RXTer |
Territory Id |
Total |
Analysis screen, Rx Trend, then by Territory - Share view |
RXTer |
Territory Id |
Total |
Analysis screen, Rx Trend, then by Prescriber - Volume view |
RXPrf |
Contact Id |
Total |
Analysis screen, Rx Trend, then by Prescriber - Share view |
RXPrf |
Contact Id |
Total |
Analysis screen, Rx Trend, then by Plan and Territory - Volume view |
RXTer |
Territory Id |
Plan |
Analysis screen, Rx Trend, then by Plan and Territory - Share view |
RXTer |
Territory Id |
Plan |
Analysis screen, Rx Trend, then by Plan and Prescriber - Volume view |
RXPrf |
Contact Id |
Plan |
Analysis screen, Rx Trend, then by Plan and Prescriber - Share view |
RXPrf |
Contact Id |
Plan |
Analysis screen, Rx Trend, then by Payment Type and Prescriber view |
RXPrf |
Contact Id |
Payer |
Analysis screen, Rx Trend, then by Payment Type and Territory view |
RXTer |
Territory Id |
Payer |
Contacts screen, Rx Trend, then the Rx Trend by Product* |
RXPrf |
Contact Id |
Total |
Contacts screen, then the Profitability view |
Anlsys ROI |
Contact Id |
Total |
Contacts screen, then the Sample Influence view |
Anlsys EvsR |
Contact Id |
Total |
Products screen, Product Profitability, then Sample ROI* |
Anlsys ROI |
Territory Id |
Total |
Products screen, then the Sample Influence view |
Anlsys EvsR |
Territory Id |
Total |
* Fourth level menu |
The following table indicates, by data source, the data values that should be loaded into the syndicated data table (S_SYND_DATA) attribute fields.
Table S_SYND_DATA Attribute by Data Source
| Data Source | Attribute 1 | Attribute 2 | Attribute 3 | Attribute 4 | Attribute 5 |
|---|---|---|---|---|---|
Anlsys EvsR |
TRx |
Number of Calls |
Number of Samples |
Number of Details |
|
Anlsys ROI |
Revenue |
Samples Cost |
Promotion Cost |
Call Expenses |
Other Expenses |
RSPT |
Product NRx |
Product TRx |
Market NRx |
Market TRx |
|
RXBrk |
Product NRx |
Product TRx |
Market NRx |
Market TRx |
|
RXEVM |
Product NRx |
Product TRx |
Market NRx |
Market TRx |
|
RXPrf |
Product NRx |
Product TRx |
Market NRx |
Market TRx |
|
RXSMI |
Product NRx |
Product TRx |
Market NRx |
Market TRx |
|
RXSMM |
Product NRx |
Product TRx |
Market NRx |
Market TRx |
|
RXTer |
Product NRx |
Product TRx |
Market NRx |
Market TRx |
|
RXXPT |
Product NRx |
Product TRx |
Market NRx |
Market TRx |
|
RXZip |
Product NRx |
Product TRx |
Market NRx |
Market TRx |
|
SlsDirAct |
Product Sales $ |
Product Sales Units |
|||
SlsDirBrk |
Product Sales $ |
Product Sales Units |
|||
SlsDirTer |
Product Sales $ |
Product Sales Units |
|||
SlsDirZip |
Product Sales $ |
Product Sales Units |
|||
SlsIndAct |
Product Sales $ |
Product Sales Units |
Market Sales $ |
Market Sales Units |
|
SlsIndBrk |
Product Sales $ |
Product Sales Units |
Market Sales |
Market Sales Units |
|
SlsIndTer |
Product Sales $ |
Product Sales Units |
Market Sales $ |
Market Sales Units |
|
SlsIndZip |
Product Sales $ |
Product Sales Units |
Market Sales $ |
Market Sales Units |
Importing Syndicated Data Files
This task is a step in Process of Importing Data.
Extracted files are transferred using Siebel Remote (as described in Siebel Remote and Replication Manager Administration Guide). After mobile users receive their extracted files, they must import the data into their local databases.
The process is described in the following procedure.
To import syndicated data files
Using Siebel Remote, synchronize your local database with extracted data files that have been routed to you. Extracted data files are received as attachment files.
Click the Import button and the extracted data files are downloaded to the
\LOCAL\FILESfolder of your hard drive.After importing the extracted data files into your local database, delete the downloaded files from the
\LOCAL\FILESfolder.Note: Users can postpone downloading of extracted data files by turning off the Retrieved Published Files option in their synchronization setup. Whether or not the extracted data files are downloaded, header information is transferred to the mobile client during the synchronization session. This information appears in the Syndicated Data Files view.
For further information, see Siebel Remote and Replication Manager Administration Guide.