3Creating and Assigning Price Lists
Creating and Assigning Price Lists
This chapter begins with an overview of price lists, and then describes the most common way of creating a new price list. It also instructs you on assigning price lists to users. This chapter covers the following topics:
About Price Lists
A price list is a set of standard prices for products or services.
A product must exist in a price list so that it appears in a catalog. So, the price list is one of the requirements for a product’s visibility.
A product price defined in a price list is commonly used as the starting price for other prices generated by Siebel Pricer. Test the price list thoroughly before applying more advanced price adjustments.
This chapter describes the four common ways of creating a price list:
Create a new price list
Copy and modify an existing price list
Copy and transform an existing price list
Import price lists from other applications using Siebel Enterprise Integration Manager (EIM)
After you create a price list, you must assign it to customers so that it controls the prices available to customers.
A product can appear in many different price lists. For example, you can create:
One price list with the wholesale prices for all of your products.
One price list with the retail prices for all of your products.
The line item records of these two price lists will have different prices for the same products. You assign these price lists to the appropriate customers.
About Sales Products and Service Products
Price lists can include prices for two different types of products:
Sales products. This is any product that is sold to a customer.
Service products. This is a specialized type of sales product consisting of a service that covers another sales product, such as a warranty service.
Price List Prerequisites
Before you create any price list, you must create the products to which the prices will apply. You must define products. For more information, see Siebel Product Administration Guide.
Optional Prerequisites
The price list includes optional fields that let you associate it with other data in the Siebel application. You must define the other data before you can use these optional fields.
For example, if you want a price list to use volume discounts, then you must define volume discount information before you can associate it with line items in a price list.
You do not have to define this data before creating the price list. You can skip these optional fields when you create the price list, and go back to the price list to fill them in later, after defining the data that is needed.
The types of data that can optionally be associated with price lists include:
Pricing procedure. You can create a custom pricing procedure with pricing logic specific to a price list or to line items. For more information, see Enabling Price List-Specific and Line Item-Specific Pricing Logic.
Rate lists. For more information, see Creating and Assigning Rate Lists.
Cost lists. For more information, see Creating and Using Cost Lists.
Volume discounts. For more information, see Creating Volume Discounts.
Aggregate discount sequences. For more information, see Creating Aggregate Discounts.
Attribute adjustments. For more information, see Creating Attribute Adjustments.
Component-based pricing adjustments. For more information, see Setting Up Pricing for Products with Components.
Process of Creating a Price List
A price list consists of one price list header record that is associated with multiple line item records. The header record contains general information about the price list as a whole. The line item records contain prices for specific products.
There are two types of line items:
Sales products. Enter line items for sales products in the Price List Line Items view.
Service products. Enter line items for service products in the Service Pricing view.
A single price list can contain one or both of these types of line items. For more information about sales and service products, see About Sales Products and Service Products.
To create a new price list, perform the following tasks:
Adding Price List Line Items for Service Products.
Note: Creating a price list line item for a product with components is more complex than creating a line item for a simple product. Consult with a Siebel Administrator before creating price lists for products with components. For more information about products with components, see Setting Up Pricing for Products with Components.
Defining a Price List Header
This task is a step in Process of Creating a Price List.
Each price list is defined by the data in its header, which includes its name, describes its purpose, and specifies the time period when it will be effective.
The price list header does not hold the actual prices for products. Prices are in the associated price list line items.
To define a price list header
Navigate to the Administration - Pricing screen, then Price Lists view.
In the Price Lists list, add a new record and complete the necessary fields, as described in the following table.
Field Comments Name
Enter a meaningful name for this price list. Overwrite any Siebel-Pricer-generated name.
If many price lists appear in your Siebel application, then use a consistent naming convention to name all your price lists.
Cost List
Select the cost list you want to associate with this price list.
Currency
Enter the default currency for this price list.
Shipping Method
Select one default shipping method you want to associate with this price list. This appears as the default Shipping Method when a run-time user creates a quote or order that specifies this price list.
Payment Terms
Select one default set of payment terms to be associated with this price list. This selection appears as the default data for Payment Terms when a run-time user creates a Quote or Order that specifies this price list.
Organization
Select all the organizations that may have prices controlled by this price list. For more information, see Assigning Price Lists to Users.
Ship Method
Enter the mode used for shipping such as air, ground, and so on.
Shipping Terms
Select one default shipping charge protocol that you want to associate with this price list. This appears as the default Shipping Terms data when a run-time user creates a quote or order that specifies this price list.
Effective From
Enter the date and time when this price list will become effective. By default, Siebel Pricer assigns the current system date and time when you first create the Price List record.
Effective To
Enter the date and time when this price list will become ineffective. After this time, Siebel applications will not be able to use this price list.
Updated By
By default, Siebel Pricer assigns the user name used to log in to the current session in which this Price List record is created.
Last Updated
By default, Siebel Pricer assigns the current system date and time when you most recently saved this Price List record.
Integration ID
If this Siebel-Pricer-generated ID appears, then you can use it as a unique identifier for this price list to assist with integration tasks. The Integration ID field is used for integration with external applications. This field is populated by Siebel EAI connectors.
Pricing Procedure
Select a custom pricing procedure. The pricing logic in this procedure will be applied to all the line items in the price list. Before this field is available, you must do the setup work described in Enabling Price List-Specific and Line Item-Specific Pricing Logic.
Aggregate Discount Sequence
Select an aggregate discount sequence in order to apply aggregate discounts to the price list. For more information, see Creating Aggregate Discounts.
Adding Price List Line Items for Products
This task is a step in Process of Creating a Price List.
A price list line item for a product includes the product name, the product price, and related information. Adding a line item is equivalent to adding a product to the price list.
A line item for a product can appear in multiple price lists. For example, your United States price list might have a line item for the product’s retail price in the United States, your Canadian price list may have the product’s retail price in Canada, and so on.
To add a new price list line item for a product
Navigate to the Administration - Pricing screen, then Price Lists view.
In the Price List form, select the price list to which you want to add a line item.
Click the Price List Line Items view tab.
In the Price List Line Items list, click New.
The Add Products dialog box appears.
Use the Add Products dialog box to add the product to the price list.
If the product is a product with components, then see the instructions in Setting Up Pricing for Products with Components.
Complete the fields in the Price List Item record, and the Price List Line Item Detail form, as described in the following table.
Caution: If you do not specify a price for a product in its price list line item, then that product may appear in a quote or order without a price, effectively making it free to a run-time user who is buying it. If you depend on other pricing mechanisms to supply a missing price, then be sure to test the results in the run-time environment.Field Comments Product
Select a product name using the Add Products dialog box.
Price Type
This field is read-only and displays the price type for this product. Options are One-Time, Recurring, and Usage. The value is based on the product definition. For more information about multiple price types, see Multiple Price Types and Totals.
Customizable
When this check box is selected, it means that the product has components. This value is based on the product definition and is read-only.
List Price
Enter a list price, the standard price used for most transactions and the most commonly used target price for price adjustments.
If you enter a promotional price, then it is used instead of this list price.
The list price is not checked against the Minimum Price and Maximum Price fields when it is first entered, because these fields are usually entered after the list price. When the minimum and maximum prices are entered, the list price is validated against them.
Note: If the list price, promotional price, and price override are all omitted, then the product may be offered with no price, the equivalent of a zero price.Promotional Price
If you enter a promotional price, then it will be used instead of the list price in all functions that do not explicitly identify the list price as the target price.
Volume Discount
Select the volume discount that applies to this line item, if any. More than one volume discount may be available for a given product, and all the volume discounts that can apply to this product are displayed in the drop-down list. For more information, see Creating Volume Discounts
Attribute Adjustments
This field specifies the attribute adjustments record that provides attribute-based pricing adjustments for this line item, if any. For more information, see Creating Attribute Adjustments.
Start Date and End Date
If this line item has different effective dates from the price list, then enter the start date when the pricing becomes effective and the end date when it is no longer effective. To enter values in these fields, use the method described in Giving a Product Multiple Prices with Different Effective Dates.
Product Line
This field displays the product line to which this line item product belongs. This value is taken from the product information.
Part Number (Part #)
This field displays the part number assigned to the line item product. This value is derived from the product information.
Cost
Enter the cost of the line item product. You can use this as the target price for some price adjustment calculations.
MSRP
Enter the manufacturer’s suggested retail price (MSRP) for reference purposes. In some cases, you can use this as the target price for price adjustment calculations.
Purchase Price
Enter the purchase price of the line item product. You can use this as the target price for some price adjustment calculations.
Unit of Measure
This field displays the unit of measure for the product item. This value comes from the product definition.
Minimum Price
If a minimum price value is provided, then Siebel Pricer does not offer a lower price for this line item, unless a run-time user (such as an agent) manually overrides this price.
As a default, specify a minimum price of zero to prevent amount discounts from resulting in negative number prices.
The minimum price does not apply to components of products with components.
Maximum Price
If a maximum price value is provided, then Siebel Pricer does not offer a higher price for this line item, unless a run-time user (such as an agent) manually overrides this price.
If a maximum price is provided for a price list line item product and if that product appears as a component in a product with components, then this maximum price will apply to that component product as well.
% Margin
Read-only. This is a calculated field that calculates the margin based on the following formula:
((List or promotional price) – cost)/List*100
Pricing Procedure
Select a custom pricing procedure. The pricing logic in this procedure will be applied to this line item. Before this field is available, you must do the setup work described in Enabling Price List-Specific and Line Item-Specific Pricing Logic.
Adding Price List Line Items for Service Products
This task is a step in Process of Creating a Price List.
A price list line item for a specific service product includes the product name, the product price, and related information, such as the time when the service price is effective. Adding a record to the Service Pricing view is equivalent to adding a service product to the price list.
As a shortcut, if you are adding the same service product with different time intervals, then you can click the New Effective Date button to add another record for the same service product, so you have to enter only the new start date, end date, and price. The time interval is the period when the service is delivered.
You can also base service pricing on the covered asset, as described in About Setting Up Service Pricing.
To add a new price list line item for a service product
Navigate to the Administration - Pricing screen, then Price Lists view.
The Price Lists view appears, displaying the currently defined price lists.
In the Price List form, select the price list to which you want to add a line item.
Click the Service Pricing view tab.
In the Service Pricing list, click New.
The Add Products dialog box appears.
Use the Add Products dialog box to add the product to the price list.
If the product is a product with components, then see the instructions in Setting Up Pricing for Products with Components.
Complete the fields in the Service Pricing record and the Service Pricing Details form, as described in the following table.
Field Comments Product
Select a product name using the Add Products dialog box.
Customizable
When this check box is selected, it means that the product has components. This value is based on the product definition and is read-only in this screen.
Service Product
This check box is selected if this is a service product. This information depends on the product definition.
List Price
Enter a list price, the standard price used for most transactions and the most commonly used target price for price adjustments.
Note: If the list price and price override are both omitted, then the product may be offered with no price, the equivalent of a zero price.Start Date and End Date
If this line item has different effective dates from the price list, then enter the start date when the pricing becomes effective, and the end date when it is no longer effective. To enter values in these fields, use the method described in Giving a Product Multiple Prices with Different Effective Dates.
Service Price Method
Specify the basis used for calculating the price markup of the service product from the covered product. The options are the list price and net price of the covered product. The percentage entered in the Service Price % field is applied to the price you specify in this field, and the resulting amount is added to the list price of the service to calculate the price.
Service Price %
Enter a percentage that is used to mark up the price of the service product. The price for this service product is the list price of the service product plus this percentage of the net or list price of the covered product, depending on whether you selected net price or list price in the Service Price Method field.
About Setting Up Service Pricing
You can set up service pricing in two ways:
Price the service as a percentage of the covered product. For example, a one-year warranty can be priced at 10% of the price of the computer system that it covers. For information about how to do this, see Setting Up Service Pricing as a Percentage of a Covered Product.
Price the service with adjustments based on a primary covered product. The price of the service can be equal to the list price of the service with a price adjustment based on the product that is covered. For information about how to do this, see Setting Up Service Pricing with Adjustments Based on a Covered Product.
In either case, the service pricing is triggered when the end user creates a quote or order and associates the service to the covered product.
Setting Up Service Pricing as a Percentage of a Covered Product
The price of the service is equal to the list price of the service plus a percentage of the price of the covered product.
This method of pricing is available without configuration.
To set up service pricing as a percentage of a covered product, perform the following tasks:
Pricing a Service as a Percentage of a Covered Product
A service can be priced as a percentage of the covered product. Alternatively, there can be a list price for the service, and a percentage of the covered product is added to this list price.
To set up service pricing as a percentage of the covered product
Add the service price line item, as described in Adding Price List Line Items for Service Products.
Complete the fields in the Service Pricing Details form as described in the following table.
Field Comments Service Pricing Method
Select Net Price of List Price to determine whether the service price is a percentage of the net of list price of the covered product.
Service Price %
Enter the percentage of the covered product’s price to use as the service price.
List Price
Enter a list price for the service product.
Associating a Service with a Covered Product
When the end user creates a quote or order for a service whose price is based on a product, the end user must associate the service with the product. For more information about how an end user creates a quote or order, see Siebel Order Management Guide.
To associate a service with a covered product
Create a quote or order as described in Siebel Order Management Guide.
Add the covered product as a line item.
From the Line Items applet menu, choose Service.
A dialog box appears that includes only service products.
Select the appropriate service product from the dialog box, and click OK.
The service product is added as a line item to the quote or order, and it is associated with the covered product. This association appears in the Covered Product field of the service product line item.
Note: As an alternative to choosing Service from the menu, you can directly populate the Covered Product field of the service line item to create an association between the service and the covered product.
Setting Up Service Pricing with Adjustments Based on a Covered Product
The price of the service equals the list price of the service plus a price adjustment that depends on the primary product that it covers.
To set up service pricing with adjustments based on a product, perform the following tasks:
Pricing a Service with Adjustments Based On a Primary Covered Product
Pricing administrators can set up service pricing with an adjustment based on the primary product that is covered. For example, there can be a list price for a one-year service agreement, with a 10 percent discount if the agreement covers computer system A and a 15 percent discount if it covers computer system B.
To price a service with adjustments based on a product
Add the service price line item, as described in Adding Price List Line Items for Service Products.
Add a record to the Service Pricing Details list for each product that the service covers and complete the necessary fields, as described in the following table.
Field Comments Product
Select the product to which this discount applies.
Adjustment Type
Select the type of the adjustment that the discount will apply. Options are Discount Amount, % Discount, Markup Amount, % Markup, and Price Override.
Target Price
Select the price to which the discount applies.
Adjustment Value
The value in the Adjustment Type field determines how the adjustment value is applied, as follows:
If the Adjustment Type is Discount Amount, then the amount in the Adjustment Value field is subtracted from the price.
If the Adjustment Type is % Discount, then the amount in the Adjustment Value field is treated as a percentage and is subtracted from the price. For example, if the Adjustment Amount is 10, then 10 percent is subtracted from the price.
If the Adjustment Type is Markup Amount, then the amount in the Adjustment Value field is added to the price.
If the Adjustment Type is % Markup, then the amount in the Adjustment Value field is treated as a percentage and added to the price.
If the Adjustment Type is Price Override, then the amount in the Adjustment Amount field is used instead of the price.
Associating the Service Product with Covered Products
When the end user creates a quote or order for products that are covered by this service, the end user must associate the service with one or more products. The price adjustment for the service depends on the primary product. For more information about how an end user creates a quote or order, see Siebel Order Management Guide.
To associate a service with covered products
Create a quote or order as described in Siebel Order Management Guide.
Add the service product as a line item of the quote or order.
Click the Assets view tab.
In the Assets list, add records and in the Asset # field, select the products covered by this service.
In the Asset record of the primary product covered by this service, select the Primary check box.
The price adjustment for the service depends on the primary product.
About Effective Dates for Pricing Line Items
You can create effective dates for individual line items in a price list, cost list, discount matrix, or component-product price adjustment. The application prevents you from entering overlapping effective dates for the same line item when you enter effective dates using the New Effective Date button, as described in Giving a Product Multiple Prices with Different Effective Dates.
For example, if a price list has a line item for Product X with a price that is effective from January 2005 through June 2005, then do not enter another line item for Product X with a price that is effective from March, 2005 through December 2005, because the product would have two different prices during several months.
This topic describes several scenarios that show how the application resolves overlapping dates.
The New Time Interval Overlaps with One Existing Time Interval
This topic describes several possible scenarios where a new time interval overlaps with an existing time interval.
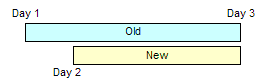
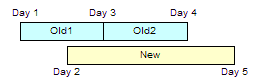
If the effective dates in the new record overlap with the existing record’s start date, or with the existing record’s end date, as shown in the following figures, then the application displays an error message and does not enter the new effective dates.
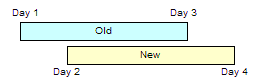
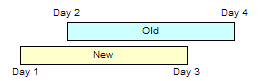
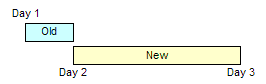
However, if the new time interval is entirely within an existing time interval and does not overlap with the start or end date, as shown in the following figure, then the application creates three time intervals, as shown in the fourth figure in this topic.
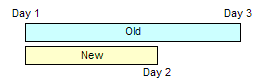
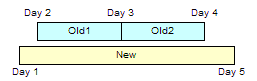
Likewise, if the new time interval is entirely within an existing time interval but its end date is the same as the end date of the existing interval, as shown in the following figure, then the application creates two time intervals, as shown in the sixth figure in this topic.
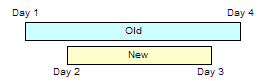
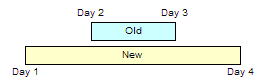
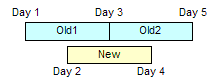
However, if the new time interval is entirely within an existing time interval but its start date is the same as the start date of the existing interval, as shown in the following figure, then the application displays an error message and does not create the new time interval.
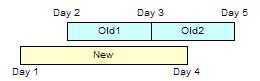
However, if the new time interval extends beyond the existing time interval, as shown in the following figure, then the application displays an error message and does not create the new time interval.
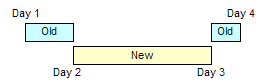
The New Time Interval Overlaps with Two Existing Time Interval
This topic describes the possible scenarios where a new time interval overlaps with two existing time intervals. The effective dates in the new record may overlap with the effective dates in two existing records, as shown in the following figures. In all of these cases, the application displays an error message and does not enter the new effective dates.
Giving a Product Multiple Prices with Different Effective Dates
Price lists, cost lists, discount matrices, and component-product price adjustments have effective dates for the list or group as a whole. You can also enter effective dates for individual line items.
Effective dates for individual line items allow you to change prices rapidly and track changes to a product’s prices. For example, if you have different prices for certain products during different seasons, then you can include prices for all the seasons in one price list, so prices change automatically when the season changes.
As a best practice, do not delete line items from a price list or directly modify the value of prices at a line level. In order to make price changes, create multiple line item records with different effective dates, as described in the following procedure.
This topic describes how to create effective dates for line items in price lists. Use the same methods for cost lists, discount matrices, or component-product price adjustments.
When you use the method described here to add multiple line items for the same product with different effective dates, the application does not create line items with overlapping effective dates. For information about how the application resolves this issue, see About Effective Dates for Pricing Line Items.
To create multiple prices with different effective dates
Create one pricing line item for the product as described in Adding Price List Line Items for Products.
Select the pricing line item for the product, and then click New Effective Date.
A new line item is created for the same product.
In the new line item, enter the Start Date and End Date for the new time interval.
If necessary, repeat Step 2 and Step 3 to continue adding more line items with different effective dates for the product.
Creating a Price List Line Item for a Simple Product Bundle
A product bundle allows you to give customers a discount if they buy a combination of products. For example, you can give customers a price for a dining room table and four chairs that is less than the price they would pay if they bought the table and chairs individually.
You do this by creating a product of type bundle. You assign a price to the bundle product in the same way that you assign a price to an individual product. For information about creating simple bundle products, see Siebel Product Administration Guide. Before performing the following procedure, follow the instructions in Adding Price List Line Items for Products.
To create a price list line item for a simple product bundle
Create a new product line item, as described in Adding Price List Line Items for Products.
In the Name field, select a product bundle that has been defined in the Product Administration screen.
Copying and Modifying a Price List
After building a price list, you can copy and modify it to create a new price list for different types of customers or markets. For example, you might use a price list named United States Price List as the basis for creating new price lists for different countries, locations, organizations, currencies, accounts, or demographics.
To modify the data in more elaborate ways, you use the Transform functionality, described in Copying and Transforming a Price List, instead of modifying the data manually.
To copy and modify a price list
Navigate to the Administration - Pricing screen, then Price Lists view.
In the Price Lists list, select the price list you want to copy.
In the Price Lists list, click the menu button, and then click Copy Record.
A new Price List record appears with all of the data from the original price list, except for the original price list name.
Modify the information in the fields of the price list header and the price list line items.
Either edit the fields directly or click the menu button, click Change Records, and then use the Change Records dialog box to modify the record.
Copying and Transforming a Price List
The Transform function allows you to transform a copy of an existing price list by making sweeping price changes to product prices. It lets you change every list price without modifying each individual line item separately. Using the Transform options, you can:
Change all list prices by the percentage you specify. For example, you can increase all list prices to 130 percent of their previous value.
Convert all list prices to a different currency. You specify the currency and the conversion date, and the prices are converted automatically.
Apply a pricing procedure to a price list, changing some or all product prices depending on the design of the procedure. To do this, you must create the pricing procedure before you do the transformation. For more information about creating pricing procedures, see Siebel Order Management Infrastructure Guide.
The Transform function transforms the list price as well as the promotional price fields.
To transform a price list
Select the price list you want to use as a basis for the new price list.
From the Price List menu, select Transform.
The Transform Price List form appears.
Enter information in the Transform Price List form, as described in the following table, and then click Transform.
Field Comments Source Price List Name
Enter the name of the price list to be transformed.
Destination Price List
Enter the name of the price list resulting from transforming the Source Price List.
Currency Code
Select the currency you want to use for prices in the transformed price list. The default value is the currency of the copied price list. If you are not changing currencies, then keep the default.
Exchange Date
If you are converting currencies, then enter the date for the currency exchange rate. The Siebel application will use the exchange rate on that day to convert currency.
Markup or Discount %
Enter a percentage to be applied to the list price for each product in the price list. For example, to increase all list prices by 30 percent, you would enter 130. To decrease all list prices by 20 percent, you would enter 80. The default value is 100 percent. If you do not want to change prices, then keep this default.
Pricing Procedure
If you are using a pricing procedure to transform the prices, then select the Workflow that calls the pricing procedure.
Importing Price Lists
It is common to use Siebel Enterprise Integration Manager (EIM) to import price lists into the Siebel application to handle large numbers of price lists that were created in other applications.
Price lists are defined by organization. By default, the column ENTERPRISE_FLG of a manually entered price list is set to N, which enables organizational visibility of price lists and associated price list items.
If you use Siebel EIM to import price lists and price list items, then set ENTERPRISE_FLG to N to retain organizational visibility. If ENTERPRISE_FLG is set to Y, then the price lists and associated price list items are become visible across the enterprise, and are routed to all users regardless of organization. For more information about using Siebel EIM, see Siebel Enterprise Integration Manager Administration Guide.
Assigning Price Lists to Users
The price list that controls a user’s prices depends on both organization and account:
Organization. This option limits visibility. The user cannot see a price list unless it was assigned to the user’s organization in the Organization field of the price list record. One price list can be assigned to many organizations, and many price lists can be assigned to a single organization.
Account. This option controls which price list is active for the user. The active price list is the price list associated with the user’s account record.
When you associate a price list with an account, that price list is automatically defaulted in the quote or order when the account is entered for the quote or order, and the price list’s currency is set as the header-level currency for the quote or order.
To assign a price list to a user
Navigate to the Administration - Pricing screen, then Price Lists view.
In the Price Lists list, select the price list you want to assign to the user.
In the price list’s Organization field, click the select icon.
The Organization’s dialog box appears.
If the user’s organization is not already listed in this dialog box, then click New, add it, and then click OK.
Navigate to the Accounts screen, then Accounts List view.
In the Accounts list, click the name of the user’s account.
Click the More Info view tab.
In the More Info view, go to the Price List field list and select the price list for this account.
Enabling Price List-Specific and Line Item-Specific Pricing Logic
You can associate a custom pricing procedure with either an entire price list or an individual line item in a price list. To associate a custom pricing procedure with an entire price list, select it in the Pricing Procedure field of the Price List record, as described in Defining a Price List Header.
To associate a custom pricing procedure with a line item, select it in the Pricing Procedure field of the Line Item record, as described in Adding Price List Line Items for Products.
Before you select the custom pricing procedure in these fields, you must create the custom pricing procedure and integrate it with the default pricing procedure. For more information about creating pricing procedures, see Siebel Order Management Infrastructure Guide.
To create price list-specific or line item-specific pricing logic, follow this general process:
Create a custom pricing subprocedure with the pricing logic that you want to add to the price list or line item.
Add a dynamic subprocedure step to the default pricing procedure.
Modify the default pricing procedure to retrieve this subprocedure during Price List Lookup.
Associate the custom subprocedure with the price list or line item as follows:
To associate it with the price list, select it in the Pricing Procedure field of the Price List record.
To associate it with a line item, select it in the Pricing Procedure field of the Line Item record.