Using Pop-up Pages
Note: Pop-up pages – Mouse-over pop-up pages are not supported in fluid applications.
This section provides an overview of pop-up pages and discusses how to:
Define pop-up pages.
Associate pop-up pages with fields.
Enable Message Catalog pop-up pages.
Pop-up pages are a type of PeopleSoft page that displays information that supplements, expands, or enhances the transaction page data. Pop-up pages are ideal for displaying additional, more detailed information that is pertinent to a subset of users. For example, you can create a Purchase Order Header Details pop-up page that displays customer details such as contact information and payment data. You can then associate the details pop-up page with the Purchase Order Line Items page so that an account representative who is reviewing line items can quickly access customer contact data without having to leave the transaction. Similarly, you can create an Employee Details pop-up page to display an employee's ID, name, department, current job assignment, phone number, and email address. You then associate the Employee Details pop-up page to a specific field on an employee-related transaction page. At runtime, when you move your mouse over this field, the pop-up page appears and displays information that is contextually relevant to the employee data on the transaction page.
Pop-up pages look and behave differently from standard PeopleSoft transaction pages. For example:
Pop-up pages are not standalone pages; they are linked to, dependent upon, and accessed from their primary transaction pages.
Pop-up pages do not appear unless you hover your mouse over the page control with which you associated the pop-up page.
Pop-up pages support only a subset of page controls.
Pop-up pages cannot contain scroll areas or grids.
Pop-up page fields are display-only.
You should place pop-up page PeopleCode either in the page Activate event or on the RowInit event of work records associated with the pop-up page.
If a value at level 0 on the pop-up page comes from one of the search key fields and if no non-search key value from that record appears at level 0 on the main page, then RowInit PeopleCode in that record does not run.
In addition, if a non-search key value from that record appears on the pop-up page only, then the system does not consider the field to be part of the main page. Because of this, no values for the non-search key fields are retrieved from the database. To populate non-search key fields on the pop-up page with data, you must place a non-search key value from that record on the main page. The field can be hidden on the main page, but it has to exist there.
Designing Context-Sensitive Pop-up Pages
To create pop-up pages that retrieve data that maintains the key field context of the main page, you must ensure that these conditions are met:
For each record definition that the pop-up page references, key field values must exist on the main page.
Note: If the key field value is not found, use the Set Trace Flags option Related Displays, and search for more information in the log file.
The names of the main page fields in which these key values exist must be identical to the names of the key fields of the record definitions referenced on the pop-up page.
Note: While the field names must be identical, they do not have to be key fields in the record definition referenced by the main page.
The fields in which the key values appear must appear in either the same scroll area as the field to which you associate the pop-up page or at a preceding level. The page field to which you link the pop-up page can be one of the fields that contains the key field values; frequently, it is the lowest order key.
Consider this scenario:
If PRec s the record that the pop-up page references and the key fields are PRec.K1 and PRec.K2, then, the K1 and K2 fields must exist on the main page as MRec.K1 and MRec.K2, where MRec is the record that the main page references.
If the field on the main page to which the pop-up page is attached is in ScrollA—a level one scroll area—then both MRec.K1 and MRec.K2 must either exist in ScrollA or at level zero.
Note: On the main page, it is not necessary that the K1 and K2 fields appear in the same record, MRec in the previous case. The fields could be MRec.K1 and NRec.K2, where NRec.K2 is some other field on the main page in the correct context.
Context-Sensitive Pop-up Page Example
In this example, you see a User Details pop-up page. This page is associated with a view, which retrieves information so that the page displays the employee's name, photo, department, phone number, address, and web site URL.
Image: User Details pop-up page
This example illustrates the fields and controls on the User Details pop-up page. You can find definitions for the fields and controls later on this page.
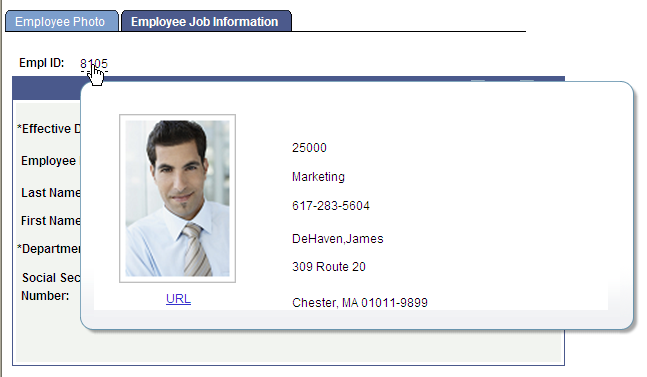
The fields on the pop-up page reference PS_EMPL_VW. The key field of PS_EMPL_VW is EMPLID, which requires that the EMPLID field exist on the main page.
The field to which the pop-up page is linked is at level 0, which requires that EMPLID be at level 0 also.
Note: EMPLID is a key field on the PS_EMPL_VW record that the pop-up page references. While EMPLID also happens to be a key field on the PS_EMPL_JOB record that the transaction page references, it is not a requirement.
Identifying Valid Controls on Pop-up Pages
You may insert these controls only on a pop-up page:
Frames
Group boxes
Horizontal rules
Static text
Static images
Check boxes
Drop-down list boxes
Edit boxes
Images
Long edit boxes
Push Button/Hyperlinks
Radio buttons
Charts
Note: Except for Push Button/Hyperlink page controls, these controls are automatically set as display-only at runtime even if you do not set the Display-Only property on the control.
Using Push Buttons and Links on Pop-up Pages
You may use only these destination type values on a pop-up page:
External link
Instant messaging action
Internal link
PeopleCode command
Process
Secondary page
Note: Do not use other destination types for push button/hyperlink controls on pop-up pages because unexpected results will occur.
Before you define your pop-up pages, you should determine which data is appropriate for pop-up information. Typically, this is data that supplements and enhances the data on the primary page or information that you might access from more than one main page.
Note: When designing pop-up pages, carefully consider how to make them more versatile and reusable.
To define pop-up pages:
Select and select Page from the New Definition dialog box.
Insert the record fields on the pop-up page.
Right-click the page and select Page Properties to open the Page Properties dialog box.
Select the Use tab.
Select Popup Page from the drop-down list box in the Page Type group box.
Select the page size:
Field or Control
Definition
Auto-Size Select to size the page automatically to fit the fields that are defined on it.
Custom Size Select to size the pop-up page by dragging the edge or by entering the width and height in pixels.
(Optional) Select Adjust Layout for Hidden Fields.
Click OK and save your pop-up page.
If you selected Auto-Size, the system sizes the page automatically to fit the fields that are defined on it when you save.
To associate pop-up pages with fields:
Select and select the main page.
Select Insert, Edit Box or Insert Push Button/Hyperlink..
Note: You can associate pop-up pages with display-only edit box and push button/hyperlink controls at level 0 or inside of scroll areas only. If you associate pop-up pages with controls that are in grids, you will receive an error.
Double-click the control.
Select the Use tab.
Select the Display Only check box.
In the Mouse Over Popup group box, select the Page Popup option.
Select the name of the pop-up page from the drop-down list box.
Note: Only pop-up pages appear in the drop-down list.
Click the OK button.
A dashed line should appear beneath the field to indicate its association with a pop-up page.
Save the page.
Note: If page controls are placed too close together on a page, the dashed line, which indicates an associated mouse over pop-up page, might not appear beneath the control.
You can enable Message Catalog pop-up pages to embed context sensitive help on any PeopleSoft page. This section discusses how to:
Enable message catalog pop-up pages.
Embed context-sensitive help in pop-up pages.
Enabling Message Catalog Pop-up Pages
To enable message catalog pop-up pages:
Double-click the field that accesses the pop-up page.
Select the Use tab.
Select the Display-Only check box.
Note: You must select Display-Only.
Select the Message Catalog Popup option.
Enter the Message Set and Message Number of the message whose Message Text and Explain strings appear in the Message Catalog pop-up page.
Click the OK button.
Note: You can also set the Message Catalog entry for mouse over pop-up pages by using PeopleCode.
Embedding Context-Sensitive Help in Pop-up Pages
You can add variables to a message to make a Message Catalog pop-up page context-sensitive to the PeopleSoft product documentation online help.
Note: You must correctly configure and implement PeopleSoft online help.
To add variables to messages to embed context-sensitive help:
Access the Message Catalog (PeopleTools, Utilities, Administration, Message Catalog to access the Message Catalog).
Select an existing message or create a new message.
Enter an explanation and place the variable in the Explanation field.
The table in the next section describes the variables and their usage.
Note: The text in the Message Text field appears as the pop-up page header. The text in the Explanation field appears in the pop-up page body.
Enable the pop-up page on the desired edit box control.
Embedded Help Variables
This table describes the variables that you can add to the embedded help content in the Message Catalog. Use these variables to generate links on the embedded help pop-up page that enable the user to access additional online help.
Note: Your PeopleSoft online help option must be configured for any Help link to function properly.
|
Variable |
URL |
Label |
|---|---|---|
|
This variable uses the current page name as the %CONTEXT_ID% to build the Help URL so that the embedded link takes the user to the Help content associated with the current page. |
Because no message is referenced, the label of the help link appears as PeopleBooks Help. |
The argument |
This variable uses the current page name as the %CONTEXT_ID% to build the PeopleBooks Help URL so that the embedded link takes the user to the PeopleBooks content associated with the current page. |
Because a message is referenced, the label of the help link appears as the value that is stored in the Message Text field for the referenced message. If you reference an invalid message, the label appears as PeopleBooks Help. |
The argument |
This variable uses the CTXT_PG_NM argument as the %CONTEXT_ID% to build the PeopleBooks Help URL so that the embedded link takes the user to the PeopleBooks content associated with the page referenced by the argument. |
Because no message is referenced, the label of the help link appears as PeopleBooks Help. |
The argument The argument |
This variable uses the CTXT_PG_NM argument as the %CONTEXT_ID% to build the PeopleBooks Help URL so that the embedded link takes the user to the PeopleBooks content associated with the page referenced by the argument. |
Because a message is referenced, the label of the help link appears as the value that is stored in the Message Text field for the referenced message. If you reference an invalid message, the label appears as PeopleBooks Help. |
The URL_IDENTIFIER is any URL_ID that is stored in the URL Maintenance component. See URL Maintenance. The argument |
This variable uses the URL_IDENTIFIER argument to build the help URL so that the embedded link takes the user to the site associated with the URL_ID. |
Because a message is referenced, the label of the help link appears as the value that is stored in the Message Text field for the referenced message. If you reference an invalid message, the system uses the URL_IDENTIFIER argument as the label. |
The argument |
This variable uses the hard-coded URL so that the embedded link takes the user to the specified site. |
Because a message is referenced, the label of the help link appears as the value that is stored in the Message Text field for the referenced message. If you reference an invalid message, the system uses the URL as the label. |
Example
In this example, the %PBCTXT variable
uses QRY_ADMIN as a CONTEXT_ID that references the Query Administration
page in PeopleBooks:
Image: Message Catalog page with context-sensitive variable embedded in text
This example illustrates the fields and controls on the Message Catalog page with context-sensitive variable embedded in text. You can find definitions for the fields and controls later on this page.
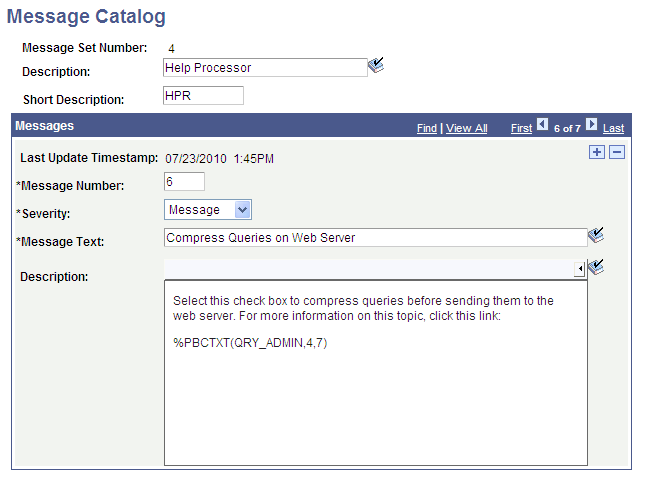
In the Description field, the 4, 7 parameters refer to Message Catalog entry (4,7), which contains the label to use for the generated link.
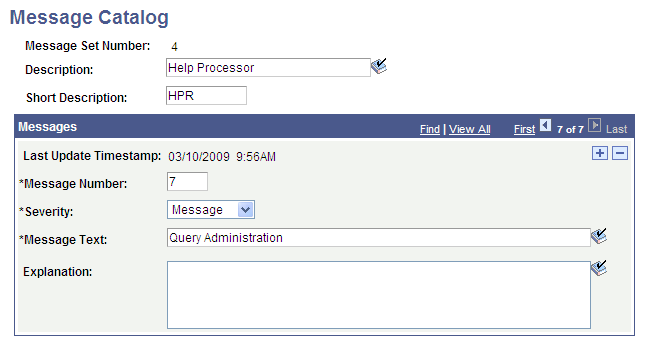
Image: Message Catalog page showing Query Administration label in the Message Text field
This example illustrates the fields and controls on the Message Catalog page showing Query Administration label in the Message Text field. You can find definitions for the fields and controls later on this page.
On the Web Profile Configuration page at runtime, mouse over the selected control to see the generated pop-up page:
Image: Web Profile - General page showing the message catalog pop-up page
This example illustrates the fields and controls on the Web Profile - General page showing the message catalog pop-up page. You can find definitions for the fields and controls later on this page.
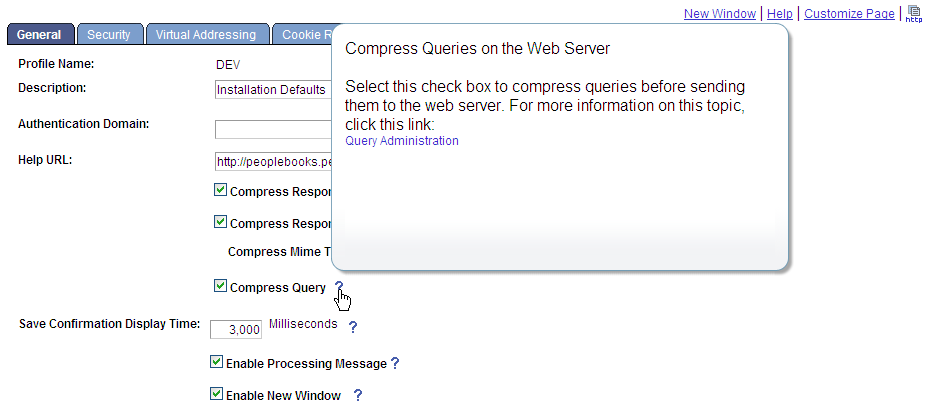
Notice that the pop-up text comes from Message Catalog entry (4,6) and the link label, Query Administration, defined by the %PBCTXT(QRY_ADMIN, 4, 7) function comes from Message Catalog entry 4,7. Click the Query Administration link, and the system accesses the PeopleBooks entry for the QRY_ADMIN CONTEXT_ID using that Help URL entry to ascertain the PeopleBooks location on the web server.
Note: You define the location of your online PeopleBooks by entering a URL in the Help URL field that is located on the Web Profile - General page (PeopleTools, Web Profile, Web Profile Configuration).
For a user in screen reader mode, for every mouse over control, the system displays an additional image that looks like an exclamation point ("!"). The accessibility user can click the image to display the mouse over popup page. The user can press the escape button (ESC) to close the mouse over popup page.
Image: Screen Reader Mode Pop-up Icon
This example illustrates the icon that appears next to fields with associated pop-up pages.
