Administering Report Manager
This section discusses how to work with the report manager.
To access the User Profiles - Roles page, select PeopleTools, Security, User Profiles, User Profiles, Roles.
Image: User Profiles - Roles page
This example illustrates the fields and controls on the User Profiles - Roles page.
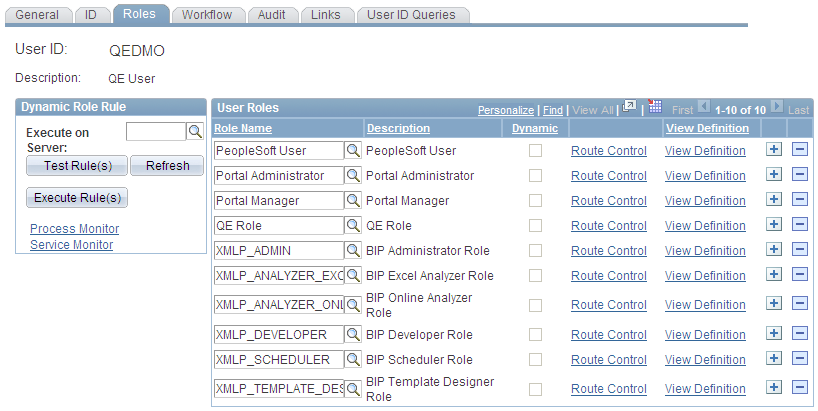
Any user who maintains the content of Report Manager must be assigned a Report Manager administrator role in PeopleSoft Security. With this administrator role, the user can:
Change the distribution list by adding or deleting a user or role ID.
Delete a report from Report Manager.
Alter the report’s expiration date.
A super user role is also available that allows you to delete and update all report output in Report Manager. Super users are allowed to delete the report entry and update the distribution list or expiration date of report entries.
The difference between the administrator (ReportDistAdmin) and super user (ReportSuperUser) roles is that the administrator role can access and update any report in the Report Manager. The super user role can update only reports that they are authorized to view.
To grant a Report Manager administrator role to a user ID:
In the role list, insert a new row, if necessary.
Click the search button next to the Role Name field.
Select ReportDistAdmin or ReportSuperUser.
Save your changes.
The Distribution Agent determines the report folder in which the report is viewed in Report Manager using the following rules:
The report folder was specified at the time that the request was scheduled, either through the Process Request Dialog page or the PeopleCode ProcessRequest class.
If the report folder was not specified when the process request was scheduled, the Distribution Agent verifies whether a folder was set in the process definition.
If the report folder was not specified when the process request was scheduled or in the process definition, the Distribution Agent assigns the default folder that is specified in the Report Folder Administration page.
To view reports on the Report Manager - Explorer and Report Manager - List pages, the service operations that are used to send reports must be added to the local node and the domain must be activated.
To add service operations to the local node:
Select PeopleTools, Integration Broker, Integration Setup, Service Operations.
Open the service operation PSRF_FOLDER_CREATE.
Make sure the Active field is selected in the Default Service Operation Version section.
Save the service.
Perform the same steps as listed above for all of these services:
PSRF_FOLDER_CREATE
PSRF_REPORT_CREATE
PSRF_REPORT_DATE_CHANGE
PSRF_REPORT_DELETE
Note: Reports that have already run do not appear on the Report Manager - Explorer and Report Manager - List pages. To distribute previously run reports to the List and Explorer pages, you must rerun them.
Note: Integration Broker must be configured and your domain must be active.
See Activating Pub/Sub Server Domains, Configuring Service Operation Definitions.
If you have several PeopleSoft applications, you may want to post reports to the report repository on another PeopleSoft databases. PeopleTools 8.50 uses the service operation PSRF_REPORT_CREATE_VERSION_2, releases prior to 8.50 use PSRF_REPORT_CREATE_VERSION_1. If you want to send reports to a system where VERSION_2 is the default (PT 8.50 and above) from a system using VERSION_1 (PT 8.49 and below), you will need to add a transformation in the Service Operation Version definition.
Note: You can not send reports from a system where VERSION_2 is the default to a system where VERSION_1 is the default.
Posting Reports to Another PeopleSoft Database with Same Version
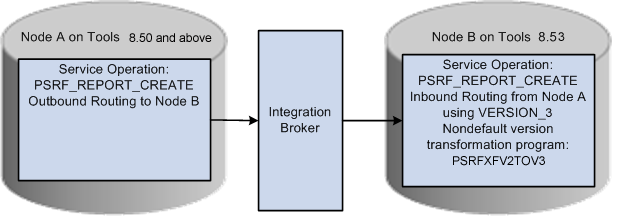
If both databases use the same version of the service operation PSFT_REPORT_CREATE, you will need to add the outbound routing on the sending system and the inbound routing on the receiving system.
Image: Posting reports to another PeopleSoft database
This example illustrates how to post reports to another PeopleSoft database using the same version of the service operation.

To add service operation routings:
On the Sending system, select
Open the service operation PSRF_REPORT_CREATE.
Navigate to Routing tab.
Enter a Routing Name for your routing and click Add.
Enter the Sender Node (node name for the system where you are logged on).
Enter the Receiver Node (node name of the PeopleSoft application where you want to post the report).
Click Save.
On the Receiving system, repeat steps 1 thru 4 above.
The Sending node is the remote system and the Receiving node is the current system.
Save the routing.
Transforming Inbound Service Operation Version
If the sending database uses PSFT_REPORT_CREATE.VERSION_1 and the receiving database expects VERSION_2, you will need to activate the nondefault version of the message and add the transformation program PSRF851XFORM. This transformation program will transform the inbound message to VERSION_2.
Image: Inbound transformation
This diagram illustrates how to transform inbound service operation version.
To add the inbound routing:
On the Receiving system, select
Open the service operation PSRF_REPORT_CREATE.
Navigate to Routing tab.
Enter a Routing Name for your routing and click Add.
Select VERSION_1 for the Version.
Enter the Sender Node (remote node).
Enter the Receiver Node (current node).
Click Save.
To set up the non-default version:
Navigate back to General tab, click VERSION_1 under Non-Default Versions to open Service Operation VERSION_1.
Make sure the Active check box is selected.
In the Service Operation Mappings section enter PSRF851XFORM in the Transform to Default field.
Click Save.
When a report fails to post to the Report Repository or fails to send the message to have the report added on the Report Manager - Explorer or Report Manager - List page, check the following sources to trace the problem:
The distribution status on the Report Manager - Administration page and the Process Monitor - Process List page.
The message log on the Report Manager - Report Detail page.
The run status on the Process Monitor - Process List page.
The Service Operations Monitor in PeopleSoft Integration Broker.
The Distribution Agent log files.
See Introduction to PeopleSoft Integration Broker.
Distribution Status on the Report Manager - Administration Page
The Report Manager - Administration page displays the current state of a report. The distribution status of the report shows the process of a request without having to check the Process Monitor. The following table lists the available statuses:
|
Status |
Description |
|---|---|
|
N/A or None |
The process has just been added to the report request, but processing has not yet started. No file is available to post. An error has occurred and no file is available to post. |
|
Generated (OS390 and SQR only) |
The report has finished processing and all files are available for transferring. |
|
Posting |
The report is in the process of being transferred to the Report Repository. |
|
Posted |
The report was successfully transferred to the Report Repository. |
|
Not Posted |
The Distribution Agent was unsuccessful in transferring the files from the PeopleSoft Process Scheduler server into the Report Repository. |
Message Log on the Report Manager Detail page
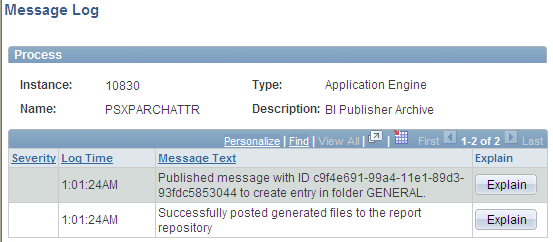
When the Distribution Agent receives the request to post the report, the agent inserts information into the Message Log table, detailing any important event. This information can be helpful in tracking down problems that the Distribution Agent encountered. If HTTP is used to transfer reports to the Report Repository, the message log includes error messages that are received from the Java servlet (SchedulerTransfer). This example illustrates a message log entry.
Image: Example message log entry
This example illustrates the fields and controls on the Example message log entry.
Run Status on the Process Monitor Detail Page
The Process Monitor − Process Detail page in PeopleSoft Process Scheduler displays the run status of a scheduled request. As PeopleSoft Process Scheduler processes the reports, it updates the status of the request. The following table shows:
The different stages that a process request with an output destination type of Web goes through from the time that the PeopleSoft Process Scheduler Server Agent initiates the process to the time that the Distribution Agent transfers the files to the Report Repository.
How the Report Manager distribution status changes as each stage is completed.
Note: The table shows only process requests with an output destination type of Web. Other process requests can be tracked through the message log.
|
Stage of Process Request |
Distribution Status (Report Manager) |
|---|---|
|
A new process request is created. |
N/A or None |
|
The program for the process request is started. |
N/A |
|
The program has finished. |
N/A |
|
The Distribution Agent attempts to transfer the files to the Report Repository. |
Posting |
|
The Distribution Agent failed to transfer a file to the Report Repository and hasn’t reached the Maximum Transfer Retries value. Note: Maximum Transfer Retries value is the number that sets how many times the Distribution Agent should retry the report Repository file transfer when it fails. The message log for the process request is updated. |
Posting |
|
All files are successfully transferred to the Report Repository. |
Posted |
|
The Distribution Agent failed to transfer files to the Report Repository and has used up the maximum transfer retries. |
Not Posted |
Service Operations Monitor in PeopleSoft Integration Broker
Select to access the Asynchronous Details page.
Note: You can also access this page by selecting the Details link for a specific transaction ID on the page.
Image: Asynchronous Details page
This example illustrates the fields and controls on the Asynchronous Details page.
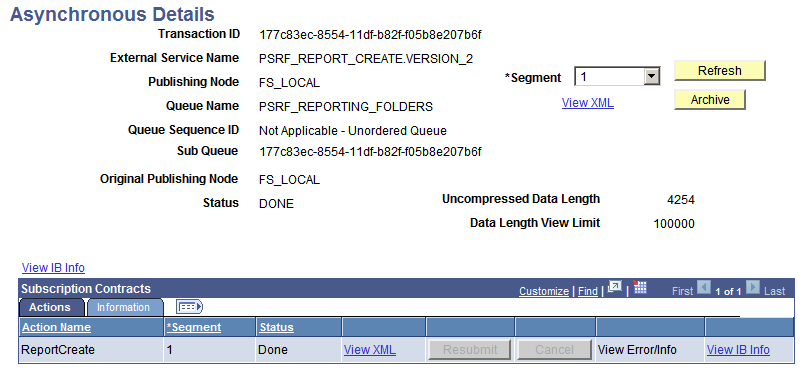
After the Distribution Agent posts the report to the Report Repository, the final task is to send a message to have the entry added to the report folder table. The Distribution Agent writes the transaction information, which includes the transaction ID and the report folder. The transaction ID can be used to monitor the status of the sent message in PeopleSoft Integration Broker.
See Messaging Types, Understanding Asynchronous Service Operations Statuses.
Distribution Agent Log Files
Additional information can be found in the Distribution Agent log files.