Creating and Maintaining Action Items
This section describes how to create and maintain action items.
Action items are the tasks that are assigned for completion within an activity guide. These tasks can be linked to specific local or remote components, PeopleSoft queries, PeopleCode programs (an application class or an iScript), self-service process definitions, or external URLs. Within an activity guide, action items are organized into an ordered list; however, in many simple activity guides, action items can be completed in a non-sequential order. Action items can be organized hierarchically with a parent (summary) action item composed of child (detail) action items. Furthermore, an action item can be set to be dependent on the status of another action item.
Note: The horizontal optimized guided sequential template type supports a simple structure with one level of action items only; summary/detail action items are not supported by this type.
Action items can be linked to specific local or remote components, PeopleSoft queries, PeopleCode programs (an application class or an iScript), self-service process definitions, or external URLs. Except for self-service process definitions, these links are made through the PeopleSoft Related Content Framework. Moreover, except for component-based related content service definitions, which can be created by clicking the Create Service link in the Action Item Details grid, you must explicitly use the Define Related Content Service page to create any other related content service definition prior to associating that service definition with an action item.
Typically, action items are created and maintained at the activity guide template level only. However, you can also create action items within activity guide instances; the same pages with the same fields are used in both cases. Once an activity guide instance is created, updates to the action items themselves would occur programmatically or through actions of the user rather than through these administrative pages. While the examples in this section illustrate creating and maintaining action items within an activity guide template, these examples could apply equally to activity guide instances.
Sequence Numbers
You must designate a sequence number for each action item, which determines its order within its designated level—that is, at the root level or as a detail action item beneath a summary item. In addition, if you want to make an action dependent on another action item, that action item must be a predecessor—that is, it must have a lower sequence number than the dependent action item. Each sequence number must be unique within an activity guide template or instance.
While sequence numbers define the order in which action items are presented to a user, they do not in and of themselves dictate that tasks be completed in sequence. Additional attributes, such as dependencies, must be defined to ensure that tasks be completed in a specific sequence when that is required. Therefore, the simplest activity guide definitions allow for non-sequential completion of tasks.
Note: Activity guides support a two-level hierarchy only—that is, only one level of detail is supported beneath a summary action item.
With a little planning, you can specify action item sequence numbers that clearly specify the order of tasks and that allow modifications to the list at a latter date—for example, to add or delete action items. Oracle recommends that you specify initial sequence numbers in units of 10 to permit insertion of new action items into an existing sequence. For example, for a simple activity guide with no summary action items, the initial sequence would be:
10, 20, 30, 40 ...If your activity guide contains summary as well as detail items, then increment the root-level items by 100 instead of by 10. For example:
100 - Summary item 1
  110, 120, 130, 140, ...
200
300
400 - Summary item 2
  410, 420, 430, 440, ...
500
Designating the initial sequence numbers in this manner will allow you to easily convert an existing root-level action item into a summary item without having to renumber the rest of the sequence.
Image: Example of summary and detail action items
The following example shows sequence numbers for summary and detail action items. In this list, Configuration (10, also collapsed), Administration (70), and Testing and Utilities (160) are parent, or summary, items:

Use the Action Item Details grid on the action item list page to maintain the list of action items.
Navigation
On the Manage Activity Guide Templates page, click the title link for an existing template.
Note: In addition, on the Manage Activity Guide Instances page, click the title link for an existing instance.
In the Setup Activity Guide WorkCenter, click the Configure Action Items task.
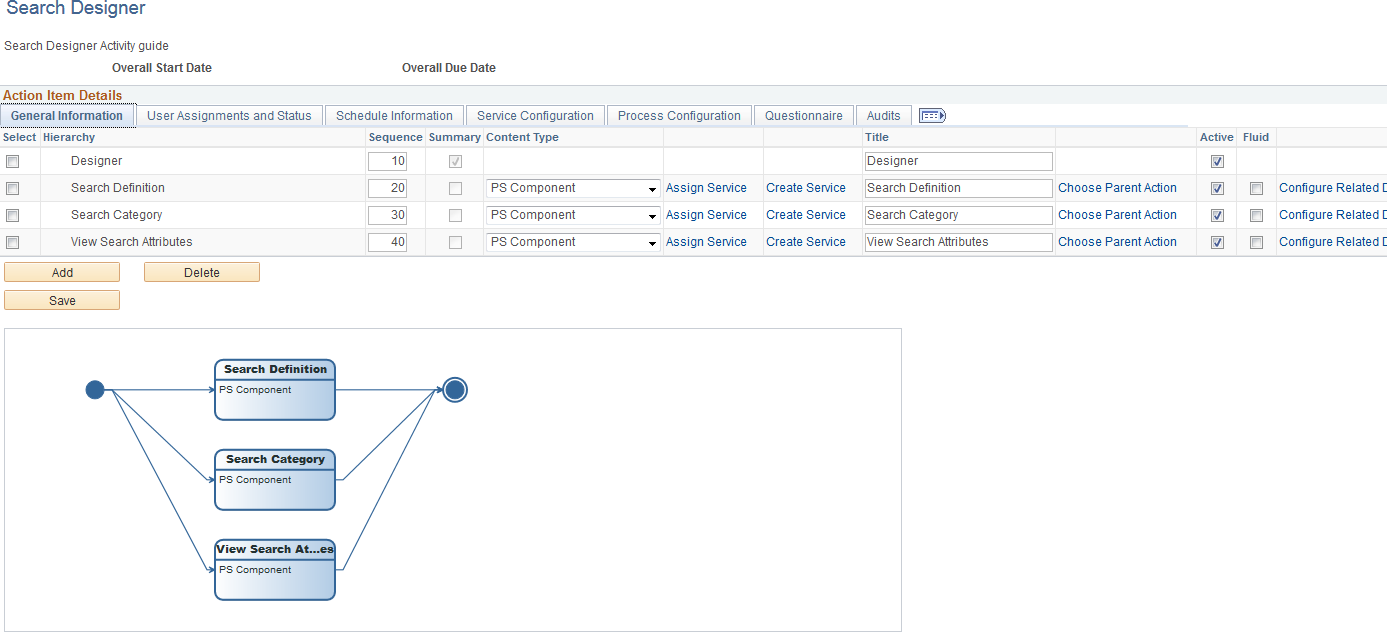
Image: Example action item list for an activity guide template
This example illustrates the fields and controls on the action item list page for an activity guide template. You can find definitions for the fields and controls later on this page.
|
Field or Control |
Definition |
|---|---|
| Overall Start Date |
Displays the start date of the activity guide template (as defined on the Properties page). |
| Overall Due Date |
Displays the due date of the activity guide template (as defined on the Properties page). |
| Select |
Select an action item to delete. Selecting a summary action item also selects any detail action items associated with it. |
| Add |
Click the Add button to access the Add an Action Item page to create a new action item. |
| Delete |
Click the Delete button to delete the selected action items. Note: There are no checks to prevent you from deleting an action item from an activity guide instance no matter its current status or relationship to other action items in the instance. |
| Save |
Click the Save button to save updates to any action item details. |
Adding Action Items
Use the Add an Action Item page to add a new action item.
Navigation
In the Setup Activity Guide WorkCenter, click the Configure Action Items task.
Click the Add button.
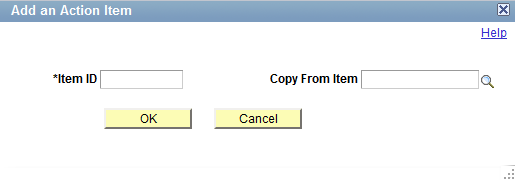
Image: Add an Action Item page
This example illustrates the fields and controls on the Add an Action Item page. You can find definitions for the fields and controls later on this page.
|
Field or Control |
Definition |
|---|---|
| Item ID |
Enter up to 10 characters as an identifier prefix. When you save the action item, the system will append digits to ensure that this identifier is unique within the template. Important! If you specify an identifier prefix that is already in use in another template, an error is generated. |
| Copy From Item |
Select the ID for an existing action item within this template. This allows you to select an existing action item from this template to clone as a new action item. You can then modify the properties of the new action item. |
Graphical Representation of Action Item Dependencies
A graphical representation of the action item dependencies is displayed beneath the Action Item Details grid.
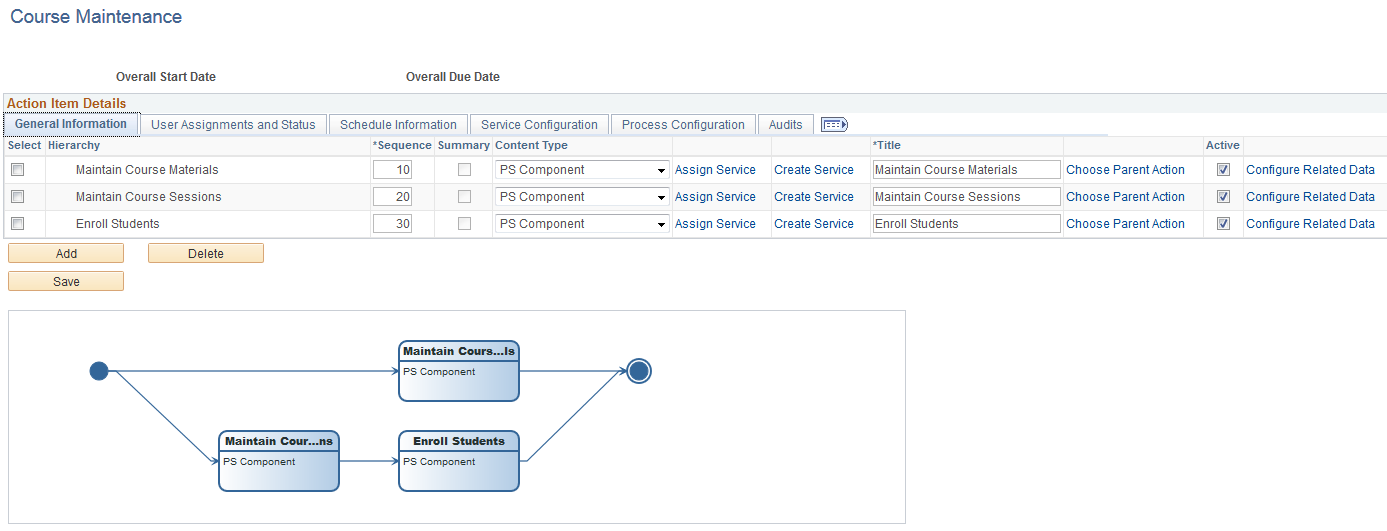
Image: Example action item list with dependencies
In the following example, the third action item, Enroll Students, has been set to be dependent on the completion of its predecessor, Maintain Course Sessions.
Use the following tabs of the Action Item Details grid to define the details for each action item:
Use the General Information tab to specify the title of the action item, assign a related content service (which can also be assigned on the Service Configuration tab), choose a parent item, and configure related data.
Use the User Assignments and Status tab to maintain the action item's status and to whom it is assigned.
Use the Schedule Information tab to define the start date and time and due date and time for each action item.
Use the Service Configuration tab to associate related content service definitions with action items.
Use the Process Configuration tab to define the self-service process details for action items defined as a Process type.
Use the Questionnaire tab to associate questions defined on the template to one or more action items.
Use the Audits tab to review audit information for each action item including a change log.
General Information Tab
Use the General Information tab to specify the title of the action item, assign a related content service (which can also be assigned on the Service Configuration tab), choose a parent item, and configure related data.
Image: Action Item Details - General Information tab
This example illustrates the fields and controls on the Action Item Details - General Information tab for an activity guide template. You can find definitions for the fields and controls later on this page.

|
Field or Control |
Definition |
|---|---|
| Hierarchy |
Displays the summary-detail (parent-child) relationship of the action items in the template or instance. |
| Sequence |
Enter up to a four-digit sequence number to indicate this item’s position in the ordered list of action items. A sequence number must be unique within an activity guide template or instance. See “Sequence Numbers” in Understanding Creation and Maintenance of Action Items. |
| Summary |
Select this option to indicate that this is a summary action item. Important! Important! You must select this option first and then save the action item. If you save the action item without selecting this option it will be created as a child action. Once an action item has been saved, it cannot be changed from a summary item to a child item, or vice versa. |
| Content Type |
Select the content type for the action item. This column is duplicated on the Service Configuration tab and the content types are documented there. Note: The column is also editable on the Process Configuration tab. |
| Assign Service |
Click this link to select an existing related content service definition of the specified content type. Note: This function is duplicated by the lookup button for the Service ID field on the Service Configuration tab |
| Create Service |
Click the this link to create a new related content service definition for a component-based related content service only. See Creating a Component-Based Service Definition for more information. Note: This link is also displayed on the Service Configuration tab. |
| Title |
Enter the title for the action item. Note: The default value is the name of the selected related content service. |
| Choose Parent Action |
Click this to access the Look Up Parent Action Item page to change the parent for an action item within the hierarchy. |
| Active |
Select this option to indicate that the action item is active. Clear this option to make an action item inactive. The action item definition remains in the template, and is copied to any instances generated from this template. However, an inactive action item will not be displayed to users. |
| Fluid |
Select this option to indicate that the action item is associated with a fluid component. Note: For optimized activity guide types, this option is selected automatically for each action item. Deselect this option for an action item associated with a classic component. |
| Configure Related Data |
Click this link to configure dependencies, related data, and pagelet button overrides for this action item. See Configuring Related Data for more information. |
User Assignments and Status Tab
Use the User Assignments and Status tab to maintain the action item's status and to whom it is assigned.
Image: Action Item Details - User Assignments and Status tab
This example illustrates the fields and controls on the Action Item Details - User Assignments and Status tab. You can find definitions for the fields and controls later on this page.

|
Field or Control |
Definition |
|---|---|
| Item ID |
Displays the ID for the action item. |
| Priority |
Select a priority for the action item: High, Low, or Medium. |
| Required |
Select this option to indicate that an action item is required. For the status of an activity guide instance to be designated as complete, all required action items must have a complete status. Similarly, for a summary action item to be designated as complete, all required detail action items under it must have a complete status. |
| Category |
Enter an optional category for this action item. Note: If the category does not exist already, it will be created for you when you save the action item. |
| Percent Comp |
Specify a percent completion for this action item. |
| Lock After Completion |
Select this option to prevent the action item from being updated after it has been marked complete. |
| Status |
Select a value for the status of the action item. Typically, in an activity guide template, the initial value should be Assigned. Note: When viewing the action item list in an activity guide instance, the status for action items will be updated dynamically through user actions. |
| Assignments |
Click the Assignments link to assign the action item on the Action Item Assignments page. |
Action Item Assignments Page
Use the Action Item Assignments page to assign one or more users, roles, or a combination to the action item.
Navigation
Click the Assignments link on the User Assignments and Status tab of the Action Item Details grid.
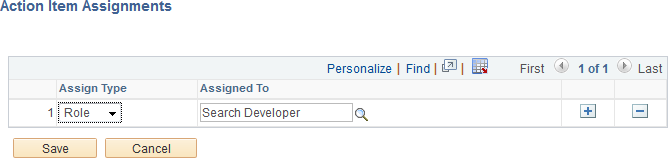
Image: Action Item Assignments page
This example illustrates the fields and controls on the Action Item Assignments page. You can find definitions for the fields and controls later on this page.
|
Field or Control |
Definition |
|---|---|
| Assign Type |
Select the type of participant that you want to assign the action item to. Available values include:
|
| Assigned To |
Select an assignee from the list of all users or roles in the system. Important! While you can select any user or role, only a user or role that has also been assigned Contributor privileges on the template or instance Security page will be allowed to complete the action item. The system will not validate your selection against the users or roles defined on the Security page. |
Schedule Information Tab
Use the Schedule Information tab to define the start date and time and due date and time for each action item.
Image: Action Item Details - Schedule Information tab
This example illustrates the fields and controls on the Schedule Information tab. You can find definitions for the fields and controls later on this page.

|
Field or Control |
Definition |
|---|---|
| Inactivate after Due Date |
Select this option to make the action item unavailable after the specified due date has passed. Note: An administrator can manually reset the action item in the activity guide instance. |
| Start Date |
Select a start date from the calender, or enter a start date in the format specified by your user personalizations. |
| Start Time |
Enter a start time. |
| Due Date |
Select a due date from the calender, or enter a due date in the format specified by your user personalizations. |
| Due Time |
Enter a due time. |
Service Configuration Tab
Use the Service Configuration tab to associate related content service definitions with action items.
Important! Action items can be linked to specific local or remote components, PeopleSoft queries, PeopleCode programs (an application class or an iScript), self-service process definitions, or external URLs. Except for self-service process definitions, these links are made through the PeopleSoft Related Content Framework. Moreover, except for component-based related content service definitions, which can be created by clicking the Create Service link in the Action Item Details grid, you must explicitly use the Define Related Content Service page to create any other related content service definition prior to associating that service definition with an action item.
See Creating and Managing Related Content Service Definitions for more information.
Image: Action Item Details - Service Configuration tab
This example illustrates the fields and controls on the Action Item Details - Service Configuration tab. You can find definitions for the fields and controls later on this page.

|
Field or Control |
Definition |
|---|---|
| Type |
Note: This column is also editable on the General Information tab and the Process Configuration tab. Select one of the following types:
|
| Service ID |
Specify the ID for an existing related content service that will be executed for this action item. Note: The related content service definitions available for selection are filtered by the type selected. Note: This field is equivalent to the Assign Service link on the General Information tab. |
| Service Name |
Displays the label of the service. |
| Create Service |
Click the this link to create a new related content service definition for a component-based related content service only. See Creating a Component-Based Service Definition for more information. Note: This link is also displayed on the General Information tab. |
| Test Service |
Click this link to test the related content service. See Testing Related Content Service Definitions for more information. |
| Configure Context Data |
Click this link to define additional contextual data that will be passed to the related content service at runtime. |
Process Configuration Tab
Use the Process Configuration tab to define the self-service process details for action items defined as a Process type. Self-service processes are executed automatically either at instance creation or when all predecessor action items configured with a finish-to-start dependency are marked complete.
For more information about creating, selecting, and configuring self-service processes, see Selecting and Configuring Self-Service Processes.
Image: Action Item Details - Process Configuration tab
This example illustrates the fields and controls on the Action Item Details - Process Configuration tab. You can find definitions for the fields and controls later on this page.

|
Field or Control |
Definition |
|---|---|
| Type |
Select Process to configure a self-service process as an action item. Note: The other values for this column are documented on the Service Configuration tab. This column is also editable on the General Information tab. |
| Assign Process |
Click this link to select a process. See Selecting and Configuring Self-Service Processes for more information. |
| Target Node |
Displays the source node for the process. |
| Schedule Name |
Displays the schedule name associated with the action item. |
| Process Run Status |
Displays the status of the process. |
| Pause Before |
Select this option to pause the process before scheduling the process. For example, you may pause the process to validate or modify the input parameters before scheduling the process. |
| Pause After |
Select this option to pause the process after the completion of process. For example, You may validate the process output before proceeding to the next. |
| Skip on Error |
Select this option to enable display of the process status as Complete even if a process item runs into Error or No Success. |
| Resume on Error |
Select this option to allow the users to reschedule process if it had stopped due to an error. |
| Configure Input Parameters |
Select this option to enable the end-users to modify the run control parameters. This activates the Configure CI Parameters link that enable you to access the Configure CI Parameters page. Note: This option is valid only if the Pause Before option is selected. |
| Configure CI Parameters |
Click this link to configure the component interface parameters. See Selecting and Configuring Self-Service Processes for more information. |
Questionnaire Tab
Use the Questionnaire tab to associate questions defined on the template to one or more action items.
Image: Action Item Details - Questionnaire tab
This example illustrates the fields and controls on the Action Item Details - Questionnaire tab. You can find definitions for the fields and controls later on this page.

|
Field or Control |
Definition |
|---|---|
| Question ID |
Select a defined question to associate with this action item. Note: If a question is associated with a summary item, then all the detail actions under that summary are made active or inactive based on a single answer. |
| Answer |
Select the answer (Yes or No) that if provided by the user will set this action item to active in the activity guide instance. |
Audits Tab
Use the Audits tab to review audit information for each action item including a change log.
Image: Action Item Details - Audits tab
This example illustrates the fields and controls on the Action Item Details - Audits tab. You can find definitions for the fields and controls later on this page.

|
Field or Control |
Definition |
|---|---|
| Created By |
Displays the user who created the action item definition. |
| Created Datetime |
Displays the date and time when this action item was created. |
| Updated By |
Displays the user who last updated the action item definition. |
| Last Updated Date |
Displays the date and time when the action item was last updated. |
| Change Log |
Click this link to view the action item’s change log. |
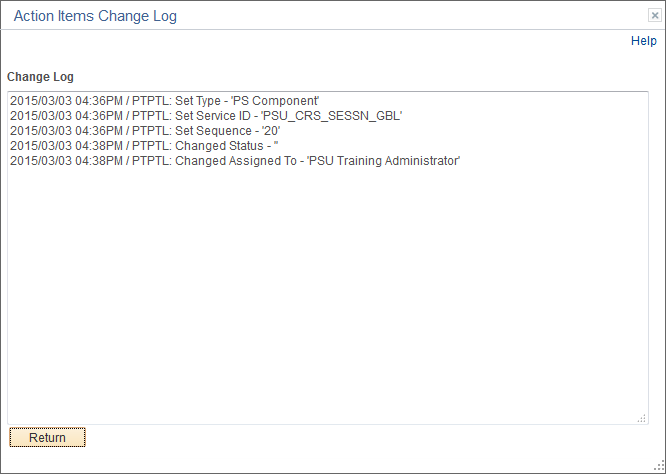
Use the Action Items Change Log page to view the changes to the action item definition.
Image: Action Items Change Log page
This example illustrates the fields and controls on the Action Items Change Log page.
To create a component-based service definition:
In the Action Item Details grid, select PS Component as the content type.
Click the Create Service link.
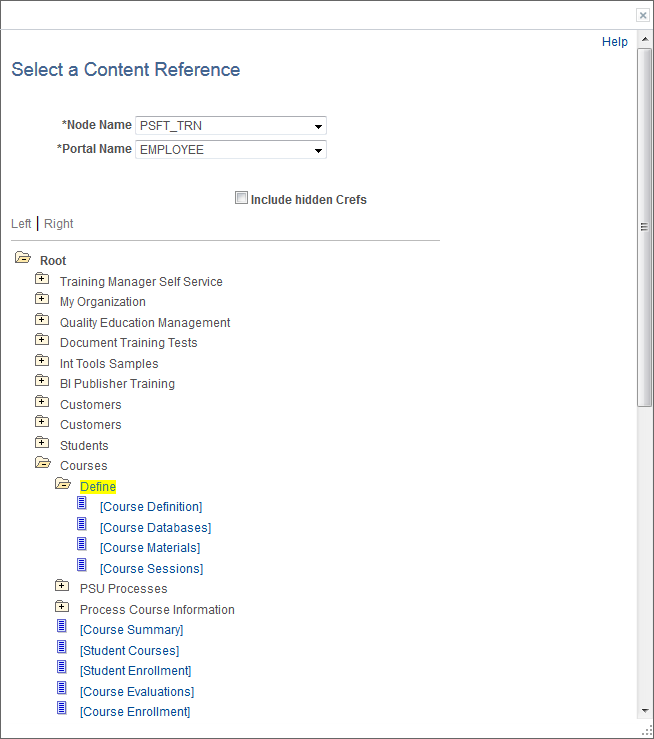
Use the Select a Content Reference page to first select the component.
Image: Select a Content Reference page
This example illustrates the fields and controls on the Select a Content Reference page.
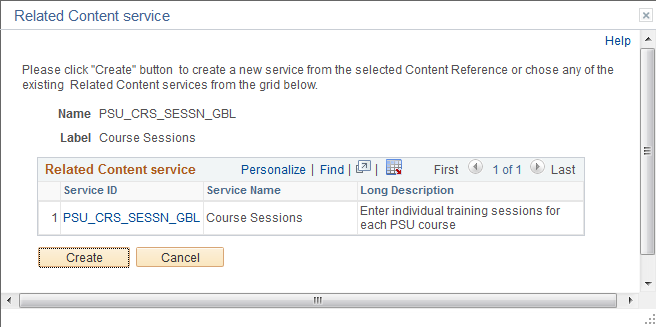
Then, use the Related Content service page to confirm your selection and create the service definition.
Image: Related Content service page
This example illustrates the fields and controls on the Related Content service page.
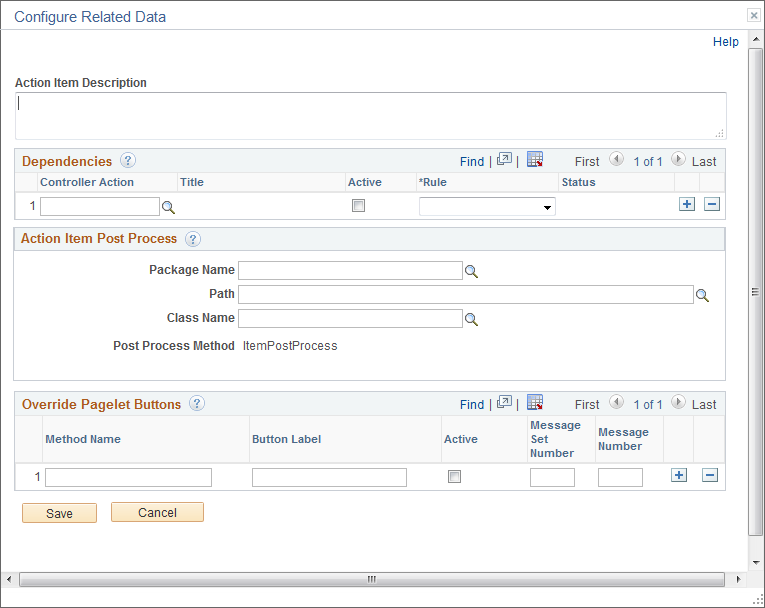
Use the Configure Related Data page to specify dependencies to other action items, to specify post-processing, to create (or override) navigation buttons for this action item, and to specify values for related data fields.
Navigation
Click the Configure Related Data link on the General Information tab of the Action Item Details grid.
Image: Configure Related Data page
This example illustrates the fields and controls on the Configure Related Data page. You can find definitions for the fields and controls later on this page.
|
Field or Control |
Definition |
|---|---|
| Action Item Description |
Enter any additional description about the action item. |
Dependencies
Use the Dependencies grid to designate controller action items upon which this action item is dependent. The finish-to-start dependency rule means that the controller action item must be completed before this (the dependent) action item is allowed to start.
|
Field or Control |
Definition |
|---|---|
| Controller Action |
Select a controller action item. The list of action items available for selection is filtered to include only those action items with a lower sequence number than the current action item and to exclude completed or cancelled action items. |
| Title |
Displays the title for the controller action item. |
| Active |
Select this option to retain the dependency as active. |
| Rule |
Select the from the following rule types:
|
| Status |
Displays the current status of the controller action item. |
Action Item Post Process
Use the Action Item Post Process group box to specify an application package and class that contains the required method to be executed as post-processing when a user completes the transaction—for example, to update the status of the action item to complete. In addition, this application class can optionally define custom navigation buttons on a per action item basis.
Post-processing can occur on the local system or the remote system if that’s where the transaction is hosted. Post-processing is executed through component save processing only. If you have implemented a custom save button on the page to save the component, the button’s page field properties must be configured to invoke the toolbar save action or the PeopleCode executed by these buttons must include either the DoSave or DoSaveNow built-in functions to trigger the component save events; otherwise, the post-processing specified here will not be executed.
|
Field or Control |
Definition |
|---|---|
| Package Name |
Enter the name of the application package that contains the method to be invoked for post-processing and the methods to be invoked for any optional, custom navigation buttons. |
| Path |
Enter the names of each subpackage in the application class hierarchy that define the location of the application class. Separate subpackage names by a colon. If the class is defined in the top-level application package, enter or select the colon. |
| Class Name |
Enter the name of the application class that contains the method to be invoked for post-processing and the methods to be invoked for any optional, custom navigation buttons. Important! This class should extend the PT_RCF:ServiceAGInterface interface class and must implement a method named ItemPostProcess, which is the method that will be executed for post-processing. If you do not require any post-processing but you want to implement custom navigation buttons for the action item, you must still implement a stub method named ItemPostProcess. Otherwise, an error will occur and save processing will be blocked for this action item. |
Related Data
The Related Data group box and fields are displayed only when configurable field labels have been defined for the activity guide template or instance. The displayed field labels allow you to associate application data with an action item at either the template level or the instance level.
Image: Example of the Related Data group box
In the following example, a configurable field labeled Session was defined for the activity guide template. Here, at the action item level, the Session field is displayed along with instance-specific data (the value 801, providing one methodology for passing data from one action item to the next in the instance:

Override Pagelet Buttons
The Override Pagelet Buttons group box allows you to create custom navigation buttons on a per action item basis. If the name of any of these buttons is the same as a button defined at the template level, then the effect is to override the definition with the method defined here at the action item level. If the name of any of these buttons differs from buttons defined at the template level, then the button is created in addition to those defined at the template level.
In fluid activity guides, these buttons are rendered in the activity guide subbanner. In classic activity guides, these buttons are rendered in the navigation frame of the classic WorkCenter.
Note: For classic activity guides, Next and Previous buttons are displayed in the navigation frame of the classic WorkCenter. Oracle recommends that you add no more than two additional custom navigation buttons to classic activity guides.
|
Field or Control |
Definition |
|---|---|
| Method Name |
Enter the name of the method to be invoked to create the additional navigation button. Important! The method named here must exist in the selected class. No validation is performed to ensure this is the case when the template definition is saved. You can implement certain methods with reserved names (MarkComplete, for example). In addition, you can use certain reserved words (for example, PTAI_NAV_SAVE, PTAI_NAV_SAVE_NEXT, and others) as method names to invoke other delivered functionality. See Developing Custom Navigation Buttons for detailed information. |
| Button Label |
Enter the label for the custom navigation button as it will be displayed to users. Note: Button labels are ignored for the following reserved word methods: PTAI_NAV_AUTO_SAVE, PTAI_NAV_SAVE_NEXT, PTAI_NAV_SAVE_PREV, and ExitAGProcess. |
| Active |
Select this option to retain the button definition as active. |
| Message Set |
Specify the message set containing an optional message to be displayed after the user clicks the button. |
| Message Number |
Specify the message number containing an optional message to be displayed after the user clicks the button and before invoking the specified method. For example, if the user clicks a Cancel button to cancel an activity guide instance, this could display a confirmation message. |
Use the Action Item Context Data page to define service parameters for the related content service.
Navigation
Click the Configure Context Data link on the Service Configuration tab of the Action Item Details grid.
Context data that is defined as a key field at the template (or instance) level is automatically passed to each related content service. However, an activity guide definition can include additional non-key context data. Use the Action Item Context Data page to map these additional context data fields to related content service parameters as needed on a per action item basis.
In addition, for activity guides defined as a single unit of work, one or more output parameters defined for one action item can serve as the input parameters to subsequent action items.
Image: Action Item Context Data page
This example illustrates the fields and controls on the Action Item Context Data page. You can find definitions for the fields and controls later on this page.
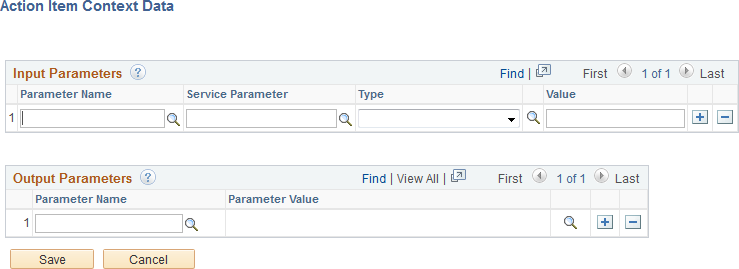
Input Parameters
Map additional non-key, context data fields to related content service parameters as needed on a per action item basis. In addition to non-key context data fields, you can select from output parameters defined on predecessor steps. At runtime, the values of the action item input parameters are passed to the associated related content service.
|
Field or Control |
Definition |
|---|---|
| Parameter Name |
Specify the parameter name in one of two ways:
|
| Service Parameter |
Select the service parameter (typically, a component key) for the related content service. |
| Type |
Select one of the following context types:
|
| Value |
Enter the value when the context type is fixed value. Alternatively, select the system variable from the look up list when the context type is system variable. Note: No value is entered when the context type is runtime. |
Output Parameters
Note: The Output Parameters section is displayed only when the activity guide is defined as a single unit of work.
Select one or more page field to serve as output parameters for this action item. The values of the selected page fields are available to subsequent action items as input parameters.
|
Field or Control |
Definition |
|---|---|
| Parameter Name |
Select the page field name to serve as an output parameter. |
Self-service scheduling allows users to execute processes and generate reports using context-specific information. You can configure execution of self-service processes from any transaction page where self-service scheduling is enabled. Scheduling in this manner retrieves mapped application data from the transaction page and uses it for the process execution. Once the process is completed, the authorized user can access the report from the dynamically generated notification from any PeopleSoft page.
Within an activity guide, an action item can be defined as a Process type, which allows you to associate that action item with an already defined self-service schedule. Use the Process Configuration tab of the Action Item Details grid to complete configuring an action item as a process type:
Click the Assign Service link to Look up Schedule Name page.
If modifiable component interface parameters have been defined for the self-service schedule, click the Configure CI Parameters link to map activity guide data to the component interface.
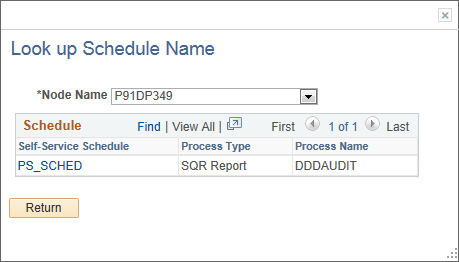
Look up Schedule Name Page
Use the Look up Schedule Name page to select the already defined self-service schedule.
Image: Look up Schedule Name
This example illustrates the fields and controls on the Look up Schedule Name page.
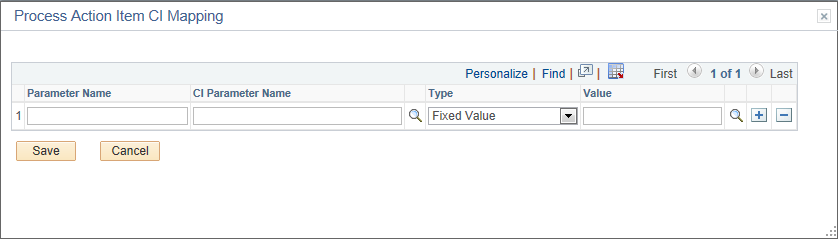
Process Action Item CI Mapping Page
Use the Process Action Item CI Mapping page to map activity guide context data to any modifiable parameters defined for the component interface for the self-service schedule.
Image: Process Action Item CI Mapping page
This example illustrates the fields and controls on the Process Action Item CI Mapping page. You can find definitions for the fields and controls later on this page.
|
Field or Control |
Definition |
|---|---|
| Parameter Name |
Enter the field name (as specified on the Template Properties: Advanced Options page) for a context data item. |
| CI Parameter Name |
Select the modifiable parameter defined for the component interface. |
| Type |
Select one of the following context types:
|
| Value |
Enter the value when the context type is fixed value. Alternatively, select the system variable from the look up list when the context type is system variable. Note: No value is entered when the context type is runtime. |