Configuring Execution Options in PeopleSoft Internet Architecture
You use execution options to configure settings for the PeopleSoft applications that you test with PTF. Execution options are stored as part of the metadata for a PTF environment and are available to all users of that environment. Only a PTF administrator (a user with the PTF Administrator role) is able to insert, delete, or modify execution options. You can configure execution options either in the PTF client, or by using the Define Execution Options component in the PeopleSoft Internet Architecture.
This section describes how to define execution options using the Define Execution Options component in PIA. For information about defining execution options in the PTF client, see Configuring Execution Options in PTF Client.
To configure execution options in PIA, complete the following tasks:
Specify execution options.
Configure debugging options.
Define advanced options.
Specify PeopleTools options.
Establish Export Log options.
Use the Define Execution Options (PSPTTSTEXEOPTIONS) page to define PTF options for executing tests.
Navigation
This example shows the Execution Options component - Options page in PIA:
Image: Define Execution Options Page
This example illustrates the fields and controls on the Define Execution Options page. You can find definitions for the fields and controls later on this page.
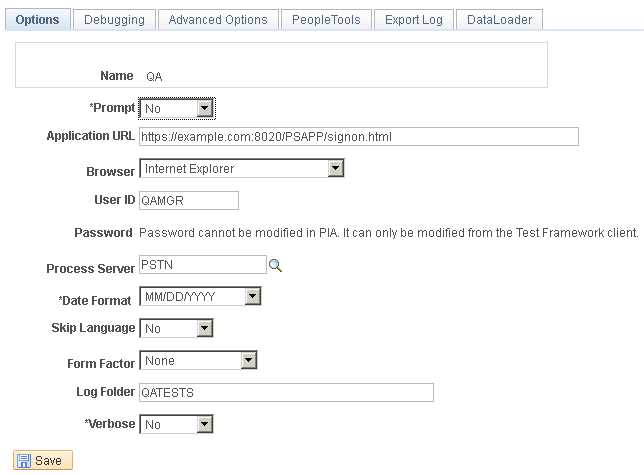
The fields on the Define Execution Options page are the same as the fields on the Options tab in the PTF client, with the exception that you cannot modify passwords on the PeopleSoft application component.
|
Field or Control |
Definition |
|---|---|
| Prompt |
Specify whether the Execution Options dialog appears when a user executes a test. |
| Application URL |
Enter the URL of the login page for the PeopleSoft application. PeopleSoft Test Framework uses this URL for the Browser.Start_Login step type/action when executing tests and when you click the Home icon (to start the web client and go to the default URL) in the test recorder. |
| Browser |
Specify the browser to use to launch the PeopleSoft application. Options are Internet Explorer, Chrome, or Firefox. If the specified browser is not present on the system, an error will appear and the test will abort. |
| User ID |
Enter a valid user ID for the application database. |
| Password |
This field is unavailable for entry. The password must be specified using the Execution Options dialog in the PTF client. For more information, see Configuring Execution Options in PTF Client. |
| Process Server |
Select a process server from the drop-down list. This list is populated by the Process Server List field in the Configuration Options page. |
| Date Format |
Select a date format. |
| Skip Language |
Select Yes to bypass the language selection on the PeopleSoft application login page. |
| Form Factor |
Select the form factor size to use when launching the application. |
| Log Folder |
Select or enter the folder name to which test logs will be written. If the folder does not exist it will be created. |
| Verbose |
Specify the log format. Select Yes to log a detail line for each step that is executed in the test. Select No to log only the test status (Pass or Fail) at the test level and to log a detail line for failed steps. |
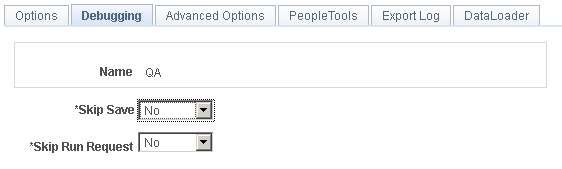
Use the Define Execution Options – Debugging (PSPTTSTDEBOPTIONS) page to define PTF configuration options.
Navigation
Select the Debugging Options tab.
Image: Define Execution Options-Debugging page
This example illustrates the fields and controls on the Define Execution Options – Debugging page. You can find definitions for the fields and controls later on this page.
|
Field or Control |
Definition |
|---|---|
| Skip Save |
Select Yes to prevent a test from executing a save. You would, for instance, select this option to avoid duplicate values in the application database if you plan to run a test repeatedly. |
| Skip Run Request |
Select Yes to prevent the test from executing process requests. |
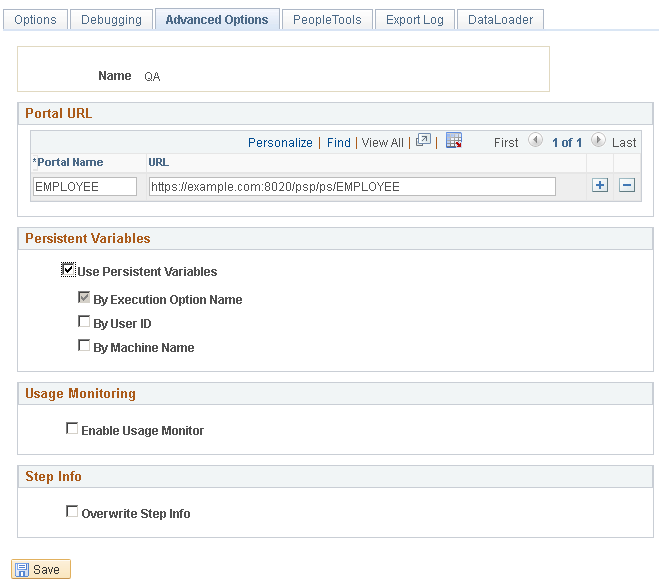
Use the Define Execution Options - Advanced Options page (PSPTTSTADVOPTIONS) to define multiple portal URLs and to enable persistent variables.
PTF uses the portal URL to access the component when there is a step in the test to set the browser URL (Browser.Set_URL). See Set_URL. To add a portal URL, click the Add icon. To remove a portal URL click the Delete icon.
Navigation
Select the Advanced Options tab.
Image: Define Execution Options - Advanced Options page
This example illustrates the fields and controls on the Define Execution Options - Advanced Options page. You can find definitions for the fields and controls later on this page.
|
Field or Control |
Definition |
|---|---|
| Portal Name |
Enter a portal name. Note: The name is saved in upper case. |
| URL |
Enter the portal URL. The portal URL is entered in the following format: For example: http://myserver.example.com:8010/psp/ps/EMPLOYEE/QE_LOCAL/ Note: The ending backslash / is optional |
| Use Persistent Variables |
Select to enable saving and using persistent variables. Selecting this option enables the other fields in this group. |
| By Execution Option Name |
This option is automatically selected when you select the Use Persistent Variables check box. Persistent variables are stored in the database keyed by execution option name. Persistent variables can also be keyed by User ID, machine name or both. |
| By User ID |
Select to store and retrieve persistent variables by PTF user ID. |
| By Machine Name |
Select to store and retrieve persistent variables by machine name. |
| Enable Usage Monitor |
Select this option to enable managed object tracking with usage monitor during test execution. When this option is selected, PTF passes the test and testcase values as parameters to the usage monitor during test execution when it encounters the UsageMonitor step type. Note: The PeopleSoft application must be properly configured for usage monitor if you select this option. For more information about configuring usage monitor, see Usage Monitor. |
| Overwrite Step Info |
Select the option Overwrite Step Info which will allow PeopleSoft Test Framework to update incorrect step information when a test encounters a failed step. If the option is not selected, then only missing steps are added. For more information on Step Information, see Using Step Information. |
Use the PeopleTools page (PSPTTSTTOOLOPTIONS) to supply the information required to connect to DataMover.
Navigation
Select the PeopleTools tab.
This example shows the Define Execution Options - PeopleTools page:
Image: Define Execution Options - PeopleTools page
This example illustrates the fields and controls on the Define Execution Options - PeopleTools page. You can find definitions for the fields and controls later on this page.
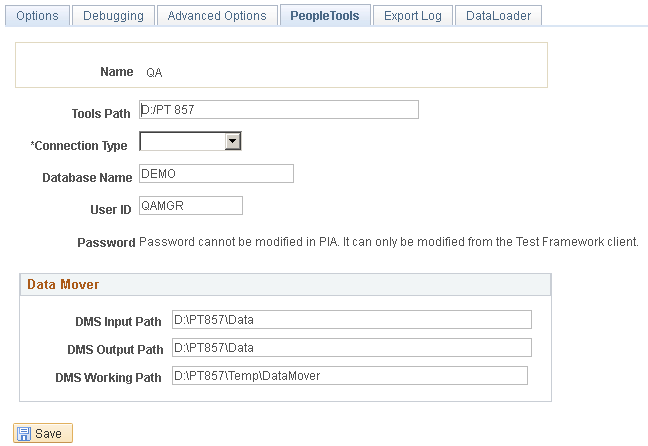
The fields on the PeopleTools page are the same as the fields on the PeopleTools tab in the PTF client, with the exception that you cannot modify passwords on the PeopleSoft application component.
|
Field or Control |
Definition |
|---|---|
| Tools Path |
Enter the path to PS_HOME for this environment. |
| Connection Type |
Select the connection type. |
| Database Name |
Enter the name of the database for this environment. |
| User ID |
Enter a valid database user ID. |
| Password |
This field is unavailable for entry. The password must be specified using the PTF Client. |
| DMS Input Path |
Enter the DataMover input path. |
| DMS Output Path |
Enter the DataMover output path. |
| DMS Working Path |
Enter the DataMover working path. |
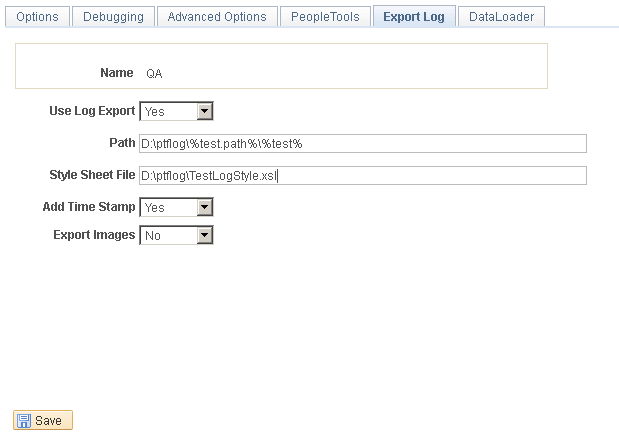
Use the Define Execution Options - Export Log page (PSPTTSTLOGOPTIONS) to automatically archive the result logs to a file system in XML + XSL format at the completion of each test.
This option provides the following benefits:
The logs are accessible from any browser.
The PTF client is not required to verify test results.
The logs are available even after the environment or database is brought down or upgraded.
Since the log is in XML format, you can write customized utilities to parse or interpret the logs as needed.
Navigation
Select the Export Log tab.
Image: Define Execution Options - Export Log page
This example illustrates the fields and controls on the Define Execution Options - Export Log page. You can find definitions for the fields and controls later on this page.
|
Field or Control |
Definition |
|---|---|
| Use Log Export |
Select Yes to activate the export log functionality. |
| Path |
Specify the shared drive to store the log files. Note: Ensure that the shared drive path allows users full read/write access. The path can be customized using existing system variables. See System Variables |
| Style Sheet File |
(Optional) Specify the path to the stylesheet. If specified, the exported XML log will be saved with the stylesheet. You can create your own stylesheet to format the XML. If this field is left blank, the XML will not be saved with a stylesheet. |
| Add Time Stamp |
If set to Yes the XML filename will be appended with the Time Stamp in the following format: <TEST_NAME>-<LOG_ID>-T<YYYYMMDD>_<HHMMSS> Example: FSCM_INS_VER-LOG5-T20121128_163649.XML |
| Export Images |
If set to Yes the Image will be saved in the same Log folder as the XML Log in the following format: <TEST_NAME>-<LOG_ID>-T<OPTIONAL_TIME_STAMP>-<LINE_NUMBER_AS_SHOWN_IN_LOG> Example: FSCM_INS_VER-LOG5-T20121128_163649-Line30.JPEG |
Use the DataLoader page to enter configurations information of the SSL port.
Image: Define Execution Options —DataLoader page
This example illustrates the fields and controls on the Execution Options page - DataLoader page. You can find definitions for the fields and controls later on this page.

|
Field or Control |
Definition |
|---|---|
| SSL Port |
Enter the SSL port of the server in the current Execution Options. |
| Node ID |
Enter the node ID added to the current Execution Options. This field is required if more than one database is connected to the server. Enter the name of the PeopleSoft node with which the integration gateway is to communicate. Contact your Integration Broker administrator or system administrator for the correct values. |